简介
React是一种流行的JavaScript库,用于构建用户界面。搭建一个React项目并不难,但确保项目的结构和配置正确可以帮助你更有效地开发和维护应用程序。以下是搭建React项目的一些步骤:
项目规范:项目中有一些开发规范和代码风格
- 文件夹、文件名称统一小写、多个单词以连接符(-)连接;
- JavaScript变量名称采用小驼峰标识,常量全部使用大写字母,组件采用大驼峰;
- CSS采用普通CSS和styled-component结合来编写(全局采用普通CSS、局部采用styled-component);
- 整个项目不再使用class组件,统一使用函数式组件,并且全面拥抱Hooks;
- 所有的函数式组件,为了避免不必要的渲染,全部使用memo进行包裹;
- 组件内部的状态,使用useState、useReducer;业务数据全部放在redux中管理;
- 函数组件内部基本按照如下顺序编写代码:
- 组件内部state管理;
- redux的hooks代码;
- 其他hooks相关代码(比如自定义hooks);
- 其他逻辑代码;
- 返回JSX代码;
- redux代码规范如下:
- redux目前我们学习了两种模式,在项目实战中尽量两个都用起来,都需要掌握;
- 每个模块有自己独立的reducer或者slice,之后合并在一起;
- redux中会存在共享的状态、从服务器获取到的数据状态;
- 网络请求采用axios
- 对axios进行二次封装;
- 所有的模块请求会放到一个请求文件中单独管理;
- 项目使用AntDesign、MUI(Material UI)
- 爱彼迎本身的设计风格更多偏向于Material UI,但是课程中也会尽量讲到AntDesign的使用方法;
- 项目中某些AntDesign、MUI中的组件会被拿过来使用;
- 但是多部分组件还是自己进行编写、封装、实现;
- 其他规范在项目中根据实际情况决定和编写;
创建项目
◼ 创建项目的方式:create-react-app
◼ 项目配置:
配置项目的icon
配置项目的标题
配置jsconfig.json
◼ 通过craco配置别名和less文件:
jsconfig.json
{
  "compilerOptions": {
    "target": "es5",
    "module": "esnext",
    "baseUrl": "./",
    "moduleResolution": "node",
    "paths": {
      "@/*": [
        "src/*"
      ]
    },
    "jsx": "preserve",
    "lib": [
      "esnext",
      "dom",
      "dom.iterable",
      "scripthost"
    ]
  }
}
项目目录结构划分
在一个React项目中,保持代码规范和结构清晰有助于提高可维护性和可读性。以下是一些新手可以遵循的规范和最佳实践来创建React项目:
项目结构
-
目录结构:
src/: 源代码目录,存放组件、页面、样式等。public/: 存放静态资源,如图片、字体等。assets/: 可存放项目中使用的资源文件,例如图片、字体、图标等。components/: 存放可复用的组件。pages/: 存放页面级组件。styles/: 存放全局样式文件。utils/: 存放通用函数。services/: 存放API调用相关代码。hooks/: 存放自定义Hook。tests/: 存放测试文件。
-
组件划分:
- 函数式组件:优先使用函数式组件,配合React Hooks使用。
- 逻辑与展示分离:在组件内部,将逻辑代码和展示代码分开,便于理解和维护。
-
文件命名:
- 文件命名采用驼峰式或帕斯卡命名法(例如:
MyComponent.js)。 - 文件扩展名为
.js或.jsx,具体视项目的配置而定。
- 文件命名采用驼峰式或帕斯卡命名法(例如:
-
样式:
- 使用模块化CSS或CSS-in-JS来管理组件的样式,避免样式冲突。
- 使用命名空间或特定命名规则(如BEM)来规范样式类名。

别名配置 @
index.js
import React from 'react';
import ReactDOM from 'react-dom/client';
import App from '@/App';

// @ => src:webpack  (采用第二种方法)
// 问题 react脚手架隐藏webpack
// 解决一 npm run reject
// 解决二 craco =>create-react-app config

const root = ReactDOM.createRoot(document.getElementById('root'));
root.render(
  <React.StrictMode>
    <App />
  </React.StrictMode>
);

安装依赖
npm i @craco/craco@alpha -D
修改配置
创建文件夹craco.config.js
const path = require('path')

const resolve = (pathName) => path.resolve(__dirname, pathName)
module.exports = {
  // less
  // webpack
  webpack: {
    alias: {
      '@': resolve('src'),
      'components': resolve('src/components'),
      'utils': resolve('src/utils'),
    },
  },
}
在修改package.json
  "scripts": {
    "start": "craco start",
    "build": "craco build",
    "test": "craco test",
    "eject": "craco eject"
  },
启动
npm run start
配置less

安装
npm i craco-less@2.1.0-alpha.0 -D
配置
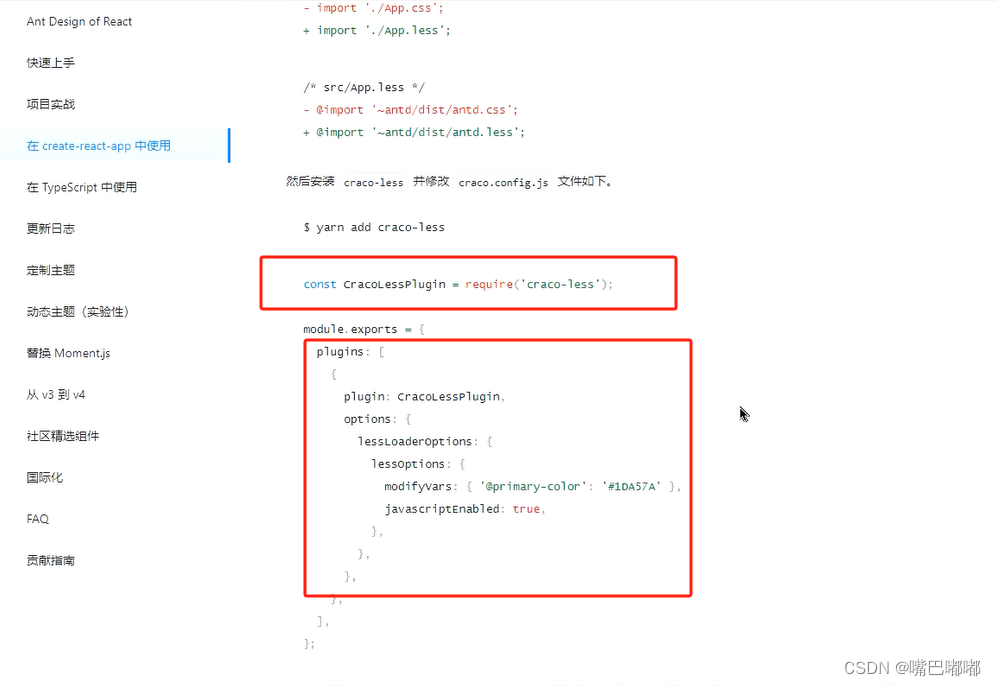
craco.config.js
const path = require('path')
const CracoLessPlugin = require('craco-less');

const resolve = pathname => path.resolve(__dirname, pathname)

module.exports = {
  // less
  plugins: [
    {
      plugin: CracoLessPlugin
    },
  ],
  // webpack
  webpack: {
    alias: {
      "@": resolve("src"),
      "components": resolve("src/components"),
      "utils": resolve("src/utils")
    }
  }
}
CSS样式的重置
- 对默认CSS样式进行重置:
- normalize.css
安装
npm i normalize.css
- reset.less
@import "./variables.less";

body, button, dd, dl, dt, form, h1, h2, h3, h4, h5, h6, hr, input, li, ol, p, pre, td, textarea, th, ul {
  padding: 0;
  margin: 0;
}

a {
  color: @textColor;
  text-decoration: none;
}


img {
  vertical-align: top;
}

ul, li {
  list-style: none;
}
variables.less定义变量
@textColor: #484848;
@textColorSecondary: #222;

index.js中配置
import "normalize.css";
import './assets/css/index.less';
全家桶 – Router配置
安装
npm i react-router-dom
index.js 配置
import React, { Suspense } from 'react'
import ReactDOM from 'react-dom/client'
import { HashRouter } from "react-router-dom"

const root = ReactDOM.createRoot(document.getElementById('root'))
root.render(
  <React.StrictMode>
    <Suspense fallback="loading">
      <HashRouter>
        <App />
      </HashRouter>
    </Suspense>
  </React.StrictMode>
)
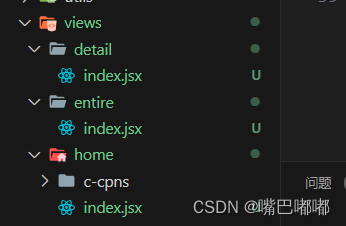
router/index.js
import React from 'react'

import { Navigate } from "react-router-dom"

const Home = React.lazy(() => import("@/views/home"))
const Entire = React.lazy(() => import("@/views/entire"))
const Detail = React.lazy(() => import("@/views/detail"))

const routes = [
  {
    path: "/",
    element: <Navigate to="/home"/>
  },
  {
    path: "/home",
    element: <Home/>
  },
  {
    path: "/entire",
    element: <Entire/>
  },
  {
    path: "/detail",
    element: <Detail/>
  }
]

export default routes
App.jsx
import React, { memo } from 'react'
import { useRoutes } from 'react-router-dom'
import routes from './router'

const App = memo(() => {
  return (
    <div className='app'>
      <div className='header'>header</div>
      <div className='page'>
        {useRoutes(routes)}
      </div>
      <div className='footer'>footer</div>
    </div>
  )
})

export default App
全家桶 – Redux状态管理
安装
npm i @reduxjs/toolkit react-redux
开始配置
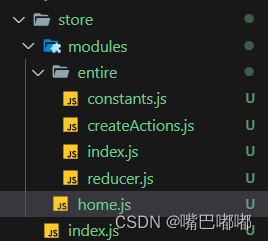
- 创建文件
sotre

store/index.js
import { configureStore } from '@reduxjs/toolkit'
import homeReducer from './modules/home'
import entireReducer from './modules/entire'

// 两种方式配置 reducer
const store = configureStore({
  reducer: {
  },
})

export default store
- 入口 修改
index.js
import { Provider } from 'react-redux'
import store from './store'

// 使用 Redux Provider 包裹应用
root.render(
  <React.StrictMode>
    <Suspense fallback="loading">
      <Provider store={store}>
        <HashRouter>
          <App />
        </HashRouter>
      </Provider>
    </Suspense>
  </React.StrictMode>
)
- 在 Store 中注册 State Slice
home.js
import { createSlice } from '@reduxjs/toolkit'

const homeSlice = createSlice({
  name: 'home',
  initialState: {
    productList:[]
  },
  reducers: {

  }
})
// 注册到store中
export default homeSlice.reducer
如果我们将所有的逻辑代码写到一起,那么当redux变得复杂时代码就难以维护。
- 接下来,我会对代码进行拆分,将store、reducer、action、constants拆分成一个个文件。
- 创建store/index.js文件:
- 创建store/reducer.js文件:
- 创建store/actionCreators.js文件:
- 创建store/constants.js文件:
reducer.sj
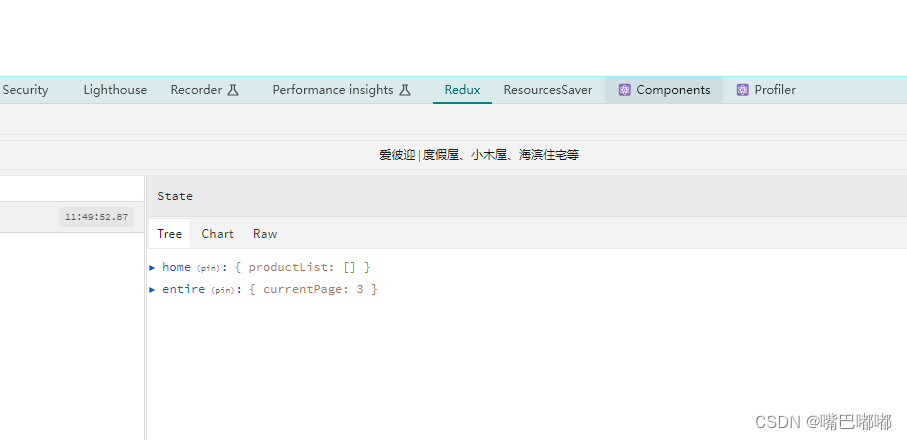
const initialState = {
  currentPage: 3,
}

function reducer(state = initialState, action) {
  switch (action.type) {
    default:
      return state
  }
}

export default reducer
index.js
import reducer from './reducer'


export default reducer
store/index.js
import { configureStore } from '@reduxjs/toolkit'
import homeReducer from './modules/home'
import entireReducer from './modules/entire'

// 两种方式配置 reducer
const store = configureStore({
  reducer: {
    home: homeReducer, // 注册reducer
    entire: entireReducer, // 注册reducer
  },
})

export default store
运行项目
网络请求 - axios
安装
npm i axios
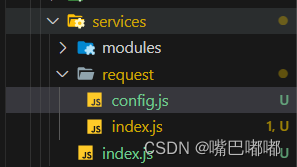
目录
配置
request/config.js
export const BASE_URL = 'http://codercba.com'
export const TIMEOUT = 10000
request/index.js
import axios from 'axios'
import { BASE_URL, TIMEOUT } from './config'
// 创建实例
class CRequest {
  constructor(baseURL, timeout) {
    this.instance = axios.create({
      baseURL,
      timeout,
    })
    this.instance.interceptors.response.use(
      (res) => {
        return res.data
      },
      (err) => {
        return err
      }
    )
  }

  request(config) {
    return this.instance.request(config)
  }

  get(config) {
    return this.request({ ...config, method: 'get' })
  }

  post(config) {
    return this.request({ ...config, method: 'post' })
  }
}

export default new CRequest(BASE_URL, TIMEOUT)
services/index.js
import hRequest from './request';

export default hRequest
组件中测试
import React, { memo, useEffect } from 'react'
import hRequest from '@/services'
const index = memo(() => {
  // 网络请求
  useEffect(() => {
    hRequest.get({ rul: '/home/highscore' }).then(res => {
      console.log(res);
    })
  },[])
  return (
    <div>Home</div>
  )
})

export default index
以上配置是基础版本,后续会随着项目的深入而继续完善
