自动驾驶定位算法-粒子滤波(Particle Filter)
自动驾驶对定位的精度的要求在厘米级的,如何实现厘米级的高精度定位呢?一种众所周知的定位方法是利用全球定位系统(GPS),利用多颗卫星的测量结果,通过三角测量(Triangulation)机制确定目标的位置,GPS定位的原理见:https://blog.csdn.net/liuphahaha/article/details/137609080?spm=1001.2014.3001.5501

附赠自动驾驶学习资料和量产经验:链接
但是GPS并不总是提供高精度定位数据,在GPS信号强的情况下,定位精度在13m范围内,在GPS信号弱的情况下,定位精度下降到1050m范围内。虽然依赖于RTK,可以将卫星定位的精度提高到厘米级,但是在GPS信号弱的场景下,定位精度仍然不能满足应用需求。所以仅仅使用GPS不能实现高可靠的高精度定位的。
为了达到厘米级(3-10cm)的定位精度,除了GPS之外,还需要借助于其它传感器,如激光传感器(LIDAR)、径向距离和角度传感器(Radial distance and angle sensor,RADAR)、视觉传感器(Camera)等,然后利用特定的算法将这些信息融合起来。粒子滤波(Particle Filter)就是利用这些传感器产生的数据进行高精定位的一种常用方法。
Particle Filters From Udacity Lecture
1.粒子滤波(Particle Filter)的算法思想
相对之前提到的标准卡尔曼滤波,粒子滤波(Particle Filter)没有线性高斯分布的假设;相对于直方图滤波,粒子滤波(Particle Filter)不需要对状态空间进行区间划分。粒子滤波算法采用很多粒子对置信度  进行近似,每个粒子都是对t时刻机器人实际状态的一个猜测。

越接近t时刻的Ground Truth状态描述的粒子,权重越高。
粒子更新的过程类似于达尔文的自然选择(Natural Selection)机制,与当前Sensor测量状态越匹配的粒子,有更大的机会生存下来,与Sensor测量结果不符的粒子会被淘汰掉,最终粒子都会集中在正确的状态附近。
2、粒子滤波算法在自动驾驶定位中的应用
以放置在封闭环境(Close Environment)中的自动驾驶车辆(Kidnapped Vehicle)为例,看它是如何通过粒子滤波(Particle Filter)确定自己所在的位置的。

2.1 先看看自动驾驶车辆有什么?
1)地图(Map)。每一辆自动驾驶汽车都配备了一幅高精度的地图,地图中包含了大量的地标(Landmark)的位置信息。地标(Landmark)是特定区域内的稳定特征,它们能够在相当长的一段时间内都保持不变,比如路边建筑物、杆状物等。
2)GPS。使用安装在车辆内部的GPS传感器设备,可以提供车辆在地图中的大概的位置范围。基于此局部性范围,仅选择全局地图的一部分用以匹配计算,从而避免大量的冗余计算,提升计算的时效性,从而达到实时定位的目的。
3)Lidar/Radar等传感器。安装在车辆上的Lidar/Radar传感器将测量其与地图路标(Landmark)之间的距离,从而进一步确定车辆的位置。但是Lidar/Radar的测量结果也不准确,存在测量噪声。
2.2 将所有传感器信息组合起来
通过粒子滤波(Particle Filter)将这些所有信息组合在一起,用于实现实时的高精度定位。

图片来源:https://github.com/sohonisaurabh/CarND-Kidnapped-Vehicle-Project
粒子滤波(Particle Filter)的主要步骤如下:
1)Initialisation Step:在初始化步骤中,根据GPS坐标输入估算位置,估算位置是存在噪声的,但是可以提供一个范围约束。
2)Prediction Step:在Prediction过程中,对所有粒子(Particles)增加车辆的控制输入(速度、角速度等),预测所有粒子的下一步位置。
3)Update Step:在Update过程中,根据地图中的Landmark位置和对应的测量距离来更新所有粒子(Particles)的权重。
4)Resample Step:根据粒子(Particles)的权重,对所有粒子(Particles)进行重采样,权重越高的粒子有更大的概率生存下来,权重越小的例子生存下来的概率就越低,从而达到优胜劣汰的目的。
2.3 粒子滤波代码实现
1)Initialisation Step:
初始化阶段,车辆接收到来自GPS的带噪声的测量值,并将其用于初始化车辆的位置。GPS的测量值包括车辆的位置P(x,y)和朝向θ,并且假设测量结果的噪声服从正态分布。
我们创建100个粒子,并用GPS的测量值初始化这些粒子的位置和朝向。粒子的个数是一个可调参数,可根据实际效果和实际需求调整。初始化时,所有粒子的权重相同。
void ParticleFilter::init(double x, double y, double theta, double std[]) {
  // TODO: Set the number of particles. Initialize all particles to first
  // position (based on estimates of
  //   x, y, theta and their uncertainties from GPS) and all weights to 1.
  // Add random Gaussian noise to each particle.
  // NOTE: Consult particle_filter.h for more information about this method (and
  // others in this file).
  // TODO Complete

 /*Number is particles are chosen in order to run the algorithm in almost real
  time and introduce lowest possible error in localization. This is a tunable
  parameter.*/
  num_particles = 20;
  default_random_engine gen;

  normal_distribution<double> dist_x(x, std[0]);
  normal_distribution<double> dist_y(y, std[1]);
  normal_distribution<double> dist_theta(theta, std[2]);

 int i;
 for (i = 0; i < num_particles; i++) {
    Particle current_particle;
    current_particle.id = i;
    current_particle.x = dist_x(gen);
    current_particle.y = dist_y(gen);
    current_particle.theta = dist_theta(gen);
    current_particle.weight = 1.0;

    particles.push_back(current_particle);
    weights.push_back(current_particle.weight);
 }
  is_initialized = true;
}
2)Prediction Step
初始化完成之后,对所有粒子执行车辆运动模型,预测每个粒子下一步出现的位置。粒子的位置更新是通过以下公式完成:

图片来源:https://github.com/sohonisaurabh/CarND-Kidnapped-Vehicle-Project
车辆运动过程同样存在噪声,前面的文章提到到,比如车辆发出控制指令velocity=10m/s,但是由于设备测量误差、车轮打滑等原因,实际的运动速度可能大于10m/s,也可能小于10m/s,我们同样假设车辆运动噪声服从正态分布。
void ParticleFilter::prediction(double delta_t, double std_pos[],
 double velocity, double yaw_rate) {
  // TODO: Add measurements to each particle and add random Gaussian noise.
  // NOTE: When adding noise you may find std::normal_distribution and
  // std::default_random_engine useful.
  //  http://en.cppreference.com/w/cpp/numeric/random/normal_distribution
  //  http://www.cplusplus.com/reference/random/default_random_engine/
  // TODO complete

  default_random_engine gen;

 int i;
 for (i = 0; i < num_particles; i++) {
 double particle_x = particles[i].x;
 double particle_y = particles[i].y;
 double particle_theta = particles[i].theta;

 double pred_x;
 double pred_y;
 double pred_theta;
  // Instead of a hard check of 0, adding a check for very low value of
  // yaw_rate
 if (fabs(yaw_rate) < 0.0001) {
      pred_x = particle_x + velocity * cos(particle_theta) * delta_t;
      pred_y = particle_y + velocity * sin(particle_theta) * delta_t;
      pred_theta = particle_theta;
 } else {
      pred_x = particle_x + (velocity / yaw_rate) *
 (sin(particle_theta + (yaw_rate * delta_t)) -
 sin(particle_theta));
      pred_y = particle_y + (velocity / yaw_rate) *
 (cos(particle_theta) -
 cos(particle_theta + (yaw_rate * delta_t)));
      pred_theta = particle_theta + (yaw_rate * delta_t);
 }

    normal_distribution<double> dist_x(pred_x, std_pos[0]);
    normal_distribution<double> dist_y(pred_y, std_pos[1]);
    normal_distribution<double> dist_theta(pred_theta, std_pos[2]);

    particles[i].x = dist_x(gen);
    particles[i].y = dist_y(gen);
    particles[i].theta = dist_theta(gen);
 }
}
3)Update Step
在预测过程中,我们将车辆的速度和角速度合并到粒子滤波器中,在更新过程中,我们将激光雷达(Lidar)/Radar对于Landmark的测量结果集成到粒子滤波(Particle Filter)中,用于更新所有粒子的权重。
Update Step包含三个主要步骤: a)Transformation;b)Association;c) Update Weights。
Transformation(坐标变换):Lidar/Radar对Landmark的测量都是相对于车辆自身坐标系统的,需要先转换到地图坐标系。传感器设备都安装在车上,所以传感器的测量结果都是以车辆为坐标原点,X轴沿车辆方向,Y轴沿垂直于X轴的左侧方向。

图片来源:https://github.com/sohonisaurabh/CarND-Kidnapped-Vehicle-Project


写成非矩阵形式:

通过Transformation我们已经将观测值的坐标转换到地图的坐标空间,下一步是将每个转换后的观测值与Map中的LandMark相关联。Associations主要将LandMark的测量结果匹配到Map中的LandMark。
如下图所示,L1,L2,…,L5是地图(Map)中的Landmark;OBS1、OBS2、OBS3是车辆的Observation。红色方块是车辆的GroundTruth位置,蓝色方块是车辆的预测位置。

我们可以看到地图有5个LandMark,它们分别被标识为L1、L2、L3、L4、L5,并且每个LandMark都有已知的地图位置。我们需要将每个转换后的观测值TOBS1、TOBS2、TOBS3与这5个标识符中的一个相关联。其中一个直观的做法就是每个转换后的观测LandMark坐标与最近的Map LandMark相关联。

void ParticleFilter::dataAssociation(std::vector<LandmarkObs> predicted,
                                     std::vector<LandmarkObs> &observations,
                                     double sensor_range) {
  // TODO: Find the predicted measurement that is closest to each observed
  // measurement and assign the
  //   observed measurement to this particular landmark.
  // NOTE: this method will NOT be called by the grading code. But you will
  // probably find it useful to
  //   implement this method and use it as a helper during the updateWeights
  //   phase.
  // TODO complete

 /*Associate observations in map co-ordinates to predicted landmarks using
nearest neighbor algorithm. Here, the number of observations may be less than
the total number of landmarks as some of the landmarks may be outside the range
of vehicle's sensor.*/
  int i, j;
 for (i = 0; i < observations.size(); i++) {
  // Maximum distance can be square root of 2 times the range of sensor.
    double lowest_dist = sensor_range * sqrt(2);
    int closest_landmark_id = -1;
    double obs_x = observations[i].x;
    double obs_y = observations[i].y;

 for (j = 0; j < predicted.size(); j++) {
      double pred_x = predicted[j].x;
      double pred_y = predicted[j].y;
      int pred_id = predicted[j].id;
      double current_dist = dist(obs_x, obs_y, pred_x, pred_y);

 if (current_dist < lowest_dist) {
        lowest_dist = current_dist;
        closest_landmark_id = pred_id;
 }
 }
    observations[i].id = closest_landmark_id;
 }
}
Update Weights:完成观测LandMark坐标转换之后和地图匹配之后,就可以更新粒子的权重了。由于粒子(Particle)对所有LandMark的观测都是独立的,所以粒子的总权重是所有观测LandMark的多元高斯概率密度的乘积。


void ParticleFilter::updateWeights(double sensor_range, double std_landmark[],
                                   std::vector<LandmarkObs> observations,
                                   Map map_landmarks) {
  // TODO: Update the weights of each particle using a mult-variate Gaussian
  // distribution. You can read
  //   more about this distribution here:
  //   https://en.wikipedia.org/wiki/Multivariate_normal_distribution
  // NOTE: The observations are given in the VEHICLE'S coordinate system. Your
  // particles are located
  //   according to the MAP'S coordinate system. You will need to transform
  //   between the two systems. Keep in mind that this transformation requires
  //   both rotation AND translation (but no scaling). The following is a good
  //   resource for the theory:
  //   https://www.willamette.edu/~gorr/classes/GeneralGraphics/Transforms/transforms2d.htm
  //   and the following is a good resource for the actual equation to implement
  //   (look at equation 3.33 http://planning.cs.uiuc.edu/node99.html
  //   TODO complete

 int i, j;
 /*This variable is used for normalizing weights of all particles and bring
    them in the range of [0, 1]*/
 double weight_normalizer = 0.0;

 for (i = 0; i < num_particles; i++) {
 double particle_x = particles[i].x;
 double particle_y = particles[i].y;
 double particle_theta = particles[i].theta;

 /*Step 1: Transform observations from vehicle co-ordinates to map
     * co-ordinates.*/
  // Vector containing observations transformed to map co-ordinates w.r.t.
  // current particle.
    vector<LandmarkObs> transformed_observations;

  // Transform observations from vehicle's co-ordinates to map co-ordinates.
 for (j = 0; j < observations.size(); j++) {
      LandmarkObs transformed_obs;
      transformed_obs.id = j;
      transformed_obs.x = particle_x +
 (cos(particle_theta) * observations[j].x) -
 (sin(particle_theta) * observations[j].y);
      transformed_obs.y = particle_y +
 (sin(particle_theta) * observations[j].x) +
 (cos(particle_theta) * observations[j].y);
      transformed_observations.push_back(transformed_obs);
 }

 /*Step 2: Filter map landmarks to keep only those which are in the
     sensor_range of current particle. Push them to predictions vector.*/
    vector<LandmarkObs> predicted_landmarks;
 for (j = 0; j < map_landmarks.landmark_list.size(); j++) {
      Map::single_landmark_s current_landmark = map_landmarks.landmark_list[j];
 if ((fabs((particle_x - current_landmark.x_f)) <= sensor_range) &&
 (fabs((particle_y - current_landmark.y_f)) <= sensor_range)) {
        predicted_landmarks.push_back(LandmarkObs{
            current_landmark.id_i, current_landmark.x_f, current_landmark.y_f});
 }
 }

 /*Step 3: Associate observations to lpredicted andmarks using nearest
     * neighbor algorithm.*/
  // Associate observations with predicted landmarks
 dataAssociation(predicted_landmarks, transformed_observations,
                    sensor_range);

 /*Step 4: Calculate the weight of each particle using Multivariate Gaussian
     * distribution.*/
  // Reset the weight of particle to 1.0
    particles[i].weight = 1.0;

 double sigma_x = std_landmark[0];
 double sigma_y = std_landmark[1];
 double sigma_x_2 = pow(sigma_x, 2);
 double sigma_y_2 = pow(sigma_y, 2);
 double normalizer = (1.0 / (2.0 * M_PI * sigma_x * sigma_y));
 int k, l;

 /*Calculate the weight of particle based on the multivariate Gaussian
     * probability function*/
 for (k = 0; k < transformed_observations.size(); k++) {
 double trans_obs_x = transformed_observations[k].x;
 double trans_obs_y = transformed_observations[k].y;
 double trans_obs_id = transformed_observations[k].id;
 double multi_prob = 1.0;

 for (l = 0; l < predicted_landmarks.size(); l++) {
 double pred_landmark_x = predicted_landmarks[l].x;
 double pred_landmark_y = predicted_landmarks[l].y;
 double pred_landmark_id = predicted_landmarks[l].id;

 if (trans_obs_id == pred_landmark_id) {
          multi_prob = normalizer *
 exp(-1.0 * ((pow((trans_obs_x - pred_landmark_x), 2) /
 (2.0 * sigma_x_2)) +
 (pow((trans_obs_y - pred_landmark_y), 2) /
 (2.0 * sigma_y_2))));
          particles[i].weight *= multi_prob;
 }
 }
 }
    weight_normalizer += particles[i].weight;
 }

 /*Step 5: Normalize the weights of all particles since resmapling using
   * probabilistic approach.*/
 for (int i = 0; i < particles.size(); i++) {
    particles[i].weight /= weight_normalizer;
    weights[i] = particles[i].weight;
 }
}
4)Resample Step
重采样(Resample)是从旧粒子(Old Particles)中随机抽取新粒子(New Particles)并根据其权重进行替换的过程。重采样后,具有更高权重的粒子保留的概率越大,概率越小的粒子消亡的概率越大。
常用的Resample技术是Resampling Wheel。Resampling Wheel的算法思想如下:如下图所示的圆环,圆环的弧长正比与它的权重(即权重越大,弧长越长)。

下一步就是利用类似于轮盘赌(Roulette Wheel)的方式,将圆环安装固定步长(Resampling Wheel中将圆环切分为2*max(weights))进行等分,选定一个方向进行n次随机旋转,每次旋转获得一个位置,这个位置就是被选中的粒子的索引。

Python代码如下:
p3 = []
index = int(random.random()*N)
beta = 0.0
mw = max(w)
for i in range(N):
  beta += random.random()*2*mw
 while w[index] < beta:
     beta = beta - w[index]
     index = index + 1

  p3.append(p[index])
Resample的C++代码如下
void ParticleFilter::resample() {
  // TODO: Resample particles with replacement with probability proportional to
  // their weight. NOTE: You may find std::discrete_distribution helpful here.
  //   http://en.cppreference.com/w/cpp/numeric/random/discrete_distribution
  //   TODO complete

  vector<Particle> resampled_particles;

  // Create a generator to be used for generating random particle index and beta
  // value
  default_random_engine gen;

  // Generate random particle index
  uniform_int_distribution<int> particle_index(0, num_particles - 1);

 int current_index = particle_index(gen);

 double beta = 0.0;

 double max_weight_2 = 2.0 * *max_element(weights.begin(), weights.end());

 for (int i = 0; i < particles.size(); i++) {
    uniform_real_distribution<double> random_weight(0.0, max_weight_2);
    beta += random_weight(gen);

 while (beta > weights[current_index]) {
      beta -= weights[current_index];
      current_index = (current_index + 1) % num_particles;
 }
    resampled_particles.push_back(particles[current_index]);
 }
  particles = resampled_particles;
}
最后把这些代码串起来,实现车辆定位的功能。
// Set up parameters here
double delta_t = 0.1;     // Time elapsed between measurements [sec]
double sensor_range = 50; // Sensor range [m]

double sigma_pos[3] = {
 0.3, 0.3, 0.01}; // GPS measurement uncertainty [x [m], y [m], theta [rad]]
double sigma_landmark[2] = {
 0.3, 0.3}; // Landmark measurement uncertainty [x [m], y [m]]

// Read map data
Map map;
if (!read_map_data("../data/map_data.txt", map)) {
  cout << "Error: Could not open map file" << endl;
 return -1;
}

// Create particle filter
ParticleFilter pf;

while (循环接收车辆的控制信息和Sense信息) {

 if (!pf.initialized()) {

  // Sense noisy position data from the simulator
 double sense_x = std::stod(j[1]["sense_x"].get<std::string>());
 double sense_y = std::stod(j[1]["sense_y"].get<std::string>());
 double sense_theta = std::stod(j[1]["sense_theta"].get<std::string>());

    pf.init(sense_x, sense_y, sense_theta, sigma_pos);
 } else {
  // Predict the vehicle's next state from previous (noiseless
  // control) data.
 double previous_velocity =
        std::stod(j[1]["previous_velocity"].get<std::string>());
 double previous_yawrate =
        std::stod(j[1]["previous_yawrate"].get<std::string>());

    pf.prediction(delta_t, sigma_pos, previous_velocity, previous_yawrate);
 }

  // receive noisy observation data from the simulator
  // sense_observations in JSON format
  // [{obs_x,obs_y},{obs_x,obs_y},...{obs_x,obs_y}]
  vector<LandmarkObs> noisy_observations;
  string sense_observations_x = j[1]["sense_observations_x"];
  string sense_observations_y = j[1]["sense_observations_y"];

  std::vector<float> x_sense;
  std::istringstream iss_x(sense_observations_x);

  std::copy(std::istream_iterator<float>(iss_x), std::istream_iterator<float>(),
            std::back_inserter(x_sense));

  std::vector<float> y_sense;
  std::istringstream iss_y(sense_observations_y);

  std::copy(std::istream_iterator<float>(iss_y), std::istream_iterator<float>(),
            std::back_inserter(y_sense));

 for (int i = 0; i < x_sense.size(); i++) {
    LandmarkObs obs;
    obs.x = x_sense[i];
    obs.y = y_sense[i];
    noisy_observations.push_back(obs);
 }

  // Update the weights and resample
  pf.updateWeights(sensor_range, sigma_landmark, noisy_observations, map);
  pf.resample();

  // Calculate and output the average weighted error of the particle
  // filter over all time steps so far.
  vector<Particle> particles = pf.particles;
 int num_particles = particles.size();
 double highest_weight = -1.0;
  Particle best_particle;
 double weight_sum = 0.0;
 for (int i = 0; i < num_particles; ++i) {
 if (particles[i].weight > highest_weight) {
      highest_weight = particles[i].weight;
      best_particle = particles[i];
 }
    weight_sum += particles[i].weight;
 }
}
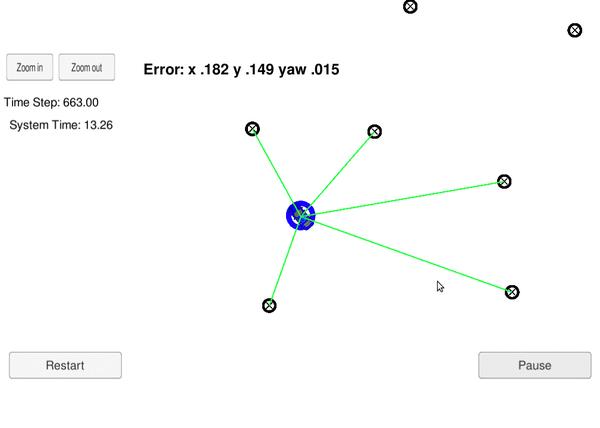
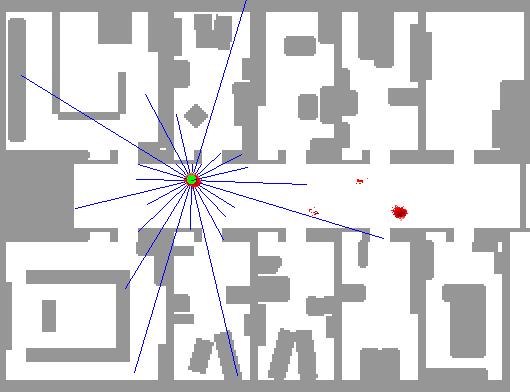
在Udacity Simulator上的演示效果如下: