目录
简介
设置
准备数据
配置超参数
建立分类模型
定义实验
使用数据增强
将补丁提取作为一个图层来实施
将位置嵌入作为一个图层来实施
MLP 混频器模型
FNet 模式
gMLP 模式
实施 gMLP 模块
政安晨的个人主页:政安晨
欢迎 👍点赞✍评论⭐收藏
收录专栏: TensorFlow与Keras机器学习实战
希望政安晨的博客能够对您有所裨益,如有不足之处,欢迎在评论区提出指正!
本文目标:为 CIFAR-100 图像分类实施 MLP-Mixer、FNet 和 gMLP 模型。
简介
本示例实现了三种基于多层感知器(MLP)的现代无注意力图像分类模型,并在 CIFAR-100 数据集上进行了演示:
1. Ilya Tolstikhin 等人基于两种类型 MLP 的 MLP-Mixer 模型。
2. James Lee-Thorp 等人基于非参数化傅立叶变换的 FNet 模型。
3. gMLP 模型,由 Hanxiao Liu 等人提出,基于带门控的 MLP。
本示例的目的并不是要比较这些模型,因为它们在不同数据集上的表现可能不同,而且超参数都经过了很好的调整。相反,它是为了展示这些模型主要构建模块的简单实现。
设置
import numpy as np
import keras
from keras import layers
准备数据
num_classes = 100
input_shape = (32, 32, 3)

(x_train, y_train), (x_test, y_test) = keras.datasets.cifar100.load_data()

print(f"x_train shape: {x_train.shape} - y_train shape: {y_train.shape}")
print(f"x_test shape: {x_test.shape} - y_test shape: {y_test.shape}")
演绎如下:

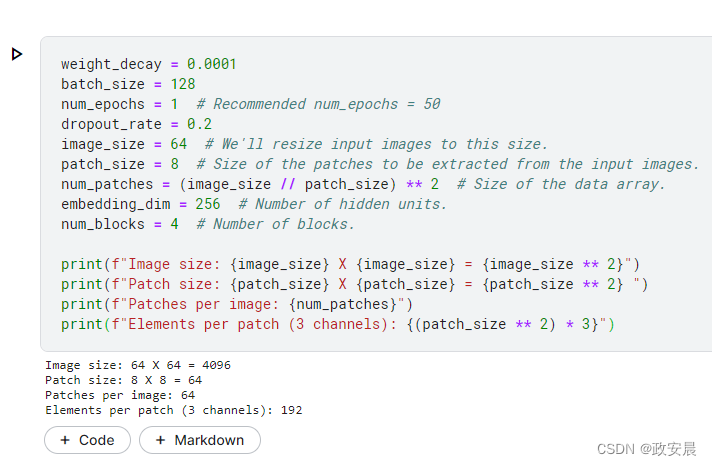
配置超参数
weight_decay = 0.0001
batch_size = 128
num_epochs = 1  # Recommended num_epochs = 50
dropout_rate = 0.2
image_size = 64  # We'll resize input images to this size.
patch_size = 8  # Size of the patches to be extracted from the input images.
num_patches = (image_size // patch_size) ** 2  # Size of the data array.
embedding_dim = 256  # Number of hidden units.
num_blocks = 4  # Number of blocks.

print(f"Image size: {image_size} X {image_size} = {image_size ** 2}")
print(f"Patch size: {patch_size} X {patch_size} = {patch_size ** 2} ")
print(f"Patches per image: {num_patches}")
print(f"Elements per patch (3 channels): {(patch_size ** 2) * 3}")
演绎如下:
建立分类模型
我们采用一种方法,根据处理模块构建分类器。
def build_classifier(blocks, positional_encoding=False):
    inputs = layers.Input(shape=input_shape)
    # Augment data.
    augmented = data_augmentation(inputs)
    # Create patches.
    patches = Patches(patch_size)(augmented)
    # Encode patches to generate a [batch_size, num_patches, embedding_dim] tensor.
    x = layers.Dense(units=embedding_dim)(patches)
    if positional_encoding:
        x = x + PositionEmbedding(sequence_length=num_patches)(x)
    # Process x using the module blocks.
    x = blocks(x)
    # Apply global average pooling to generate a [batch_size, embedding_dim] representation tensor.
    representation = layers.GlobalAveragePooling1D()(x)
    # Apply dropout.
    representation = layers.Dropout(rate=dropout_rate)(representation)
    # Compute logits outputs.
    logits = layers.Dense(num_classes)(representation)
    # Create the Keras model.
    return keras.Model(inputs=inputs, outputs=logits)
定义实验
我们实现了一个实用功能,用于编译、训练和评估给定模型。
def run_experiment(model):
    # Create Adam optimizer with weight decay.
    optimizer = keras.optimizers.AdamW(
        learning_rate=learning_rate,
        weight_decay=weight_decay,
    )
    # Compile the model.
    model.compile(
        optimizer=optimizer,
        loss=keras.losses.SparseCategoricalCrossentropy(from_logits=True),
        metrics=[
            keras.metrics.SparseCategoricalAccuracy(name="acc"),
            keras.metrics.SparseTopKCategoricalAccuracy(5, name="top5-acc"),
        ],
    )
    # Create a learning rate scheduler callback.
    reduce_lr = keras.callbacks.ReduceLROnPlateau(
        monitor="val_loss", factor=0.5, patience=5
    )
    # Create an early stopping callback.
    early_stopping = keras.callbacks.EarlyStopping(
        monitor="val_loss", patience=10, restore_best_weights=True
    )
    # Fit the model.
    history = model.fit(
        x=x_train,
        y=y_train,
        batch_size=batch_size,
        epochs=num_epochs,
        validation_split=0.1,
        callbacks=[early_stopping, reduce_lr],
        verbose=0,
    )

    _, accuracy, top_5_accuracy = model.evaluate(x_test, y_test)
    print(f"Test accuracy: {round(accuracy * 100, 2)}%")
    print(f"Test top 5 accuracy: {round(top_5_accuracy * 100, 2)}%")

    # Return history to plot learning curves.
    return history
使用数据增强
data_augmentation = keras.Sequential(
    [
        layers.Normalization(),
        layers.Resizing(image_size, image_size),
        layers.RandomFlip("horizontal"),
        layers.RandomZoom(height_factor=0.2, width_factor=0.2),
    ],
    name="data_augmentation",
)
# Compute the mean and the variance of the training data for normalization.
data_augmentation.layers[0].adapt(x_train)
将补丁提取作为一个图层来实施
class Patches(layers.Layer):
    def __init__(self, patch_size, **kwargs):
        super().__init__(**kwargs)
        self.patch_size = patch_size

    def call(self, x):
        patches = keras.ops.image.extract_patches(x, self.patch_size)
        batch_size = keras.ops.shape(patches)[0]
        num_patches = keras.ops.shape(patches)[1] * keras.ops.shape(patches)[2]
        patch_dim = keras.ops.shape(patches)[3]
        out = keras.ops.reshape(patches, (batch_size, num_patches, patch_dim))
        return out
将位置嵌入作为一个图层来实施
class PositionEmbedding(keras.layers.Layer):
    def __init__(
        self,
        sequence_length,
        initializer="glorot_uniform",
        **kwargs,
    ):
        super().__init__(**kwargs)
        if sequence_length is None:
            raise ValueError("`sequence_length` must be an Integer, received `None`.")
        self.sequence_length = int(sequence_length)
        self.initializer = keras.initializers.get(initializer)

    def get_config(self):
        config = super().get_config()
        config.update(
            {
                "sequence_length": self.sequence_length,
                "initializer": keras.initializers.serialize(self.initializer),
            }
        )
        return config

    def build(self, input_shape):
        feature_size = input_shape[-1]
        self.position_embeddings = self.add_weight(
            name="embeddings",
            shape=[self.sequence_length, feature_size],
            initializer=self.initializer,
            trainable=True,
        )

        super().build(input_shape)

    def call(self, inputs, start_index=0):
        shape = keras.ops.shape(inputs)
        feature_length = shape[-1]
        sequence_length = shape[-2]
        # trim to match the length of the input sequence, which might be less
        # than the sequence_length of the layer.
        position_embeddings = keras.ops.convert_to_tensor(self.position_embeddings)
        position_embeddings = keras.ops.slice(
            position_embeddings,
            (start_index, 0),
            (sequence_length, feature_length),
        )
        return keras.ops.broadcast_to(position_embeddings, shape)

    def compute_output_shape(self, input_shape):
        return input_shape
MLP 混频器模型
MLP 混频器是一种完全基于多层感知器(MLP)的架构,包含两种类型的 MLP 层:
1. 一种是独立应用于图像斑块,混合每个位置的特征。
2. 另一种应用于跨斑块(沿通道),混合空间信息。
这类似于基于深度可分离卷积的模型,如 Xception 模型,但有两个链式密集变换,没有最大池化,以及层归一化而不是批归一化。
实施 MLP 混频器模块
class MLPMixerLayer(layers.Layer):
    def __init__(self, num_patches, hidden_units, dropout_rate, *args, **kwargs):
        super().__init__(*args, **kwargs)

        self.mlp1 = keras.Sequential(
            [
                layers.Dense(units=num_patches, activation="gelu"),
                layers.Dense(units=num_patches),
                layers.Dropout(rate=dropout_rate),
            ]
        )
        self.mlp2 = keras.Sequential(
            [
                layers.Dense(units=num_patches, activation="gelu"),
                layers.Dense(units=hidden_units),
                layers.Dropout(rate=dropout_rate),
            ]
        )
        self.normalize = layers.LayerNormalization(epsilon=1e-6)

    def build(self, input_shape):
        return super().build(input_shape)

    def call(self, inputs):
        # Apply layer normalization.
        x = self.normalize(inputs)
        # Transpose inputs from [num_batches, num_patches, hidden_units] to [num_batches, hidden_units, num_patches].
        x_channels = keras.ops.transpose(x, axes=(0, 2, 1))
        # Apply mlp1 on each channel independently.
        mlp1_outputs = self.mlp1(x_channels)
        # Transpose mlp1_outputs from [num_batches, hidden_dim, num_patches] to [num_batches, num_patches, hidden_units].
        mlp1_outputs = keras.ops.transpose(mlp1_outputs, axes=(0, 2, 1))
        # Add skip connection.
        x = mlp1_outputs + inputs
        # Apply layer normalization.
        x_patches = self.normalize(x)
        # Apply mlp2 on each patch independtenly.
        mlp2_outputs = self.mlp2(x_patches)
        # Add skip connection.
        x = x + mlp2_outputs
        return x
构建、训练和评估 MLP-Mixer 模型
请注意,在 V100 GPU 上以当前设置训练模型,每个轮次大约需要 8 秒钟。
mlpmixer_blocks = keras.Sequential(
    [MLPMixerLayer(num_patches, embedding_dim, dropout_rate) for _ in range(num_blocks)]
)
learning_rate = 0.005
mlpmixer_classifier = build_classifier(mlpmixer_blocks)
history = run_experiment(mlpmixer_classifier)
演绎结果如下:

与卷积模型和基于变换器的模型相比,MLP-Mixer 模型的参数数量要少得多,这就减少了训练和计算成本。
正如 MLP-Mixer 论文中提到的,当在大型数据集上进行预训练或使用现代正则化方案时,MLP-Mixer 可获得与最先进模型相当的分数。您可以通过增加嵌入维度、增加混合块数量和延长模型训练时间来获得更好的结果。您还可以尝试增加输入图像的大小,并使用不同的补丁尺寸。
FNet 模式
FNet 使用与 Transformer 模块类似的模块。不过,FNet 用一个无参数的二维傅立叶变换层取代了 Transformer 模块中的自注意层:
1. 一个一维傅里叶变换沿斑块应用。
2. 沿通道进行一次一维傅里叶变换。
(实施 FNet 模块)
class FNetLayer(layers.Layer):
    def __init__(self, embedding_dim, dropout_rate, *args, **kwargs):
        super().__init__(*args, **kwargs)

        self.ffn = keras.Sequential(
            [
                layers.Dense(units=embedding_dim, activation="gelu"),
                layers.Dropout(rate=dropout_rate),
                layers.Dense(units=embedding_dim),
            ]
        )

        self.normalize1 = layers.LayerNormalization(epsilon=1e-6)
        self.normalize2 = layers.LayerNormalization(epsilon=1e-6)

    def call(self, inputs):
        # Apply fourier transformations.
        real_part = inputs
        im_part = keras.ops.zeros_like(inputs)
        x = keras.ops.fft2((real_part, im_part))[0]
        # Add skip connection.
        x = x + inputs
        # Apply layer normalization.
        x = self.normalize1(x)
        # Apply Feedfowrad network.
        x_ffn = self.ffn(x)
        # Add skip connection.
        x = x + x_ffn
        # Apply layer normalization.
        return self.normalize2(x)
构建、训练和评估 FNet 模型
请注意,在 V100 GPU 上以当前设置训练模型,每个轮次大约需要 8 秒钟。
演绎如下;

如 FNet 论文所示,通过增加嵌入维度、增加 FNet 块数和延长模型训练时间,可以获得更好的结果。您还可以尝试增加输入图像的大小,并使用不同的补丁尺寸。FNet 可以非常高效地扩展到较长的输入,运行速度比基于注意力的 Transformer 模型快得多,并能产生具有竞争力的准确性结果。
gMLP 模式
gMLP 是一种以空间门控单元(SGU)为特色的 MLP 架构。空间门控单元(SGU)可通过以下方式实现跨空间(通道)维度的跨门控互动:
1. 通过跨补丁(沿通道)线性投影,对输入进行空间转换。
2. 对输入及其空间变换进行元素乘法运算。
实施 gMLP 模块
class gMLPLayer(layers.Layer):
    def __init__(self, num_patches, embedding_dim, dropout_rate, *args, **kwargs):
        super().__init__(*args, **kwargs)

        self.channel_projection1 = keras.Sequential(
            [
                layers.Dense(units=embedding_dim * 2, activation="gelu"),
                layers.Dropout(rate=dropout_rate),
            ]
        )

        self.channel_projection2 = layers.Dense(units=embedding_dim)

        self.spatial_projection = layers.Dense(
            units=num_patches, bias_initializer="Ones"
        )

        self.normalize1 = layers.LayerNormalization(epsilon=1e-6)
        self.normalize2 = layers.LayerNormalization(epsilon=1e-6)

    def spatial_gating_unit(self, x):
        # Split x along the channel dimensions.
        # Tensors u and v will in the shape of [batch_size, num_patchs, embedding_dim].
        u, v = keras.ops.split(x, indices_or_sections=2, axis=2)
        # Apply layer normalization.
        v = self.normalize2(v)
        # Apply spatial projection.
        v_channels = keras.ops.transpose(v, axes=(0, 2, 1))
        v_projected = self.spatial_projection(v_channels)
        v_projected = keras.ops.transpose(v_projected, axes=(0, 2, 1))
        # Apply element-wise multiplication.
        return u * v_projected

    def call(self, inputs):
        # Apply layer normalization.
        x = self.normalize1(inputs)
        # Apply the first channel projection. x_projected shape: [batch_size, num_patches, embedding_dim * 2].
        x_projected = self.channel_projection1(x)
        # Apply the spatial gating unit. x_spatial shape: [batch_size, num_patches, embedding_dim].
        x_spatial = self.spatial_gating_unit(x_projected)
        # Apply the second channel projection. x_projected shape: [batch_size, num_patches, embedding_dim].
        x_projected = self.channel_projection2(x_spatial)
        # Add skip connection.
        return x + x_projected
建立、训练和评估 gMLP 模型
请注意,在 V100 GPU 上以当前设置训练模型,每个轮次大约需要 9 秒钟。
gmlp_blocks = keras.Sequential(
    [gMLPLayer(num_patches, embedding_dim, dropout_rate) for _ in range(num_blocks)]
)
learning_rate = 0.003
gmlp_classifier = build_classifier(gmlp_blocks)
history = run_experiment(gmlp_classifier)
演绎如下:

如 gMLP 论文所示,通过增加嵌入维度、增加 gMLP 块数和延长模型训练时间,可以获得更好的效果。您还可以尝试增加输入图像的大小,并使用不同的补丁尺寸。请注意,该论文使用了高级正则化策略,如 MixUp 和 CutMix,以及 AutoAugment。

