如果对你有用的话,希望能够点赞支持一下,这样我就能有更多的动力更新更多的学习笔记了。😄😄
使用ResNet进行CIFAR-10数据集进行测试,这里使用的是将CIFAR-10数据集的分辨率扩大到32X32,因为算力相关的问题所以我选择了较低的训练图像分辨率。但是假如你自己的算力比较充足的话,我建议使用训练的使用图像的分辨率设置为224X224(这个可以在代码里面的transforms.RandomResizedCrop(32)和transforms.Resize((32, 32)),进行修改,很简单),因为在测试训练的时候,发现将CIFAR10数据集的分辨率拉大可以让模型更快地进行收敛,并且识别的效果也是比低分辨率的更加好。
首先来介绍一下,ResNet:
1.论文下载地址:https://arxiv.org/pdf/1512.03385.pdf
2.ResNet的介绍:


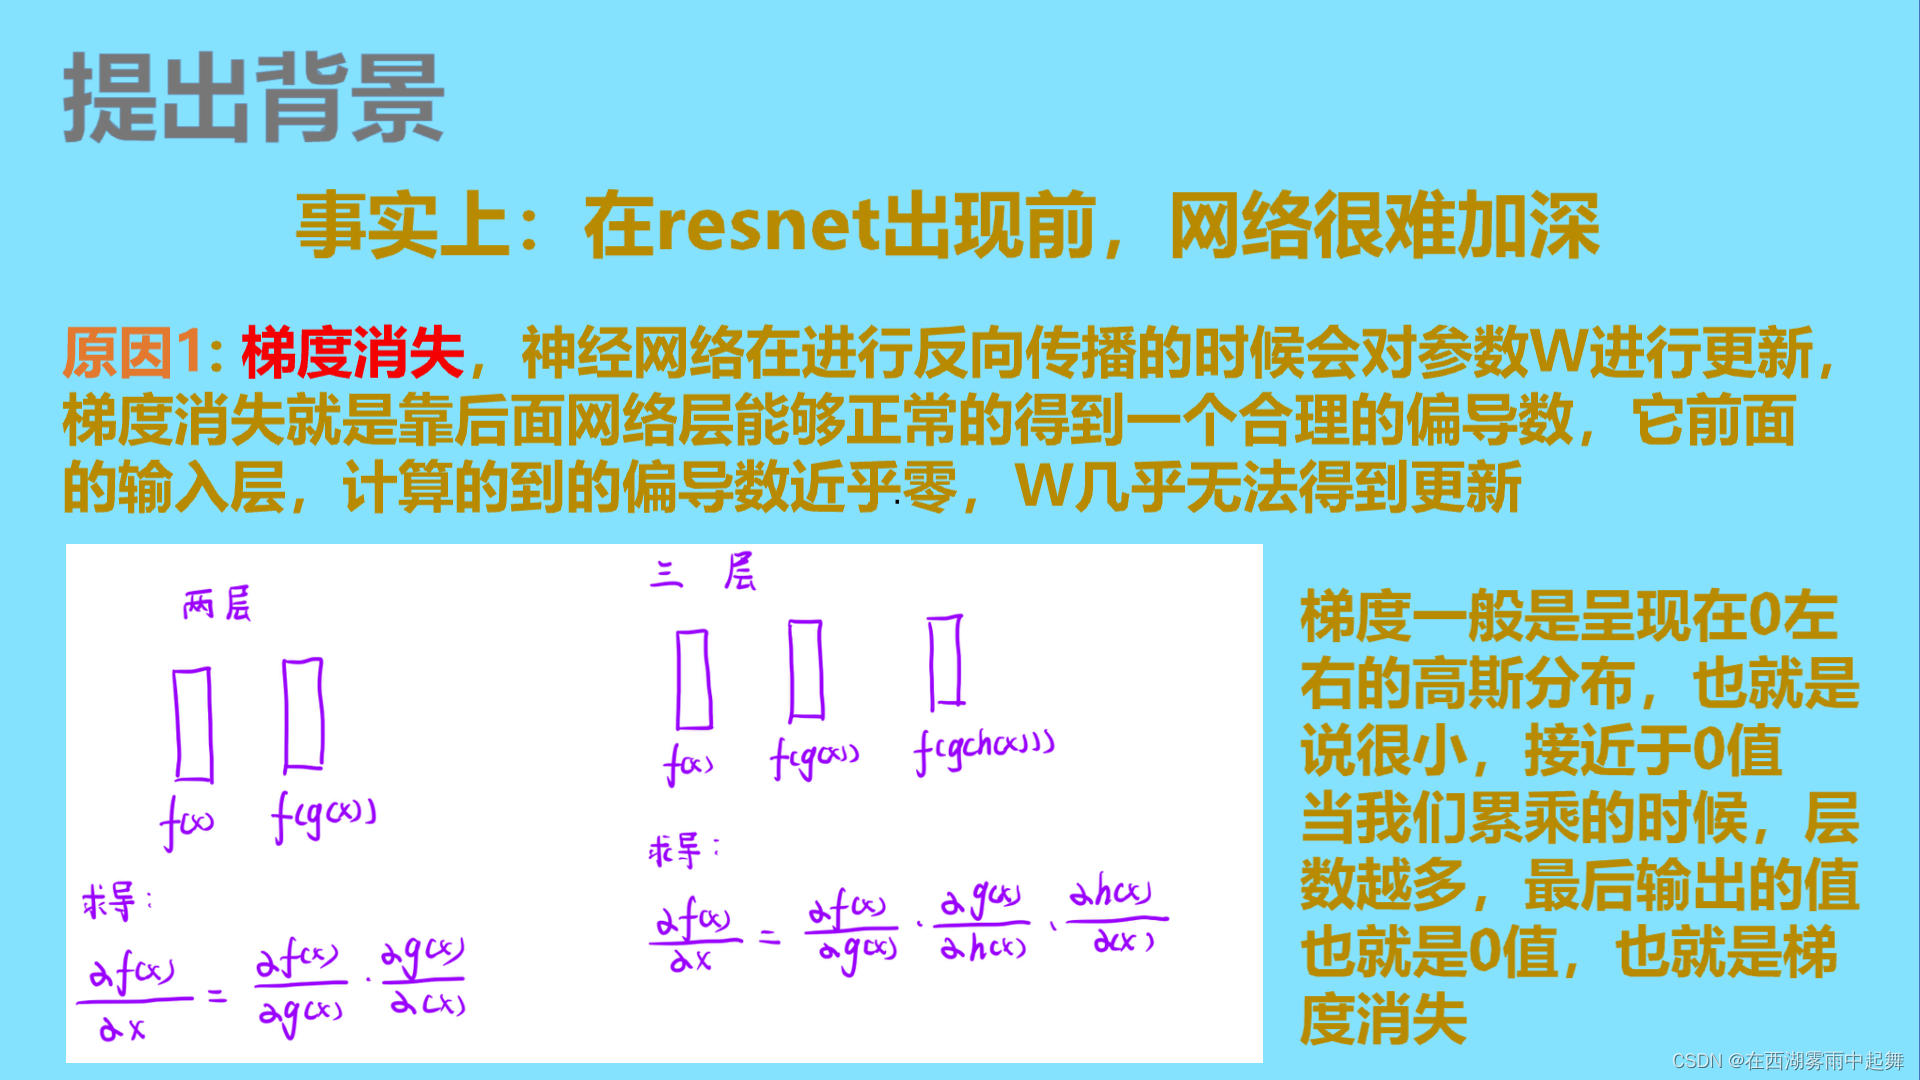


代码实现:
数据集的处理:
调用torchvision里面封装好的数据集进行数据的训练,并且利用官方已经做好的数据集分类是数据集的划分大小。进行了一些简单的数据增强,分别是随机的随机剪切和随机的水平拉伸操作。
模型的代码结构目录:
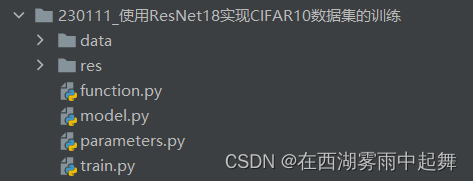
train.py文件内容:
# -*- coding:utf-8 -*-
# @Time : 2023-01-11 20:25
# @Author : DaFuChen
# @File : CSDN写作代码笔记
# @software: PyCharm


import torchvision

from model import resnet18
import os
import parameters
import function
import torch
import torch.nn as nn
import torch.optim as optim
from torchvision import transforms
from tqdm import tqdm


def main():
    device = torch.device("cuda:0" if torch.cuda.is_available() else "cpu")
    print("using {} device.".format(device))
    epochs = parameters.epoch
    save_model = parameters.resnet_save_model
    save_path = parameters.resnet_save_path_CIFAR10


    data_transform = {
        "train": transforms.Compose([transforms.RandomResizedCrop(32),
                                     transforms.RandomHorizontalFlip(),
                                     transforms.ToTensor(),
                                     transforms.Normalize((0.5, 0.5, 0.5), (0.5, 0.5, 0.5))]),

        "val": transforms.Compose([transforms.Resize((32, 32)),  # cannot 224, must (224, 224)
                                   transforms.ToTensor(),
                                   transforms.Normalize((0.5, 0.5, 0.5), (0.5, 0.5, 0.5))]),
        }

    train_dataset = torchvision.datasets.CIFAR10(root='./data/CIFAR10', train=True,
                                                download=True, transform=data_transform["train"])

    val_dataset = torchvision.datasets.CIFAR10(root='./data/CIFAR10', train=False,
                                           download=False, transform=data_transform["val"])


    train_num = len(train_dataset)
    val_num = len(val_dataset)
    print("using {} images for training, {} images for validation.".format(train_num, val_num))
    # #################################################################################################################

    batch_size = parameters.batch_size

    nw = min([os.cpu_count(), batch_size if batch_size > 1 else 0, 8])  # number of workers
    print('Using {} dataloader workers every process'.format(nw))

    # ##################################################################################################################
    train_loader = torch.utils.data.DataLoader(train_dataset,
                                               batch_size=batch_size,
                                               shuffle=True,
                                               pin_memory=True,
                                               num_workers=nw,
                                               )

    val_loader = torch.utils.data.DataLoader(val_dataset,
                                             batch_size=batch_size,
                                             shuffle=False,
                                             pin_memory=True,
                                             num_workers=nw,
                                             )

    model = resnet18(num_classes=parameters.CIFAR10_class)
    model.to(device)
    loss_function = nn.CrossEntropyLoss()
    optimizer = optim.Adam(model.parameters(), lr=parameters.resnet_lr)
    best_acc = 0.0

    # 为后面制作表图
    train_acc_list = []
    train_loss_list = []
    val_acc_list = []

    for epoch in range(epochs):
        # train
        model.train()
        running_loss_train = 0.0
        train_accurate = 0.0
        train_bar = tqdm(train_loader)
        for images, labels in train_bar:
            optimizer.zero_grad()

            outputs = model(images.to(device))
            loss = loss_function(outputs, labels.to(device))
            loss.backward()
            optimizer.step()

            predict = torch.max(outputs, dim=1)[1]
            train_accurate += torch.eq(predict, labels.to(device)).sum().item()
            running_loss_train += loss.item()

        train_accurate = train_accurate / train_num
        running_loss_train = running_loss_train / train_num
        train_acc_list.append(train_accurate)
        train_loss_list.append(running_loss_train)

        print('[epoch %d] train_loss: %.7f  train_accuracy: %.3f' %
              (epoch + 1, running_loss_train, train_accurate))

        # validate
        model.eval()
        acc = 0.0  # accumulate accurate number / epoch
        with torch.no_grad():
            val_loader = tqdm(val_loader)
            for val_data in val_loader:
                val_images, val_labels = val_data
                outputs = model(val_images.to(device))
                predict_y = torch.max(outputs, dim=1)[1]
                acc += torch.eq(predict_y, val_labels.to(device)).sum().item()

        val_accurate = acc / val_num
        val_acc_list.append(val_accurate)
        print('[epoch %d] val_accuracy: %.3f' %
              (epoch + 1, val_accurate))

        function.writer_into_excel_onlyval(save_path, train_loss_list, train_acc_list, val_acc_list,"CIFAR10")

        # 选择最best的模型进行保存 评价指标此处是acc
        if val_accurate > best_acc:
            best_acc = val_accurate
            torch.save(model.state_dict(), save_model)


if __name__ == '__main__':
    main()
model.py文件:
# -*- coding:utf-8 -*-
# @Time : 2023-01-11 20:24
# @Author : DaFuChen
# @File : CSDN写作代码笔记
# @software: PyCharm


import torch.nn as nn
import torch


class BasicBlock(nn.Module):
    expansion = 1

    def __init__(self, in_channel, out_channel, stride=1, downsample=None, **kwargs):
        super(BasicBlock, self).__init__()
        self.conv1 = nn.Conv2d(in_channels=in_channel, out_channels=out_channel,
                               kernel_size=3, stride=stride, padding=1, bias=False)
        self.bn1 = nn.BatchNorm2d(out_channel)
        self.relu = nn.ReLU()
        self.conv2 = nn.Conv2d(in_channels=out_channel, out_channels=out_channel,
                               kernel_size=3, stride=1, padding=1, bias=False)
        self.bn2 = nn.BatchNorm2d(out_channel)
        self.downsample = downsample

    def forward(self, x):
        identity = x
        if self.downsample is not None:
            identity = self.downsample(x)

        out = self.conv1(x)
        out = self.bn1(out)
        out = self.relu(out)

        out = self.conv2(out)
        out = self.bn2(out)

        out += identity
        out = self.relu(out)

        return out


class Bottleneck(nn.Module):
    """
    注意:原论文中,在虚线残差结构的主分支上,第一个1x1卷积层的步距是2,第二个3x3卷积层步距是1。
    但在pytorch官方实现过程中是第一个1x1卷积层的步距是1,第二个3x3卷积层步距是2,
    这么做的好处是能够在top1上提升大概0.5%的准确率。
    可参考Resnet v1.5 https://ngc.nvidia.com/catalog/model-scripts/nvidia:resnet_50_v1_5_for_pytorch
    """
    expansion = 4

    def __init__(self, in_channel, out_channel, stride=1, downsample=None,
                 groups=1, width_per_group=64):
        super(Bottleneck, self).__init__()

        width = int(out_channel * (width_per_group / 64.)) * groups

        self.conv1 = nn.Conv2d(in_channels=in_channel, out_channels=width,
                               kernel_size=1, stride=1, bias=False)  # squeeze channels
        self.bn1 = nn.BatchNorm2d(width)
        # -----------------------------------------
        self.conv2 = nn.Conv2d(in_channels=width, out_channels=width, groups=groups,
                               kernel_size=3, stride=stride, bias=False, padding=1)
        self.bn2 = nn.BatchNorm2d(width)
        # -----------------------------------------
        self.conv3 = nn.Conv2d(in_channels=width, out_channels=out_channel*self.expansion,
                               kernel_size=1, stride=1, bias=False)  # unsqueeze channels
        self.bn3 = nn.BatchNorm2d(out_channel*self.expansion)
        self.relu = nn.ReLU(inplace=True)
        self.downsample = downsample

    def forward(self, x):
        identity = x
        if self.downsample is not None:
            identity = self.downsample(x)

        out = self.conv1(x)
        out = self.bn1(out)
        out = self.relu(out)

        out = self.conv2(out)
        out = self.bn2(out)
        out = self.relu(out)

        out = self.conv3(out)
        out = self.bn3(out)

        out += identity
        out = self.relu(out)

        return out


class ResNet(nn.Module):

    def __init__(self,
                 block,
                 blocks_num,
                 num_classes=1000,
                 include_top=True,
                 groups=1,
                 width_per_group=64):
        super(ResNet, self).__init__()
        self.include_top = include_top
        self.in_channel = 64

        self.groups = groups
        self.width_per_group = width_per_group

        self.conv1 = nn.Conv2d(3, self.in_channel, kernel_size=7, stride=2,
                               padding=3, bias=False)
        self.bn1 = nn.BatchNorm2d(self.in_channel)
        self.relu = nn.ReLU(inplace=True)
        self.maxpool = nn.MaxPool2d(kernel_size=3, stride=2, padding=1)

        self.layer1 = self._make_layer(block, 64, blocks_num[0])
        self.layer2 = self._make_layer(block, 128, blocks_num[1], stride=2)
        self.layer3 = self._make_layer(block, 256, blocks_num[2], stride=2)
        self.layer4 = self._make_layer(block, 512, blocks_num[3], stride=2)

        if self.include_top:
            self.avgpool = nn.AdaptiveAvgPool2d((1, 1))  # output size = (1, 1)
            self.fc = nn.Linear(512 * block.expansion, num_classes)

        for m in self.modules():
            if isinstance(m, nn.Conv2d):
                nn.init.kaiming_normal_(m.weight, mode='fan_out', nonlinearity='relu')

        self.classifier = nn.Sequential(
            nn.Dropout(p=0.5),
            nn.Linear(512 * block.expansion, 512),  # [2 512 1 1]
            nn.ReLU(inplace=True),
            # nn.Linear(512, num_classes),

        )

    def _make_layer(self, block, channel, block_num, stride=1):
        downsample = None
        if stride != 1 or self.in_channel != channel * block.expansion:
            downsample = nn.Sequential(
                nn.Conv2d(self.in_channel, channel * block.expansion, kernel_size=1, stride=stride, bias=False),
                nn.BatchNorm2d(channel * block.expansion))

        layers = []
        layers.append(block(self.in_channel,
                            channel,
                            downsample=downsample,
                            stride=stride,
                            groups=self.groups,
                            width_per_group=self.width_per_group))
        self.in_channel = channel * block.expansion

        for _ in range(1, block_num):
            layers.append(block(self.in_channel,
                                channel,
                                groups=self.groups,
                                width_per_group=self.width_per_group))

        return nn.Sequential(*layers)

    def forward(self, x):
        x = self.conv1(x)
        x = self.bn1(x)
        x = self.relu(x)
        x = self.maxpool(x)

        x = self.layer1(x)
        x = self.layer2(x)
        x = self.layer3(x)
        x = self.layer4(x)

        if self.include_top:
            x = self.avgpool(x)
            x = torch.flatten(x, 1)
            # x = self.fc(x)
            # print((x.shape()))
            x = self.classifier(x)

        return x


class AlexnetChange(nn.Module):
    def __init__(self, ):
        super(AlexnetChange, self).__init__()
        self.features = nn.Sequential(
            nn.Conv2d(3, 48, kernel_size=11, stride=4, padding=2),  # input[3, 224, 224]  output[48, 55, 55]
            nn.ReLU(inplace=True),
            nn.MaxPool2d(kernel_size=3, stride=2),                  # output[48, 27, 27]
            nn.Conv2d(48, 128, kernel_size=5, padding=2),           # output[128, 27, 27]
            nn.ReLU(inplace=True),
            nn.MaxPool2d(kernel_size=3, stride=2),                  # output[128, 13, 13]
            nn.Conv2d(128, 192, kernel_size=3, padding=1),          # output[192, 13, 13]
            nn.ReLU(inplace=True),
            nn.Conv2d(192, 128, kernel_size=3, padding=1),          # output[128, 13, 13]
            nn.ReLU(inplace=True),
            nn.MaxPool2d(kernel_size=13, stride=2, padding=0),                  # output[128, 1, 1]
        )

        self.classifier = nn.Sequential(
            nn.Dropout(p=0.5),
            nn.Linear(128 * 1 * 1, 512),        # [batchsize值 512 1 1]
            nn.ReLU(inplace=True),
            # nn.Linear(512, num_classes),

        )

    def forward(self, x):
        x = self.features(x)
        x = torch.flatten(x, start_dim=1)
        x = self.classifier(x)      # output[512, 1, 1]

        return x


class Classifier(nn.Module):
    def __init__(self, num_classe=1000):
        super(Classifier, self).__init__()

        self.FC = nn.Sequential(
            nn.Linear(512 * 1 * 1, 128),
            nn.ReLU(inplace=True),
            nn.Linear(128, num_classe),
        )

    def forward(self, x1=None, x2=None):
        if x1 != None and x2 != None:
            x = x1.add(x2)
            x = self.FC(x)
            # print("x1 add x2  ")
        elif x1 != None and x2 == None:
            x = self.FC(x1)
            # print("only x1  ")
        elif x1 == None and x2 != None:
            x = self.FC(x2)
            # print("only x2  ")
        else:
            print("Alexnet_Con has wrong")

        return x


def resnet18(num_classes=1000, include_top=True):
    # https://download.pytorch.org/models/resnet34-333f7ec4.pth
    return ResNet(BasicBlock, [2, 2, 2, 2], num_classes=num_classes, include_top=include_top)

def resnet34(num_classes=1000, include_top=True):
    # https://download.pytorch.org/models/resnet34-333f7ec4.pth
    return ResNet(BasicBlock, [3, 4, 6, 3], num_classes=num_classes, include_top=include_top)


def resnet50(num_classes=1000, include_top=True):
    # https://download.pytorch.org/models/resnet50-19c8e357.pth
    return ResNet(Bottleneck, [3, 4, 6, 3], num_classes=num_classes, include_top=include_top)
function.py文件:
# -*- coding:utf-8 -*-
# @Time : 2023-01-11 20:25
# @Author : DaFuChen
# @File : CSDN写作代码笔记
# @software: PyCharm


import xlwt


def writer_into_excel_onlyval(excel_path,loss_train_list, acc_train_list, val_acc_list,dataset_name:str=""):
    workbook = xlwt.Workbook(encoding='utf-8')  # 设置一个workbook,其编码是utf-8
    worksheet = workbook.add_sheet("sheet1", cell_overwrite_ok=True)  # 新增一个sheet
    worksheet.write(0, 0, label='Train_loss')
    worksheet.write(0, 1, label='Train_acc')
    worksheet.write(0, 2, label='Val_acc')


    for i in range(len(loss_train_list)):  # 循环将a和b列表的数据插入至excel
        worksheet.write(i + 1, 0, label=loss_train_list[i])  # 切片的原来是传进来的Imgs是一个路径的信息
        worksheet.write(i + 1, 1, label=acc_train_list[i])
        worksheet.write(i + 1, 2, label=val_acc_list[i])


    workbook.save(excel_path + str(dataset_name) +".xls")  # 这里save需要特别注意,文件格式只能是xls,不能是xlsx,不然会报错
    print('save success!   .')
parameters.py文件:
# -*- coding:utf-8 -*-
# @Time : 2023-01-11 20:25
# @Author : DaFuChen
# @File : CSDN写作代码笔记
# @software: PyCharm


# 训练的次数
epoch = 2

# 训练的批次大小
batch_size = 1024

# 数据集的分类类别数量
CIFAR10_class = 10

# 模型训练时候的学习率大小
resnet_lr = 0.002

# 保存模型权重的路径 保存xml文件的路径
resnet_save_path_CIFAR10 = './res/'
resnet_save_model = './res/best_model.pth'
其中部分参数,例如是学习率的大小,训练的批次大小,数据增强的一些小参数,可以根据自己的经验和算力的现实情况进行调整。
如果对你有用的话,希望能够点赞支持一下,这样我就能有更多的动力更新更多的学习笔记了。😄😄
