一、项目背景
近年来,随着人工智能技术的不断发展,人脸表情识别已经成为了计算机视觉领域中的重要研究方向之一。然而,在当前的疫情形势下,佩戴口罩已经成为了一项必要的防疫措施,但是佩戴口罩会遮挡住人脸的部分区域,给表情识别带来了一定的挑战。
目前,已经有很多关于没有遮挡人脸的表情识别的技术研究,例如基于深度学习的卷积神经网络(CNN)和循环神经网络(RNN)等。这些技术已经取得了不错的成果,并且已经应用于实际的场景中,例如情感识别、人机交互等。
然而,在佩戴口罩的情况下,传统的表情识别技术无法识别出人脸的表情信息,因为口罩遮挡了人脸的大部分区域,导致识别的准确率降低。因此,一些研究人员开始关注口罩人脸识别技术,并提出了一些新的方法来解决这个问题。例如,他们使用图像处理技术来减少口罩的遮挡效果,或者使用额外的传感器来收集面部表情的其他数据。
然而,戴口罩人脸表情识别存在一些技术难点。首先,佩戴口罩会导致人脸的特征信息被遮挡,难以准确识别。其次,戴口罩人脸的表情信息可能会因为口罩遮挡而变得不够丰富,这也给表情识别带来了一定的挑战。最后,因为戴口罩人脸表情识别的研究资料较少,数据集需要个人收集标注。因此,如何在遮挡的情况下准确地识别出人脸表情信息是戴口罩人脸表情识别技术研究的重要问题之一
二、数据集来源与详情
2.1 来源
本项目基于fer2013人脸表情数据集,它于2013年国际机器学习会议(ICML)上推出,并成为比较表情识别模型性能的基准之一,同时也作为了2013年Kaggle人脸识别比赛的数据。Fer2013包含28709张训练集图像、3589张公开测试集图像和3589张私有测试集图像,每张图像为4848大小的灰度图片,如下图所示。Fer2013数据集中由有生气(angry)、厌恶(disgust)、恐惧(fear)、开心(happy)、难过(sad)、惊讶(surprise)和中性(neutral)七个类别组成。由于这个数据集大多是通过爬虫在互联网上进行爬取所得,因此存在一定的误差性。

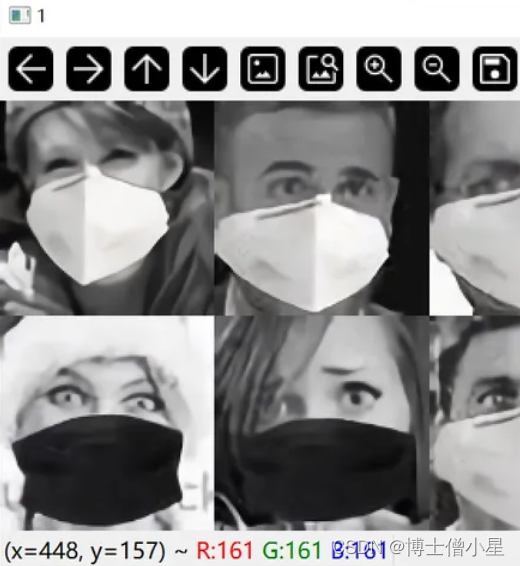
本项目使用face-mask对人脸添加口罩,简单介绍一下face-mask是基于dlib和face_recognition两大人脸检测的库实现的人脸关键点检测的方法。处理完成后共得到11870张训练集,3016张测试集(原数据集存在一些不能被face-mask所识别到的人脸)。经过实验发现sad、disgust、anger眼部特征十分相识,因此本试验只进行对anger、fear、happy、surprise的分类。
2.2 详细处理
- 安装face-mask 在安装之前要先配置dlib,具体过程请大家自行探索。
pip install face-mask
- 关键代码
# -*- coding: utf-8 -*-
import os
import numpy as np
from PIL import Image, ImageFile

__version__ = '0.3.0'


IMAGE_DIR = os.path.join(os.path.dirname(os.path.abspath(__file__)), 'images')
DEFAULT_IMAGE_PATH = os.path.join(IMAGE_DIR, 'default-mask.png')
BLACK_IMAGE_PATH = os.path.join(IMAGE_DIR, 'black-mask.png')
BLUE_IMAGE_PATH = os.path.join(IMAGE_DIR, 'blue-mask.png')
RED_IMAGE_PATH = os.path.join(IMAGE_DIR, 'red-mask.png')


class FaceMasker:
    KEY_FACIAL_FEATURES = ('nose_bridge', 'chin')

    def __init__(self, face_path, mask_path, show=False, model='hog'):
        self.face_path = face_path
        self.mask_path = mask_path
        self.show = show
        self.model = model
        self._face_img: ImageFile = None
        self._mask_img: ImageFile = None

    def mask(self):
        import face_recognition

        face_image_np = face_recognition.load_image_file(self.face_path)
        face_locations = face_recognition.face_locations(face_image_np, model=self.model)
        face_landmarks = face_recognition.face_landmarks(face_image_np, face_locations)
        self._face_img = Image.fromarray(face_image_np)
        self._mask_img = Image.open(self.mask_path)

        found_face = False
        for face_landmark in face_landmarks:
            # check whether facial features meet requirement
            skip = False
            for facial_feature in self.KEY_FACIAL_FEATURES:
                if facial_feature not in face_landmark:
                    skip = True
                    break
            if skip:
                continue

            # mask face
            found_face = True
            self._mask_face(face_landmark)

        if found_face:
            if self.show:
                self._face_img.show()

            # save
            self._save()
        else:
            print('Found no face.')

    def _mask_face(self, face_landmark: dict):
        nose_bridge = face_landmark['nose_bridge']
        nose_point = nose_bridge[len(nose_bridge) * 1 // 4]
        nose_v = np.array(nose_point)

        chin = face_landmark['chin']
        chin_len = len(chin)
        chin_bottom_point = chin[chin_len // 2]
        chin_bottom_v = np.array(chin_bottom_point)
        chin_left_point = chin[chin_len // 8]
        chin_right_point = chin[chin_len * 7 // 8]

        # split mask and resize
        width = self._mask_img.width
        height = self._mask_img.height
        width_ratio = 1.2
        new_height = int(np.linalg.norm(nose_v - chin_bottom_v))

        # left
        mask_left_img = self._mask_img.crop((0, 0, width // 2, height))
        mask_left_width = self.get_distance_from_point_to_line(chin_left_point, nose_point, chin_bottom_point)
        mask_left_width = int(mask_left_width * width_ratio)
        mask_left_img = mask_left_img.resize((mask_left_width, new_height))

        # right
        mask_right_img = self._mask_img.crop((width // 2, 0, width, height))
        mask_right_width = self.get_distance_from_point_to_line(chin_right_point, nose_point, chin_bottom_point)
        mask_right_width = int(mask_right_width * width_ratio)
        mask_right_img = mask_right_img.resize((mask_right_width, new_height))

        # merge mask
        size = (mask_left_img.width + mask_right_img.width, new_height)
        mask_img = Image.new('RGBA', size)
        mask_img.paste(mask_left_img, (0, 0), mask_left_img)
        mask_img.paste(mask_right_img, (mask_left_img.width, 0), mask_right_img)

        # rotate mask
        angle = np.arctan2(chin_bottom_point[1] - nose_point[1], chin_bottom_point[0] - nose_point[0])
        rotated_mask_img = mask_img.rotate(angle, expand=True)

        # calculate mask location
        center_x = (nose_point[0] + chin_bottom_point[0]) // 2
        center_y = (nose_point[1] + chin_bottom_point[1]) // 2

        offset = mask_img.width // 2 - mask_left_img.width
        radian = angle * np.pi / 180
        box_x = center_x + int(offset * np.cos(radian)) - rotated_mask_img.width // 2
        box_y = center_y + int(offset * np.sin(radian)) - rotated_mask_img.height // 2

        # add mask
        self._face_img.paste(mask_img, (box_x, box_y), mask_img)

    def _save(self):
        path_splits = os.path.splitext(self.face_path)
        new_face_path = path_splits[0] + '-with-mask' + path_splits[1]
        self._face_img.save(new_face_path)
        print(f'Save to {new_face_path}')

    @staticmethod
    def get_distance_from_point_to_line(point, line_point1, line_point2):
        distance = np.abs((line_point2[1] - line_point1[1]) * point[0] +
                          (line_point1[0] - line_point2[0]) * point[1] +
                          (line_point2[0] - line_point1[0]) * line_point1[1] +
                          (line_point1[1] - line_point2[1]) * line_point1[0]) / \
                   np.sqrt((line_point2[1] - line_point1[1]) * (line_point2[1] - line_point1[1]) +
                           (line_point1[0] - line_point2[0]) * (line_point1[0] - line_point2[0]))
        return int(distance)


if __name__ == '__main__':
    FaceMasker("./face/1.jpg", DEFAULT_IMAGE_PATH, True, 'hog').mask()
- 本项目已为大家提供处理好的数据集地址 ,后边直接使用。如果想了解更多处理细节请关注我的主页
三、模型介绍
3.1 Xception简介
Xception是Google公司继Inception后提出的对 Inception-v3 的另一种改进。作者认为,通道之间的相关性与空间相关性最好要分开处理。于是采用 Separable Convolution来替换原来 Inception-v3中的卷积操作。
传统卷积的实现过程:

Depthwise Separable Convolution 的实现过程:

深度可分离卷积 Depthwise Separable Convolution
Depthwise Separable Convolution 与 极致的 Inception 区别:
极致的 Inception:
- 第一步:普通 1×1 卷积。
- 第二步:对 1×1 卷积结果的每个 channel,分别进行 3×3卷积操作,并将结果 concat。
Depthwise Separable Convolution:
- 第一步:Depthwise 卷积,对输入的每个channel,分别进行 3×3卷积操作,并将结果 concat。
- 第二步:Pointwise 卷积,对 Depthwise 卷积中的 concat 结果,进行1×1卷积操作。
两种操作的顺序不一致:Inception 先进行1×1卷积,再进行3×3 卷积;Depthwise Separable Convolution 先进行 3×3卷积,再进行 1×1卷积。
3.2 Xception网络框架
先进行普通卷积操作,再对 1×1 卷积后的每个channel分别进行 3×3 卷积操作,最后将结果 concat。
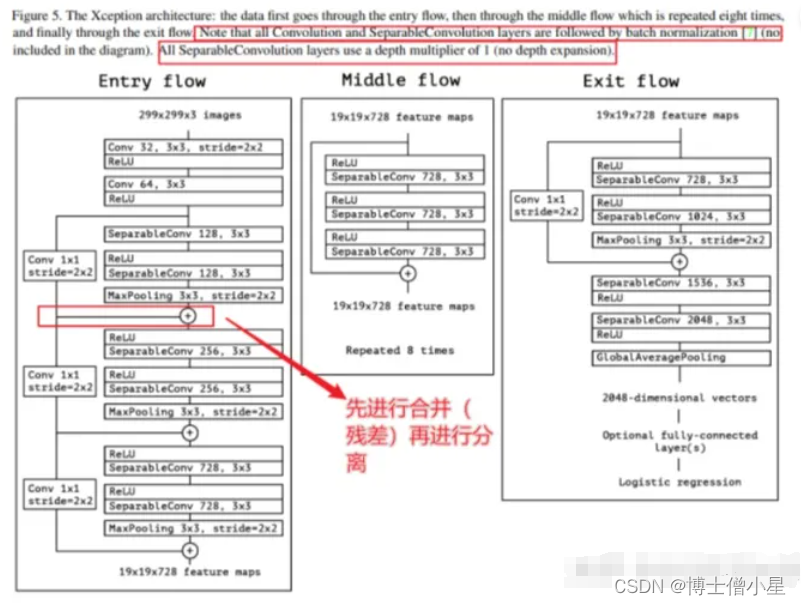
注:Xception包含三个部分:输入部分,中间部分和结尾部分;其中所有卷积层和可分离卷积层后面都使用Batch Normalization处理,所有的可分离卷积层使用一个深度乘数1(深度方向并不进行扩充)。
三、技术路线
3.1 PaddleClas简介
飞桨图像分类套件PaddleClas是飞桨为工业界和学术界所准备的一个图像分类任务的工具集,助力使用者训练出更好的视觉模型和应用落地。
PaddleClas特性:
- 丰富的模型库:基于ImageNet1k分类数据集,PaddleClas提供了29个系列的分类网络结构和训练配置,133个预训练模型和性能评估。
- SSLD知识蒸馏:基于该方案蒸馏模型的识别准确率普遍提升3%以上。
- 数据增广:支持AutoAugment、Cutout、Cutmix等8种数据增广算法详细介绍、代码复现和在统一实验环境下的效果评估。
- 10万类图像分类预训练模型:百度自研并开源了基于10万类数据集训练的 ResNet50_vd 模型,在一些实际场景中,使用该预训练模型的识别准确率最多可以提升30%。
- 多种训练方案,包括多机训练、混合精度训练等。
- 多种预测推理、部署方案,包括TensorRT预测、Paddle-Lite预测、模型服务化部署、模型量化、Paddle Hub等。可运行于Linux、Windows、MacOS等多种系统。
3.2 模型库链接
Paddleclas代码GitHub链接: https://github.com/PaddlePaddle/PaddleClas
Paddleclas代码Gitee链接: https://gitee.com/PaddlePaddle/PaddleClas
Paddleclas文档链接: https://paddleclas.readthedocs.io
四、环境配置
- 更新pip(很重要,要不然很多包装不上)
pip install --upgrade pip
- 克隆Paddleclas仓库
%cd /home/aistudio/work/
# 克隆Paddleclas仓库
# gitee 国内下载比较快
!git clone https://gitee.com/PaddlePaddle/PaddleClas.git
# github
# !git clone https://github.com/PaddlePaddle/PaddleClas.git
- 导入package
%cd /home/aistudio/work/PaddleClas
# 导入package
!pip install -r requirements.txt
- 解压数据集
# 解压数据集
# 注意数据集压缩包的名字和位置
!echo "解压数据集"
!unzip -oq /home/aistudio/data/data201630/fer2013(添加口罩_四分类) _.zip -d /home/aistudio/work/PaddleClas/dataset
- 数据集结构
dataset:
    train:
        imags            # 训练集图片
        train_list.txt   # 训练集标签
    eval:
        imags            # 评估图片
        eval_list.txt    # 评估标签
    test:
        imags            #测试图片
        test_list.txt    #测试标签
        list.txt           # 标签对应含义
五、模型训练
5.1 配置训练参数文件(已为大家提供参考参数文件)
- 本项目使用的配置文件是
/home/aistudio/work/PaddleClas/ppcls/configs/ImageNet/Xception/Xception65.yaml
# global configs
Global:
  ...
  output_dir: ./output/ # 模型保存路径
  epochs: 200       # 训练步数
  ...
  use_visualdl: Ture  # 训练可视化,在训练时可以绘制出可视化图像
  ...
  save_inference_dir: ./inference #导出模型保存路径

  ....


Optimizer:
  ....
  lr:
    name: Cosine
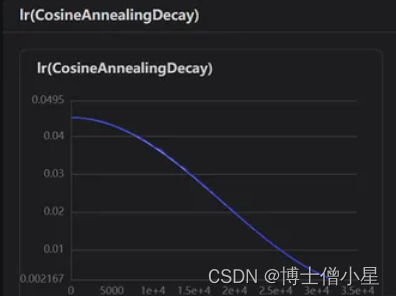
    learning_rate: 0.045 # 学习率,根据训练时的可视化图像进行调整
  regularizer:
    name: 'L2'
    coeff: 0.0001
.....
# data loader for train and eval
DataLoader:
  Train:
    dataset:
      name: ImageNetDataset
      image_root: ./dataset/ # 图片路径
      cls_label_path: ./dataset/train/train_list.txt # 标签路径
      ......
    sampler:
      name: DistributedBatchSampler
      batch_size: 64 # 根据配置进行调整,在环境最左边工具栏的监控中根据显存和cup占用率进行调整
      ....

  Eval:
    dataset:
      name: ImageNetDataset
      image_root: ./dataset/
      cls_label_path: ./dataset/eval/eval_list.txt # 同上
      .....

Infer:
  infer_imgs: ./dataset/test/imags/10276.jpg  # 预测的图片
  batch_size: 10 # 根据实际调整
  ....
    class_id_map_file: ./dataset/test/list.txt# 此文件是标签对应的含义,根据开始数据集说明时的图片可知:0对应生气 1害怕.....
5.2 训练
%cd /home/aistudio/work/PaddleClas
!echo "开始炼丹"
!python3 -m paddle.distributed.launch tools/train.py \
-c /home/aistudio/work/PaddleClas/ppcls/configs/ImageNet/Xception/Xception65.yaml
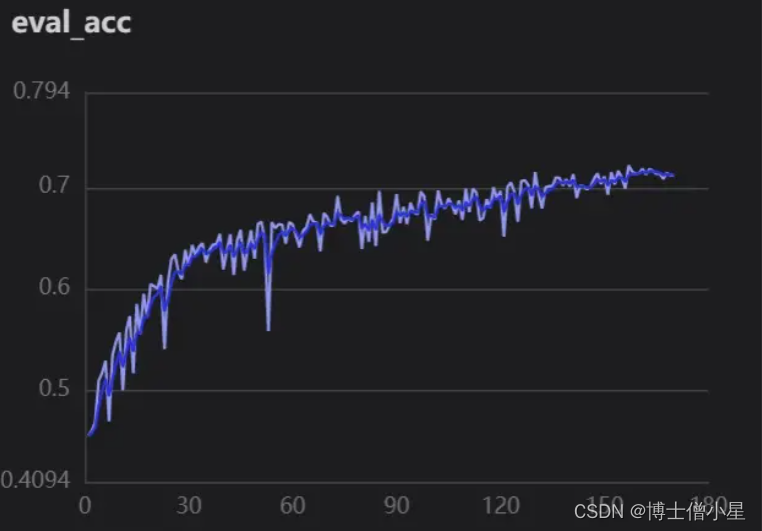
- 精确度
5.3 加载训练可视化
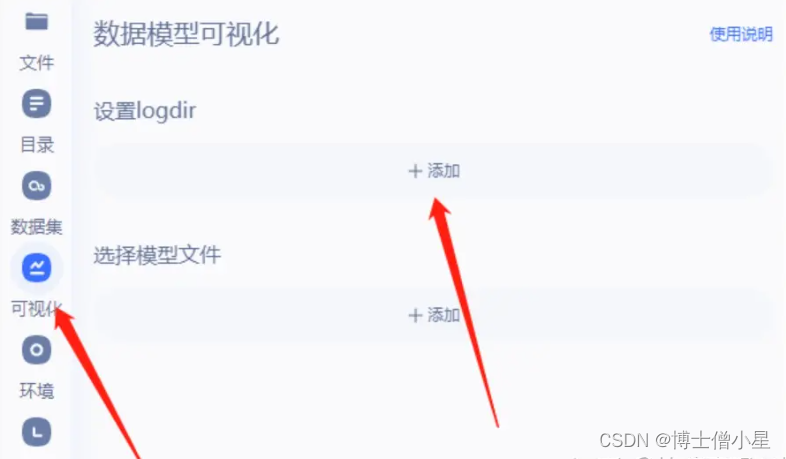
- 设置VisualDL服务
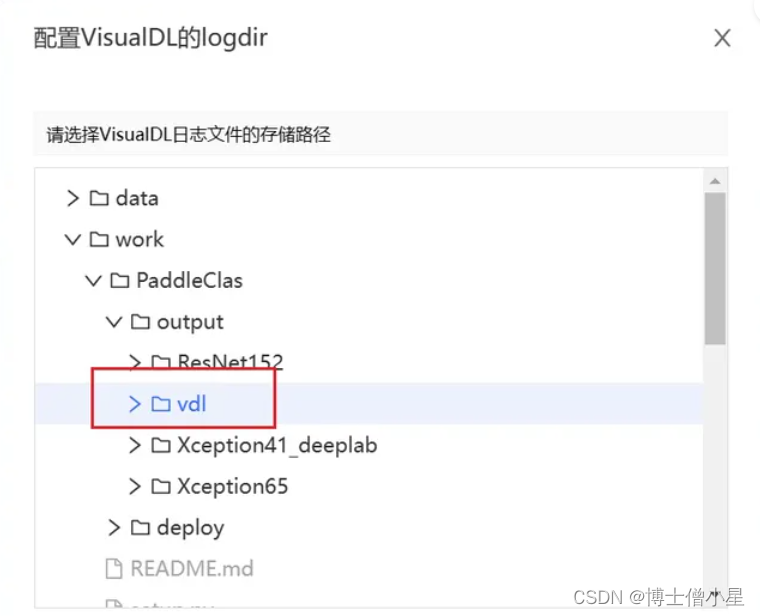
- 加载logdir
- 启动打开
5.4 效果
六、模型预测
备注:
- 这里-o Global.pretrained_model="/home/aistudio/work/PaddleClas/output/Xception65/best_model" 指定了当前最佳权重所在的路径,如果指定其他权重,只需替换对应的路径即可。
- 默认是对 /home/aistudio/work/data/test 进行预测,此处也可以通过增加字段 -o Infer.infer_imgs=xxx 对其他图片预测。
- 默认输出的是 Top-5 的值,如果希望输出 Top-k 的值,可以指定-o Infer.PostProcess.topk=k,其中,k 为您指定的值。
修改
/home/aistudio/work/PaddleClas-2.4.0/ppcls/engine/engine.py中的推理代码infer(self),将推理结果存入csv文件。
@paddle.no_grad()
    def infer(self):
        assert self.mode == "infer" and self.eval_mode == "classification"
        total_trainer = dist.get_world_size()
        local_rank = dist.get_rank()
        image_list = get_image_list(self.config["Infer"]["infer_imgs"])
        # data split
        image_list = image_list[local_rank::total_trainer]

        with open("/home/aistudio/work/PaddleClas/dataset/eval/eval_list.txt", "r") as f:
            dat = f.readlines()
        Dta= {}
        for delr in dat:
            wed=delr.replace('./eval/imags/','').replace('\n','').split(' ')
            Dta[wed[0]] =wed[1]
        print(Dta)

        csvfile = open("/home/aistudio/work/PaddleClas/output/result.csv", "w", newline="")
        writer = csv.writer(csvfile)

        batch_size = self.config["Infer"]["batch_size"]
        self.model.eval()
        batch_data = []
        image_file_list = []
        for idx, image_file in enumerate(image_list):
            with open(image_file, 'rb') as f:
                x = f.read()
            for process in self.preprocess_func:
                x = process(x)
            batch_data.append(x)
            image_file_list.append(image_file)
            if len(batch_data) >= batch_size or idx == len(image_list) - 1:
                batch_tensor = paddle.to_tensor(batch_data)

                if self.amp and self.amp_eval:
                    with paddle.amp.auto_cast(
                            custom_black_list={
                                "flatten_contiguous_range", "greater_than"
                            },
                            level=self.amp_level):
                        out = self.model(batch_tensor)
                else:
                    out = self.model(batch_tensor)

                if isinstance(out, list):
                    out = out[0]
                if isinstance(out, dict) and "Student" in out:
                    out = out["Student"]
                if isinstance(out, dict) and "logits" in out:
                    out = out["logits"]
                if isinstance(out, dict) and "output" in out:
                    out = out["output"]
                result = self.postprocess_func(out, image_file_list)
                print(result)


                for res in result:
                    file_name = res['file_name'].split('/')[-1]
                    class_id  = res['class_ids'][0]
                    try:
                        ture_id = Dta[file_name]
                        writer.writerow([file_name, class_id,ture_id])
                    except:
                        pass
                batch_data.clear()
                image_file_list.clear()
%cd /home/aistudio/work/PaddleClas/
!echo "模型预测"
!python tools/infer.py \
    -c /home/aistudio/work/PaddleClas/ppcls/configs/ImageNet/Xception/Xception65.yaml\
    -o Global.pretrained_model=/home/aistudio/work/PaddleClas/output/Xception65/best_model
- 提取预测结果
import glob
import matplotlib.pyplot as plt
import pandas as pd
import cv2

data_1=pd.read_csv("/home/aistudio/work/PaddleClas/output/result.csv",",",encoding="utf-8",header=None)
# 随机抽取数据
data_2=data_1.sample(10)
print(data_2)

ji = 1
for index, row in data_2.iterrows():
    i=row.tolist()
    img = cv2.imread("/home/aistudio/work/PaddleClas/dataset/eval/imags/"+str(i[0]))
    title='pri:'+str(i[1])+'    true:'+str(i[2])
    plt.subplot(3,5,ji)
    plt.imshow(cv2.cvtColor(img, cv2.COLOR_BGR2RGB))
    plt.title(title,fontsize=10)
    ji=ji+1

plt.tight_layout()
plt.show()
sum_num = 0
cr_num = 0
for index, row in data_1.iterrows():
    i = row.tolist()
    if int(i[1])==int(i[2]):
        cr_num = cr_num + 1
    sum_num = sum_num + 1

print("正确:",cr_num,"\n总数:",sum_num)
print('ACC:',cr_num*100/sum_num,"%")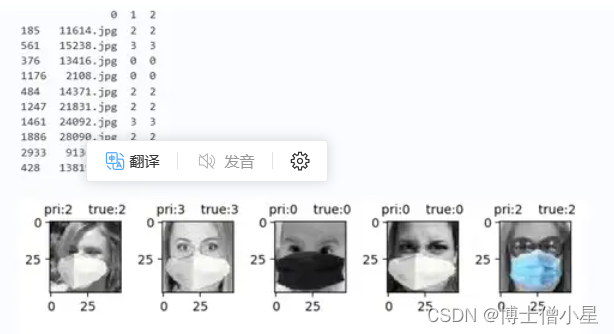

七、模型导出
# 导出模型
!echo "模型导出"
!python tools/export_model.py -c /home/aistudio/work/PaddleClas/ppcls/configs/ImageNet/Xception/Xception65.yaml\
         -o Global.pretrained_model=/home/aistudio/work/PaddleClas/output/Xception65/best_model\
        -o Global.save_inference_dir=./inference
- 模型结构
八、模型部署
参考
- EfficientNet实现农业病害识别(FastDeploy部署和安卓端部署)
- 基于PP-PicoDet行车检测(完成安卓端部署))
九、项目总结
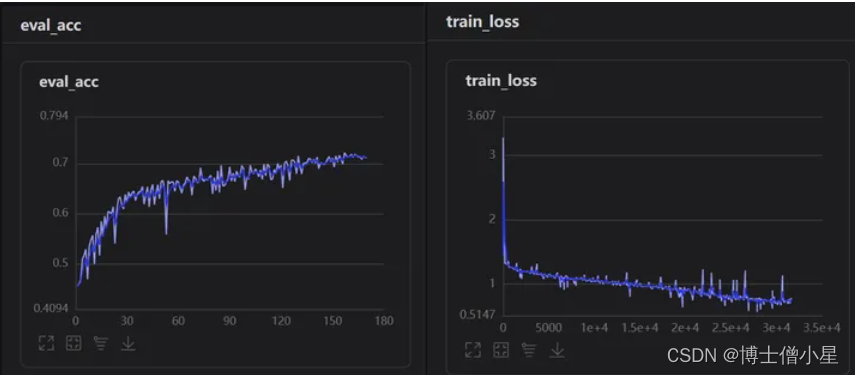
本次项目的完成可谓是经历重重困难,在看到题目时是懵懵的。在我以往学习的知识里,单纯人脸表情识别并没有太大的难度,但是要求对遮挡人脸的表情进行识别(口罩遮挡),查阅资料发现连数据集都没有找到,后来只能自己构建数据集,就利用以往做人脸表情识别的经验,使用未遮挡人脸通过检测人脸面部特征,定位眼、口、鼻、嘴给面部添加口罩。又学习了face-mask的一些操作,算是把数据集构建完成。当选取神经网络时问题有来了,该选取什么网络才好呢?从主流的ResNet、SwinTransformer、VGG效果都不是很理想。仔细分析问题,发现数据集中sad、disgust、anger眼部特征十分相识,所以就减少分类,重新处理数据集。在探索过程中隐约发现Xception网络特性(上文已介绍)可能对此数据集能产生较好的效果,果断进行测试,分别使用Xception41_deeplab和Xception65进行对比,发现ception65精度上升较快(这里可能不严谨,lr等当时并未考虑太多),紧接着使用可视化训练,观察lr,loss,acc曲线变化关系,调整参数,最终只实现了0.72左右精度。因为时间的原因,我没有办法继续优化项目,再以后的时间里我会不断的学习相关知识和优化项目,如果大家有好的想法和观点,欢迎给我留言!!!


