目录
- 1. 背景
- 2. 参考
- 3. 文档
- 3.1 使用docker container commit命令构建镜像
- 3.1.1 [Docker官方文档-docker container commit](https://docs.docker.com/reference/cli/docker/container/commit/)
- Description(概述)
- Options(选项)
- Examples(示例)
- 3.2 使用Dockerfile 构建镜像
- 3.2.1 [Docker官方文档-Dockerfile](https://docs.docker.com/build/building/packaging/#dockerfile)
- Dockerfile
- Docker images(镜像)
- Building(构建)
- Other resources(其他资源)
- 4. 实践
- 4.1 docker container commit
- 4.2 dockerfile
1. 背景
记录了Docker 的制作镜像知识。
2. 参考
- 链接: docker官方文档
- 链接: 关于制作Docker镜像?| Dockerfile快速开始
3. 文档
3.1 使用docker container commit命令构建镜像
使用docker commit命令,基于已存在的容器构建出新镜像。
3.1.1 Docker官方文档-docker container commit
docker container commit

Description(概述)
It can be useful to commit a container’s file changes or settings into a new image. This lets you debug a container by running an interactive shell, or export a working dataset to another server.
将容器的文件更改或设置提交到新镜像中非常有用。这使您可以通过运行交互式shell调试容器,或者将工作数据集导出到另一台服务器。
Commits do not include any data contained in mounted volumes.
提交不包括挂载卷中的任何数据。
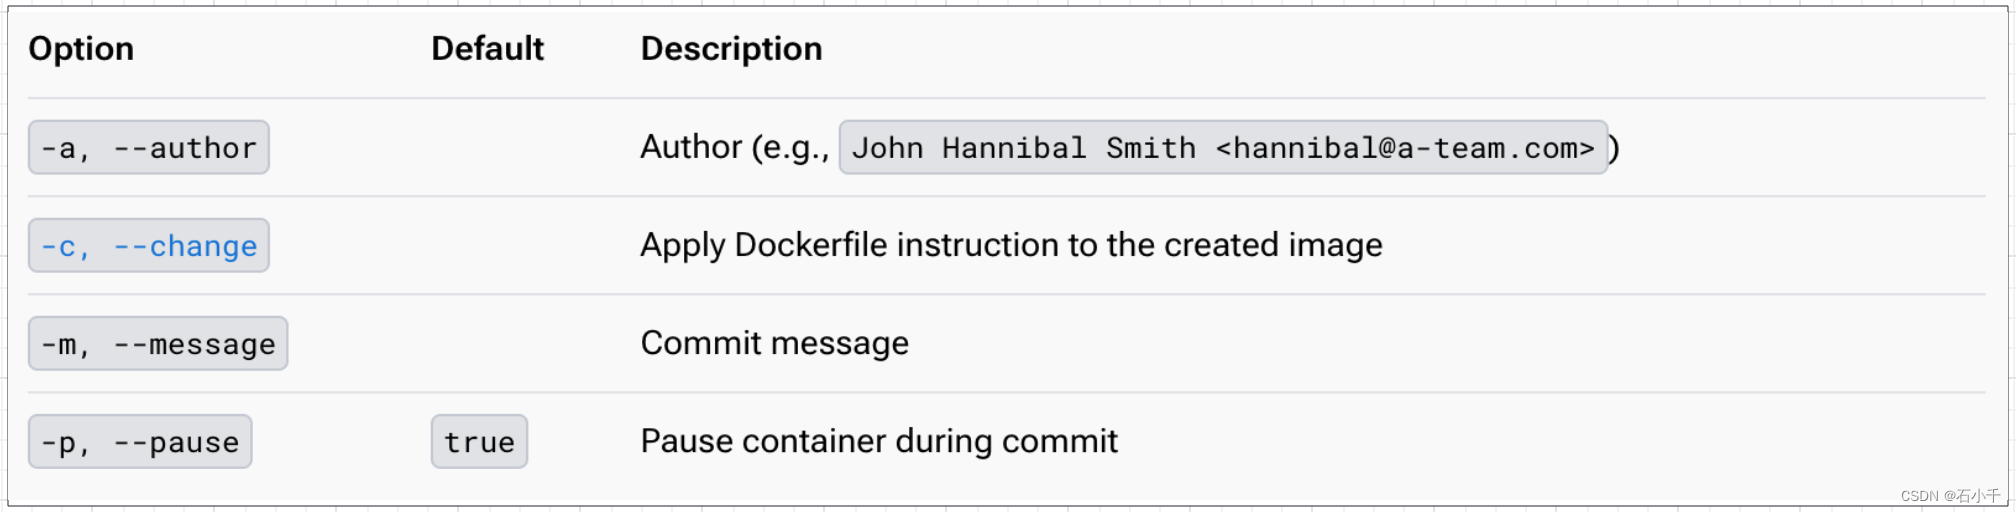
By default, the container being committed and its processes will be paused while the image is committed. This reduces the likelihood of encountering data corruption during the process of creating the commit. If this behavior is undesired, set the --pause option to false.
默认情况下,在提交镜像时,正在提交的容器和它的进程将暂停。这降低了在创建提交过程中遇到数据损坏的可能性。如果不希望出现这种行为,请将–pause选项设置为false。
The --change option will apply Dockerfile instructions to the image that’s created. Supported Dockerfile instructions: CMD|ENTRYPOINT|ENV|EXPOSE|LABEL|ONBUILD|USER|VOLUME|WORKDIR
–change选项将Dockerfile指令应用于创建的镜像。支持的Dockerfile指令:CMD|ENTRYPOINT|ENV|EXPOSE|LABEL|ONBUILD|USER|VOLUME|WORKDIR
Options(选项)
Examples(示例)
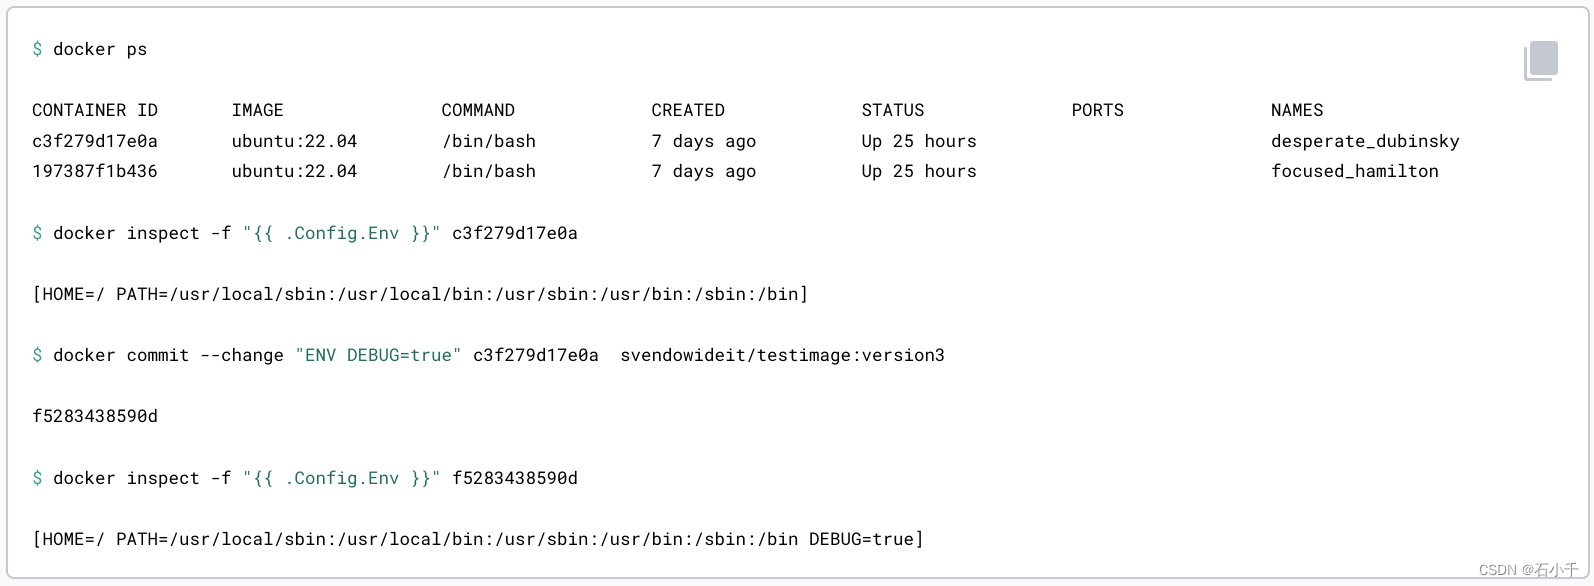
- Commit a container
- 提交容器ID:c3f279d17e0a,
- 仓库/镜像名:svendowideit/testimage
- TAG:version3

- Commit a container with new configurations (–change)
- 提交容器ID:c3f279d17e0a,
- 仓库/镜像名:svendowideit/testimage
- TAG:version3
- 修改配置:–change “ENV DEBUG=true”
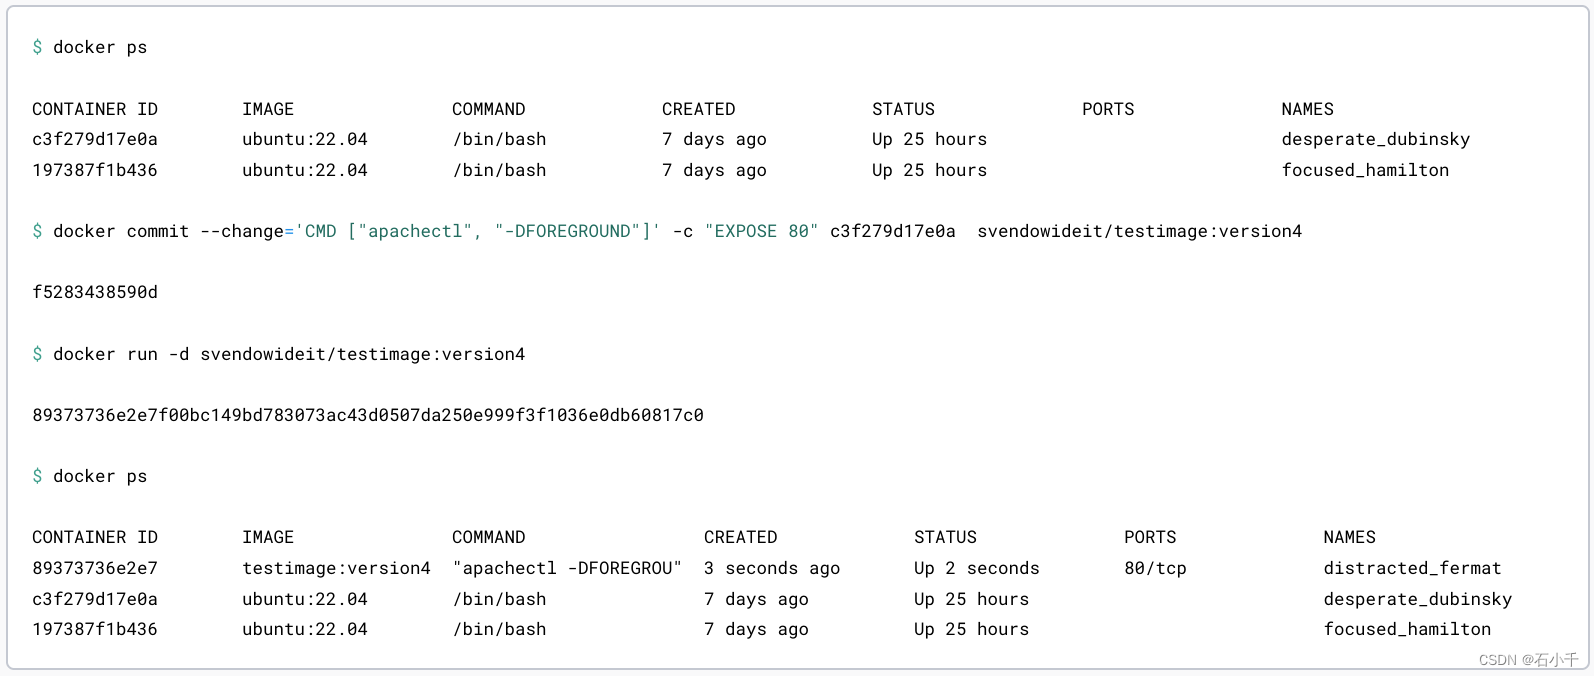
- Commit a container with new CMD and EXPOSE instructions
- 提交容器ID:c3f279d17e0a,
- 仓库/镜像名:svendowideit/testimage
- TAG:version4
- 修改配置: --change=‘CMD [“apachectl”, “-DFOREGROUND”]’
- 修改配置:-c “EXPOSE 80”
3.2 使用Dockerfile 构建镜像
编写 Dockerfile 文件,使用docker build命令来构建镜像。
3.2.1 Docker官方文档-Dockerfile
Dockerfile
It all starts with a Dockerfile.
这一切都是从Dockerfile开始的。
Docker builds images by reading the instructions from a Dockerfile. A Dockerfile is a text file containing instructions for building your source code. The Dockerfile instruction syntax is defined by the specification reference in the Dockerfile reference.
Docker通过从Dockerfile中读取指令来构建镜像。Dockerfile是一个文本文件,包含构建源代码的指令。Dockerfile指令语法在参考规范中定义,详见Dockerfile reference。
Here are the most common types of instructions:
以下是最常见的指令类型:
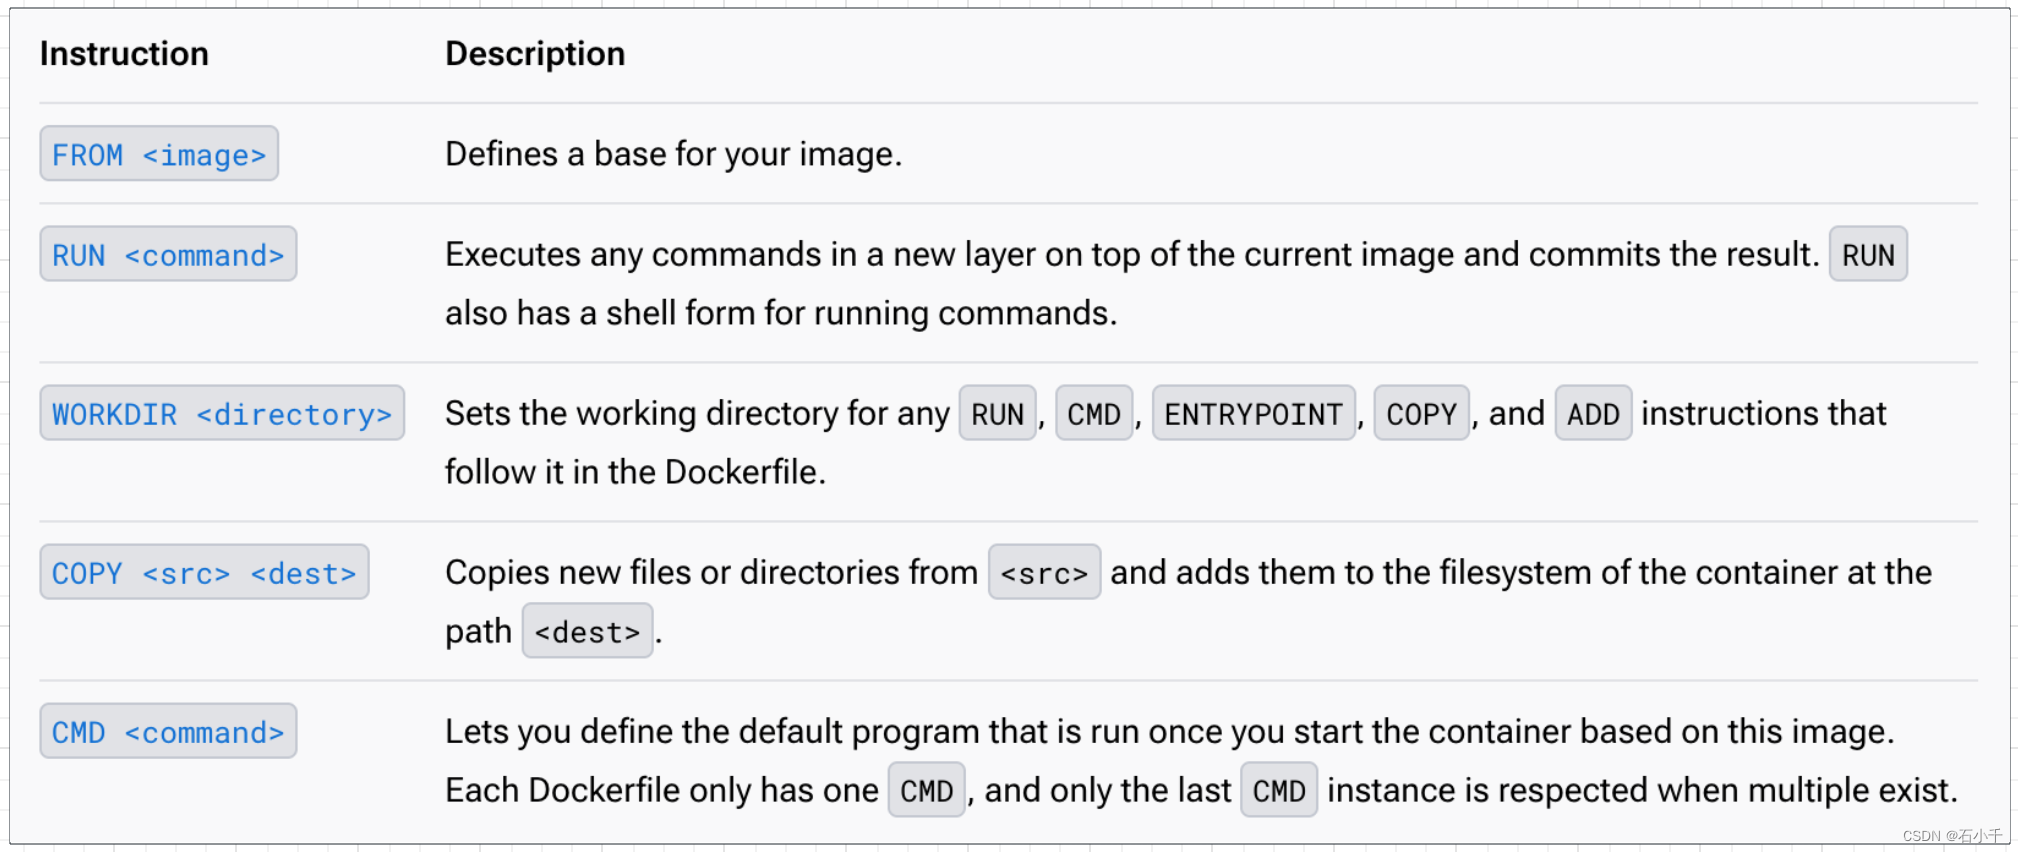
- FROM :定义镜像的基础镜像。
- RUN :在当前镜像顶部的新层中执行命令并提交结果。RUN还有一个shell形式,用于运行命令。
- WORKDIR :为Dockerfile中的任何RUN、CMD、ENTRYPOINT、COPY和ADD指令设置工作目录。
- COPY <src> <dest>:从<src>复制新文件或目录,并将它们添加到容器文件系统的<dest>路径中。
- CMD :用于定义使用镜像启动容器后运行的默认程序。每个Dockerfile应该只有一个CMD,如果存在多个CMD时,只有最后一个生效。
Dockerfiles are crucial inputs for image builds and can facilitate automated, multi-layer image builds based on your unique configurations. Dockerfiles can start simple and grow with your needs to support more complex scenarios.
Dockerfiles是镜像构建的关键输入,它可以根据您特定配置,自动化构建多层镜像。Dockerfiles可以从简单开始,并随着您的需求而增长,以支持更复杂的场景。
Filename
The default filename to use for a Dockerfile is Dockerfile, without a file extension. Using the default name allows you to run the docker build command without having to specify additional command flags.
Dockerfile使用的默认文件名是Dockerfile,没有文件扩展名。使用默认名称可以运行docker构建命令,而无需指定其他命令标志。
Some projects may need distinct Dockerfiles for specific purposes. A common convention is to name these <something>.Dockerfile. You can specify the Dockerfile filename using the --file flag for the docker build command. Refer to the docker build CLI reference to learn about the --file flag.
某些项目可能需要不同的Dockerfile来实现特定目的。一个通常的约定是使用<something>.Dockerfile形式命名。您可以使用docker构建命令的–file标志来指定Dockerfile文件名。请参阅docker build CLI参考,了解–file标志。
Note
We recommend using the default (Dockerfile) for your project’s primary Dockerfile.
注意
我们推荐使用默认(Dockerfile)作为您项目的主Dockerfile。
Docker images(镜像)
Docker镜像
Docker images consist of layers. Each layer is the result of a build instruction in the Dockerfile. Layers are stacked sequentially, and each one is a delta representing the changes applied to the previous layer.
Docker镜像由层组成。每一层都是Dockerfile中构建指令的结果。层按顺序堆叠,每个层都是一个三角形,表示应用于前一层的更改。
Example
Here’s what a typical workflow for building applications with Docker looks like.
以下是使用Docker构建应用程序的典型工作流。
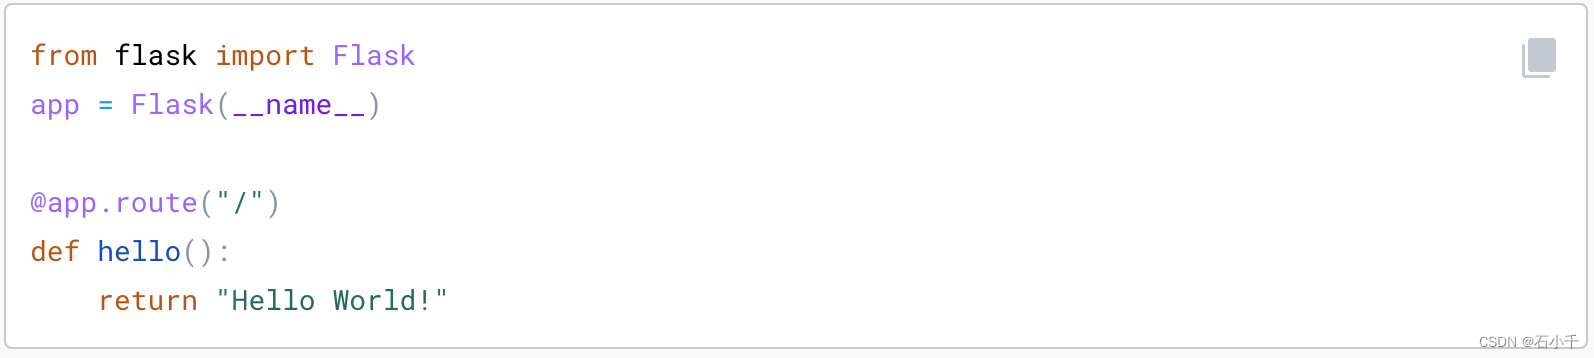
The following example code shows a small “Hello World” application written in Python, using the Flask framework.
下面的示例代码显示了一个使用Flask框架,用Python编写的小型“Hello World”应用程序。
In order to ship and deploy this application without Docker Build, you would need to make sure that:
为了交付和部署此应用程序,在Docker Build前,您需要确保:
- The required runtime dependencies are installed on the server
- The Python code gets uploaded to the server’s filesystem
- The server starts your application, using the necessary parameters
- 所需的运行时依赖项已安装在服务器上
- Python代码被上传到服务器的文件系统
- 服务器启动应用程序,需要使用必要的参数
The following Dockerfile creates a container image, which has all the dependencies installed and that automatically starts your application.
以下Dockerfile创建了一个容器镜像,该镜像安装了所有依赖项,并自动启动应用程序。
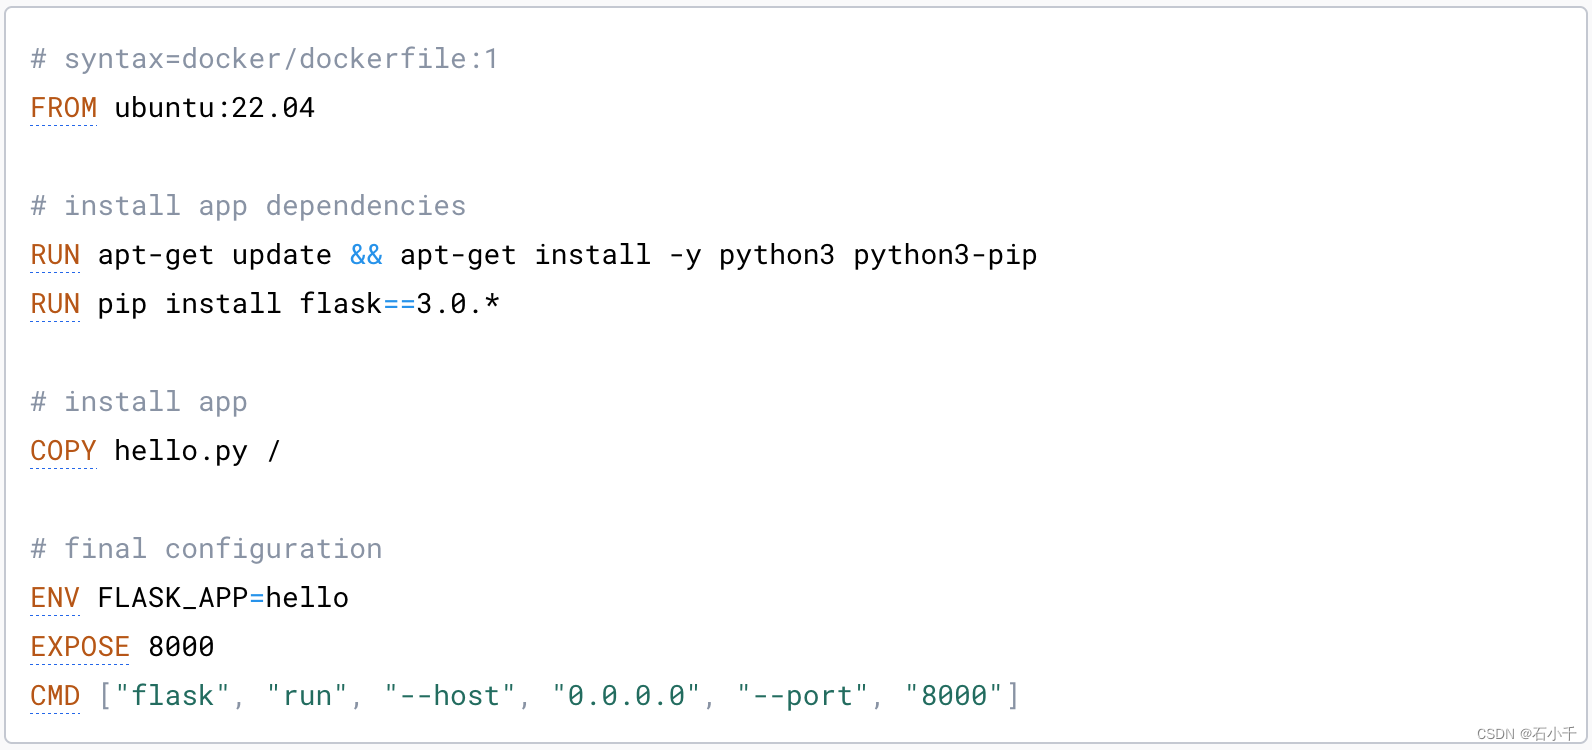
Here’s a breakdown of what this Dockerfile does:
以下是这个Dockerfile的功能明细:
- Dockerfile syntax ( Dockerfile语法 )
- Base image ( 基本镜像 )
- Environment setup ( 环境设置 )
- Comments ( 注释 )
- Installing dependencies ( 安装依赖 )
- Copying files ( 拷贝文件 )
- Setting environment variables ( 设置环境变量 )
- Exposed ports ( 暴露端口 )
- Starting the application ( 启动应用 )
Dockerfile syntax ( Dockerfile语法 )
The first line to add to a Dockerfile is a # syntax parser directive. While optional, this directive instructs the Docker builder what syntax to use when parsing the Dockerfile, and allows older Docker versions with BuildKit enabled to use a specific Dockerfile frontend before starting the build. Parser directives must appear before any other comment, whitespace, or Dockerfile instruction in your Dockerfile, and should be the first line in Dockerfiles.
Dockerfile的第一行是#语法解析器命令。虽然是可选的,但该命令指示Docker构建器在解析Dockerfile时使用什么语法,并允许带BuildKit的旧Docker版本在开始构建之前使用特定的Dockerfile前端(需要Docker CE 版本 > 18.09)。Parser命令必须出现在Dockerfile中的任何其他注释、空格或Dockerfile指令之前,并且应该是Dockerfile的第一行。

Tip
We recommend using docker/dockerfile:1, which always points to the latest release of the version 1 syntax. BuildKit automatically checks for updates of the syntax before building, making sure you are using the most current version.
我们建议使用docker/dokerfile:1,它总是指向版本1语法的最新版本。BuildKit在生成之前会自动检查语法的更新,确保您使用的是最新版本。
注意:在公有云上使用前,请先检查Docker的版本
Base image( 基本镜像 )
The line following the syntax directive defines what base image to use:
syntax命令后面的行,定义了要使用基础镜像

The FROM instruction sets your base image to the 22.04 release of Ubuntu. All instructions that follow are executed in this base image: an Ubuntu environment. The notation ubuntu:22.04, follows the name:tag standard for naming Docker images. When you build images, you use this notation to name your images. There are many public images you can leverage in your projects, by importing them into your build steps using the Dockerfile FROM instruction.
FROM指令将您的基础镜像设置为Ubuntu的22.04版本。下面的所有指令都在这个基础镜像中执行:Ubuntu环境。符号ubuntu:22.04遵循命名Docker镜像的标准,名称:标签。当你构建镜像时,您可以使用这个符号来命名您的镜像。通过使用Dockerfile FROM指令,可以将许多公共镜像导入到构建步骤中,这样就可以在项目中利用它们。
Docker Hub contains a large set of official images that you can use for this purpose.
Docker Hub包含大量官方镜像,您可以将其用于此目的。
Environment setup ( 环境设置 )
The following line executes a build command inside the base image.
以下行在基础镜像中执行一个构建命令。
 This RUN instruction executes a shell in Ubuntu that updates the APT package index and installs Python tools in the container.
这个RUN指令在Ubuntu中执行一个shell,更新APT包的索引,并在容器中安装Python工具。
Comments ( 注释 )
Note the # install app dependencies line. This is a comment. Comments in Dockerfiles begin with the # symbol. As your Dockerfile evolves, comments can be instrumental to document how your Dockerfile works for any future readers and editors of the file, including your future self!
请注意 “# install app dependencies”。这是一条注释。Dockerfiles中的注释以 # 符号开头。随着Dockerfile的发展,注释可以记录您的Dockerfile是如何工作的,这有助于这今后的文件读者和编辑者,包括今后的您自己!
Note
You might’ve noticed that comments are denoted using the same symbol as the syntax directive on the first line of the file. The symbol is only interpreted as a directive if the pattern matches a directive and appears at the beginning of the Dockerfile. Otherwise, it’s treated as a comment.
您可能已经注意到,注释使用与文件第一行的syntax指令相同的符号(#)表示。只有 # 匹配并出现在Dockerfile的开头时,才会被解释为指令。否则,它将被视为注释。
Installing dependencies ( 安装依赖 )
The second RUN instruction installs the flask dependency required by the Python application.
第二条RUN指令安装Python应用程序所需的flask依赖项。

A prerequisite for this instruction is that pip is installed into the build container. The first RUN command installs pip, which ensures that we can use the command to install the flask web framework.
此指令的先决条件是将pip安装到构建的容器中。第一个RUN命令安装了pip,这确保了我们可以使用该命令安装flask web框架。
Copying files ( 拷贝文件 )
The next instruction uses the COPY instruction to copy the hello.py file from the local build context into the root directory of our image.
下一条指令使用COPY指令将hello.py文件从本地构建上下文环境中复制到镜像的根目录中。

A build context is the set of files that you can access in Dockerfile instructions such as COPY and ADD.
After the COPY instruction, the hello.py file is added to the filesystem of the build container.
构建上下文环境是您可以在Dockerfile指令(如COPY和ADD)中访问的一组文件。在COPY指令之后,hello.py文件被添加到构建容器的文件系统中。
Setting environment variables ( 设置环境变量 )
If your application uses environment variables, you can set environment variables in your Docker build using the ENV instruction.
如果您的应用程序使用环境变量,则可以使用ENV指令在Docker构建中设置环境变量。

This sets a Linux environment variable we’ll need later. Flask, the framework used in this example, uses this variable to start the application. Without this, flask wouldn’t know where to find our application to be able to run it.
这将设置我们稍后需要的Linux环境变量。本例中使用的框架Flask使用此变量启动应用程序。如果没有这个,flask就不知道在哪里可以找到我们的应用程序来运行它。
Exposed ports ( 暴露端口 )
The EXPOSE instruction marks that our final image has a service listening on port 8000.
EXPOSE指令标志着我们的最终镜像有一个侦听端口8000的服务。

This instruction isn’t required, but it is a good practice and helps tools and team members understand what this application is doing.
此指令不是必需的,但它是一种很好的做法,有助于工具和团队成员了解此应用程序的功能。
Starting the application ( 启动应用 )
Finally, CMD instruction sets the command that is run when the user starts a container based on this image.
最后,CMD指令设置当用户基于此镜像启动容器时运行的命令。

This command starts the flask development server listening on all addresses on port 8000. The example here uses the “exec form” version of CMD. It’s also possible to use the “shell form”:
这个命令启动flask开发服务器,侦听所有地址上的8000端口。这里的示例使用CMD的“exec-form”版本。也可以使用“shell形式”:

There are subtle differences between these two versions, for example in how they trap signals like SIGTERM and SIGKILL. For more information about these differences, see Shell and exec form.
这两个版本之间有细微的区别,例如它们如何捕获SIGTERM和SIGKILL等信号。有关这些差异的更多信息,请参阅Shell和exec表单
Building(构建)
To build a container image using the Dockerfile example from the previous section, you use the docker build command:
要使用上一节中的Dockerfile示例构建容器镜像,请使用docker build命令:

The -t test:latest option specifies the name and tag of the image.
-t test:latest选项指定镜像的名称和标记(TAG)。
The single dot (.) at the end of the command sets the build context to the current directory. This means that the build expects to find the Dockerfile and the hello.py file in the directory where the command is invoked. If those files aren’t there, the build fails.
命令末尾的点(.)将构建上下文设置为当前目录。这意味着构建期望在调用命令的目录中找到Dockerfile和hello.py文件。如果这些文件不存在,则构建失败。
After the image has been built, you can run the application as a container with docker run, specifying the image name:
构建镜像后,您可以用docker run命令,指定镜像名称将应用程序作为容器运行

This publishes the container’s port 8000 to http://localhost:8000 on the Docker host.
这将容器的8000端口发布到Docker主机上的http://localhost:8000
Other resources(其他资源)
If you are interested in examples in other languages, such as Go, check out our language-specific guides in the Guides section.
如果您对Go等其他语言的示例感兴趣,请查看指南部分中的特定语言指南。
For more information about building, including advanced use cases and patterns, refer to the Build with Docker guide.
有关构建的更多信息,包括高级用例和模式,请参阅《使用Docker构建指南》。
4. 实践
4.1 docker container commit
docker container commit和docker build命令的基本使用详见《docker 容器内服务随容器自动启动》中的方法三和方法五。
4.2 dockerfile
详见后续文档:
Docker 笔记(八)–Dockerfile