SpringBoot-04 | spring-boot-starter-logging原理原理
- 第一步:springboot加载factories文件
- 第二步:构造监听器
- 第三步:注册监听器到Spring中
- 第四步:开始加载日志框架
- 第五步:加载日志框架logback-spring.xml
- 第六步:jul-to-slf4j和log4j-to-slf4j是干啥用的?
- 1)slf4j接口
- 2)重定向
- 3)组合实现示例
- 第七步:logback使用分析
- 总结一下
第一步:springboot加载factories文件
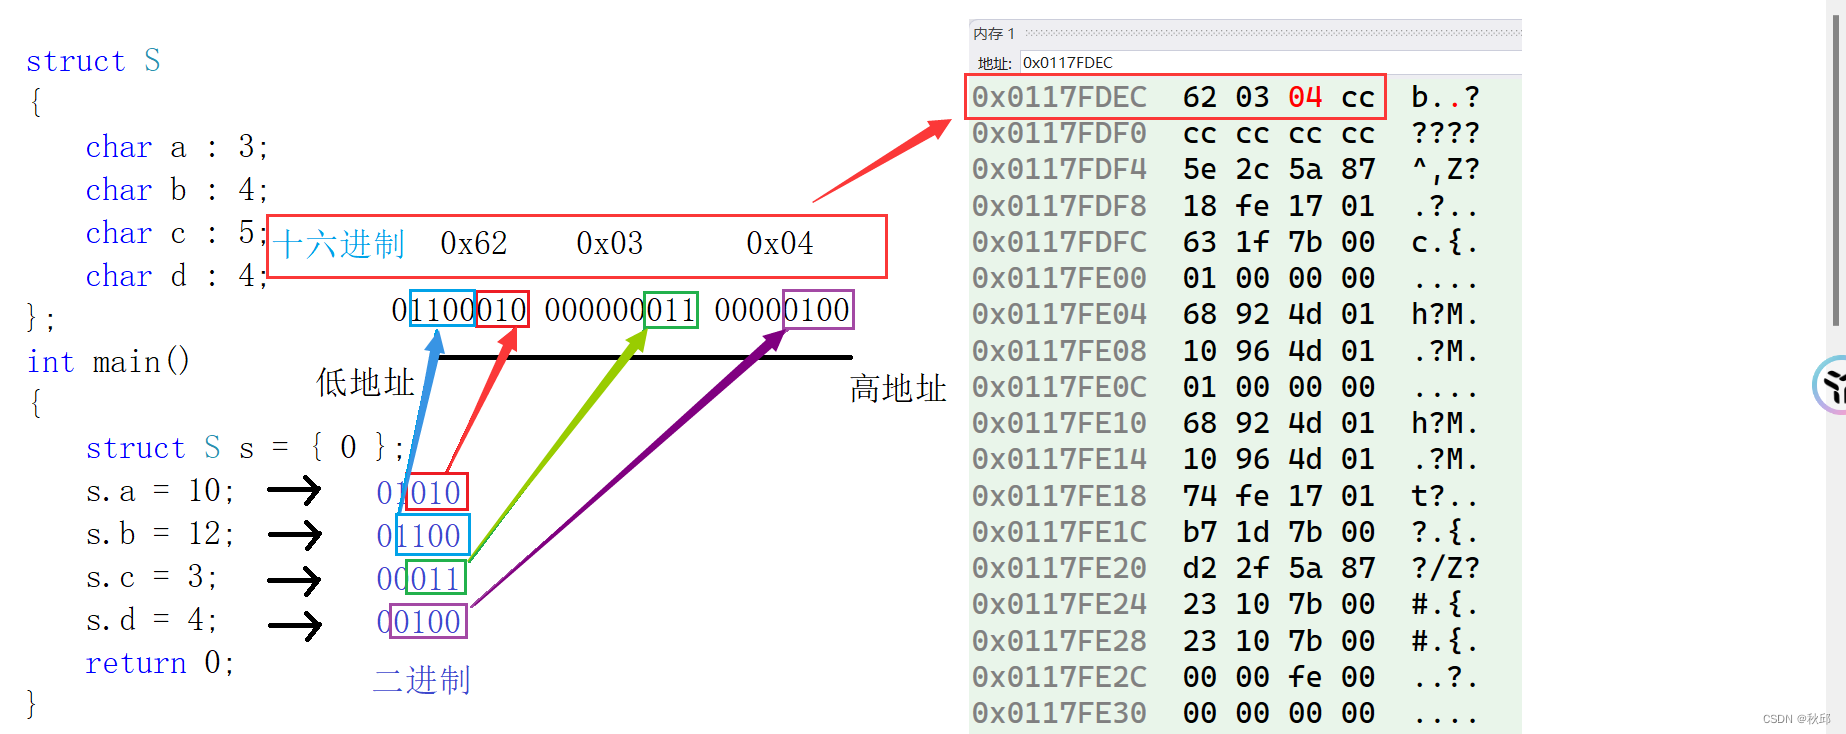
读取的spring.factories里面所有的ApplicationListener,然后保存到listeners成员变量里面去备用。
public SpringApplication(ResourceLoader resourceLoader, Class<?>... primarySources) {
    ***
    setListeners((Collection) getSpringFactoriesInstances(ApplicationListener.class));
    this.mainApplicationClass = deduceMainApplicationClass();
}
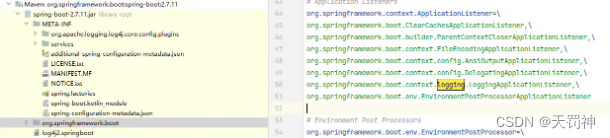
打开autoconfigure的jar包,找到spring.factories,搜索logging:
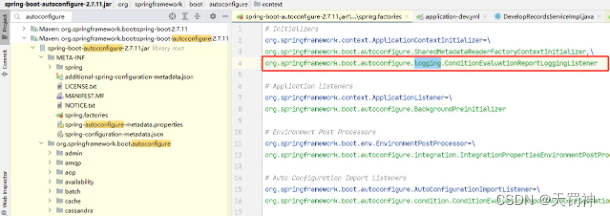
打开ConditionEvaluationReportLoggingListener,看不出用了哪个log框架的实现,继续看一下pom的依赖,logback是springboot默认使用的日志框架。
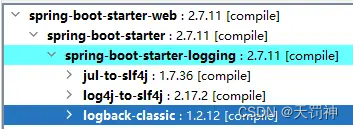
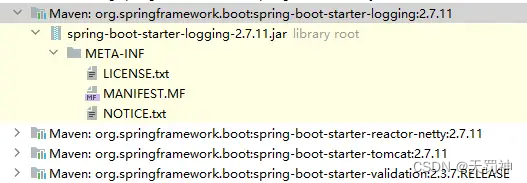
打开jar包,不出所料,空空如也,他是作为一个Starter依赖包存在,它主要用于管理和集成日志框架(如Logback、Log4j2等)以及配置日志记录功能,具体看下pom即可。
Starter的作用就是导入其他包,springboot框架来实现这些包。
<?xml version="1.0" encoding="UTF-8"?>
******
  <dependencies>
    <dependency>
      <groupId>ch.qos.logback</groupId>
      <artifactId>logback-classic</artifactId>
      <version>1.2.12</version>
      <scope>compile</scope>
    </dependency>
    <dependency>
      <groupId>org.apache.logging.log4j</groupId>
      <artifactId>log4j-to-slf4j</artifactId>
      <version>2.17.2</version>
      <scope>compile</scope>
    </dependency>
    <dependency>
      <groupId>org.slf4j</groupId>
      <artifactId>jul-to-slf4j</artifactId>
      <version>1.7.36</version>
      <scope>compile</scope>
    </dependency>
  </dependencies>
</project>
第二步:构造监听器
EventPublishingRunListener加载springboot定义的监听器,并将log接口实现埋进去。
public ConfigurableApplicationContext run(String... args) {
    ***
    SpringApplicationRunListeners listeners = getRunListeners(args);
    ***
}
getRunListeners从spring.factories继续读取SpringApplicationRunListener.class的配置类,默认值配置了唯一的一个EventPublishingRunListener,很显然是来做事件发布的,因为此时Spring环境还没有构建出来,Spring的那一套事件机制还无法使用,SpringBoot只好自己又搞了一个。
private SpringApplicationRunListeners getRunListeners(String[] args) {
    Class<?>[] types = new Class<?>[] { SpringApplication.class, String[].class };
    return new SpringApplicationRunListeners(logger,
          getSpringFactoriesInstances(SpringApplicationRunListener.class, types, this, args),
          this.applicationStartup);
}
--spring.factories # Run Listeners
org.springframework.boot.SpringApplicationRunListener=\
org.springframework.boot.context.event.EventPublishingRunListener
这里拿到了EventPublishingRunListener以后,然后又封装进了SpringApplicationRunListeners里面,同时还传进去一个log对象。注意这里的logger此时还是org.apache.commons.logging这个包下面的log。
class SpringApplicationRunListeners {
    private final Log log;
    private final List<SpringApplicationRunListener> listeners;
    private final ApplicationStartup applicationStartup;
    SpringApplicationRunListeners(Log log, Collection<? extends SpringApplicationRunListener> listeners,
          ApplicationStartup applicationStartup) {
       this.log = log;
       this.listeners = new ArrayList<>(listeners);
       this.applicationStartup = applicationStartup;
    }
    ***
}
第三步:注册监听器到Spring中
把一开始从spring.factories中拿到的所有的ApplicationListener注册到了initialMulticaster里面,显然这里面也包括了我们今天要说的主角LoggingApplicationListener。
public ConfigurableApplicationContext run(String... args) {
    ***
    listeners.starting(bootstrapContext, this.mainApplicationClass);
    ***
}

class SpringApplicationRunListeners {
    void starting(ConfigurableBootstrapContext bootstrapContext, Class<?> mainApplicationClass) {
        doWithListeners("spring.boot.application.starting", (listener) -> listener.starting(bootstrapContext),
              (step) -> {
                 if (mainApplicationClass != null) {
                    step.tag("mainApplicationClass", mainApplicationClass.getName());
                 }
              });
    }
}

public class EventPublishingRunListener implements SpringApplicationRunListener, Ordered {

    public void starting(ConfigurableBootstrapContext bootstrapContext) {
        this.initialMulticaster
           .multicastEvent(new ApplicationStartingEvent(bootstrapContext, this.application, this.args));
    }
}
当initialMulticaster发布事件的时候,就可以根据事件的类型回调不同的ApplicationListener,看下LoggingApplicationListener所接收的事件:
public class LoggingApplicationListener implements GenericApplicationListener {

    private static final Class<?>[] EVENT_TYPES = {
        ApplicationStartingEvent.class,
        ApplicationEnvironmentPreparedEvent.class,
        ApplicationPreparedEvent.class,
        ContextClosedEvent.class,
        ApplicationFailedEvent.class
    };
}
因此,当SpringBoot发出以上几个事件的时候,是可以回调到LoggingApplicationListener里面的,我们看下事件的回调处理:
public class LoggingApplicationListener implements GenericApplicationListener {
    @Override
    public void onApplicationEvent(ApplicationEvent event) {
        if (event instanceof ApplicationStartingEvent) {
           onApplicationStartingEvent((ApplicationStartingEvent) event);
        }
        else if (event instanceof ApplicationEnvironmentPreparedEvent) {
           onApplicationEnvironmentPreparedEvent((ApplicationEnvironmentPreparedEvent) event);
        }
        else if (event instanceof ApplicationPreparedEvent) {
           onApplicationPreparedEvent((ApplicationPreparedEvent) event);
        }
        else if (event instanceof ContextClosedEvent) {
           onContextClosedEvent((ContextClosedEvent) event);
        }
        else if (event instanceof ApplicationFailedEvent) {
           onApplicationFailedEvent();
        }
    }
}
第四步:开始加载日志框架
ApplicationStartingEvent事件,这里才真正开始加载日志框架,继续看下LoggingSystem#get
private void onApplicationStartingEvent(ApplicationStartingEvent event) {
    this.loggingSystem = LoggingSystem.get(event.getSpringApplication().getClassLoader());
    this.loggingSystem.beforeInitialize();
}
从System环境变量获取对应的log实现,如果没有就从SYSTEM_FACTORY加载对应的实现框架,getLoggingSystem在springboot里有三种实现:JavaLoggingSystem
、Log4J2LoggingSystem、LogbackLoggingSystem,因为spring-boot-starter-logging默认依赖了logback,因此,logback会被初始化使用。
private static final LoggingSystemFactory SYSTEM_FACTORY =
                        LoggingSystemFactory.fromSpringFactories();

public static LoggingSystem get(ClassLoader classLoader) {
    String loggingSystemClassName = System.getProperty(SYSTEM_PROPERTY);
    if (StringUtils.hasLength(loggingSystemClassName)) {
       if (NONE.equals(loggingSystemClassName)) {
          return new NoOpLoggingSystem();
       }
       return get(classLoader, loggingSystemClassName);
    }
    LoggingSystem loggingSystem = SYSTEM_FACTORY.getLoggingSystem(classLoader);
    Assert.state(loggingSystem != null, "No suitable logging system located");
    return loggingSystem;
}

static LoggingSystemFactory fromSpringFactories() {
    return new DelegatingLoggingSystemFactory(
          (classLoader) -> SpringFactoriesLoader.loadFactories(LoggingSystemFactory.class, classLoader));
}
第五步:加载日志框架logback-spring.xml
它使用的是哪一个配置文件
private void onApplicationEnvironmentPreparedEvent(ApplicationEnvironmentPreparedEvent event) {
    SpringApplication springApplication = event.getSpringApplication();
    if (this.loggingSystem == null) {
       this.loggingSystem = LoggingSystem.get(springApplication.getClassLoader());
    }
    initialize(event.getEnvironment(), springApplication.getClassLoader());
}
LogbackLoggingSystem#initialize():
AbstractLoggingSystem#initialize():
在classpath:下查找配置文件
- getSelfInitializationConfig()按顺序查找"logback-test.groovy", “logback-test.xml”, “logback.groovy”, “logback.xml”,存在就立刻返回。
- 如果为空,getSpringInitializationConfig()继续为每个文件拼接上-spring继续查找,比如"logback-spring.xml"
- loadConfiguration使用对应的日志实现,例如LogbackLoggingSystem;
- loadDefaults:此方法用于在日志初始化上下文中加载默认的日志配置,针对指定的日志文件。
public abstract class AbstractLoggingSystem extends LoggingSystem {
    private void initializeWithConventions(LoggingInitializationContext initializationContext, LogFile logFile) {
        String config = getSelfInitializationConfig();
        if (config != null && logFile == null) {
           // self initialization has occurred, reinitialize in case of property changes
           reinitialize(initializationContext);
           return;
        }
        if (config == null) {
           config = getSpringInitializationConfig();
        }
        if (config != null) {
           loadConfiguration(initializationContext, config, logFile);
           return;
        }
        loadDefaults(initializationContext, logFile);
    }
}
第六步:jul-to-slf4j和log4j-to-slf4j是干啥用的?
java里面的日志框架很多,比较有名的:jdk自带的jul、jcl、log4j、logback等等,后来为了统一这些乱七八糟的日志出来了一个slf4j,所以现在大家一般都是使用slf4j的api来打印日志。
1)slf4j接口
仅仅定义了接口,因此,需要绑定到具体的日志框架才可以打印日志出来,具体如何来做呢,引用一张slf4j官网上的图片:
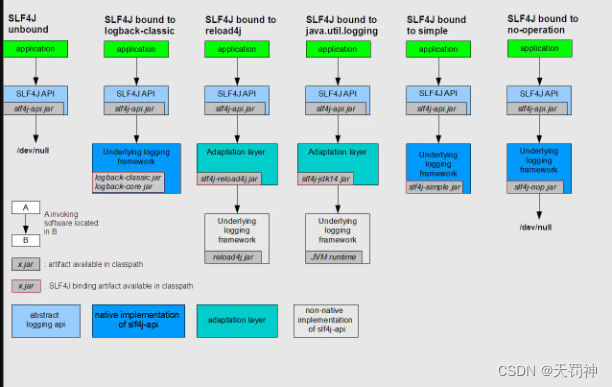
具体的组合使用:
slf4j-api,日志是打到了/dev/null里面,因此啥也打印不出来
slf4j-api + logback-classic:使用的是logback,因为logback本身直接实现了slf4j的api
slf4j-api + slf4j-log4j + log4j:最终是使用log4j,因为log4j本身并没有实现slf4j的接口,所以中间用slf4j-log4j桥接了一下子。
slf4j-api + slf4j-jdk + jul:最终是使用jul,中间用slf4j-jdk桥接了一下。
slf4j-api + slf4j-simple:slf4j的一个简单实现,只能把日志打印到System.err中。
slf4j-api + slf4j-nop:跟只用slf4j-api一样,啥也不打印输出。
slf4j-api + slf4j-jcl + jcl: 最终是使用jcl。
2)重定向
很多时候,我们的项目依赖了某一个jar,依赖包里面可能并没有使用slf4j打印日志,而是使用的log4j或者jcl打印日志,而我们的项目本身又想用slf4j,能不能把依赖包里面的日志打印重定向成我们的slf4j呢?,slf4j对这种情况也做了处理,在不修改依赖包里面的代码的情况下可以这样:
把jcl的jar包删掉,换上jcl-over-slf4j;log4j的jar删掉,换成log4j-over-slf4j;添加上jul-to-slf4j;然后再添加上slf4j-api 和 logback就可以在不修改打日志的代码的情况下,最终都使用logback打印日志。
把jcl的jar包删掉,换上jcl-over-slf4j;添加上jul-to-slf4j;然后再添加上slf4j-api 和slf4j-log4j 和 log4j,最终就是使用log4j打印日志。
把jcl的jar包删掉,换上jcl-over-slf4j;log4j的jar删掉,换成log4j-over-slf4j;然后再添加上slf4j-api 和 slf4j-jdk + jul,最终就是使用jul打印日志。
以上也可以看出来,jcl-over-slf4j.jar和slf4j-jcl.jar不能共存的,log4j-over-slf4j.jar和slf4j-log4j12不能共存,jul-to-slf4j和slf4j-jdk14.jar不能共存。
3)组合实现示例
SLF4J + Log4j2实现
第七步:logback使用分析
使用日志框架打印日志信息,这个是简单的使用,这就是接口编程的好处。
public class SpringAppRun {
    private static final Logger logger = LoggerFactory.getLogger(SpringAppRun.class);

    public static void main(String[] args) throws Exception {
        logger.info("openai web启动中....");
        SpringApplication.run(SpringAppRun.class, args);
        logger.info("openai web启动成功!");
        System.out.println("Open your web browser and navigate to http://"+ SysUtility.getHostIp() +":" + 7778 + "/doc.html");
    }
}
根据官网slf4j的描述,如果只是引入log4j-api包,是不会打印日志的。此处我们直接查看实现了logback-classic日志框架,他是如何加载的。
public final class LoggerFactory {
    public static Logger getLogger(Class<?> clazz) {
        //获取logger对象
        Logger logger = getLogger(clazz.getName());
        ***
    }

    public static Logger getLogger(String name) {
        // 获取ILoggerFactory实例
        ILoggerFactory iLoggerFactory = getILoggerFactory();
        return iLoggerFactory.getLogger(name);
    }

    public static ILoggerFactory getILoggerFactory() {
        ***
        //内部的bind使用StaticLoggerBinder.getSingleton();桥接实现类,实现
        performInitialization();
        ***
        //由于只实现了logback框架,所以得到LoggerContext的实现类
        return StaticLoggerBinder.getSingleton().getLoggerFactory();
        ***
}
在1.2.10的版本中,StaticLoggerBinder类在slf4j-api接口包中可是没有的,由于引入了logback包,所以直接跳转到logback包中的StaticLoggerBinder实现类。
在高版本(1.3.6本文查看的版本)中bind()方法内部有spi加载的实现,但低版本,直接jar包关联引入使用了。
import org.slf4j.impl.StaticLoggerBinder;

public final class LoggerFactory {

    private final static void performInitialization() {
        bind();
        if (INITIALIZATION_STATE == SUCCESSFUL_INITIALIZATION) {
            versionSanityCheck();
        }
    }

    private final static void bind() {
        ***
        StaticLoggerBinder.getSingleton();
        ***
    }
}
logback中先初始化出一些上下文对象。
static {
    SINGLETON.init();
}

public static StaticLoggerBinder getSingleton() {
    return SINGLETON;
}

void init() {
    try {
        try {
            new ContextInitializer(defaultLoggerContext).autoConfig();
        } catch (JoranException je) {
            Util.report("Failed to auto configure default logger context", je);
        }
        // logback-292
        if (!StatusUtil.contextHasStatusListener(defaultLoggerContext)) {
            StatusPrinter.printInCaseOfErrorsOrWarnings(defaultLoggerContext);
        }
        contextSelectorBinder.init(defaultLoggerContext, KEY);
        initialized = true;
    } catch (Exception t) { // see LOGBACK-1159
        Util.report("Failed to instantiate [" + LoggerContext.class.getName() + "]", t);
    }
}
接下来我们回到LoggerFactory.getILoggerFactory()直接查看logback的getLoggerFactory()
是如何实现的。
public final class LoggerFactory {
  public static ILoggerFactory getILoggerFactory() {
      ***
      return StaticLoggerBinder.getSingleton().getLoggerFactory();
      ***
  }
}
在这里,1.2.10的版本基本分析完毕了,这里就是logback的获取log对象的具体实现了。
public class LoggerContext extends ContextBase implements ILoggerFactory, LifeCycle {
    @Override
    public final Logger getLogger(final String name) {
        if (name == null) {
            throw new IllegalArgumentException("name argument cannot be null");
        }
        // if we are asking for the root logger, then let us return it without
        // wasting time
        if (Logger.ROOT_LOGGER_NAME.equalsIgnoreCase(name)) {
            return root;
        }
        int i = 0;
        Logger logger = root;
        // check if the desired logger exists, if it does, return it
        // without further ado.
        Logger childLogger = (Logger) loggerCache.get(name);
        // if we have the child, then let us return it without wasting time
        if (childLogger != null) {
            return childLogger;
        }
        // if the desired logger does not exist, them create all the loggers
        // in between as well (if they don't already exist)
        String childName;
        while (true) {
            int h = LoggerNameUtil.getSeparatorIndexOf(name, i);
            if (h == -1) {
                childName = name;
            } else {
                childName = name.substring(0, h);
            }
            // move i left of the last point
            i = h + 1;
            synchronized (logger) {
                childLogger = logger.getChildByName(childName);
                if (childLogger == null) {
                    childLogger = logger.createChildByName(childName);
                    loggerCache.put(childName, childLogger);
                    incSize();
                }
            }
            logger = childLogger;
            if (h == -1) {
                return childLogger;
            }
        }
    }
}
接下来我们继续进一步看一下1.3.6这个版本,他有如何的呢?
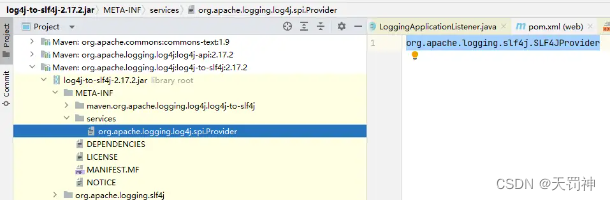
发现多了一些spi,比如SLF4JServiceProvider
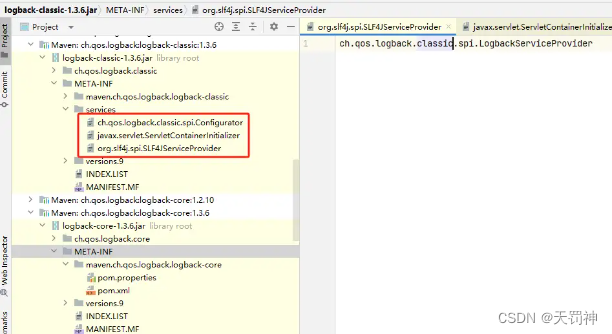
这里我们接着上文,直接查看slf4j-api接口包的LoggerFactory的bind()方法,注意这个包已经从1.7.25升级到了2.0.4,接口支持了才能进一步升级logback这个日志实现框架,没毛病。
slf4j通过ServiceLoader加载不同的日志框架,而不同的日志框架都需要实现SLF4JServiceProvider接口,也就是所谓的“门面模式”。
private final static void bind() {
    try {
        List<SLF4JServiceProvider> providersList = findServiceProviders(); // 查找可以用的provider日志实现
        reportMultipleBindingAmbiguity(providersList);
        if (providersList != null && !providersList.isEmpty()) {
            PROVIDER = providersList.get(0);
        ***
}
这个方法用于查找并加载 SLF4JServiceProvider,以便在运行时提供日志记录功能。
这里就是使用spi的ServiceLoader直接加载到SLF4JServiceProvider下的实现类。
static List<SLF4JServiceProvider> findServiceProviders() {
    // retain behaviour similar to that of 1.7 series and earlier. More specifically, use the class loader that
    // loaded the present class to search for services
    final ClassLoader classLoaderOfLoggerFactory = LoggerFactory.class.getClassLoader();
    ServiceLoader<SLF4JServiceProvider> serviceLoader = ServiceLoader.load(SLF4JServiceProvider.class, classLoaderOfLoggerFactory);
    List<SLF4JServiceProvider> providerList = new ArrayList<>();
    Iterator<SLF4JServiceProvider> iterator = serviceLoader.iterator();
    while (iterator.hasNext()) {
        safelyInstantiate(providerList, iterator);
    }
    return providerList;
}
SLF4JServiceProvider内部有对应的接口,对应日志框架会进行相应的实现。
package org.slf4j.spi;
import org.slf4j.ILoggerFactory;
import org.slf4j.IMarkerFactory;
import org.slf4j.LoggerFactory;
import org.slf4j.MDC;
/**
* This interface based on {@link java.util.ServiceLoader} paradigm.
*
* <p>It replaces the old static-binding mechanism used in SLF4J versions 1.0.x to 1.7.x.
*
* @author Ceki G¨lc¨
* @since 1.8
*/
public interface SLF4JServiceProvider {
/**
* Return the instance of {@link ILoggerFactory} that
* {@link org.slf4j.LoggerFactory} class should bind to.
*
* @return instance of {@link ILoggerFactory}
*/
public ILoggerFactory getLoggerFactory();
/**
* Return the instance of {@link IMarkerFactory} that
* {@link org.slf4j.MarkerFactory} class should bind to.
*
* @return instance of {@link IMarkerFactory}
*/
public IMarkerFactory getMarkerFactory();
/**
* Return the instance of {@link MDCAdapter} that
* {@link MDC} should bind to.
*
* @return instance of {@link MDCAdapter}
*/
public MDCAdapter getMDCAdapter();
/**
* Return the maximum API version for SLF4J that the logging
* implementation supports.
*
* <p>For example: {@code "2.0.1"}.
*
* @return the string API version.
*/
public String getRequestedApiVersion();
/**
* Initialize the logging back-end.
*
* <p><b>WARNING:</b> This method is intended to be called once by
* {@link LoggerFactory} class and from nowhere else.
*
*/
public void initialize();
}
好了,到这为止,日志框架的spi与springboot的日志框架加载,算是结合起来了。
总结一下
- SpringBoot启动的时候会读取spring-boot-2.2.0.jar里面的spring.factories,拿到所有的ApplicationListener(有很多个,其中包括了LoggingApplicationListener)和SpringApplicationRunListener(只有一个,EventPublishingRunListener,它里面会使用了Spring的SimpleApplicationEventMulticaster做事件发布)。
- SpringBoot启动过程中会发出很多事件,LoggingApplicationListener在就收到ApplicationStartingEvent事件的时候,开始加载日志框架。
- SpringBoot内置了对logback、log4j2和jdk 日志的支持,因为默认有logback的依赖,因此默认是使用logback打印日志。
- SpringBoot同时还添加了jul-to-slf4j和log4j-to-slf4j,把依赖包中使用jul和log4j2打印的日志重定向使用slf4j做日志输出。
- logback框架与springboot的starter-logging,是通过slf4j-api中的LoggerFactory来关联实现的。