一、xray服务配置
下载:https://github.com/XTLS/Xray-core
进入下载界面
这里我选择的是Xray-linux-64.zip
将文件解压到 /usr/local/xray
编辑配置文件/usr/local/xray/config.json
uuid可以在v2ray客服端自动生成,也可以在UUID v4 生成器 - KKTool工具箱 (kktoolkit.com) 上获取uuid
{
    "inbounds": [
        {
            "port": 10000,
            "protocol": "vmess",
            "settings": {
                "clients": [
                    {
                        "id": "6ec56d51-52cd-4b64-a925-52982ed7044e",
                        "alterId": 100
                    }
                ],
                "decryption": "none"
            },
           "streamSettings": {
             "network": "ws",
             "wsSettings": {
               "path": "/kazfs"
             }
            }
        }
    ],
    "outbounds": [
        {
            "protocol": "freedom"
        }
    ]
}
配置xray启动服务vi /etc/systemd/system/xray.service
[Unit]
Description=Xray Service
After=network.target

[Service]
User=nobody
ExecStart=/usr/local/xray/xray -config /usr/local/xray/config.json
Restart=on-failure
RestartSec=10
LimitNOFILE=51200

[Install]
WantedBy=multi-user.target
设置开机启动xray
systemctl enable xray --now二、nginx配置
    location /kazfs {
        if ($http_upgrade != "websocket") { # WebSocket协商失败时返回404
            return 404;
        }
        proxy_redirect off;
        proxy_pass http://127.0.0.1:10000;
        proxy_http_version 1.1;
        proxy_set_header Upgrade $http_upgrade;
        proxy_set_header Connection "upgrade";
        proxy_set_header Host $host;
        # Show real IP in v2ray access.log
        proxy_set_header X-Real-IP $remote_addr;
        proxy_set_header X-Forwarded-For $proxy_add_x_forwarded_for;
    }
三、客服端配置
3.1 windows客服端
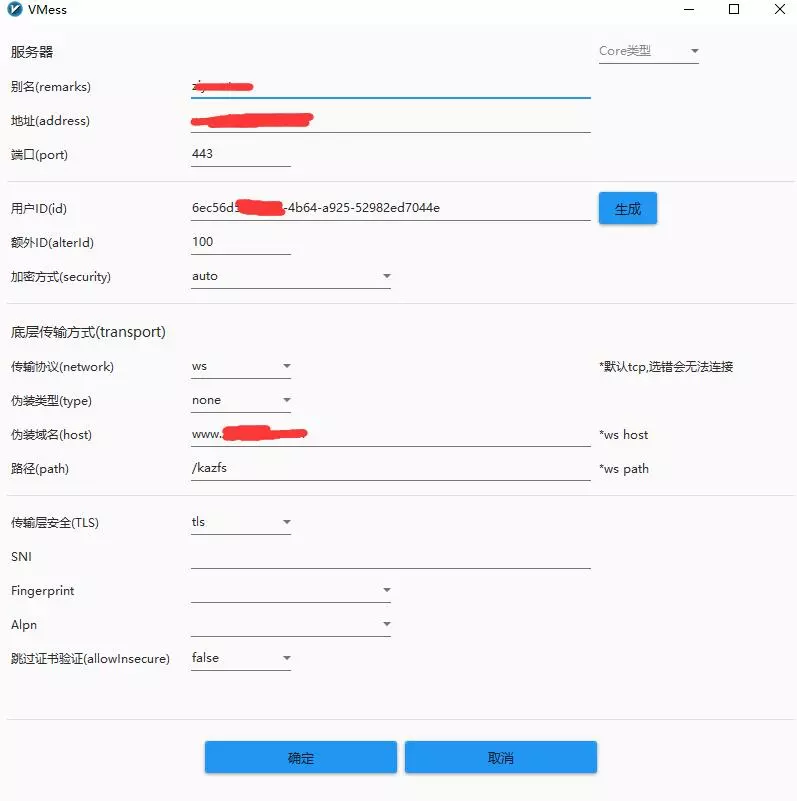
测试结果:

3.2 linux客服端配置
下载软件还是去https://github.com/XTLS/Xray-core下载,用的还是服务端一样的xray
/usr/local/xray/config.json
{
    "log":{
        "loglevel":"warning"
    },
    "inbounds":[
        {
            "port":10808,
            "listen":"127.0.0.1",
            "protocol":"socks",
            "settings":{
                "udp":true
            }
        },
        {
            "tag":"http",
            "port":10809,
            "listen":"127.0.0.1",
            "protocol":"http",
            "sniffing":{
                "enabled":true,
                "destOverride":[
                    "http",
                    "tls"
                ]
            },
            "settings":{
                "auth":"noauth",
                "udp":true,
                "allowTransparent":false
            }
        }
    ],
    "outbounds":[
        {
            "tag":"proxy",
            "protocol":"vmess",
            "settings":{
                "vnext":[
                    {
                        "address":"www.yuantao.com",
                        "port":443,
                        "users":[
                            {
                                "id":"6ec56d51-52cd-4b64-a925-52982ed7044e",
                                "alterId": 100
                            }
                        ]
                    }
                ]
            },
            "streamSettings":{
                "network":"ws",
                "security":"tls",
                "tlsSettings":{
                    "serverName":"www.yuantao.com"
                },
                "wsSettings":{
                    "path":"/kazfs"
                }
            }
        },
        {
            "tag":"direct",
            "protocol":"freedom",
            "settings":{

            }
        },
        {
            "tag":"block",
            "protocol":"blackhole",
            "settings":{
                "response":{
                    "type":"http"
                }
            }
        }
    ],
    "routing":{
        "domainStrategy":"IPIfNonMatch",
        "domainMatcher":"linear",
        "rules":[
            {
                "type":"field",
                "inboundTag":[
                    "api"
                ],
                "outboundTag":"api",
                "enabled":true
            },
            {
                "type":"field",
                "outboundTag":"direct",
                "domain":[
                    "domain:example-example.com",
                    "domain:example-example2.com"
                ],
                "enabled":true
            },
            {
                "type":"field",
                "outboundTag":"direct",
                "ip":[
                    "192.168.10.1/24"
                ],
                "protocol":[
                    "http",
                    "tls",
                    "bittorrent"
                ]
            },
            {
                "type":"field",
                "outboundTag":"block",
                "domain":[
                    "geosite:category-ads-all"
                ],
                "enabled":true
            },
            {
                "type":"field",
                "outboundTag":"direct",
                "domain":[
                    "geosite:cn"
                ],
                "enabled":true
            },
            {
                "type":"field",
                "outboundTag":"direct",
                "ip":[
                    "geoip:private",
                    "geoip:cn"
                ],
                "enabled":true
            },
            {
                "type":"field",
                "port":"0-65535",
                "outboundTag":"proxy",
                "enabled":true
            },
            {
                "type":"field",
                "port":"0-65535",
                "outboundTag":"proxy",
                "enabled":true
            }
        ]
    }
}
服务配置:
[Unit]
Description=Xray Service
After=network.target

[Service]
User=nobody
ExecStart=/usr/local/xray/xray -config /usr/local/xray/config.json
Restart=on-failure
RestartSec=10
LimitNOFILE=51200

[Install]
WantedBy=multi-user.target
启动服务:
systemctl start xray
四、测试
curl -x socks5h://127.0.0.1:10808 https://www.google.com
curl -x http://127.0.0.1:10809 https://www.google.com
五、设置
export http_proxy=http://127.0.0.1:10809
export https_proxy=http://127.0.0.1:10809
然后通过curl google.com就能访问
六、问题排查(重要)
VMess: Invalid User 可能的原因:
1、客户端和服务器端的用户 ID 不匹配;
2、客户端和服务器端的用户 alterId 不匹配;
3、客户端与服务器的时间不匹配,误差不能超过90秒钟;
可以选择证书自申请的caddy+xray,也可以选择网上那些一键式搭建的方式
由于我的服务器需要nginx,就用nginx做websocket连接了


