文章目录
- 前言
- 1、Smart Light Random Memory Sprays Retinex概况
- 2、Smart Light Random Memory Sprays Retinex的实现
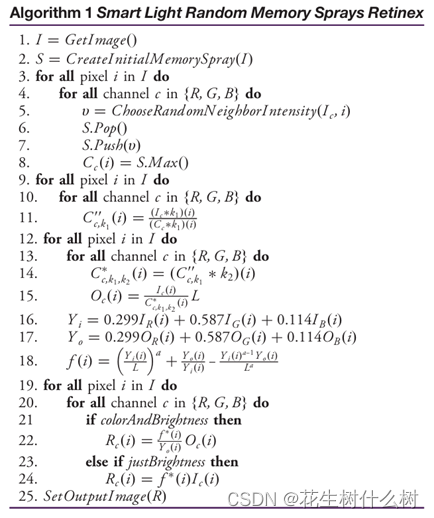
- 2.1、SLRMSR算法的伪代码
- 2.2、初始化记忆喷雾(CreateInitialMemorySpray)
- 2.3、更新记忆喷雾 (UpdateMemorySpray)
- 2.4、计算颜色校正因子(ComputeColorCorrectionFactor)
- 2.5、应用强度重映射(ApplyIntensityRemapping)
- 2.6、应用引导滤波 (ApplyGuidedImageFiltering)
- 3、Smart Light Random Memory Sprays Retinex效果
前言
Smart Light Random Memory Sprays Retinex,即“智能光随机记忆喷雾Retinex”,简称SLRMSR。作为一种新的基于Retinex理论的图像增强算法,旨在解决图像亮度调整和颜色校正的问题。
1、Smart Light Random Memory Sprays Retinex概况
论文名称:
Smart light random memory sprays Retinex: a fast Retinex implementation for high-quality brightness adjustment and color correction
作者:
Nikola Banić,Sven Lončarić
“智能光随机记忆喷雾Retinex”(Smart Light Random Memory Sprays Retinex,简称SLRMSR),该算法提出了记忆喷雾的概念,以减少每个像素操作的数量,从而实现了快速的Retinex基础的局部图像增强。同时提出了一种有效的图像强度重映射的方法,进一步显著地提高了图像的质量。最后通过使用引导滤波作为替代的光照处理方法,减少了原有LRSR算法的光晕效应。作为一种新的基于Retinex理论的图像增强算法,在解决图像亮度调整和颜色校正的问题上,具有显著优势。
2、Smart Light Random Memory Sprays Retinex的实现
2.1、SLRMSR算法的伪代码
2.2、初始化记忆喷雾(CreateInitialMemorySpray)
图像第一个像素创建一个包含随机选择的邻近像素强度的记忆喷雾。
① 定义喷雾大小:
确定记忆喷雾参数的大小n,作为预设值,决定了喷雾中包含像素的数量。
② 选择邻近像素:
对于图像中每个像素,在其邻域定义一个包含n个随机选择的邻近像素区域。
③ 构建笛卡尔树:
对于选定的每个邻近像素,收集其RGB强度值,进行笛卡尔树的构造,其每个节点包含子树的最大值。
④ 存储喷雾内容:
构建好的笛卡尔树被作为存储记忆喷雾的数据结构,用于后续的像素处理。
2.3、更新记忆喷雾 (UpdateMemorySpray)
① 选择新像素:
当处理新的像素时,算法会从当前像素的局部邻域中选择一个新的邻近像素。
② 更新笛卡尔树:
新选定的像素强度值被添加到笛卡尔树中,同时,最旧的像素强度值被从树中移除。这种“先进先出”的更新机制确保了记忆喷雾始终反应最新的局部信息。
③ 计算最大值:
通过笛卡尔树的根节点,可以快速获取当前记忆喷雾中所有像素强度的最大值。
//基于随机内存喷雾Retinex(Random Memory Sprays Retinex)算法对输入的彩色图像进行白平衡处理
void RandomMemorySpraysRetinexPerformWhiteBalance(Mat source, Mat& destination, int N, int n, double upperBound, int rowsStep, int colsStep, double rFactor) {

	int rows = source.rows;
	int cols = source.cols;

	int R = rFactor * sqrt((double)(rows * rows + cols * cols)) + 0.5;

	Mat normalized;
	source.convertTo(normalized, CV_64FC3);

	int outputRows = rows / rowsStep;
	int outputCols = cols / colsStep;
	destination = Mat(outputRows, outputCols, CV_64FC3);

	Vec3d* input = (Vec3d*)normalized.data;
	Vec3d* inputPoint = input;
	Vec3d* output = (Vec3d*)destination.data;
	Vec3d* outputPoint = output;

	RNG random;

	CartesianTree<double>** qhs;

	qhs = new CartesianTree<double>*[N];
	for (int i = 0; i < N; ++i) {
		qhs[i] = new CartesianTree<double>[3];
	}

	for (int outputRow = 0; outputRow < outputRows; ++outputRow) {
		for (int outputCol = 0; outputCol < outputCols; ++outputCol) {

			int row = outputRow * rowsStep;
			int col = outputCol * colsStep;

			inputPoint = input + row * cols + col;
			outputPoint = output + outputRow * outputCols + outputCol;

			Vec3d& currentPoint = *inputPoint;
			Vec3d& finalPoint = *outputPoint;
			finalPoint = Vec3d(0, 0, 0);

			for (int i = 0; i < N; ++i) {

				Vec3d max = Vec3d(0, 0, 0);

				while (qhs[i][0].Size() < n) {
					double angle = 2 * CV_PI * random.uniform(0.0, 1.0);
					double r = R * random.uniform(0.0, 1.0);

					int newRow = row + r * sin(angle);
					int newCol = col + r * cos(angle);

					if (newRow >= 0 && newRow < rows && newCol >= 0 && newCol < cols) {
						Vec3d& newPoint = input[newRow * cols + newCol];
						for (int k = 0; k < 3; ++k) {
							qhs[i][k].Push(newPoint[k]);
						}
					}
				}

				for (int k = 0; k < 3; ++k) {
					if (max[k] < qhs[i][k].Max()) {
						max[k] = qhs[i][k].Max();
					}

					qhs[i][k].Pop();

				}

				for (int k = 0; k < 3; ++k) {
					if (max[k] == 0) {
						max[k] = 1;
					}
					finalPoint[k] += currentPoint[k] / max[k];
				}

			}

			finalPoint /= N;

			for (int i = 0; i < 3; ++i) {
				if (finalPoint[i] > 1) {
					finalPoint[i] = 1;
				}
			}

		}
	}

	for (int i = 0; i < N; ++i) {
		delete[] qhs[i];
	}
	delete[] qhs;

	double scaleFactor = upperBound;

	if (rowsStep > 1 || colsStep > 1) {
		resize(destination, destination, source.size());
	}

	destination = destination * scaleFactor - 1;

	destination.convertTo(destination, source.type());

}
2.4、计算颜色校正因子(ComputeColorCorrectionFactor)
颜色校正因子是基于当前像素亮度值和记忆喷雾的最大强度计算得出。其主要用于调整像素的颜色,以便在不同的光照条件下保持颜色的一致性。
//光照校正算法的实现
void ApplyIllumination(Mat source, Mat illumination, Mat& destination, double upperBound) {
	vector<Mat> destinationChannels;
	split(source, destinationChannels);
	vector<Mat> illuminationChannels;
	split(illumination, illuminationChannels);
	for (int i = 0; i < destinationChannels.size(); ++i) {
		destinationChannels[i].convertTo(destinationChannels[i], CV_64FC1);
		divide(destinationChannels[i], illuminationChannels[i], destinationChannels[i]);
	}

	merge(destinationChannels, destination);

	double* check = (double*)destination.data;
	for (int i = 0; i < destination.rows * destination.cols * 3; ++i) {
		if (check[i] >= upperBound) {
			check[i] = upperBound - 1;
		}
	}

	destination.convertTo(destination, source.type());

}
2.5、应用强度重映射(ApplyIntensityRemapping)
强度重映射主要用于改善图像亮度调整和颜色校正的方法,特别是在处理高光细节处,以防止过度增强造成细节的丢失。即,在增强图像暗区域的同时,保持亮区域的高光细节,从而获得更为自然的视觉效果。
① 计算初始及LRSR的亮度:
对于每个像素,首先计算其初始亮度Yi,及LRSR算法处理后的亮度Yo。
② 确定重映射的参数:
引入重映射参数,用于调整亮度的增加强度。
③ 计算调整后的亮度:
调整后的亮度是初始亮度Yi和处理后亮度Yo的凸组会。即:Yr = λi * Yi + (1 - λi) * Yo
其中,λi 是一个介于0和1之间的权重因子,主要基于初始亮度Yi和一个调整参数a来计算。
④ 计算权重因子:
权重因子λi,即:λi = (Yi / D) / (Yi / D + a)。
其中,D是颜色通道的最大值(对于8bit颜色通道,D通常是255)。λi的值越大,表示保留的初始亮度越多,处理后亮度的影响越小。
⑤ 过滤处理:
为了避免亮度增加的剧烈变化,对λi施以一个滤波器(例如使用5*5的均值核)进行平滑处理,得到平滑后的权重因子λ’i。
⑥ 计算最终亮度:
最终的亮度值,即:OpIci = λ’i * Yo + (1 - λ’i) * Ici。
其中OpIci是最终的输出亮度,Ici是原始图像中的像素亮度通道强度。
//基于随机内存喷雾Retinex算法对输入的彩色图像进行局部光照估计
void LightRandomMemorySpraysRetinexEstimateLocalIlumination(Mat source, Mat& destination, int N, int n, int inputKernelSize, int illuminantKernelSize, bool normalizeIlluminant = false, int rowsStep = 1, int colsStep = 1, double upperBound = 256.0, double rFactor = 1.0) {

	Mat retinex;
	RandomMemorySpraysRetinexPerformWhiteBalance(source, retinex, N, n, upperBound, rowsStep, colsStep, rFactor);

	Mat inputSource;
	Mat inputRetinex;

	source.convertTo(inputSource, CV_64FC3);
	retinex.convertTo(inputRetinex, CV_64FC3);

	Mat guidance;
	inputSource.copyTo(guidance);

	if (normalizeIlluminant) {
		Mat illuminant;
		divide(inputSource, inputRetinex, illuminant);
		vector<Mat> illuminantChannels;

		split(illuminant, illuminantChannels);
		Mat illuminantAverage = (illuminantChannels[0] + illuminantChannels[1] + illuminantChannels[2]) / 3;
		for (int i = 0; i < 3; ++i) {
			divide(illuminantChannels[i], illuminantAverage, illuminantChannels[i]);
		}
		merge(illuminantChannels, illuminant);

		inputSource = inputRetinex.mul(illuminant);
	}

	if (inputKernelSize > 1) {
		Mat averaging = Mat::ones(inputKernelSize, inputKernelSize, CV_64FC1) / (double)(inputKernelSize * inputKernelSize);
		boxFilter(inputSource, inputSource, -1, Size(inputKernelSize, inputKernelSize));
		boxFilter(inputRetinex, inputRetinex, -1, Size(inputKernelSize, inputKernelSize));
	}

	Mat illuminant;
	divide(inputSource, inputRetinex, illuminant);
	vector<Mat> illuminantChannels;

	if (illuminantKernelSize > 1) {
		Mat averaging = Mat::ones(illuminantKernelSize, illuminantKernelSize, CV_64FC1) / (double)(illuminantKernelSize * illuminantKernelSize);
		boxFilter(illuminant, illuminant, -1, Size(illuminantKernelSize, illuminantKernelSize));
	}

	illuminant.copyTo(destination);

}
2.6、应用引导滤波 (ApplyGuidedImageFiltering)
使用引导滤波来处理重映射后的像素强度,以减少光晕效果并保留图像边缘。
其中,对图像进一步灰度化作为引导图像,进而采用引导滤波进行处理,最后输出目标图像。
//图像引导滤波
//对输入的图像img进行引导滤波,输出结果保存在result中。
void GuidedImageFilterC1(Mat img, Mat guidance, Mat& result, int r, double epsilon) {

	Mat p;
	img.convertTo(p, CV_64F);

	Mat I;
	guidance.convertTo(I, CV_64F);

	Mat meanI;
	boxFilter(I, meanI, -1, Size(r, r));

	Mat meanP;
	boxFilter(p, meanP, -1, Size(r, r));

	Mat corrI;
	boxFilter(I.mul(I), corrI, -1, Size(r, r));

	Mat corrIp;
	boxFilter(I.mul(p), corrIp, -1, Size(r, r));

	Mat varI = corrI - meanI.mul(meanI);
	Mat covIp = corrIp - meanI.mul(meanP);

	Mat a;
	divide(covIp, varI + epsilon, a);
	Mat b = meanP - a.mul(meanI);

	Mat meanA;
	boxFilter(a, meanA, -1, Size(r, r));

	Mat meanB;
	boxFilter(b, meanB, -1, Size(r, r));

	Mat q = meanA.mul(I) + meanB;

	q.convertTo(result, img.type());
}


//基于引导图像的彩色图像滤波方法
//基于引导图像guidance对输入的彩色图像img进行引导滤波,输出结果保存在result中。
void GuidedImageFilterC3(Mat img, Mat guidance, Mat& result, int r, double epsilon) {

	vector<Mat> imgChannels;
	vector<Mat> guidanceChannels;

	split(img, imgChannels);
	split(guidance, guidanceChannels);

	vector<Mat> resultChannels;

	for (int i = 0; i < imgChannels.size(); ++i) {
		Mat channelResult;
		GuidedImageFilterC1(imgChannels[i], guidanceChannels[i], channelResult, r, epsilon);
		resultChannels.push_back(channelResult);
	}

	merge(resultChannels, result);

}

//基于引导图像和随机内存喷雾Retinex算法的彩色图像局部光照估计方法
void GuidedLightRandomMemorySpraysRetinexEstimateLocalIlumination(Mat source, Mat& destination, int N, int n, int inputKernelSize, int illuminantKernelSize, bool normalizeIlluminant = false, int rowsStep = 1, int colsStep = 1, double upperBound = 256.0, double rFactor = 1.0) {

	Mat retinex;
	//白平衡化处理
	RandomMemorySpraysRetinexPerformWhiteBalance(source, retinex, N, n, upperBound, rowsStep, colsStep, rFactor);

	Mat inputSource;
	Mat inputRetinex;

	source.convertTo(inputSource, CV_64FC3);
	retinex.convertTo(inputRetinex, CV_64FC3);

	Mat guidance;
	inputSource.copyTo(guidance);

	//归一化处理
	if (normalizeIlluminant) {
		Mat illuminant;
		divide(inputSource, inputRetinex, illuminant);
		vector<Mat> illuminantChannels;

		split(illuminant, illuminantChannels);
		Mat illuminantAverage = (illuminantChannels[0] + illuminantChannels[1] + illuminantChannels[2]) / 3;
		for (int i = 0; i < 3; ++i) {
			divide(illuminantChannels[i], illuminantAverage, illuminantChannels[i]);
		}
		merge(illuminantChannels, illuminant);

		inputSource = inputRetinex.mul(illuminant);
	}

	double value = 40;
	double epsilon = value * value;

	if (inputKernelSize > 1) {
		//平滑图像
		GuidedImageFilterC3(inputSource, guidance, inputSource, inputKernelSize, epsilon);
		GuidedImageFilterC3(inputRetinex, guidance, inputRetinex, inputKernelSize, epsilon);
	}

	Mat illuminant;
	divide(inputSource, inputRetinex, illuminant);
	vector<Mat> illuminantChannels;

	if (illuminantKernelSize > 1) {
		GuidedImageFilterC3(illuminant, guidance, illuminant, illuminantKernelSize, epsilon);
	}

	illuminant.copyTo(destination);

}
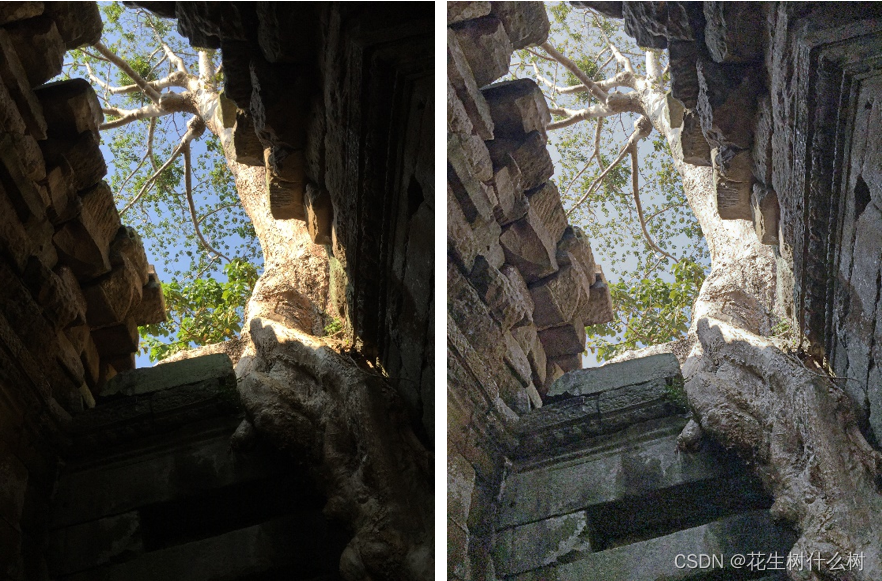
3、Smart Light Random Memory Sprays Retinex效果