1. 什么是Shiro缓存管理器
上一章节分析完了Realm是怎么运作的,自定义的Realm该如何写,需要注意什么。本章来关注Realm中的一个话题,缓存。再看看 AuthorizingRealm 类继承关系
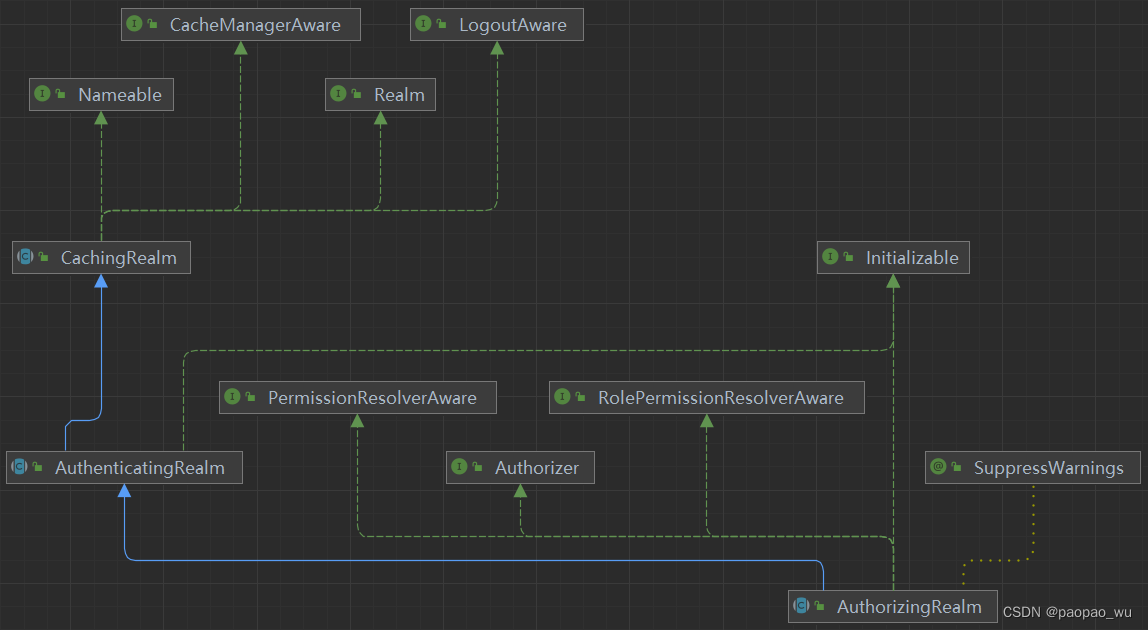
其中抽象类 CachingRealm ,表示这个Realm是带缓存的,那什么东西是需要缓存的?
我们说Realm主要是提供认证信息(org.apache.shiro.authc.AuthenticationInfo 含有身份信息和凭证信息)和授权信息的(org.apache.shiro.authz.AuthorizationInfo 含有角色,权限信息)这些信息往往会存储到数据库中。 当用户频繁访问系统的时候,SecurityManager 就需要从Realm中获取 认证信息和授权信息来对当前的访问进行 认证和鉴权,这样就会频繁操作数据库。为了提高性能,我们可以将这两个信息缓存起来,下次再需要的时候,直接从缓存中获取,而无需再次调用Reaml来获取。
2. 默认缓存管理器
可以看到在 org.apache.shiro.realm.CachingRealm 类中有一个 org.apache.shiro.cache.CacheManager 它是一个接口,即缓存管理器。既然是缓存管理器,就是说它可以对缓存进行管理。那 Realm 默认情况下使用的是哪个 具体的CacheManager实现?
查阅 AuthorizingRealm 源码,发现CacheManager 是后set进来的。那什么时候set进来的?
上一章节介绍了 SecurityManager 的实例化,它是通过SpringBoot 的自动配置实例化出来的。通过跟踪源码,看到了如下代码:
org.apache.shiro.spring.config.AbstractShiroConfiguration
public class AbstractShiroConfiguration {
	// 只需要在Spring 容器中配置一个 bean,就会被注入进来
    @Autowired(required = false)
    protected CacheManager cacheManager;

    protected SessionsSecurityManager securityManager(List<Realm> realms) {
        SessionsSecurityManager securityManager = createSecurityManager();
        ...
        securityManager.setRealms(realms);
        ...
        if (cacheManager != null) {
            securityManager.setCacheManager(cacheManager);
        }

        return securityManager;
    }
}
在 securityManager.setRealms(realms); 这个方法的内部看到执行了一个方法applyCacheManagerToRealms(), 这个方法会找到系统中所有的realm ,然后依次将 cacheManager配置到realm中。
而且 securityManager 中使用的CacheManager 和 realm中使用的是同一个缓存管理器。
那要找到默认的缓存管理器,就要看看自动配置中有没有配置CacheManager,经过一番查找,并没有找到。也就是说Shiro框架默认是不带缓存的。为了证实想法,可以在 前面 SystemAccountRealm 的 doGetAuthenticationInfo 方法中获取 CacheManager,然后判断它是否为空:
public class SystemAccountRealm extends AuthorizingRealm {
    ...
    @Override
    protected AuthenticationInfo doGetAuthenticationInfo(AuthenticationToken token) throws AuthenticationException {
        if (getCacheManager() == null) {
            log.debug("================>cacheManager为空");
        } else {
            log.debug("================cacheManager:{}", getCacheManager().getClass().getName());
        }
        ...
    }
}
启动应用后进行登录,发现CacheManager果然为空。
3. Shiro Cache与CacheManager
Shiro对 Cache和 CacheManager做了规范,并提供了简单实现
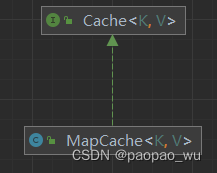
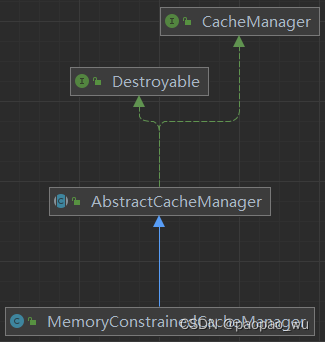
MapCache 其实就使用Map来存储数据,将数据缓存到内存中。
MemoryConstrainedCacheManager 就是内存缓存管理器
如果是单机应用,完全可以使用内存来作为缓存。但对于分布式集群化部署的应用,如果还是使用内存,那就会造成数据的不一致。
本章节使用Redis作为Shiro的 Cache。官方并没有提供Redis缓存的实现,所以需要我们自己实现 Cache和 CacheManager接口。
4. 使用Redis作为ShiroCache
请自行准备Redis服务器。这里使用本机上安装的Redis服务。
4.1 引入spring-boot-starter-data-redis
SpringBoot官方有一个 starter,提供了对Redis的访问。首先在xml中引入:
pom.xml
...
<dependency>
    <groupId>org.springframework.boot</groupId>
    <artifactId>spring-boot-starter-data-redis</artifactId>
</dependency>
...
在application.properties 文件中配置redis服务器参数:
...
spring.redis.database=0
spring.redis.host=127.0.0.1
spring.redis.port=6379
spring.redis.password=123456
...
4.2 自己实现shiro Cache规范
要想用redis作为shiro的 cache,那么就需要自己来实现Cache和CahceManager
ShiroRedisCache.java
package com.qinyeit.shirojwt.demos.shiro.cache;
import org.apache.shiro.cache.Cache;
import org.apache.shiro.cache.CacheException;
import org.springframework.data.redis.core.RedisTemplate;

import java.util.Collection;
import java.util.Set;
// 其实就是对数据进行存,取,清除,删除
public class ShiroRedisCache<K, V> implements Cache<K, V> {
    private RedisTemplate redisTemplate;
    private String        cacheName;

    public ShiroRedisCache(RedisTemplate redisTemplate, String cacheName) {
        this.redisTemplate = redisTemplate;
        this.cacheName = cacheName;
    }

    @Override
    public V get(K key) throws CacheException {
        // 取hash中的值
        return (V) redisTemplate.opsForHash().get(this.cacheName, key.toString());
    }

    @Override
    public V put(K key, V value) throws CacheException {
        redisTemplate.opsForHash().put(this.cacheName, key.toString(), value);
        return value;
    }

    @Override
    public V remove(K key) throws CacheException {
        return (V) redisTemplate.opsForHash().delete(this.cacheName, key.toString());
    }

    @Override
    public void clear() throws CacheException {
        redisTemplate.delete(this.cacheName);
    }

    @Override
    public int size() {
        return redisTemplate.opsForHash().size(this.cacheName).intValue();
    }

    @Override
    public Set<K> keys() {
        return redisTemplate.opsForHash().keys(this.cacheName);
    }

    @Override
    public Collection<V> values() {
        return redisTemplate.opsForHash().values(this.cacheName);
    }
}
ShiroRedisCacheManager.java 缓存管理器
package com.qinyeit.shirojwt.demos.shiro.cache;
import org.apache.shiro.cache.Cache;
import org.apache.shiro.cache.CacheException;
import org.apache.shiro.cache.CacheManager;
import org.springframework.data.redis.core.RedisTemplate;
public class ShiroRedisCacheManager implements CacheManager {
    private RedisTemplate redisTemplate;

    public ShiroRedisCacheManager(RedisTemplate redisTemplate) {
        this.redisTemplate = redisTemplate;
    }

    // 这个方法由Shiro框加来调用,当需要用到缓存的时候,就会传入缓存的名字,比如我们可以为
    // 认证信息缓存,为“authenticationCache”;为授权信息缓存,为“authorizationCache”;为“sessionCache”等
    @Override
    public <K, V> Cache<K, V> getCache(String name) throws CacheException {
        // 自动去RedisCahce中找具体实现
        return new ShiroRedisCache<K, V>(redisTemplate, name);
    }
}
4.3 开启缓存
从前面的分析知道,只需要将缓存管理器注册为SpringBean, 就会自动注入到 securityManager 中。
引入了 spring-boot-starter-data-redis 之后,自动配置会创建 org.springframework.data.redis.core.RedisTemplate 这个bean, 我们将他配置到Shiro的CacheManager中:
- 第8-19行, 配置realm开启 认证和授权数据缓存,并给缓存设置了名字。稍后我们可以到Redis中检查是否缓存成功
- 第23-26行配置了自定义的
ShiroRedisCacheManager,它需要 RedisTemplate 才能工作。
package com.qinyeit.shirojwt.demos.configuration;
...
@Configuration
@Slf4j
public class ShiroConfiguration {
    @Bean
    public Realm realm() {
        SystemAccountRealm realm = new SystemAccountRealm();
        // 开启全局缓存
        realm.setCachingEnabled(true);
        // 打开认证缓存
        realm.setAuthenticationCachingEnabled(true);
        // 认证缓存的名字,不设置也可以,默认由
        realm.setAuthenticationCacheName("shiro:authentication:cache");

        // 打开授权缓存
        realm.setAuthorizationCachingEnabled(true);
        // 授权缓存的名字, 不设置也可以,默认由
        realm.setAuthorizationCacheName("shiro:authorization:cache");
        return new SystemAccountRealm();
    }
	// 创建Shiro 的 CahceManager
    @Bean
    public CacheManager shiroCacheManager(RedisTemplate redisTemplate) {
        return new ShiroRedisCacheManager(redisTemplate);
    }

    @Bean
    public ShiroFilterChainDefinition shiroFilterChainDefinition() {...}

    @Bean
    public FilterRegistrationBean<AuthenticationFilter> customShiroFilterRegistration(ShiroFilterFactoryBean shiroFilterFactoryBean) { ... }
}
4.4 Redis序列化错误
此时启动应用,执行登录。 前面我们在SystemAccountRealm.doGetAuthenticationInfo 方法中添加了打印日志,可以看到 cacheManager已经配置成了我们自定义的com.qinyeit.shirojwt.demos.shiro.cache.ShiroRedisCacheManager ,但是后续的执行中报错了:
org.springframework.data.redis.serializer.SerializationException: Cannot serialize; nested exception is org.springframework.core.serializer.support.SerializationFailedException: Failed to serialize object using DefaultSerializer; nested exception is java.io.NotSerializableException: org.apache.shiro.lang.util.SimpleByteSource
意思是,Redis尝试将对象序列化到Redis中的时候,遇到了一个不可序列化的对象org.apache.shiro.lang.util.SimpleByteSource。
跟踪源码:
-
自定义的 SystemAccountRealm 中的 doGetAuthenticationInfo 是在哪里调用的?这个方法在其父类中被定义为抽象方法,那么它应该是在父类
AuthenticationRealm中被调用的,下面代码的第 6行就是:public final AuthenticationInfo getAuthenticationInfo(AuthenticationToken token) throws AuthenticationException { // 从缓存中获取认证信息 AuthenticationInfo info = getCachedAuthenticationInfo(token); // 缓存中没有,则调用 子类 Realm中的 doGetAuthenticationInfo 方法 if (info == null) { info = doGetAuthenticationInfo(token); // 如果获取到了 认证信息,则进行缓存 if (token != null && info != null) { cacheAuthenticationInfoIfPossible(token, info); } } else { LOGGER.debug("Using cached authentication info [{}] to perform credentials matching.", info); } if (info != null) { // 调用匹配器进行匹配 assertCredentialsMatch(token, info); } else { LOGGER.debug("No AuthenticationInfo found for submitted AuthenticationToken [{}]. Returning null.", token); } return info; } -
继续跟踪 cacheAuthenticationInfoIfPossible 方法:
    private void cacheAuthenticationInfoIfPossible(AuthenticationToken token, AuthenticationInfo info) {
        if (!isAuthenticationCachingEnabled(token, info)) {
            LOGGER.debug("AuthenticationInfo caching is disabled for info [{}].  Submitted token: [{}].", info, token);
            //return quietly, caching is disabled for this token/info pair:
            return;
        }

        Cache<Object, AuthenticationInfo> cache = getAvailableAuthenticationCache();
        if (cache != null) {
            // 获取缓存的Redis中的Hash key . 注意这个key 不是Redis 的key ,Reidskey实际是缓存的名字, 而这里的key是 redis Hash数据结构中的key。 查看自定义的 ShiroRedisCache 的 put方法就不难理解
            Object key = getAuthenticationCacheKey(token);
            // 缓存 info, 这里实际上就是在从 Reaml 中 的 doGetAuthenticationInfo 方法返回的 SimpleAuthenticationInfo
            // 到这里就交个 CacheManager去缓存了
            cache.put(key, info);
            LOGGER.trace("Cached AuthenticationInfo for continued authentication.  key=[{}], value=[{}].", key, info);
        }
    }
所以自定义的ShiroRedisCache向Redis中 缓存的数据 是一个 Redis Hash, Redis key为:
shiro:authentication:cache, Redis Hash 中的key 为:protected Object getAuthenticationCacheKey(AuthenticationToken token) { return token != null ? token.getPrincipal() : null; }就是token中的认证主体,就是用户名。因为AuthenticationToken 的实际类型是 UsernamePasswordToken ,
getPrincipal()返回的是用户名value就是 从 Reaml 中 的 doGetAuthenticationInfo 方法返回的 SimpleAuthenticationInfo
至此可以总结出Shiro在 Redis中缓存的数据结构:
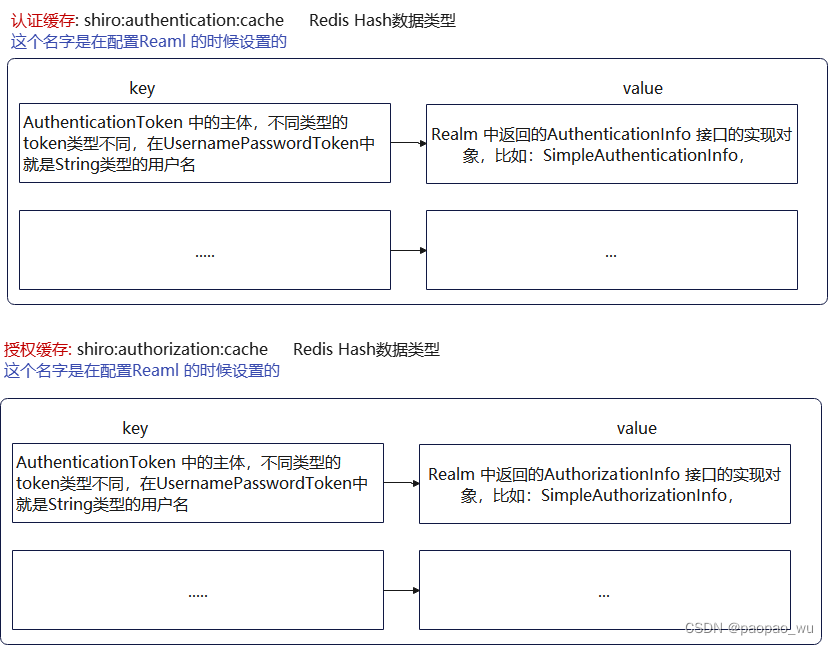
注意:
认证相关的单词: AuthenticationInfo , SimpleAuthenticationInfo
授权相关的单词:AuthorizationInfo , SimpleAuthorizationInfo
很相似,比较容易搞混淆 。 当然他们都可以自定义
SimpleAuthenticationInfo 中就包含了 SimpleByteSource 类型,默认的序列化器无法完成序列化,所以就需要我们自定义Redis的序列化器
4.5 解决序列化错误
为什么SimpleByteSource 无法完成序列化?看看它的定义:
package org.apache.shiro.lang.util;
...
public class SimpleByteSource implements ByteSource {
    ...
}
它没有实现 java.io.Serializable 即序列化接口。 而系统 RedisTemplate 中默认的序列化器为 JdkSerializationRedisSerializer ,也就是说要序列化的数据全部都需要实现 java.io.Serializable 接口才行。
所以要解决这个序列化错误就有两种办法:
- 自定义Shiro的ByteSource
- 自定义RedisTemplate中的序列化器
对于两种方案,第一种是最简单的,第二种麻烦一点,大家可以自行百度。
4.5.1 自定义ByteSource 实现Serializable接口
在来看看 SimpleAuthenticationInfo 中的 代码.
public class SimpleAuthenticationInfo implements MergableAuthenticationInfo, SaltedAuthenticationInfo {
    ...
    protected ByteSource credentialsSalt = SimpleByteSource.empty();

    public SimpleAuthenticationInfo(Object principal, Object hashedCredentials, ByteSource credentialsSalt, String realmName) {
        this.principals = new SimplePrincipalCollection(principal, realmName);
        this.credentials = hashedCredentials;
        this.credentialsSalt = credentialsSalt;
    }
    ...
    @Override
    public ByteSource getCredentialsSalt() {
        return credentialsSalt;
    }
    ...
    public void setCredentialsSalt(ByteSource salt) {
        this.credentialsSalt = salt;
    }
    ...
}
credentialsSalt 其实就是盐值的凭证,它可以通过构造方法传入,也可以通过set方法传入,所以我们只需要定义个子类继承 SimpleByteSource,然后实现Serializable接口即可。下面是代码:
package com.qinyeit.shirojwt.demos.shiro.realm;
...
package com.qinyeit.shirojwt.demos.shiro.realm;
...
//继承SimpleByteSource,然后实现 Serializable接口, 仿照SimpleByteSource 中代码实现
//添加一个无参构造方法,反序列化的时候会用到,要不然依然会报错
public class SaltSimpleByteSource extends CodecSupport implements ByteSource, Serializable {
    private byte[] bytes;
    private String cachedHex;
    private String cachedBase64;

    // 添加一个无参构造函数,反序列化会用到
    public SaltSimpleByteSource() {
    }

    public SaltSimpleByteSource(byte[] bytes) {
        this.bytes = bytes;
    }

    public SaltSimpleByteSource(char[] chars) {
        this.bytes = toBytes(chars);
    }

    public SaltSimpleByteSource(String string) {
        this.bytes = toBytes(string);
    }

    public SaltSimpleByteSource(ByteSource source) {
        this.bytes = source.getBytes();
    }

    public SaltSimpleByteSource(File file) {
        this.bytes = toBytes(file);
    }

    public SaltSimpleByteSource(InputStream stream) {
        this.bytes = toBytes(stream);
    }

    @Override
    public byte[] getBytes() {
        return bytes;
    }

    @Override
    public String toHex() {
        if (this.cachedHex == null) {
            this.cachedHex = Hex.encodeToString(this.getBytes());
        }

        return this.cachedHex;
    }

    @Override
    public String toBase64() {
        if (this.cachedBase64 == null) {
            this.cachedBase64 = Base64.encodeToString(this.getBytes());
        }
        return this.cachedBase64;
    }

    public String toString() {
        return this.toBase64();
    }

    public int hashCode() {
        return this.bytes != null && this.bytes.length != 0 ? Arrays.hashCode(this.bytes) : 0;
    }

    public boolean equals(Object o) {
        if (o == this) {
            return true;
        } else if (o instanceof ByteSource) {
            ByteSource bs = (ByteSource) o;
            return Arrays.equals(this.getBytes(), bs.getBytes());
        } else {
            return false;
        }
    }

    @Override
    public boolean isEmpty() {
        return this.bytes == null || this.bytes.length == 0;
    }
}
4.5.2 在Realm中使用自定义的SaltSimpleByteSource
将 Reaml中返回SimpleAuthenticationInfo 中的 ByteSource替换成我们自己的 SaltSimpleByteSource
package com.qinyeit.shirojwt.demos.shiro.realm;
...
@Slf4j
public class SystemAccountRealm extends AuthorizingRealm {
    ...
    @Override
    protected AuthenticationInfo doGetAuthenticationInfo(AuthenticationToken token) throws AuthenticationException {
        if (getCacheManager() == null) {
            log.info("================>cacheManager为空");
        } else {
            log.info("================cacheManager:{}", getCacheManager().getClass().getName());
        }
        // 1.从传过来的认证Token信息中,获得账号
        String account = token.getPrincipal().toString();

        // 2.通过用户名到数据库中获取整个用户对象
        SystemAccount systemAccount = systemAccountMap.get(account);
        if (systemAccount == null) {
            throw new UnknownAccountException();
        }
        // 3. 创建认证信息,即用户正确的用户名和密码。
        // 四个参数:

        // 第一个参数为主体,第二个参数为凭证,第三个参数为Realm的名称
        // 因为上面将凭证信息和主体身份信息都保存在 SystemAccount中了,所以这里直接将 SystemAccount对象作为主体信息即可

        // 第二个参数表示凭证,匹配器中会从 SystemAccount中获取盐值,密码登凭证信息,所以这里直接传null。

        // 第三个参数,表示盐值,这里使用了自定义的SaltSimpleByteSource,之所以在这里new了一个自定义的SaltSimpleByteSource,
        // 是因为开启redis缓存的情况下,序列化会报错

        // 第四个参数表示 Realm的名称
        SimpleAuthenticationInfo authenticationInfo = new SimpleAuthenticationInfo(
                systemAccount,
                null,
                new SaltSimpleByteSource(systemAccount.getSalt()),
                getName()
        );
        // authenticationInfo.setCredentialsSalt(null);
        return authenticationInfo;
    }
    ...
}
4.6 查看Redis 中的key
做如下操作后查看Redis服务器中的key:
-
登录
登录执行完毕之后,就会对认证信息 AuthenticationInfo 进行缓存

-
访问home
访问home的时候,会调用Reaml中的
doGetAuthenticationInfo方法获取认证信息,此时因为缓存中已经有了认证信息,所以直接从缓存中获取。home页面需要鉴权才能访问,所以第一次会调用Reaml中的doGetAuthorizationInfo方法获取鉴权信息,然后放入到缓存中。

4.7 Key前面的16进制字符是什么?
我们发现Redis 中的key前面有几个16进制的字符,这是为什么? 这还是因为RedisTemplate 中使用的序列化器使用的都是默认的 JdkSerializationRedisSerializer , 它将所有的key都当成Object来进行序列化。 我们可以将 与key相关的序列化器配置成 StringRedisSerializer ,前面的16进制字符就消失了。
RedisTemplate 中有如下的序列化器可以配置:
- keySerializer: redis key序列化器
- valueSerializer: redis value 序列化器
- hashKeySerializer: reids Hash 结构中的key的序列化器
- hashValueSerializer: redis Hash 结构中的value的序列化器
下面将 RedisTemplate 中的 keySerializer, 和 hashKeySerializer 指定为 StringRedisSerializer:
package com.qinyeit.shirojwt.demos.configuration;
...
@Configuration
@Slf4j
public class ShiroConfiguration {
    ...
     @Bean
    public CacheManager shiroCacheManager(RedisTemplate redisTemplate) {
        RedisSerializer<String> stringSerializer = RedisSerializer.string();
        // 设置key的序列化器
        redisTemplate.setKeySerializer(stringSerializer);
        // 设置 Hash 结构中 key 的序列化器
        redisTemplate.setHashKeySerializer(stringSerializer);
        return new ShiroRedisCacheManager(redisTemplate);
    }
    ...
}
修改完毕之后,就看起来正常了:

4.8 缓存什么时候清除
在CachingRealm中,找到了如下代码:
public abstract class CachingRealm implements Realm, Nameable, CacheManagerAware, LogoutAware {
	// LogoutAware 接口中定义的方法,当Subject 调用退出的时候,会委托securityManager来调用这个方法
    // 此时就会将当前登录用户的 缓存清理掉
    public void onLogout(PrincipalCollection principals) {
        clearCache(principals);
    }
    ...
    protected void clearCache(PrincipalCollection principals) {
        if (!isEmpty(principals)) {
            doClearCache(principals);
            LOGGER.trace("Cleared cache entries for account with principals [{}]", principals);
        }
    }
    // 实际执行的时候,会调用子类中重写的方法
    protected void doClearCache(PrincipalCollection principals) {
    }
    ...
}

可以看到, AuthenticationRealm 和 AuthorizingRealm 中都重写了这个方法,所以 退出的时候会清理掉 认证信息和授权信息
5. 总结
- 缓存管理器主要缓存 Reaml中 返回的认证信息和授权信息
- Shiro自动配置中没有配置缓存管理器。
- 自定义Shiro Redis Cache 缓存管理器步骤:
- 实现 Shiro Cachce接口
org.apache.shiro.cache.Cache - 实现Shiro CacheManager接口
org.apache.shiro.cache.CacheManage - 在配置中将自定义的CacheManager配置成Spring Bean
- 在Reaml中开启缓存
- Shiro中的
org.apache.shiro.lang.util.SimpleByteSource没有实现序列化接口,所以RedisTemplate序列化的时候由于采用的是 JdkSerializationRedisSerializer ,这样会报错。所以要自定义 SimpleByteSource ,实现序列化接口即可解决这个问题
- 实现 Shiro Cachce接口
- 登录或者认证的时候,都会调用Realm的
doGetAuthenticationInfo方法,此时会使用配置的缓存管理器来缓存 认证信息数据 - 鉴权的时候,会调用 Realm 的
doGetAuthorizationInfo方法,此时会调用配置的缓存管理器来缓存鉴权数据。 - 退出的时候,会清理当前用户下的认证和鉴权数据信息。
代码仓库 https://github.com/kaiwill/shiro-jwt , 本节代码在 3_springboot_shiro_jwt_多端认证鉴权_Redis缓存管理器 分支上.


