基于class的编程结构,中间穿插ros的话题发布机制。
首先建立功能包:
catkin_create_pkg control geometry_msgs message_generation message_runtime nav_msgs roscpp rospy std_msgs
以上依赖基本上是大多数的ros消息所需要的依赖了。
然后确定我们的文件结构:
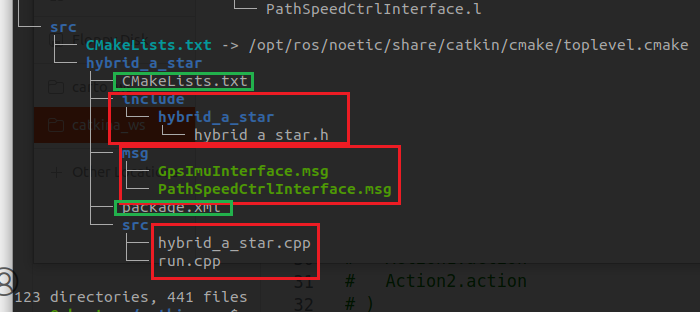
一般而言,为实现更好的模块化开发和代码复用,一般会将类的定义和实现分开。
总体来说,就是.h文件定义类:
#include <ros/ros.h>
#include <geometry_msgs/Twist.h>
#include <nav_msgs/Path.h>
#include <hybrid_a_star/PathSpeedCtrlInterface.h> //
#include <hybrid_a_star/GpsImuInterface.h> //

class AutonomousDrivingNode {
public:
    AutonomousDrivingNode();
    void pathCallback(const nav_msgs::Path::ConstPtr& msg);
    void gpsCallback(const hybrid_a_star::GpsImuInterface::ConstPtr& msg);
    void Run();

private:
    ros::NodeHandle nh_;
    ros::Publisher control_test_pub_;
    ros::Publisher cmd_vel_pub_;
    ros::Subscriber path_sub_;
    ros::Subscriber gps_sub_;

    void publishControlTest();
    void publishCmdVel();
};
hybrid_a_star.cpp类的具体实现:
#include "hybrid_a_star/hybrid_a_star.h"
AutonomousDrivingNode::AutonomousDrivingNode() {
    control_test_pub_ = nh_.advertise<hybrid_a_star::PathSpeedCtrlInterface>("control_test", 10);
    cmd_vel_pub_ = nh_.advertise<geometry_msgs::Twist>("cmd_vel", 10);
    path_sub_ = nh_.subscribe("path", 10, &AutonomousDrivingNode::pathCallback, this);
    gps_sub_ = nh_.subscribe("gps", 10, &AutonomousDrivingNode::gpsCallback, this);
}

void AutonomousDrivingNode::pathCallback(const nav_msgs::Path::ConstPtr& msg) {
    for (const auto& point : msg->poses) {
        // 处理每个路径点
        // 示例:输出路径点的坐标
        ROS_INFO("Path Point: x=%f, y=%f", point.pose.position.x, point.pose.position.y);
    }
}

void AutonomousDrivingNode::gpsCallback(const hybrid_a_star::GpsImuInterface::ConstPtr& msg)
{
    // 处理gps消息
    // 示例:获取GPS数据
    double x = msg->x;
    double y = msg->y;
    double z = msg->z;
    float pitch = msg->pitch;
    float roll = msg->roll;
    float yaw = msg->yaw;
    float vel = msg->vel;
    float lat = msg->lat;
    float lon = msg->lon;
    bool state_ndt = msg->state_ndt;
    std::string nav_flag_g = msg->nav_flag_g;
}

void AutonomousDrivingNode::Run()
{
    hybrid_a_star::PathSpeedCtrlInterface msg_ctrl;

    msg_ctrl.Target_velocity = 10.0;  // 示例:设置目标速度为10 m/s
    msg_ctrl.Target_steering_angle = 0.5;  // 示例:设置目标转角为0.5弧度
    msg_ctrl.Target_gear = 3;  // 示例:设置目标档位为前进档

    control_test_pub_.publish(msg_ctrl);

    geometry_msgs::Twist msg_cmd;
    // 填充msg_cmd
    msg_cmd.linear.x = 0.5;  // 示例:设置线速度为0.5 m/s
    msg_cmd.angular.z = 0.1;  // 示例:设置角速度为0.1 rad/s    control_test_pub_.publish(msg_ctrl);
    cmd_vel_pub_.publish(msg_cmd);

}
void AutonomousDrivingNode::publishControlTest() {
    hybrid_a_star::PathSpeedCtrlInterface msg;
    // 填充msg
    control_test_pub_.publish(msg);
}

void AutonomousDrivingNode::publishCmdVel() {
    geometry_msgs::Twist msg;
    // 填充msg
    cmd_vel_pub_.publish(msg);
}
最后再run.cpp中创建类的对象并调用成员函数:
#include "ros/ros.h"
#include "hybrid_a_star/hybrid_a_star.h"

int main(int argc, char **argv) {
    ros::init(argc, argv, "autonomous_driving_node");
    AutonomousDrivingNode node;

    ros::Rate rate(10);

    while (ros::ok()) {
        node.Run();
        ros::spinOnce();
        rate.sleep();
    }
    ros::shutdown();
    return 0;
}
这里遇到了也顺便说一下ros里面这些已有的函数该怎么用:
ros::Rate looprate(10);  // 定义ros::Rate对象,设置节点的循环频率。
looprate.sleep();  // 根据之前设置的频率暂停程序执行直到下一个循环周期开始
ros::spinOnce(); //处理一次ros的消息回调—>话说回调函数是可以强制进去是吗?如果没有发布的话?(值得尝试)
ros::spin(); //进入 ROS 事件循环,让节点一直运行。
ros::shutdown(); //停止 ROS 节点的运行。
ros::ok(); //检查 ROS 节点的运行状态。
ros::NodeHandle nh; //创建一个 ROS 节点句柄,用于访问 ROS 系统中的资源。
ros::NodeHandle nh("~"); //创建一个私有节点句柄,用于访问节点的私有参数。
ros::Publisher pub = nh.advertise<msg_type>("topic_name", queue_size); //话题发布
ros::Subscriber sub = nh.subscribe("topic_name", queue_size, callback); //话题订阅
ros::ServiceServer srv = nh.advertiseService("service_name", callback); //服务服务端
ros::ServiceClient cli = nh.serviceClient<srv_type>("service_name"); // 服务客户端
nh.getParam("param_name", value); // 从参数服务器读取
nh.setParam("param_name", value); // 向参数服务器写入
ros::Time now = ros::Time::now(); // 获取ROS的时间系统
理清一些很像的东西:
ros::spinOnce() 和 ros::spin() 是两种不同的 ROS 节点编程模式,它们不能同时存在于同一个节点中。
 int main(int argc, char** argv) {
    ros::init(argc, argv, "my_node");
    ros::NodeHandle nh;

    // 创建发布者和订阅者
    ros::Publisher pub = nh.advertise<std_msgs::String>("topic_name", 10);
    ros::Subscriber sub = nh.subscribe("another_topic", 10, callback);

    ros::Rate loop_rate(10); // 10 Hz 循环频率
    while (ros::ok()) {
        // 执行其他操作
        publishSomeData(pub);

        // 处理消息回调
        ros::spinOnce();

        // 控制循环频率
        loop_rate.sleep();
    }

    return 0;
}
int main(int argc, char** argv) {
    ros::init(argc, argv, "my_node");
    ros::NodeHandle nh;

    // 创建发布者和订阅者
    ros::Publisher pub = nh.advertise<std_msgs::String>("topic_name", 10);
    ros::Subscriber sub = nh.subscribe("another_topic", 10, callback);

    // 其他操作放在单独的线程中执行
    std::thread other_thread(doOtherStuff, pub);

    // 进入 ROS 事件循环
    ros::spin();

    other_thread.join();
    return 0;
}

void doOtherStuff(ros::Publisher& pub) {
    // 执行其他操作,比如发布数据
    while (ros::ok()) {
        publishSomeData(pub);
        ros::Duration(1.0).sleep(); // 每秒发布一次
    }
}
它们的区别非常细微,需要理解清楚。
还有全局句柄和私有节点句柄:
int main(int argc, char** argv) {
    ros::init(argc, argv, "my_node");
    ros::NodeHandle nh;       // 全局节点句柄
    ros::NodeHandle nh_private("~"); // 私有节点句柄

    // 使用全局节点句柄发布话题
    ros::Publisher pub = nh.advertise<std_msgs::String>("topic_name", 10);

    // 使用私有节点句柄读取参数
    std::string param_value;
    nh_private.getParam("param_name", param_value);

    // 执行其他操作
    while (ros::ok()) {
        ros::spinOnce();
    }

    ros::shutdown(); // 停止节点运行
    return 0;
}
这里最重要的就是参数服务器了,也就是你使用的是什么句柄。一般来说发布话题是一定要使用全局句柄的,毕竟私有句柄限制很多,主要是在节点内部可以有私有句柄来修改参数:
<launch>
	// 全局参数
    <param name="global_param" value="global_value" />
    <node pkg="my_package" type="my_node" name="my_node">
        <!-- 私有参数 -->
        <param name="param_name" value="private_value" />
    </node>
</launch>
这里就很好的展示了私有句柄和全局句柄应该怎么设置参数。
以上就是一些基本的基于类的结构化编程思路,下次在python中尝试以上内容。
最后附上我的cmakeLists和package.xml:
cmake_minimum_required(VERSION 3.0.2)
project(hybrid_a_star)

find_package(catkin REQUIRED COMPONENTS
  geometry_msgs
  message_generation
  message_runtime
  nav_msgs
  roscpp
  rospy
  std_msgs
)

add_message_files(
  FILES
  GpsImuInterface.msg
  PathSpeedCtrlInterface.msg
)

## Generate services in the 'srv' folder
# add_service_files(
#   FILES
#   Service1.srv
#   Service2.srv
# )

## Generate actions in the 'action' folder
# add_action_files(
#   FILES
#   Action1.action
#   Action2.action
# )

generate_messages(
  DEPENDENCIES
  geometry_msgs
  nav_msgs
  std_msgs
)

catkin_package(
 CATKIN_DEPENDS geometry_msgs message_generation message_runtime nav_msgs roscpp rospy std_msgs
)

include_directories(
  include
  ${catkin_INCLUDE_DIRS}
)

add_executable(hybrid_a_star  src/run.cpp src/hybrid_a_star.cpp)

add_dependencies(hybrid_a_star  ${${PROJECT_NAME}_EXPORTED_TARGETS} ${catkin_EXPORTED_TARGETS})

target_link_libraries(hybrid_a_star
  ${catkin_LIBRARIES}
)
<?xml version="1.0"?>
<package format="2">
  <name>hybrid_a_star</name>
  <version>0.0.0</version>
  <description>The hybrid_a_star package</description>

  <maintainer email="cyun@todo.todo">cyun</maintainer>

  <license>TODO</license>

  <buildtool_depend>catkin</buildtool_depend>
  <build_depend>geometry_msgs</build_depend>
  <build_depend>message_generation</build_depend>
  <build_depend>message_runtime</build_depend>

  <build_depend>nav_msgs</build_depend>
  <build_depend>roscpp</build_depend>
  <build_depend>rospy</build_depend>
  <build_depend>std_msgs</build_depend>
  <build_export_depend>geometry_msgs</build_export_depend>
  <build_export_depend>nav_msgs</build_export_depend>
  <build_export_depend>roscpp</build_export_depend>
  <build_export_depend>rospy</build_export_depend>
  <build_export_depend>std_msgs</build_export_depend>
  <exec_depend>geometry_msgs</exec_depend>
  <exec_depend>message_runtime</exec_depend>
  <exec_depend>nav_msgs</exec_depend>
  <exec_depend>roscpp</exec_depend>
  <exec_depend>rospy</exec_depend>
  <exec_depend>std_msgs</exec_depend>
  <exec_depend>message_generation</exec_depend>

  <export>

  </export>
</package>
