一、需求前提
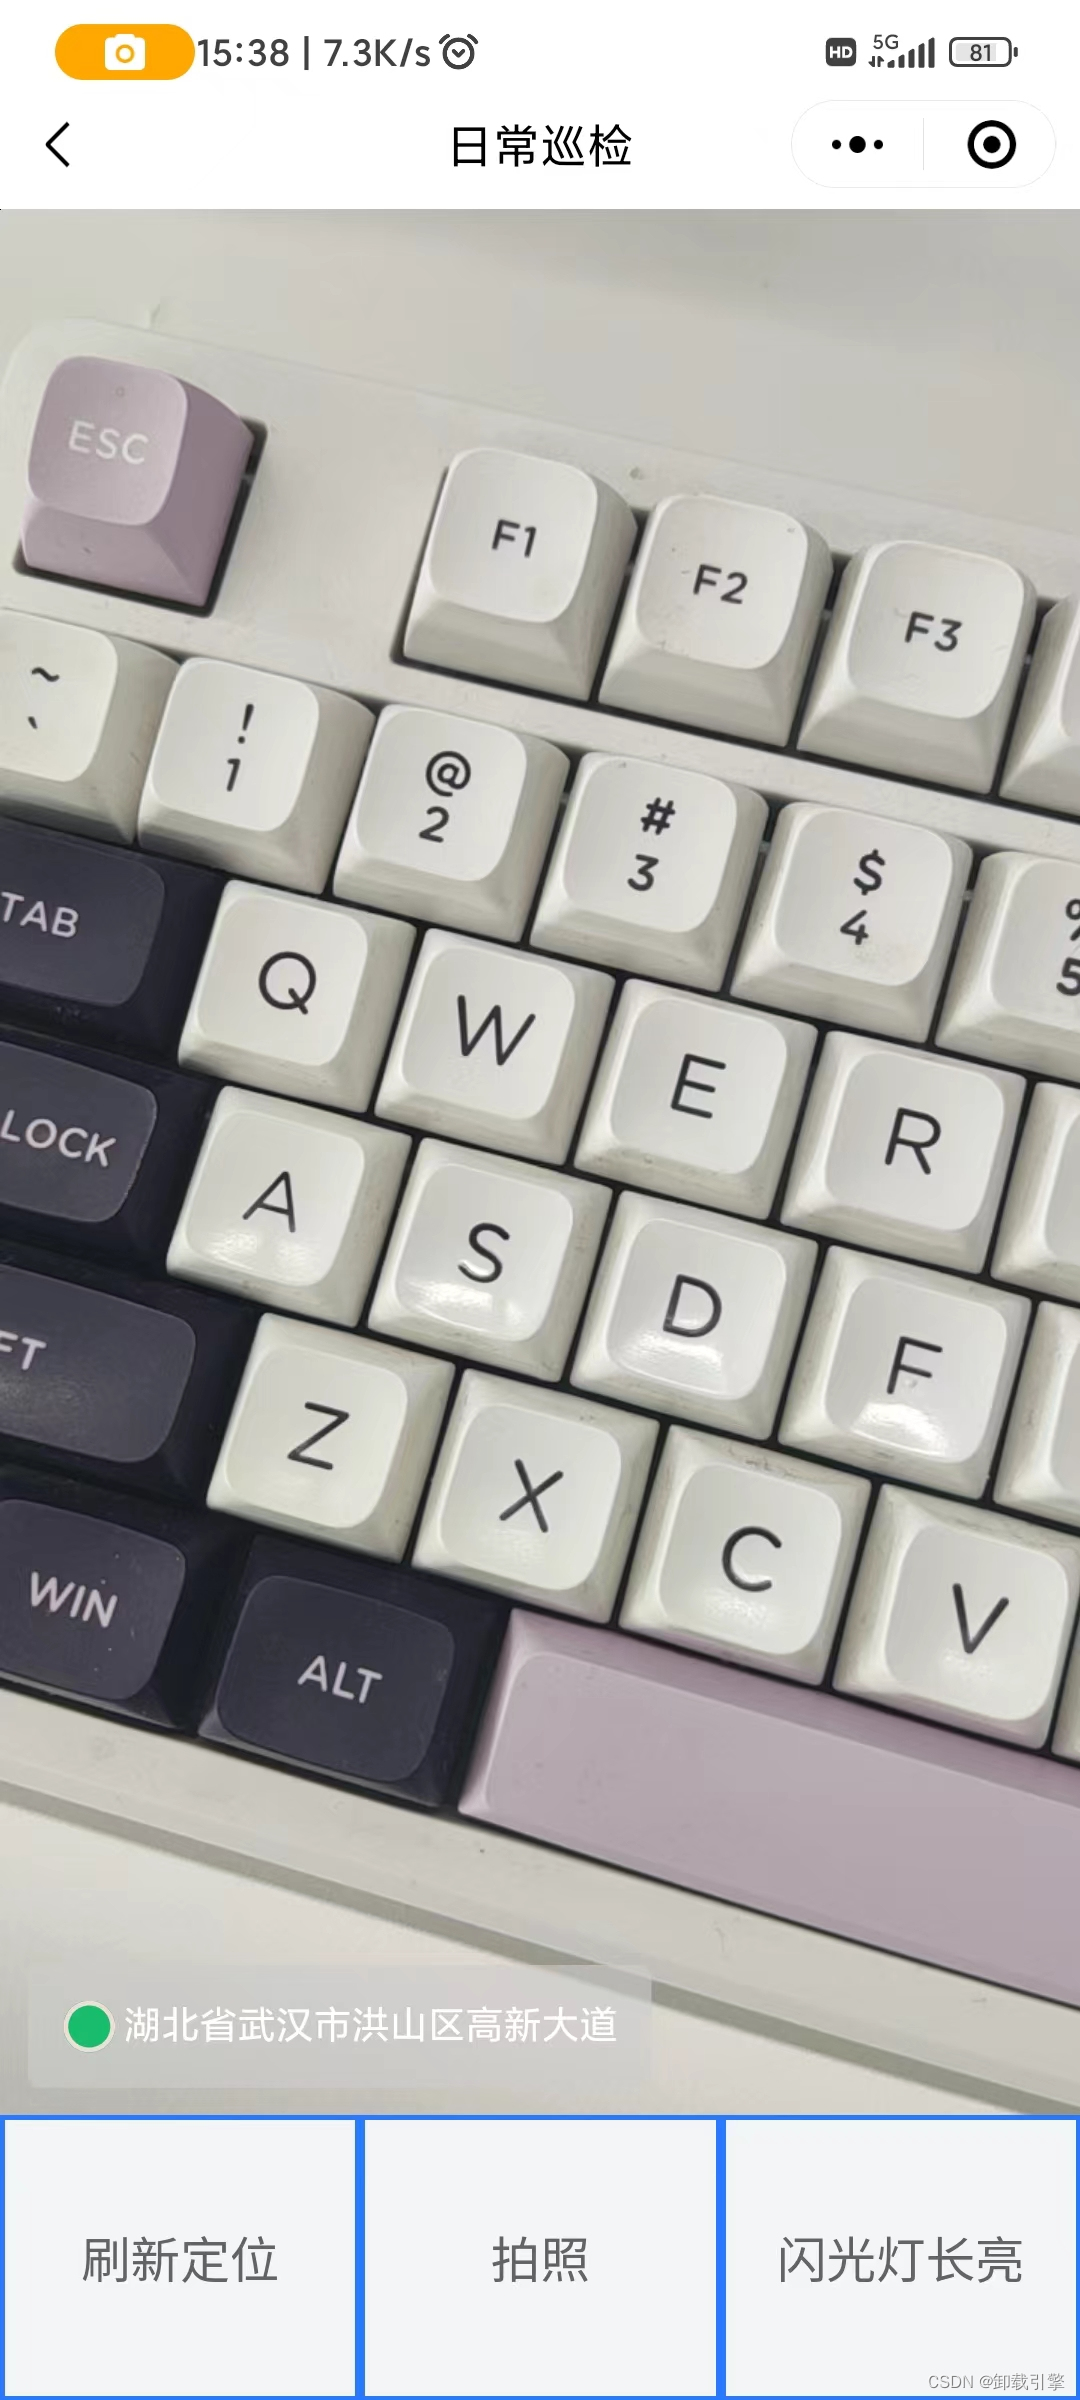
特殊场景中,需要拍照的同时打开闪光灯,(例如黑暗场景下的设备维护巡检功能)。
起初我是用的uviewui中的u-upload组件自带的拍照功能,但是这个不支持拍照时打开闪光灯,也不支持从通知栏中打开闪光灯。
二、解决方案
采用组合形式解决:
- 使用uniapp官方内置组件中的 媒体组件:camera 实现闪光灯拍照,
uni.createCameraContext()获取返回图片结果 - 结合uniapp官方内置组件中的 视图容器:cover-view 做定制化布局
1. 媒体组件:camera
camera 是页面内嵌的区域相机组件。注意这不是点击后全屏打开的相机。
其中flash属性可以动态实现拍照闪光灯的功能,值为auto, on, off, torch
拍照动作可以使用uni.createCameraContext()获取拍照的图片结果,再做后续操作。
注意:
- camera 组件是由客户端创建的原生组件,它的层级是最高的,不能通过 z-index 控制层级。可使用 cover-view 、cover-image 覆盖在上面。
- 同一页面只能插入一个 camera 组件。(多次打开自定义的拍照界面可以使用
v-if做销毁)
2. 视图容器:cover-view
cover-view是覆盖在原生组件上的文本视图。
app-vue和小程序框架,渲染引擎是webview的。但为了优化体验,部分组件如map、video、textarea、canvas通过原生控件实现,原生组件层级高于前端组件(类似flash层级高于div)。为了能正常覆盖原生组件,设计了cover-view。
注意:
- 容器内的每一个元素最好都用
cover-view标签包裹(包括文字内容),否则会出现渲染异常问题。
三、 示例
<!--
 * @Description: 自定义文件上传组件,支持拍照、闪光灯、本地图片选择
 * @Doc: 双向绑定使用 <customUpload :modelValue.sync="test"></customUpload>
 * @Author: y
 * @Date: 2024-03-07 09:51:25
-->
<template>
	<view class="custom-upload">
		<!-- 预览图片 -->
		<template v-if="previewImage">
			<view class="file-item" v-for="(item,index) in fileList" :key="index" :style="[{width,height}]">
				<view v-if="item.status ==='uploading'" class="file-uploading">
					<u-loading-icon color="#19be6b"></u-loading-icon>
				</view>
				<u--image v-else :showLoading="true" :src="item.thumb || item.url" :width="width" :height="height"
					@tap="onPreviewImage(item)">
					<template v-slot:loading>
						<!-- 此处后期需要优化为本地文件地址,避免走两次加载 -->
						<u-loading-icon text="加载中" textSize="18"></u-loading-icon>
					</template>
				</u--image>

				<!-- 删除按钮角标 -->
				<view class="upload-deletable" @tap.stop="deleteItem(index)">
					<view class="upload-deletable-icon">
						<u-icon name="close" color="#ffffff" size="10"></u-icon>
					</view>
				</view>
				<!-- 文件状态角标 -->
				<view class="upload-success" v-if="item.status === 'success'">
					<view class="upload-success-icon">
						<u-icon name="checkmark" color="#ffffff" size="12"></u-icon>
					</view>
				</view>
			</view>
		</template>

		<!-- 如果图片数量在设定范围内 -->
		<template v-if="isInCount">
			<view class="upload-button" @tap="chooseOperationType" :style="[{width,height}]">
				<u-icon name="plus" size="26" color="#2979ff"></u-icon>
				<text v-if="uploadText" class="upload-button-text">{{ uploadText }}</text>
				<text v-else class="upload-button-text">上传</text>
			</view>
		</template>

		<!-- 选项弹出层 -->
		<u-popup :show="showOptionsPopup" :round="10" mode="bottom" :closeable="true" @close="this.showOptionsPopup=false">
			<view class="option-list">
				<view v-if="showTakePhoto" class="option-btn" @tap="onTakePhoto">拍照</view>
				<view v-if="showChoosePhoto" class="option-btn" @tap="onChoosePhoto">从相册选择</view>
				<view class="option-btn-close" @tap="this.showOptionsPopup=false">取消</view>
			</view>
		</u-popup>

		<!-- 相机弹出层 -->
		<u-overlay v-if="showCameraPopup" :show="showCameraPopup" mask-click-able="false">
			<!-- 添加v-if避免缓存相机,每次打开都需要重新创建 -->
			<view class="camera-container">
				<camera device-position="back" :flash="flashStatus" style="width: 100%; height: calc(100% - 200rpx);">
					<cover-view class="user-location">
						<!-- 此处只可以使用cover-image插入图片(待开发) -->
						<cover-view v-if="!userLocationRefreshing" class="icon-location"></cover-view>
						<cover-view v-else class="icon-location-refreshing"></cover-view>
						<cover-view v-if="userLocationRefreshing" style="color: #ff9900;">
							加载中...
						</cover-view>
						<cover-view>{{userLocation||'---'}}</cover-view>
					</cover-view>
				</camera>
				<view class="camera-option-list">
					<view class="option-btn" @tap.stop="$u.throttle(refreshLocation, 1000)">刷新定位</view>
					<view class="option-btn" @tap.stop="takePhoto">拍照</view>
					<view class="option-btn" @tap.stop="openFlash">{{flashStatus==='auto'?'闪光灯长亮':'闪光灯自动'}}</view>
				</view>
			</view>
		</u-overlay>
	</view>
</template>

<script>
	import { mapState, mapActions } from 'vuex';
	import { apiUrl } from '@/utils/env.js'; // 全局项目地址
	export default {
		name: "customUpload",
		props: {
			// 对外:上传的文件列表 {status:success|uploading|fail, url:''}
			modelValue: {
				type: Array,
				default: () => []
			},

			showTakePhoto: {
				type: Boolean,
				default: true
			},
			showChoosePhoto: {
				type: Boolean,
				default: true
			},
			// 上传组件的宽度
			width: {
				type: String,
				default: '180rpx'
			},
			// 上传组件的高度
			height: {
				type: String,
				default: '180rpx'
			},
			// 上传图标的文字
			uploadText: {
				type: String,
				default: ''
			},
			// 上传文件的存储位置
			fileStorageLocation: {
				type: String,
				default: 'yhtest'
			},
		},
		data() {
			return {
				fileList: [], // 对内:上传的文件列表 {status:success|uploading|fail, url:''}
				isFileError: false, // 文件列表出现故障(待开发)

				previewImage: false, // 预览图片
				isInCount: true, // 是在限制的文件数量范围内
				showOptionsPopup: false, // 选项弹出层
				showCameraPopup: false, // 相机弹出层
				flashStatus: 'auto', // 闪光灯,值为auto, on, off, torch

				userLocationRefreshing: false, // 用户位置刷新中
				userLocation: '', // 用户位置
			};
		},
		watch: {
			// 监听文件列表数据长度变化,存在数据则显示预览
			fileList(newData, oldData) {
				this.$emit('update:modelValue', newData);
				this.previewImage = newData.length ? true : false;
			},

			modelValue: {
				handler: function(newData, oldData) {
					this.fileList = newData;
				},
				immediate: true,
				deep: true
			}
		},
		computed: {
			...mapState(['userInfo']),
		},
		async created() {
			this.flashStatus = 'auto';
		},
		methods: {
			// 引入vuex中方法
			...mapActions(['getUserLocation']),
			// 选择操作类型
			chooseOperationType() {
				this.showOptionsPopup = true;
				this.refreshLocation(); // 获取定位
			},
			// 拍照
			onTakePhoto() {
				this.flashStatus = 'auto';
				this.showOptionsPopup = false;
				this.showCameraPopup = true;
			},
			//从文件夹选择
			onChoosePhoto() {
				this.showOptionsPopup = false;
				uni.chooseMedia({
					count: 9,
					mediaType: ['image', 'video'], // 文件类型
					sourceType: ['album'], // 指定从相册获取
					maxDuration: 30,
					success: async (res) => {
						// 按顺序执行异步操作,异步迭代
						for (let item of res.tempFiles) {
							const tempUrl = item.tempFilePath;
							console.log('拍照的临时图片地址:', tempUrl);
							this.fileList.push({
								status: 'uploading', // 状态为上传中
								url: tempUrl, // 文件的临时地址
								thumb: tempUrl, // 文件的临时地址
							});

							const realUrl = await this.uploadFilePromise(item.tempFilePath); // 上传图片
							console.log('上传返回的真实图片地址:', realUrl);
							this.fileList.pop();
							this.fileList.push({
								status: 'success', // 状态为上传中
								url: realUrl, // 文件的真实地址
								thumb: tempUrl, // 文件的临时地址
							});
						}
					},
					fail: (err) => {
						console.log('文件夹选择报错:', err);
					},
				})
			},

			// 手动拍照
			async takePhoto() {
				console.log('拍照按钮点击---------', new Date());
				// 创建并返回 camera 组件的上下文 cameraContext 对象
				const ctx = uni.createCameraContext();
				setTimeout(() => {
					this.showCameraPopup = false; // 关闭弹出层
				}, 200);
				await ctx.takePhoto({
					quality: 'high',
					success: async (res) => {
						uni.$u.toast('拍摄成功');
						// 返回照片文件的临时路径
						const tempUrl = res.tempImagePath;
						console.log('拍照的临时图片地址:', tempUrl);
						this.fileList.push({
							status: 'uploading', // 状态为上传中
							url: tempUrl, // 文件的临时地址
							thumb: tempUrl, // 文件的临时地址
						});

						const realUrl = await this.uploadFilePromise(res.tempImagePath); // 上传图片
						console.log('上传返回的真实图片地址:', realUrl);
						this.fileList.pop();
						this.fileList.push({
							status: 'success', // 状态为上传中
							url: realUrl, // 文件的真实地址
							thumb: tempUrl, // 文件的临时地址
						});
					},
					fail: (err) => {
						console.log('手动拍照报错:', err);
					},
				});
			},

			// 打开闪光灯
			openFlash() {
				if (this.flashStatus === 'auto') {
					this.flashStatus = 'torch'; // 闪光灯长亮
				} else {
					this.flashStatus = 'auto'; // 闪光灯长亮
				}
			},

			// 刷新定位
			async refreshLocation() {
				this.userLocationRefreshing = true;
				this.userLocation = await this.getUserLocation(); // 获取用户位置信息
				setTimeout(() => {
					this.userLocationRefreshing = false;
				}, 1000)
			},

			// 上传图片
			async uploadFilePromise(filePath) {
				return new Promise((resolve, reject) => {
					let token = "Bearer ";
					token += uni.getStorageSync('token');
					let a = uni.uploadFile({
						url: `${apiUrl}/wx/wxfile/upload`, // 接口地址
						filePath: filePath,
						name: 'multipartFile', // 此处默认值是file,实际需要根据后端接口做更改
						header: {
							'Content-Type': 'multipart/form-data',
							'Authorization': token
						},
						// HTTP 请求中其他额外的 form data
						formData: {
							"cameraMan": this.userInfo.nickName || '---', // 拍摄人
							"cameraSite": this.userLocation || '---', // 拍摄位置
							"customPath": this.fileStorageLocation, // 自定义文件存放路径
						},
						success: (res) => {
							let parseData = JSON.parse(res.data);
							console.log("上传成功的地址", parseData);
							resolve(parseData.data);
						}
					});
				})
			},

			// 按下标删除图片
			deleteItem(index) {
				this.fileList.splice(index, 1);
			},

			// 预览图片
			onPreviewImage(item) {
				if (item.status !== 'success') return;
				uni.previewImage({
					// 先filter找出为图片的item,再返回filter结果中的图片url
					urls: this.fileList.filter((item) => item.status === 'success' && item.url).map((item) => item.url || item
						.thumb),
					current: item.url || item.thumb,
					fail() {
						uni.$u.toast('预览图片失败')
					},
				});
			},

		}
	}
</script>

<style lang="scss">
	.custom-upload {
		// border: 1px dashed red;
		display: flex;
		flex-direction: row;
		flex-wrap: wrap;

		.file-item {
			position: relative;
			display: flex;
			flex-direction: column;
			justify-content: center;
			align-items: center;

			border-radius: 2px;
			margin: 0 8px 8px 0;
			box-sizing: border-box;

			.upload-deletable {
				position: absolute;
				top: 0;
				right: 0;
				background-color: #373737;
				height: 14px;
				width: 14px;
				display: flex;
				flex-direction: row;
				border-bottom-left-radius: 100px;
				align-items: center;
				justify-content: center;
				z-index: 3;

				.upload-deletable-icon {
					position: absolute;
					-webkit-transform: scale(0.7);
					transform: scale(0.7);
					top: 0px;
					right: 0px;
				}
			}

			.upload-success {
				position: absolute;
				bottom: 0;
				right: 0;
				display: flex;
				flex-direction: row;
				border-style: solid;
				border-top-color: transparent;
				border-left-color: transparent;
				border-bottom-color: #5ac725;
				border-right-color: #5ac725;
				border-width: 9px;
				align-items: center;
				justify-content: center;

				.upload-success-icon {
					position: absolute;
					-webkit-transform: scale(0.7);
					transform: scale(0.7);
					bottom: -10px;
					right: -10px;
				}
			}
		}

		.upload-button {
			padding: 10rpx;
			display: flex;
			flex-direction: column;
			justify-content: center;
			align-items: center;

			background-color: #f4f5f7;
			border-radius: 2px;
			margin: 0 8px 8px 0;
			box-sizing: border-box;

			.upload-button-text {
				margin-top: 8rpx;
				color: #ccc;
				text-align: center;
			}
		}

		.option-list {
			display: flex;
			flex-direction: column;
			justify-content: center;
			align-items: center;
			padding: 40rpx 40rpx 20rpx 40rpx;

			.option-btn {
				border-bottom: 1px solid #ccc6;
				padding: 30rpx;
				width: 100%;
				text-align: center;
				font-size: 16px;
			}

			.option-btn-close {
				padding: 30rpx;
				width: 100%;
				text-align: center;
				font-size: 16px;
			}
		}


		.camera-container {
			position: relative;
			width: 100%;
			height: 100%;

			.user-location {
				position: absolute;
				bottom: 20rpx;
				left: 20rpx;
				padding: 20rpx;
				background-color: #cccccc9c;
				color: #fff;
				border-radius: 10rpx;
				display: flex;
				flex-direction: row;
				justify-content: center;
				align-items: center;

				.icon-location {
					width: 30rpx;
					height: 30rpx;
					border-radius: 50%;
					background-color: #19be6b;
					margin: 6rpx;
					border: 2px solid #ecddd5;
				}

				.icon-location-refreshing {
					width: 30rpx;
					height: 30rpx;
					border-radius: 50%;
					background-color: #ff9900;
					margin: 6rpx;
					border: 2px solid #ecddd5;
				}
			}

			.camera-option-list {
				width: 100%;
				height: 200rpx;
				background-color: #f4f5f7;
				display: flex;
				flex-direction: row;

				.option-btn {
					display: flex;
					flex-direction: column;
					justify-content: center;
					border: 2px solid #2979ff;
					box-sizing: border-box;
					height: 100%;
					width: 33.33%;
					text-align: center;
					font-size: 18px;
				}
			}
		}

	}
</style>