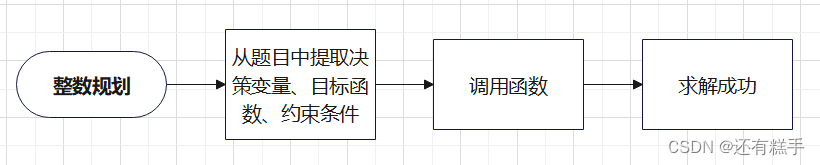
首先,让我们获取一个表面法线,以便进行着色。这是一个垂直于交点处表面的向量。在我们的代码中,我们需要做一个重要的设计决定:法线向量是否为任意长度,还是将其归一化为单位长度。
诱人的是,如果不需要法线向量具有单位长度,可以跳过涉及归一化向量的昂贵平方根操作。然而,在实践中,有三个重要观察结果。首先,如果以后需要单位长度的法线向量,那么最好一次性完成它,而不是为了每个需要单位长度的位置而一次又一次地进行“以防万一”。其次,在几个地方我们确实需要单位长度的法线向量。第三,如果你需要法线向量具有单位长度,那么通常可以通过对特定几何类的构造函数或hit()函数进行理解来有效地生成该向量。例如,球体的法线可以通过除以球体半径而完全避免使用平方根来制作单位长度。
鉴于所有这些情况,我们将采用所有法线向量都具有单位长度的策略。
对于一个球体而言,外向法线是指击中点减去中心点的方向: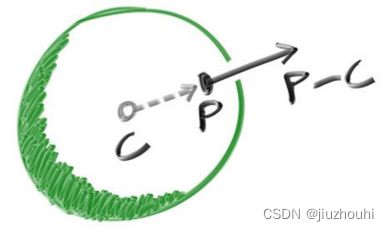
在球表面上,这意味着从球中心指向您的矢量是笔直向上的。现在让我们将其加入代码中并进行着色。我们还没有任何灯光之类的东西,所以让我们用颜色映射来可视化法线。一种常见的技巧是将法线的每个分量映射到0到1的区间,并将(x,y,z)映射为(red,green,blue)。对于法线,我们需要击中点,而不仅仅是确定是否击中(这是我们目前正在计算的)。场景中只有一个球体,并且它直接位于相机前方,所以我们暂时不用担心t的负值。我们只假设最近的击中点(最小的t)就是我们想要的。通过对代码进行这些更改,我们可以计算并可视化法线n:
double hit_sphere(const point3& center, double radius, const ray& r) {
vec3 oc = r.origin() - center;
auto a = dot(r.direction(), r.direction());
auto b = 2.0 * dot(oc, r.direction());
auto c = dot(oc, oc) - radius*radius;
auto discriminant = b*b - 4*a*c;

if(discriminant < 0){
 return -1.0;
}
else {
return (-b - sqrt(discriminant) ) / (2.0*a);
}
}
color ray_color(const ray& r) {
Auto t = hit_sphere(point3(0,0,-1), 0.5, r);
if(t>0.0){
vec3 N = unit_vector(r.at(t) - vec3(0,0,-1));
return 0.5*color(N.x()+1, N.y()+1, N.z()+1);
}
    vec3 unit_direction = unit_vector(r.direction());
auto a = 0.5*(unit_direction.y() + 1.0);
return (1.0-a)*color(1.0, 1.0, 1.0) + a*color(0.5, 0.7, 1.0);
}
这就是生成的图片: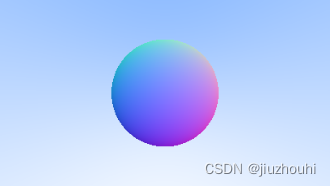
6.2 简化光线与球体相交代码
让我们重新来看一下光线和球体的函数:
double hit_sphere(const point3& center, double radius, const ray& r) {
	vec3 oc = r.origin() - center;
	auto a = dot(r.direction(), r.direction());
	auto b = 2.0 * dot(oc, r.direction());
	auto c = dot(oc, oc) - radius*radius;
	auto discriminant = b*b - 4*a*c;
	if (discriminant < 0) {
	     return -1.0;
	}
	else {
	    return (-b - sqrt(discriminant) ) / (2.0*a);
	}
}
光线和球体相交的代码(之前)
首先,回想一下,一个向量与自身的点积等于该向量的长度的平方。
其次,注意到方程中的b有一个因子为2。考虑一下如果b=2h时二次方程会发生什么变化。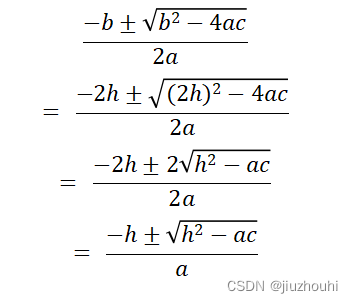
我们现在可以将球体相交的代码简化为以下形式:
double hit_sphere(const point3& center, double radius, const ray& r) {
vec3 oc = r.origin() - center;
auto a = r.direction().length_squared();
auto half_b = dot(oc, r.direction());
auto c = oc.length_squared() - radius*radius;
auto discriminant = half_b*half_b - a*c;
if (discriminant < 0) {
        return -1.0;
    }
else {
	return (-half_b - sqrt(discriminant) ) / a;
}
}
6.3 An Abstraction for Hittable Objects
现在,多个球体怎么办?虽然使用球体数组的方式很诱人,但一个非常简洁的解决方案是为光线可能碰到的任何物体创建一个"抽象类",并将球体和球体列表都视为可击中的物体。关于该抽象类应该被称为什么有点困扰——如果不考虑"面向对象"编程,称之为"对象"会很好。通常会使用"表面(Surface)"一词,但它的弱点可能在于我们可能需要处理体积(如雾、云等)。"hittable"强调了将它们统一起来的成员函数。我对这些名称都不太满意,但我们将采用"hittable"。
这个"hittable"抽象类将具有一个接受光线作为参数的hit函数。大多数光线追踪器发现给hit添加一个有效的命中区间tmin至tmax很方便,因此只有当tmin<t<tmax时,命中才会"计数"。对于初始光线,这个区间是正数t,但正如我们将看到的,将tmin与tmax定义为区间可以简化我们的代码。一个设计问题是是否在命中物体时计算法线。随着搜索的进行,我们可能会命中更近的物体,而我们只需要最近物体的法线。我将选择简单的解决方案,计算一些我将存储在某个结构中的相关信息。以下是这个抽象类的实现:
#ifndef HITTABLE_H
#define HITTABLE_H

#include "ray.h"

class hit_record {
public:
point3  p;
    vec3 normal;
    double t;
};

class hittable {
	public:
	virtual ~hittable() = default;
	virtual bool hit(const ray& r, double ray_tmin, double ray_tmax, hit_record& 	rec) const = 0;
};

#endif
这是球体的实现代码:
#ifndef SPHERE_H
#define SPHERE_H
#include "hittable.h"
#include "vec3.h"

class sphere : public hittable {
public:
    sphere(point3 _center, double _radius) : center(_center), radius(_radius) {}
bool hit(const ray& r, double ray_tmin, double ray_tmax, hit_record& rec) const override {
	        vec3 oc = r.origin() - center;
	        auto a = r.direction().length_squared();
	        auto half_b = dot(oc, r.direction());
	        auto c = oc.length_squared() - radius*radius;
	        auto discriminant = half_b*half_b - a*c;
	        if (discriminant < 0) return false;
	        auto sqrtd = sqrt(discriminant);

	        // Find the nearest root that lies in the acceptable range.
	        auto root = (-half_b - sqrtd) / a;
	        if (root <= ray_tmin || ray_tmax <= root) {
	            root = (-half_b + sqrtd) / a;
	        if (root <= ray_tmin || ray_tmax <= root)
	                return false;
	}
	rec.t = root;
	rec.p = r.at(rec.t);
	rec.normal = (rec.p - center) / radius;
        return true;
    }

private:    point3 center;    double radius;
};

#endif
Listing 16: [sphere.h] The sphere class
6.4 正面面片与背面面片的区别
关于法线的第二个设计决定是它们是否应该始终指向外部。目前,找到的法线始终指向从中心到交点的方向(法线指向外部)。如果射线从外部与球体相交,法线则指向与射线相反的方向。如果射线从内部与球体相交,法线(始终指向外部)则指向与射线相同的方向。或者,我们可以让法线始终指向与射线相反的方向。如果射线在球体外部,法线将指向外部;但如果射线在球体内部,法线将指向内部。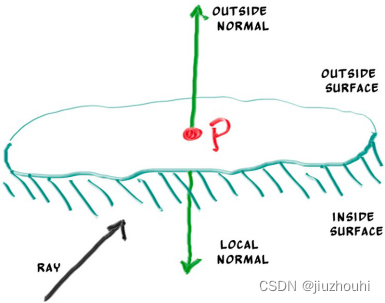
图7:球体表面法线的可能方向
我们需要从这些可能性中选择一个,因为最终我们希望确定射线是从表面的哪一侧射出的。这对于在每一侧上都以不同方式渲染的对象非常重要,例如双面纸上的文本或者内外部分明确的玻璃球。
如果我们决定法线始终指向外部,那么在给射线上色时,我们需要确定射线所在的一侧。我们可以通过将射线与法线进行比较来找到答案。如果射线和法线方向相同,射线在物体内部;如果射线和法线方向相反,射线在物体外部。这可以通过计算这两个向量的点积来确定,如果它们的点积为正数,那么射线在球体内部。
if (dot(ray_direction, outward_normal) > 0.0) {
	// ray is inside the sphere
...}
 else {
	// ray is outside the sphere
...}
如果我们决定法线始终指向逆向的射线,我们将无法使用点积来确定射线在表面的哪一侧。相反,我们需要存储这个信息:
bool front_face;
if (dot(ray_direction, outward_normal) > 0.0) {
// ray is inside the sphere
normal = -outward_normal;
front_face = false;
}
else {
    // ray is outside the sphere
    normal = outward_normal;
    front_face = true;
}
我们可以设置让法线始终从表面“向外”指向,或者始终指向入射射线的反方向。这个决定取决于您是想在几何相交时确定表面的哪一侧,还是在着色时确定。在本书中,我们有比几何类型更多的材质类型,所以我们将选择较少的工作量,并将确定放在几何时间。这只是一种偏好问题,在文献中会看到两种实现方式。
我们在hit_record类中添加了front_face布尔变量。我们还将添加一个函数来解决这个计算:set_face_normal()。为了方便起见,我们假设传递给新的set_face_normal()函数的向量长度为单位长度。我们可以显式地对参数进行归一化,但如果几何代码这样做,效率更高,因为当您对特定几何有更多了解时,通常更容易处理。
class hit_record {
public:
point3 p;
vec3 normal;
double t;
 bool front_face;

void set_face_normal(const ray& r, const vec3& outward_normal) {
    // Sets the hit record normal vector.
    // NOTE: the parameter `outward_normal` is assumed to have unit length.
   front_face = dot(r.direction(), outward_normal) < 0;
   normal = front_face ? outward_normal : -outward_normal;
}
};
Listing 19: [hittable.h] Adding front-face tracking to hit_record
然后我们将表面边界确定添加到该类中:
class sphere : public hittable {
  public:
...
 bool hit(const ray& r, double ray_tmin, double ray_tmax, hit_record& rec) const   {
        ...
        rec.t = root;
        rec.p = r.at(rec.t);
        vec3 outward_normal = (rec.p - center) / radius;
        rec.set_face_normal(r, outward_normal);
	    return true;
	}
	...
};
Listing 20: [sphere.h] The sphere class with normal determination
6.5 hittable_list
我们有一个名为"hittable"的通用对象,光线可以与其相交。现在我们添加一个类,用于存储一系列"hittable"对象的列表:
#ifndef HITTABLE_LIST_H
#define HITTABLE_LIST_H

#include "hittable.h"
#include <memory>
#include <vector>

using std::shared_ptr;
using std::make_shared;

class hittable_list : public hittable {
 public:
std::vector<shared_ptr<hittable>> objects;
    hittable_list() { }
hittable_list(shared_ptr<hittable> object) { add(object); }

void clear() { objects.clear(); }

void add(shared_ptr<hittable> object) {
   objects.push_back(object);
}

  bool hit(const ray& r, double ray_tmin, double ray_tmax, hit_record& rec) const override {
        hit_record temp_rec;
        bool hit_anything = false;
        auto closest_so_far = ray_tmax;

        for (const auto& object : objects) {
            if (object->hit(r, ray_tmin, closest_so_far, temp_rec)){
                hit_anything = true;
                closest_so_far = temp_rec.t;
                rec = temp_rec;
            }
        }
        return hit_anything;
}
};
#endif
Listing 21: [hittable_list.h] The hittable_list class
6.6 一些C++的新特性
hittable_list 类的代码使用了两个C++特性,如果你平时不是C++程序员可能会遇到困扰:vector和shared_ptr。
shared_ptr<type>是指向已分配类型的指针,具有引用计数语义。每次将其值赋给另一个共享指针(通常是简单赋值),引用计数就会递增。当共享指针超出范围(例如在块或函数的结尾处),引用计数就会递减。一旦计数降至零,对象就会被安全地删除。
通常,共享指针首先使用新分配的对象进行初始化,类似于下面的示例:
shared_ptr<double> double_ptr = make_shared<double>(0.37);
shared_ptr<vec3> vec3_ptr = make_shared<vec3>(1.414214, 2.718281, 1.618034);
shared_ptr<sphere> sphere_ptr = make_shared<sphere>(point3(0,0,0), 1.0);
make_shared<thing>(thing_constructor_params ...) 分配一个新的 thing 类型的实例,使用构造函数参数。它返回一个 shared_ptr<thing>。
由于类型可以通过 make_shared<type>(...) 的返回类型自动推断出来,上述代码可以更简洁地使用 C++ 的 auto 类型推导器表示如下:
auto double_ptr = make_shared<double>(0.37);
auto vec3_ptr   = make_shared<vec3>(1.414214, 2.718281, 1.618034);
auto sphere_ptr = make_shared<sphere>(point3(0,0,0), 1.0);
在我们的代码中,我们将使用 shared_ptr,因为它允许多个几何体共享一个公共实例(例如,一组使用相同颜色材质的球体),并且使内存管理自动化并更易于理解。
std::shared_ptr 包含在 <memory> 头文件中。
第二个您可能不熟悉的 C++ 特性是 std::vector。它是一个泛型的类似数组的集合,可以存储任意类型的元素。在上面的代码中,我们使用了一个 hittable 指针的集合。std::vector 会在添加更多值时自动扩展:objects.push_back(object) 将一个值添加到 std::vector 成员变量 objects 的末尾。
std::vector 包含在 <vector> 头文件中。
最后,在第21行的 using 语句告诉编译器我们将从 std 库中获取 shared_ptr 和 make_shared,因此我们在引用它们时不需要每次都加上 std:: 前缀。
6.7 常见的常量和实用函数
我们需要一些数学常数,在它们自己的头文件中方便地进行定义。现在我们只需要无穷大(infinity),但稍后我们还会在其中添加我们自己对圆周率(pi)的定义,因为我们以后会用到它。关于pi,没有标准的可移植定义,所以我们只需为其定义我们自己的常量。我们将把常见有用的常数和未来的实用函数放在rtweekend.h中,这是我们的主要通用头文件。
#ifndef RTWEEKEND_H
#define RTWEEKEND_H

#include <cmath>
#include <limits>
#include <memory>

// Usings
Using std::shared_ptr;
using std::make_shared;
using std::sqrt;

// Constants
const double infinity = std::numeric_limits<double>::infinity();
const double pi = 3.1415926535897932385;

// Utility Functions
inline double degrees_to_radians(double degrees) {
return degrees * pi / 180.0;
}

// Common Headers
#include "ray.h"
#include "vec3.h"

#endif
新的main 函数
#include "rtweekend.h"
#include "color.h"
#include "hittable.h"
#include "hittable_list.h"
#include "sphere.h"

#include <iostream>

double hit_sphere(const point3& center, double radius, const ray& r) {
 ...
}

color ray_color(const ray& r, const hittable& world) {
hit_record rec;
    if (world.hit(r, 0, infinity, rec)) {
       return 0.5 * (rec.normal + color(1,1,1));
}

vec3 unit_direction = unit_vector(r.direction());
auto a = 0.5*(unit_direction.y() + 1.0);
    return (1.0-a)*color(1.0, 1.0, 1.0) + a*color(0.5, 0.7, 1.0);
}

int main() {
// Image
auto aspect_ratio = 16.0 / 9.0;
int image_width = 400;

    // Calculate the image height, and ensure that it's at least 1.
int image_height = static_cast<int>(image_width / aspect_ratio);
image_height = (image_height < 1) ? 1 : image_height;
   // World
hittable_list world;
world.add(make_shared<sphere>(point3(0,0,-1), 0.5));
world.add(make_shared<sphere>(point3(0,-100.5,-1), 100));

// Camera
auto focal_length = 1.0;
auto viewport_height = 2.0;
auto viewport_width = viewport_height * (static_cast<double>(image_width)/image_height);
auto camera_center = point3(0, 0, 0);

 // Calculate the vectors across the horizontal and down the vertical viewport edges.    auto viewport_u = vec3(viewport_width, 0, 0);
auto viewport_v = vec3(0, -viewport_height, 0);

  // Calculate the horizontal and vertical delta vectors from pixel to pixel.
auto pixel_delta_u = viewport_u / image_width;
auto pixel_delta_v = viewport_v / image_height;

// Calculate the location of the upper left pixel.
auto viewport_upper_left = camera_center - vec3(0, 0, focal_length) - viewport_u/2 - viewport_v/2;
auto pixel00_loc = viewport_upper_left + 0.5 * (pixel_delta_u + pixel_delta_v);

 // Render
   std::cout << "P3\n" << image_width << ' ' << image_height << "\n255\n";
for (int j = 0; j < image_height; ++j) {
        std::clog << "\rScanlines remaining: " << (image_height - j) << ' ' << std::flush;
        for (int i = 0; i < image_width; ++i) {
            auto pixel_center = pixel00_loc + (i * pixel_delta_u) + (j * pixel_delta_v);
            auto ray_direction = pixel_center - camera_center;
            ray r(camera_center, ray_direction);
color pixel_color = ray_color(r, world);
               write_color(std::cout, pixel_color);
        }
}
std::clog << "\rDone.                 \n";
}
这会产生一张图片,实际上只是一个显示球体位置及其表面法线的可视化图像。这通常是查看几何模型的任何缺陷或特定特征的绝佳方式。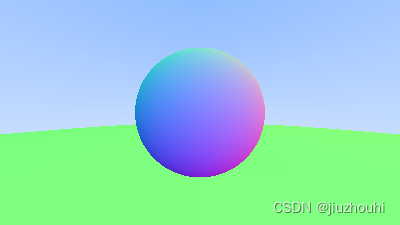
Image 5: Resulting render of normals-colored sphere with ground
6.8 An Interval Class
在我们继续之前,我们将实现一个区间类来管理具有最小值和最大值的实数区间。随着我们的进展,我们将经常使用这个类。
#ifndef INTERVAL_H
#define INTERVAL_H

class interval {
  public:
double min, max;

interval() : min(+infinity), max(-infinity) {}  // Default interval is empty
interval(double _min, double _max) : min(_min), max(_max) {}

bool contains(double x) const {
        return min <= x && x <= max;
}

bool surrounds(double x) const {
        return min < x && x < max;
}

static const interval empty, universe;
};

const static interval empty   (+infinity, -infinity);
const static interval universe(-infinity, +infinity);

#endif
Listing 26: [interval.h] Introducing the new interval class
class hittable_list : public hittable {
  public:
...
bool hit(const ray& r, interval ray_t, hit_record& rec) const override {
        hit_record temp_rec;
        bool hit_anything = false;
        auto closest_so_far = ray_t.max;
        for (const auto& object : objects) {
            if (object->hit(r, interval(ray_t.min, closest_so_far), temp_rec)) {
                hit_anything = true;
                closest_so_far = temp_rec.t;
                rec = temp_rec;
            }
        }
        return hit_anything;
}
    ...
};
Listing 29: [hittable_list.h] hittable_list::hit() using interval
class sphere : public hittable {
  public:
...
bool hit(const ray& r, interval ray_t, hit_record& rec) const override {
        ...
        // Find the nearest root that lies in the acceptable range.
        auto root = (-half_b - sqrtd) / a;
        if (!ray_t.surrounds(root)) {
            root = (-half_b + sqrtd) / a;
            if (!ray_t.surrounds(root))
                return false;
        }
	...
}
    ...
};
Listing 30: [sphere.h] sphere using interval
...
color ray_color(const ray& r, const hittable& world) {
    hit_record rec;
    if (world.hit(r, interval(0, infinity), rec)) {
        return 0.5 * (rec.normal + color(1,1,1));
}
    vec3 unit_direction = unit_vector(r.direction());
    auto a = 0.5*(unit_direction.y() + 1.0);
    return (1.0-a)*color(1.0, 1.0, 1.0) + a*color(0.5, 0.7, 1.0);
}
...
Listing 31: [main.cc] The new main using interval