目录
- 1. 任务要求
- 2. 数据集
- 3. 实现算法
- 4. 实验结果
- 5. 源代码
1. 任务要求
- 输入:给定测试集图片,预测在15个场景中的类别。
- 任务:
- 实现Tiny images representation。
- 实现最近邻分类器nearest neighbor classifier。
- 实现SIFT特征词袋表示
- 输出:
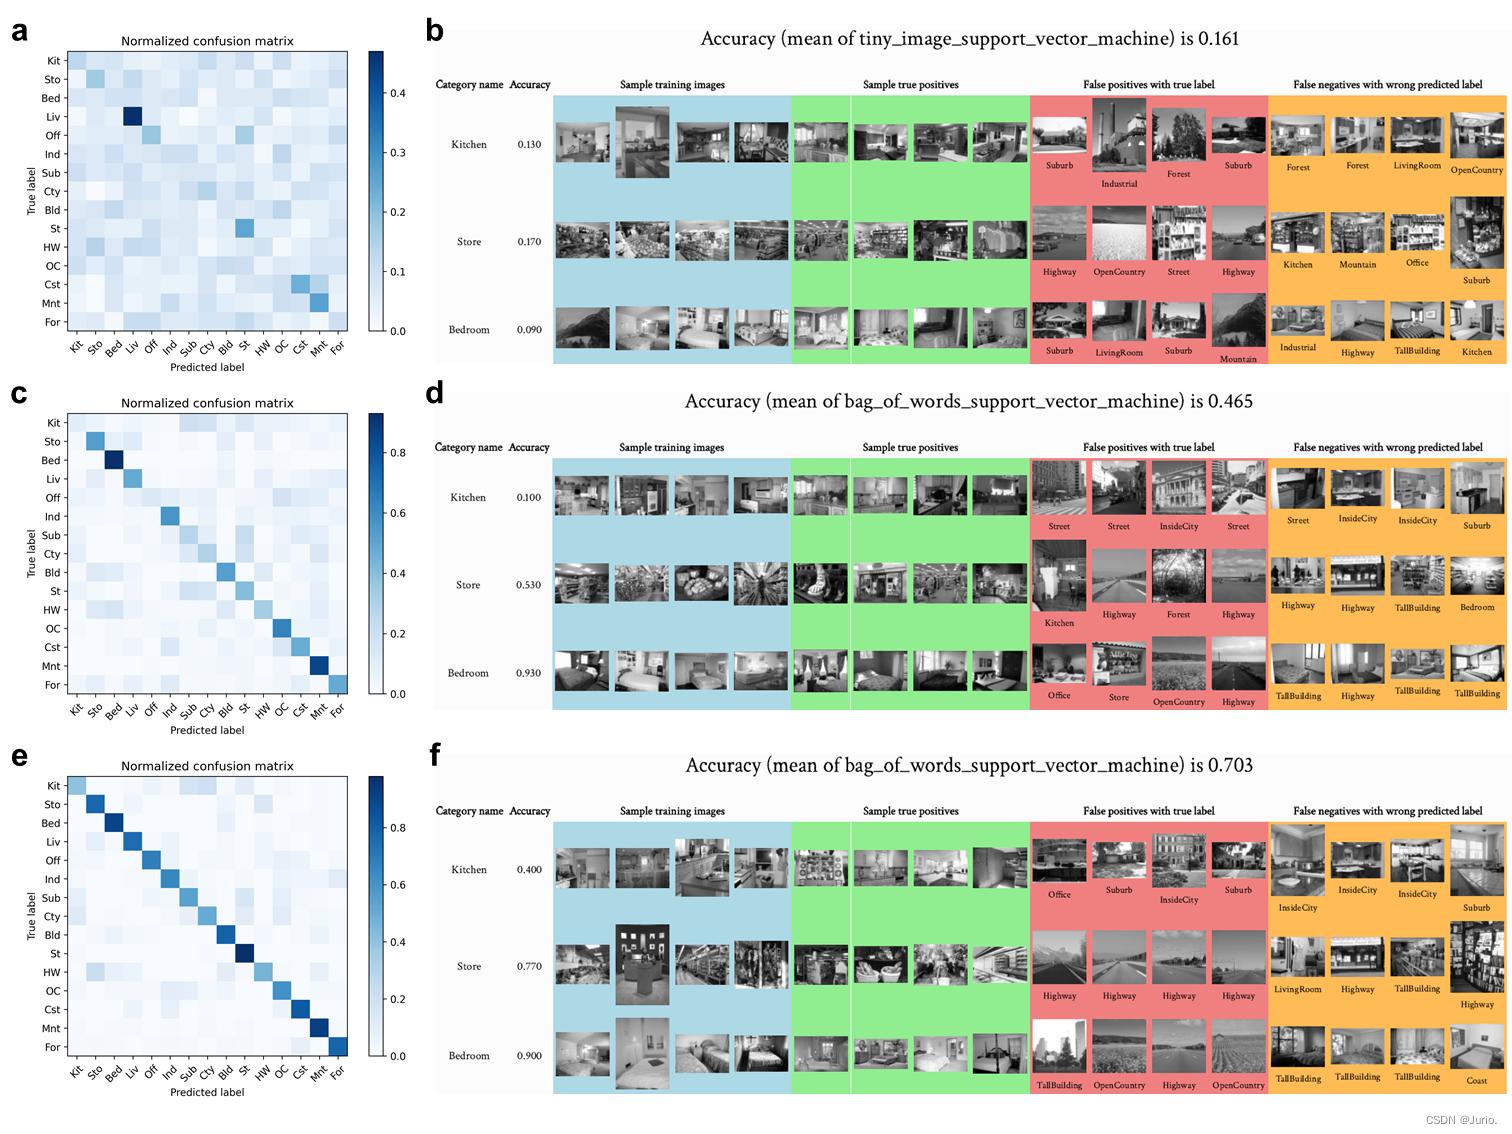
- 针对Tiny images representation 和SIFT 词袋表示,报告每个类别的准确度和平均准确度。
- 对这两种方案,对正确和错误的识别结果挑出示例进行可视化。
- 探索不同的参数设置对结果的影响,总结成表格。
- 通过实验讨论词汇量的大小对识别分类结果的影响,比如哪个类别的识别准确率最高/最低,原因是什么。
2. 数据集
http://www.cad.zju.edu.cn/home/gfzhang/course/cv/Homework3.zip
3. 实现算法
- Tiny images representation
- SIFT特征词袋表示
- 分类算法:HOG、NNS和SVM。
4. 实验结果
场景识别与词袋模型
5. 源代码
- 完整项目地址:https://github.com/Jurio0304/Scene_Recognition_with_Bag_of_Words,参考引用麻烦点点star,非常感谢!
main.py源代码如下:
#!/usr/bin/python
import sys

import numpy as np
import os
import argparse

from create_results import create_results
from get_image_path import get_image_paths
from get_tiny_images import get_tiny_images
from build_vocabulary import build_vocabulary, build_vocabulary_sift
from get_bags_of_words import get_bags_of_words, get_bags_of_words_sift
from svm_classify import svm_classify
from nearest_neighbor_classify import nearest_neighbor_classify


# from create_results_webpage import create_results_webpage


def scene_recognition(feature='chance_feature', feature_detector='sift', classifier='chance_classifier'):
    """
    For this project, you will need to report performance for three
    combinations of features / classifiers. We recommend that you code them in
    this order:
        1) Tiny image features and nearest neighbor classifier
        2) Bag of word features and nearest neighbor classifier
        3) Bag of word features and linear SVM classifier
    The starter code is initialized to 'chance_' just so that the starter
    code does not crash when run unmodified and you can get a preview of how
    results are presented.

    Interpreting your performance with 100 training examples per category:
     accuracy  =   0 -> Something is broken.
     accuracy ~= .07 -> Your performance is equal to chance.
                        Something is broken or you ran the starter code unchanged.
     accuracy ~= .20 -> Rough performance with tiny images and nearest
                        neighbor classifier. Performance goes up a few
                        percentage points with K-NN instead of 1-NN.
     accuracy ~= .20 -> Rough performance with tiny images and linear SVM
                        classifier. Although the accuracy is about the same as
                        nearest neighbor, the confusion matrix is very different.
     accuracy ~= .40 -> Rough performance with bag of word and nearest
                        neighbor classifier. Can reach .60 with K-NN and
                        different distance metrics.
     accuracy ~= .50 -> You've gotten things roughly correct with bag of
                        word and a linear SVM classifier.
     accuracy >= .70 -> You've also tuned your parameters well. E.g. number
                        of clusters, SVM regularization, number of patches
                        sampled when building vocabulary, size and step for
                        dense features.
     accuracy >= .80 -> You've added in spatial information somehow or you've
                        added additional, complementary image features. This
                        represents state of the art in Lazebnik et al 2006.
     accuracy >= .85 -> You've done extremely well. This is the state of the
                        art in the 2010 SUN database paper from fusing many
                        features. Don't trust this number unless you actually
                        measure many random splits.
     accuracy >= .90 -> You used modern deep features trained on much larger
                        image databases.
     accuracy >= .96 -> You can beat a human at this task. This isn't a
                        realistic number. Some accuracy calculation is broken
                        or your classifier is cheating and seeing the test
                        labels.
    """

    # Step 0: Set up parameters, category list, and image paths.
    FEATURE = feature
    CLASSIFIER = classifier

    # This is the path the script will look at to load images from.
    data_path = './data/'

    # This is the list of categories / directories to use. The categories are
    # somewhat sorted by similarity so that the confusion matrix looks more
    # structured (indoor and then urban and then rural).
    categories = ['Kitchen', 'Store', 'Bedroom', 'LivingRoom', 'Office',
                  'Industrial', 'Suburb', 'InsideCity', 'TallBuilding', 'Street',
                  'Highway', 'OpenCountry', 'Coast', 'Mountain', 'Forest']

    # This list of shortened category names is used later for visualization.
    abbr_categories = ['Kit', 'Sto', 'Bed', 'Liv', 'Off', 'Ind', 'Sub',
                       'Cty', 'Bld', 'St', 'HW', 'OC', 'Cst', 'Mnt', 'For']

    # Number of training examples per category to use. Max is 100.
    # For simplicity, we assume this is the number of test cases per category as well.
    num_train_per_cat = 100

    # This function returns string arrays containing the file path for each train and test image
    print('Getting paths and labels for all train and test data.')

    train_image_paths, test_image_paths, train_labels, test_labels = \
        get_image_paths(data_path, categories, num_train_per_cat)
    #   train_image_paths  1500x1   list
    #   test_image_paths   1500x1   list
    #   train_labels       1500x1   list
    #   test_labels        1500x1   list

    ############################################################################
    # Step 1: Represent each image with the appropriate feature
    # Each function to construct features should return an N x d matrix, where
    # N is the number of paths passed to the function and d is the
    # dimensionality of each image representation. See the starter code for
    # each function for more details.
    ############################################################################

    print('Using %s representation for images.' % FEATURE)

    if FEATURE.lower() == 'tiny_image':
        print('Loading tiny images...')
        h, w = 16, 32

        train_image_feats = get_tiny_images(train_image_paths, h_size=h, w_size=w)
        test_image_feats = get_tiny_images(test_image_paths, h_size=h, w_size=w)
        print('Tiny images loaded.')

    elif FEATURE.lower() == 'bag_of_words':
        # Because building the vocabulary takes a long time, we save the generated
        # vocab to a file and re-load it each time to make testing faster.

        # Larger values will work better (to a point), but are slower to compute
        vocab_size = 50
        if not os.path.isfile(f'{feature_detector}_vocab_{vocab_size}.npy'):
            print('No existing visual word vocabulary found. Computing one from training images.')

            if feature_detector.lower() == 'sift':
                vocab = build_vocabulary_sift(train_image_paths, vocab_size)
            else:
                vocab = build_vocabulary(train_image_paths, vocab_size)

            np.save(f'{feature_detector}_vocab_{vocab_size}.npy', vocab)

        if feature_detector.lower() == 'sift':
            train_image_feats = get_bags_of_words_sift(train_image_paths, vocab_size, feature_detector)
            test_image_feats = get_bags_of_words_sift(test_image_paths, vocab_size, feature_detector)
        else:
            train_image_feats = get_bags_of_words(train_image_paths, vocab_size)
            test_image_feats = get_bags_of_words(test_image_paths, vocab_size)

    elif FEATURE.lower() == 'chance_feature':
        train_image_feats = []
        test_image_feats = []

    else:
        raise ValueError('Unknown feature type!')

    ############################################################################
    # Step 2: Classify each test image by training and using the appropriate classifier
    # Each function to classify test features will return an N x 1 string array,
    # where N is the number of test cases and each entry is a string indicating
    # the predicted category for each test image. Each entry in
    # 'predicted_categories' must be one of the 15 strings in 'categories',
    # 'train_labels', and 'test_labels'. See the starter code for each function
    # for more details.
    ############################################################################

    print('Using %s classifier to predict test set categories.' % CLASSIFIER)

    if CLASSIFIER.lower() == 'nearest_neighbor':
        predicted_categories = nearest_neighbor_classify(train_image_feats, train_labels, test_image_feats)

    elif CLASSIFIER.lower() == 'support_vector_machine':
        predicted_categories = svm_classify(train_image_feats, train_labels, test_image_feats)

    elif CLASSIFIER.lower() == 'chance_classifier':
        # The placeholder classifier simply predicts a random category for every test case
        random_permutation = np.random.permutation(len(test_labels))
        predicted_categories = [test_labels[i] for i in random_permutation]

    else:
        raise ValueError('Unknown classifier type')

    ############################################################################
    # Step 3: Build a confusion matrix and score the recognition system
    # You do not need to code anything in this section.

    # If we wanted to evaluate our recognition method properly we would train
    # and test on many random splits of the data. You are not required to do so
    # for this project.

    # This function will recreate results_webpage/index.html and various image
    # thumbnails each time it is called. View the webpage to help interpret
    # your classifier performance. Where is it making mistakes? Are the
    # confusions reasonable?
    ############################################################################
    result_path = f'results/{feature}_{classifier}'
    if not os.path.isdir('./results'):
        print('Making results directory.')
        os.mkdir('./results')
    if not os.path.isdir(result_path):
        os.mkdir(result_path)

    create_results(train_image_paths, test_image_paths, train_labels, test_labels, categories, abbr_categories,
                   predicted_categories, result_path)


if __name__ == '__main__':
    '''
    Command line usage:
    python main.py [-f | --feature <representation to use>] [-c | --classifier <classifier method>]

    '''
    # create the command line parser
    parser = argparse.ArgumentParser()

    parser.add_argument('-f', '--feature', default='bag_of_words',
                        help='Either chance_feature, tiny_image, or bag_of_words')
    parser.add_argument('-fd', '--feature_detector', default='sift',
                        help='Either sift or hog')
    parser.add_argument('-c', '--classifier', default='support_vector_machine',
                        help='Either chance_classifier, nearest_neighbor, or support_vector_machine')

    args = parser.parse_args()

    # RUN THE MAIN SCRIPT
    scene_recognition(args.feature, args.feature_detector, args.classifier)

    sys.exit(0)

