目录
简介
CBAM注意力机制原理及代码实现
原理
代码实现
GAM注意力机制
原理
代码实现
修改损失函数
YAML文件
完整代码
🚀🚀🚀订阅专栏,更新及时查看不迷路🚀🚀🚀
http://t.csdnimg.cn/sVHxv![]() http://t.csdnimg.cn/sVHxv
http://t.csdnimg.cn/sVHxv
简介
Ultralytics 推出了最新版本的 YOLO 模型。注意力机制是提高模型性能最热门的方法之一。
本次将介绍几种常见的注意力机制,这些注意力机制在大多数的数据集上均能有效的提升目标检测的精度/召回率/准确率。
CBAM注意力机制原理及代码实现
原理

CBAM(Convolutional Block Attention Module)是一种用于卷积神经网络(CNN)的注意力机制,它能够增强网络对输入特征的关注度,提高网络性能。CBAM 主要包含两个子模块:通道注意力模块(Channel Attention Module)和空间注意力模块(Spatial Attention Module)。
以下是CBAM注意力机制的基本原理:
1. 通道注意力模块(Channel Attention Module):
输入:经过卷积层的特征图。
处理步骤:
对每个通道进行全局平均池化,得到通道的全局平均值。
通过两个全连接层,将全局平均值映射为两个权重向量(一个用于缩放,一个用于偏置)。
将这两个权重向量与原始特征图相乘,以加权调整每个通道的重要性。
2. 空间注意力模块(Spatial Attention Module):**
输入:通道注意力模块的输出。
处理步骤:
对每个通道的特征图进行分别的最大池化和平均池化,得到两个空间特征图。
将这两个空间特征图相加,通过一个卷积层产生一个权重图。
将原始特征图与权重图相乘,以加权调整每个空间位置的重要性。
3. 整合:
将通道注意力模块和空间注意力模块的输出相乘,得到最终的注意力增强特征图。
将这个注意力增强的特征图传递给网络的下一层进行进一步处理。
CBAM的关键优势在于它能够同时考虑通道和空间信息,有助于网络更好地理解和利用输入特征。这种注意力机制有助于提高网络在视觉任务上的性能,使其能够更有针对性地关注重要的特征。
代码实现
路径:"./ultralytics/nn/modules/conv.py"
class ChannelAttention(nn.Module):
    """Channel-attention module https://github.com/open-mmlab/mmdetection/tree/v3.0.0rc1/configs/rtmdet."""

    def __init__(self, channels: int) -> None:
        super().__init__()
        self.pool = nn.AdaptiveAvgPool2d(1)
        self.fc = nn.Conv2d(channels, channels, 1, 1, 0, bias=True)
        self.act = nn.Sigmoid()

    def forward(self, x: torch.Tensor) -> torch.Tensor:
        return x * self.act(self.fc(self.pool(x)))


class SpatialAttention(nn.Module):
    """Spatial-attention module."""

    def __init__(self, kernel_size=7):
        """Initialize Spatial-attention module with kernel size argument."""
        super().__init__()
        assert kernel_size in (3, 7), 'kernel size must be 3 or 7'
        padding = 3 if kernel_size == 7 else 1
        self.cv1 = nn.Conv2d(2, 1, kernel_size, padding=padding, bias=False)
        self.act = nn.Sigmoid()

    def forward(self, x):
        """Apply channel and spatial attention on input for feature recalibration."""
        return x * self.act(self.cv1(torch.cat([torch.mean(x, 1, keepdim=True), torch.max(x, 1, keepdim=True)[0]], 1)))


class CBAM(nn.Module):
    """Convolutional Block Attention Module."""

    def __init__(self, c1, kernel_size=7):  # ch_in, kernels
        super().__init__()
        self.channel_attention = ChannelAttention(c1)
        self.spatial_attention = SpatialAttention(kernel_size)

    def forward(self, x):
        """Applies the forward pass through C1 module."""
        return self.spatial_attention(self.channel_attention(x))
添加完代码以后需要在"./ultralytics/nn/tasks.py"进行注册
GAM注意力机制
原理
目标的设计是一种减少信息缩减并放大全局维度交互特征的机制。我们采用 CBAM 的顺序通道空间注意力机制并重新设计子模块。整个过程如图所示。
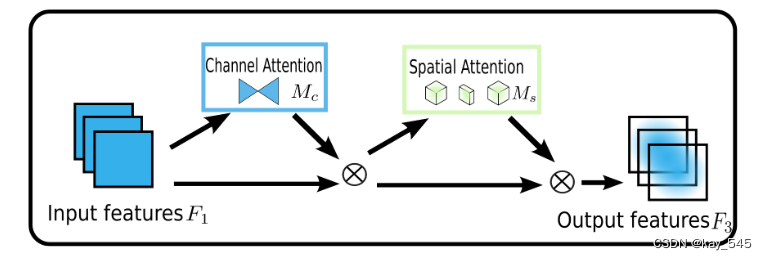
通道注意力机制
通道注意力子模块使用 3D 排列来保留三个维度的信息。然后,它使用两层 MLP(多层感知器)放大跨维度通道空间依赖性。 (MLP是一种编码器-解码器结构,其缩减比为r,与BAM相同。)通道注意子模块如图所示。

空间注意力机制
在空间注意力子模块中,为了关注空间信息,我们使用两个卷积层进行空间信息融合。我们还使用与 BAM 相同的通道注意子模块的缩减率 r。同时,最大池化会减少信息并产生负面影响。我们删除池化以进一步保留特征图。因此,空间注意力模块有时会显着增加参数的数量。为了防止参数显着增加,我们在 ResNet50 中采用带有通道洗牌的组卷积。没有组卷积的空间注意力子模块如图所示。

代码实现
代码添加在 ./ultralytics/nn/modules/conv.py 中,同样需要在task.py中注册
class GAM_Attention(nn.Module):
    def __init__(self, c1, c2, group=True, rate=4):
        super(GAM_Attention, self).__init__()

        self.channel_attention = nn.Sequential(
            nn.Linear(c1, int(c1 / rate)),
            nn.ReLU(inplace=True),
            nn.Linear(int(c1 / rate), c1)
        )

        self.spatial_attention = nn.Sequential(

            nn.Conv2d(c1, c1 // rate, kernel_size=7, padding=3, groups=rate) if group else nn.Conv2d(c1, int(c1 / rate),
                                                                                                     kernel_size=7,
                                                                                                     padding=3),
            nn.BatchNorm2d(int(c1 / rate)),
            nn.ReLU(inplace=True),
            nn.Conv2d(c1 // rate, c2, kernel_size=7, padding=3, groups=rate) if group else nn.Conv2d(int(c1 / rate), c2,
                                                                                                     kernel_size=7,
                                                                                                     padding=3),
            nn.BatchNorm2d(c2)
        )

    def forward(self, x):
        b, c, h, w = x.shape
        x_permute = x.permute(0, 2, 3, 1).view(b, -1, c)
        x_att_permute = self.channel_attention(x_permute).view(b, h, w, c)
        x_channel_att = x_att_permute.permute(0, 3, 1, 2)
        # x_channel_att=channel_shuffle(x_channel_att,4) #last shuffle
        x = x * x_channel_att

        x_spatial_att = self.spatial_attention(x).sigmoid()
        x_spatial_att = channel_shuffle(x_spatial_att, 4)  # last shuffle
        out = x * x_spatial_att
        # out=channel_shuffle(out,4) #last shuffle
        return out
修改损失函数
WIoU是一种新型的损失函数,代码实现
def WIoU(cls, pred, target, self=None):
        self = self if self else cls(pred, target)
        dist = torch.exp(self.l2_center / self.l2_box.detach())
        return self._scaled_loss(dist * self.iou)
这个其实就是修改了loss.py中的BboxLoss,在本段代码的第十二行,将type改成了WIoU
class BboxLoss(nn.Module):

    def __init__(self, reg_max, use_dfl=False):
        """Initialize the BboxLoss module with regularization maximum and DFL settings."""
        super().__init__()
        self.reg_max = reg_max
        self.use_dfl = use_dfl

    def forward(self, pred_dist, pred_bboxes, anchor_points, target_bboxes, target_scores, target_scores_sum, fg_mask):
        """IoU loss."""
        weight = target_scores.sum(-1)[fg_mask].unsqueeze(-1)
        loss,iou = bbox_iou(pred_bboxes[fg_mask], target_bboxes[fg_mask], xywh=False,type_='WIoU')
        loss_iou=loss.sum()/target_scores_sum

        # DFL loss
        if self.use_dfl:
            target_ltrb = bbox2dist(anchor_points, target_bboxes, self.reg_max)
            loss_dfl = self._df_loss(pred_dist[fg_mask].view(-1, self.reg_max + 1), target_ltrb[fg_mask]) * weight
            loss_dfl = loss_dfl.sum() / target_scores_sum
        else:
            loss_dfl = torch.tensor(0.0).to(pred_dist.device)

        return loss_iou, loss_dfl
YAML文件
# Ultralytics YOLO 🚀, AGPL-3.0 license
# YOLOv8 object detection model with P3-P5 outputs. For Usage examples see https://docs.ultralytics.com/tasks/detect

# Parameters
nc: 9  # number of classes
scales: # model compound scaling constants, i.e. 'model=yolov8n.yaml' will call yolov8.yaml with scale 'n'
  # [depth, width, max_channels]
  n: [0.33, 0.25, 1024]  # YOLOv8n summary: 225 layers,  3157200 parameters,  3157184 gradients,   8.9 GFLOPs
  s: [0.33, 0.50, 1024]  # YOLOv8s summary: 225 layers, 11166560 parameters, 11166544 gradients,  28.8 GFLOPs
  m: [0.67, 0.75, 768]   # YOLOv8m summary: 295 layers, 25902640 parameters, 25902624 gradients,  79.3 GFLOPs
  l: [1.00, 1.00, 512]   # YOLOv8l summary: 365 layers, 43691520 parameters, 43691504 gradients, 165.7 GFLOPs
  x: [1.00, 1.25, 512]   # YOLOv8x summary: 365 layers, 68229648 parameters, 68229632 gradients, 258.5 GFLOPs

# YOLOv8.0n backbone
backbone:
  # [from, repeats, module, args]
  - [-1, 1, Conv, [64, 3, 2]]  # 0-P1/2
  - [-1, 1, Conv, [128, 3, 2]]  # 1-P2/4
  - [-1, 3, C2f, [128, True]]
  - [-1, 1, Conv, [256, 3, 2]]  # 3-P3/8
  - [-1, 6, C2f, [256, True]]
  - [-1, 1, Conv, [512, 3, 2]]  # 5-P4/16
  - [-1, 6, C2f, [512, True]]
  - [-1, 1, Conv, [1024, 3, 2]]  # 7-P5/32
  - [-1, 3, C2f, [1024, True]]
  - [-1, 1, SPPF, [1024, 5]]  # 9

# YOLOv8.0n head
head:
  - [-1, 1, nn.Upsample, [None, 2, 'nearest']]
  - [[-1, 6], 1, Concat, [1]]  # cat backbone P4
  - [-1, 3, C2f, [512]]  # 12
  - [-1, 1, GAM_Attention, [512,512]]

  - [-1, 1, nn.Upsample, [None, 2, 'nearest']]
  - [[-1, 4], 1, Concat, [1]]  # cat backbone P3
  - [-1, 3, C2f, [256]]  # 16 (P3/8-small)
  - [-1, 1, GAM_Attention, [256,256]]

  - [-1, 1, Conv, [256, 3, 2]]
  - [[-1, 12], 1, Concat, [1]]  # cat head P4
  - [-1, 3, C2f, [512]]  # 20 (P4/16-medium)
  - [-1, 1, GAM_Attention, [512,512]]

  - [-1, 1, Conv, [512, 3, 2]]
  - [[-1, 9], 1, Concat, [1]]  # cat head P5
  - [-1, 3, C2f, [1024]]  # 24 (P5/32-large)
  - [-1, 1, GAM_Attention, [1024,1024]]

  - [[17, 21, 25], 1, Detect, [nc]]  # Detect(P3, P4, P5)
在head部分,可以将GAM_attention改成不同的注意力机制,来改变网络结构,从而提升目标检测 的精度
完整代码
链接: https://pan.baidu.com/s/1IDnEZxpcaEgBowlTxX2iNA?pwd=vdrs 提取码: vdrs


