使用ceph建议采用多节点多磁盘方式部署,本文章仅作为单节点部署参考,请勿用于生产环境
使用ceph建议采用多节点多磁盘方式部署,本文章仅作为单节点部署参考,请勿用于生产环境
使用ceph建议采用多节点多磁盘方式部署,本文章仅作为单节点部署参考,请勿用于生产环境
1. yum 配置文件添加如下相关源
[root@testserver01 ~]# cat /etc/yum.conf
[epel]
name=CentOS7-epel
baseurl=https://mirrors.aliyun.com/epel/7/x86_64/
gpgcheck=0
enabled=1
[base]
name=CentOS7-OS
baseurl=https://mirrors.aliyun.com/centos/7/os/x86_64/
gpgcheck=0
enabled=1
[nautilus-x86_64]
name=ceph-x86_64
baseurl=https://mirrors.aliyun.com/ceph/rpm-nautilus/el7/x86_64/
gpgcheck=0
enabled=1
[nautilus-noarch]
name=ceph-noarch
baseurl=https://mirrors.aliyun.com/ceph/rpm-nautilus/el7/noarch/
gpgcheck=0
enabled=1
2. 安装ceph mgr依赖的python2-Werkzeug包
[root@testserver01 ~]# rpm -ivh http://rpmfind.net/linux/opensuse/distribution/leap/15.3/repo/oss/noarch/python2-Werkzeug-1.0.1-1.10.noarch.rpm
3. [root@testserver01 ~]# yum install ceph chrony gdisk ceph-radosgw ceph-deploy ceph-mgr-dashboard -y
4. 修改系统参数
[root@testserver01 ~]# sysctl -w kernel.pid_max=4194303; echo 'kernel.pid_max=4194303' >> /etc/sysctl.conf; sysctl -p
5. 添加ceph配置文件
[root@testserver01 ~]# cat /etc/ceph/ceph.conf
[global]
fsid = b080bada-7f10-11ee-8f11-666666666666
mon initial members = testserver01
mon host = 192.168.1.128
public network = 192.168.1.0/24
auth cluster required = cephx
auth service required = cephx
auth client required = cephx
osd pool default pg num = 16
osd pool default pgp num = 16
osd crush update on start=false
osd_pool_default_min_size = 1
mon_osd_down_out_subtree_limit = host
osd_pool_default_size = 1
mon_warn_on_pool_no_redundancy = false
mon_warn_on_insecure_global_id_reclaim_allowed = false
[osd]
osd_scrub_begin_hour = 23
osd_scrub_end_hour = 7
6. 部署mon
[root@testserver01 ~]# ceph-authtool --create-keyring /tmp/ceph.mon.keyring --gen-key -n mon. --cap mon 'allow *'
creating /tmp/ceph.mon.keyring
[root@testserver01 ~]# ceph-authtool --create-keyring /etc/ceph/ceph.client.admin.keyring --gen-key -n client.admin --cap mon 'allow *' --cap osd 'allow *' --cap mds 'allow *' --cap mgr 'allow *'
creating /etc/ceph/ceph.client.admin.keyring
[root@testserver01 ~]# ceph-authtool /tmp/ceph.mon.keyring --import-keyring /etc/ceph/ceph.client.admin.keyring
importing contents of /etc/ceph/ceph.client.admin.keyring into /tmp/ceph.mon.keyring
[root@testserver01 ~]# monmaptool --create --add testserver01 192.168.1.128 --fsid b080bada-7f10-11ee-8f11-666666666666 /tmp/monmap
monmaptool: monmap file /tmp/monmap
monmaptool: set fsid to b080bada-7f10-11ee-8f11-666666666666
monmaptool: writing epoch 0 to /tmp/monmap (1 monitors)
[root@testserver01 ~]# ceph-mon --mkfs -i testserver01 --monmap /tmp/monmap --keyring /tmp/ceph.mon.keyring
[root@testserver01 ~]# chown ceph.ceph /var/lib/ceph/mon -R
[root@testserver01 ~]# systemctl start ceph-mon@testserver01
system[root@testserver01 ~]# systemctl enable ceph-mon@testserver01
Created symlink from /etc/systemd/system/ceph-mon.target.wants/ceph-mon@testserver01.service to /usr/lib/systemd/system/ceph-mon@.service.
[root@testserver01 ~]# ceph mon enable-msgr2
[root@testserver01 ~]# ceph -s
cluster:
id: b080bada-7f10-11ee-8f11-666666666666
health: HEALTH_OK
services:
mon: 1 daemons, quorum testserver01 (age 43s)
mgr: no daemons active
osd: 0 osds: 0 up, 0 in
data:
pools: 0 pools, 0 pgs
objects: 0 objects, 0 B
usage: 0 B used, 0 B / 0 B avail
pgs:
7. 部署mgr
[root@testserver01 ~]# mkdir -p /var/lib/ceph/mgr/ceph-testserver01
[root@testserver01 ~]# ceph auth get-or-create mgr.testserver01 mon 'allow profile mgr' osd 'allow *' mds 'allow *' >/var/lib/ceph/mgr/ceph-testserver01/keyring
[root@testserver01 ~]# chown ceph.ceph -R /var/lib/ceph/mgr/
[root@testserver01 ~]# systemctl start ceph-mgr@testserver01
[root@testserver01 ~]# systemctl enable ceph-mgr@testserver01
Created symlink from /etc/systemd/system/ceph-mgr.target.wants/ceph-mgr@testserver01.service to /usr/lib/systemd/system/ceph-mgr@.service.
[root@testserver01 ~]# ceph -s
cluster:
id: b080bada-7f10-11ee-8f11-666666666666
health: HEALTH_WARN
OSD count 0 < osd_pool_default_size 1
services:
mon: 1 daemons, quorum testserver01 (age 4m)
mgr: testserver01(active, since 70s)
osd: 0 osds: 0 up, 0 in
data:
pools: 0 pools, 0 pgs
objects: 0 objects, 0 B
usage: 0 B used, 0 B / 0 B avail
pgs:
8. 部署osd
[root@testserver01 ~]# ceph auth get client.bootstrap-osd -o /var/lib/ceph/bootstrap-osd/ceph.keyring
exported keyring for client.bootstrap-osd
[root@testserver01 ~]# sgdisk --zap-all /dev/vdb
Creating new GPT entries.
GPT data structures destroyed! You may now partition the disk using fdisk or
other utilities.
[root@testserver01 ~]# ceph-volume lvm create --bluestore --data /dev/vdb
9. 配置crushmap
[root@testserver01 ~]# ceph osd crush move osd.0 host=testserver01 root=default
moved item id 0 name 'osd.0' to location {host=testserver01,root=default} in crush map
[root@testserver01 ~]# ceph osd crush reweight osd.0 0.01
reweighted item id 0 name 'osd.0' to 0.01 in crush map
10. 创建块存储池
[root@testserver01 ~]# ceph osd pool create rbdpool01 32 32
pool 'rbdpool01' created
[root@testserver01 ~]# ceph osd pool application enable rbdpool01 rbd
enabled application 'rbd' on pool 'rbdpool01'
[root@testserver01 ~]# ceph osd pool ls detail
pool 1 'rbdpool01' replicated size 1 min_size 1 crush_rule 0 object_hash rjenkins pg_num 32 pgp_num 32 autoscale_mode warn last_change 10 flags hashpspool stripe_width 0 application rbd
11. 创建rbd存储块
[root@testserver01 ~]# rbd create rbdpool01/testimg --size 5G
[root@testserver01 ~]# rbd ls -p rbdpool01 -l
NAME SIZE PARENT FMT PROT LOCK
testimg 5 GiB 2
12. 添加mds服务
[root@testserver01 ~]# mkdir -p /var/lib/ceph/mds/ceph-testserver01
[root@testserver01 ~]# ceph-authtool --create-keyring /var/lib/ceph/mds/ceph-testserver01/keyring --gen-key -n mds.testserver01
creating /var/lib/ceph/mds/ceph-testserver01/keyring
[root@testserver01 ~]# ceph auth add mds.testserver01 osd 'allow rwx' mds 'allow *' mon 'allow profile mds' -i /var/lib/ceph/mds/ceph-testserver01/keyring
added key for mds.testserver01
[root@testserver01 ~]# chown -R ceph.ceph /var/lib/ceph/
[root@testserver01 ~]# systemctl enable ceph-mds@testserver01
Created symlink from /etc/systemd/system/ceph-mds.target.wants/ceph-mds@testserver01.service to /usr/lib/systemd/system/ceph-mds@.service.
[root@testserver01 ~]# systemctl start ceph-mds@testserver01
13. 添加cephfs存储池
[root@testserver01 ~]# ceph osd pool create cephfs-metadata 16 16
pool 'cephfs-metadata' created
[root@testserver01 ~]# ceph osd pool create cephfs-data 32 32
pool 'cephfs-data' created
[root@testserver01 ~]# ceph fs new cephfs cephfs-metadata cephfs-data
new fs with metadata pool 2 and data pool 3
[root@testserver01 ~]# ceph fs status
cephfs - 0 clients
======
+------+--------+--------------+---------------+-------+-------+
| Rank | State | MDS | Activity | dns | inos |
+------+--------+--------------+---------------+-------+-------+
| 0 | active | testserver01 | Reqs: 0 /s | 10 | 13 |
+------+--------+--------------+---------------+-------+-------+
+-----------------+----------+-------+-------+
| Pool | type | used | avail |
+-----------------+----------+-------+-------+
| cephfs-metadata | metadata | 512k | 8697M |
| cephfs-data | data | 0 | 8697M |
+-----------------+----------+-------+-------+
+-------------+
| Standby MDS |
+-------------+
+-------------+
MDS version: ceph version 14.2.22 (ca74598065096e6fcbd8433c8779a2be0c889351) nautilus (stable)
[root@testserver01 ~]#
14. 部署rgw (默认7480端口)
[root@testserver01 ~]# cp /etc/ceph/ceph.conf /tmp/
[root@testserver01 ~]# cd /tmp
[root@testserver01 tmp]# ceph auth get client.bootstrap-rgw -o ceph.bootstrap-rgw.keyring
exported keyring for client.bootstrap-rgw
[root@testserver01 tmp]# ceph-deploy --overwrite-conf rgw create testserver01
[ceph_deploy.conf][DEBUG ] found configuration file at: /root/.cephdeploy.conf
[ceph_deploy.cli][INFO ] Invoked (2.0.1): /usr/bin/ceph-deploy --overwrite-conf rgw create testserver01
[ceph_deploy.cli][INFO ] ceph-deploy options:
[ceph_deploy.cli][INFO ] username : None
[ceph_deploy.cli][INFO ] verbose : False
[ceph_deploy.cli][INFO ] rgw : [('testserver01', 'rgw.testserver01')]
[ceph_deploy.cli][INFO ] overwrite_conf : True
[ceph_deploy.cli][INFO ] subcommand : create
[ceph_deploy.cli][INFO ] quiet : False
[ceph_deploy.cli][INFO ] cd_conf : <ceph_deploy.conf.cephdeploy.Conf instance at 0x7fca20b03a28>
[ceph_deploy.cli][INFO ] cluster : ceph
[ceph_deploy.cli][INFO ] func : <function rgw at 0x7fca21148050>
[ceph_deploy.cli][INFO ] ceph_conf : None
[ceph_deploy.cli][INFO ] default_release : False
[ceph_deploy.rgw][DEBUG ] Deploying rgw, cluster ceph hosts testserver01:rgw.testserver01
[testserver01][DEBUG ] connected to host: testserver01
[testserver01][DEBUG ] detect platform information from remote host
[testserver01][DEBUG ] detect machine type
[ceph_deploy.rgw][INFO ] Distro info: CentOS Linux 7.9.2009 Core
[ceph_deploy.rgw][DEBUG ] remote host will use systemd
[ceph_deploy.rgw][DEBUG ] deploying rgw bootstrap to testserver01
[testserver01][DEBUG ] write cluster configuration to /etc/ceph/{cluster}.conf
[testserver01][WARNIN] rgw keyring does not exist yet, creating one
[testserver01][DEBUG ] create a keyring file
[testserver01][DEBUG ] create path recursively if it doesn't exist
[testserver01][INFO ] Running command: ceph --cluster ceph --name client.bootstrap-rgw --keyring /var/lib/ceph/bootstrap-rgw/ceph.keyring auth get-or-create client.rgw.testserver01 osd allow rwx mon allow rw -o /var/lib/ceph/radosgw/ceph-rgw.testserver01/keyring
[testserver01][INFO ] Running command: systemctl enable ceph-radosgw@rgw.testserver01
[testserver01][WARNIN] Created symlink from /etc/systemd/system/ceph-radosgw.target.wants/ceph-radosgw@rgw.testserver01.service to /usr/lib/systemd/system/ceph-radosgw@.service.
[testserver01][INFO ] Running command: systemctl start ceph-radosgw@rgw.testserver01
[testserver01][INFO ] Running command: systemctl enable ceph.target
[ceph_deploy.rgw][INFO ] The Ceph Object Gateway (RGW) is now running on host testserver01 and default port 7480
[root@testserver01 tmp]# radosgw-admin user create --uid=admin --display-name="admin user" --system
{
"user_id": "admin",
"display_name": "admin user",
"email": "",
"suspended": 0,
"max_buckets": 1000,
"subusers": [],
"keys": [
{
"user": "admin",
"access_key": "7DRHRKOVTQF0EBWHL7LZ",
"secret_key": "01qnDj58DmWTjQZzCwDv9SLfC6x2bIsWgD2EgHri"
}
],
"swift_keys": [],
"caps": [],
"op_mask": "read, write, delete",
"system": "true",
"default_placement": "",
"default_storage_class": "",
"placement_tags": [],
"bucket_quota": {
"enabled": false,
"check_on_raw": false,
"max_size": -1,
"max_size_kb": 0,
"max_objects": -1
},
"user_quota": {
"enabled": false,
"check_on_raw": false,
"max_size": -1,
"max_size_kb": 0,
"max_objects": -1
},
"temp_url_keys": [],
"type": "rgw",
"mfa_ids": []
}
15. 开启并配置mgr dashboard
[root@testserver01 ~]# ceph mgr module enable prometheus (开启监控端口,9283端口,需要安装ceph-mgr-dashboard包)
[root@testserver01 ~]# ceph config set mgr mgr/dashboard/ssl false
[root@testserver01 ~]# ceph mgr module enable dashboard (关闭dashboard ssl,默认8080端口)
[root@testserver01 tmp]# echo 'passwordxxx' > password.txt
[root@testserver01 tmp]# ceph dashboard ac-user-create admin administrator -i password.txt
{"username": "admin", "lastUpdate": 1709353417, "name": null, "roles": ["administrator"], "password": "$2b$12$FcEB.KYWVB8BCXaXxu5VJOQbUqwO0KCUOEfi2wgSnmlFPW3RqTQp2", "email": null}
监控端口:
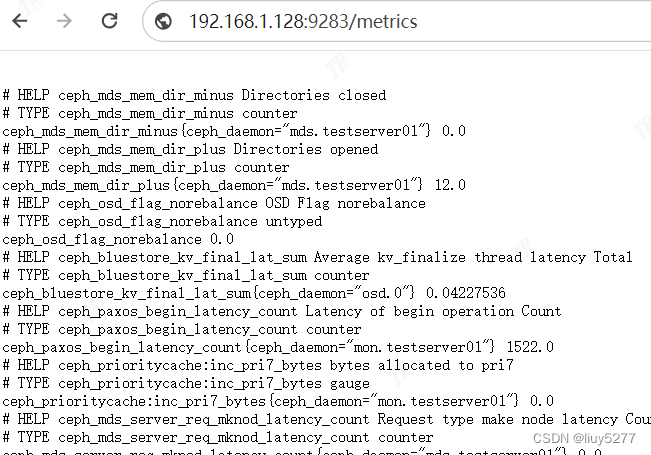
访问mgr dashboard http://192.168.1.128:8080

16. 配置rgw dashboard
[root@testserver01 tmp]# radosgw-admin user info --uid=admin (查看ak和sk)
[root@testserver01 tmp]# cat /tmp/a.txt
7DRHRKOVTQF0EBWHL7LZ
[root@testserver01 tmp]# cat /tmp/s.txt
01qnDj58DmWTjQZzCwDv9SLfC6x2bIsWgD2EgHri
[root@testserver01 tmp]# ceph dashboard set-rgw-api-access-key -i a.txt
Option RGW_API_ACCESS_KEY updated
[root@testserver01 tmp]# ceph dashboard set-rgw-api-secret-key -i s.txt
Option RGW_API_SECRET_KEY updated
17. 查看健康状态,osd,pool,crush rule,端口等
[root@testserver01 ~]# ceph -s
cluster:
id: b080bada-7f10-11ee-8f11-666666666666
health: HEALTH_OK
services:
mon: 1 daemons, quorum testserver01 (age 33m)
mgr: testserver01(active, since 11m)
mds: cephfs:1 {0=testserver01=up:active}
osd: 1 osds: 1 up (since 28m), 1 in (since 28m)
rgw: 1 daemon active (testserver01)
task status:
data:
pools: 7 pools, 144 pgs
objects: 216 objects, 5.7 KiB
usage: 1.0 GiB used, 9.0 GiB / 10 GiB avail
pgs: 144 active+clean
[root@testserver01 ~]# ceph osd df
ID CLASS WEIGHT REWEIGHT SIZE RAW USE DATA OMAP META AVAIL %USE VAR PGS STATUS
0 hdd 0.00999 1.00000 10 GiB 1.0 GiB 4.9 MiB 0 B 1 GiB 9.0 GiB 10.05 1.00 144 up
TOTAL 10 GiB 1.0 GiB 4.9 MiB 0 B 1 GiB 9.0 GiB 10.05
MIN/MAX VAR: 1.00/1.00 STDDEV: 0
[root@testserver01 ~]# ceph osd pool ls detail
pool 1 'rbdpool01' replicated size 1 min_size 1 crush_rule 0 object_hash rjenkins pg_num 32 pgp_num 32 autoscale_mode warn last_change 28 flags hashpspool,selfmanaged_snaps stripe_width 0 application rbd
removed_snaps [1~3]
pool 2 'cephfs-metadata' replicated size 1 min_size 1 crush_rule 0 object_hash rjenkins pg_num 16 pgp_num 16 autoscale_mode warn last_change 17 flags hashpspool stripe_width 0 pg_autoscale_bias 4 pg_num_min 16 recovery_priority 5 application cephfs
pool 3 'cephfs-data' replicated size 1 min_size 1 crush_rule 0 object_hash rjenkins pg_num 32 pgp_num 32 autoscale_mode warn last_change 17 flags hashpspool stripe_width 0 application cephfs
pool 4 '.rgw.root' replicated size 1 min_size 1 crush_rule 0 object_hash rjenkins pg_num 16 pgp_num 16 autoscale_mode warn last_change 20 flags hashpspool stripe_width 0 application rgw
pool 5 'default.rgw.control' replicated size 1 min_size 1 crush_rule 0 object_hash rjenkins pg_num 16 pgp_num 16 autoscale_mode warn last_change 22 flags hashpspool stripe_width 0 application rgw
pool 6 'default.rgw.meta' replicated size 1 min_size 1 crush_rule 0 object_hash rjenkins pg_num 16 pgp_num 16 autoscale_mode warn last_change 24 flags hashpspool stripe_width 0 application rgw
pool 7 'default.rgw.log' replicated size 1 min_size 1 crush_rule 0 object_hash rjenkins pg_num 16 pgp_num 16 autoscale_mode warn last_change 26 flags hashpspool stripe_width 0 application rgw
[root@testserver01 ~]# ceph osd crush rule dump
[
{
"rule_id": 0,
"rule_name": "replicated_rule",
"ruleset": 0,
"type": 1,
"min_size": 1,
"max_size": 10,
"steps": [
{
"op": "take",
"item": -1,
"item_name": "default"
},
{
"op": "chooseleaf_firstn",
"num": 0,
"type": "host"
},
{
"op": "emit"
}
]
}
]
[root@testserver01 ~]# netstat -tnlp
Active Internet connections (only servers)
Proto Recv-Q Send-Q Local Address Foreign Address State PID/Program name
tcp 0 0 192.168.1.128:6809 0.0.0.0:* LISTEN 2694/ceph-osd
tcp 0 0 127.0.0.1:25 0.0.0.0:* LISTEN 977/master
tcp 0 0 192.168.1.128:6810 0.0.0.0:* LISTEN 3037/ceph-mds
tcp 0 0 192.168.1.128:6811 0.0.0.0:* LISTEN 3037/ceph-mds
tcp 0 0 192.168.1.128:3300 0.0.0.0:* LISTEN 1944/ceph-mon
tcp 0 0 192.168.1.128:6789 0.0.0.0:* LISTEN 1944/ceph-mon
tcp 0 0 192.168.1.128:6800 0.0.0.0:* LISTEN 4480/ceph-mgr
tcp 0 0 192.168.1.128:6801 0.0.0.0:* LISTEN 4480/ceph-mgr
tcp 0 0 192.168.1.128:6802 0.0.0.0:* LISTEN 2694/ceph-osd
tcp 0 0 192.168.1.128:6803 0.0.0.0:* LISTEN 2694/ceph-osd
tcp 0 0 192.168.1.128:6804 0.0.0.0:* LISTEN 2694/ceph-osd
tcp 0 0 192.168.1.128:6805 0.0.0.0:* LISTEN 2694/ceph-osd
tcp 0 0 192.168.1.128:6806 0.0.0.0:* LISTEN 2694/ceph-osd
tcp 0 0 0.0.0.0:22 0.0.0.0:* LISTEN 873/sshd
tcp 0 0 192.168.1.128:6807 0.0.0.0:* LISTEN 2694/ceph-osd
tcp 0 0 0.0.0.0:7480 0.0.0.0:* LISTEN 3280/radosgw
tcp 0 0 192.168.1.128:6808 0.0.0.0:* LISTEN 2694/ceph-osd
tcp6 0 0 ::1:25 :::* LISTEN 977/master
tcp6 0 0 :::9283 :::* LISTEN 4480/ceph-mgr
tcp6 0 0 :::8080 :::* LISTEN 4480/ceph-mgr
tcp6 0 0 :::22 :::* LISTEN 873/sshd
tcp6 0 0 :::7480 :::* LISTEN 3280/radosgw