目录
一、Nginx调优补充
1.验证模块——登录
1.1htpasswd
1.1.1htpasswd -c——交互式
1.1.2htpasswd -b——免交互式
2.自定义错误页面
2.1设置错误页面——想让客户端看到的页面
2.2自定义错误码
3.日志位置存放(可以自定义存放位置)
4.检测文件是否存在
5.定义错误日志
6.长连接
7.作为下载服务器
7.1显示大小
7.2显示时间
7.3调整页面格式
8.用户上传资料
9.其他设置
二、高级配置
1.网页的状态页
1.1提取状态页访问量
1.2指定用户访问状态页
1.3指定IP进行访问状态页
2.第三方模块
2.1常用模块总结
2.2echo模块
3.变量
3.1内置变量
3.1.1$proxy_add_x_forwarded_for
3.1.2$args
3.1.3$document_root
3.1.4$request_filename
3.1.5内置变量的实践
3.2自定义变量
4.拓展——自定义图标
5.自定义访问日志
5.1自定义json格式
6.日志分割脚本
7.Nginx压缩
8.httpds功能
8.1自签名证书
nginx分割日志脚本 使用USR1信号进行分割
修改openfile并不能修改Max open files

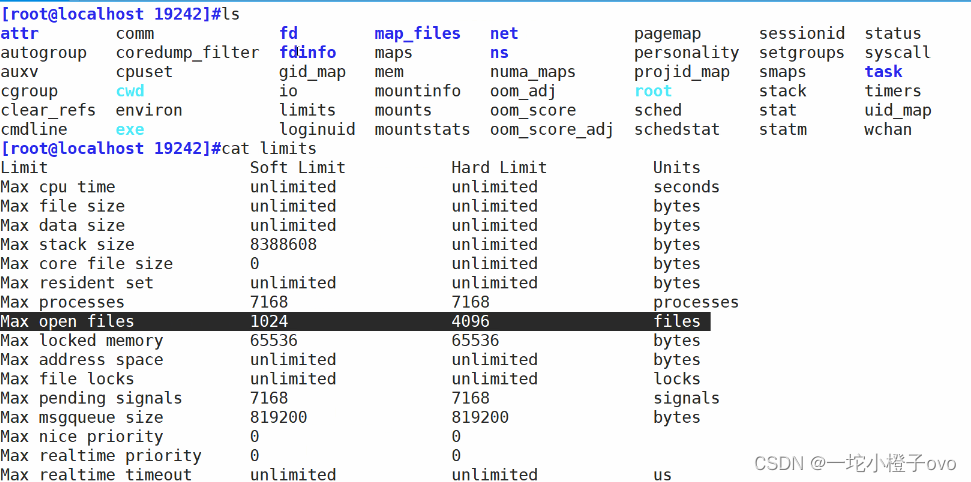
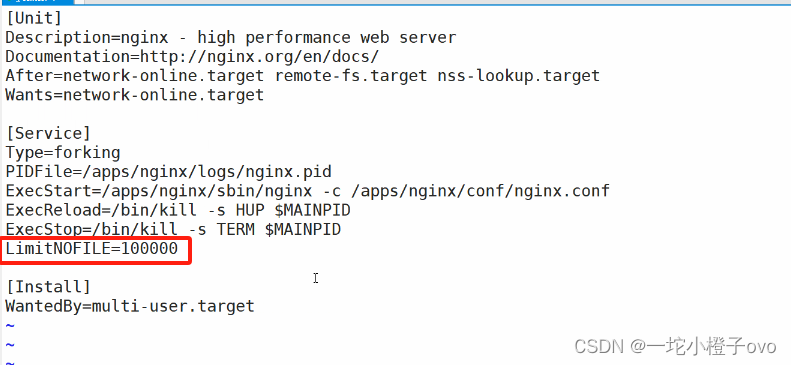
如果不加这个选项的话,单个进程打开最大文件数还是1024
limit_except 限制用户的访问控制
limit_except GET {
   allow 192.168.241.0/24;
   #允许192.168.241.0/24网段的主机进行下载
   deny all;
   #默认拒绝所有主机下载
}
一、Nginx调优补充
1.验证模块——登录
[root@localhost ~]#vim /apps/nginx/conf.d/pc.conf
[root@localhost ~]#cat /apps/nginx/conf.d/pc.conf
server {
   listen 80;
   server_name www.cxk.com;
   root /opt/html;
}
[root@localhost ~]#nginx -s reload
[root@localhost html]#vim /apps/nginx/conf.d/pc.conf
[root@localhost html]#ls
index.html
[root@localhost html]#pwd
/opt/html
[root@localhost html]#mkdir pc
[root@localhost html]#ls
index.html  pc
[root@localhost html]#nginx -s reload
[root@localhost html]#echo "FBI WARNING"  >  /opt/html/pc/index.html
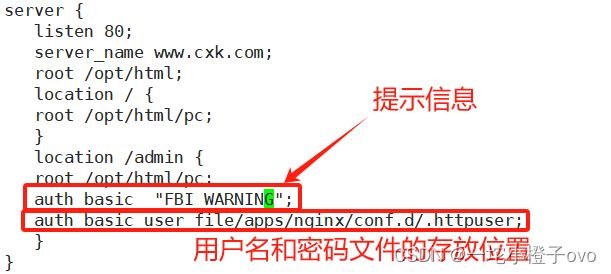

1.1htpasswd
此命令来自于 httpd-tools 包,如果没有安装 一下即可
[root@localhost html]#yum install httpd-tools -y
| 选项 | 含义 |
|---|---|
| -c | 新建用户名和密码对应的文件 |
| -b | 免交互新建用户名和密码 |
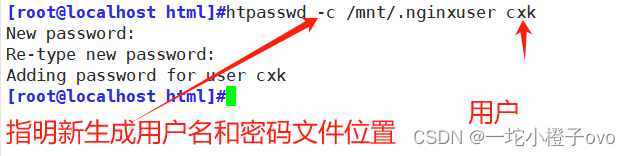
1.1.1htpasswd -c——交互式
第一次生成 htpasswd -c 文件路径 姓名 交互式生成密码;
非第一次生成 htpasswd 文件路径 姓名 交互式生成密码
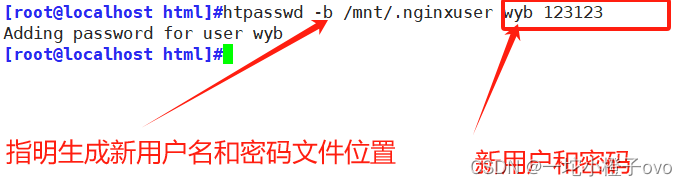
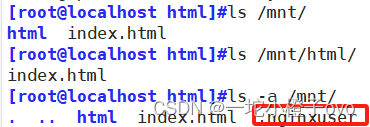
1.1.2htpasswd -b——免交互式
第一次生成 htpasswd -c 文件路径 姓名 交互式生成密码;
非第一次生成 htpasswd -b 文件路径 姓名 密码 直接将密码跟在后面

[root@localhost html]#nginx -t
nginx: the configuration file /apps/nginx/conf/nginx.conf syntax is ok
nginx: configuration file /apps/nginx/conf/nginx.conf test is successful
[root@localhost html]#nginx -s reload
[root@localhost pc]#vim /apps/nginx/conf.d/pc.conf
[root@localhost pc]#mkdir /opt/html/admin
[root@localhost pc]#echo "FBI WARNING"  >  /opt/html/admin/index.html

2.自定义错误页面
我们 可以改变 默认的错误页面,同时也可以用指定的响应状态码进行响应, 可用位置:http, server, location, if in location
格式
error_page code ... [=[response]] uri;
页面错误代码
error_page 固定写法
code 响应码
= 可以将响应码转换
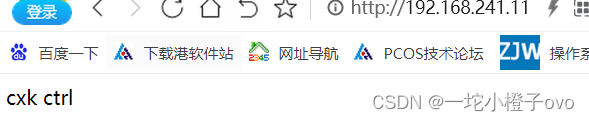
uri 访问连接[root@localhost ~]#vim /apps/nginx/conf.d/pc.conf
[root@localhost ~]#cat /opt/html/index.html
cxk ctrl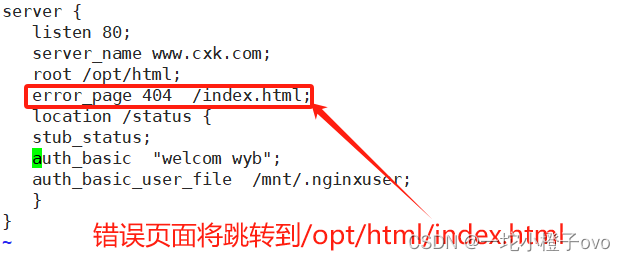
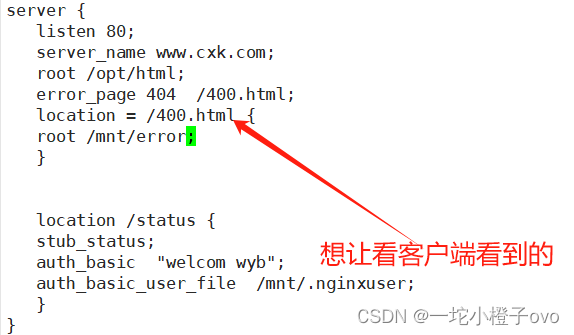
2.1设置错误页面——想让客户端看到的页面
如果要进行维护或者不影响客户端看到404报错的页面,可以做一个跳转
[root@localhost ~]#nginx -t
nginx: the configuration file /apps/nginx/conf/nginx.conf syntax is ok
nginx: configuration file /apps/nginx/conf/nginx.conf test is successful
[root@localhost ~]#nginx -s reload
[root@localhost ~]#mkdir /mnt/error
[root@localhost ~]#echo "Wait minute" > /mnt/error/400.html
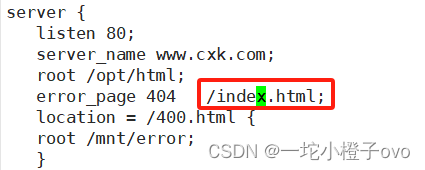
2.2自定义错误码

未修改之前,报错404未找到
[root@localhost ~]#vim /apps/nginx/conf.d/pc.conf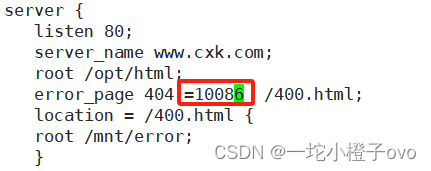
如果出错跳转到主站点
![]()
3.日志位置存放(可以自定义存放位置)
[root@localhost ~]#vim /apps/nginx/conf/nginx.conf
![]()
Context: main, http, mail, stream, server, location
level: debug, info, notice, warn, error, crit, alert, emerg
[root@clocalhost ~]# mkdir /opt/nginx/logs
 listen 80;
 server_name www.cxk.com;
 error_page  500 502 503 504 404 /error.html;
 access_log /apps/nginx/logs/kgc_access.log;
 error_log /apps/nginx/logs/kgc_error.log;
 #定义错误日志文件
[root@localhost ~]#mkdir /apps/nginx/logs
重启nginx并访问不存在的页面进行测试并验证是在指定目录生成新的日志文件
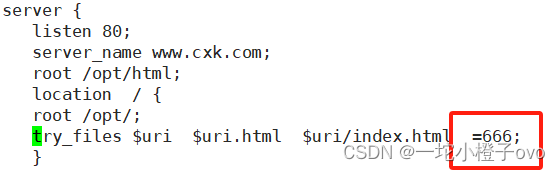
4.检测文件是否存在
try_files会按顺序检查文件是否存在,返回第一个找到的文件或文件夹(结尾加斜线表示为文件夹),如果所有文件或文件夹都找不到,会进行一个内部重定向到最后一个参数。只有最后一个参数可以引起一个内部重定向,之前的参数只设置内部URI的指向。最后一个参数是回退URI且必须存在,否则会出现内部500错误。
location / {
  root /opt/nginx/html/pc;
  try_files $uri $uri.html $uri/index.html /about/default.html
  #假如访问192.168.241.11/cxk  (cxk就是$uri)
  #/about/default.html  实际是追加在/opt/nginx/html/pc/
  #也就是/opt/nginx/html/pc/about/defaul.html
}


#托底机制
[root@localhost ~]#vim /apps/nginx/conf.d/pc.conf
[root@localhost ~]#nginx -t
nginx: the configuration file /apps/nginx/conf/nginx.conf syntax is ok
nginx: configuration file /apps/nginx/conf/nginx.conf test is successful
[root@localhost ~]#nginx -s reload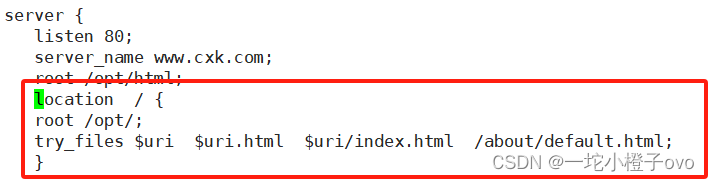
[root@localhost ~]#cd /opt/
[root@localhost opt]#ls
html  image  index.html  nginx-1.18.0  nginx-1.18.0.tar.gz  test
[root@localhost opt]#mkdir about
[root@localhost opt]#echo Rap > /opt/about/default.html
[root@localhost opt]#cat /opt/about/default.html
Rap
验证读取$uri的顺序
[root@localhost opt]#ls
about  html  image  index.html  nginx-1.18.0  nginx-1.18.0.tar.gz  test
[root@localhost opt]#echo Basketball > cxk.html
[root@localhost opt]#cat cxk.html
Basketball![]()
还可以定义返回响应码

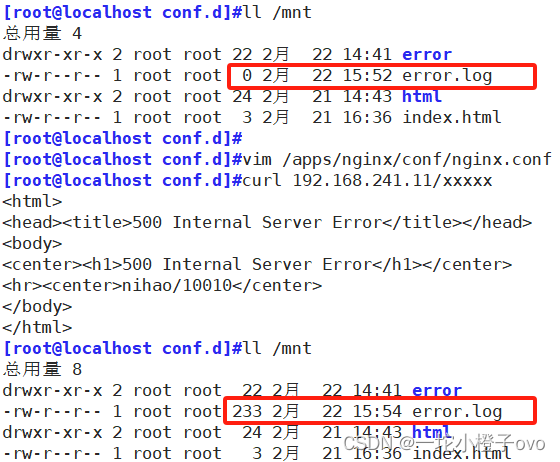
5.定义错误日志
[root@localhost conf.d]#vim /apps/nginx/conf/nginx.conf


6.长连接
keepalive_timeout timeout [header_timeout];
#设定保持连接超时时长,0表示禁止长连接,默认为75s,通常配置在http字段作为站点全局配置
keepalive_requests number;
#在一次长连接上所允许请求的资源的最大数量,默认为100次,建议适当调大,比如:500
可以加在全局或者 server
[root@localhost conf.d]#vim /apps/nginx/conf/nginx.conf
全局配置中,keepalive默认是开启的
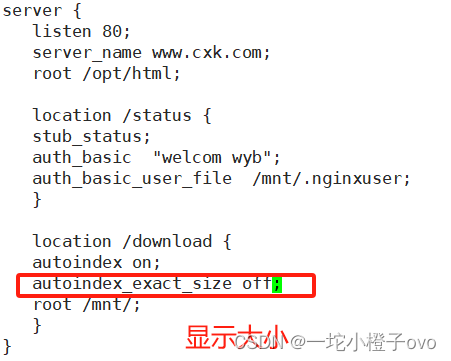
7.作为下载服务器
ngx_http_autoindex_module 模块处理以斜杠字符 "/" 结尾的请求,并生成目录列表,可以做为下载服务
http://nginx.org/en/docs/http/ngx_http_autoindex_module.html
#官方文档
autoindex on | off;
#自动文件索引功能,默为off
autoindex_exact_size on | off;
#计算文件确切大小(单位bytes),off 显示大概大小(单位K、M),默认on
autoindex_localtime on | off ;
#显示本机时间而非GMT(格林威治)时间,默认off
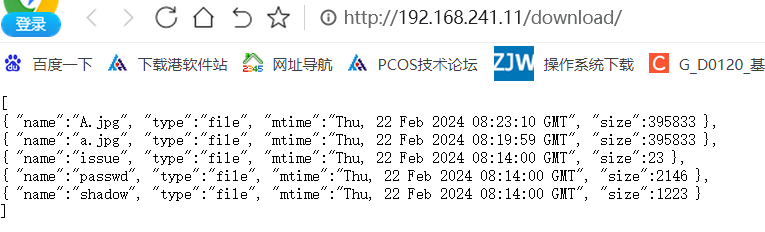
autoindex_format html | xml | json | jsonp;
#显示索引的页面文件风格,默认html
limit_rate rate;
#限制响应客户端传输速率(除GET和HEAD以外的所有方法),单位B/s,即bytes/second,默认值0,表示无限制,此指令由ngx_http_core_module提供
set $limit_rate
#变量提供 限制 变量优先级高[root@localhost conf.d]#vim pc.conf
[root@localhost conf.d]#nginx -t
nginx: the configuration file /apps/nginx/conf/nginx.conf syntax is ok
nginx: configuration file /apps/nginx/conf/nginx.conf test is successful
[root@localhost conf.d]#nginx -s reload
[root@localhost conf.d]#ls /mnt
error  error.log  html  index.html
[root@localhost conf.d]#mkdir /mnt/download
[root@localhost conf.d]#cp /etc/passwd /etc/shadow /etc/issue /mnt/download/[root@localhost conf.d]#ls /mnt/download/
issue  passwd  shadow
7.1显示大小
[root@localhost conf.d]#cp /opt/image/a.jpg /mnt/download/

7.2显示时间
[root@localhost conf.d]#vim pc.conf 
[root@localhost conf.d]#nginx -t
nginx: the configuration file /apps/nginx/conf/nginx.conf syntax is ok
nginx: configuration file /apps/nginx/conf/nginx.conf test is successful
[root@localhost conf.d]#nginx -s reload

locatime默认为格林威治时间;比我们的时间要晚八小时
7.3调整页面格式
[root@localhost conf.d]#vim pc.conf 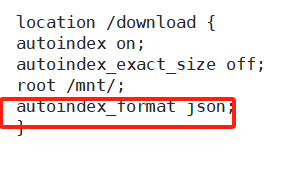
[root@localhost conf.d]#nginx -t
nginx: the configuration file /apps/nginx/conf/nginx.conf syntax is ok
nginx: configuration file /apps/nginx/conf/nginx.conf test is successful
[root@localhost conf.d]#nginx -s reload
8.用户上传资料
上传需要借助开发小的程序, 并且程序 5M 和 nginx 10M 都会限制。 两者取最小
client_max_body_size 1m;
#设置允许客户端上传单个文件的最大值,默认值为1m,上传文件超过此值会出413错误
client_body_buffer_size size;
#用于接收每个客户端请求报文的body部分的缓冲区大小;默认16k;超出此大小时,其将被暂存到磁盘上的由下面client_body_temp_path指令所定义的位置
client_body_temp_path path [level1 [level2 [level3]]];
#设定存储客户端请求报文的body部分的临时存储路径及子目录结构和数量,目录名为16进制的数字,使用hash之后的值从后往前截取1位、2位、2位作为目录名
9.其他设置
directio size | off;
#操作完全和aio相反,aio是读取文件而directio是写文件到磁盘,启用直接I/O,默认为关闭,当文件大于等于给定大小时,例如:directio 4m;同步(直接)写磁盘,而非写缓存。
open_file_cache off;  #是否缓存打开过的文件信息
open_file_cache max=N [inactive=time];


max=N:#可缓存的缓存项上限数量;达到上限后会使用LRU(Least recently used,最近最少使用)算法实现管理
inactive=time:#缓存项的非活动时长,在此处指定的时长内未被命中的或命中的次数少于
nginx可以缓存以下三种信息
- 文件元数据:文件的描述符、文件大小和最近一次的修改时间
- 打开的目录结构
- 没有找到的或者没有权限访问的文件的相关信息
open_file_cache max=10000 inactive=60s;
#最大缓存10000个文件,非活动数据超时时长60s
open_file_cache_valid   60s;
#每间隔60s检查一下缓存数据有效性
open_file_cache_min_uses 5;
#60秒内至少被命中访问5次才被标记为活动数据
open_file_cache_errors   on;
#缓存错误信息
limit_except method ... { ... },仅用于location
#限制客户端使用除了指定的请求方法之外的其它方法method:GET, HEAD, POST, PUT, DELETE,MKCOL, COPY, MOVE, OPTIONS, PROPFIND, PROPPATCH, LOCK, UNLOCK, PATCH
| 请求方式 | 用途 |
|---|---|
| GET | 对服务器资源获取的简单请求 |
| POST | 用于发送包含用户提交数据的请求 |
| PUT | 向服务器提交数据,以修改数据 |
| HEAD | 请求页面的首部,获取资源的元信息 |
| DELETE | 删除服务器上的某些资源 |
| CONNECT | 用于ssl隧道的基于代理的请求 |
| OPTIONS | 返回所有可用的方法,常用于跨域 |
| TRACE | 追踪请求-响应的传输路径 |
limit_except GET {
 allow 192.168.241.22;
 deny all;
}
#允许192.168.241.22使用除了GET 之外其它方法
二、高级配置
1.网页的状态页
[root@localhost conf.d]#vim pc.conf 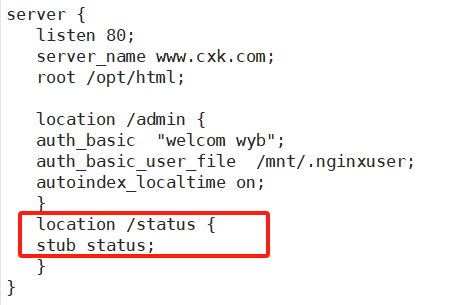
| 状态 | 含义 |
|---|---|
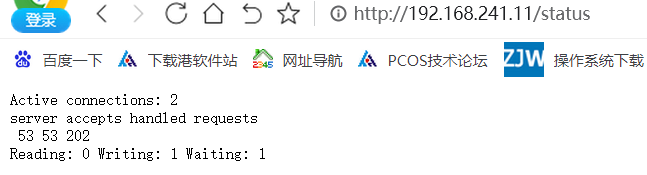
| Active connections | 当前处于活动状态的客户端连接数,包括连接等待空闲连接数=reading+writing+waiting |
| accept | 统计总值,Nginx自启动后已经接受的客户端请求的总数 |
| handled | 统计总值,Nginx自启动后已经处理完成的客户端请求总数,通常等于accepts,除非有因worker_connections限制等被拒绝的连接 |
| requests | 统计总值,Nginx自启动后客户端发来的总的请求数 |
| Reading | 当前状态,正在读取客户端请求报文首部的连接的连接数,数值越大,说明排队现象严重,性能不足 |
| Writing | 当前状态,正在向客户端发送响应报文过程中的连接数,数值越大,说明访问量很大 |
| Waiting | 当前状态,正在等待客户端发出请求的空闲连接数,开启 keep-alive的情况下,这个值等于active – (reading+writing) |
1.1提取状态页访问量
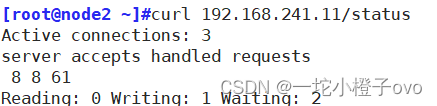
如果想在操作系统中提取状态页的Reading、Writing、Waiting数量
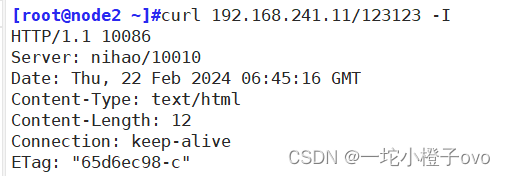
[root@localhost conf.d]#curl 192.168.241.11/status
Active connections: 1
server accepts handled requests
 58 58 207
Reading: 0 Writing: 1 Waiting: 0
[root@localhost conf.d]#curl 192.168.241.11/status 2>/dev/null
Active connections: 1
server accepts handled requests
 59 59 208
Reading: 0 Writing: 1 Waiting: 0
[root@localhost conf.d]#curl 192.168.241.11/status 2>/dev/null|tail -n1
Reading: 0 Writing: 1 Waiting: 0
[root@localhost conf.d]#curl 192.168.241.11/status 2>/dev/null|tail -n1|awk '/Reading/ {print $2,$4,$6}'
0 1 0
1.2指定用户访问状态页
这样设置的话,谁都可以访问,不是很安全,我们可以设置指定用户才可以进行访问
[root@localhost conf.d]#vim pc.conf 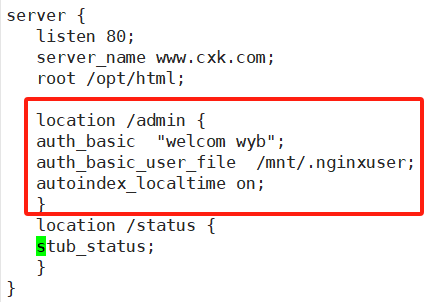
1.3指定IP进行访问状态页
[root@localhost conf.d]#vim pc.conf 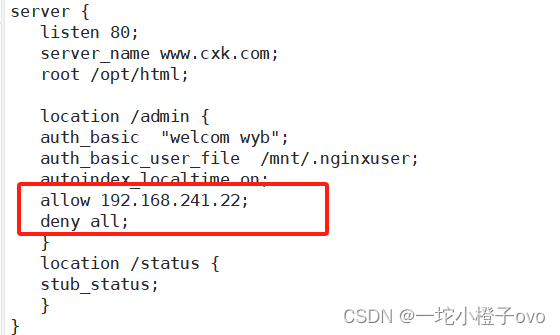
2.第三方模块
2.1常用模块总结
| 模块名 | 含义 |
|---|---|
| ngx_http_core_module | 核心模块 |
| ngx_http_access_module | 访问控制模块(deny、allow) |
| ngx_http_auth_basic_module | 身份(虚拟用户) |
| ngx_http_gzip_module ngx_http_gzip_static_module | 压缩模块 |
| ngx_http_log_module | 日志模块 |
| ngx_http_proxy_module | 代理模块 |
| ngx_http_rewrite_module | 重写模块 |
| ngx_http_stub_status_module | 状态页 |
| ngx_http_upstream_module | 反向代理 |
2.2echo模块
开源的echo模块 https://github.com/openresty/echo-nginx-module[root@localhost nginx]#cd /opt
[root@localhost opt]#rz -E
rz waiting to receive.
[root@localhost opt]#unzip echo-nginx-module-master.zip
Archive: echo-nginx-module-master.zip
054df94a075701bf29626fd8f666913b57c771e9
creating: echo-nginx-module-master/
extracting: echo-nginx-module-master/.gitattributes
inflating: echo-nginx-module-master/.gitignore
inflating: echo-nginx-module-master/.travis.yml
inflating: echo-nginx-module-master/LICENSE
inflating: echo-nginx-module-master/README.markdown
inflating: echo-nginx-module-master/config
creating: echo-nginx-module-master/src/
inflating: echo-nginx-module-master/src/ddebug.h
inflating: echo-nginx-module-master/src/ngx_http_echo_echo.c
inflating: echo-nginx-module-master/src/ngx_http_echo_echo.h
inflating: echo-nginx-module-master/src/ngx_http_echo_filter.c
inflating: echo-nginx-module-master/src/ngx_http_echo_filter.h
inflating: echo-nginx-module-master/src/ngx_http_echo_foreach.c
inflating: echo-nginx-module-master/src/ngx_http_echo_foreach.h
inflating: echo-nginx-module-master/src/ngx_http_echo_handler.c
inflating: echo-nginx-module-master/src/ngx_http_echo_handler.h
inflating: echo-nginx-module-master/src/ngx_http_echo_location.c
inflating: echo-nginx-module-master/src/ngx_http_echo_location.h
inflating: echo-nginx-module-master/src/ngx_http_echo_module.c
inflating: echo-nginx-module-master/src/ngx_http_echo_module.h
inflating: echo-nginx-module-master/src/ngx_http_echo_request_info.c
inflating: echo-nginx-module-master/src/ngx_http_echo_request_info.h
inflating: echo-nginx-module-master/src/ngx_http_echo_sleep.c
inflating: echo-nginx-module-master/src/ngx_http_echo_sleep.h
inflating: echo-nginx-module-master/src/ngx_http_echo_subrequest.c
inflating: echo-nginx-module-master/src/ngx_http_echo_subrequest.h
inflating: echo-nginx-module-master/src/ngx_http_echo_timer.c
inflating: echo-nginx-module-master/src/ngx_http_echo_timer.h
inflating: echo-nginx-module-master/src/ngx_http_echo_util.c
inflating: echo-nginx-module-master/src/ngx_http_echo_util.h
inflating: echo-nginx-module-master/src/ngx_http_echo_var.c
inflating: echo-nginx-module-master/src/ngx_http_echo_var.h
creating: echo-nginx-module-master/t/
inflating: echo-nginx-module-master/t/abort-parent.t
inflating: echo-nginx-module-master/t/blocking-sleep.t
inflating: echo-nginx-module-master/t/echo-after-body.t
inflating: echo-nginx-module-master/t/echo-before-body.t
inflating: echo-nginx-module-master/t/echo-duplicate.t
inflating: echo-nginx-module-master/t/echo-timer.t
inflating: echo-nginx-module-master/t/echo.t
inflating: echo-nginx-module-master/t/exec.t
inflating: echo-nginx-module-master/t/filter-used.t
inflating: echo-nginx-module-master/t/foreach-split.t
inflating: echo-nginx-module-master/t/gzip.t
inflating: echo-nginx-module-master/t/if.t
inflating: echo-nginx-module-master/t/incr.t
inflating: echo-nginx-module-master/t/location-async.t
inflating: echo-nginx-module-master/t/location.t
inflating: echo-nginx-module-master/t/mixed.t
inflating: echo-nginx-module-master/t/request-body.t
inflating: echo-nginx-module-master/t/request-info.t
inflating: echo-nginx-module-master/t/sleep.t
inflating: echo-nginx-module-master/t/status.t
inflating: echo-nginx-module-master/t/subrequest-async.t
inflating: echo-nginx-module-master/t/subrequest.t
inflating: echo-nginx-module-master/t/unused.t
creating: echo-nginx-module-master/util/
inflating: echo-nginx-module-master/util/build.sh
inflating: echo-nginx-module-master/util/releng
inflating: echo-nginx-module-master/util/wiki2pod.pl
inflating: echo-nginx-module-master/valgrind.suppress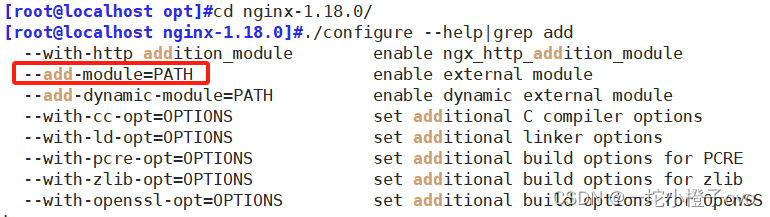
增加模块的格式,并要指明的路径
[root@localhost nginx-1.18.0]#nginx -V
nginx version: nihao/10010
built by gcc 4.8.5 20150623 (Red Hat 4.8.5-44) (GCC)
built with OpenSSL 1.0.2k-fips  26 Jan 2017
TLS SNI support enabled
configure arguments: --prefix=/apps/nginx --user=nginx --group=nginx --with-http_ssl_module --with-http_v2_module --with-http_realip_module --with-http_stub_status_module --with-http_gzip_static_module --with-pcre --with-stream --with-stream_ssl_module --with-stream_realip_module
[root@localhost nginx-1.18.0]#./configure --prefix=/apps/nginx --user=nginx --group=nginx --with-http_ssl_module --with-http_v2_module --with-http_realip_module --with-http_stub_status_module --with-http_gzip_static_module --with-pcre --with-stream --with-stream_ssl_module --with-stream_realip_module --add-module=/opt/echo-nginx-module-master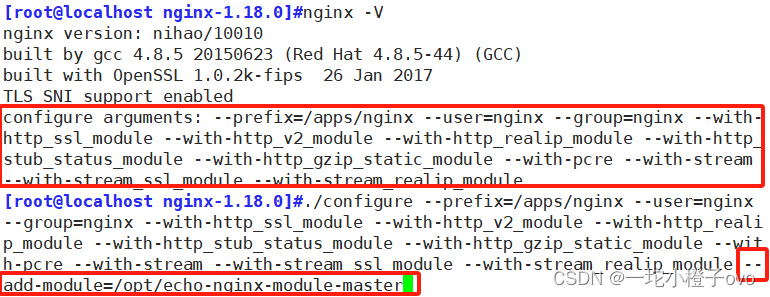
[root@localhost nginx-1.18.0]#make
[root@localhost nginx-1.18.0]#make install
[root@localhost conf.d]#vim pc.conf 
[root@localhost conf.d]#mkdir /opt/html/ip
[root@localhost conf.d]#echo /opt/ > /opt/html/ip/index.html
[root@localhost conf.d]#nginx -t
nginx: the configuration file /apps/nginx/conf/nginx.conf syntax is ok
nginx: configuration file /apps/nginx/conf/nginx.conf test is successful
[root@localhost conf.d]#nginx -s reload

3.变量
http://nginx.org/en/docs/varindex.html
官方文档
3.1内置变量
| 内置变量 | 含义 |
|---|---|
| $remote_addr | 远端IP,也就是客户端的公网IP地址 |
| $proxy_add_x_forwarded_for | 此变量表示将客户端IP追加请求报文中X-Forwarded-For首部字段,多个IP之间用逗号分隔 |
| $args | 变量中存放了URL中的参数(http://www.cxk.com/main/index.do?id=123456789&parter=search;参数是指?之后的内容,也就是id=123456789&parter=search都称为参数,参数保存了文件大小、文件位置等内容) |
| $document_root | 保存了针对当前资源的请求的系统根目录(如果是编译安装的目录就可以指定为/apps/nginx/html;如果是yum安装/usr/share/nginx/html) (站点目录,location位置不同,以location为准,如果是root /opt;location/admin root /mnt;如果访问admin就是访问/mnt,如果访问其他则访问/opt) |
| $document_uri | 保存了当前请求中不包含参数的URI,注意是不包含请求的指令(http://www.cxk.com/main/index.do?id=123456789&partner=search会被定义为/main/index.do)?之前是URI |
| $host | 存放了请求的host名称(服务端的主机名) |
| limit_rate 10240; echo $limit_rate; | 如果nginx服务器使用limit_rate配置了显示网络速率,则会显示,如果没有设置, 则显示0 |
| $remote_port | 客户端请求Nginx服务器时随机打开的端口,这是每个客户端自己的端口 |
| $remote_user | 已经经过Auth Basic Module验证的用户名 |
| $request_body_file | 做反向代理时发给后端服务器的本地资源的名称 |
| $request_method | 请求资源的方式,GET/PUT/DELETE等 |
| $request_filename | 当前请求的资源文件的磁盘路径,由root或alias指令与URI请求生成的文件绝对路径(如:/apps/nginx/html/main/index.html)(location /data,root /data,如果客户端访问实际访问的是/data/data) |
| $request_uri | 包含请求参数的原始URI,不包含主机名(https://www.baidu.com/main/index.do?id=20190221&partner=search;$document_uri?$args,例如:/main/index.do?id=20190221&partner=search) |
| $scheme | 请求的协议(:http,https,ftp等) |
| $server_protocol | 保存了客户端请求资源使用的协议的版本(HTTP/1.0,HTTP/1.1,HTTP/2.0等) |
| $server_addr | 保存了服务器的IP地址 |
| $server_name | 请求的服务器的主机名 |
| $server_port | 请求的服务器的端口号(443 https) |
| $http_<name> | name为任意请求报文首部字段,表示记录请求报文的首部字段,用下划线代替横线( echo $http_User_Agent) |
| $http_user_agent | 客户端浏览器的详细信息 |
| $http_cookie | 客户端的cookie信息 |
| 客户端的cookie信息 | name为任意请求报文首部字部cookie的key名 |
| $http_<name> | name为任意请求报文首部字段,表示记录请求报文的首部字段,ame的对应的首部字段名需要为小写,如果有横线需要替换为下划线(echo $http_user_agent;echo $http_host;) |
| $sent_http_<name> | name为响应报文的首部字段,name的对应的首部字段名需要为小写,如果有横线需要替换为下划线,此变量有问题(echo $sent_http_server;) |
| $arg_<name> | 此变量存放了URL中的指定参数,name为请求url中指定的参数(对比变量$arg是全部,如果只要id,echo $arg_id;) |
3.1.1$proxy_add_x_forwarded_for
正向代理:代理客户端(翻墙VPN)
反向代理:代理服务端(访问百度,实际访问的是百度的代理服务器)

客户机 ---> 代理1 ---> 代理2 ---> nginx服务器
$proxy_add_x_forwarded_for: 在代理1 上存的是 客户机的ip
$proxy_add_x_forwarded_for: 在代理2 上存的是 客户机的ip 和 代理1的ip
$proxy_add_x_forwarded_for: nginx 上存的是 客户机的ip,代理1的ip,代理2的ip
开启foward_for也就是开启了IP透传
3.1.2$args
变量中存放了URL中的参数(http://www.cxk.com/main/index.do?id=123456789&parter=search;参数是指?之后的内容,也就是id=123456789&parter=search都称为参数,参数保存了文件大小、文件位置等内容)
3.1.3$document_root
保存了针对当前资源的请求的系统根目录(如果是编译安装的目录就可以指为/apps/nginx/html;如果是yum安装/usr/share/nginx/html)
站点目录
root  /opt
location /admin {
root /mnt
}
location位置不同,以location为准
如果访问admin其实就是访问/mnt,如果访问其他的是访问/opt
3.1.4$request_filename
当前请求的资源文件的磁盘路径,由root或alias指令与URI请求生成的文件绝对路径(如:/apps/nginx/html/main/index.html)
location  /opt {
root /opt/;
}
如果客户端访问实际访问的是/opt/opt
3.1.5内置变量的实践
[root@localhost conf.d]#vim pc.conf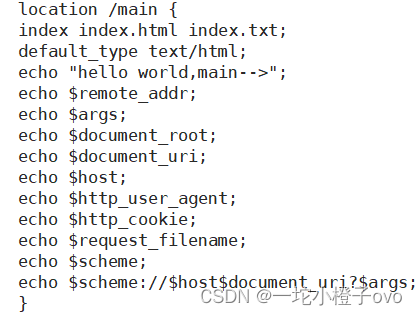
[root@localhost conf.d]#nginx -t
nginx: the configuration file /apps/nginx/conf/nginx.conf syntax is ok
nginx: configuration file /apps/nginx/conf/nginx.conf test is successful
[root@localhost conf.d]#nginx -s reload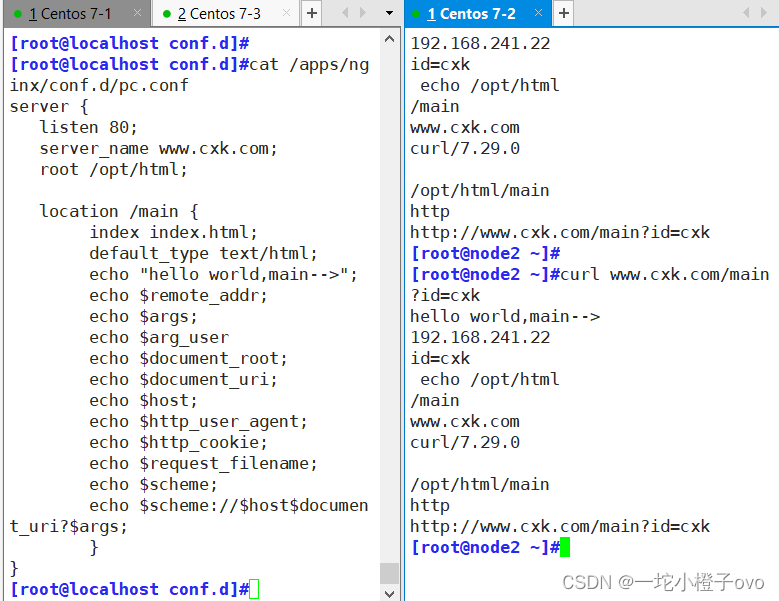
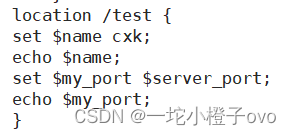
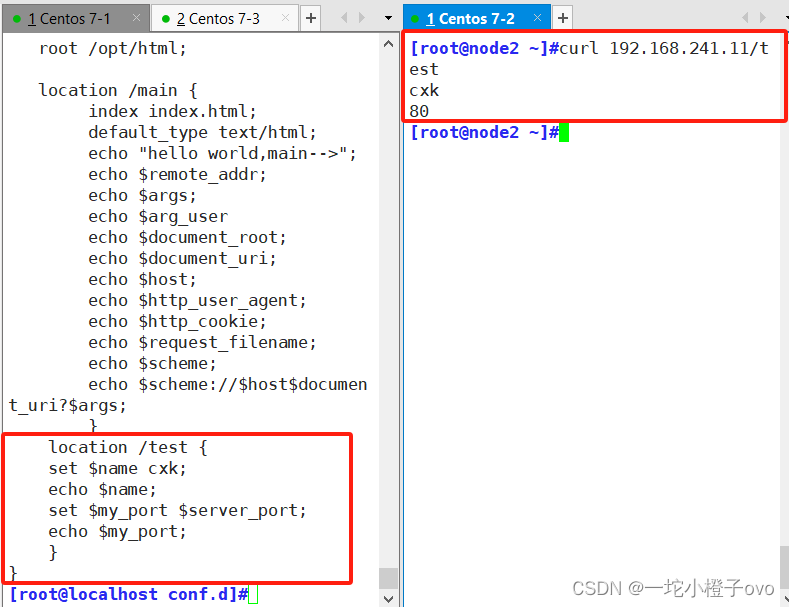
3.2自定义变量
假如需要自定义变量名称和值,使用指令set $variable value;
set $my_port $server_port
将后面的变量赋值给前面的变量
[root@localhost conf.d]#vim pc.conf [root@localhost conf.d]#nginx -t
nginx: the configuration file /apps/nginx/conf/nginx.conf syntax is ok
nginx: configuration file /apps/nginx/conf/nginx.conf test is successful
[root@localhost conf.d]#nginx -s reload
4.拓展——自定义图标
favicon.ico 文件是浏览器收藏网址时显示的图标,当客户端使用浏览器问页面时,浏览器会自己主动发起请求获取页面的favicon.ico文件,但是当浏览器请求的favicon.ico文件不存在时,服务器会记录404日志,而且浏览器也会显示404报错

[root@localhost conf.d]#wget www.jd.com/favicon.ico
--2024-02-22 19:16:17--  http://www.jd.com/favicon.ico
正在解析主机 www.jd.com (www.jd.com)... 183.248.220.65, 2409:8728:5eff:1009:8000::65
正在连接 www.jd.com (www.jd.com)|183.248.220.65|:80... 已连接。
已发出 HTTP 请求,正在等待回应... 302 Moved Temporarily
位置:https://www.jd.com/favicon.ico [跟随至新的 URL]
--2024-02-22 19:16:17--  https://www.jd.com/favicon.ico
正在连接 www.jd.com (www.jd.com)|183.248.220.65|:443... 已连接。
已发出 HTTP 请求,正在等待回应... 200 OK
长度:25214 (25K) [image/x-icon]
正在保存至: “favicon.ico”

100%[==================================>] 25,214      --.-K/s 用时 0.001s

2024-02-22 19:16:18 (31.9 MB/s) - 已保存 “favicon.ico” [25214/25214])
[root@localhost conf.d]#nginx -t
nginx: the configuration file /apps/nginx/conf/nginx.conf syntax is ok
nginx: configuration file /apps/nginx/conf/nginx.conf test is successful
[root@localhost conf.d]#nginx -s reload

5.自定义访问日志
访问日志是记录客户端即用户的具体请求内容信息,而在全局配置模块中的error_log是记录nginx服务器运行时的日志保存路径饿记录日志的level,因此两者是不同的,而且Nginx的错误日志一般只有一个,但是访问日志可以在不同server中定义多个,定义一个日志需要使用access_log指定日志饿保存路径,使用log_format指定日志的格式,格式中定义要保存的具体日志内容。
访问日志由ngx_http_log_module模块实现;
官方帮助文档:http://nginx.org/en/docs/http/ngx_http_log_module.html
log_format main '$remote_addr - $remote_user [$time_local] "$request" '
'$status $body_bytes_sent "$http_referer" '
'"$http_user_agent" "$http_x_forwarded_for"'
'$server_name:$server_port';
log_format test '$remote_addr - $remote_user [$time_local] "$request" '
'$status $body_bytes_sent "$http_referer" '
'"$http_user_agent" "$http_x_forwarded_for"'
'$server_name:$server_port';
#注意如果开启 include 注意定义自配置文件与 日志格式的上下关系 , 日志格式一定要在 include 之前 否则会不生效。


设置的变量与访问的日志可以对应,例如$remote_addr远端IP(客户端的IP地址);$time_local访问的本地时间;$request客户端请求
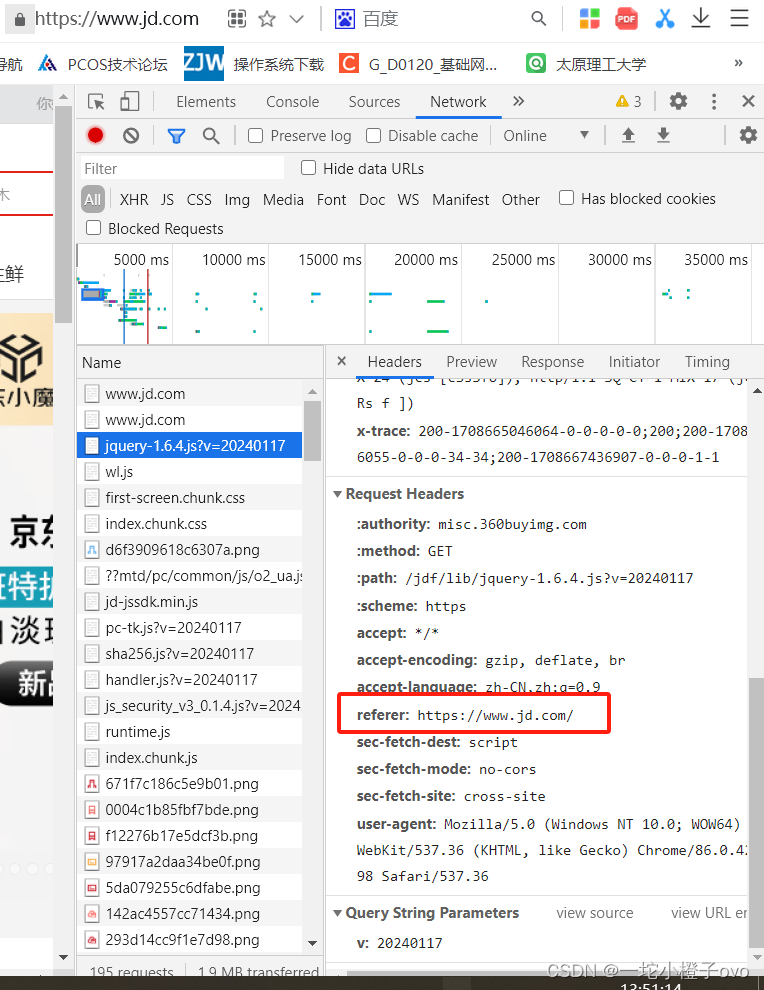
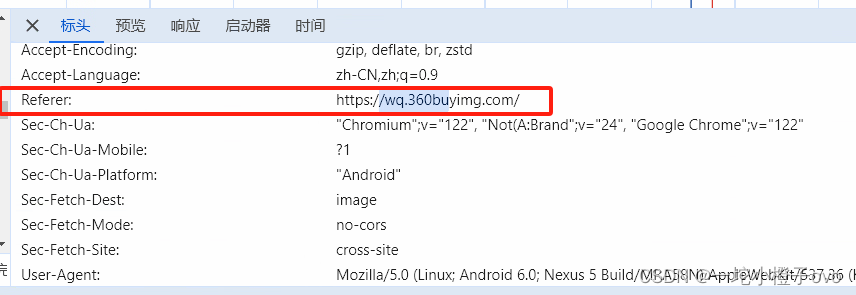
refer定义,如果在浏览器输入京东的域名,refer就是空的,norefer;
如果从refer跳转到京东,refer就是京东的域名
5.1自定义json格式
有些情况会不支持日志格式的查看,我们可以通过修改日志格式,查看json格式的内容
[root@localhost conf]#vim nginx.conf
[root@localhost conf]#nginx -t
nginx: the configuration file /apps/nginx/conf/nginx.conf syntax is ok
nginx: configuration file /apps/nginx/conf/nginx.conf test is successful
[root@localhost conf]#nginx -s reload
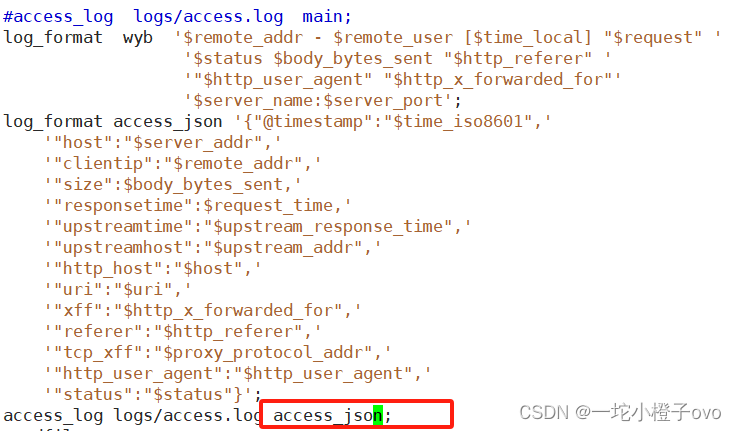

设置的json格式使用的内置变量$time_iso格林威治时间对应2024-02-23T114:18:55+8:00;host:$server_Addr对应当前服务端的主机地址;总之看的更加清晰一些
如果想提取状态码
[root@localhost conf]#cat /apps/nginx/logs/access.log|awk -F: '{print $18}'|awk -F\" '{print $2}'
304
304[root@localhost conf]#cat /apps/nginx/logs/access.log|sed -r 's/.*(status)":"(.*)"}.*/\2/'|sort -n|uniq -c
2 304如果在日志中提取本机IP
[root@localhost conf]#cat /apps/nginx/logs/access.log|awk -F: '{print $6}'|sed -r 's/"(.*)",.*/\1/'
192.168.241.11
192.168.241.116.日志分割脚本
vim /opt/fenge.sh
#!/bin/bash
# Filename: fenge.sh
day=$(date -d "-1 day" "+%Y%m%d")
#显示前一天的时间
logs_path="/var/log/nginx"
pid_path="/usr/local/nginx/logs/nginx.pid"
[ -d $logs_path ] || mkdir -p $logs_path
#创建日志文件目录
mv /usr/local/nginx/logs/access.log ${logs_path}/kgc.com-access.log-$day
#移动并重命名日志文件
kill -USR1 $(cat $pid_path)
#重建新日志文件
find $logs_path -mtime +30 -exec rm -rf {} \;
#删除30天之前的日志文件
#find $logs_path -mtime +30 | xargs rm -rf
chmod +x /opt/fenge.sh
/opt/fenge.sh
ls /var/log/nginx
ls /usr/local/nginx/logs/access.log
crontab -e
0 1 * * * /opt/fenge.sh7.Nginx压缩
支持对指定类型的文件进行压缩然后再传输给客户端,而且压缩还可以设置压缩比例,压缩后的文件大小将比源文件显著变小,这样有助于降低出口带宽的利用率,降低企业的IT支出,不过会占用相应的CPU资源。Nginx对文件的压缩功能是依赖于模块 ngx_http_gzip_module
官方文档: https://nginx.org/en/docs/http/ngx_http_gzip_module.html#启用或禁用gzip压缩,默认关闭
gzip on | off;
#压缩比由低到高从1到9,默认为1
gzip_comp_level level;
#禁用IE6 gzip功能
gzip_disable "MSIE [1-6]\.";
#gzip压缩的最小文件,小于设置值的文件将不会压缩
gzip_min_length 1k;
#启用压缩功能时,协议的最小版本,默认HTTP/1.1
gzip_http_version 1.0 | 1.1;
#指定Nginx服务需要向服务器申请的缓存空间的个数和大小,平台不同,默认:32 4k或者16 8k;
gzip_buffers number size;
#指明仅对哪些类型的资源执行压缩操作;默认为gzip_types 如果不指定,默认压缩text/html,不用显示指定,否则出错
gzip_types mime-type ...;
#如果启用压缩,是否在响应报文首部插入“Vary: Accept-Encoding”,一般建议打开;如果显示“Vary: Accept-Encoding”代表压缩完成
gzip_vary on | off;
#预压缩,先压缩好,不用临时压缩,消耗cpu
gzip_static on | off;[root@localhost conf.d]#vim pc.conf
[root@localhost conf.d]#nginx -t
nginx: the configuration file /apps/nginx/conf/nginx.conf syntax is ok
nginx: configuration file /apps/nginx/conf/nginx.conf test is successful
[root@localhost conf.d]#nginx -s reload


[root@localhost conf.d]#tail -f /apps/nginx/logs/access.log

curl 不支持压缩
[root@localhost conf.d]#tail -f /apps/nginx/logs/access.log

[root@localhost conf.d]#vim pc.conf
[root@localhost conf.d]#nginx -t
nginx: the configuration file /apps/nginx/conf/nginx.conf syntax is ok
nginx: configuration file /apps/nginx/conf/nginx.conf test is successful
[root@localhost conf.d]#nginx -s reload

开启预压缩功能
[root@localhost conf.d]#cd /opt/
[root@localhost opt]#mv index.html index.html.gz
[root@localhost opt]#ls
echo-nginx-module-master      index.html.gz  nginx-1.18.0.tar.gz
echo-nginx-module-master.zip  ip
image                         nginx-1.18.0
[root@localhost opt]#cat index.html
123123
[root@localhost opt]#gzip index.html
[root@localhost opt]#ls
echo-nginx-module-master index.html.gz nginx-1.18.0.tar.gz
echo-nginx-module-master.zip ip
image nginx-1.18.0
[root@localhost opt]#mv index.html.gz m.html
[root@localhost opt]#ls
echo-nginx-module-master image m.html nginx-1.18.0.tar.gz
echo-nginx-module-master.zip ip nginx-1.18.0
[root@localhost opt]#ls
echo-nginx-module-master      image  m.html        nginx-1.18.0.tar.gz
echo-nginx-module-master.zip  ip     nginx-1.18.0
[root@localhost opt]#gzip m.html
[root@localhost opt]#ls
echo-nginx-module-master      image  m.html.gz     nginx-1.18.0.tar.gz
echo-nginx-module-master.zip  ip     nginx-1.18.0
[root@localhost opt]#cp m.html.gz ./m.html
[root@localhost opt]#ls
echo-nginx-module-master      image  m.html     nginx-1.18.0
echo-nginx-module-master.zip  ip     m.html.gz  nginx-1.18.0.tar.gz
预压缩可以减少CPU消耗;m.html 和 m.html.gz可以共存;如果要修改m.html.gz可以将其解压(tar)后再进行修改配置
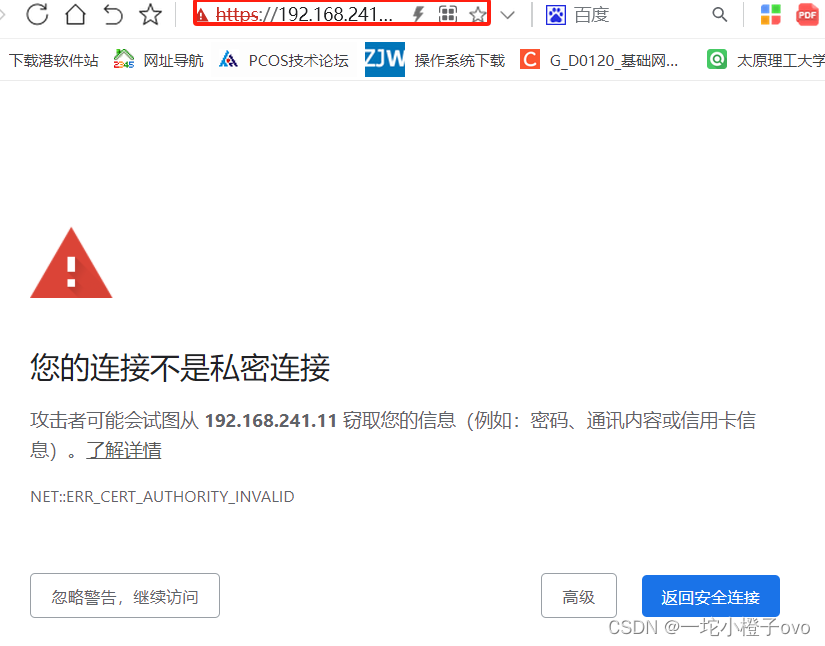
8.httpds功能
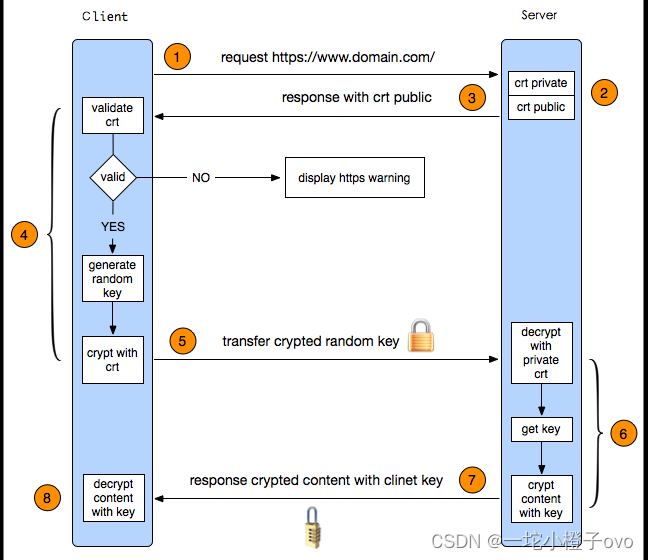
Web网站的登录页面都是使用https加密传输的,加密数据以保障数据的安全,HTTPS能够加密信息,以免敏感信息被第三方获取,所以很多银行网站或电子邮箱等等安全级别较高的服务都会采用HTTPS协议,HTTPS其实是有两部分组成:HTTP + SSL / TLS,也就是在HTTP上又加了一层处理加密信息的模块。服务端和客户端的信息传输都会通过TLS进行加密,所以传输的数据都是加密后的数据。
nginx 的https 功能基于模块ngx_http_ssl_module实现,因此如果是编译安装的nginx要使用参数ngx_http_ssl_module开启ssl功能,但是作为nginx的核心功能,yum安装的nginx默认就是开启的,编译安装的nginx需要指定编译参数--with-http_ssl_module开启

官方文档:https://nginx.org/en/docs/http/ngx_http_ssl_module.html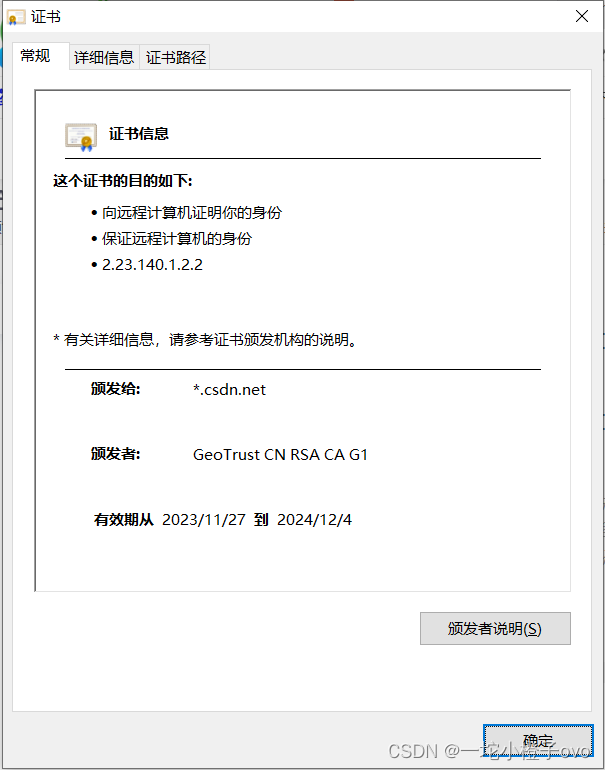
ssl on | off;
#为指定的虚拟主机配置是否启用ssl功能,此功能在1.15.0废弃,使用listen [ssl]替代
listen 443 ssl;
#监听443端口,https是443端口的协议

ssl_certificate /path/to/file;
#指向包含当前虚拟主机和CA的两个证书信息的文件,一般是crt文件

ssl_certificate_key /path/to/file;
#当前虚拟主机使用的私钥文件,一般是key文件

ssl_protocols [SSLv2] [SSLv3] [TLSv1] [TLSv1.1] [TLSv1.2];
#支持ssl协议版本,早期为ssl现在是TLS,默认为后三个

ssl_session_cache off | none | [builtin[:size]] [shared:name:size];
#配置ssl缓存
 off: #关闭缓存
 none:  #通知客户端支持ssl session cache,但实际不支持
 builtin[:size]:#使用OpenSSL内建缓存,为每worker进程私有
 [shared:name:size]:#在各worker之间使用一个共享的缓存,需要定义一个缓存名称和缓存空间大小,一兆可以存储4000个会话信息,多个虚拟主机可以使用相同的缓存名称

ssl_session_timeout time;
#客户端连接可以复用ssl session cache中缓存的有效时长,默认5m
openssl可以生成公私钥
[root@localhost opt]#openssl -h
openssl:Error: '-h' is an invalid command.

Standard commands
asn1parse         ca                ciphers           cms
crl               crl2pkcs7         dgst              dh
dhparam           dsa               dsaparam          ec
ecparam           enc               engine            errstr
gendh             gendsa            genpkey           genrsa
nseq              ocsp              passwd            pkcs12
pkcs7             pkcs8             pkey              pkeyparam
pkeyutl           prime             rand              req
rsa               rsautl            s_client          s_server
s_time            sess_id           smime             speed
spkac             ts                verify            version
x509

Message Digest commands (see the `dgst' command for more details)
md2               md4               md5               rmd160
sha               sha1

Cipher commands (see the `enc' command for more details)
aes-128-cbc       aes-128-ecb       aes-192-cbc       aes-192-ecb
aes-256-cbc       aes-256-ecb       base64            bf
bf-cbc            bf-cfb            bf-ecb            bf-ofb
camellia-128-cbc  camellia-128-ecb  camellia-192-cbc  camellia-192-ecb
camellia-256-cbc  camellia-256-ecb  cast              cast-cbc
cast5-cbc         cast5-cfb         cast5-ecb         cast5-ofb
des               des-cbc           des-cfb           des-ecb
des-ede           des-ede-cbc       des-ede-cfb       des-ede-ofb
des-ede3          des-ede3-cbc      des-ede3-cfb      des-ede3-ofb
des-ofb           des3              desx              idea
idea-cbc          idea-cfb          idea-ecb          idea-ofb
rc2               rc2-40-cbc        rc2-64-cbc        rc2-cbc
rc2-cfb           rc2-ecb           rc2-ofb           rc4
rc4-40            rc5               rc5-cbc           rc5-cfb
rc5-ecb           rc5-ofb           seed              seed-cbc
seed-cfb          seed-ecb          seed-ofb          zlib
nginx也是通过openssl进行公私钥生成的
8.1自签名证书
[root@localhost opt]#ls
echo-nginx-module-master image m.html nginx-1.18.0
echo-nginx-module-master.zip ip m.html.gz nginx-1.18.0.tar.gz
[root@localhost opt]#mkdir ssl
[root@localhost opt]#cd ssl/
[root@localhost ssl]#rz -E
rz waiting to receive.
[root@localhost ssl]#cat certificate.sh
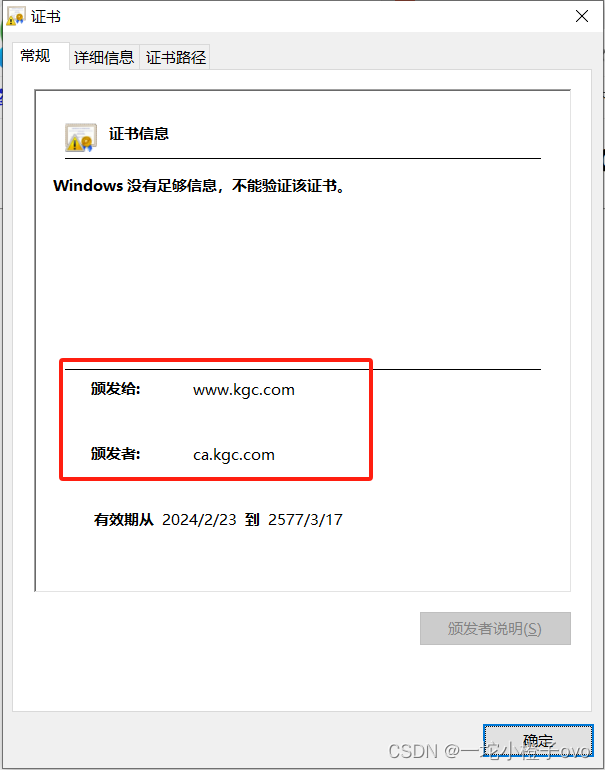
CA_SUBJECT="/O=kgc/CN=ca.kgc.com"
SUBJECT="/C=CN/ST=js/L=nj/O=kgc/CN=www.kgc.com"
SERIAL=34
EXPIRE=202002
FILE=kgc.com
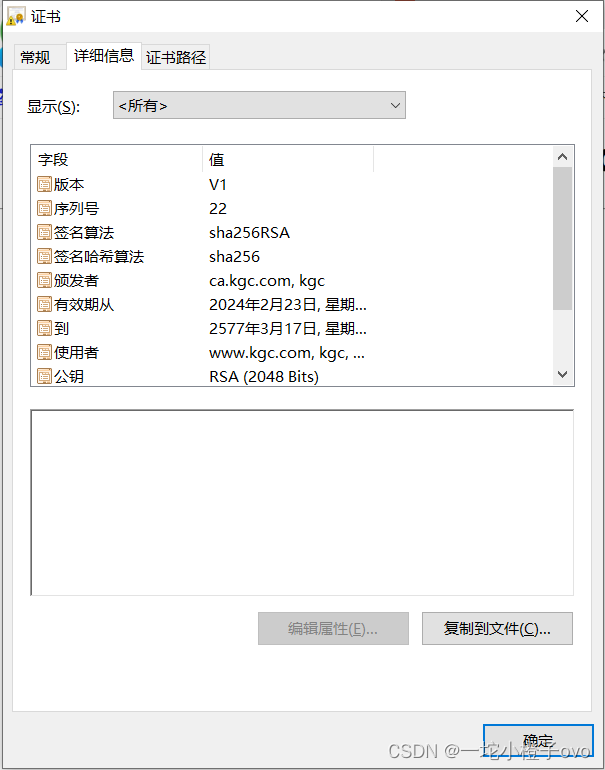
openssl req -x509 -newkey rsa:2048 -subj $CA_SUBJECT -keyout ca.key -nodes -days 202002 -out ca.crt
openssl req -newkey rsa:2048 -nodes -keyout ${FILE}.key -subj $SUBJECT -out ${FILE}.csr
openssl x509 -req -in ${FILE}.csr -CA ca.crt -CAkey ca.key -set_serial $SERIAL -days $EXPIRE -out ${FILE}.crt
chmod 600 ${FILE}.key ca.key
[root@localhost ssl]#bash certificate.sh
Generating a 2048 bit RSA private key
....................................................................................................+++
....................................................................................................................................................................................................+++
writing new private key to 'ca.key'
-----
Generating a 2048 bit RSA private key
...................................+++
.+++
writing new private key to 'kgc.com.key'
-----
Signature ok
subject=/C=CN/ST=js/L=nj/O=kgc/CN=www.kgc.com
Getting CA Private Key
[root@localhost ssl]#ls
ca.crt ca.key certificate.sh kgc.com.crt kgc.com.csr kgc.com.key
所有证书都需要放在一起,不能移开
[root@localhost ssl]#mv kgc.com.crt www.kgc.com.crt
[root@localhost ssl]#mv kgc.com.key www.kgc.com.key
[root@localhost ssl]#ll www*
-rw-r--r-- 1 root root 1062 2月  23 16:34 www.kgc.com.crt
-rw-r--r-- 1 root root  964 2月  23 16:34 www.kgc.com.key
[root@localhost ssl]#vim /apps/nginx/conf.d/pc.conf
[root@localhost ssl]#nginx -t
nginx: the configuration file /apps/nginx/conf/nginx.conf syntax is ok
nginx: configuration file /apps/nginx/conf/nginx.conf test is successful
[root@localhost ssl]#nginx -s reload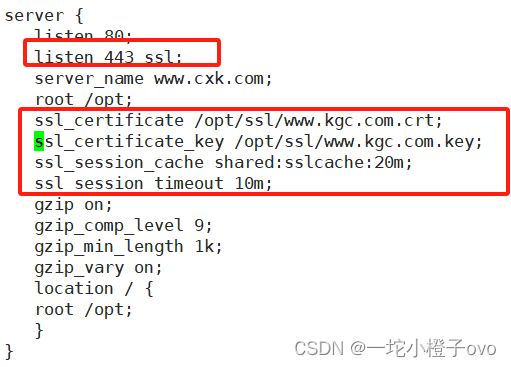
[root@localhost ssl]#ls /opt
echo-nginx-module-master      image  m.html     nginx-1.18.0         ssl
echo-nginx-module-master.zip  ip     m.html.gz  nginx-1.18.0.tar.gz
[root@localhost ssl]#echo test > /opt/index.html

kgc.com.crt(购买者)ca.crt(颁发者)> www.kgc.com.crt
kgc.com.key www.kgc.com.key(验证钥匙)