前文:
petalinux_zynq7 C语言驱动DAC以及ADC模块之一:建立IP![]() https://blog.csdn.net/qq_27158179/article/details/136234296petalinux_zynq7 C语言驱动DAC以及ADC模块之二:petalinux
https://blog.csdn.net/qq_27158179/article/details/136234296petalinux_zynq7 C语言驱动DAC以及ADC模块之二:petalinux![]() https://blog.csdn.net/qq_27158179/article/details/136236138petalinux_zynq7 C语言驱动DAC以及ADC模块之三:实现C语言API并编译出库被python调用
https://blog.csdn.net/qq_27158179/article/details/136236138petalinux_zynq7 C语言驱动DAC以及ADC模块之三:实现C语言API并编译出库被python调用![]() https://blog.csdn.net/qq_27158179/article/details/136238093petalinux_zynq7 C语言驱动DAC以及ADC模块之四:python实现http_api
https://blog.csdn.net/qq_27158179/article/details/136238093petalinux_zynq7 C语言驱动DAC以及ADC模块之四:python实现http_api![]() https://blog.csdn.net/qq_27158179/article/details/136239572petalinux_zynq7 C语言驱动DAC以及ADC模块之五:nodejs+vue3实现web网页波形显示
https://blog.csdn.net/qq_27158179/article/details/136239572petalinux_zynq7 C语言驱动DAC以及ADC模块之五:nodejs+vue3实现web网页波形显示![]() https://blog.csdn.net/qq_27158179/article/details/136240421本文:ubuntu18搭建zynq qt开发环境。
https://blog.csdn.net/qq_27158179/article/details/136240421本文:ubuntu18搭建zynq qt开发环境。
0. 环境
mizar z7010
vivado 2018.3
petalinux 2018.3
ubuntu18
1. 获取linux-qt
1.1 下载
petalinux2018.3配套的qt版本是5.9.6。
下载地址:
https://download.qt.io/new_archive/qt/5.9/5.9.6/
下载
qt-opensource-linux-x64-5.9.6.run
qt-everywhere-opensource-src-5.9.6.tar.xz
1.2 安装
sudo chmod 777 qt-opensource-linux-x64-5.9.6.run
./qt-opensource-linux-x64-5.9.6.run
-> Next
-> 这里需要注册一个账号,并登录
-> Next
-> Installation Folder: /home/xxjianvm/Qt5.9.6 -> Next
-> Select Components -> 勾选 Desktop gcc 64-bit,勾选 Qt Charts,勾选 Developer and Designer Tools -> Next
-> License Agreement -> Next
-> Install
1.3 界面 helloworld
通过开始界面打开 Qt Creator

1.3.1 创建工程
Qt Creator -> File -> New File or Project -> Application -> Qt Widgets Application -> choose
Location
-> Name: hello_qt
-> Create in: /home/xxjianvm/work/workspace_qt/
-> Next
Details
-> Class Information: hello_qt -> Next
Summary -> Finish
1.3.2 编译
问题:Could not determine which "make" command to run
解决办法:sudo apt install make
问题:/bin/sh: 1: g++: not found
解决办法:sudo apt install g++
问题:/usr/bin/ld: cannot find -lGL
解决办法:find /usr/lib/ -name "libGL*"
sudo ln -s /usr/lib/x86_64-linux-gnu/libGL.so.1 /usr/lib/libGL.so
1.3.2 修改界面
双击 hello_qt/Forms/hello_qt.ui
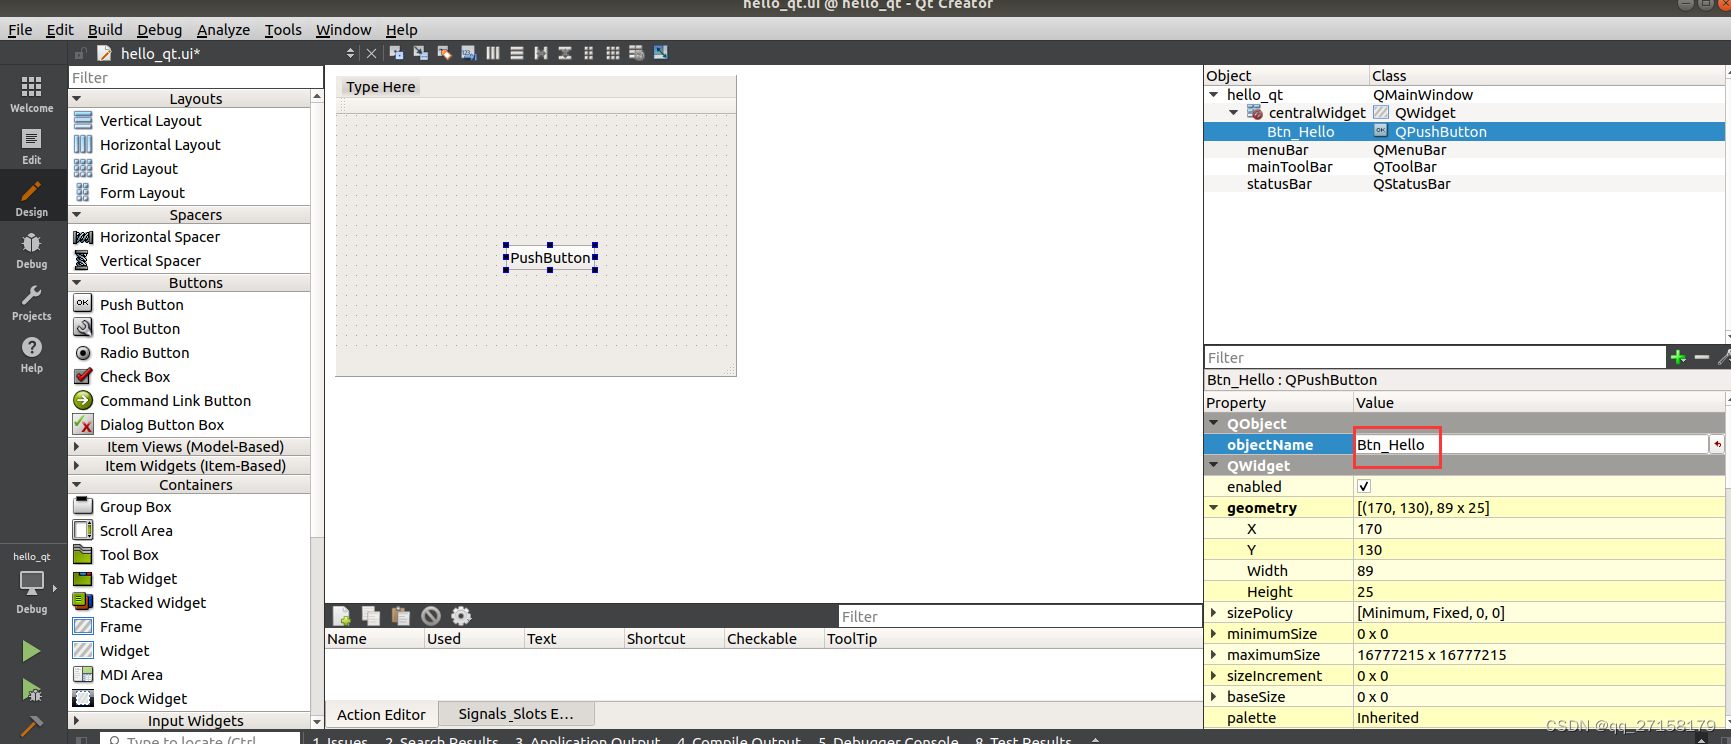
添加 Push Button ->
-> objectName: Btn_Hello
-> 右键 -> Go to slot... -> clicked() -> OK
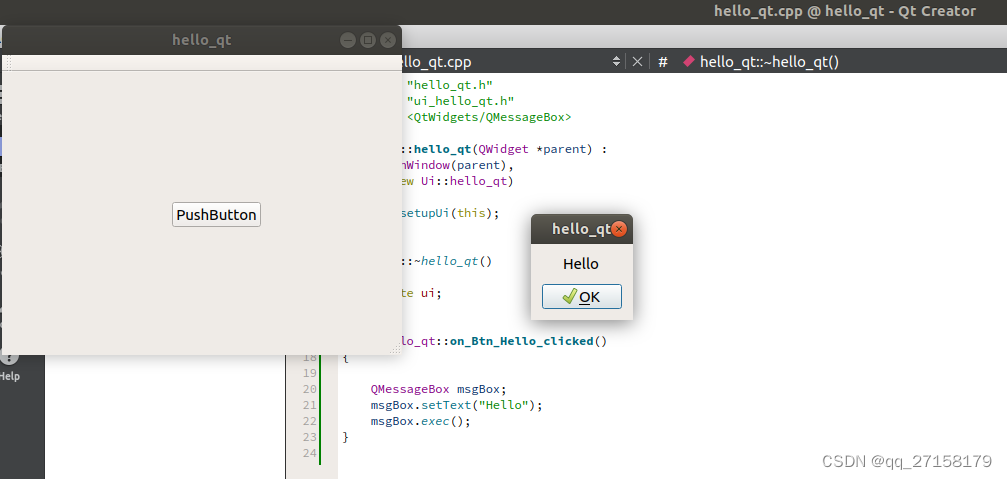
修改 hello_qt.cpp:
#include <QtWidgets/QMessageBox>
void hello_qt::on_Btn_Hello_clicked()
{
QMessageBox msgBox;
msgBox.setText("Hello");
msgBox.exec();
}

编译运行
2. 安装sdk
前文petalinux篇生成了sdk。
把
/home/dell/work/mizar/linux_sd_adda/images/linux/sdk.sh
拷贝到
/home/xxjianvm/work/mizar/sdk.sh安装
chmod +x sdk.sh
./sdk.sh
安装到
/opt/petalinux/2018.3测试
source /opt/petalinux/2018.3/environment-setup-cortexa9hf-neon-xilinx-linux-gnueabi
arm-xilinx-linux-gnueabi-gcc -v
打开 qtcreator
source /opt/petalinux/2018.3/environment-setup-cortexa9hf-neon-xilinx-linux-gnueabi
/home/xxjianvm/Qt5.9.6/Tools/QtCreator/bin/qtcreator
注意打开qtcreator前需要source SDK的交叉编译环境。
3. 添加Kit
Qt Creator -> Tools -> Options -> Build & Run
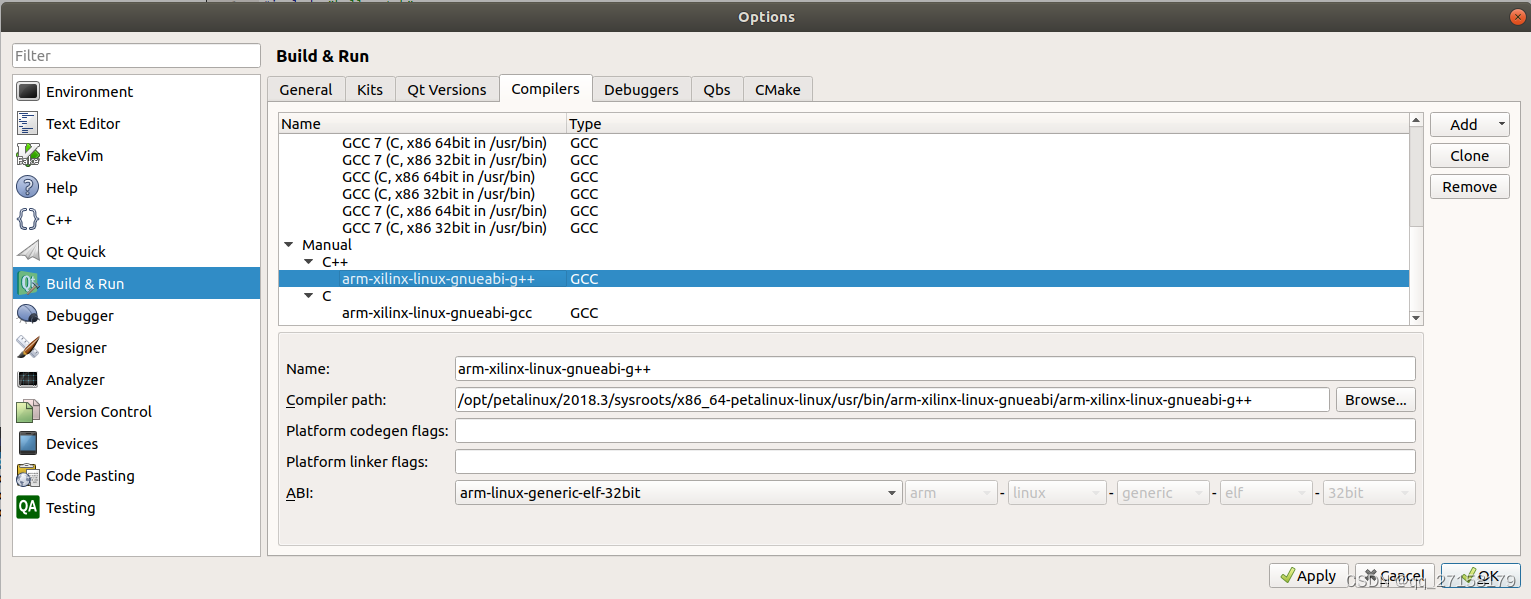
3.1 Compilers
-> Build & Run -> Compilers -> Manual -> C -> Add -> GCC -> C
-> Name: arm-xilinx-linux-gnueabi-gcc
-> Compiler path: /opt/petalinux/2018.3/sysroots/x86_64-petalinux-linux/usr/bin/arm-xilinx-linux-gnueabi/arm-xilinx-linux-gnueabi-gcc
-> Kits -> Compilers -> Manual -> C++ -> Add -> GCC -> C++
-> Name: arm-xilinx-linux-gnueabi-g++
-> Compiler path: /opt/petalinux/2018.3/sysroots/x86_64-petalinux-linux/usr/bin/arm-xilinx-linux-gnueabi/arm-xilinx-linux-gnueabi-g++
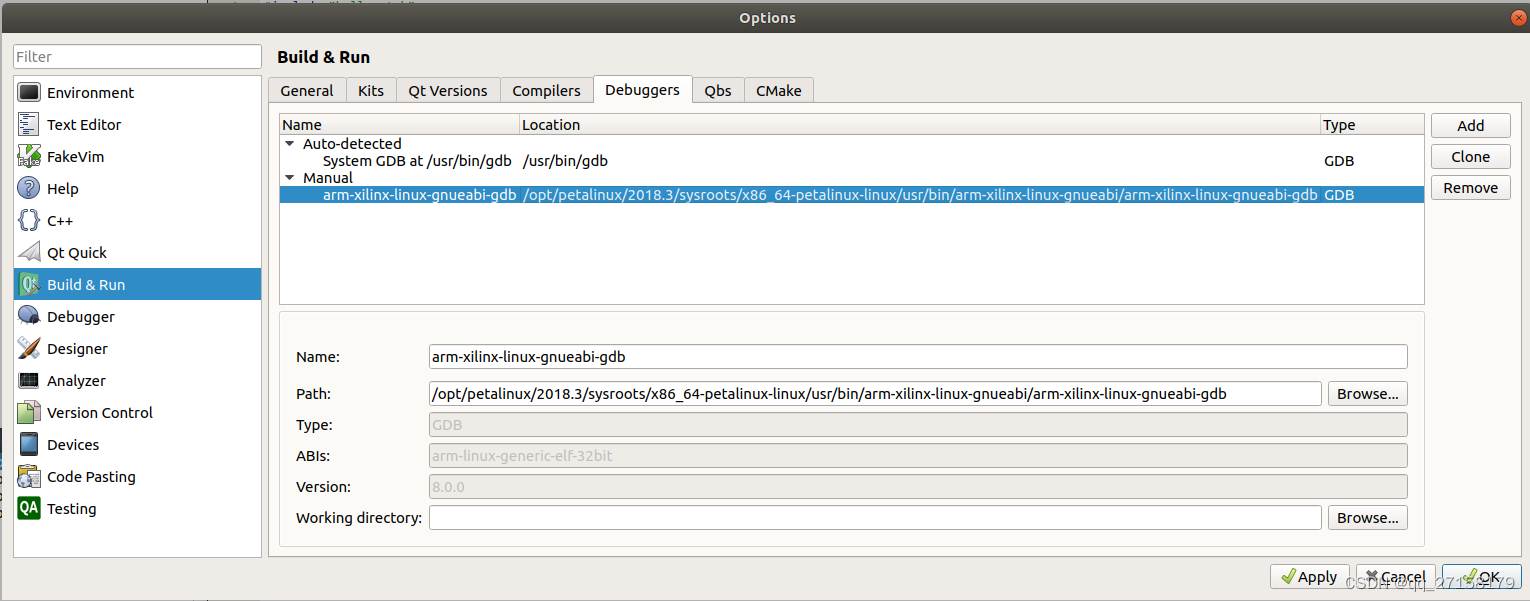
3.2 Debuggers
-> Build & Run -> Debuggers -> Manual -> Add ->
-> Name: arm-xilinx-linux-gnueabi-gdb
-> Path: /opt/petalinux/2018.3/sysroots/x86_64-petalinux-linux/usr/bin/arm-xilinx-linux-gnueabi/arm-xilinx-linux-gnueabi-gdb
3.3 Qt Versions
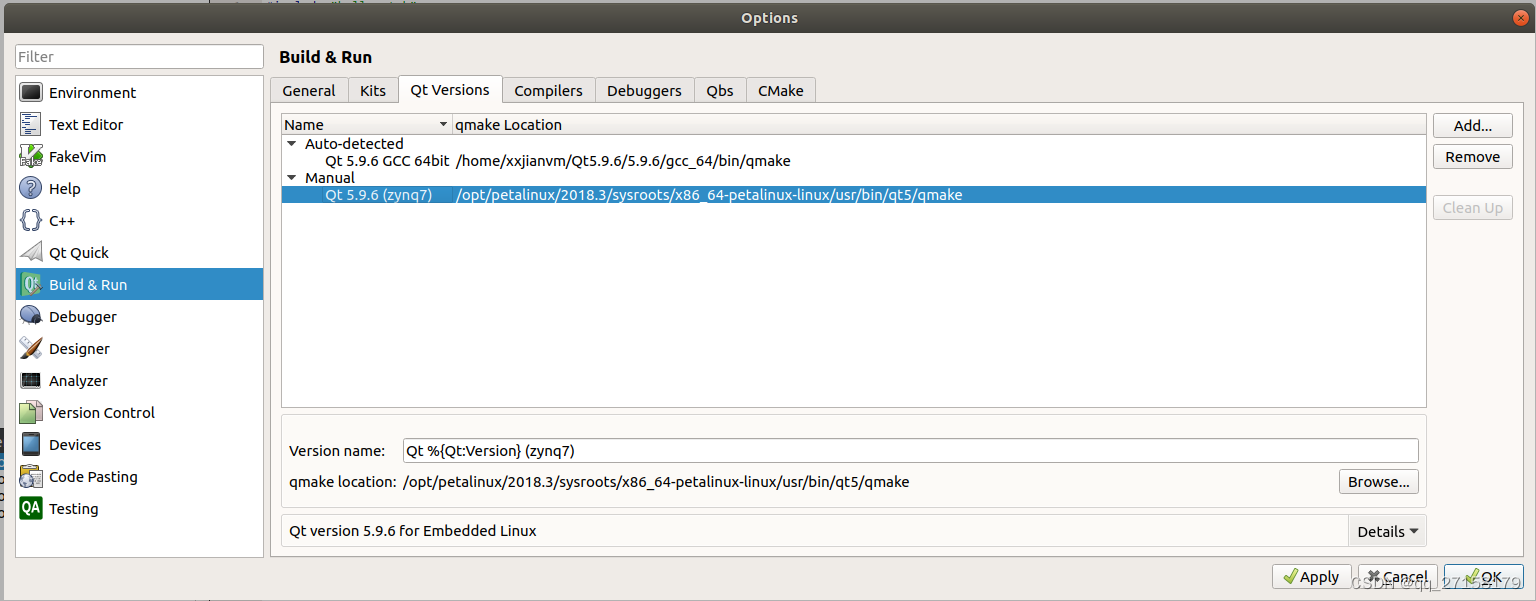
-> Build & Run -> Qt Versions -> Manual -> Add ->
-> Version name: Qt %{Qt:Version} (zynq7)
-> qmake location: /opt/petalinux/2018.3/sysroots/x86_64-petalinux-linux/usr/bin/qt5/qmake
3.4 Kits

-> Build & Run -> Kits -> Manual -> Add
-> Name: zynq7
-> Sysroot: /opt/petalinux/2018.3/sysroots/cortexa9hf-neon-xilinx-linux-gnueabi
-> Compiler C: arm-xilinx-linux-gnueabi-gcc
-> Compiler C++: arm-xilinx-linux-gnueabi-g++
-> Debugger: arm-xilinx-linux-gnueabi-gdb
-> Qt version: Qt 5.9.6 (zynq7)
4. 界面 helloworld
通过开始界面打开 Qt Creator
4.1 创建工程
Qt Creator -> File -> New File or Project -> Application -> Qt Widgets Application -> choose
Location
-> Name: hello2_qt
-> Create in: /home/xxjianvm/work/workspace_qt/
-> Next
Kits ->
-> 全选 -> Next
Build System:
-> Build System: qmake -> Next
Details
-> Class Information: hello2_qt -> Next
-> Finish
4.2 修改界面
双击 helloworld_ui/Forms/hello_qt.ui
添加 Push Button ->
-> objectName: Btn_Hello
-> 右键 -> Go to slot... -> clicked() -> OK
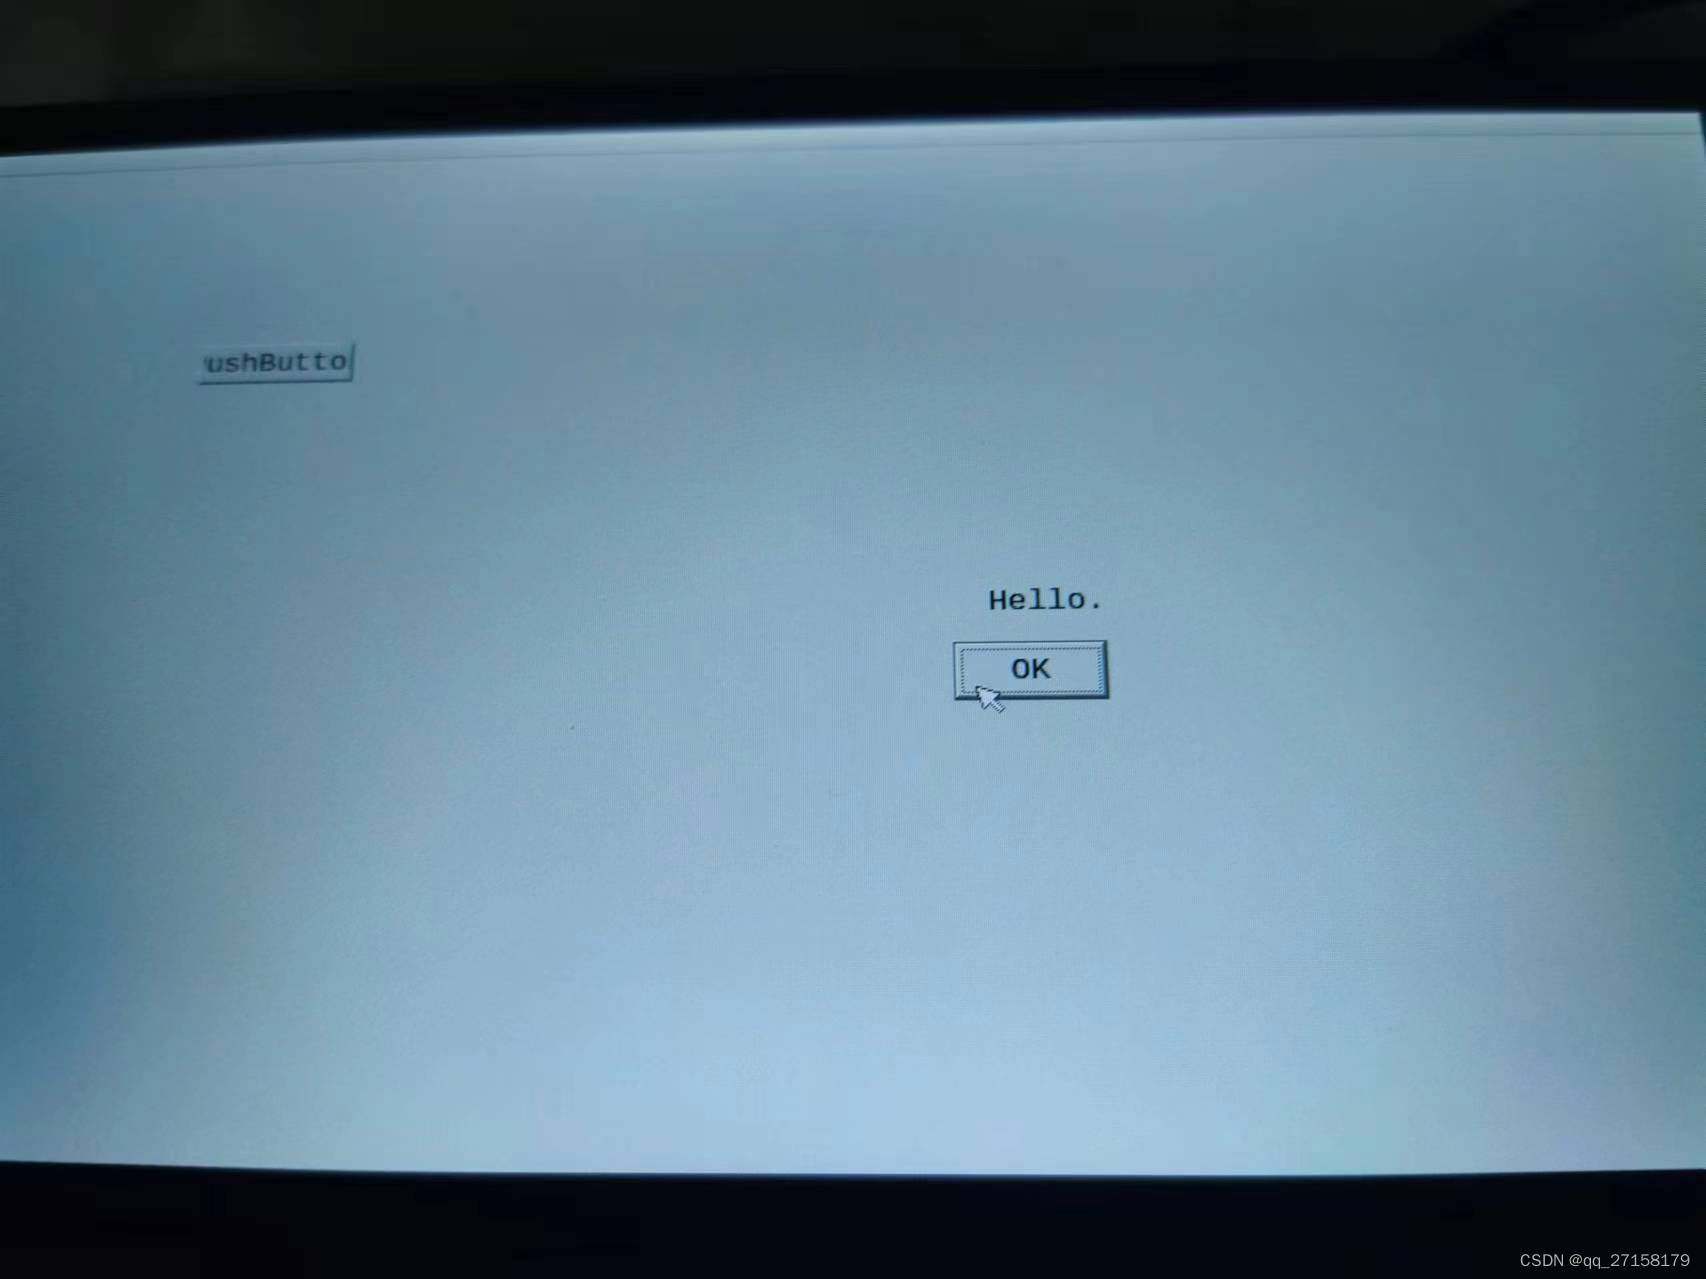
修改 hello2_qt.cpp:
#include <QtWidgets/QMessageBox>
void hello2_qt::on_Btn_Hello_clicked()
{
QMessageBox msgBox;
msgBox.setText("Hello.");
msgBox.exec();
}
4.3 编译
左下角可以切换kit,切换后编译。可以分别编译出本机可以运行的程序,和zynq运行的。
4.4 运行[ZYNQ]
拷贝
/home/xxjianvm/work/workspace_qt/build-hello2_qt-zynq7-Debug/hello2_qt
到板子上的
/root/hello2_qt
配置QT程序的启动的方式
(如果没有配置X11,环境变量使用export QT_QPA_PLATFORM=linuxfb)
export DISPLAY=:0.0
export QT_QPA_PLATFORM=linuxfb
chmod +x hello2_qt
./hello2_qt
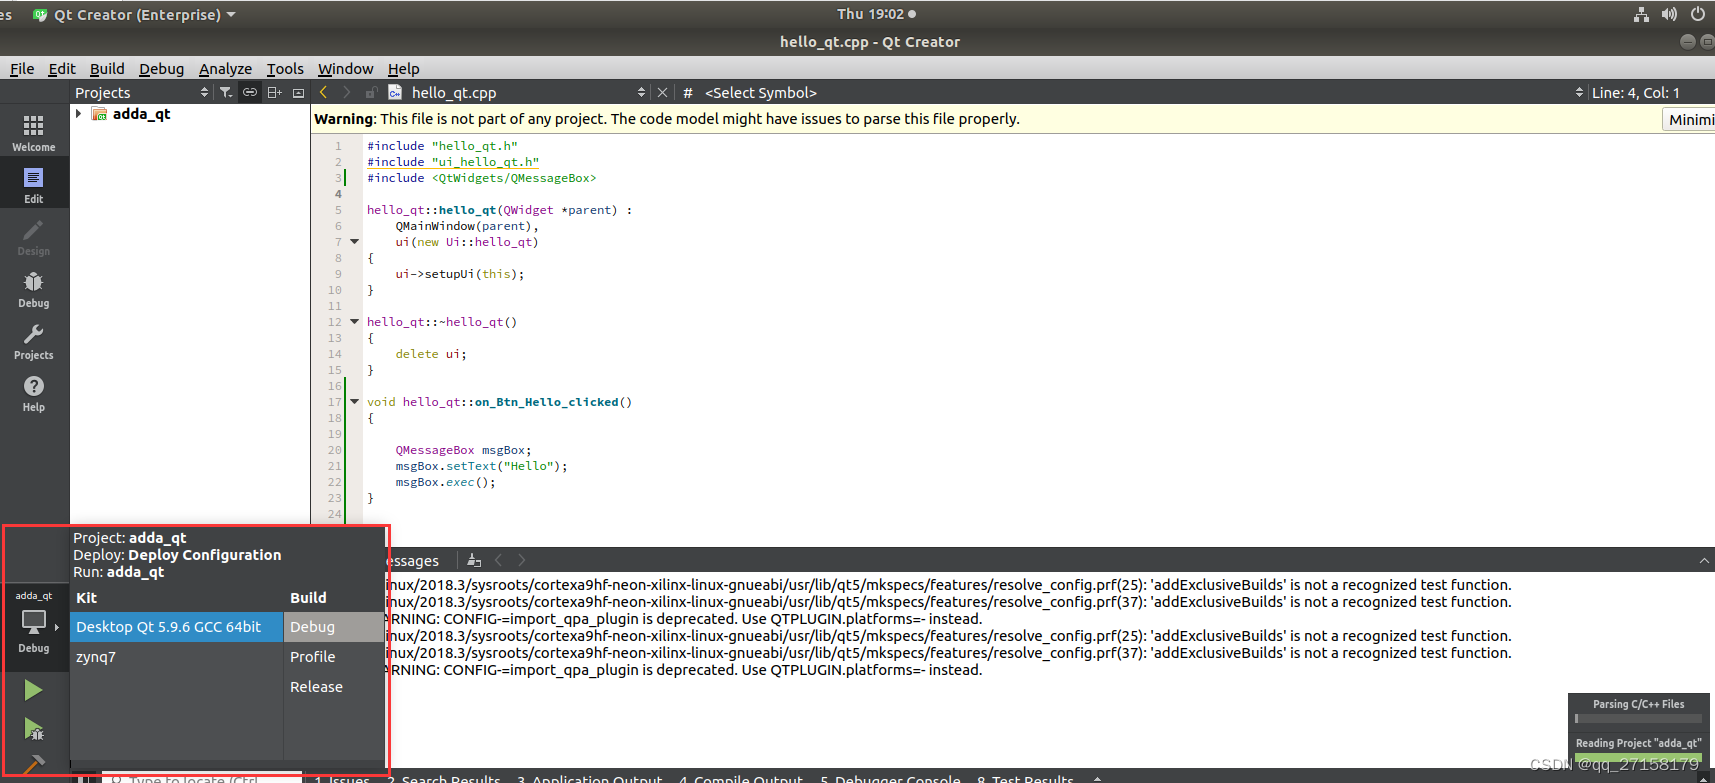
5. adda_qt
5.1 打开 qtcreator
source /opt/petalinux/2018.3/environment-setup-cortexa9hf-neon-xilinx-linux-gnueabi
/home/xxjianvm/Qt5.9.6/Tools/QtCreator/bin/qtcreator
5.2 创建工程
Qt Creator -> File -> New File or Project -> Application -> Qt Widgets Application -> choose
Location
-> Name: adda_qt
-> Create in: /home/xxjianvm/work/workspace_qt/
-> Next
Kits ->
-> 全选 -> Next
Build System:
-> Build System: qmake -> Next
Details
-> Class Information: adda_qt -> Next
-> Finish
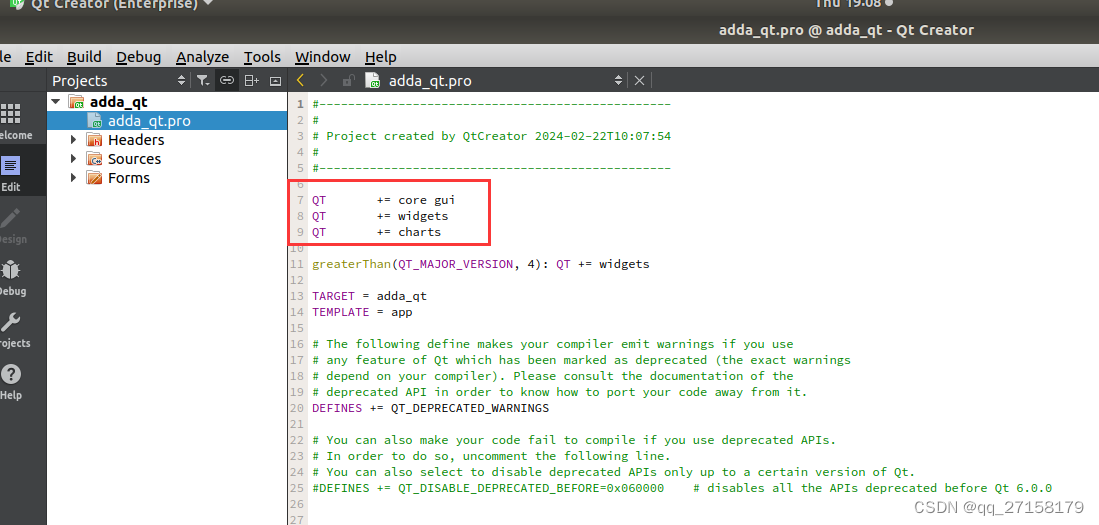
5.3 添加模块
修改 adda_qt.pro
添加:
QT += widgets
QT += charts
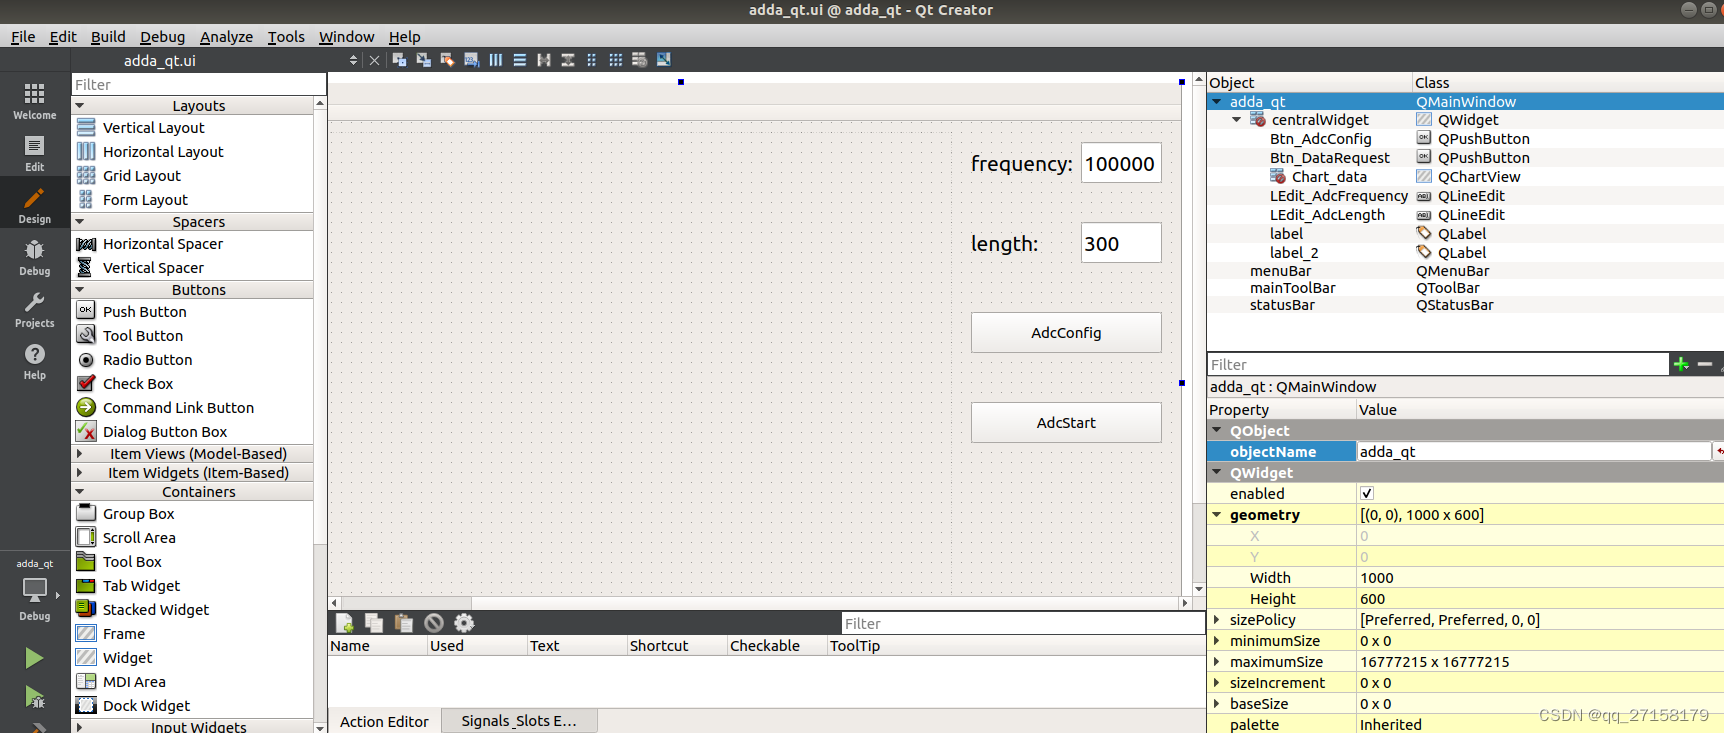
5.4. 修改界面
双击 adda_qt/Forms/adda_qt.ui
采样频率:
添加 Label -> text: frequency:
添加 Line Edit ->
-> objectName: LEdit_AdcFrequency
采样长度:
添加 Line Edit ->
-> objectName: LEdit_AdcLength
采样配置:
添加 Push Button ->
-> objectName: Btn_AdcSample
-> text: AdcStart
-> 右键 -> Go to slot... -> clicked() -> OK
采样开始:
添加 Push Button ->
-> objectName: Btn_AdcDataRequest
-> text: AdcStart
-> 右键 -> Go to slot... -> clicked() -> OK
图表
添加 Containers 的 Widget 到窗口 ->
-> objectName: Chart_data
-> 右键 widget -> promote to...
-> Promoted class name: QChartView
-> Add -> Promote
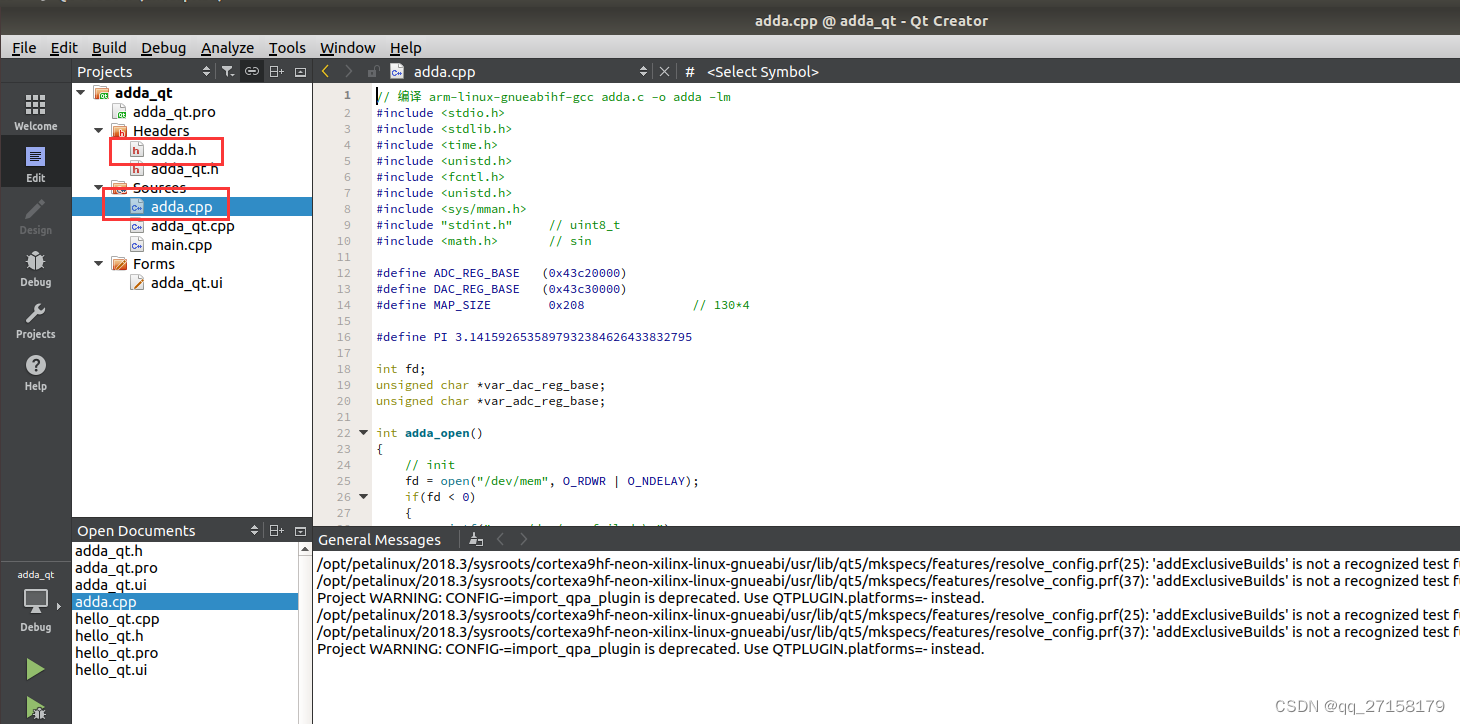
5.5 添加源码
把
/home/xxjianvm/work/mizar/code/adda.c
/home/xxjianvm/work/mizar/code/adda.h
拷贝到
/home/xxjianvm/work/workspace_qt/adda_qt/adda.cpp
/home/xxjianvm/work/workspace_qt/adda_qt/adda.h
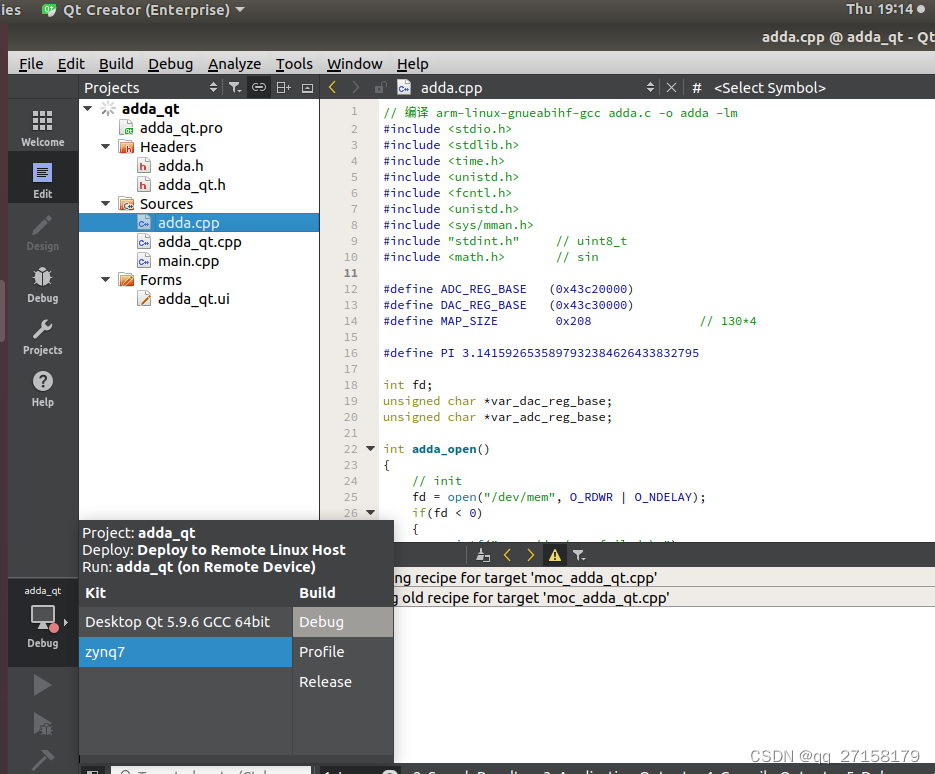
5.6 修改源码
5.6.1 adda_qt.h
#ifndef ADDA_QT_H
#define ADDA_QT_H

#include <QMainWindow>
#include <QtCharts>
QT_CHARTS_USE_NAMESPACE

namespace Ui {
class adda_qt;
}

class adda_qt : public QMainWindow
{
    Q_OBJECT

public:
    explicit adda_qt(QWidget *parent = 0);
    ~adda_qt();

private slots:
    void on_Btn_DataRequest_clicked();

    void on_Btn_AdcConfig_clicked();

    void timer1_period();

private:
    Ui::adda_qt *ui;
};

#endif // ADDA_QT_H
5.6.2 adda_qt.cpp
#include "adda_qt.h"
#include "ui_adda_qt.h"
#include "adda.h"


QChart* m_chart;
QLineSeries* m_lineSeries_1;
QList<QPointF> listForChartLine_1;
QList<QPointF> listForChartLineHistory_1;
int AXIS_MAX_X = 300;

adda_qt::adda_qt(QWidget *parent) :
    QMainWindow(parent),
    ui(new Ui::adda_qt)
{
    ui->setupUi(this);


    m_chart = new QChart();
    m_lineSeries_1 = new QLineSeries();
    m_lineSeries_1->setName("ch1");
    ui->Chart_data->setChart(m_chart);  // 将图表绑定到视图


    QTimer *timer = new QTimer(this);
    connect(timer, SIGNAL(timeout()), this, SLOT(timer1_period()));
    timer->start(1000);
}

adda_qt::~adda_qt()
{
    delete ui;
}
bool flag_RequestDataStart = false;
void adda_qt::on_Btn_DataRequest_clicked()
{
    setbuf(stdout,NULL);
    if(flag_RequestDataStart){
        flag_RequestDataStart = false;
        ui->Btn_DataRequest->setText("AdcStart");
        printf("[on_Btn_DataRequest_clicked]start");
    }
    else{
        flag_RequestDataStart = true;
        ui->Btn_DataRequest->setText("AdcStop");
        printf("[on_Btn_DataRequest_clicked]stop");
        demo_dac_sin();
    }
}

uint32_t AdcParam_SampleFrequency = 100000;
uint32_t AdcParam_SampleLength = 100;
void adda_qt::on_Btn_AdcConfig_clicked()
{
    setbuf(stdout,NULL);
    AdcParam_SampleFrequency = ui->LEdit_AdcFrequency->text().toInt();
    AdcParam_SampleLength = ui->LEdit_AdcLength->text().toInt();
    printf("[on_Btn_AdcConfig_clicked]AdcParam_SampleFrequency = %d\r\n", AdcParam_SampleFrequency);
    printf("[on_Btn_AdcConfig_clicked]AdcParam_SampleLength = %d\r\n", AdcParam_SampleLength);
}
void adda_qt::timer1_period(){
    if(flag_RequestDataStart){
        printf("ticks");

        // demo
//        printf("listForChartLINE1.size() = %d\r\n", listForChartLine_1.size());
//        if(listForChartLine_1.size() >= AXIS_MAX_X){
//            listForChartLine_1.removeAt(0);
//        }
//        double value = sin(static_cast<double>(0.5f * listForChartLineHistory_1.size()));
//        int current_size1 = listForChartLineHistory_1.size();
//        listForChartLineHistory_1.append(QPointF(current_size1, value));

        //require adc data
        // init
        adda_open();
        // 设置采样频率
        adda_AdcSetSampleFrequency(AdcParam_SampleFrequency);
        // 开始采样
        uint8_t adc_buff[10240];
        uint16_t adc_buff_length = AdcParam_SampleLength;
        adda_AdcSampleData(adc_buff, adc_buff_length);
        // close
        adda_close();
        // 打印结果
//        printf("adc_buff[%d]: ", adc_buff_length);
//        for(int i =0;i<adc_buff_length;i++){
//            printf("%02X ", adc_buff[i]);
//        }
//        printf("\r\n");
        for (int i = 0; i < adc_buff_length; i++)
        {
            double ch1_value = adc_buff[i];
            int current_size1 = listForChartLineHistory_1.size();
            listForChartLineHistory_1.append(QPointF(current_size1, ch1_value));
        }


        listForChartLine_1.clear();
        if(listForChartLineHistory_1.size() <= AXIS_MAX_X){
            listForChartLine_1.append(listForChartLineHistory_1);
        }
        else{
            long long listForChartLineHistory_1_size = listForChartLineHistory_1.size();
            for(int i = 0; i < AXIS_MAX_X; i++){
                listForChartLine_1.append(listForChartLineHistory_1[listForChartLineHistory_1_size - AXIS_MAX_X + i]);
            }
        }

        m_lineSeries_1 = new QLineSeries();
        m_lineSeries_1->append(listForChartLine_1);//在serial中添加数据
        m_lineSeries_1->setName("test1");

        m_chart = new QChart();
        //m_chart->removeAllSeries(); //清除即可,重要操作,QChart刷新的必要操作
        m_chart->addSeries(m_lineSeries_1);   // 将系列添加到图表
        m_chart->createDefaultAxes();       // 基于已添加到图表的 series 来创建默认的坐标轴

        ui->Chart_data->setChart(m_chart);  // 将图表绑定到视图
    }
}
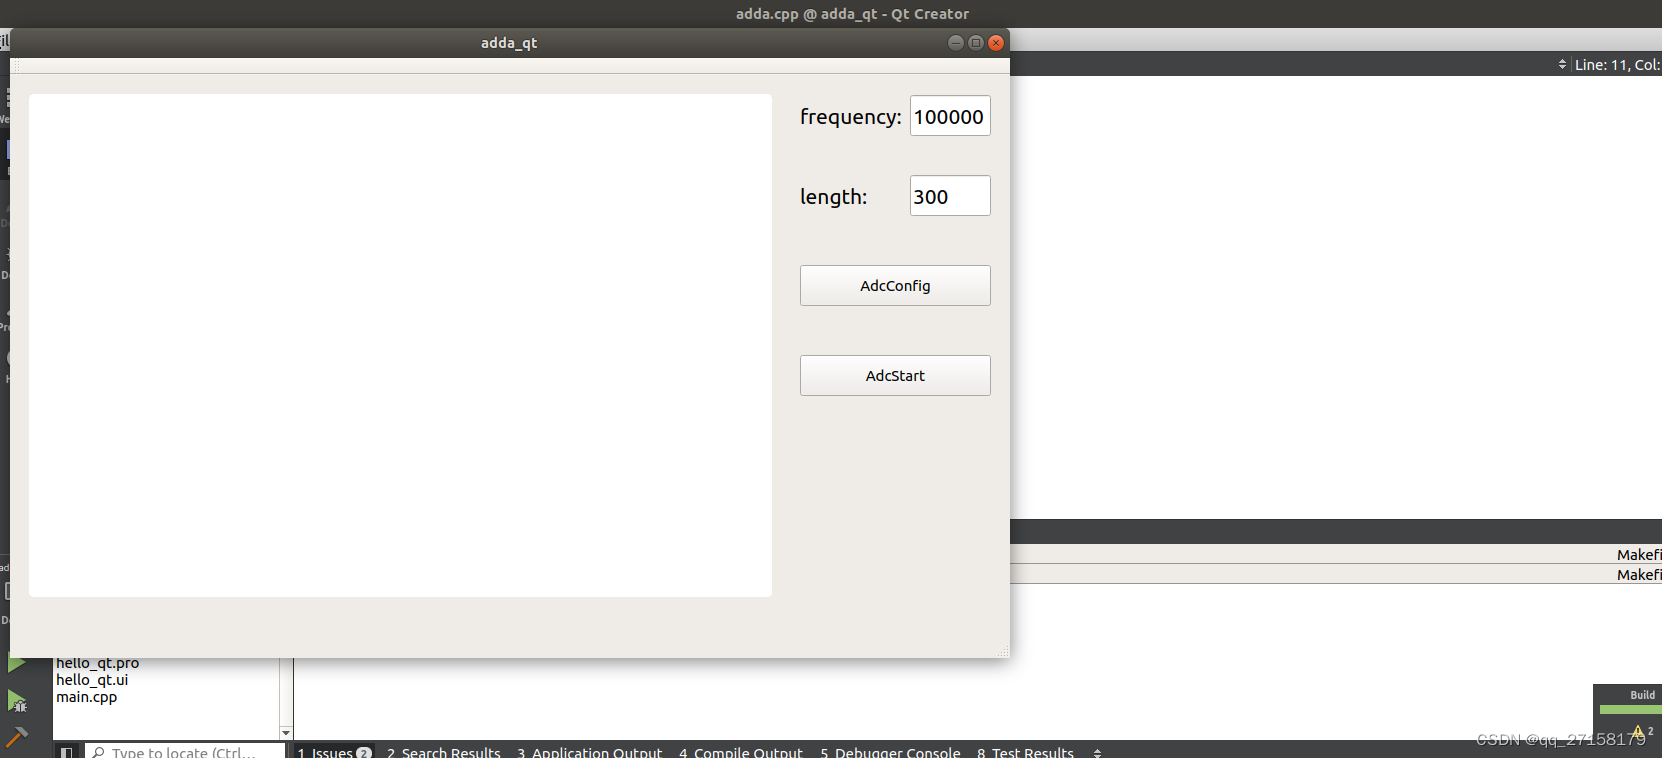
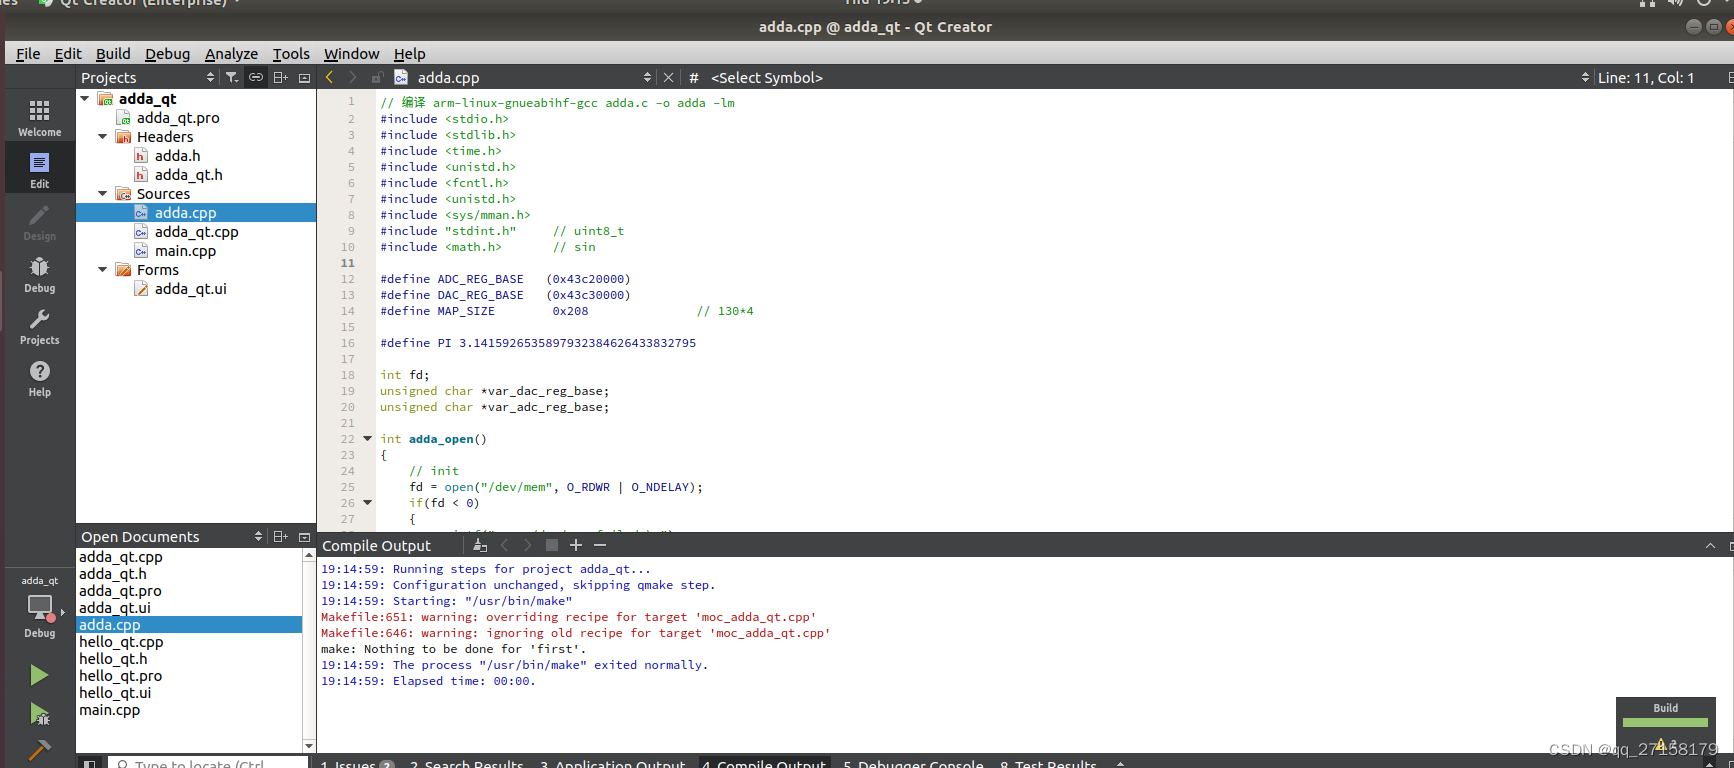
5.7 编译
5.7.1 上位机运行测试界面
切换KIT

编译

运行查看界面
5.7.2 交叉编译出ZYNQ版本
切换KIT
编译
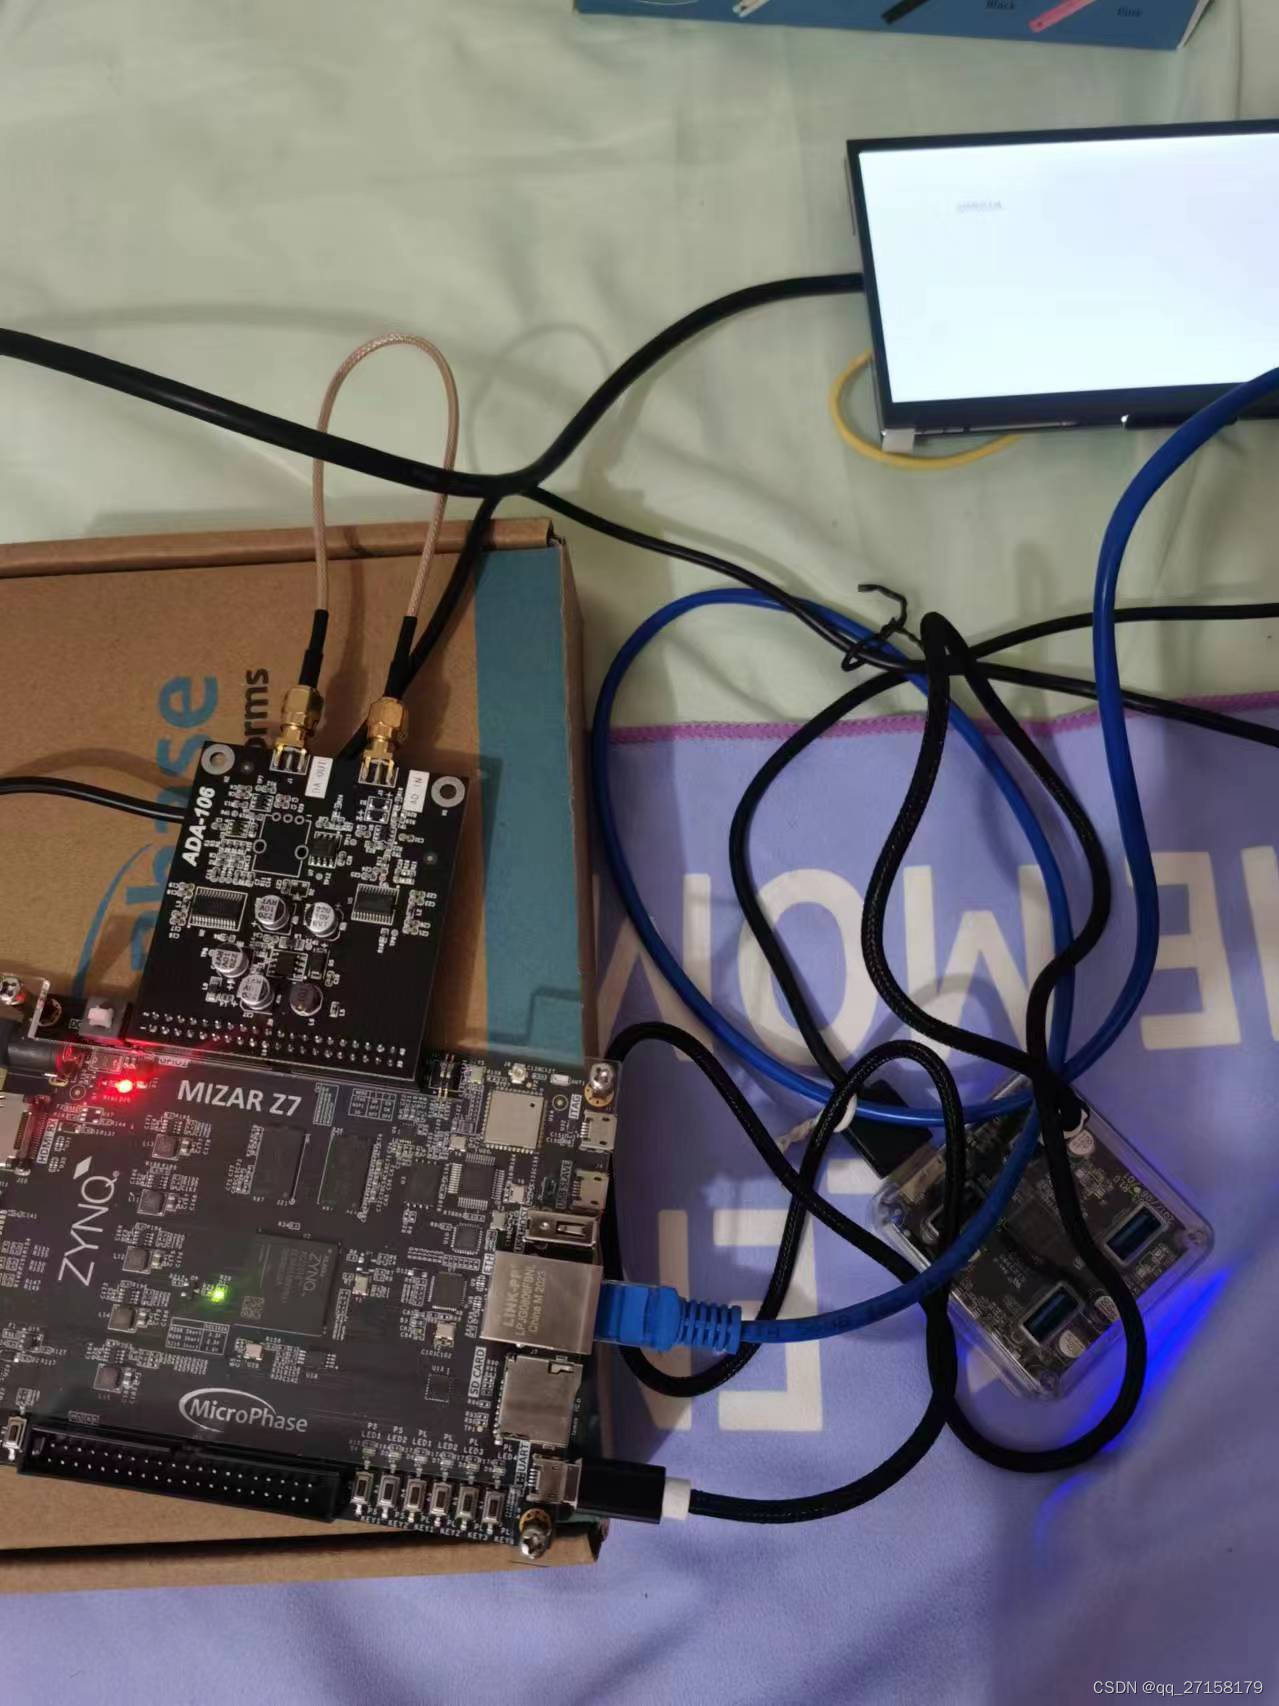
6. 板子运行测试
用winscp拷贝adda_qt到板子上
export DISPLAY=:0.0
export QT_QPA_PLATFORM=linuxfb
chmod +x adda_qt
./adda_qt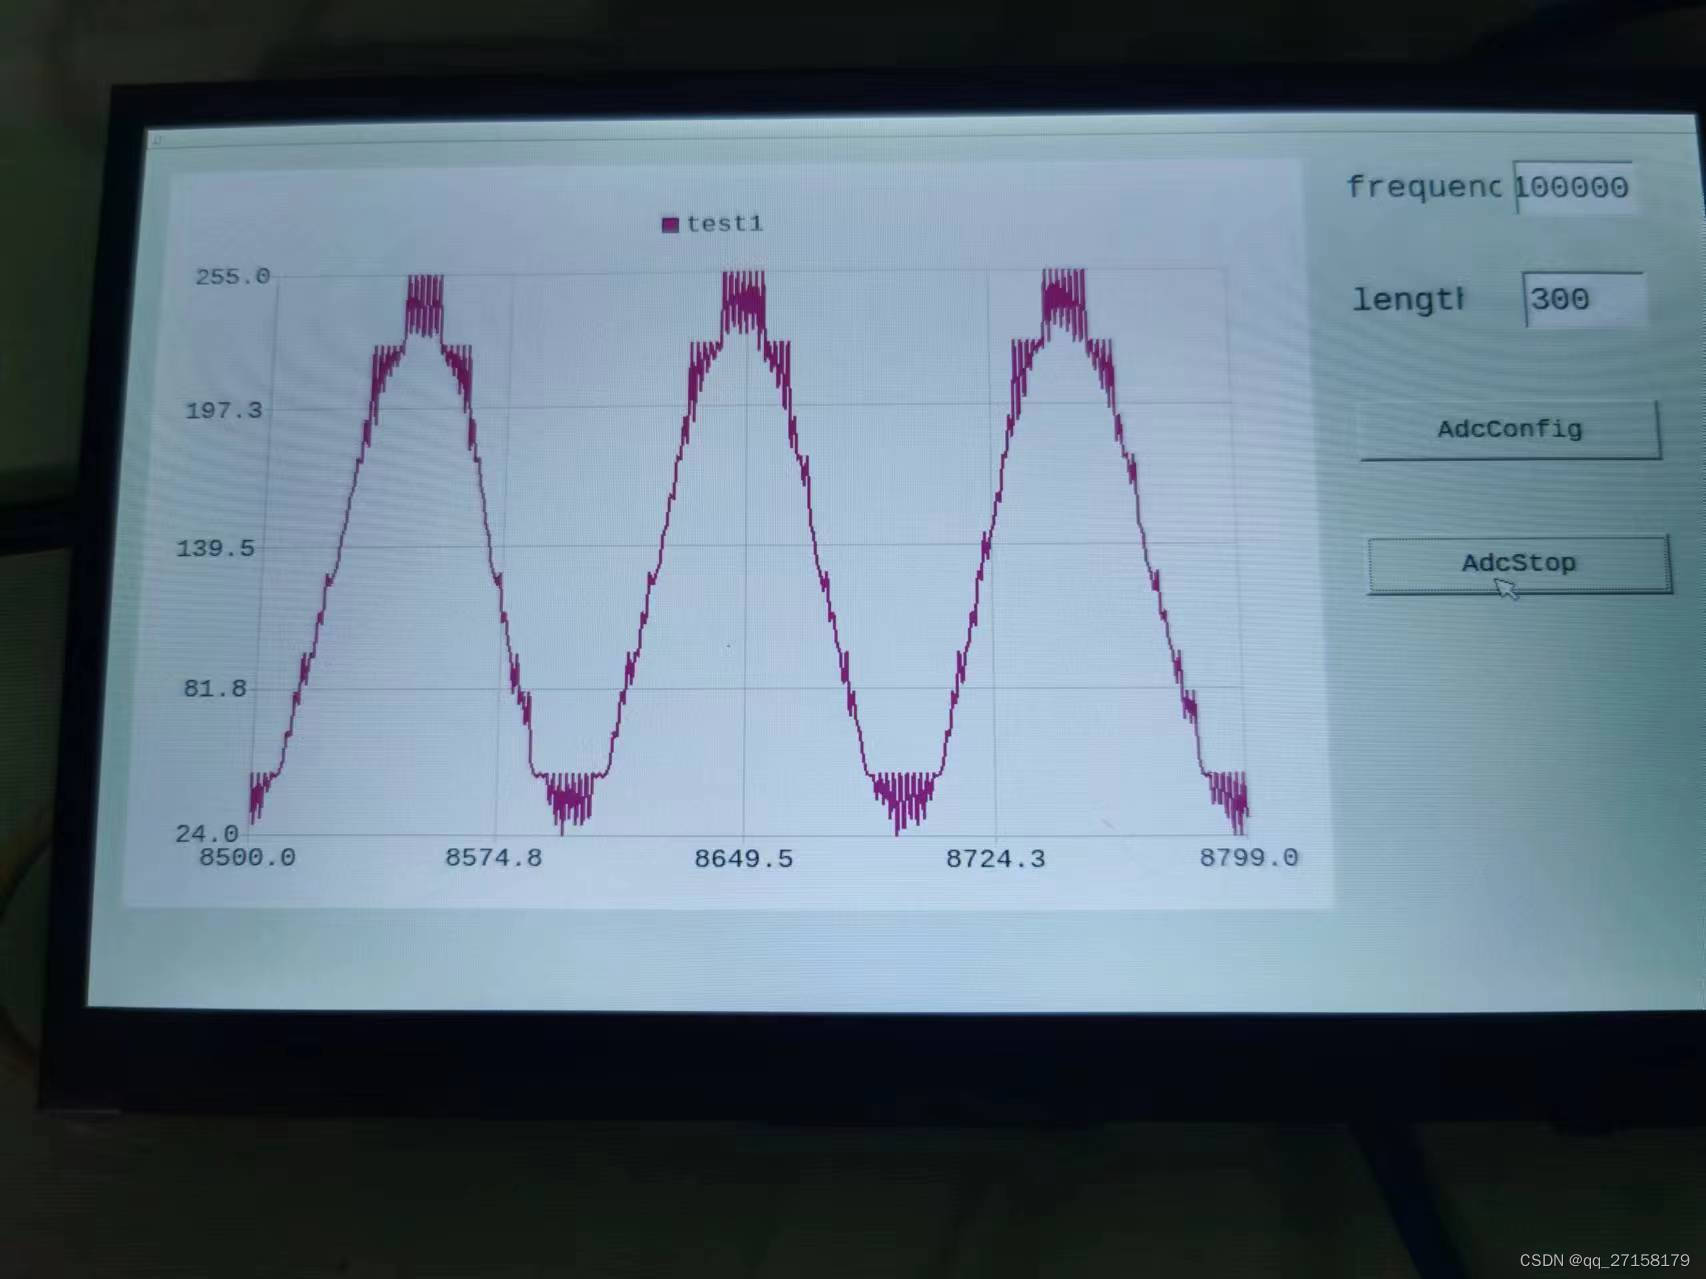
参考
[1]【正点原子FPGA连载】第十章Petalinux构建Qt和OpenCV交叉编译开发环境 摘自【正点原子】DFZU2EG_4EV MPSoC之嵌入式Linux开发指南,https://blog.csdn.net/weixin_55796564/article/details/128615252
好了,本系列暂告一段落。