目录
一. 前言
1.1. Spring AOP 和 CGLIB 是什么关系?
二. CGLIB 代理示例
2.1. pom 包依赖
2.2. 定义实体
2.3. 被代理的类
2.4. CGLIB 代理
2.5. 使用代理
三. CGLIB 代理的流程
四. Spring AOP 中 CGLIB 代理的实现
一. 前言
CGLIB 是一个强大的高性能的代码生成包。它广泛的被许多 AOP 的框架使用,例如 Spring AOP 和 dynaop,为他们提供方法的 interception(拦截)。CGLIB 包的底层是通过使用一个小而快的字节码处理框架 ASM,来转换字节码并生成新的类。除了 CGLIB 包,脚本语言例如 Groovy和 BeanShell,也是使用 ASM 来生成 Java 的字节码。当然不鼓励直接使用 ASM,因为它要求你必须对 JVM 内部结构包括 class 文件的格式和指令集都很熟悉。
1.1. Spring AOP 和 CGLIB 是什么关系?
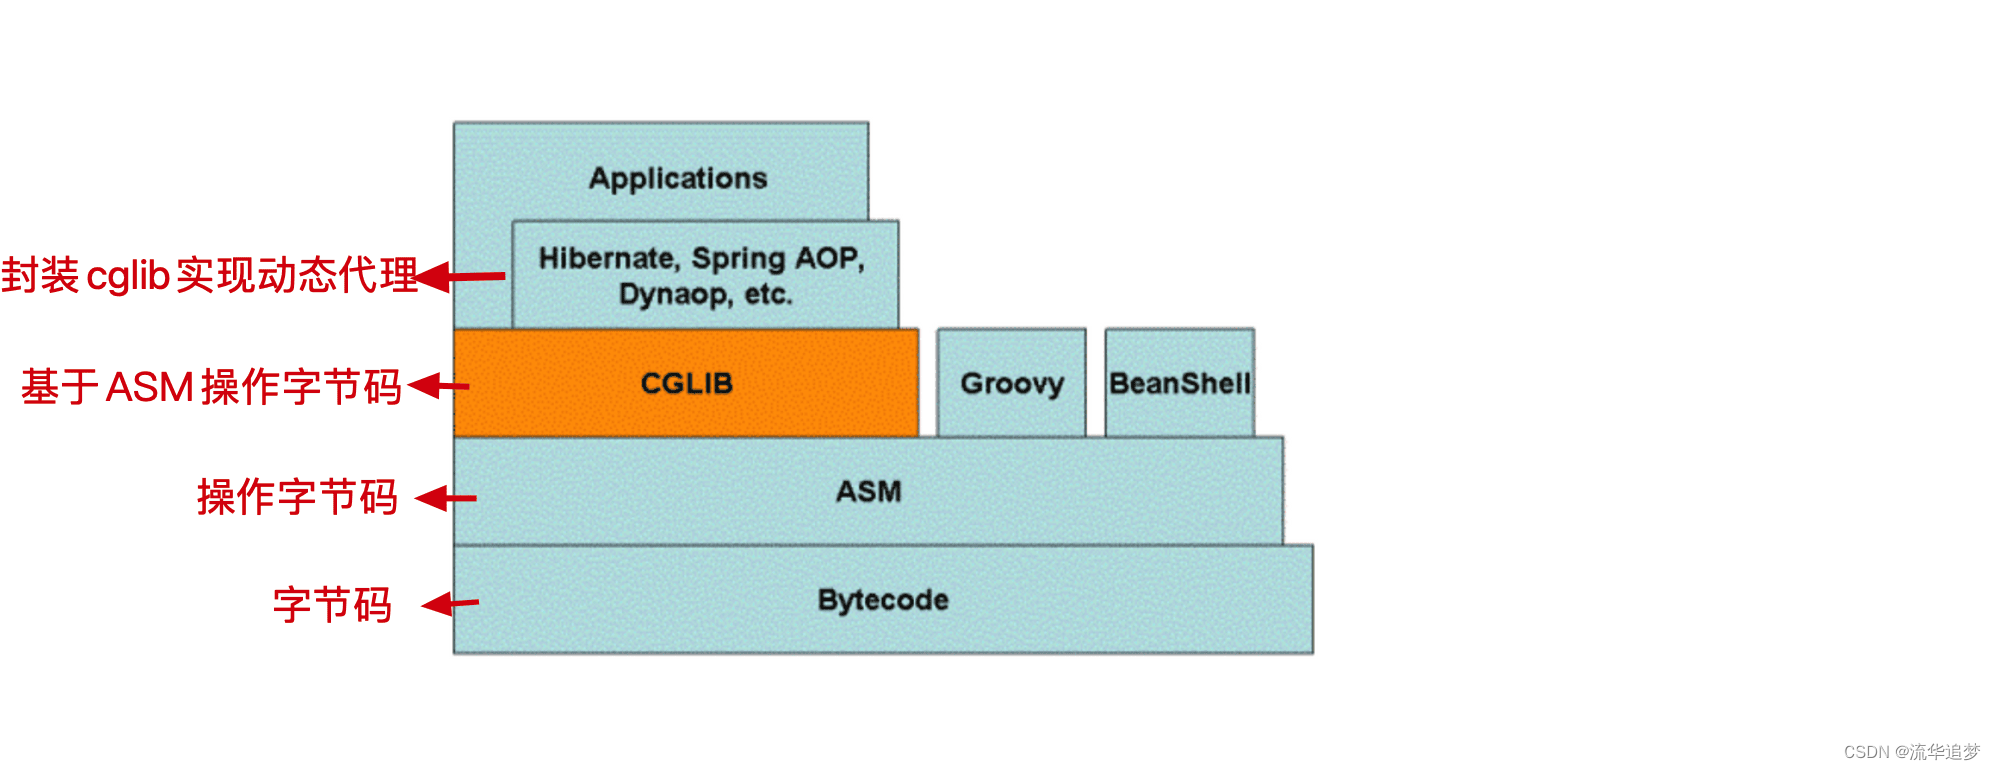
- 最底层是字节码,字节码相关的知识请参见《JVM 之 class文件详解》。
- ASM是操作字节码的工具。
- CGLIB 基于 ASM 字节码工具操作字节码(即动态生成代理,对方法进行增强)。
- Spring AOP 基于 CGLIB 进行封装,实现 CGLIB 方式的动态代理 。
二. CGLIB 代理示例
2.1. pom 包依赖
引入 CGLIB 的依赖包:
<?xml version="1.0" encoding="UTF-8"?>
<project xmlns="http://maven.apache.org/POM/4.0.0"
         xmlns:xsi="http://www.w3.org/2001/XMLSchema-instance"
         xsi:schemaLocation="http://maven.apache.org/POM/4.0.0 http://maven.apache.org/xsd/maven-4.0.0.xsd">
    <parent>
        <groupId>com.lm.it</groupId>
        <artifactId>lm-spring-demo</artifactId>
        <version>1.0-SNAPSHOT</version>
    </parent>
    <modelVersion>4.0.0</modelVersion>

    <artifactId>06-lm-spring-demo-aop-proxy-cglib</artifactId>

    <properties>
        <maven.compiler.source>8</maven.compiler.source>
        <maven.compiler.target>8</maven.compiler.target>
    </properties>

    <dependencies>
        <!-- https://mvnrepository.com/artifact/cglib/cglib -->
        <dependency>
            <groupId>cglib</groupId>
            <artifactId>cglib</artifactId>
            <version>3.3.0</version>
        </dependency>
    </dependencies>

</project>
2.2. 定义实体
User 类:
package com.lm.it.springframework.entity;

/**
 * User
 */
public class User {
    /**
     * user's name.
     */
    private String name;

    /**
     * user's age.
     */
    private int age;

    /**
     * init.
     *
     * @param name name
     * @param age  age
     */
    public User(String name, int age) {
        this.name = name;
        this.age = age;
    }

    public String getName() {
        return name;
    }

    public void setName(String name) {
        this.name = name;
    }

    public int getAge() {
        return age;
    }

    public void setAge(int age) {
        this.age = age;
    }

    @Override
    public String toString() {
        return "User{" +
                "name='" + name + '\'' +
                ", age=" + age +
                '}';
    }
}
2.3. 被代理的类
即目标类,对被代理的类中的方法进行增强:
package com.lm.it.springframework.service;

import java.util.Collections;
import java.util.List;

import com.lm.it.springframework.entity.User;

/**
 * UserService
 */
public class UserServiceImpl {
    /**
     * find user list.
     *
     * @return user list
     */
    public List<User> findUserList() {
        return Collections.singletonList(new User("流华追梦", 18));
    }

    /**
     * add user
     */
    public void addUser() {
        // do something
    }
}
2.4. CGLIB 代理
CGLIB 代理类,需要实现 MethodInterceptor 接口,并指定代理目标类 target:
package com.lm.it.springframework.proxy;

import java.lang.reflect.Method;

import net.sf.cglib.proxy.Enhancer;
import net.sf.cglib.proxy.MethodInterceptor;
import net.sf.cglib.proxy.MethodProxy;

/**
 * This class is for proxy demo.
 */
public class UserLogProxy implements MethodInterceptor {
    /**
     * 业务类对象,供代理方法中进行真正的业务方法调用
     */
    private Object target;

    public Object getUserLogProxy(Object target) {
        // 给业务对象赋值
        this.target = target;
        // 创建加强器,用来创建动态代理类
        Enhancer enhancer = new Enhancer();
        // 为加强器指定要代理的业务类(即:为下面生成的代理类指定父类)
        enhancer.setSuperclass(this.target.getClass());
        // 设置回调:对于代理类上所有方法的调用,都会调用CallBack,而Callback则需要实现intercept()方法进行拦
        enhancer.setCallback(this);
        // 创建动态代理类对象并返回
        return enhancer.create();
    }

    // 实现回调方法
    @Override
    public Object intercept(Object obj, Method method, Object[] args, MethodProxy proxy) throws Throwable {
        // log - before method
        System.out.println("[before] execute method: " + method.getName());

        // call method
        Object result = proxy.invokeSuper(obj, args);

        // log - after method
        System.out.println("[after] execute method: " + method.getName() + ", return value: " + result);
        return null;
    }
}
2.5. 使用代理
启动类中指定代理目标并执行:
package com.lm.it.springframework;

import com.lm.it.springframework.proxy.UserLogProxy;
import com.lm.it.springframework.service.UserServiceImpl;

/**
 * Cglib proxy demo.
 */
public class App {
    /**
     * main interface.
     *
     * @param args args
     */
    public static void main(String[] args) {
        // proxy
        UserServiceImpl userService = (UserServiceImpl) new UserLogProxy().getUserLogProxy(new UserServiceImpl());

        // call methods
        userService.findUserList();
        userService.addUser();
    }
}
启动上述类 main() 函数,运行结果如下:
[before] execute method: findUserList
[after] execute method: findUserList, return value: [User{name='流华追梦', age=18}]
[before] execute method: addUser
[after] execute method: addUser, return value: null
三. CGLIB 代理的流程
我们把上述 Demo 的主要流程画出来,以便能很快理解:
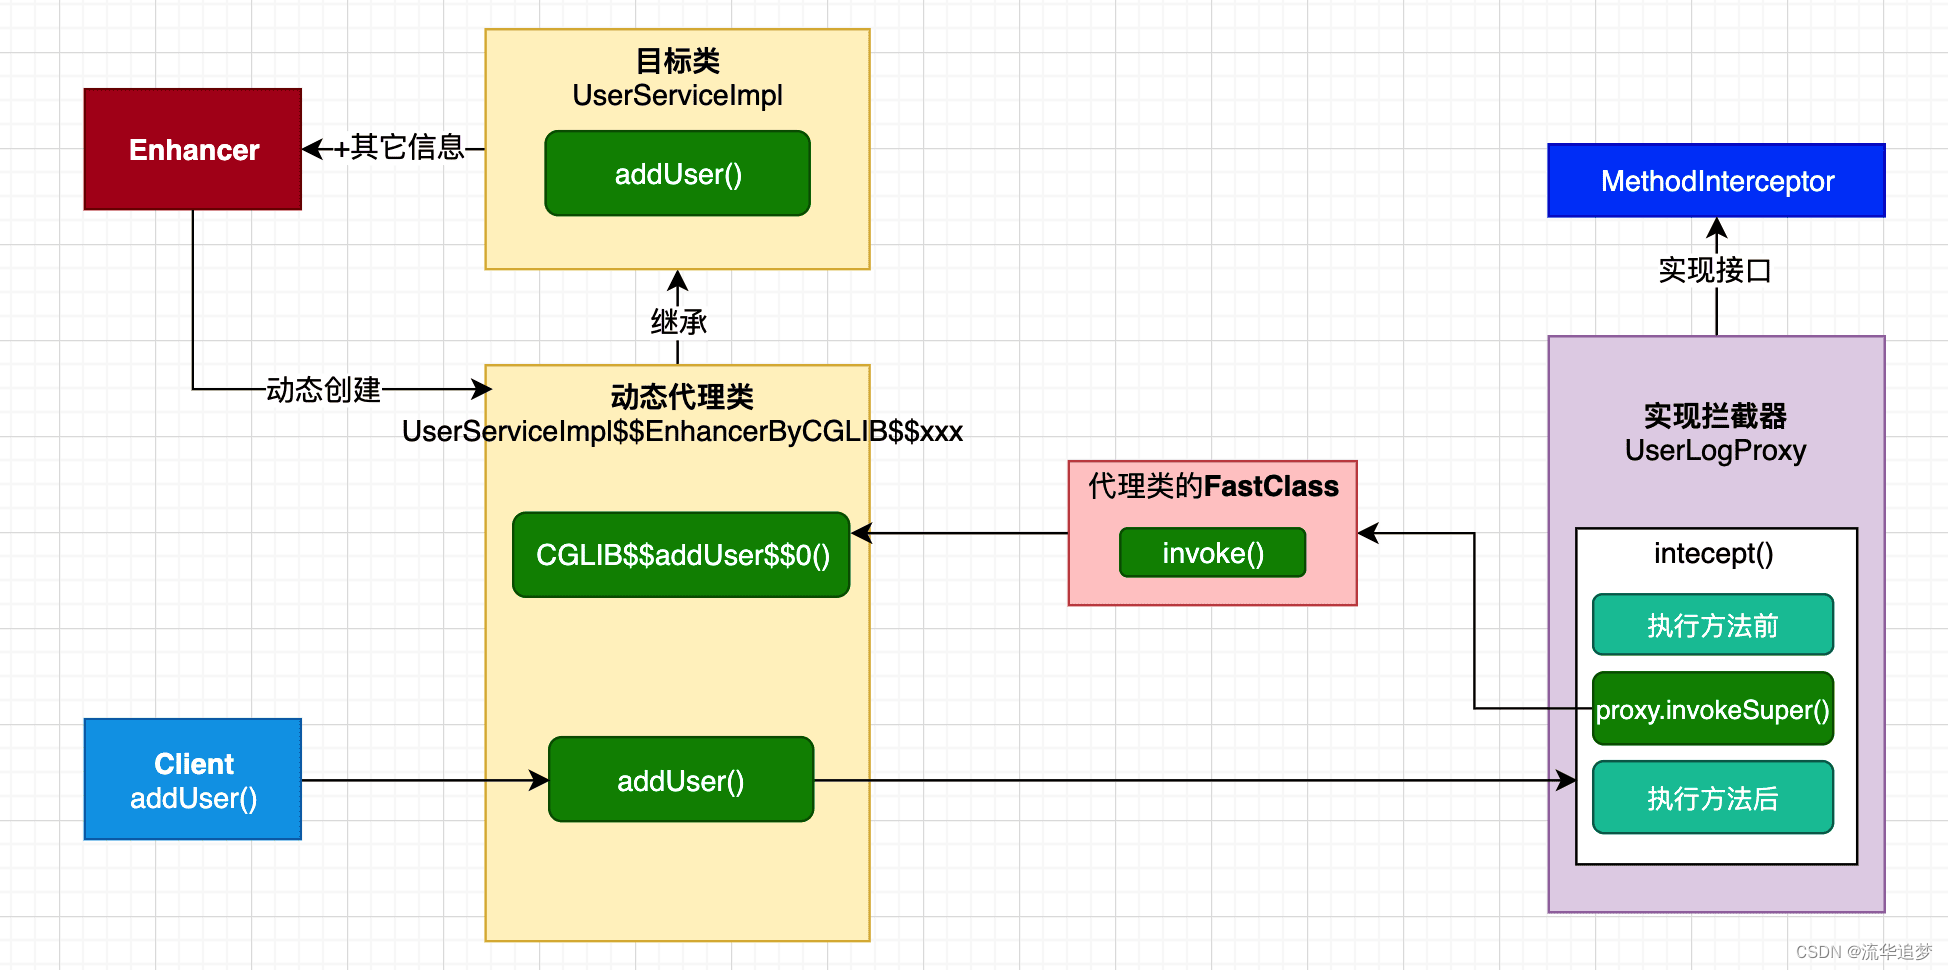
更多细节:
- 在上图中,我们可以通过在 Enhancer 中配置更多的参数来控制代理的行为,比如如果只希望增强这个类中的一个方法而不是所有方法,那就增加 callbackFilter 来对目标类中方法进行过滤。Enhancer 可以有更多的参数类配置其行为,不过我们在学习上述主要的流程就够了。
- final 方法为什么不能被代理?很显然 final 方法没法被子类覆盖,当然不能代理了。
- Mockito 为什么不能 mock 静态方法?因为 mockito 也是基于 CGLIB 动态代理来实现的,static 方法也不能被子类覆盖,所以显然不能 mock。但 PowerMock 可以 mock 静态方法,因为它直接在 bytecode 上工作,更多可以看 Mockito 单元测试。
四. Spring AOP 中 CGLIB 代理的实现
Spring AOP封装了 CGLIB,通过其进行动态代理的创建。
我们看下 CglibAopProxy 的 getProxy() 方法:
@Override
public Object getProxy() {
  return getProxy(null);
}

@Override
public Object getProxy(@Nullable ClassLoader classLoader) {
  if (logger.isTraceEnabled()) {
    logger.trace("Creating CGLIB proxy: " + this.advised.getTargetSource());
  }

  try {
    Class<?> rootClass = this.advised.getTargetClass();
    Assert.state(rootClass != null, "Target class must be available for creating a CGLIB proxy");

    // 上面流程图中的目标类
    Class<?> proxySuperClass = rootClass;
    if (rootClass.getName().contains(ClassUtils.CGLIB_CLASS_SEPARATOR)) {
      proxySuperClass = rootClass.getSuperclass();
      Class<?>[] additionalInterfaces = rootClass.getInterfaces();
      for (Class<?> additionalInterface : additionalInterfaces) {
        this.advised.addInterface(additionalInterface);
      }
    }

    // Validate the class, writing log messages as necessary.
    validateClassIfNecessary(proxySuperClass, classLoader);

    // 重点看这里,就是上图的enhancer,设置各种参数来构建
    Enhancer enhancer = createEnhancer();
    if (classLoader != null) {
      enhancer.setClassLoader(classLoader);
      if (classLoader instanceof SmartClassLoader &&
          ((SmartClassLoader) classLoader).isClassReloadable(proxySuperClass)) {
        enhancer.setUseCache(false);
      }
    }
    enhancer.setSuperclass(proxySuperClass);
    enhancer.setInterfaces(AopProxyUtils.completeProxiedInterfaces(this.advised));
    enhancer.setNamingPolicy(SpringNamingPolicy.INSTANCE);
    enhancer.setStrategy(new ClassLoaderAwareGeneratorStrategy(classLoader));

    // 设置callback回调接口,即方法的增强点
    Callback[] callbacks = getCallbacks(rootClass);
    Class<?>[] types = new Class<?>[callbacks.length];
    for (int x = 0; x < types.length; x++) {
      types[x] = callbacks[x].getClass();
    }
    // 上节说到的filter
    enhancer.setCallbackFilter(new ProxyCallbackFilter(
        this.advised.getConfigurationOnlyCopy(), this.fixedInterceptorMap, this.fixedInterceptorOffset));
    enhancer.setCallbackTypes(types);

    // 重点:创建proxy和其实例
    return createProxyClassAndInstance(enhancer, callbacks);
  }
  catch (CodeGenerationException | IllegalArgumentException ex) {
    throw new AopConfigException("Could not generate CGLIB subclass of " + this.advised.getTargetClass() +
        ": Common causes of this problem include using a final class or a non-visible class",
        ex);
  }
  catch (Throwable ex) {
    // TargetSource.getTarget() failed
    throw new AopConfigException("Unexpected AOP exception", ex);
  }
}
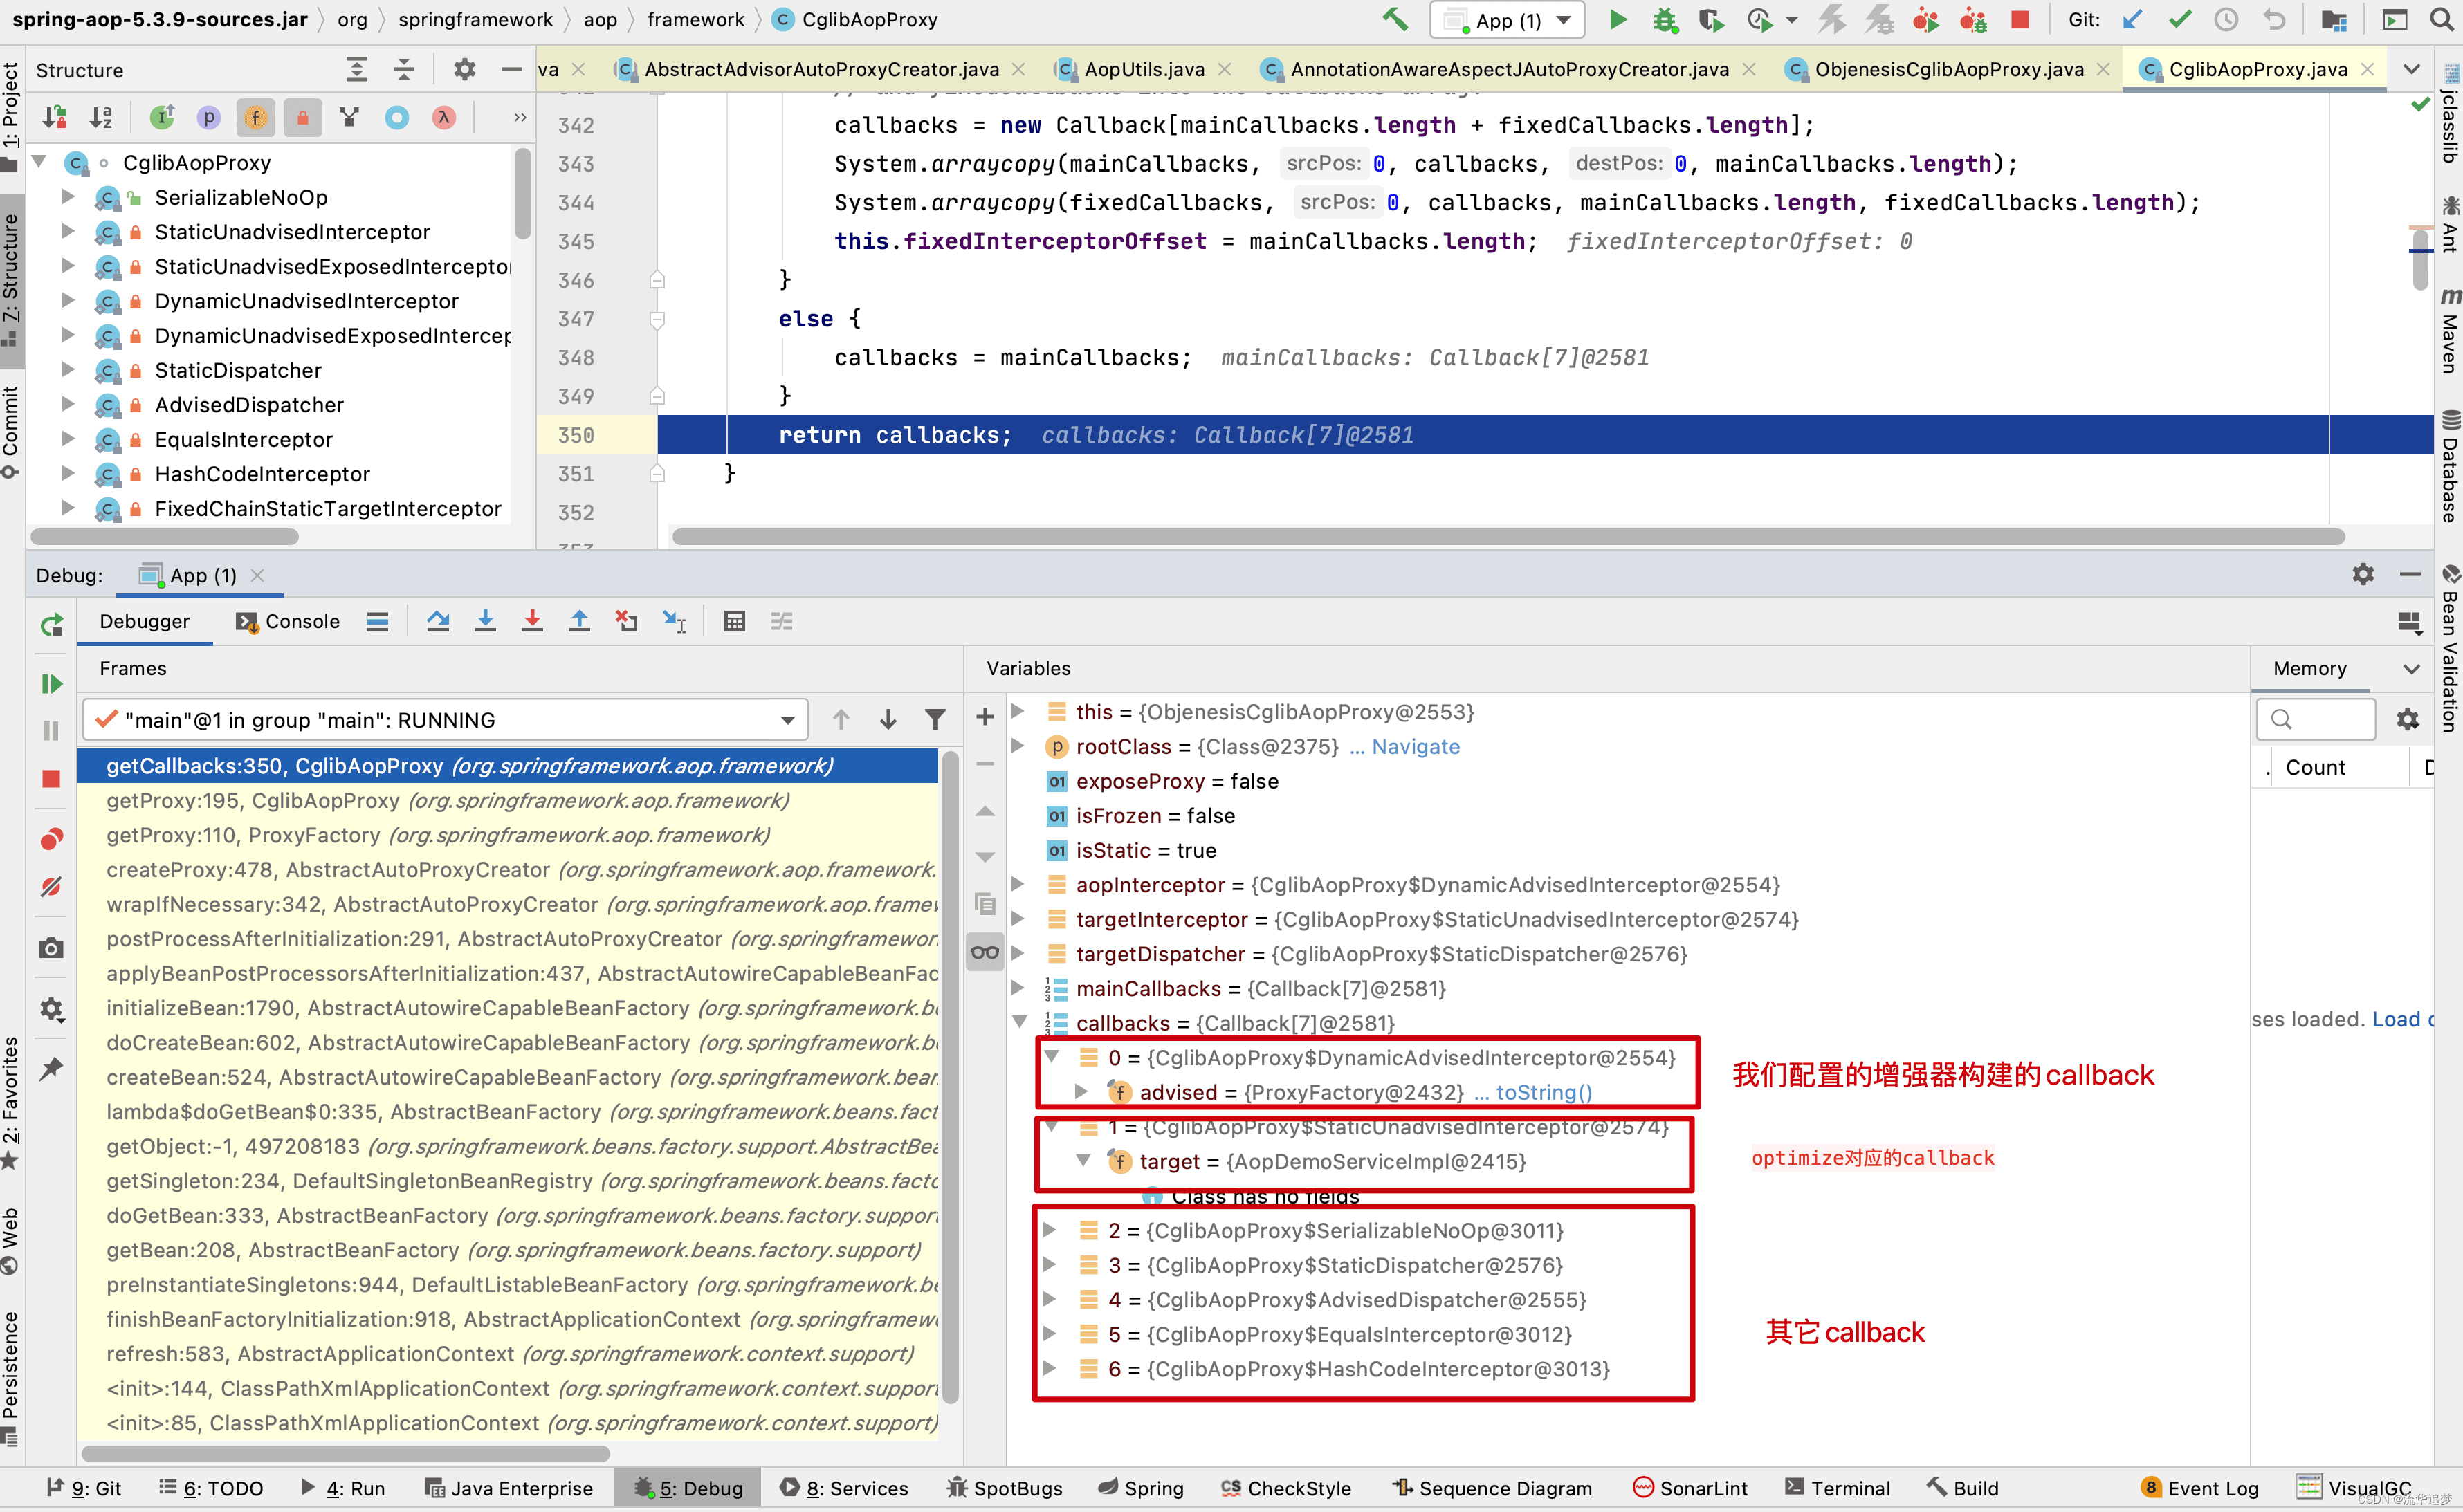
获取 callback 的方法如下,提几个理解的要点:
- rootClass:即目标代理类。
- advised:包含上文中我们获取到的 advisor 增强器的集合。
- exposeProxy:在 xml 配置文件中配置的,背景就是如果在事务 A 中使用了代理,事务 A 调用了目标类的的方法 a,在方法 a 中又调用目标类的方法 b,方法 a、b 同时都是要被增强的方法,如果不配置 exposeProxy 属性,方法 b 的增强将会失效,如果配置 exposeProxy,方法 b 在方法 a 的执行中也会被增强了
- DynamicAdvisedInterceptor:拦截器将 advised(包含上文中我们获取到的 advisor 增强器)构建配置的 AOP 的 callback(第一个 callback)。
- targetInterceptor:xml 配置的 optimize 属性使用的(第二个 callback)。
- 最后连同其它5个默认的 Interceptor 返回作为 CGLIB 的拦截器链,之后通过 CallbackFilter 的accpet() 方法返回的索引从这个集合中返回对应的拦截增强器执行增强操作。
private Callback[] getCallbacks(Class<?> rootClass) throws Exception {
  // Parameters used for optimization choices...
  boolean exposeProxy = this.advised.isExposeProxy();
  boolean isFrozen = this.advised.isFrozen();
  boolean isStatic = this.advised.getTargetSource().isStatic();

  // Choose an "aop" interceptor (used for AOP calls).
  Callback aopInterceptor = new DynamicAdvisedInterceptor(this.advised);

  // Choose a "straight to target" interceptor. (used for calls that are
  // unadvised but can return this). May be required to expose the proxy.
  Callback targetInterceptor;
  if (exposeProxy) {
    targetInterceptor = (isStatic ?
        new StaticUnadvisedExposedInterceptor(this.advised.getTargetSource().getTarget()) :
        new DynamicUnadvisedExposedInterceptor(this.advised.getTargetSource()));
  }
  else {
    targetInterceptor = (isStatic ?
        new StaticUnadvisedInterceptor(this.advised.getTargetSource().getTarget()) :
        new DynamicUnadvisedInterceptor(this.advised.getTargetSource()));
  }

  // Choose a "direct to target" dispatcher (used for
  // unadvised calls to static targets that cannot return this).
  Callback targetDispatcher = (isStatic ?
      new StaticDispatcher(this.advised.getTargetSource().getTarget()) : new SerializableNoOp());

  Callback[] mainCallbacks = new Callback[] {
      aopInterceptor,  //
      targetInterceptor,  // invoke target without considering advice, if optimized
      new SerializableNoOp(),  // no override for methods mapped to this
      targetDispatcher, this.advisedDispatcher,
      new EqualsInterceptor(this.advised),
      new HashCodeInterceptor(this.advised)
  };

  Callback[] callbacks;

  // If the target is a static one and the advice chain is frozen,
  // then we can make some optimizations by sending the AOP calls
  // direct to the target using the fixed chain for that method.
  if (isStatic && isFrozen) {
    Method[] methods = rootClass.getMethods();
    Callback[] fixedCallbacks = new Callback[methods.length];
    this.fixedInterceptorMap = CollectionUtils.newHashMap(methods.length);

    // TODO: small memory optimization here (can skip creation for methods with no advice)
    for (int x = 0; x < methods.length; x++) {
      Method method = methods[x];
      List<Object> chain = this.advised.getInterceptorsAndDynamicInterceptionAdvice(method, rootClass);
      fixedCallbacks[x] = new FixedChainStaticTargetInterceptor(
          chain, this.advised.getTargetSource().getTarget(), this.advised.getTargetClass());
      this.fixedInterceptorMap.put(method, x);
    }

    // Now copy both the callbacks from mainCallbacks
    // and fixedCallbacks into the callbacks array.
    callbacks = new Callback[mainCallbacks.length + fixedCallbacks.length];
    System.arraycopy(mainCallbacks, 0, callbacks, 0, mainCallbacks.length);
    System.arraycopy(fixedCallbacks, 0, callbacks, mainCallbacks.length, fixedCallbacks.length);
    this.fixedInterceptorOffset = mainCallbacks.length;
  }
  else {
    callbacks = mainCallbacks;
  }
  return callbacks;
}
可以结合调试,方便理解:
