背景:
1.我们打包时其实需要很多资源打到jar包之外,这样子修改了配置后,就可以生效了。
2.包的命名: 以mj为例子:
业务层:
com.jn.mj // 这个是这个工程的总包名
com.jn.mj.gateway // web服集群
com.jn.mj.server // 游戏服
框架层:
com.jn.orm // 对orm的包装
com.jn.net // 对tcp和websocket的支持
com.jn.excel // 导表工具
1)目录结构
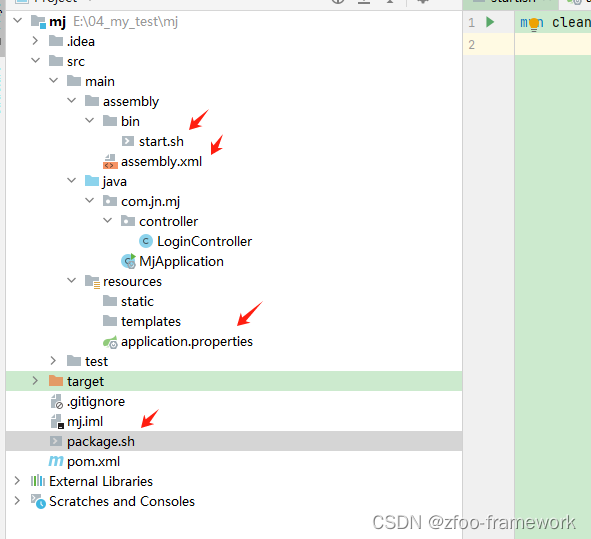
2)pom.xml
<?xml version="1.0" encoding="UTF-8"?>
<project xmlns="http://maven.apache.org/POM/4.0.0" xmlns:xsi="http://www.w3.org/2001/XMLSchema-instance"
         xsi:schemaLocation="http://maven.apache.org/POM/4.0.0 https://maven.apache.org/xsd/maven-4.0.0.xsd">
    <modelVersion>4.0.0</modelVersion>
    <parent>
        <groupId>org.springframework.boot</groupId>
        <artifactId>spring-boot-starter-parent</artifactId>
        <version>2.2.5.RELEASE</version>
        <relativePath/> <!-- lookup parent from repository -->
    </parent>

    <groupId>com.jn</groupId>
    <artifactId>mj</artifactId>
    <version>0.0.1-SNAPSHOT</version>
    <name>mj</name>
    <description>Demo project for Spring Boot</description>

    <properties>
        <java.version>11</java.version>
    </properties>

    <dependencies>
        <dependency>
            <groupId>org.springframework.boot</groupId>
            <artifactId>spring-boot-starter-web</artifactId>
        </dependency>

        <dependency>
            <groupId>org.projectlombok</groupId>
            <artifactId>lombok</artifactId>
            <optional>true</optional>
        </dependency>
        <dependency>
            <groupId>org.springframework.boot</groupId>
            <artifactId>spring-boot-starter-test</artifactId>
            <scope>test</scope>
        </dependency>
    </dependencies>

    <!--测试/正式环境: 选择不同的配置文件-->
    <profiles>
        <profile>
            <id>dev</id>
            <activation>
                <activeByDefault>true</activeByDefault>
            </activation>
            <build>
                <resources></resources>
            </build>
        </profile>

        <profile>
            <id>prod</id>
            <build>
                <resources>
                    <resource>
                        <directory>src/main/resources</directory>
                        <excludes>
                            <exclude>**/*.*</exclude>
                        </excludes>
                    </resource>
                </resources>
            </build>
        </profile>
    </profiles>

    <build>
        <plugins>
            <plugin>
                <groupId>org.springframework.boot</groupId>
                <artifactId>spring-boot-maven-plugin</artifactId>

                <configuration>
                    <includeSystemScope>true</includeSystemScope>
                    <excludes>
                        <exclude>
                            <groupId>org.projectlombok</groupId>
                            <artifactId>lombok</artifactId>
                        </exclude>
                    </excludes>
                </configuration>
                <executions>
                    <execution>
                        <goals>
                            <goal>repackage</goal>
                        </goals>
                    </execution>
                </executions>
            </plugin>

            <plugin>
                <groupId>org.apache.maven.plugins</groupId>
                <artifactId>maven-compiler-plugin</artifactId>
                <configuration>
                    <source>11</source>
                    <target>11</target>
                </configuration>
            </plugin>

            <plugin>
                <artifactId>maven-assembly-plugin</artifactId>
                <executions>
                    <execution>
                        <id>make-assembly</id>
                        <phase>package</phase>
                        <goals>
                            <goal>single</goal>
                        </goals>
                        <configuration>
                            <descriptors>
                                <descriptor>src/main/assembly/assembly.xml</descriptor>
                            </descriptors>
                        </configuration>
                    </execution>
                </executions>
            </plugin>

        </plugins>
    </build>

</project>
3)assembly.xml
<assembly>
    <id>assembly</id>
    <formats>
        <format>tar.gz</format>
    </formats>

    <includeBaseDirectory>true</includeBaseDirectory>

    <fileSets>
        <fileSet>
            <directory>src/main/assembly/bin</directory>
            <outputDirectory>./bin</outputDirectory>
            <fileMode>0755</fileMode>
        </fileSet>

        <fileSet>
            <directory>src/main/resources</directory>
            <includes>
                <include>application.properties</include>
            </includes>
            <outputDirectory>./config</outputDirectory>
            <fileMode>0644</fileMode>
        </fileSet>
    </fileSets>

    <dependencySets>
        <dependencySet>
            <outputDirectory>lib</outputDirectory>
            <scope>runtime</scope>
        </dependencySet>
    </dependencySets>
</assembly>
4)package.sh // 打包时跳过测试,使用prod环境,这样子打的包不会有application.properties
mvn clean package -DskipTests=true -Pprod
5)start.sh // 注意:运行jar的路径!!!
#!/bin/bash

# 这个路径特别重要,必须回到总目录下
cd `dirname $0`
cd ..

java -jar ./lib/mj-0.0.1-SNAPSHOT.jar
6)打包后,解压开

7)展开看下打包生成的东西
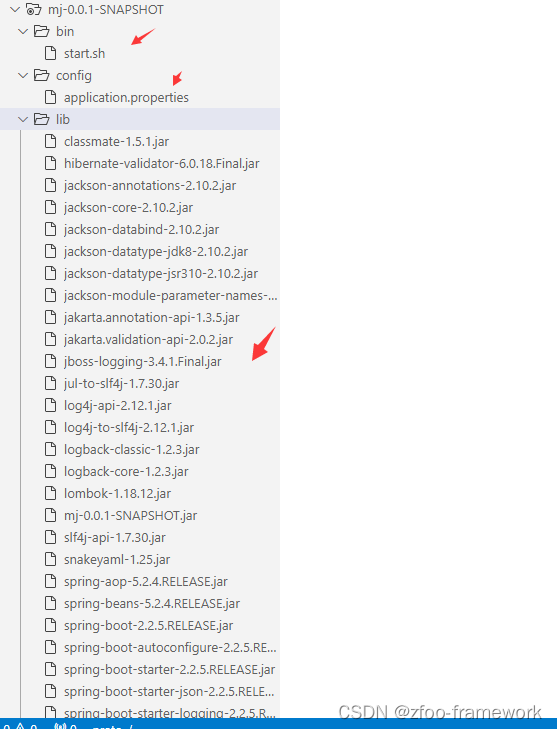
也就是我们的jar,配置和启动脚本都已经放到指定目录
8)双击bin/start.sh就可以运行起来了,而且会走config下application.properties配置的端口

