在实际应用中,富文本随处可见,如留言板,聊天软件,文档编辑,特定格式内容等,在WPF开发中,如何实现富文本编辑呢?本文以一个简单的小例子,简述如何通过RichTextBox实现富文本编辑功能,主要实现复制,剪切,粘贴,撤销,重做,保存,打开,文本加粗,斜体,下划线,删除线,左对齐,居中对齐,右对齐,两端对齐,缩进,减少缩进,项目符号,数字符号,上标,下标,背景色,前景色,图片,打印等功能,仅供学习分享使用,如有不足之处,还请指正。
什么是RichTextBox?
使用RichTextBox可以显示或编辑流内容,如文本,图片,表格等,TextBox和RichTextBox都可以用于编辑文本,但使用场景不同。如果是单纯的无格式的纯文本,建议使用TextBox;如果是需要编辑带格式的文本、图像、表格或其他多种格式的内容时,RichTextBox 是更好的选择。
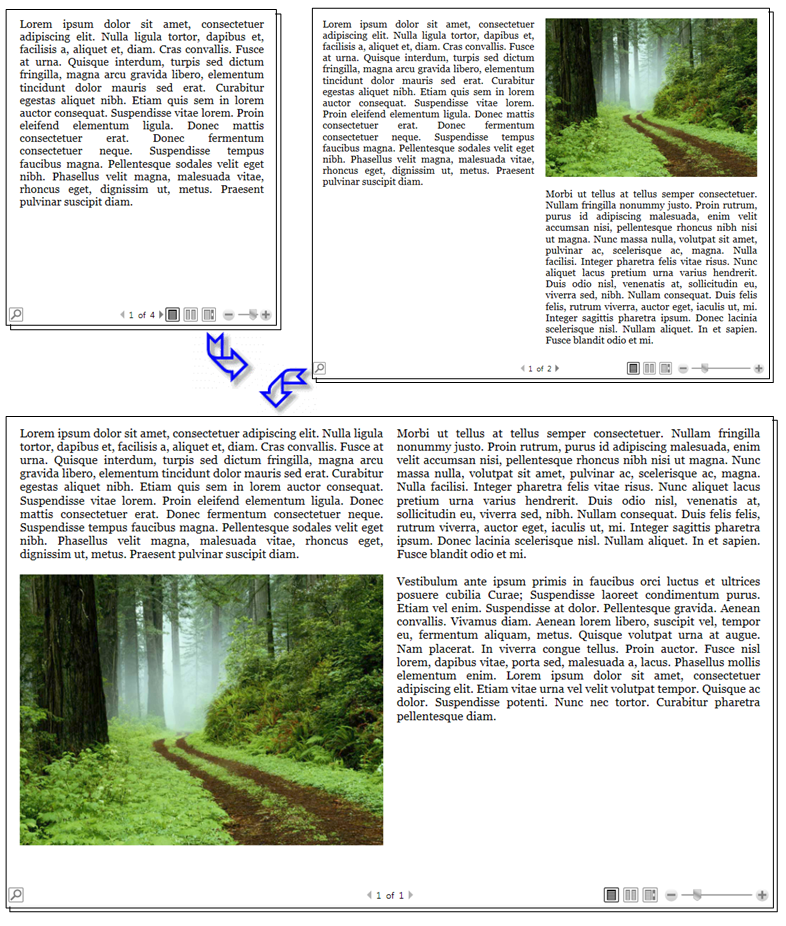
什么是流内容和流文档?
通常情况下,所有在富文本编辑器中呈现的内容,都是流内容(FlowContent),而为了呈现流内容的构建块,称为流内容元素(Element)。不同的流内容元素,组成了流文档(FlowDocument),RichTextBox是流文档的托管对象之一。
流文档旨在根据窗口大小、设备分辨率和其他环境变量来“重排内容”。 此外,流文档还具有很多内置功能,包括搜索、能够优化可读性的查看模式以及更改字体大小和外观的功能。 当易读性是文档的主要使用要求时,最适合使用流文档。
涉及知识点
在通过RichTextBox实现富文本编辑器时,涉及到的知识点如下所示:
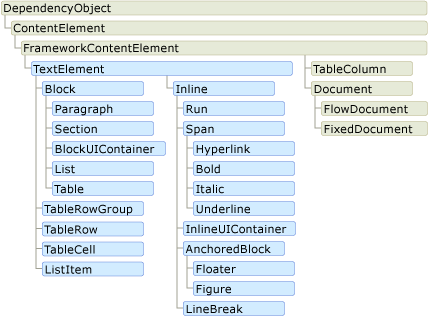
根据流内容的用途,可分为两个重要类别:
-
Block 派生类:也称为“Block 内容元素”,或简称为“Block 元素”。 继承自 Block 的元素可用于将元素分组到一个公用父级下,或将公用属性应用于某个组。
-
Inline 派生类:也称为“Inline 内容元素”,或简称为“Inline 元素”。 继承自 Inline 的元素要么包含在 Block 元素中,要么包含在另一个 Inline 元素中。 Inline 元素通常用作在屏幕上呈现的内容的直接容器。 例如,Paragraph(Block 元素)可包含 Run(Inline 元素),而 Run 实际包含在屏幕上呈现的文本。
在实现富文本编辑器时,需要用到图标实现,主要内容如下:
- 在本示例中图标主要通过自定义路径Path实现,其中Data属性是Geometry类型,用于接收自定以的图形。而用到的图标类型数据,可以通过iconfont官网进行获取。
- 在本示例中,用到很多图标,为了统一管理,创建资源字典,图标数据作为一种资源引入。
操作流文档时,常见使用到的类,如下所示:
创建RichTextBox
RichTextBox托管流文档对象,流文档包含流内容,包括文本,段落,图像,表格,等内容,创建语法如下所示:
<RichTextBox x:Name="richTextBox" AcceptsTab="True" Grid.Row="1" BorderThickness="1" BorderBrush="LightBlue" Margin="2" Padding="2" ScrollViewer.CanContentScroll="True" ScrollViewer.VerticalScrollBarVisibility="Auto">
	<RichTextBox.Document>
		<FlowDocument>
			<Paragraph>
				I am a sunny boy. My name is xxxx. I am from xxxx Primary School. I am over 1.5 meters old when I just turned 12. Alas, I may be a little fat because of eating too much sugar. A pair of pretty big eyes are inlaid under the dark hair and curved eyebrows. There is also a thin mouth.
			</Paragraph>
			<Paragraph>
				I like to play computer games. I play online whenever I have time, and my mother scolds me all day. I also like reading. Once, when I went to the library to read, I was fascinated by it. I was immersed in the ocean of knowledge and didn't remember to go home for dinner. I didn't want to leave until the library closed. I also like to play basketball. Every Saturday and Sunday, I will invite some friends to play basketball for a few hours.
			</Paragraph>
			<Paragraph>
				My advantage is that I love to move. Every morning I go outside to exercise, run, play the horizontal bar, etc. My math scores are also very good, but my Chinese and English scores are average, so my face is always filled with joy. My shortcoming is that I can't play table tennis, and I don't know what is going on. I just don't like it. This is me. If your hobbies are the same as mine, you can find me.
			</Paragraph>
			<Paragraph>
				thank you.
			</Paragraph>
		</FlowDocument>
	</RichTextBox.Document>
</RichTextBox>
编辑命令
为了方便起见,WPF 提供由 ApplicationCommands、MediaCommands、ComponentCommands、NavigationCommands 和 EditingCommands 组成的常用命令库,你也可以定义自己的命令。在实现富文本编辑器时,用到的命令主要有三种:
- ApplicationCommands,主要是应用程序中常见的命令,如:复制Copy,剪切Cut,粘贴Paste,重做Redo,撤销Undo等。
- EditingCommands 提供了一组常见的编辑相关的命令,如:加粗Bold,斜体Italic,下划线UnderLine,左对齐,右对齐,居中对齐,两端对齐,缩进,减少缩进,项目符号,数字符号等。
- 自定义命令,默认RichTextBox并没有提供相应的命令,所以需要根据功能自行定义,如:背景色,前景色,打印,打开,保存,上标,下标,图像等。
编辑命令页面布局和绑定
使用WPF自带的命令,需要指定Command和CommandTarget两个属性,否则将不起作用。其中Command直接使用Commnad="命令名称",CommandTarget=“{Binding ElementName=控件名称}”的格式进行绑定。
自定义命令,需要通过Command="{Binding 命令名称}"的格式进行绑定。具体如下所示:
<StackPanel Orientation="Horizontal" Grid.Row="0">
	<Button ToolTip="打开" Command="{Binding OpenCommand}">
		<Path Data="{StaticResource icon_open}" Stretch="Fill" Fill="#1296db"></Path>
	</Button>
	<Button ToolTip="保存" Command="{Binding SaveCommand}">
		<Path Data="{StaticResource icon_save}" Stretch="Fill" Fill="#1296db"></Path>
	</Button>
	<GridSplitter Width="1" Margin="3 2 3 2" Background="LightGray" IsEnabled="False"></GridSplitter>
	<Button ToolTip="剪切" Command="ApplicationCommands.Cut" CommandTarget="{Binding ElementName=richTextBox}">
		<Path Data="{StaticResource icon_cut}" Stretch="Fill" Fill="Black"></Path>
	</Button>
	<Button ToolTip="复制" Command="ApplicationCommands.Copy" CommandTarget="{Binding ElementName=richTextBox}">
		<Path Data="{StaticResource icon_copy}" Stretch="Fill" Fill="#1296db"></Path>
	</Button>
	<Button ToolTip="粘贴" Command="ApplicationCommands.Paste" CommandTarget="{Binding ElementName=richTextBox}">
		<Path Data="{StaticResource icon_paste}" Stretch="Fill" Fill="#1296db"></Path>
	</Button>
	<Button ToolTip="撤销" Command="ApplicationCommands.Undo" CommandTarget="{Binding ElementName=richTextBox}">
		<Path Data="{StaticResource icon_undo}" Stretch="Fill" Fill="#8a8a8a"></Path>
	</Button>
	<Button ToolTip="重做" Command="ApplicationCommands.Redo" CommandTarget="{Binding ElementName=richTextBox}">
		<Path Data="{StaticResource icon_redo}" Stretch="Fill" Fill="#8a8a8a"></Path>
	</Button>
	<GridSplitter Width="1" Margin="3 2 3 2" Background="LightGray" IsEnabled="False"></GridSplitter>
	<Button ToolTip="加粗" Command="EditingCommands.ToggleBold" CommandTarget="{Binding ElementName=richTextBox}">
		<Path Data="{StaticResource icon_bold}" Stretch="Fill" Fill="Black"></Path>
	</Button>
	<Button ToolTip="斜体" Command="EditingCommands.ToggleItalic" CommandTarget="{Binding ElementName=richTextBox}">
		<Path Data="{StaticResource icon_italic}" Stretch="Fill" Fill="LightGray"></Path>
	</Button>
	<Button ToolTip="下划线" Command="EditingCommands.ToggleUnderline" CommandTarget="{Binding ElementName=richTextBox}">
		<Path Data="{StaticResource icon_underline}" Stretch="Fill" Fill="Gray"></Path>
	</Button>
	<Button ToolTip="删除线" Command="{Binding SettingCommand}" CommandParameter="StrikeLine">
		<Path Data="{StaticResource icon_strikeline}" Stretch="Fill" Fill="Black"></Path>
	</Button>
	<Button ToolTip="左对齐" Command="EditingCommands.AlignLeft" CommandTarget="{Binding ElementName=richTextBox}">
		<Path Data="{StaticResource icon_left}" Stretch="Fill" Fill="Black" Stroke="LimeGreen"></Path>
	</Button>
	<Button ToolTip="居中对齐" Command="EditingCommands.AlignCenter" CommandTarget="{Binding ElementName=richTextBox}">
		<Path Data="{StaticResource icon_center}" Stretch="Fill" Fill="Black" Stroke="LimeGreen"></Path>
	</Button>
	<Button ToolTip="右对齐" Command="EditingCommands.AlignRight" CommandTarget="{Binding ElementName=richTextBox}">
		<Path Data="{StaticResource icon_right}" Stretch="Fill" Fill="Black" Stroke="LimeGreen"></Path>
	</Button>
	<Button ToolTip="两端对齐" Command="EditingCommands.AlignJustify" CommandTarget="{Binding ElementName=richTextBox}">
		<Path Data="{StaticResource icon_justify}" Stretch="Fill" Fill="Black" Stroke="LimeGreen"></Path>
	</Button>
	<Button ToolTip="缩进" Command="EditingCommands.IncreaseIndentation" CommandTarget="{Binding ElementName=richTextBox}">
		<Path Data="{StaticResource icon_addident}" Stretch="Fill" Fill="DimGray"></Path>
	</Button>
	<Button ToolTip="减少缩进" Command="EditingCommands.DecreaseIndentation" CommandTarget="{Binding ElementName=richTextBox}">
		<Path Data="{StaticResource icon_lessident}" Stretch="Fill" Fill="DimGray"></Path>
	</Button>
	<Button ToolTip="项目编号" Command="EditingCommands.ToggleBullets" CommandTarget="{Binding ElementName=richTextBox}">
		<Path Data="{StaticResource icon_bullets}" Stretch="Fill" Fill="DimGray"></Path>
	</Button>
	<Button ToolTip="数字编号" Command="EditingCommands.ToggleNumbering" CommandTarget="{Binding ElementName=richTextBox}">
		<Path Data="{StaticResource icon_numbering}" Stretch="Fill" Fill="DimGray"></Path>
	</Button>
	<Button ToolTip="上标" Command="{Binding SettingCommand}" CommandParameter="Super">
		<Path Data="{StaticResource icon_upper}" Stretch="Fill" Fill="CadetBlue"></Path>
	</Button>
	<Button ToolTip="下标" Command="{Binding SettingCommand}" CommandParameter="Sub">
		<Path Data="{StaticResource icon_down}" Stretch="Fill" Fill="CadetBlue"></Path>
	</Button>
	<GridSplitter Width="1" Margin="3 2 3 2" Background="LightGray" IsEnabled="False"></GridSplitter>

	<Grid Background="White" Width="42" Height="30" Margin="3">
		<ComboBox Width="42" Height="30" BorderThickness="0" HorizontalAlignment="Left" VerticalAlignment="Center" SelectedIndex="0" BorderBrush="White" Background="White" Name="combBackground">
			<ComboBoxItem Background="#000000" Content="#000000"></ComboBoxItem>
			<ComboBoxItem Background="#FF0000" Content="#FF0000"></ComboBoxItem>
			<ComboBoxItem Background="#00FF00" Content="#00FF00"></ComboBoxItem>
			<ComboBoxItem Background="#0000FF" Content="#0000FF"></ComboBoxItem>
			<ComboBoxItem Background="#00AA00" Content="#00AA00"></ComboBoxItem>
			<ComboBoxItem Background="#AA0000" Content="#AA0000"></ComboBoxItem>
			<ComboBoxItem Background="#0000AA" Content="#0000AA"></ComboBoxItem>
			<ComboBoxItem Background="#AA00CC" Content="#AA00CC"></ComboBoxItem>
			<ComboBoxItem Background="#00BBCC" Content="#00BBCC"></ComboBoxItem>
			<ComboBoxItem Background="#555555" Content="#555555"></ComboBoxItem>
			<ComboBoxItem Background="#AAAAAA" Content="#AAAAAA"></ComboBoxItem>
			<ComboBoxItem Background="#BBBBBB" Content="#BBBBBB"></ComboBoxItem>
			<ComboBoxItem Background="#CCCCCC" Content="#CCCCCC"></ComboBoxItem>
			<ComboBoxItem Background="#DDDDDD" Content="#DDDDDD"></ComboBoxItem>
			<ComboBoxItem Background="#EEEEEE" Content="#EEEEEE"></ComboBoxItem>
			<ComboBoxItem Background="#FFFFFF" Content="#FFFFFF"></ComboBoxItem>
			<i:Interaction.Triggers>
				<i:EventTrigger EventName="SelectionChanged">
					<i:InvokeCommandAction Command="{Binding BgColorCommand}" CommandParameter="{Binding ElementName=combBackground, Path=SelectedItem}"/>
				</i:EventTrigger>
			</i:Interaction.Triggers>
		</ComboBox>
		<Button ToolTip="背景色" Width="30" Height="30" Padding="0" Margin="0" HorizontalAlignment="Left" VerticalAlignment="Center">
			<Path Data="{StaticResource icon_background}" Stretch="Fill"  Fill="{Binding ElementName=combBackground, Path=SelectedItem.Background}"  ></Path>
		</Button>
	</Grid>
	<Grid Background="White" Width="42" Height="30" Margin="3">
		<ComboBox Width="42" Height="30" BorderThickness="0" HorizontalAlignment="Left" VerticalAlignment="Center" SelectedIndex="0" BorderBrush="White" Background="White" Name="combForeground">
			<ComboBoxItem Background="#000000" Content="#000000"></ComboBoxItem>
			<ComboBoxItem Background="#FF0000" Content="#FF0000"></ComboBoxItem>
			<ComboBoxItem Background="#00FF00" Content="#00FF00"></ComboBoxItem>
			<ComboBoxItem Background="#0000FF" Content="#0000FF"></ComboBoxItem>
			<ComboBoxItem Background="#00AA00" Content="#00AA00"></ComboBoxItem>
			<ComboBoxItem Background="#AA0000" Content="#AA0000"></ComboBoxItem>
			<ComboBoxItem Background="#0000AA" Content="#0000AA"></ComboBoxItem>
			<ComboBoxItem Background="#AA00CC" Content="#AA00CC"></ComboBoxItem>
			<ComboBoxItem Background="#00BBCC" Content="#00BBCC"></ComboBoxItem>
			<ComboBoxItem Background="#555555" Content="#555555"></ComboBoxItem>
			<ComboBoxItem Background="#AAAAAA" Content="#AAAAAA"></ComboBoxItem>
			<ComboBoxItem Background="#BBBBBB" Content="#BBBBBB"></ComboBoxItem>
			<ComboBoxItem Background="#CCCCCC" Content="#CCCCCC"></ComboBoxItem>
			<ComboBoxItem Background="#DDDDDD" Content="#DDDDDD"></ComboBoxItem>
			<ComboBoxItem Background="#EEEEEE" Content="#EEEEEE"></ComboBoxItem>
			<ComboBoxItem Background="#FFFFFF" Content="#FFFFFF"></ComboBoxItem>
			<i:Interaction.Triggers>
				<i:EventTrigger EventName="SelectionChanged">
					<i:InvokeCommandAction Command="{Binding ForeColorCommand}" CommandParameter="{Binding ElementName=combForeground, Path=SelectedItem}"/>
				</i:EventTrigger>
			</i:Interaction.Triggers>
		</ComboBox>
		<Button ToolTip="前景色" Width="30" Height="30" Padding="0" Margin="0" HorizontalAlignment="Left" VerticalAlignment="Center">
			<Path Data="{StaticResource icon_foreground}" Stretch="Fill"  Fill="{Binding ElementName=combForeground, Path=SelectedItem.Background}"  ></Path>
		</Button>
	</Grid>
	<Button ToolTip="图像" Command="{Binding SettingCommand}" CommandParameter="Image">
		<Path Data="{StaticResource icon_img}" Stretch="Fill" Fill="Goldenrod"></Path>
	</Button>
	<Button ToolTip="打印" Command="{Binding SettingCommand}" CommandParameter="Print">
		<Path Data="{StaticResource icon_print}" Stretch="Fill" Fill="Tomato"></Path>
	</Button>

</StackPanel>
自定义命令
在本示例中,后台命令使用和属性绑定,使用CommunityToolkit.Mvvm库实现。后台实现业务主要分为三种:
1. 打开,保存命令
打开,保存主要实现对RichTextBox中的流文档对象的序列化和反序列化,具体如下所示:
private IRelayCommand saveCommand;

public IRelayCommand SaveCommand
{
	get
	{
		if (saveCommand == null)
		{
			saveCommand = new RelayCommand(Save);
		}
		return saveCommand;
	}
}

private void Save()
{
	SaveFileDialog saveFileDialog = new SaveFileDialog();
	saveFileDialog.Title = "请选择要保存的路径";
	saveFileDialog.Filter = "富文本格式|*.xaml";
	bool? flag = saveFileDialog.ShowDialog();
	if (flag == true)
	{
		string _fileName=saveFileDialog.FileName;
		TextRange range;
		FileStream fStream;
		range = new TextRange(this.richTextBox.Document.ContentStart, this.richTextBox.Document.ContentEnd);
		fStream = new FileStream(_fileName, FileMode.Create);
		range.Save(fStream, DataFormats.XamlPackage);
		fStream.Close();
	}
}

private IRelayCommand openCommand;

public IRelayCommand OpenCommand
{
	get
	{
		if (openCommand == null)
		{
			openCommand = new RelayCommand(Open);
		}
		return openCommand;
	}
}

private void Open()
{
	TextRange range;
	FileStream fStream;
	OpenFileDialog openFileDialog = new OpenFileDialog();
	openFileDialog.Title = "请选择要加载的文件";
	openFileDialog.Filter = "富文本格式|*.xaml";
	bool? flag = openFileDialog.ShowDialog();
	if (flag == true)
	{
		string _fileName = openFileDialog.FileName;
		if (File.Exists(_fileName))
		{
			range = new TextRange(this.richTextBox.Document.ContentStart, this.richTextBox.Document.ContentEnd);
			fStream = new FileStream(_fileName, FileMode.OpenOrCreate);
			range.Load(fStream, DataFormats.XamlPackage);
			fStream.Close();
		}
	}
}
2. 颜色设置命令
颜色设置,主要用于将用户选择的颜色,赋值给用于选择的流内容元素对象。如下所示:
private IRelayCommand<object> bgColorCommand;

public IRelayCommand<object> BgColorCommand
{
	get
	{
		if(bgColorCommand == null)
		{
			bgColorCommand = new RelayCommand<object>(BgColor);
		}
		return bgColorCommand;
	}
}

private void BgColor(object obj)
{
	if (obj == null)
	{
		return;
	}
	var item = obj as ComboBoxItem;
	if (item != null)
	{
		var color = item.Background;
		var buttonType = "Background";
		SetColor(buttonType, color);
	}
}

private IRelayCommand<object> foreColorCommand;

public IRelayCommand<object> ForeColorCommand
{
	get
	{
		if (foreColorCommand == null)
		{
			foreColorCommand = new RelayCommand<object>(ForeColor);
		}
		return foreColorCommand;
	}
}

private void ForeColor(object obj)
{
	if (obj == null)
	{
		return;
	}
	var item = obj as ComboBoxItem;
	if (item != null)
	{
		var color = item.Background;
		var buttonType = "Foreground";
		SetColor(buttonType, color);
	}
}

private void SetColor(string buttonType, Brush brush)
{
	var textSelection = this.richTextBox.Selection;
	if (textSelection == null)
	{
		return;
	}
	if (buttonType == "Background")
	{
		var propertyValue = textSelection.GetPropertyValue(TextElement.BackgroundProperty);
		var bgBrush = (Brush)propertyValue;
		if (bgBrush == brush)
		{
			textSelection.ApplyPropertyValue(TextElement.BackgroundProperty, Colors.White);
		}
		else
		{
			textSelection.ApplyPropertyValue(TextElement.BackgroundProperty, brush);
		}
	}
	if (buttonType == "Foreground")
	{
		var propertyValue = textSelection.GetPropertyValue(TextElement.ForegroundProperty);
		var foreground = (Brush)propertyValue;
		if (foreground == brush)
		{
			textSelection.ApplyPropertyValue(TextElement.ForegroundProperty, Colors.Black);
		}
		else
		{
			textSelection.ApplyPropertyValue(TextElement.ForegroundProperty, brush);
		}
	}
}
3. 其他设置命令
其他设置命令,如删除线,上标,下标,图像插入,打印等命令,如下所示:
private IRelayCommand<string> settingCommand;

public IRelayCommand<string> SettingCommand
{
	get
	{
		if(settingCommand == null)
		{
			settingCommand = new RelayCommand<string>(Setting);
		}
		return settingCommand;
	}
}

private void Setting(string buttonType)
{
	var textSelection = this.richTextBox.Selection;
	if (textSelection == null)
	{
		return;
	}
	if (buttonType == "StrikeLine")
	{
		var propertyValue = textSelection.GetPropertyValue(Inline.TextDecorationsProperty);
		var textDecorationCollection = (TextDecorationCollection)propertyValue;
		if (textDecorationCollection == TextDecorations.Strikethrough)
		{
			textSelection.ApplyPropertyValue(Inline.TextDecorationsProperty, null);
		}
		else
		{
			textSelection.ApplyPropertyValue(Inline.TextDecorationsProperty, TextDecorations.Strikethrough);
		}
	}else if (buttonType == "Super")
	{
		var propertyValue = textSelection.GetPropertyValue(Inline.BaselineAlignmentProperty);
		var supper = (BaselineAlignment)propertyValue;
		if (supper == BaselineAlignment.Superscript)
		{
			textSelection.ApplyPropertyValue(Inline.BaselineAlignmentProperty, BaselineAlignment.Top);
		}
		else
		{
			textSelection.ApplyPropertyValue(Inline.BaselineAlignmentProperty, BaselineAlignment.Superscript);
		}
	}
	else if(buttonType == "Sub")
	{
		var propertyValue = textSelection.GetPropertyValue(Inline.BaselineAlignmentProperty);
		var sub = (BaselineAlignment)propertyValue;
		if (sub == BaselineAlignment.Subscript)
		{
			textSelection.ApplyPropertyValue(Inline.BaselineAlignmentProperty, BaselineAlignment.Top);
		}
		else
		{
			textSelection.ApplyPropertyValue(Inline.BaselineAlignmentProperty, BaselineAlignment.Subscript);
		}
	}
	else if (buttonType == "Image")
	{
		OpenFileDialog openFileDialog = new OpenFileDialog();
		openFileDialog.Title = "请选择需要插入的图片";
		openFileDialog.Filter = "图片文件|*.png";
		bool? flag = openFileDialog.ShowDialog();
		if (flag ==true)
		{
			var fileName = openFileDialog.FileName;
			var img = new Image() { Source = new BitmapImage(new Uri(fileName)), Stretch = Stretch.Uniform, Width = this.richTextBox.ActualWidth - 50 };
			var imgContainer = new BlockUIContainer(img);
			this.richTextBox.CaretPosition.InsertParagraphBreak();
			this.richTextBox.Document.Blocks.InsertBefore(this.richTextBox.CaretPosition.Paragraph, imgContainer);
		}
	}
	else if(buttonType == "Print")
	{
		PrintDialog pd = new PrintDialog();
		if ((pd.ShowDialog() == true))
		{
			//use either one of the below
			pd.PrintVisual(this.richTextBox as Visual, "打印富文本1");
			pd.PrintDocument((((IDocumentPaginatorSource)this.richTextBox.Document).DocumentPaginator), "打印富文本2");
		}
	}
}
示例截图
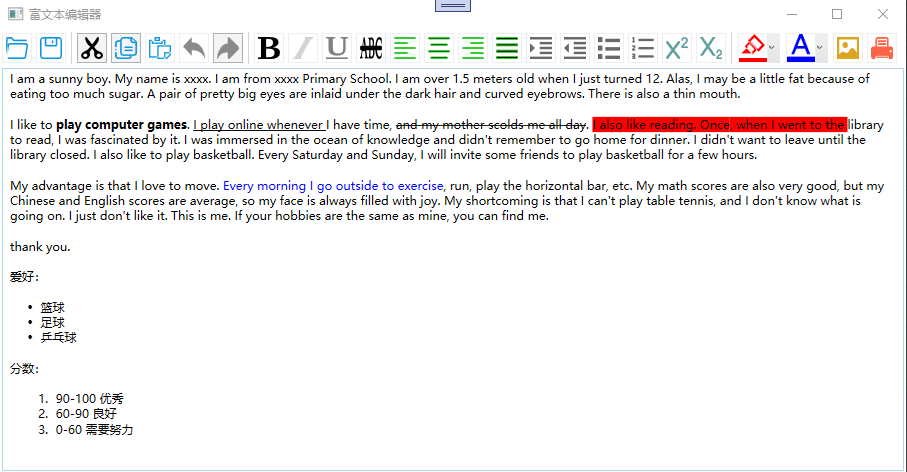
主要实现复制,剪切,粘贴,撤销,重做,保存,打开,文本加粗,斜体,下划线,删除线,左对齐,居中对齐,右对齐,两端对齐,缩进,减少缩进,项目符号,数字符号,上标,下标,背景色,前景色,图片,打印等功能,效果如下:
源码下载
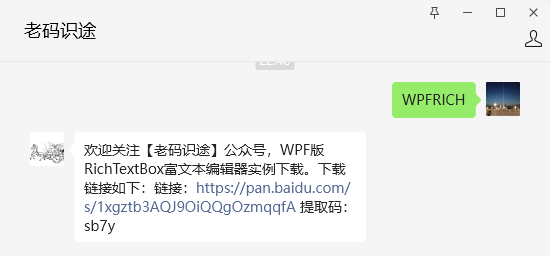
关于源码下载,可关注公众号,回复WPFRICH进行下载,如下所示:
参考文献
流文档介绍:https://learn.microsoft.com/zh-cn/dotnet/desktop/wpf/advanced/flow-document-overview?view=netframeworkdesktop-4.8
RichTextBox介绍:https://learn.microsoft.com/zh-cn/dotnet/desktop/wpf/controls/richtextbox-overview?view=netframeworkdesktop-4.8
ApplicationCommands介绍:https://learn.microsoft.com/zh-cn/dotnet/api/system.windows.input.applicationcommands?view=windowsdesktop-8.0
EditingCommands介绍:https://learn.microsoft.com/zh-cn/dotnet/api/system.windows.documents.editingcommands?view=windowsdesktop-8.0
以上就是【浅谈WPF之利用RichTextBox实现富文本编辑器】的全部内容。

