《WebGL编程指南》学习笔记
- 前言
- 1.第一章 WebGL概述
- 1.1 WebGL优势
- 1.2 WebGL起源
- 1.3 WebGL程序结构
- 2.第二章 WebGL入门
- 2.1 了解canvas
- 2.1.1 使用canvas绘制一个长方形
- 2.2 第一个WebGL程序(清除画布)
- 2.3 绘制一个点(版本1——了解着色器)
- 2.3.1 示例代码
- 2.3.2 着色器
- 2.3.2.1 顶点着色器(Vertex shader)
- 2.3.2.2 片元着色器(Fragment shader)
- 2.3.2.3 着色器的作用
- 2.3.2.4 着色器的工作流程
- 2.3.2.5 使用着色器的程序结构
- 2.3.2.6 着色器语言(GLSL ES)是一种强类型语言
- 2.3.2.7 齐次坐标(由4个分量组成的矢量——使用矩阵描述顶点成为可能)
- 2.3.3 绘制操作(gl.drawArrays(mode, first, count))
- 2.3.4 WebGL坐标系
- 2.3.4.1 坐标设置实验
- 2.3.4.2 颜色设置实验
- 2.4 绘制一个点(版本2——了解存储限定符)
- 2.4.1 示例代码
- 2.4.2 顶点着色器设置变量(attribute变量)
- 2.4.2.1 存储限定符
- 2.4.2.2 attribute存储限定符
- 2.4.2.3 uniform存储限定符
- 2.4.2.4 设置着色器变量步骤
- 2.4.3 相关API
- 2.4.3.1 获取attribute变量——gl.getAttribLocation(program,name)
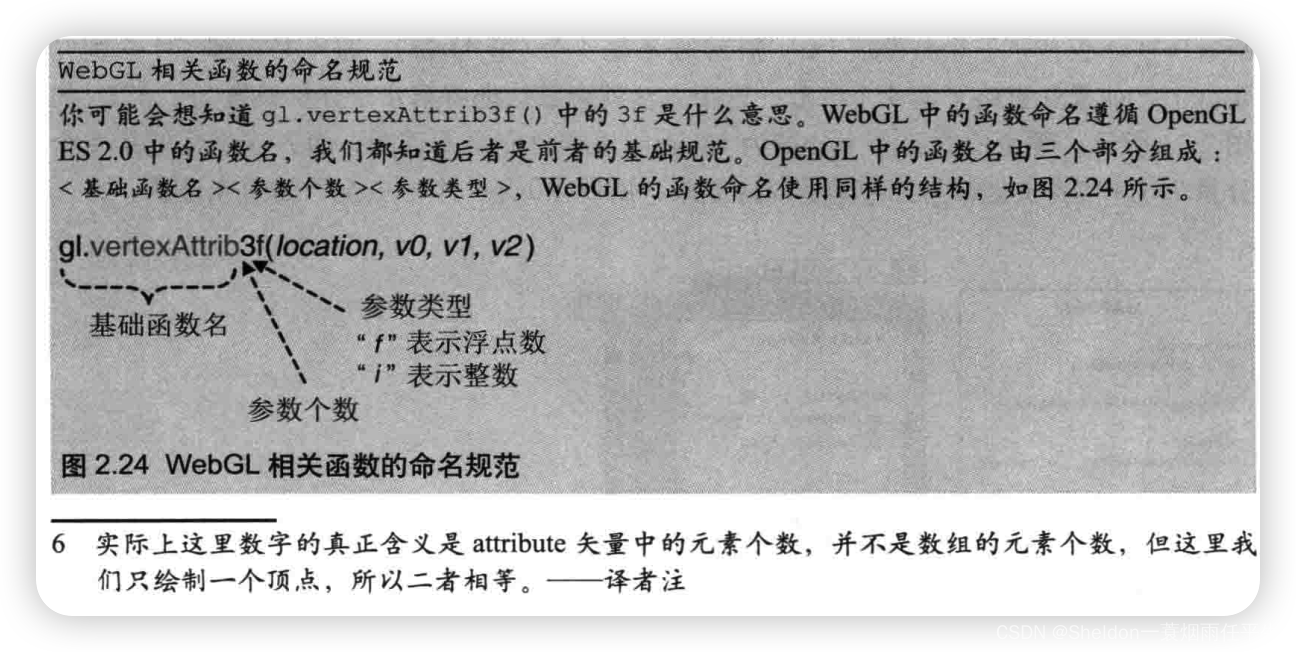
- 2.4.3.2 赋值attribute变量——gl.vertexAttrib3f(location, v0, v1, v2)
- 2.4.3.3 gl.vertexAttrib3f()的同族函数
- 2.4.4 WebGL的API命名规范
- 2.5 通过鼠标绘制点(画布的点击事件——canvas.onmousedown)
- 2.5.1 示例代码
- 2.5.2 注册canvas鼠标点击事件(渲染多个点位)
- 2.6 改变点的颜色(uniform变量)
- 2.6.1 示例代码
- 2.6.2 uniform存储限定符
- 2.6.3 相关API
- 2.6.3.1 获取uniform变量的存储地址——gl.getUniformLocation(program, name)
- 2.6.3.2 赋值uniform变量——gl.uniform4f(location, v0, v1, v2, v3)
- 2.6.3.3 gl.uniform4f()的同族函数
- 2.8 总结
- 2.9 课后练习——贪吃蛇
- 2.9.1 游戏规则
- 2.9.2 游戏制作
- 2.9.2.1 绘制一只蛇
- 2.9.2.1.1 绘制效果和代码
- 2.9.2.1.2 步骤讲解
- 2.9.2.1 测试
- 2.9.2.2 点击上、下、左、右,蛇按照方向移动
- 2.9.2.2.1 绘制效果和代码
- 2.9.2.2.2 步骤讲解
- 2.9.2.3 蛇碰到地图边缘结束游戏(地图的碰撞检测)
- 2.9.2.4 初始化蛇的长度
- 2.9.2.4.1 绘制效果和代码
- 2.9.2.4.2 步骤讲解
- 2.9.2.4.3 测试
- 2.9.2.5 开始时,生成100个随机大小、随机位置、随机颜色的食物
- 2.9.2.5.1 绘制效果和代码
- 2.9.2.5.2 步骤讲解
- 2.9.2.6 蛇移动碰到食物时,吃掉食物,长度变长
- 2.9.2.6.1 绘制效果和代码
- 2.9.2.6.2 步骤讲解
- 2.9.2.7 蛇的长度变大一定长时,宽度也随着变大
- 2.8.2.7.1 绘制效果和代码
- 2.8.2.7.2 步骤讲解
- 2.9.2.8 食物的数量随着时间的推移而增多
- 2.9.2.8.1 绘制效果和代码
- 2.9.2.8.2 步骤讲解
- 2.9.2.9 扩展
- 3.第三章 绘制和变换三角形
- 3.1 绘制多个点
- 3.1.1 示例代码
- 3.1.2 相关概念
- 3.1.2.1 定型数组(typed array,有的书中也叫类型化数组)
- 3.1.2.1.1 目的
- 3.1.2.1.2 历史
- 3.1.2.1.3 WebGL使用的各种类型化数组
- 3.1.2.1.4 类型化数组的方法、属性和常量
- 3.1.2.1.5 创建方式(使用new运算符)
- 3.1.2.2 缓冲区对象
- 3.1.3 使用缓冲区对象(相关API)
- 3.1.3.1 创建缓冲区对象—— gl.createBuffer()
- 3.1.3.2 绑定缓冲区对象——gl.bindBuffer()
- 3.1.3.3 将数据写入缓冲区对象——gl.bufferData()
- 3.1.3.4 将缓冲区对象分配给一个atrribute变量——gl.vertexAttribPointer()
- 3.1.3.5 开启attribute变量——gl.enableVertexAttribArray()
- 3.1.4 回顾gl.drawArrays()
- 3.1.5 程序实验
- 3.1.5.1 定型数组长度过短
- 3.1.5.2 定型数组长度过长
- 3.1.5.3 修改gl.drawArrays()参数 first 和 count
- 3.2 WebGL基本图形——点、线段、线条、回路、三角形、三角带和三角扇
- 3.2.1 基本图形介绍
- 3.2.2 基本图形绘制实验
- 3.2.2.1 点——gl.POINTS
- 3.2.2.2 线段——gl.LINES
- 3.2.2.3 线条——gl.LINE_STRIP
- 3.2.2.4 回路——gl.LINE_LOOP
- 3.2.2.5 三角形——gl.TRIANGLES
- 3.2.2.6 三角带——gl.TRIANGLE_STRIP
- 3.2.2.6 三角扇——gl.TRIANGLE_FAN
- 3.2.3 基本图形组成其他图形
- 3.2.3.1 矩形/长方形
- 3.2.3.2 绘制多边形/圆形
- 3.2.3.2.1 设计思路
- 3.2.3.2.2 绘制效果和代码
- 3.3 移动、旋转和缩放
- 3.3.1 移动(平移)
- 3.3.2 旋转
- 3.3.3 变换矩阵
- 3.3.3.1 为什么需要变换矩阵?
- 3.3.3.2 变换矩阵是什么
- 3.3.3.3 矩阵的乘法
- 3.3.3.4 旋转矩阵
- 3.3.3.5 平移矩阵
- 3.3.3.6 旋转平移矩阵(4 * 4 矩阵)
- 3.3.3.7 平移旋转矩阵(4 * 4 矩阵)
- 3.3.3.8 结论:旋转平移矩阵 ≠ 平移旋转矩阵
- 3.3.3.9 WebGL的旋转矩阵运算——使用 4 * 4 矩阵
- 3.3.3.10 WebGL的平移矩阵运算
- 3.3.4 缩放
- 4.第四章 高级变换和动画基础
- 4.1 矩阵函数库
- 4.1.1 初识矩阵函数库
- 4.1.2 详解矩阵函数库
- 4.1.2.1 矩阵构造函数
- 4.1.2.2 矩阵函数原型链
- 4.1.3 使用矩阵库
- 4.1.3.1 矩阵函数——setRotate(angle, x, y, z)
- 4.1.3.1.1 源码解析
- 5.第五章 颜色和纹理
- 6.第六章 OpenGL ES着色器语言(GLSL ES)
- 7.第七章 进入三维世界
- 8.第八章 光照
- 9.第九章 层次模型
- 10.第十章 高级技术
前言
之前接触过Three.js和ht.js这类的3D引擎,借助他们,设计师和前端可以完成非常炫酷或者逼真的3D场景及其动画效果。但是学习这些总有一种空中楼阁的感觉,毕竟这是别人写的WebGL第三方库,很多时候我们并不清楚其中的原理和概念。因此学习它们的基础——WebGL就势在必行。本篇文章主要是本人在研读《WebGL编程指南》时,做的一些关键概念和代码的笔记,以及一些有趣猜测和想法的实现。
本来是想把整本书的内容都写完再发布的,刚好遇到公司的部门内部分享,就把这部分的内容先发布了。有兴趣的同学可以先一睹为快,接下来的内容我后续再补上。
被这篇文章吸引的同学,有的是因为感兴趣,有的是因为工作需要,或者两者都有。我有几点建议:
1、对于后者,我建议大家先学习three.js或者其他已经相对成熟的基于WebGL的3D引擎(网上的文档和教程都有),因为这样可以帮助大家快速掌握3D场景的创建和运用,毕竟要吃饭的嘛;
2、但是从学习本身的角度上来说,还是希望大家能够从WebGL开始学习。因为Three.js(或者其他基于WebGL的引擎)相对于WebGL,就像JQuery相对于JavaScript,大家在使用的时候会感到很舒适方便,但是一旦遇到更加底层的问题(比如引擎本身的bug),你就只能对客户说做不到,甚至连问题本身都不清楚。并且还有一个风险,就是市场,引擎面对竞争时,很可能会被淘汰,就像Jquery、easyUI等,大家已经几乎看不到他们的身影了,但是HTML、JS和CSS本身却仍然存在,WebGL也是如此。
1.第一章 WebGL概述
1.1 WebGL优势
(1)内嵌在浏览器中,无需搭建开发环境
(2)电子版的OpenGL,参考书籍众多,学习方便
1.2 WebGL起源

1.3 WebGL程序结构
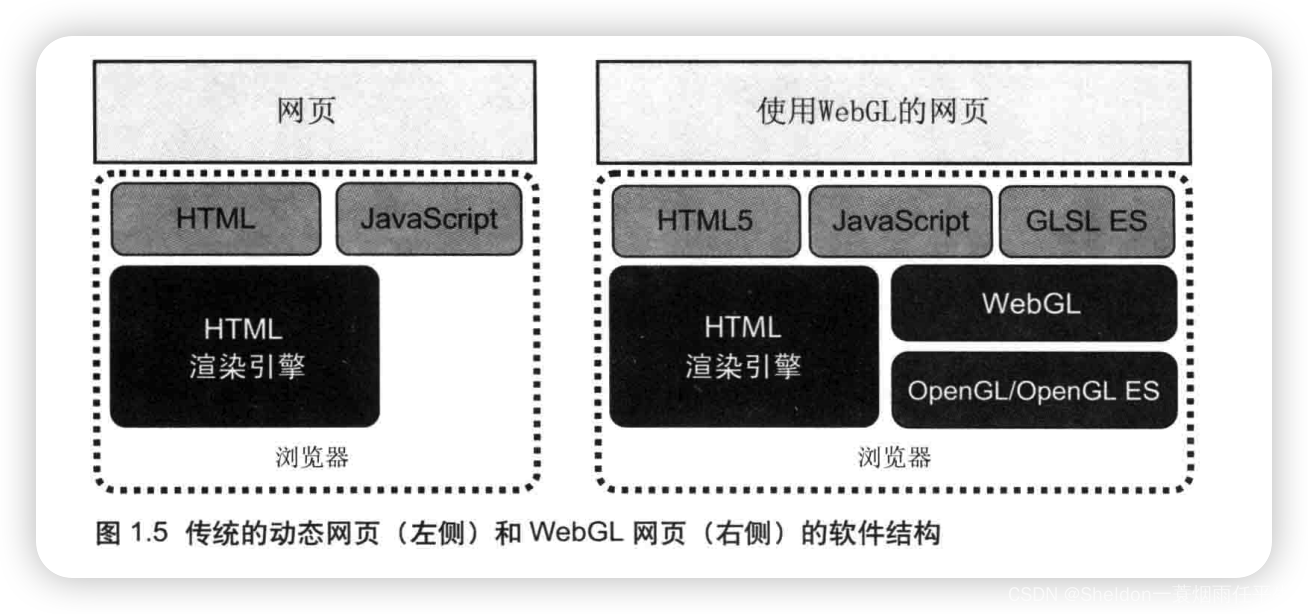
WebGL开发用到3中语言:HTML、JavaScript和GLSL ES。
但是因为着色器代码GLSL ES内嵌在JavaScript中,所以两者文件结构一致。
大家可能没有听说过着色器,不用着急。在第二章中,我们会进行讲解。目前你只需要把它理解为3D场景的画笔即可,理解了着色器,我们就初步掌握了绘制3D场景的方法。
2.第二章 WebGL入门
2.1 了解canvas
相信很多人都听说过或者间接使用过canvas,比如我们经常使用的echart其实就是canvas。

可以看到,canvas(翻译为“画布”)就是一个html元素,类似于img,可以展示图像,但是这里的图像是我们自己绘制的,echarts针对图表做了封装,因此大家只需要经过配置即可实现。在WebGL中,目前我们只需要对canvas先有个基础的认知即可,不需要做到像echart一般复杂。
2.1.1 使用canvas绘制一个长方形
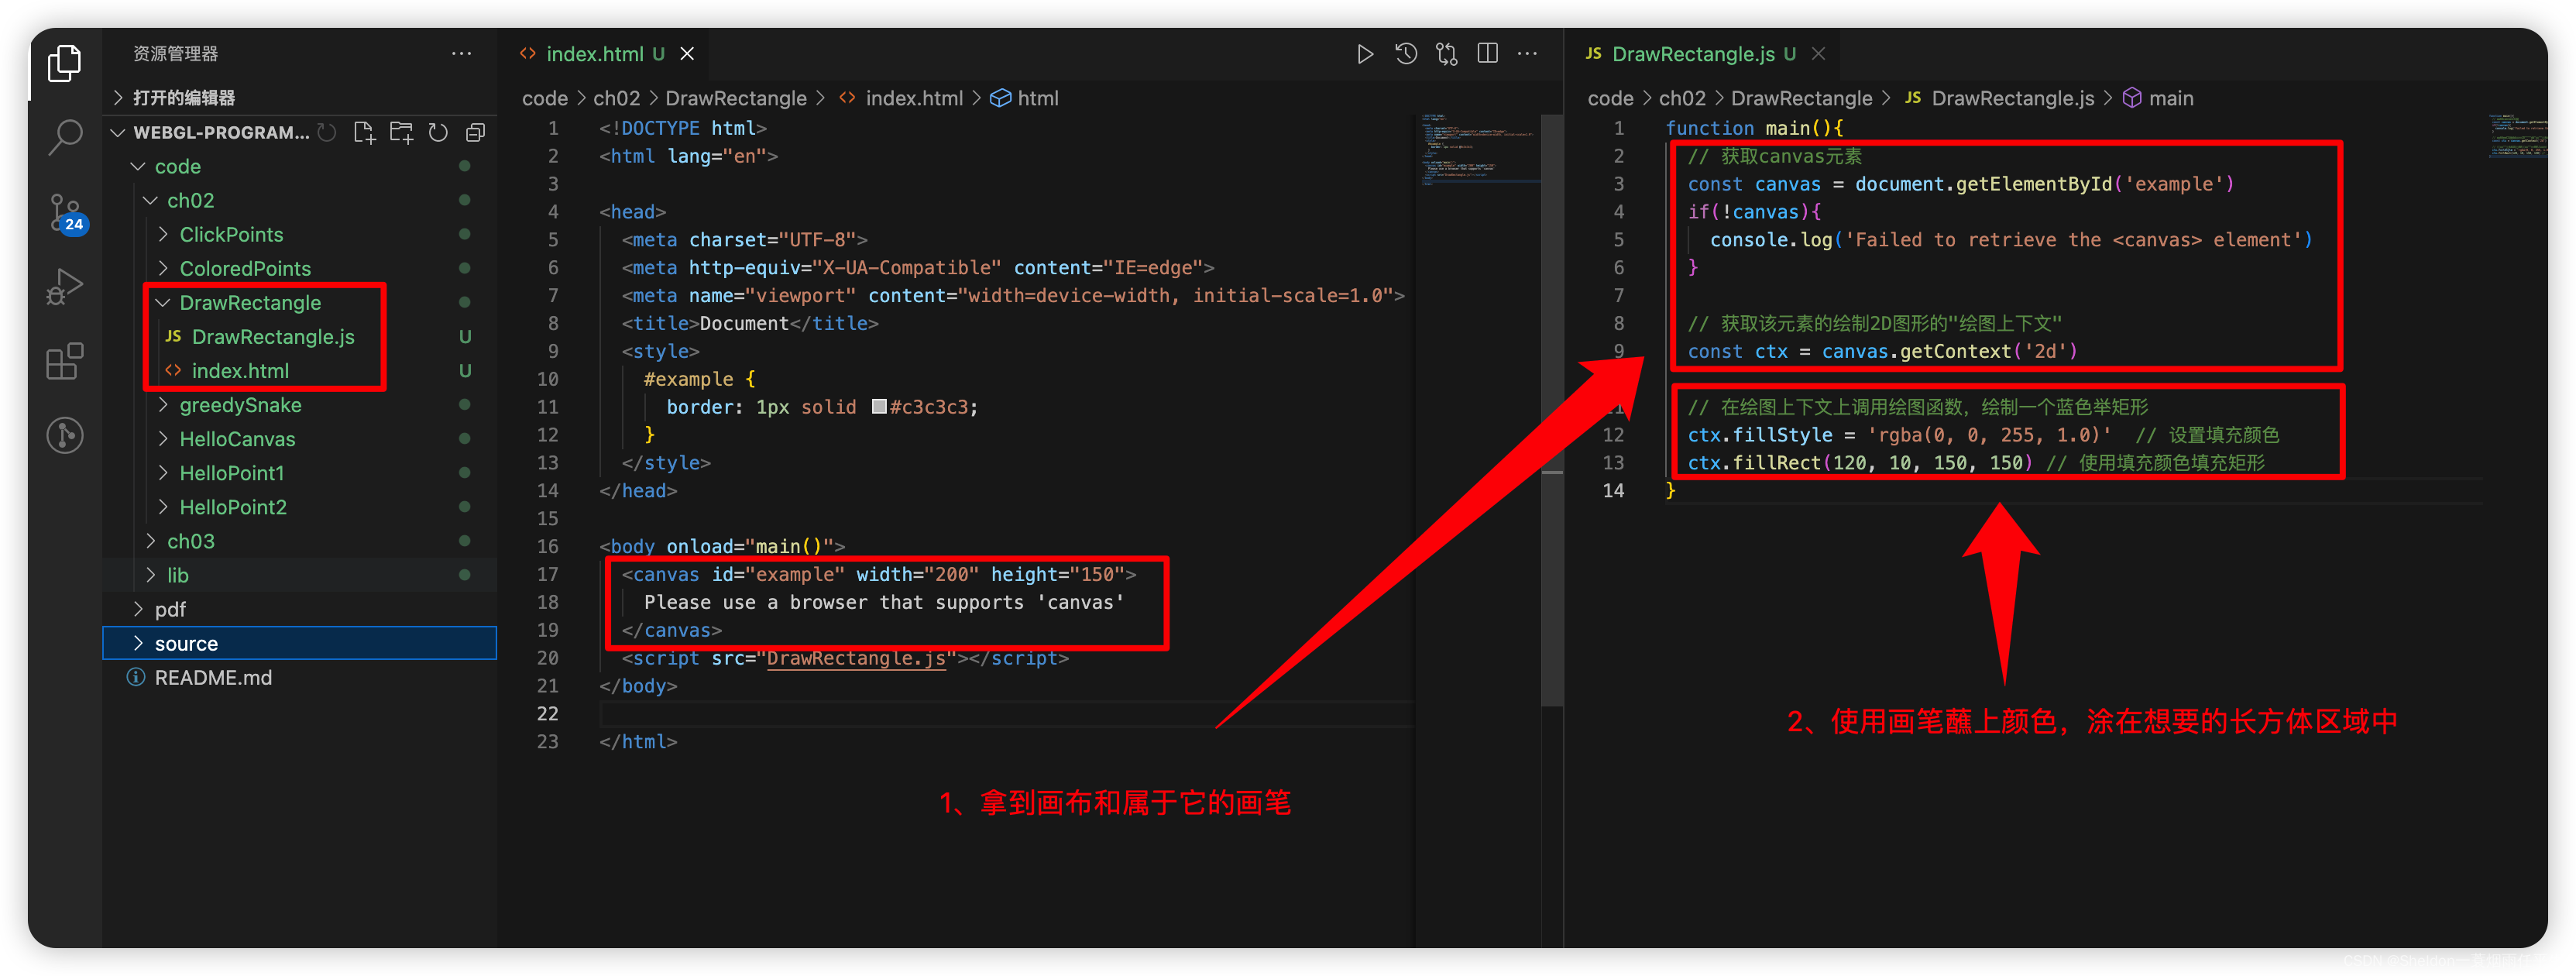
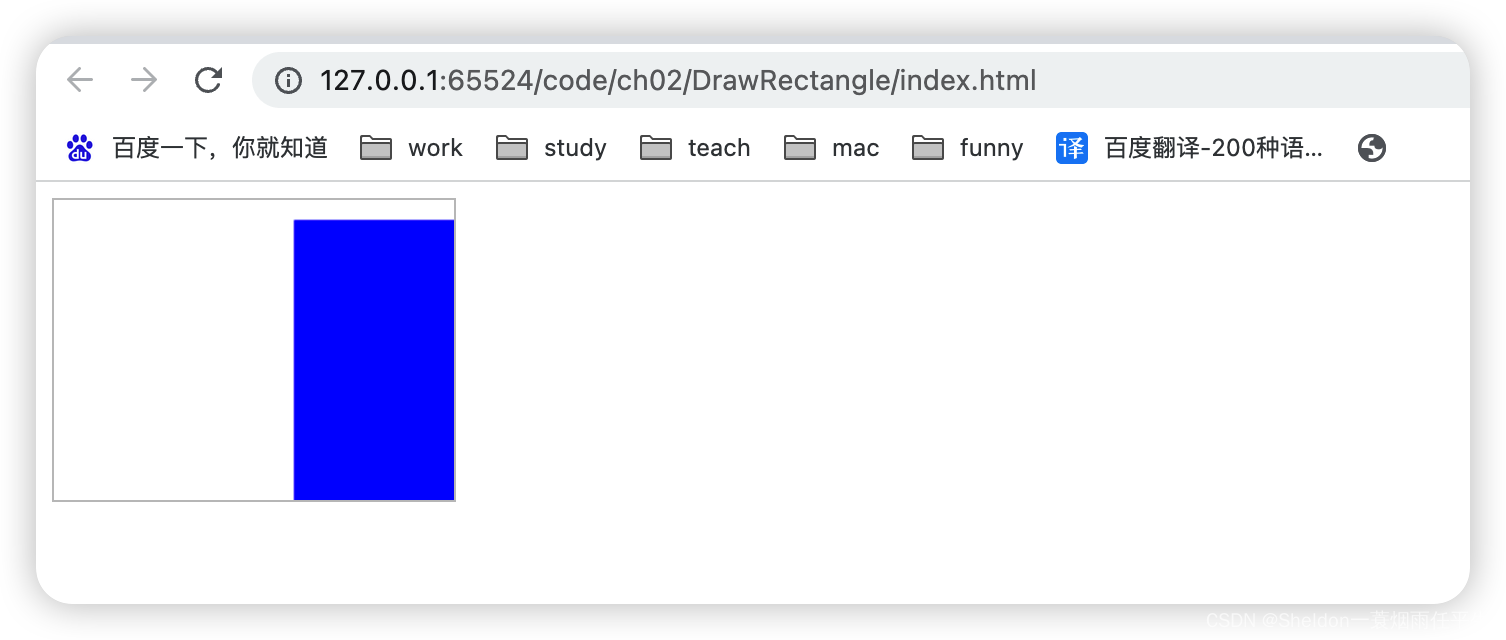
理解canvas的绘制过程也很简单,就是大概分成两步,第一步:拿到画布和属于它的画笔,第二步,使用画笔进行绘制。具体的代码如下:
DrawRectangle/index.html:
<!DOCTYPE html>
<html lang="en">

<head>
  <meta charset="UTF-8">
  <meta http-equiv="X-UA-Compatible" content="IE=edge">
  <meta name="viewport" content="width=device-width, initial-scale=1.0">
  <title>Document</title>
  <style>
    #example {
      border: 1px solid #c3c3c3;
    }
  </style>
</head>

<body onload="main()">
  <canvas id="example" width="200" height="150">
    Please use a browser that supports 'canvas'
  </canvas>
  <script src="DrawRectangle.js"></script>
</body>

</html>
DrawRectangle/DrawRectangle.js:
function main(){
  // 获取canvas元素
  const canvas = document.getElementById('example')
  if(!canvas){
    console.log('Failed to retrieve the <canvas> element')
  }

  // 获取该元素的绘制2D图形的"绘图上下文"
  const ctx = canvas.getContext('2d')

  // 在绘图上下文上调用绘图函数,绘制一个蓝色举矩形
  ctx.fillStyle = 'rgba(0, 0, 255, 1.0)'  // 设置填充颜色
  ctx.fillRect(120, 10, 150, 150) // 使用填充颜色填充矩形
}
2.2 第一个WebGL程序(清除画布)
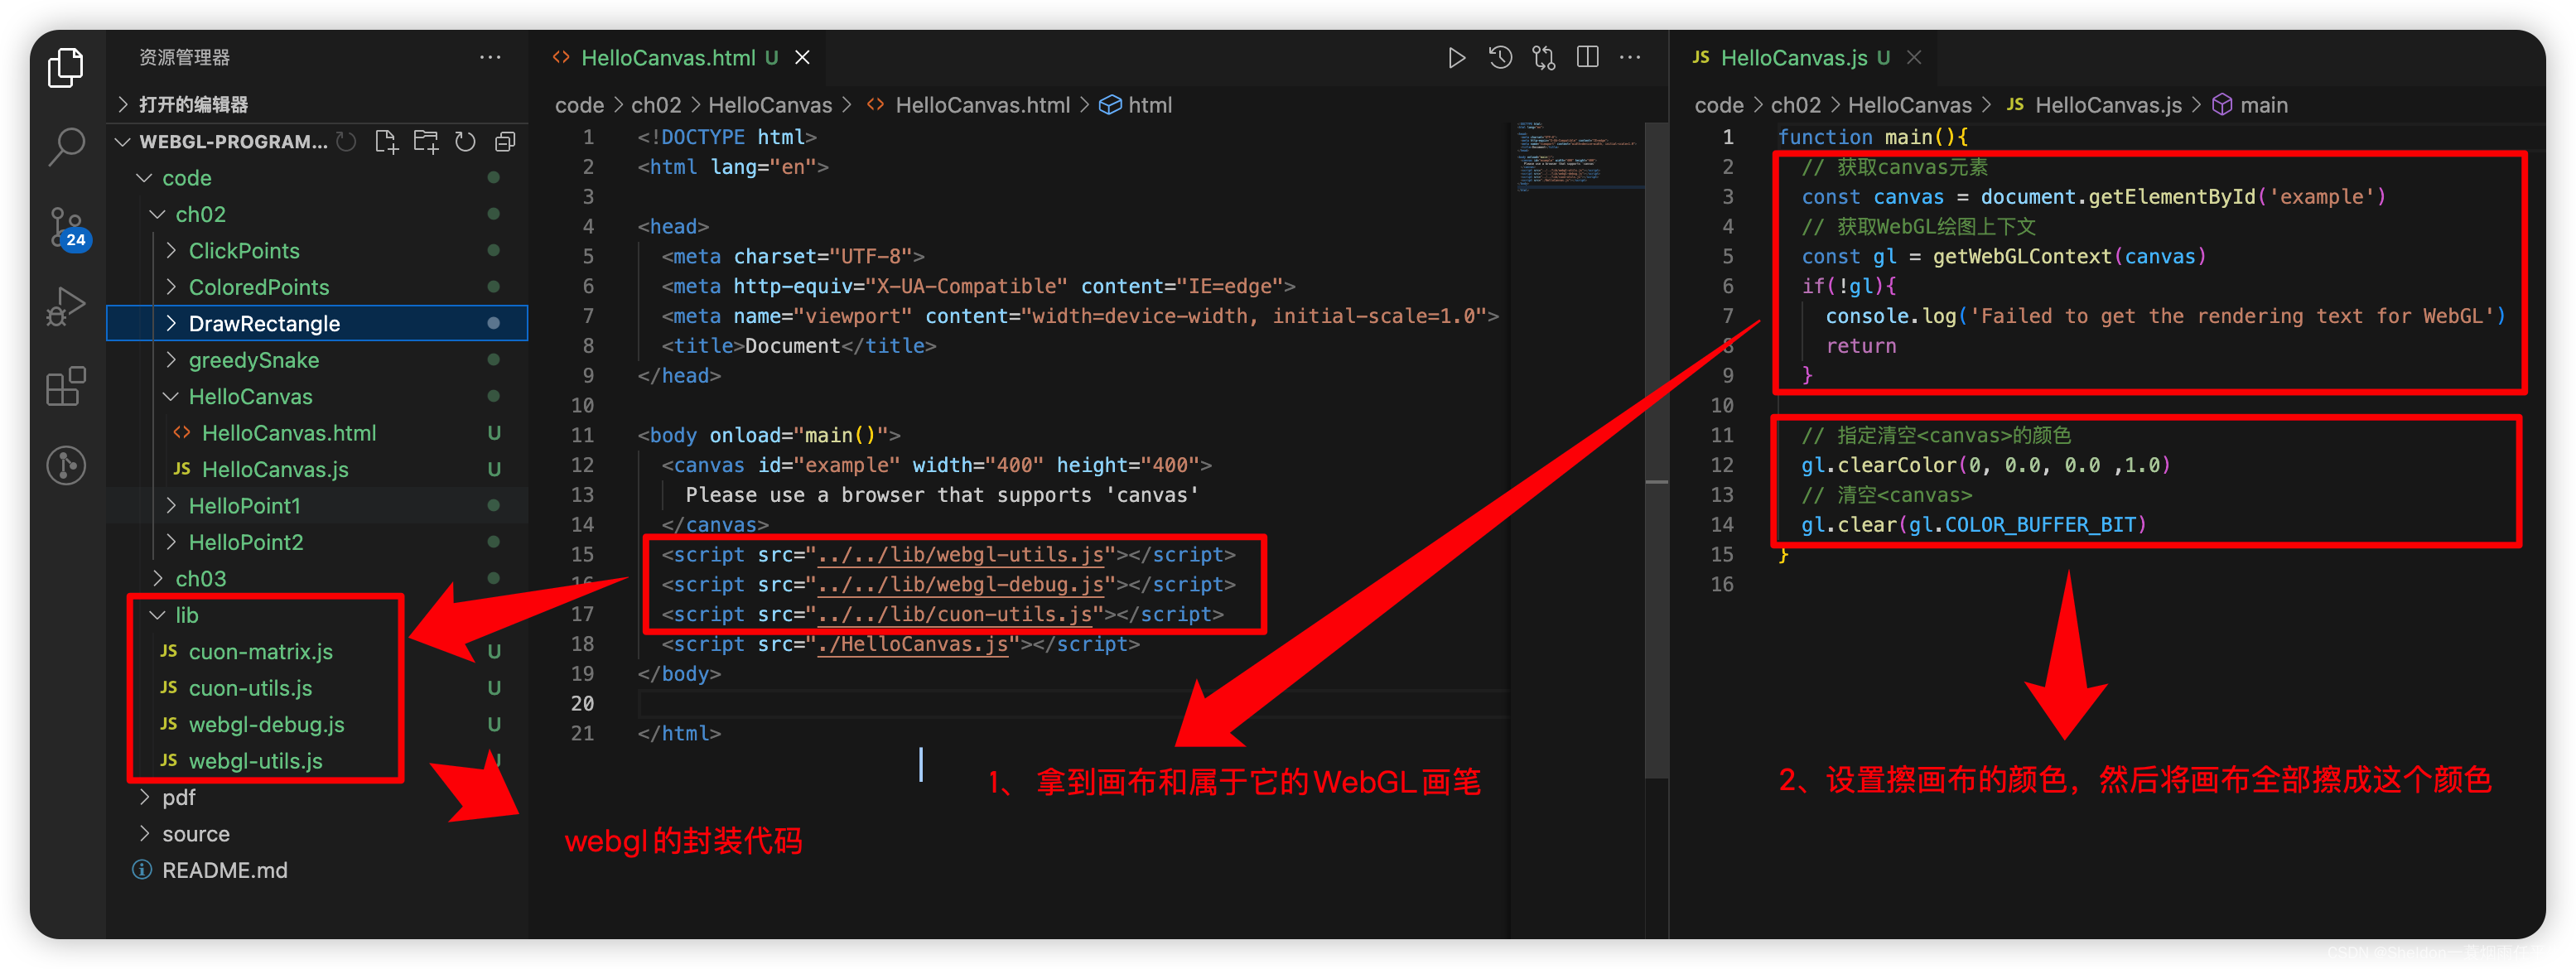
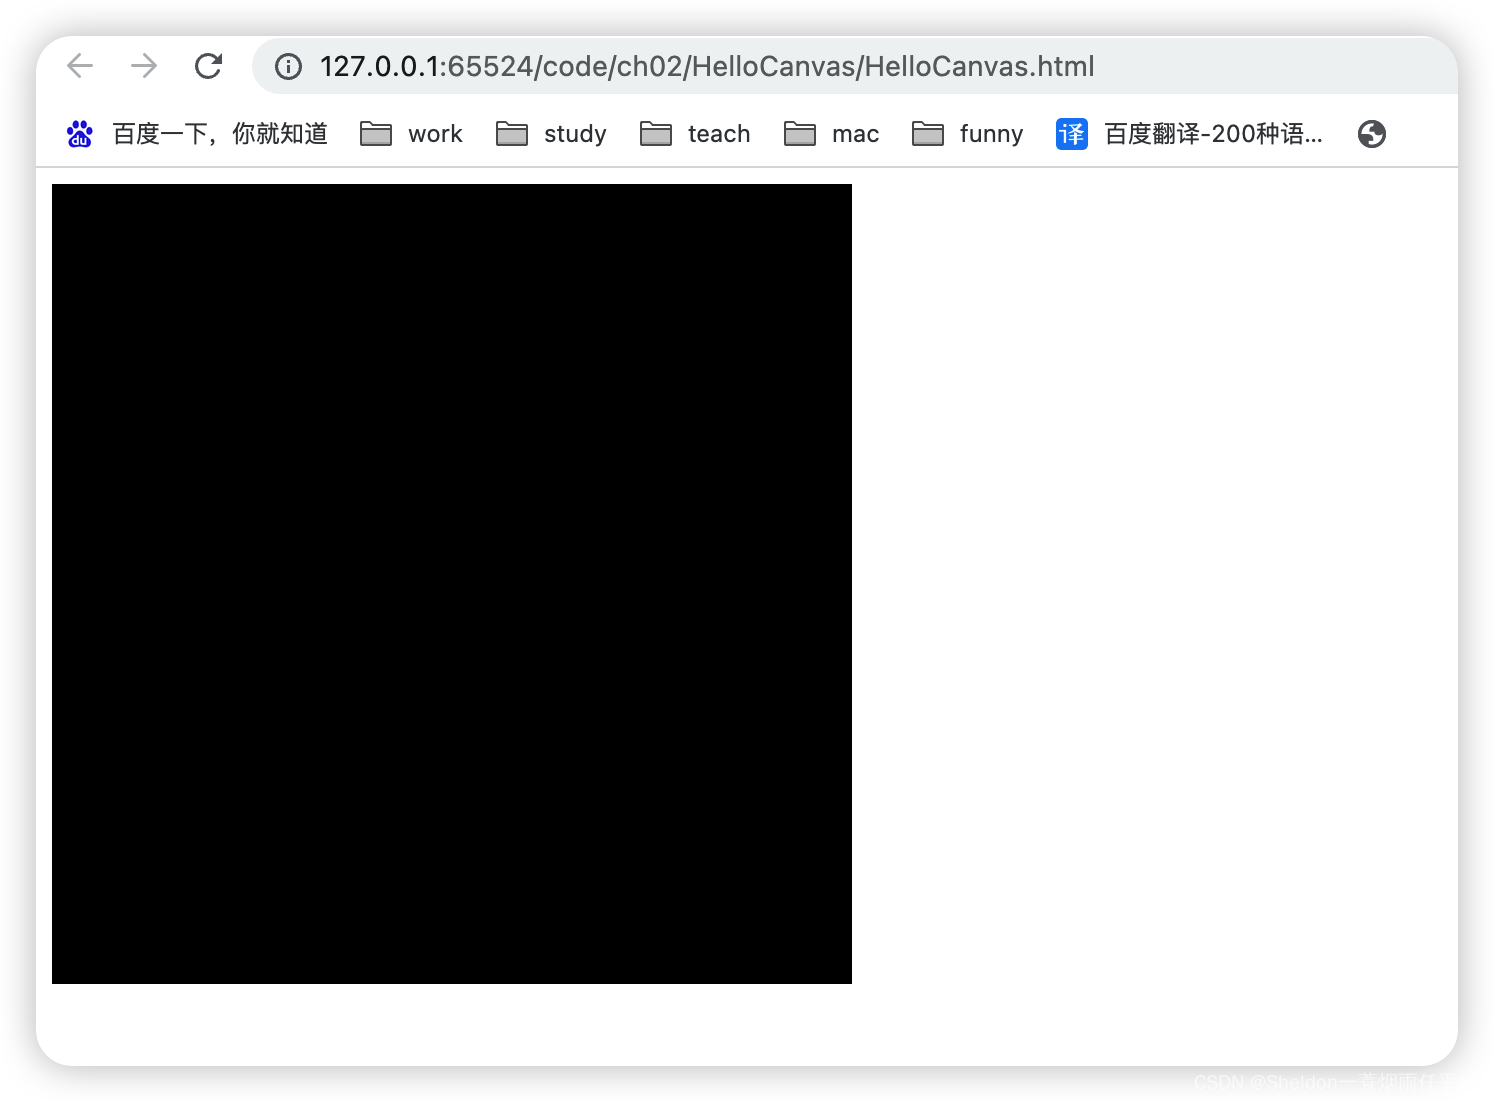
这是一个最简单的WebGL程序,还没有涉及到比较难理解的知识,这个WebGL程序的绘制过程也很简单,大致也分成两步。
第一步:拿到画布和属于它的WebGL画笔;
第二步:设置清除画布的颜色,然后清除画布。
HelloCanvas/HelloCanvas.html:
<!DOCTYPE html>
<html lang="en">

<head>
  <meta charset="UTF-8">
  <meta http-equiv="X-UA-Compatible" content="IE=edge">
  <meta name="viewport" content="width=device-width, initial-scale=1.0">
  <title>Document</title>
</head>

<body onload="main()">
  <canvas id="example" width="400" height="400">
    Please use a browser that supports 'canvas'
  </canvas>
  <script src="../../lib/webgl-utils.js"></script>
  <script src="../../lib/webgl-debug.js"></script>
  <script src="../../lib/cuon-utils.js"></script>
  <script src="./HelloCanvas.js"></script>
</body>

</html>
HelloCanvas/HelloCanvas.js:
function main(){
  // 获取canvas元素
  const canvas = document.getElementById('example')
  // 获取WebGL绘图上下文
  const gl = getWebGLContext(canvas)
  if(!gl){
    console.log('Failed to get the rendering text for WebGL')
    return
  }

  // 指定清空<canvas>的颜色
  gl.clearColor(0, 0.0, 0.0 ,1.0)
  // 清空<canvas>
  gl.clear(gl.COLOR_BUFFER_BIT)
}
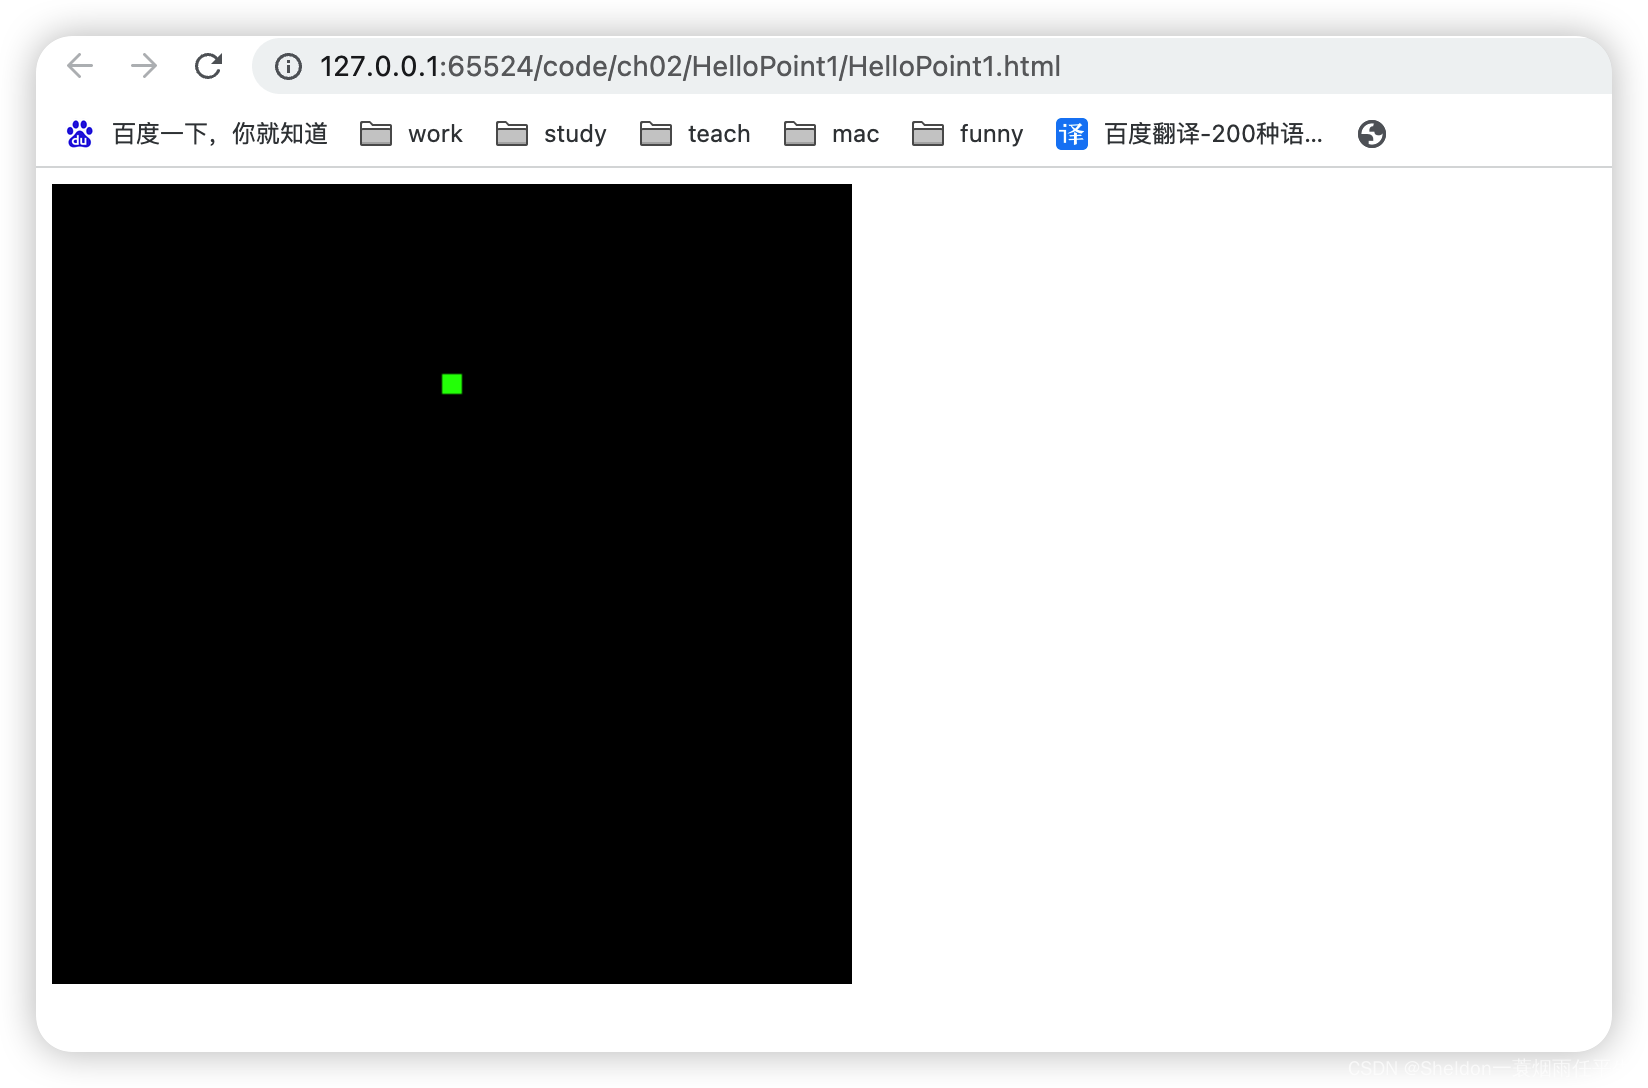
2.3 绘制一个点(版本1——了解着色器)
2.3.1 是代码部分,同学们可以直接复制使用(不过更加建议手打一遍,有利于记忆和理解着色器的编写方式),不会做过多的介绍。因为2.3的代码部分内容不多,但是涉及到的概念较多,因此分多点介绍。大家可以看完2.3.1以后的部分之后,再反过头来观察2.3.1的整体代码,更有利于理解着色器的使用。
2.3.1 示例代码
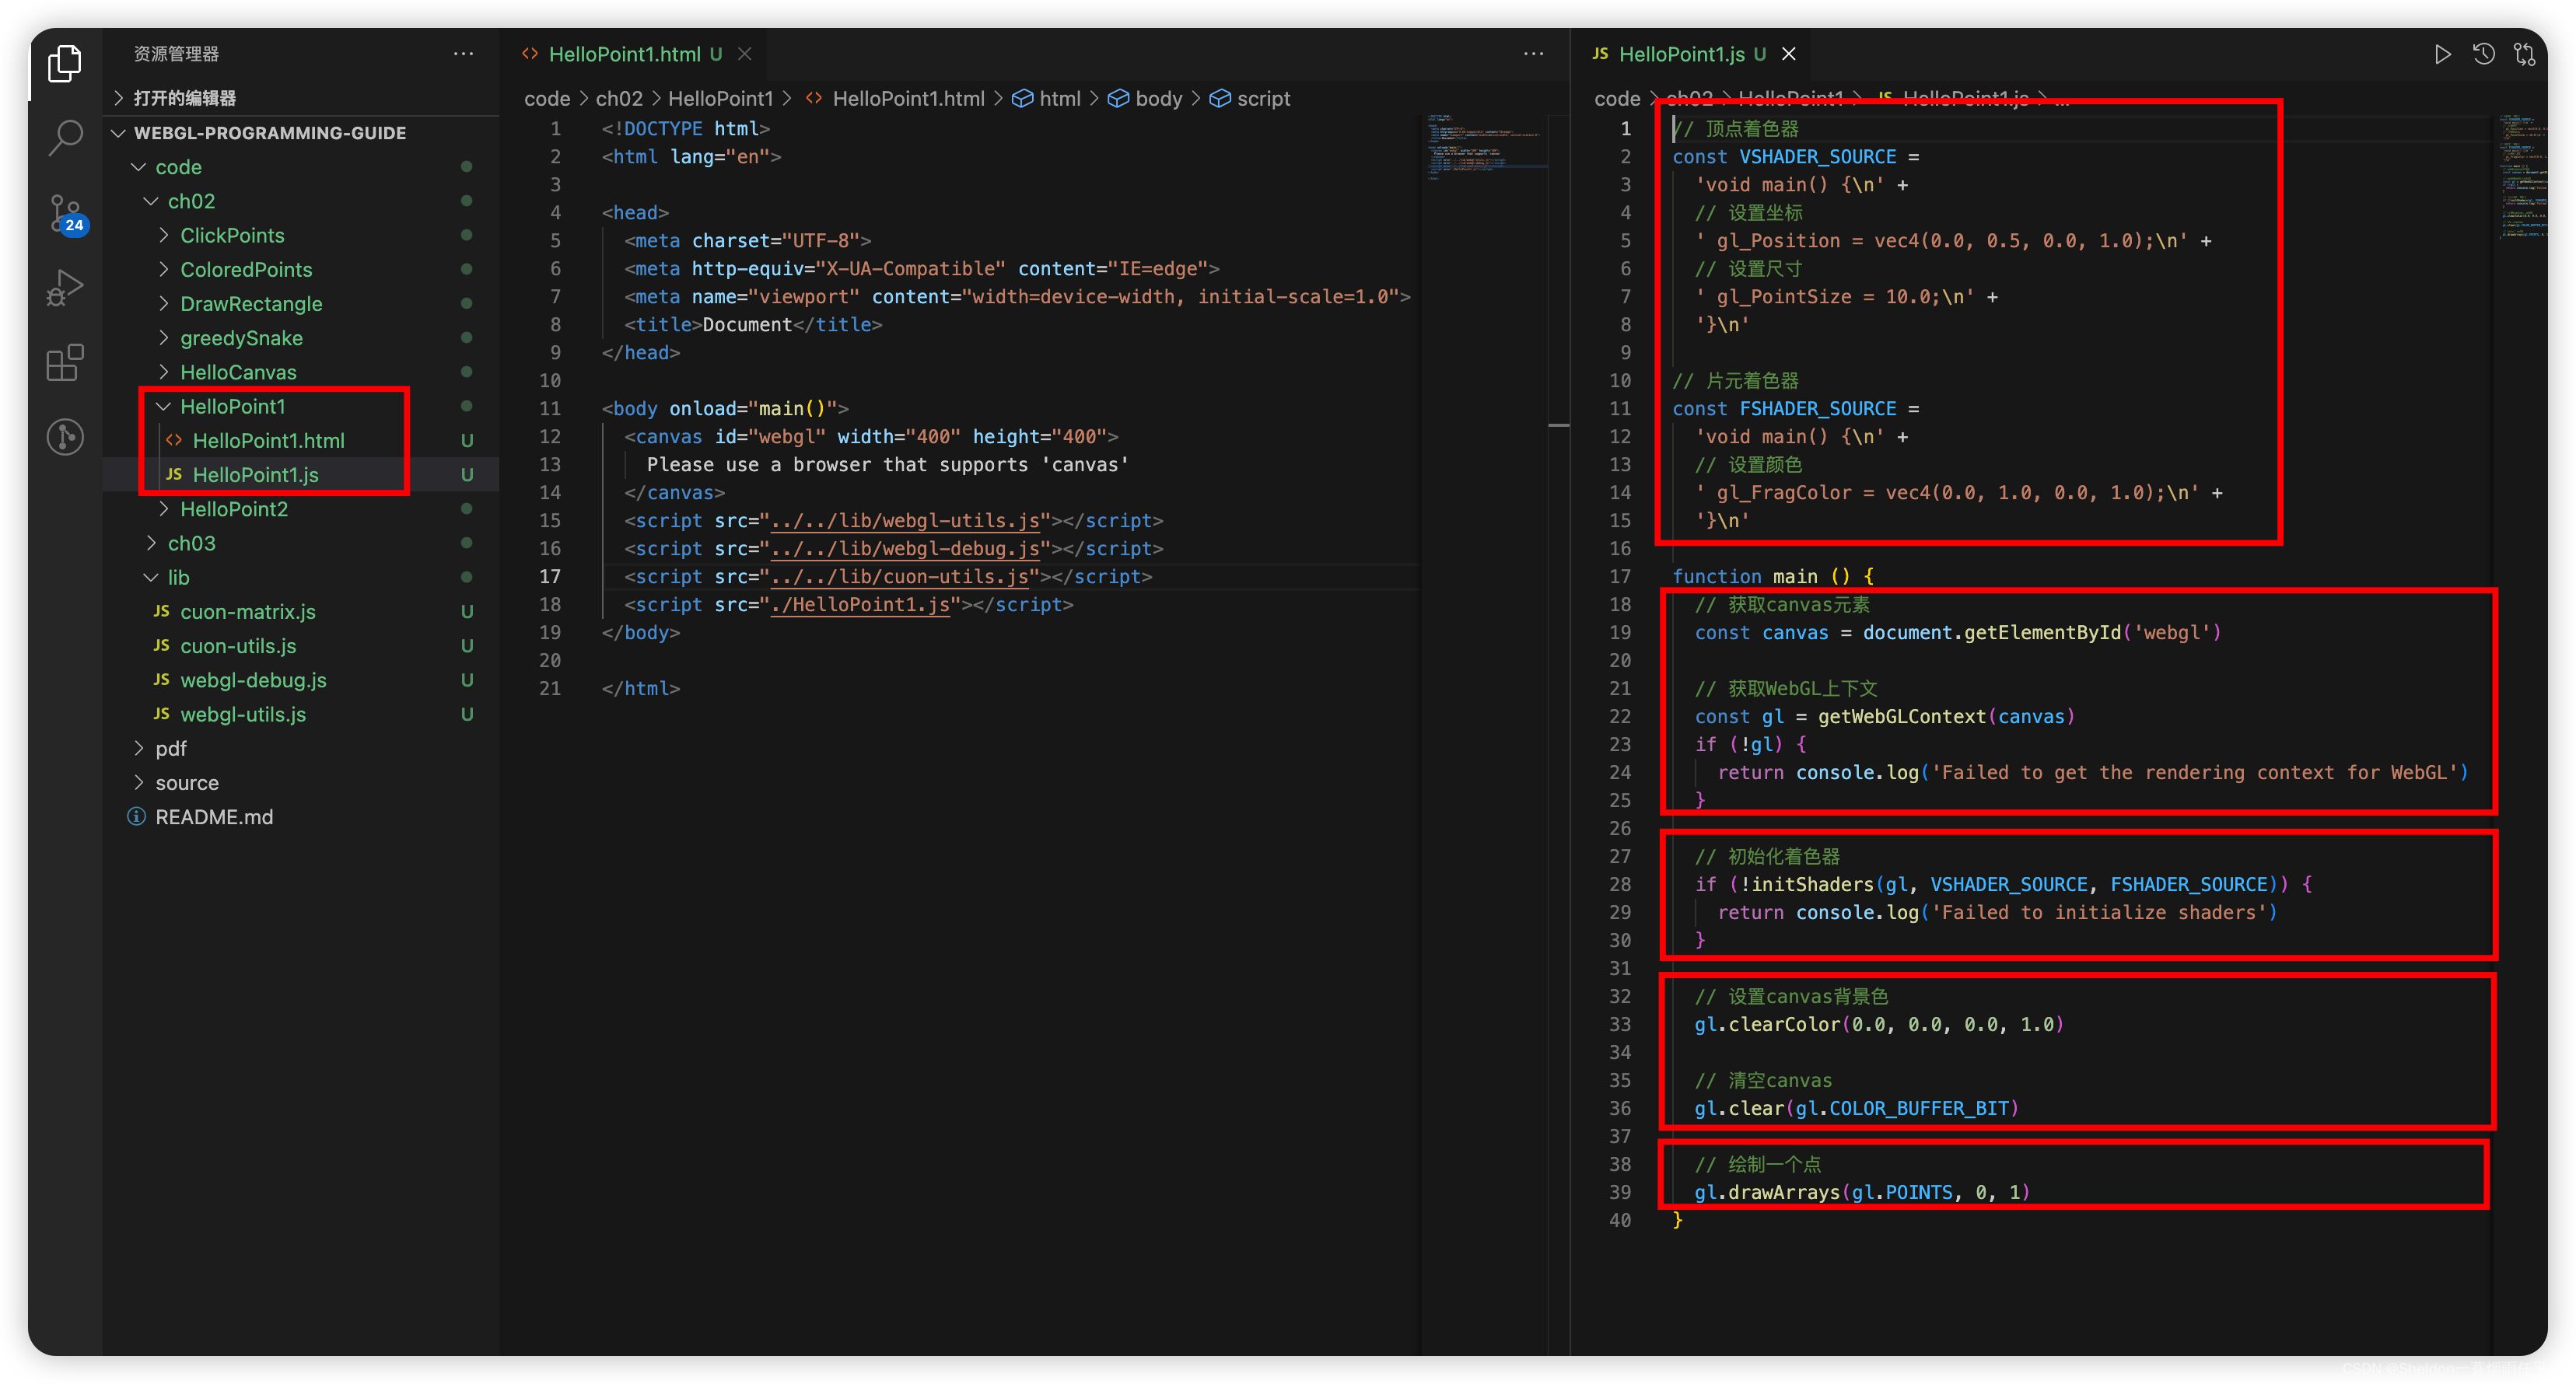

HelloPoint1/HelloPoint1.html:
<!DOCTYPE html>
<html lang="en">

<head>
  <meta charset="UTF-8">
  <meta http-equiv="X-UA-Compatible" content="IE=edge">
  <meta name="viewport" content="width=device-width, initial-scale=1.0">
  <title>Document</title>
</head>

<body onload="main()">
  <canvas id="webgl" width="400" height="400">
    Please use a browser that supports 'canvas'
  </canvas>
  <script src="../../lib/webgl-utils.js"></script>
  <script src="../../lib/webgl-debug.js"></script>
  <script src="../../lib/cuon-utils.js"></script>
  <script src="./HelloPoint1.js"></script>
</body>

</html>
HelloPoint1/HelloPoint1.js:
// 顶点着色器
const VSHADER_SOURCE =
  'void main() {\n' +
  // 设置坐标
  ' gl_Position = vec4(0.0, 0.5, 0.0, 1.0);\n' +
  // 设置尺寸
  ' gl_PointSize = 10.0;\n' +
  '}\n'

// 片元着色器
const FSHADER_SOURCE =
  'void main() {\n' +
  // 设置颜色
  ' gl_FragColor = vec4(0.0, 1.0, 0.0, 1.0);\n' +
  '}\n'

function main () {
  // 获取canvas元素
  const canvas = document.getElementById('webgl')

  // 获取WebGL上下文
  const gl = getWebGLContext(canvas)
  if (!gl) {
    return console.log('Failed to get the rendering context for WebGL')
  }

  // 初始化着色器
  if (!initShaders(gl, VSHADER_SOURCE, FSHADER_SOURCE)) {
    return console.log('Failed to initialize shaders')
  }

  // 设置canvas背景色
  gl.clearColor(0.0, 0.0, 0.0, 1.0)

  // 清空canvas
  gl.clear(gl.COLOR_BUFFER_BIT)

  // 绘制一个点
  gl.drawArrays(gl.POINTS, 0, 1)
}
2.3.2 着色器
2.3.1中提到了顶点着色器和片元着色器两种着色器,那么着色器究竟是什么呢?
2.3.2.1 顶点着色器(Vertex shader)
顶点着色器(Vertex shader):描述顶点特性(比如位置、大小等)的程序。顶点(vertex)是指二维或者三维空间中的一个点,比如二维或三维图形的端点或交点。
2.3.2.2 片元着色器(Fragment shader)
片元着色器(Fragment shader):进行逐片元处理过程如光照(见第八章“光照”)的程序。片元(fragment)是一个WebGL术语,可以理解为像素(图像的单元)。
其实严格来说,片元着色器应该是控制像素的位置、大小、颜色和其他信息。因为顶点着色器对位置和大小赋值后,会将这些信息传入片元着色器,之后片元着色器再根据这些信息和自定义的颜色进行像素的绘制。
2.3.2.3 着色器的作用
在三维场景中,仅仅用线条和颜色把图形画出来是远远不够的。我们必须考虑,光照和观察者视角发生变化,对场景产生的影响。而着色器可以高度灵活地完成这一工作,提供各种渲染效果,这也是如今的电脑能够如此逼真渲染三维场景的原因。因此在接下来的章节,我们将会仔细地研究着色器。
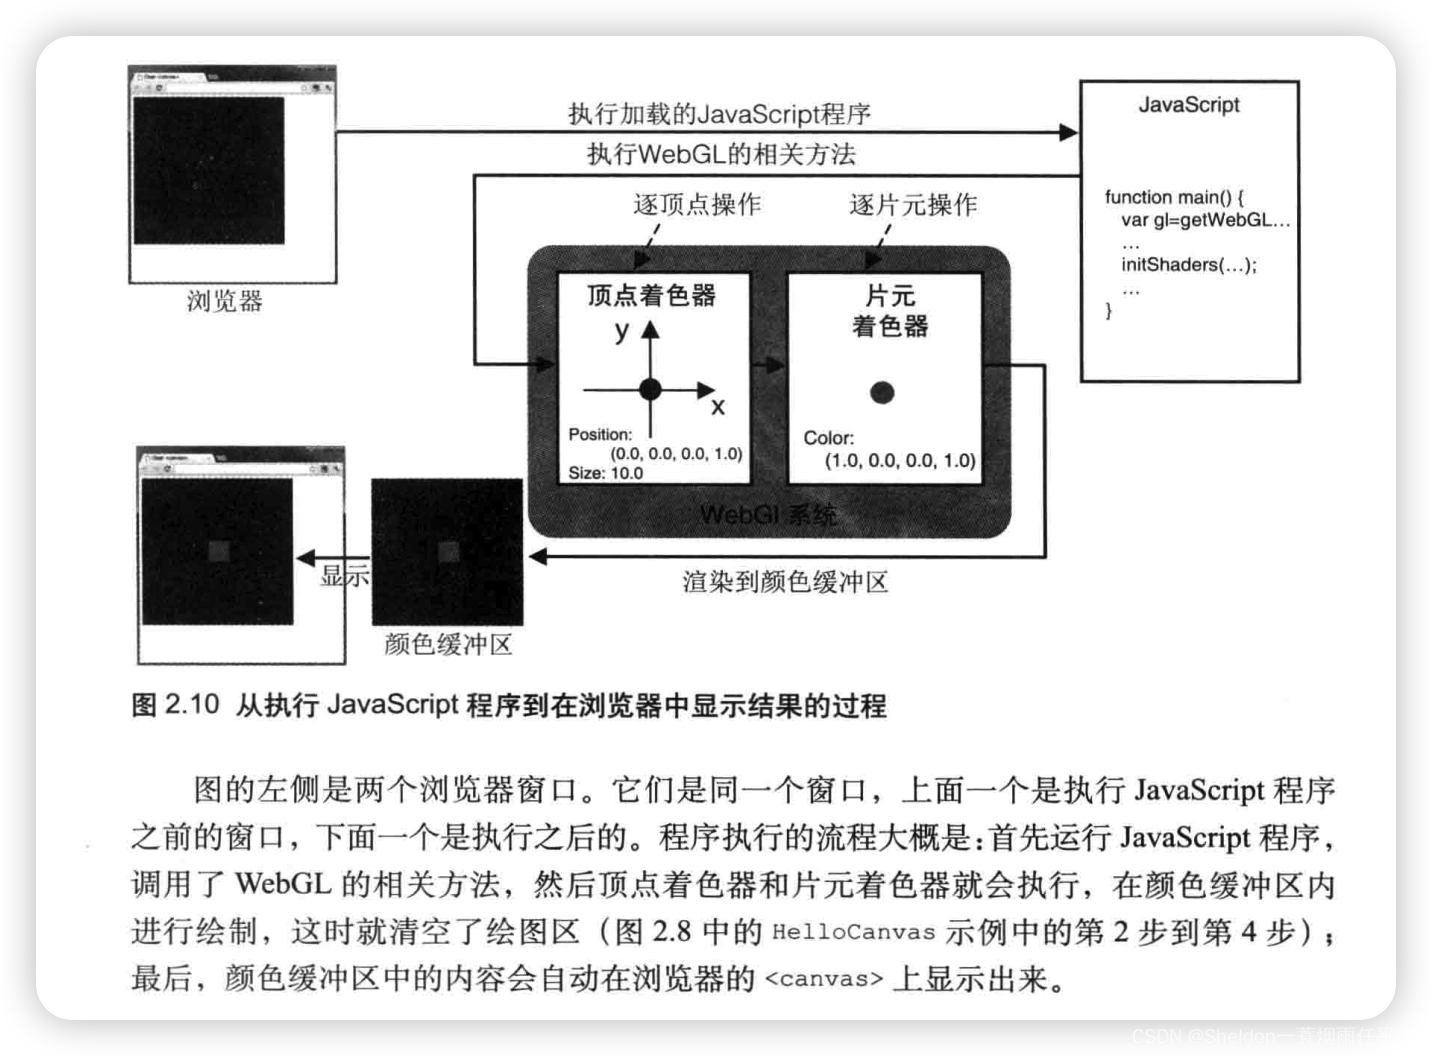
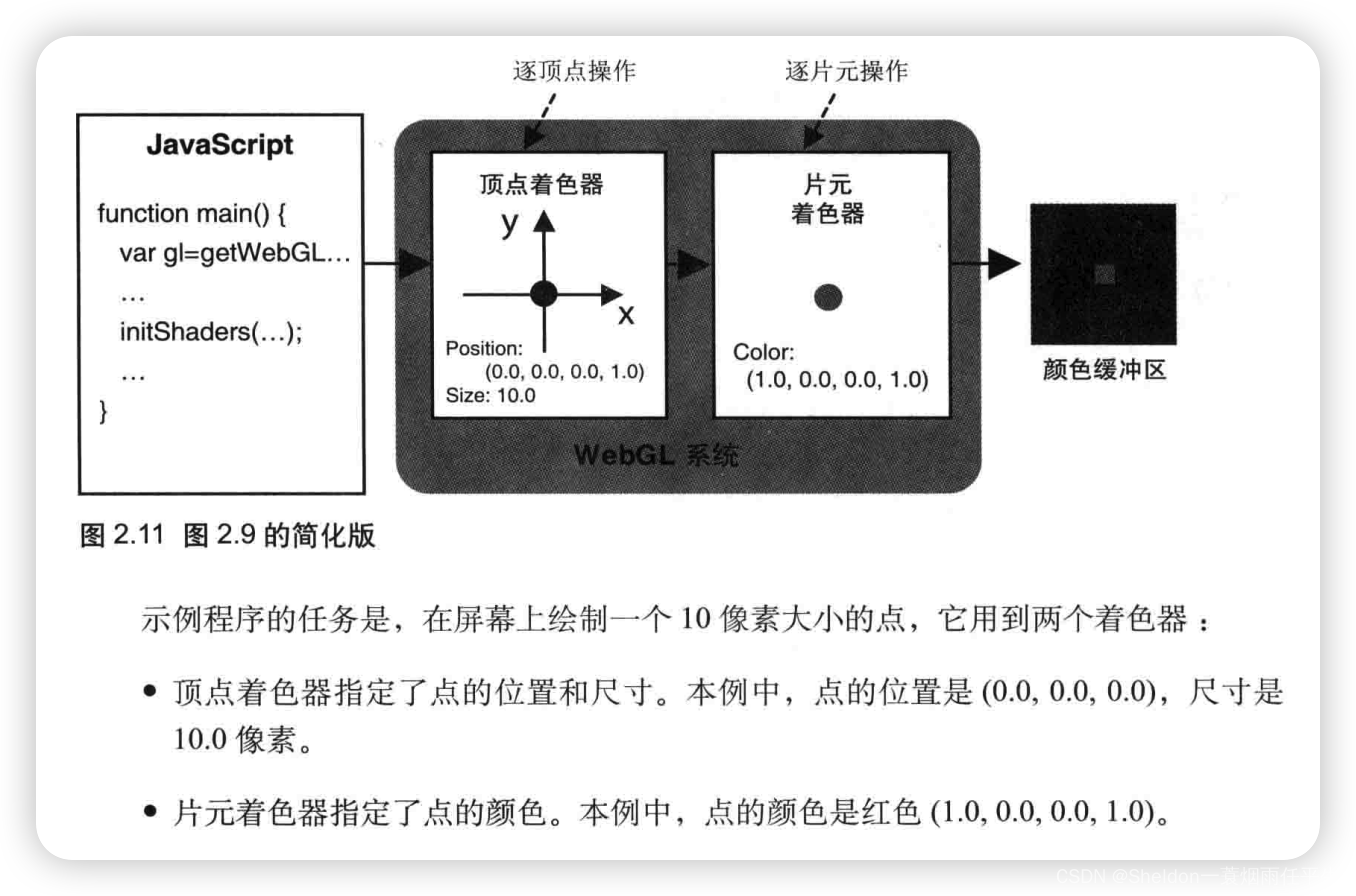
2.3.2.4 着色器的工作流程
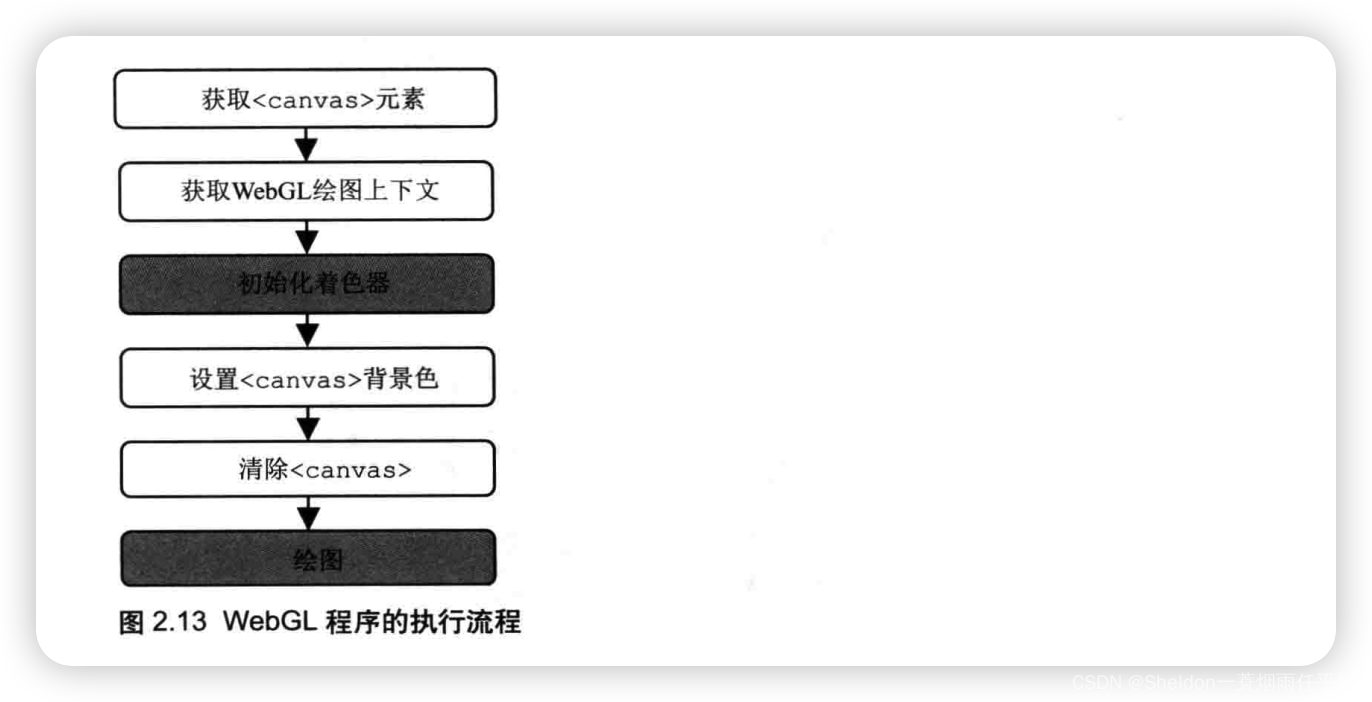
2.3.2.5 使用着色器的程序结构
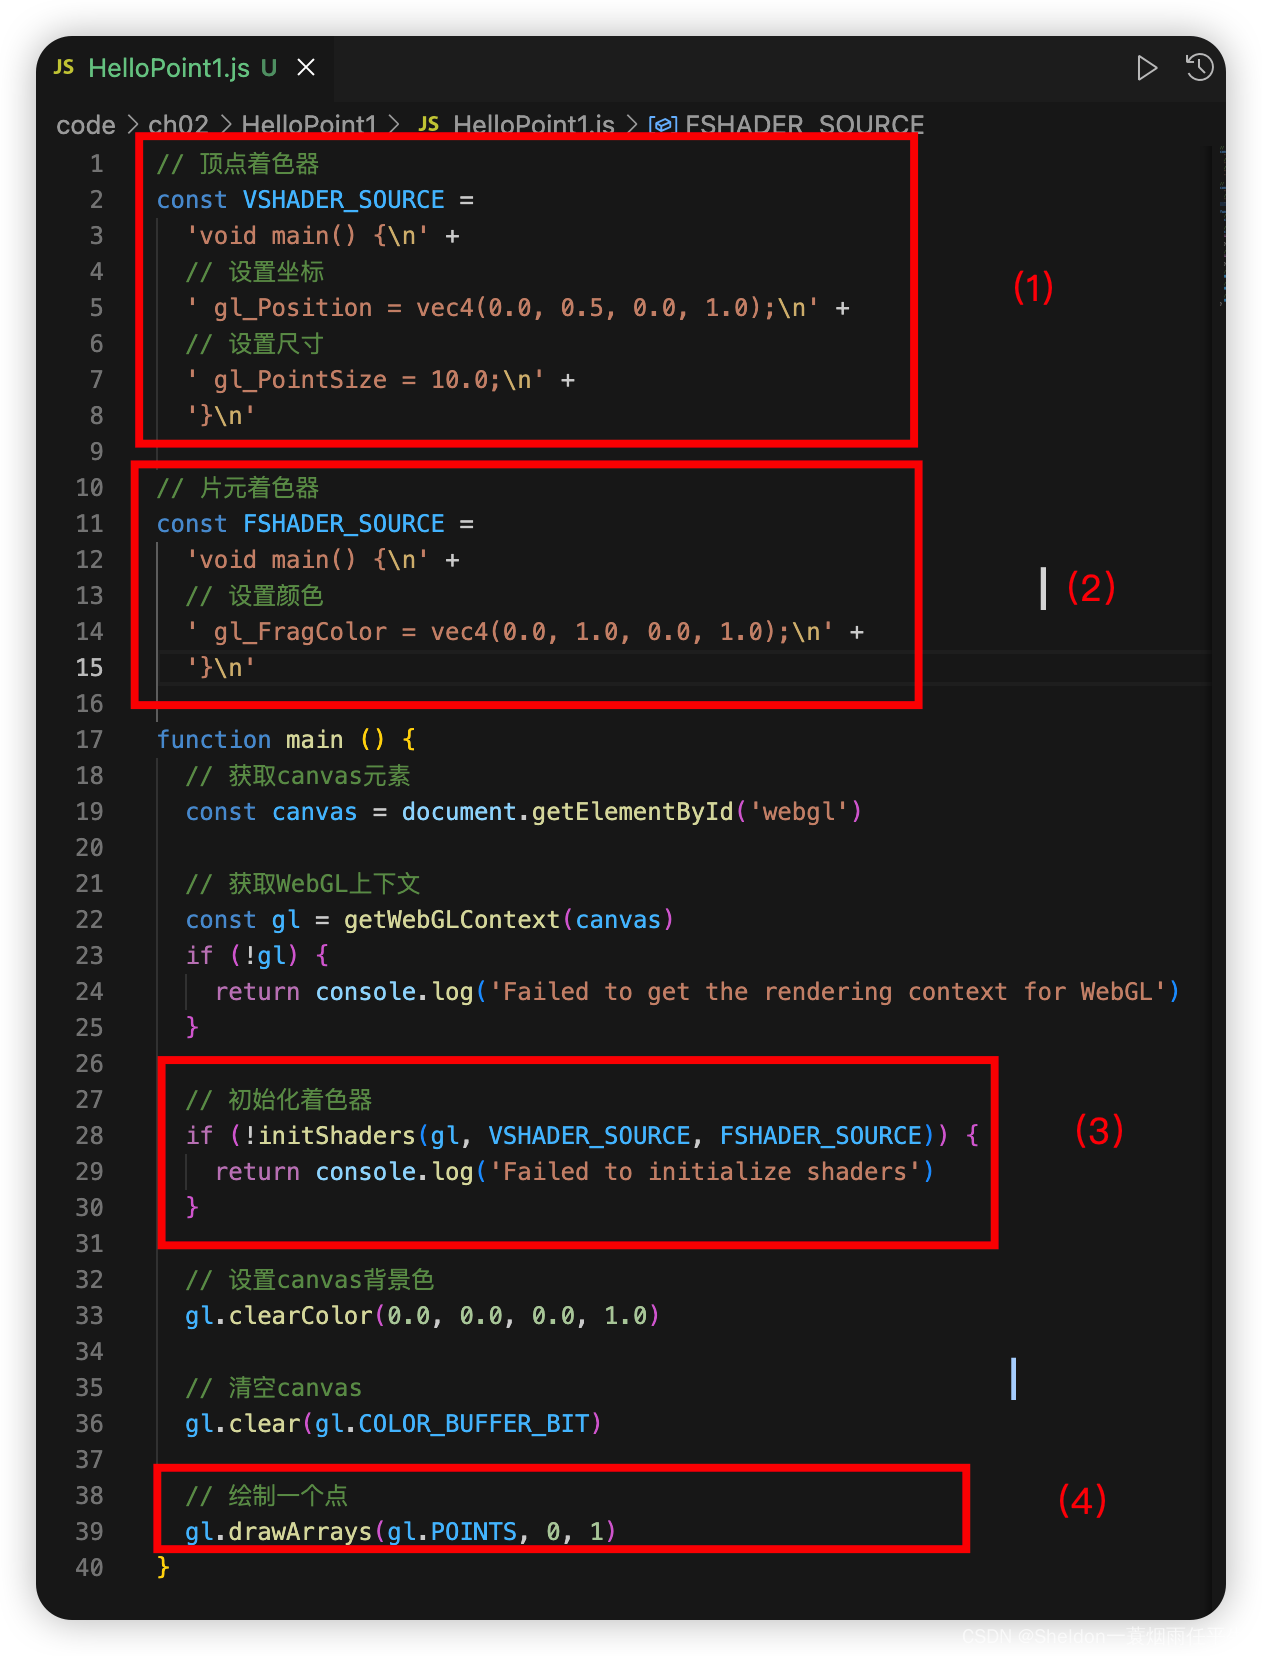
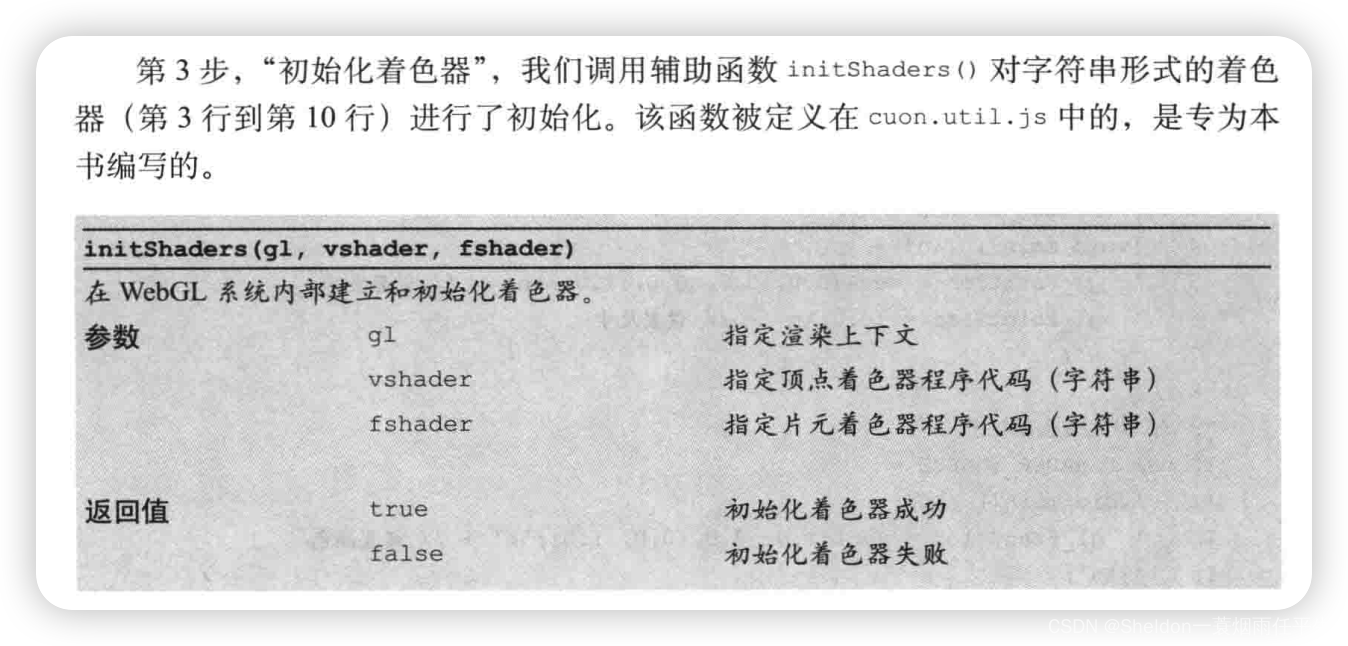
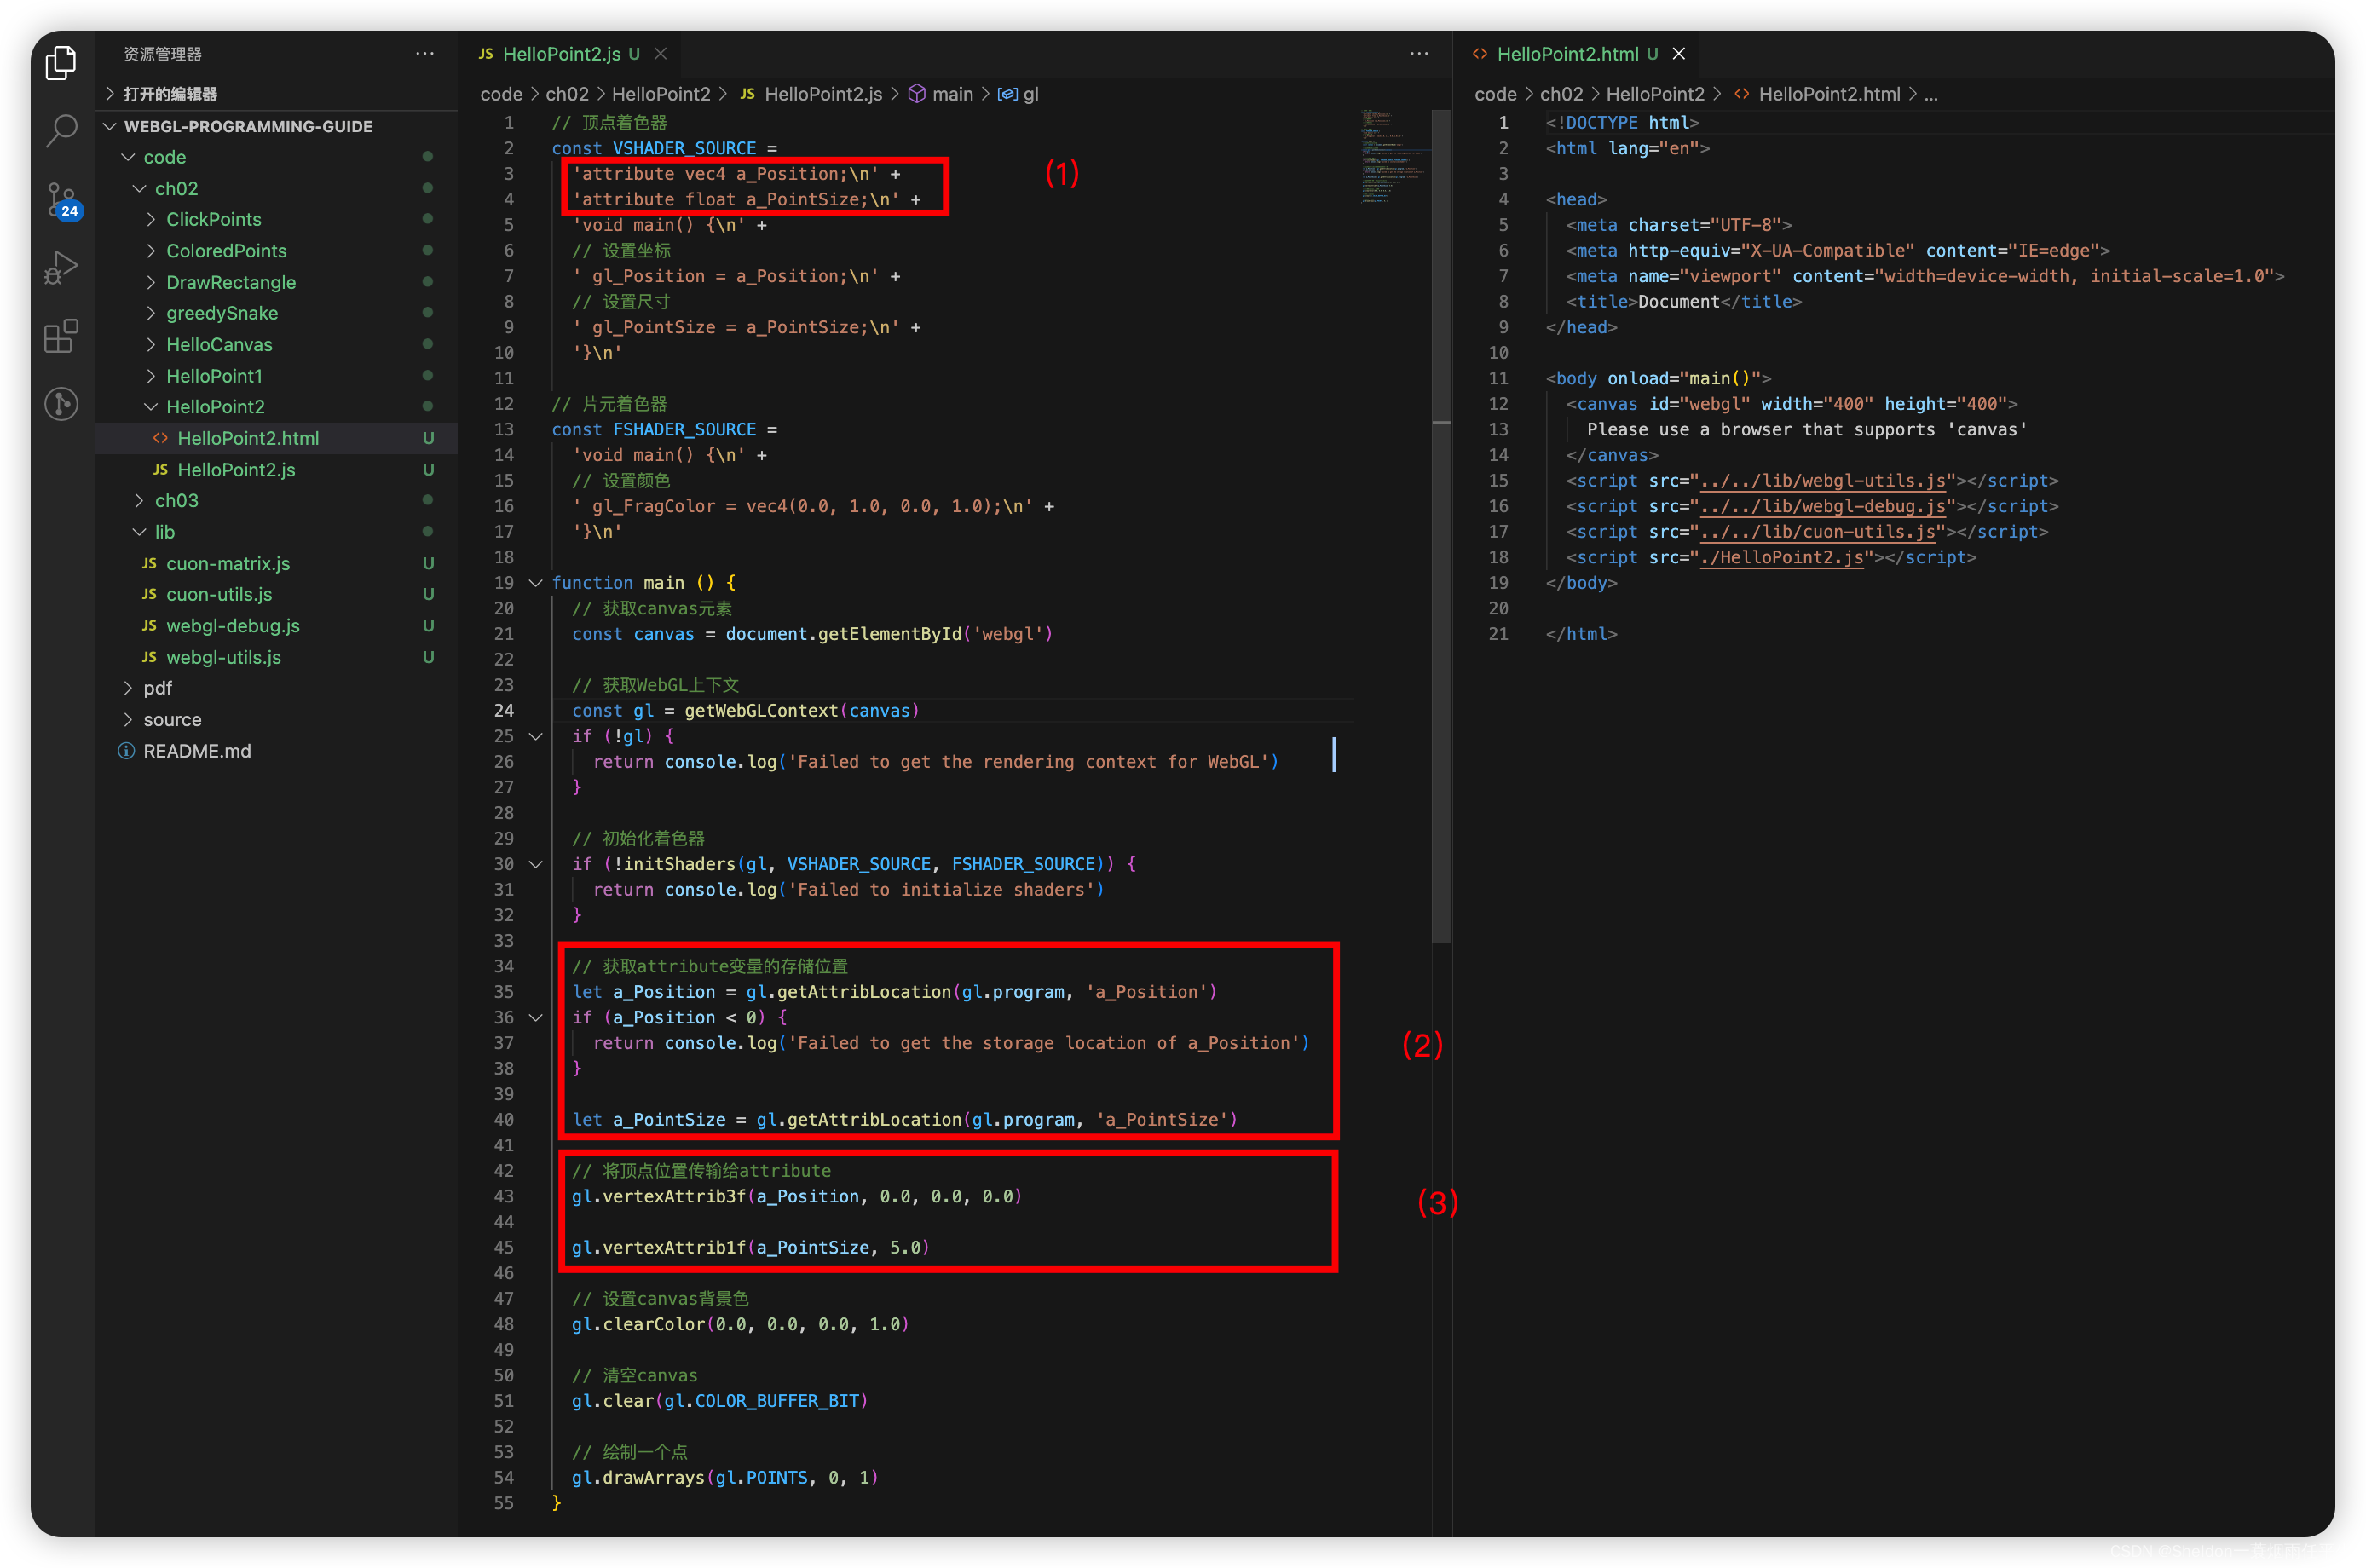
可以看到(1)(2)分别是顶点着色器和片元着色器的代码片段。不难看出,着色器语言程序是使用JavaScript字符串的形式(使用 \n 只是为了将代码分行,更加有助于观察)。
(3)是写在coun.util.js中的初始化着色器辅助函数,在第九章中会进行详细解析。我们现在直接使用即可。
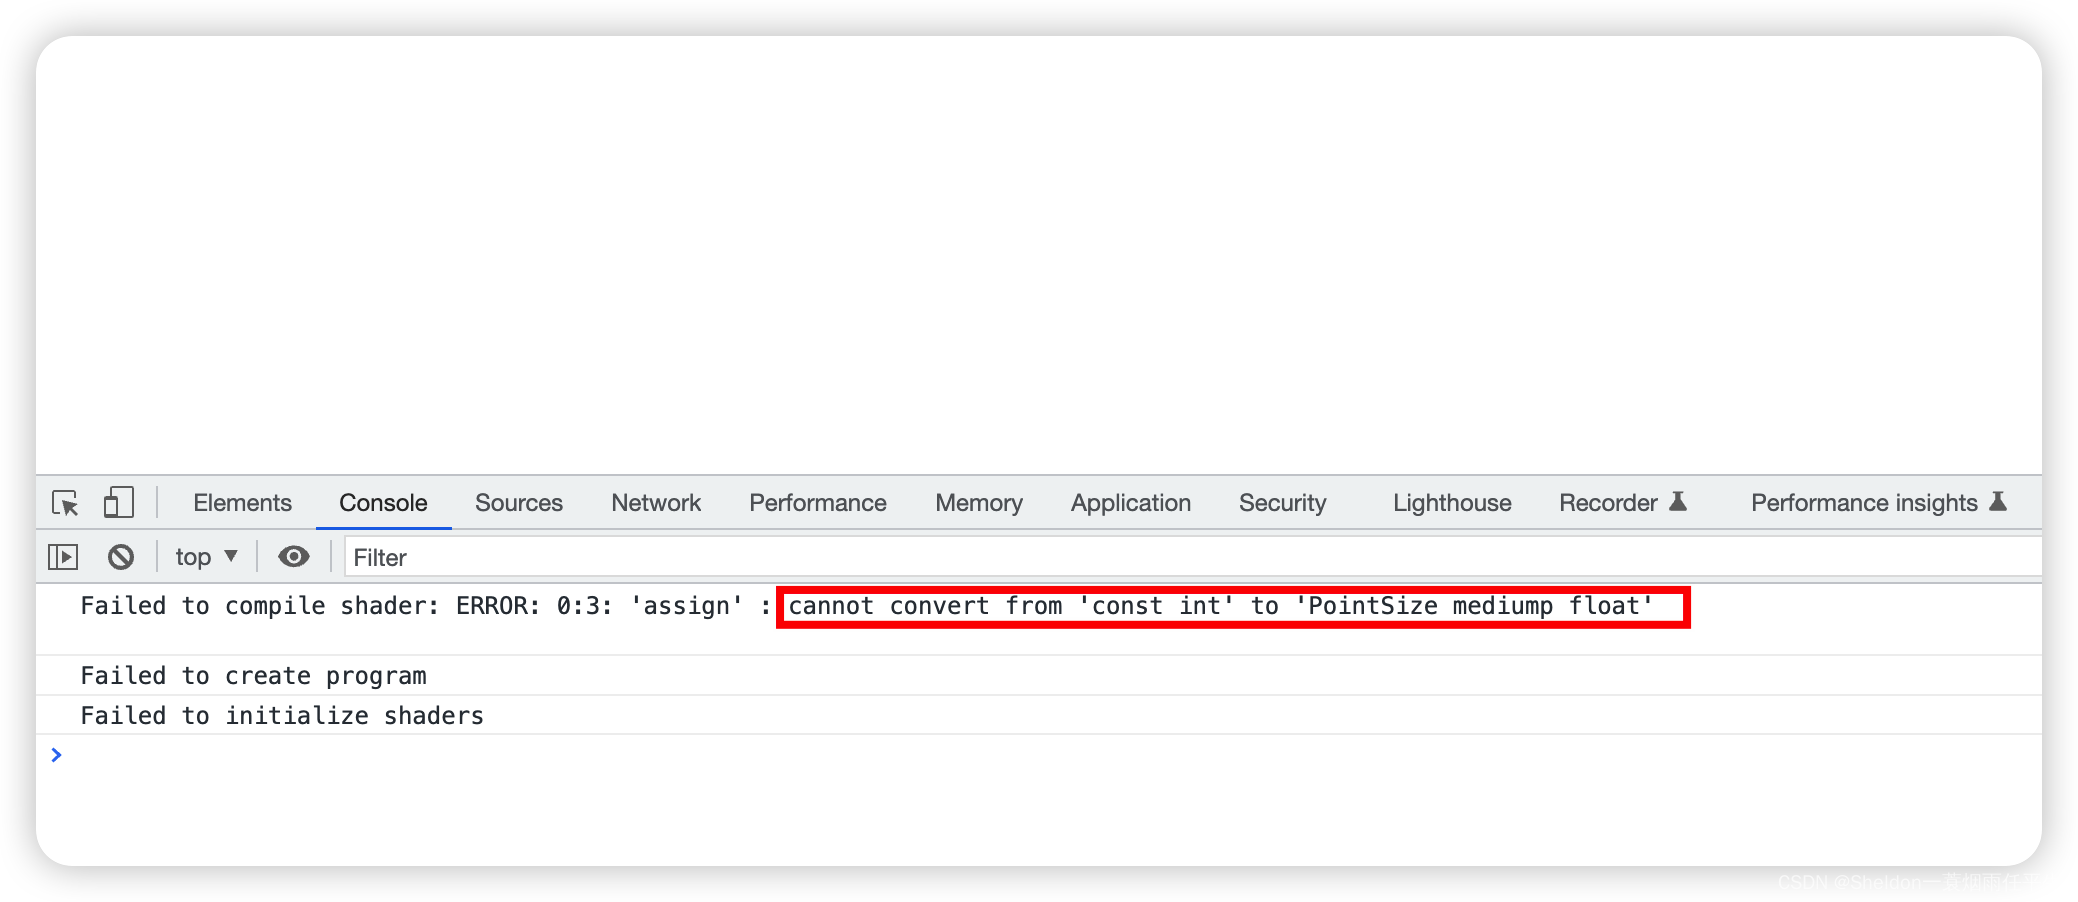
2.3.2.6 着色器语言(GLSL ES)是一种强类型语言
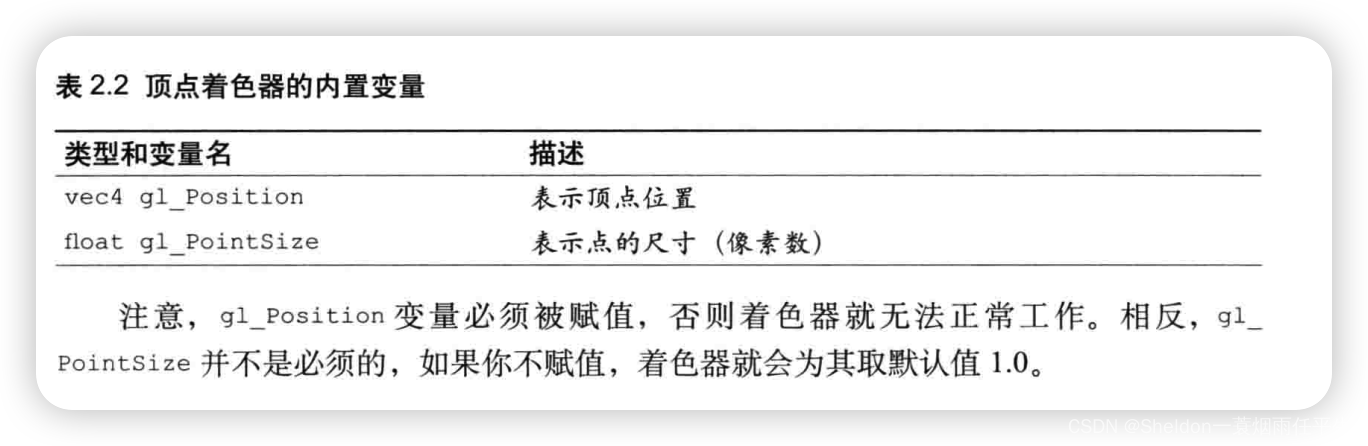
和JavaScript不同的是,着色器语言(GLSL ES)是一种强类型语言。如果你将
gl_PointSize = 10.0
修改为
gl_PointSize = 10
就会导致发生错误,画布渲染失败。
2.3.2.7 齐次坐标(由4个分量组成的矢量——使用矩阵描述顶点成为可能)
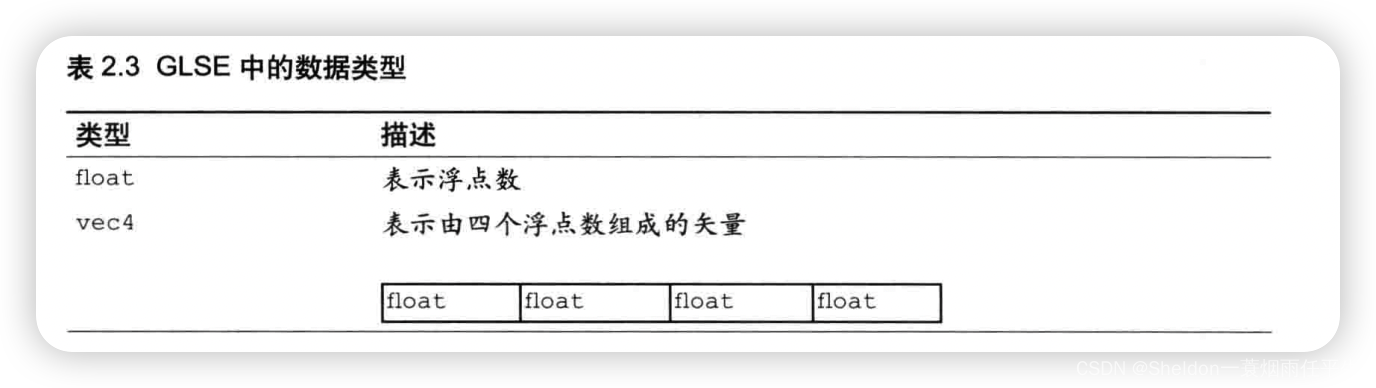
gl_Position = vec4(0.0, 0.5, 0.0, 1.0);
在我们的认知中,三维坐标就只需要3个方向的坐标。那为什么需要所谓的齐次坐标呢?
由4个分量组成的矢量,(x,y,z,w)等价于三维坐标(x/w, y/w, z/w),如果w是1,就可以将它当成三维坐标使用。w ≧ 0,如果w趋近于0,那么它表示的点就趋近于无穷远。也正是因为齐次坐标的存在,使得用矩阵来描述顶点变为可能。
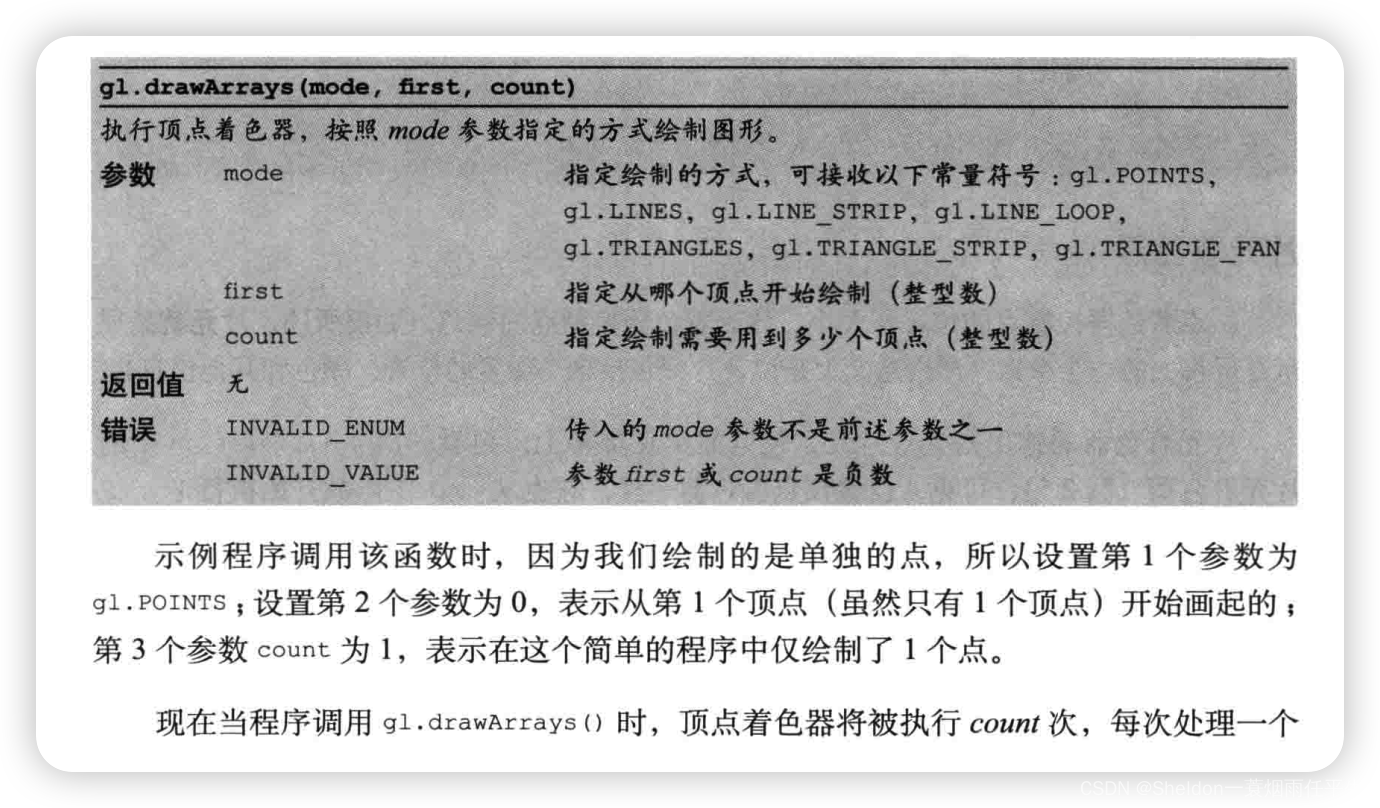
2.3.3 绘制操作(gl.drawArrays(mode, first, count))
// 绘制一个点
  gl.drawArrays(gl.POINTS, 0, 1)
2.3.4 WebGL坐标系
因为WebGL处理的是三维图形,所以使用三维坐标系(笛卡尔坐标系),具有x轴,y轴和z轴。通常情况下,我们是用右手坐标系(right-handed coordinate system),因为也可以用右手来表示。
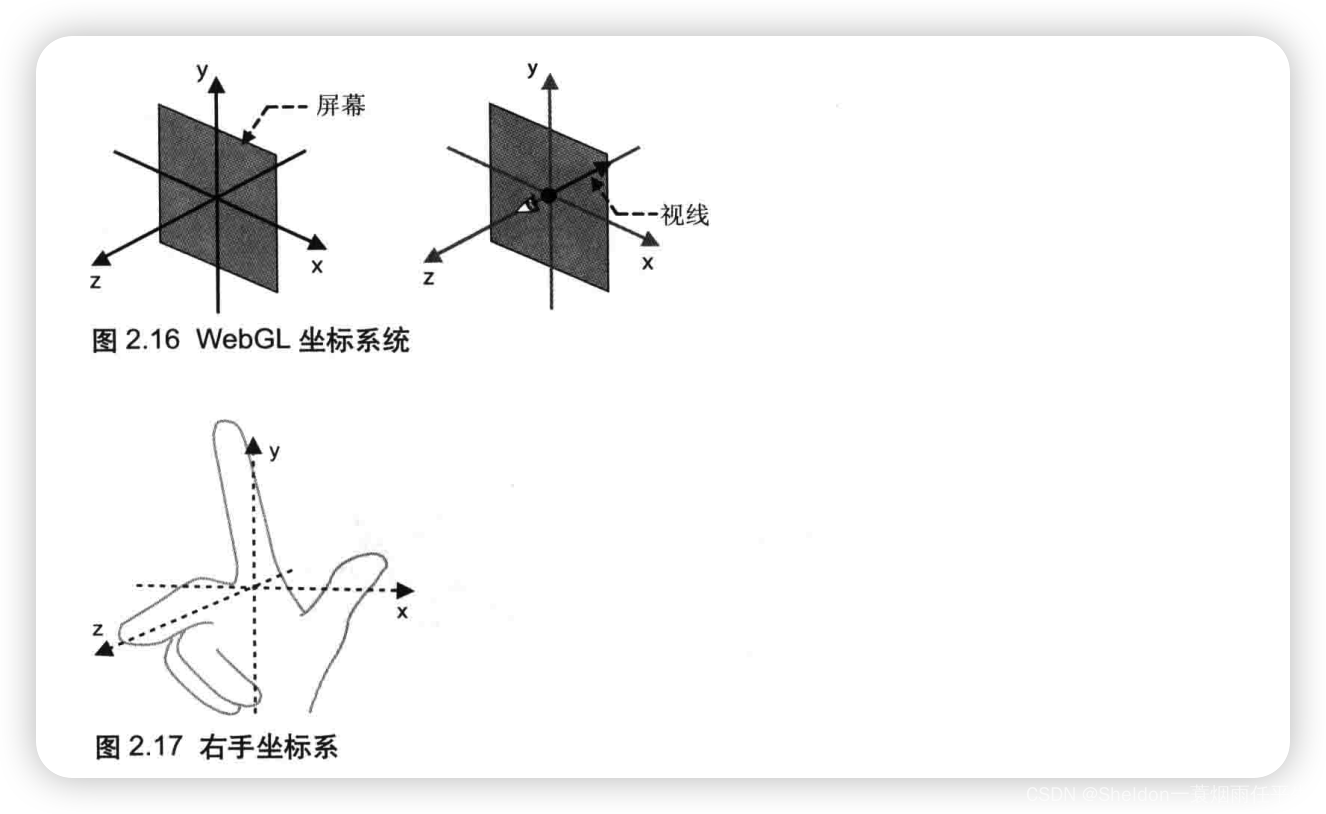
如图所示x轴水平向右为正方向,y轴垂直向上为正方向,z轴垂直于屏幕向外为正方向。
但是我们需要知道的是,WebGL本身即不是右手坐标系,也不是左手坐标系的,因为我们甚至可以设置坐标系的方向。不过现在把它当作右手坐标系使用即可。
2.3.4.1 坐标设置实验
因为目前我们还没有学会如何变换视角,所以z轴的设置对于我们而言没有任何效果,因此当前只研究x和y值的变化。
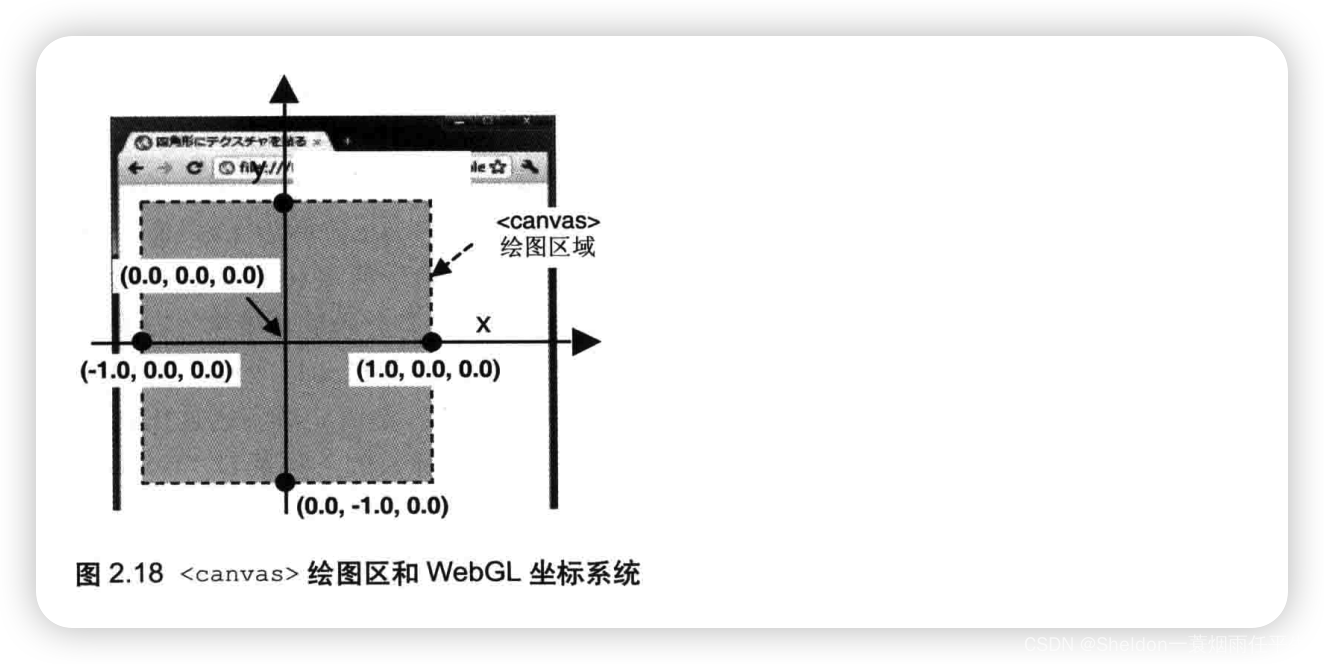
(1)点中心在canvas中心。
按照坐标系的理解,不难猜出(0.0,0.0,0.0)就是屏幕的中心点。
gl_Position = vec4(0.0, 0.0, 0.0, 1.0);
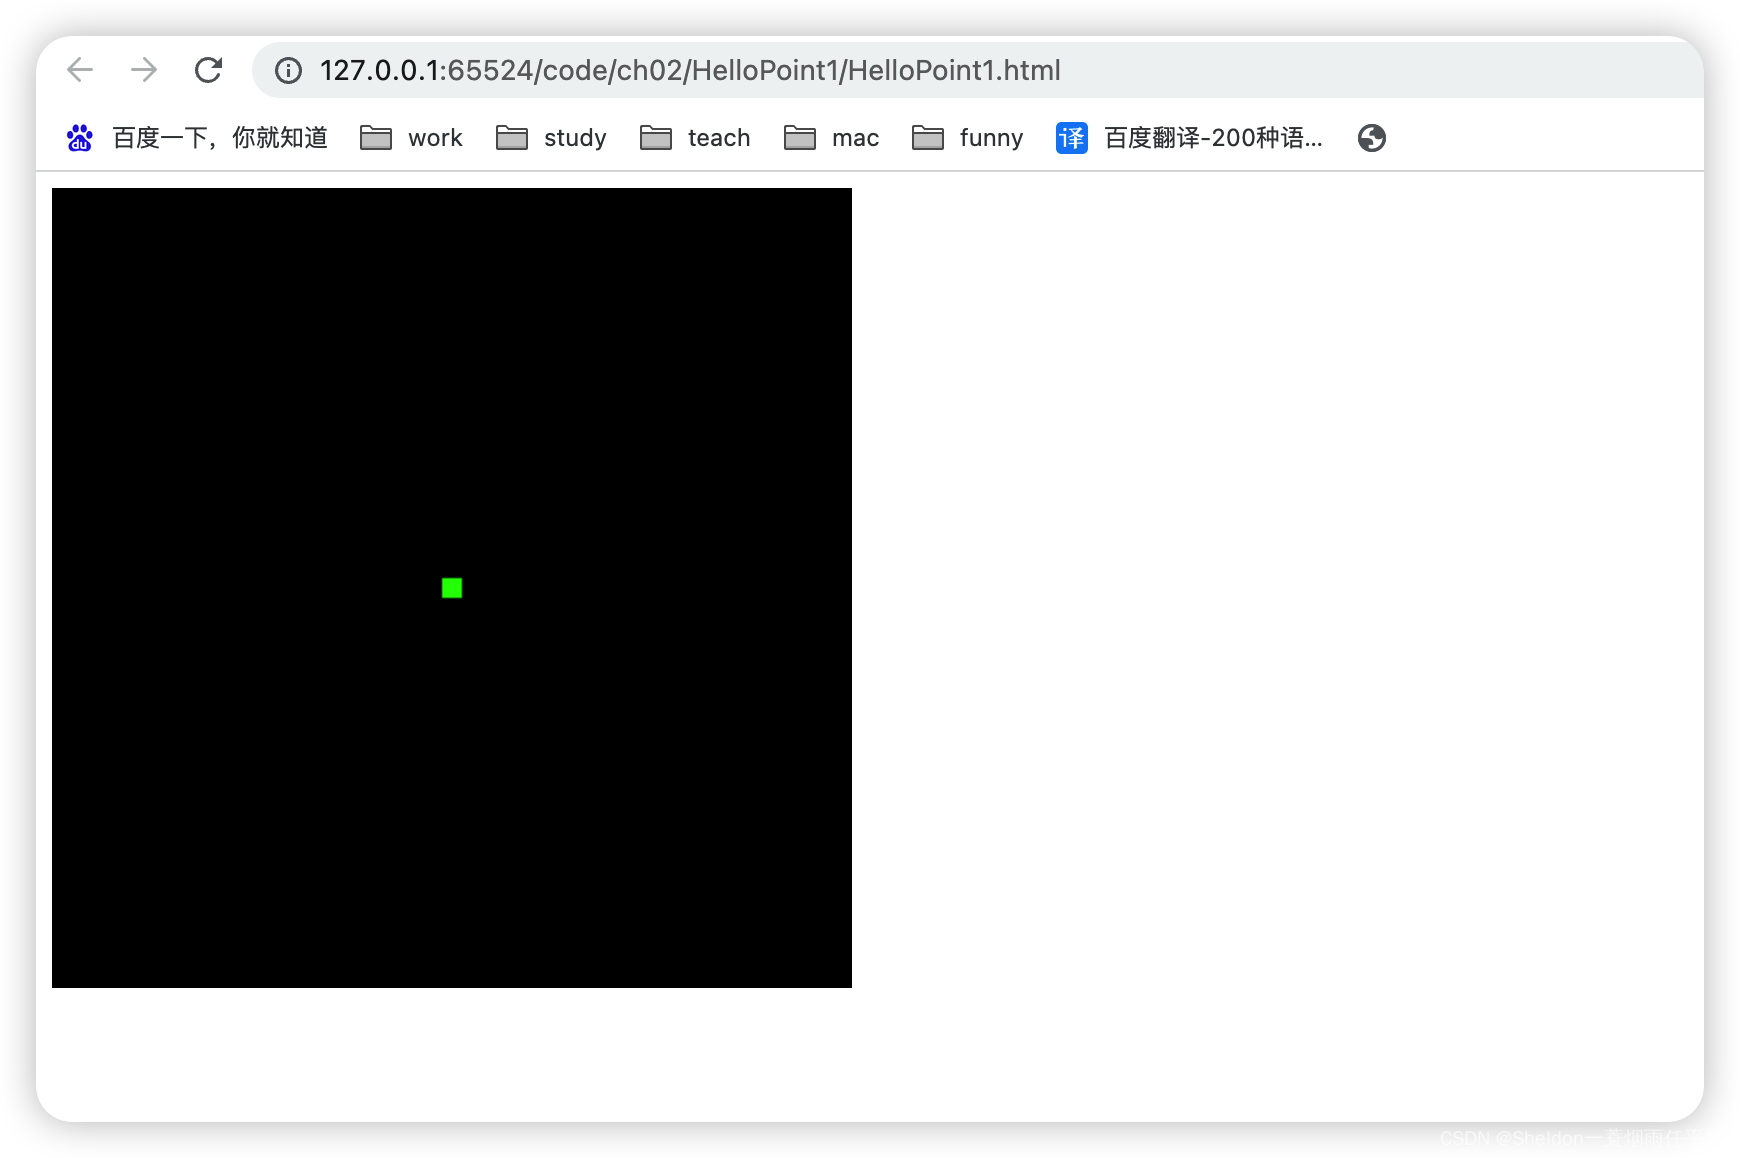
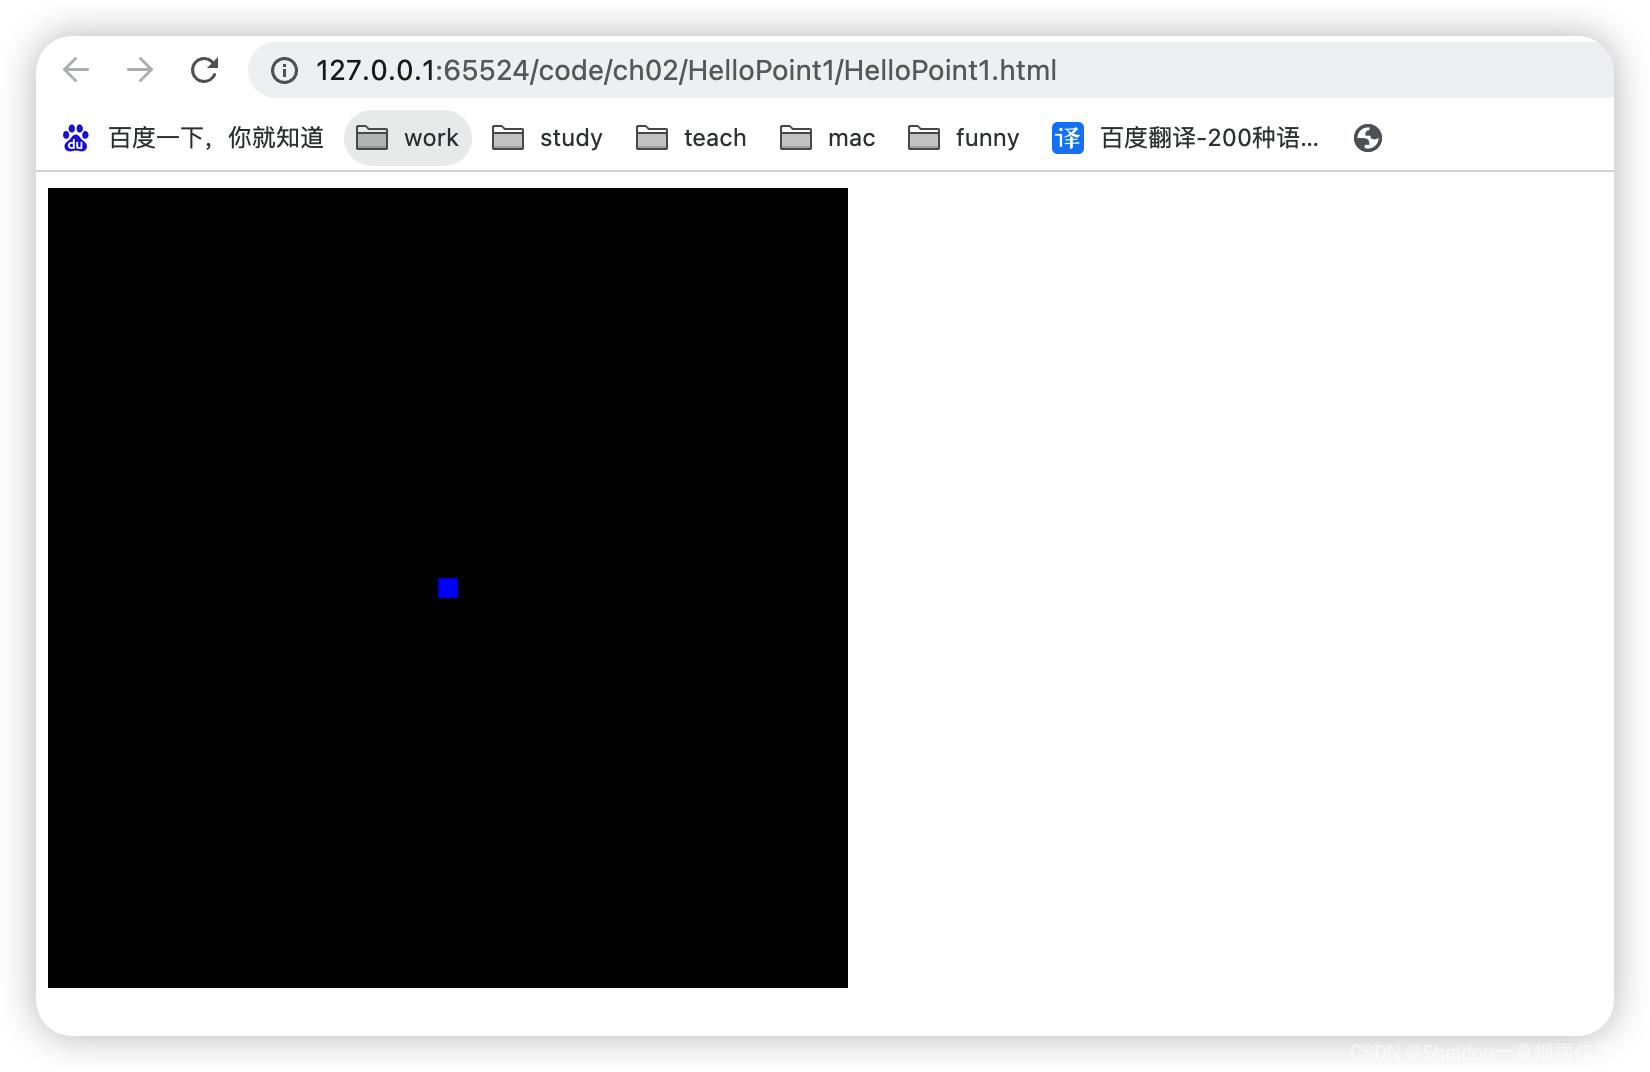
(2)点中心在canvas左上角。
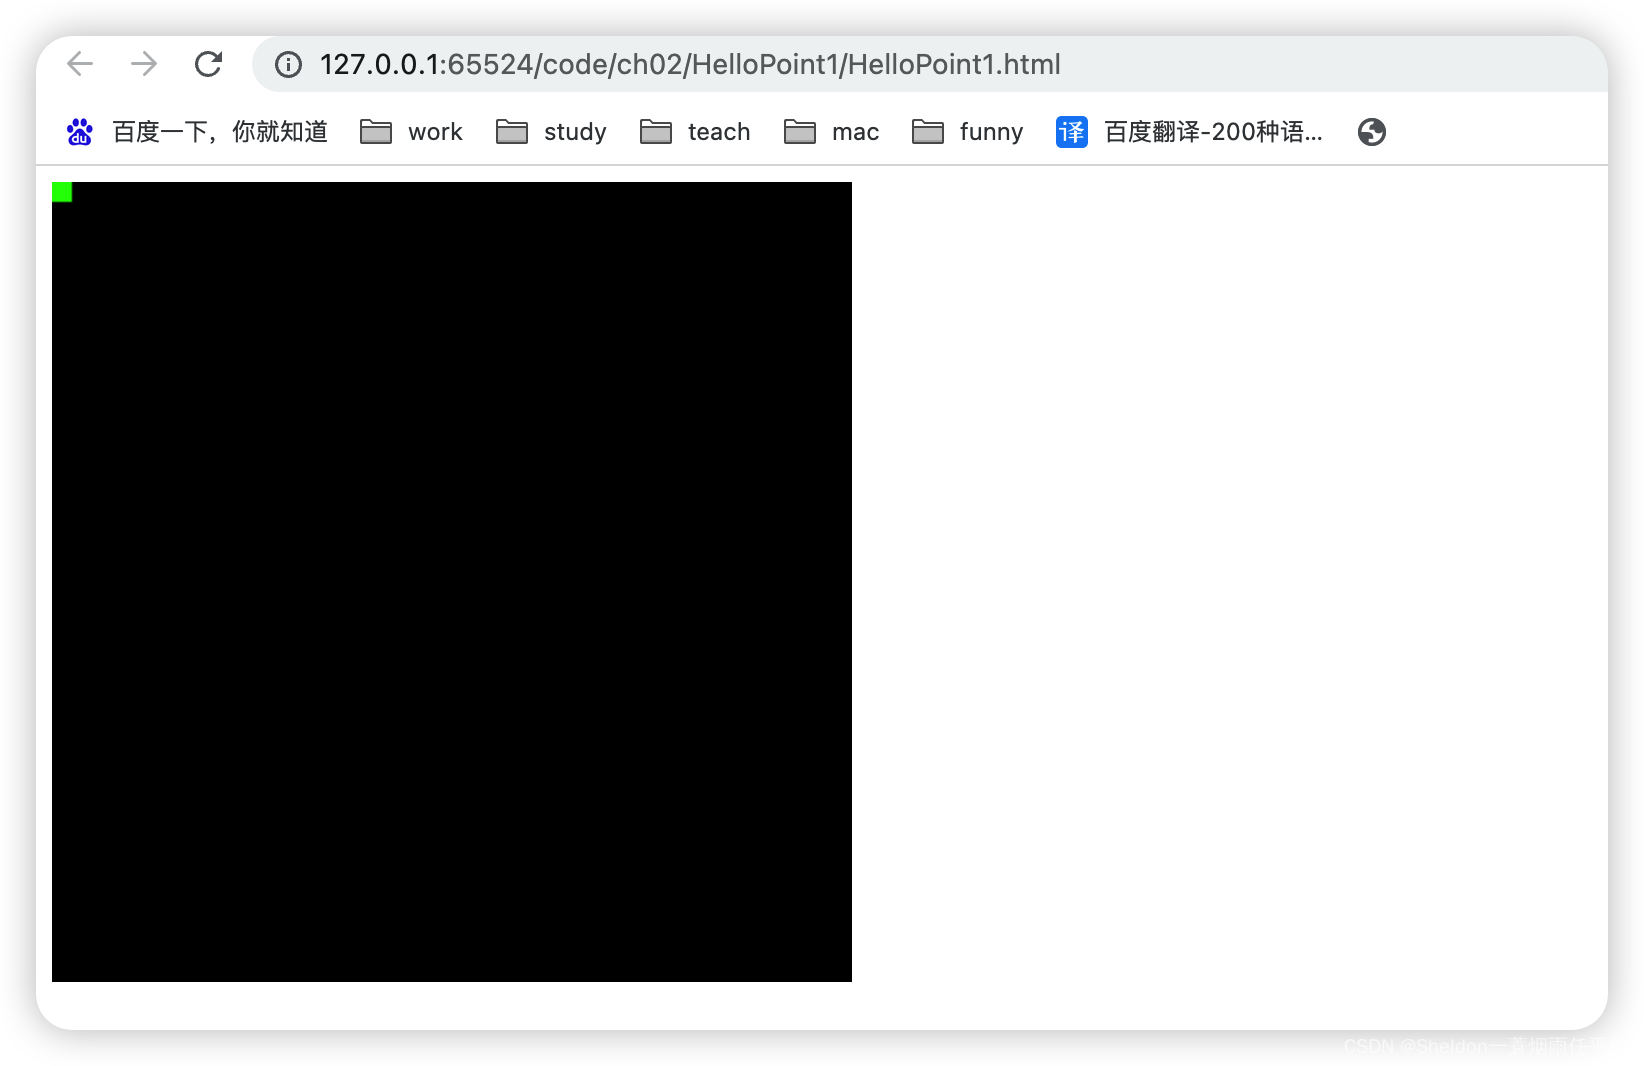
因为之前的示例gl_Position = vec4(0.0, 0.5, 0.0, 1.0)显示如下:
大概在中上二分之一处,因此可以推测,对于WebGL而言,是按照比例进行位置的设置,x和y的可视取值范围为[-1,1]。那左上角的坐标就是(-1.0,1.0,0.0)
gl_Position = vec4(-1.0, 1.0, 0.0, 1.0);

(3)点中心在canvas4个角落(由(2)可以推测)
左上角:(-1.0,1.0,0.0)
右上角:(1.0,1.0,0.0)
左下角:(-1.0,-1.0,0.0)
右下角:(1.0,-1.0,0.0)
(4)点的左上角在canvas左上角。
按照比例进行计算,x坐标 = - (canvs.width/2 - gl_PointSize/2) / (canvas.width/2) = - (200 - 5) / 200 = -0.975。
同理,y坐标 = (canvas.height/2 - gl_PointSize/2) / canvas.height/2 = 0.975
gl_Position = vec4(-0.975, 0.975, 0.0, 1.0);
(5)点的边缘在canvas4个角落(由(4)可以推测)
左上角:(-0.975, 0.975, 0.0)
右上角:(0.975, 0.975, 0.0)
左下角:(-0.975, -0.975, 0.0)
右下角:(0.975, -0.975, 0.0)
(6)坐标轴和canvas的交点
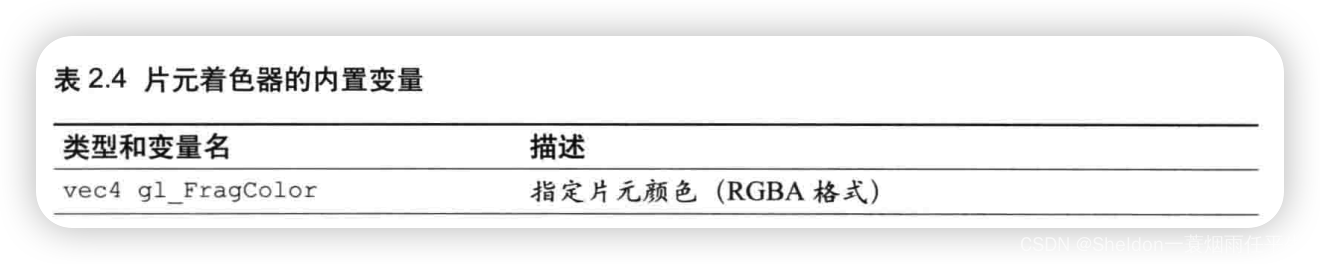
2.3.4.2 颜色设置实验
既然讲了坐标的设置,那么颜色的设置也一并说了吧。
按照我们平时的浏览器的颜色设置可知:rgba分别代表red(红色)、green(绿色)、blue(蓝色)、Alpha(透明度),并且r、g、b的取值范围是在[0,255]之间,a的取值范围是在[0,1]之间。所以 color: rgba(0.0, 1.0, 0.0, 1.0);表示的是一个接近黑色的颜色。
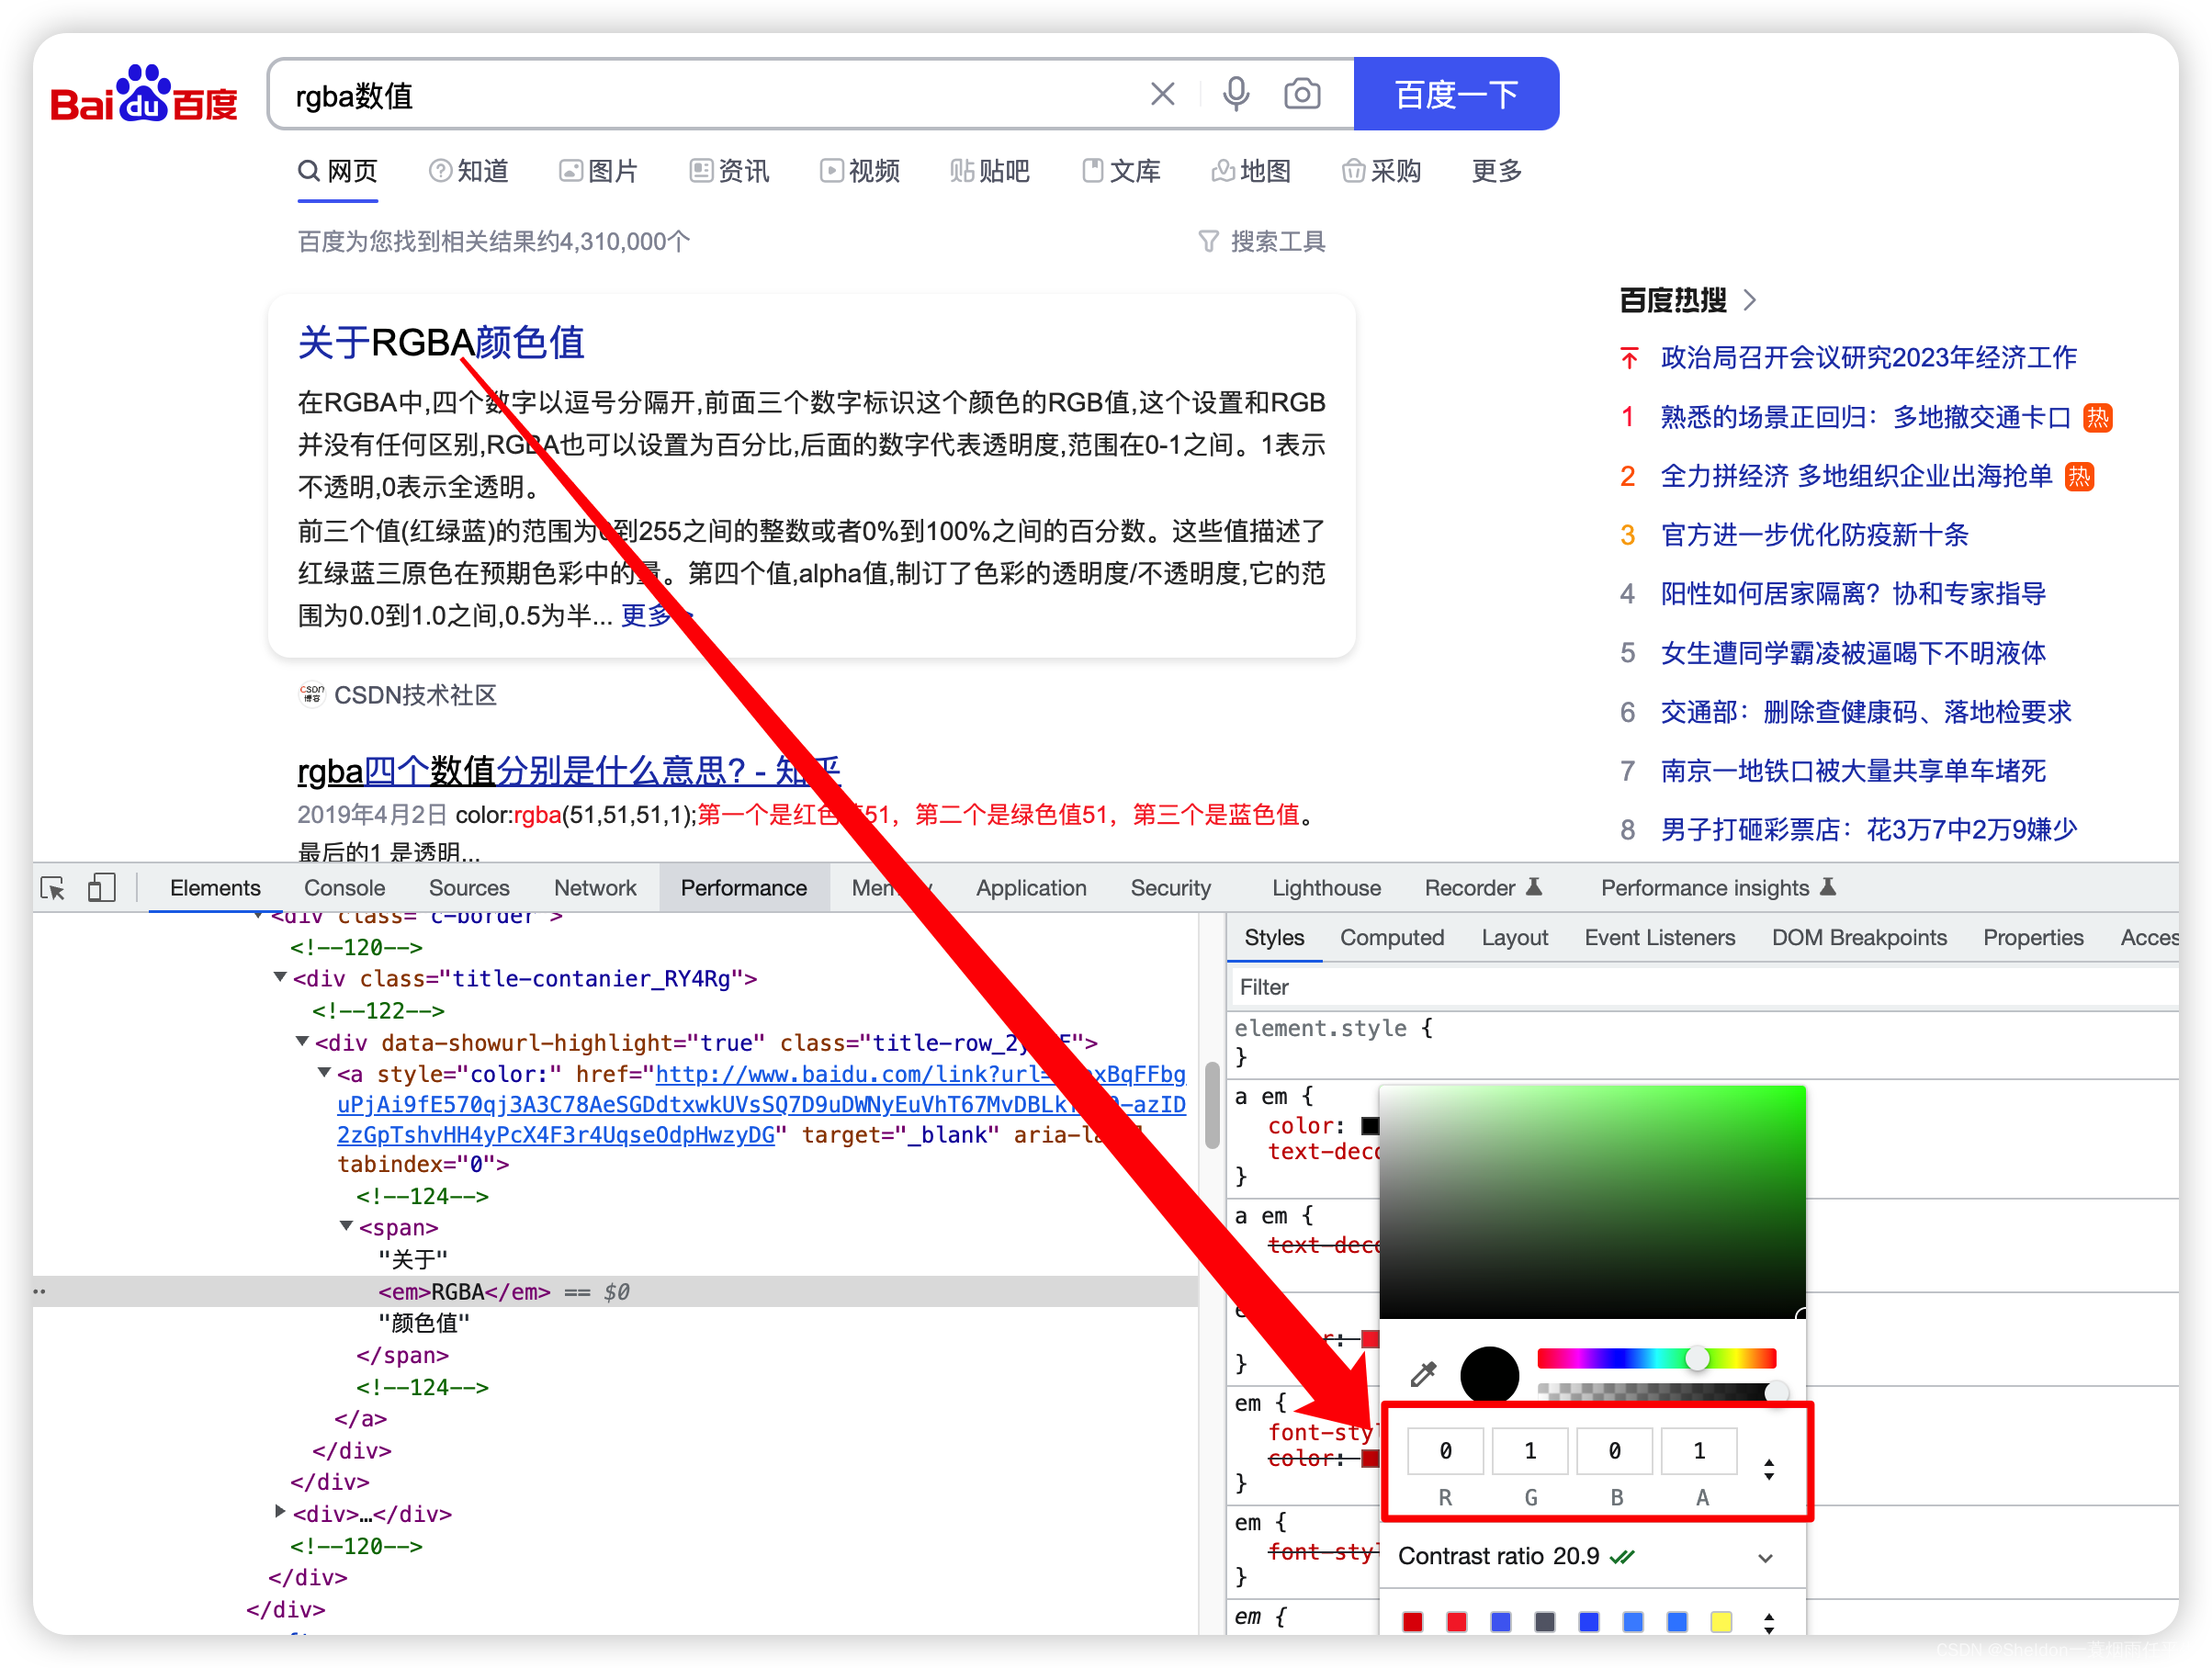
但是在之前的设置中gl_FragColor = vec4(0.0, 1.0, 0.0, 1.0);表示设置片元着色器为绿色。这就说明这里颜色的设置范围(或者说r、g、b的取值范围)是在[0,1]之间,按照比例进行压缩。
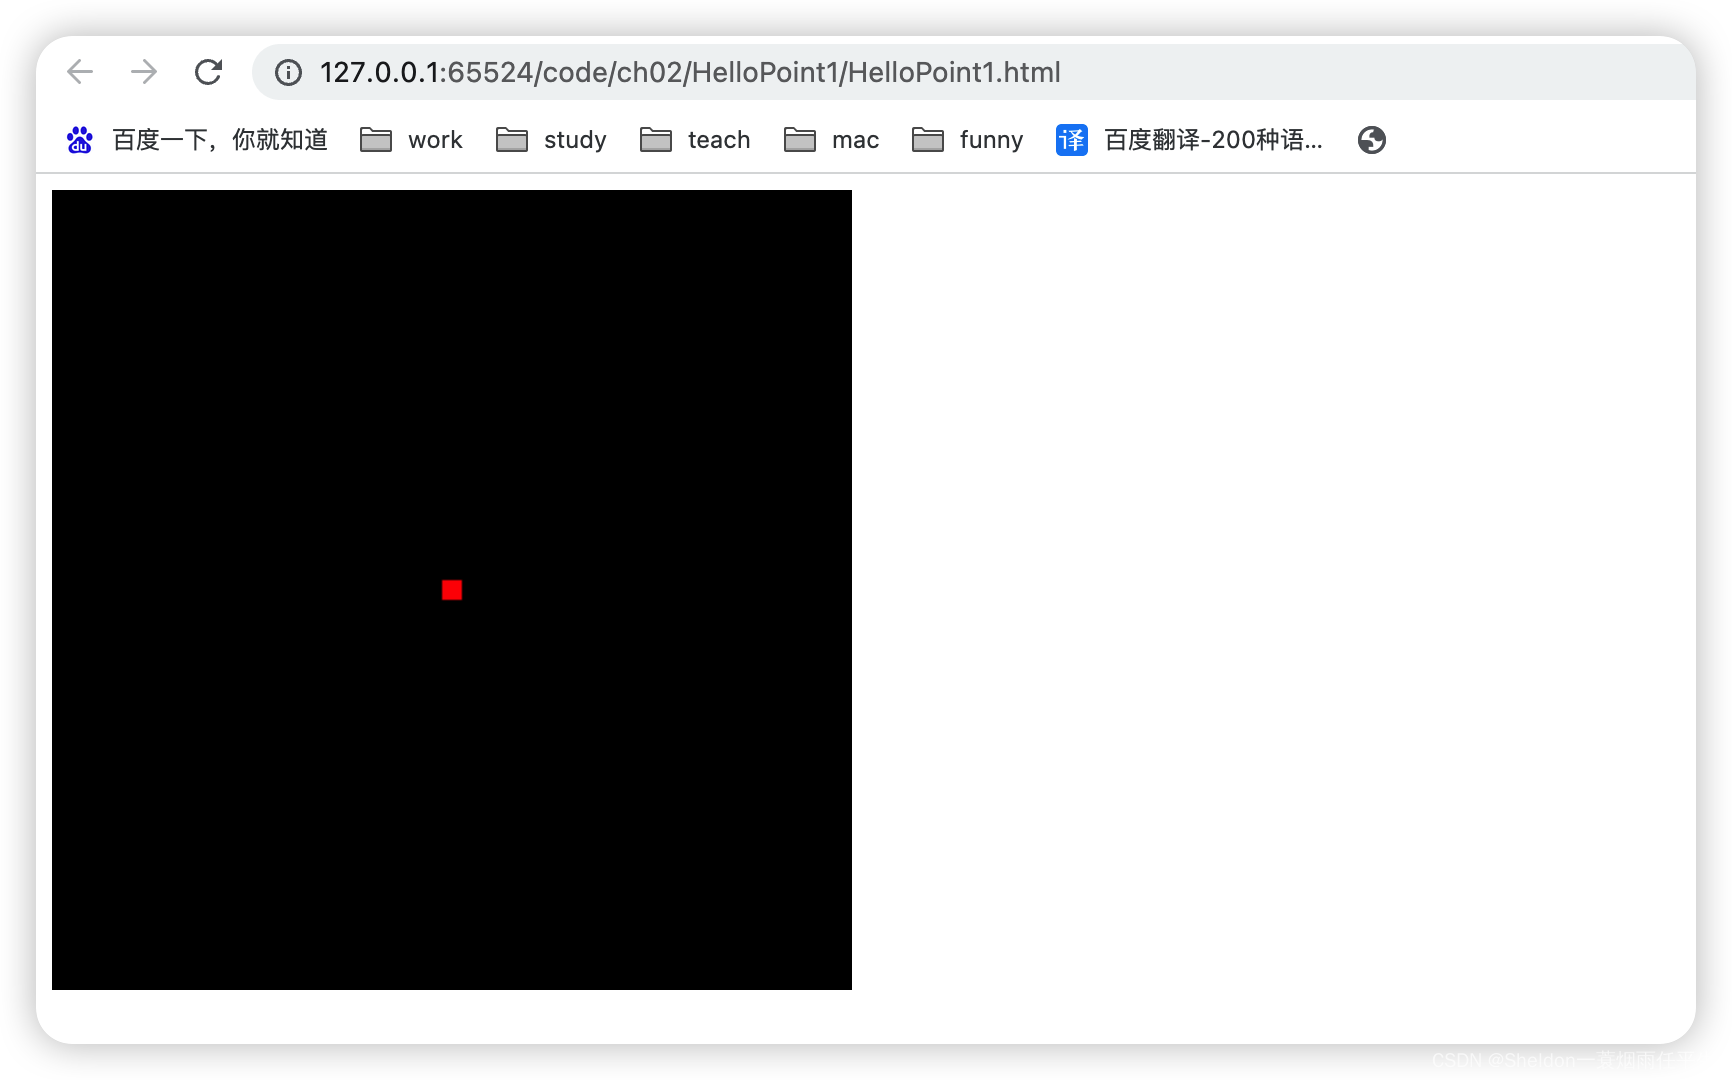
(1)设置红色
gl_FragColor = vec4(1.0, 0.0, 0.0, 1.0);
(2)设置蓝色
gl_FragColor = vec4(0.0, 0.0, 1.0, 1.0);
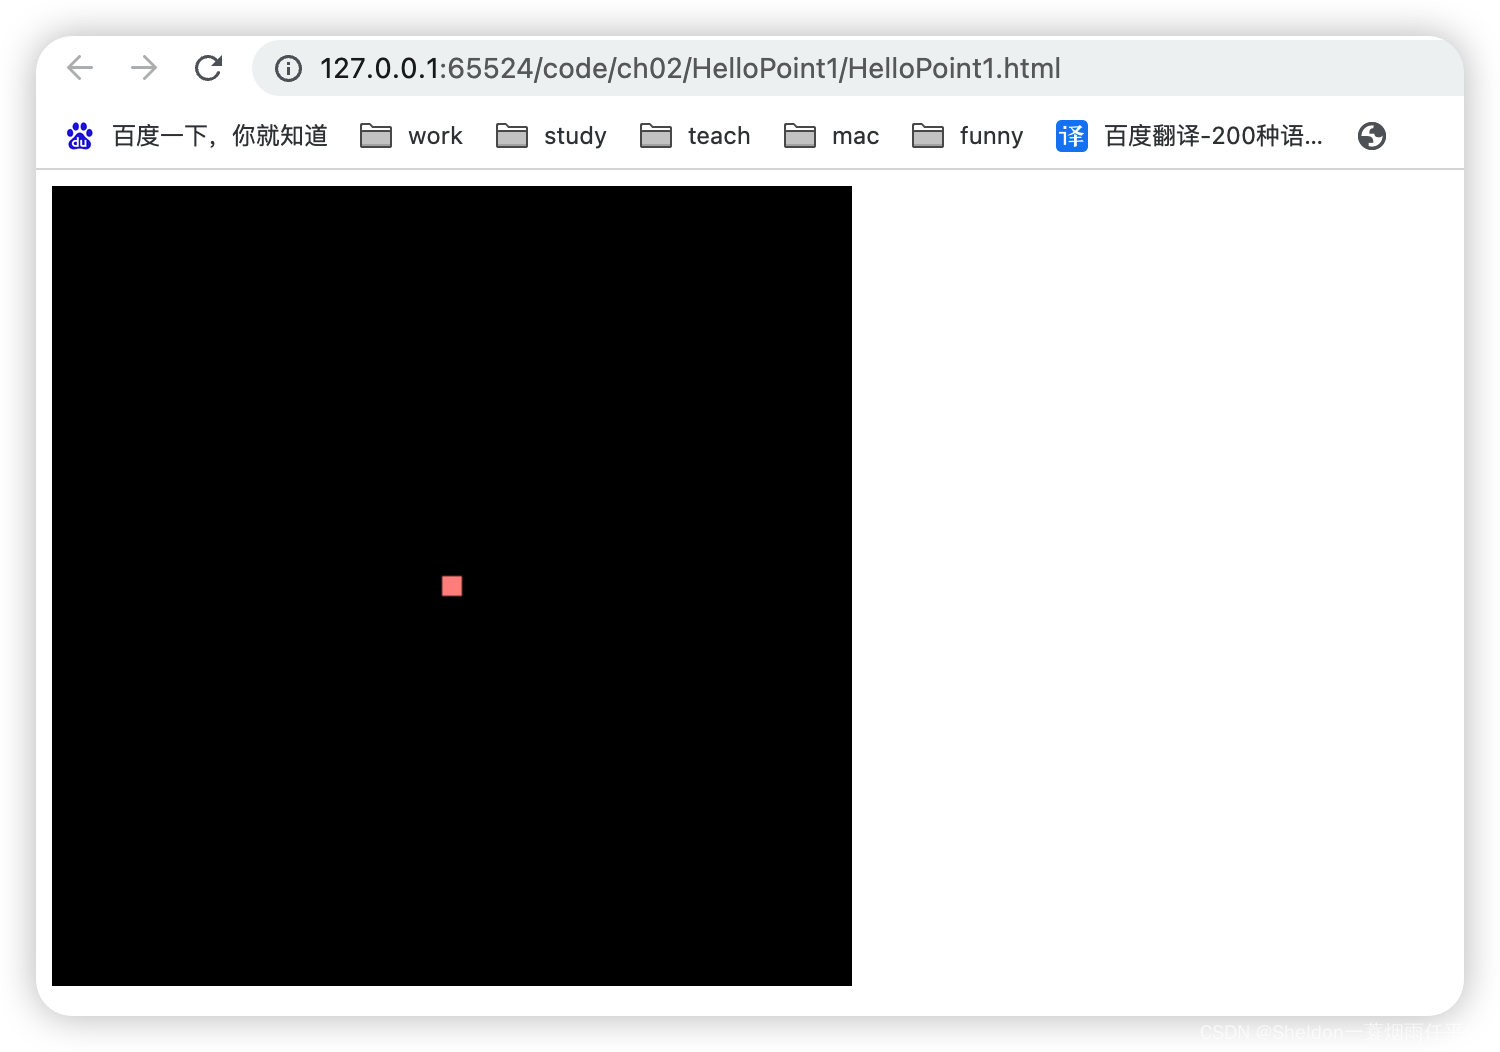
(3)其他颜色,比如粉色(红色降低数值,透明度降低)
gl_FragColor = vec4(0.5, 0.0, 0.0, 0.5);
2.4 绘制一个点(版本2——了解存储限定符)
2.4.1 示例代码
HelloPoint2/HelloPoint2.html:
<!DOCTYPE html>
<html lang="en">

<head>
  <meta charset="UTF-8">
  <meta http-equiv="X-UA-Compatible" content="IE=edge">
  <meta name="viewport" content="width=device-width, initial-scale=1.0">
  <title>Document</title>
</head>

<body onload="main()">
  <canvas id="webgl" width="400" height="400">
    Please use a browser that supports 'canvas'
  </canvas>
  <script src="../../lib/webgl-utils.js"></script>
  <script src="../../lib/webgl-debug.js"></script>
  <script src="../../lib/cuon-utils.js"></script>
  <script src="./HelloPoint2.js"></script>
</body>

</html>
HelloPoint2/HelloPoint2.js:
// 顶点着色器
const VSHADER_SOURCE =
  'attribute vec4 a_Position;\n' +
  'attribute float a_PointSize;\n' +
  'void main() {\n' +
  // 设置坐标
  ' gl_Position = a_Position;\n' +
  // 设置尺寸
  ' gl_PointSize = a_PointSize;\n' +
  '}\n'

// 片元着色器
const FSHADER_SOURCE =
  'void main() {\n' +
  // 设置颜色
  ' gl_FragColor = vec4(0.0, 1.0, 0.0, 1.0);\n' +
  '}\n'

function main () {
  // 获取canvas元素
  const canvas = document.getElementById('webgl')

  // 获取WebGL上下文
  const gl = getWebGLContext(canvas)
  if (!gl) {
    return console.log('Failed to get the rendering context for WebGL')
  }

  // 初始化着色器
  if (!initShaders(gl, VSHADER_SOURCE, FSHADER_SOURCE)) {
    return console.log('Failed to initialize shaders')
  }

  // 获取attribute变量的存储位置
  let a_Position = gl.getAttribLocation(gl.program, 'a_Position')
  if (a_Position < 0) {
    return console.log('Failed to get the storage location of a_Position')
  }

  let a_PointSize = gl.getAttribLocation(gl.program, 'a_PointSize')

  // 将顶点位置传输给attribute
  gl.vertexAttrib3f(a_Position, 0.0, 0.0, 0.0)

  gl.vertexAttrib1f(a_PointSize, 5.0)

  // 设置canvas背景色
  gl.clearColor(0.0, 0.0, 0.0, 1.0)

  // 清空canvas
  gl.clear(gl.COLOR_BUFFER_BIT)

  // 绘制一个点
  gl.drawArrays(gl.POINTS, 0, 1)
}
2.4.2 顶点着色器设置变量(attribute变量)
2.4.2.1 存储限定符
在2.3的示例中,我们的顶点着色器和片元着色器的变量都是直接使用字符串写死的,导致无法动态设置。WebGL于是就想了个办法,用于设置着色器中的变量,并且在JavaScript中能够获取到该变量,之后再进行设置。
根据传输数据的内容,可以将变量分为attribute变量(即attribute存储限定符表示的变量)和uniform变量(即uniform存储限定符表示的变量。
值得注意的是,attribute变量和uniform变量只和传输的内容有关,和它本身的数据格式并没有任何关联,这样的符号叫做存储限定符。
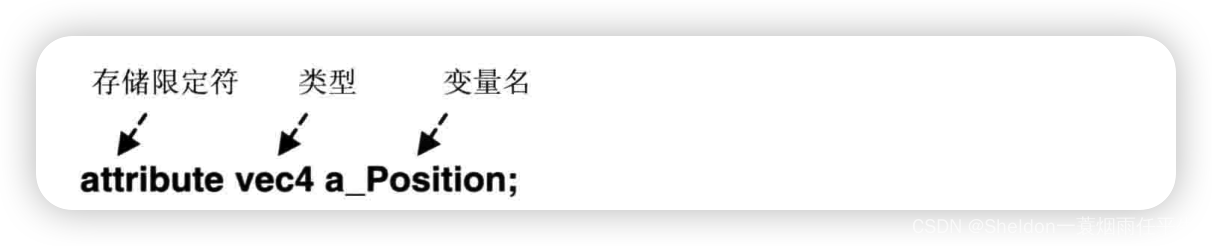
2.4.2.2 attribute存储限定符
attribute存储限定符:表示传输的是和顶点相关的数据,比如顶点的位置、大小。
2.4.2.3 uniform存储限定符
uniform存储限定符:表示传输的是那些对于顶点都相同(或者与顶点无关)的数据,比如颜色。
大家可能会奇怪,为什么颜色会和顶点无关呢?其实我也想不通,但是换个角度理解,attribute变量传递顶点的位置和颜色,这确实和顶点有关。但是颜色,是由画笔绘制的,也就是片元着色器进行处理的部分,那似乎就说得通了。
2.4.2.4 设置着色器变量步骤
(1)在顶点着色器中,设置attribute变量(告诉着色器我设置了一个和顶点有关的变量);
(2)将attribute变量赋值给gl_Position变量(将设置的变量地址拿到主程序中);
(3)向attribute传输变量(给变量赋值)。
2.4.3 相关API
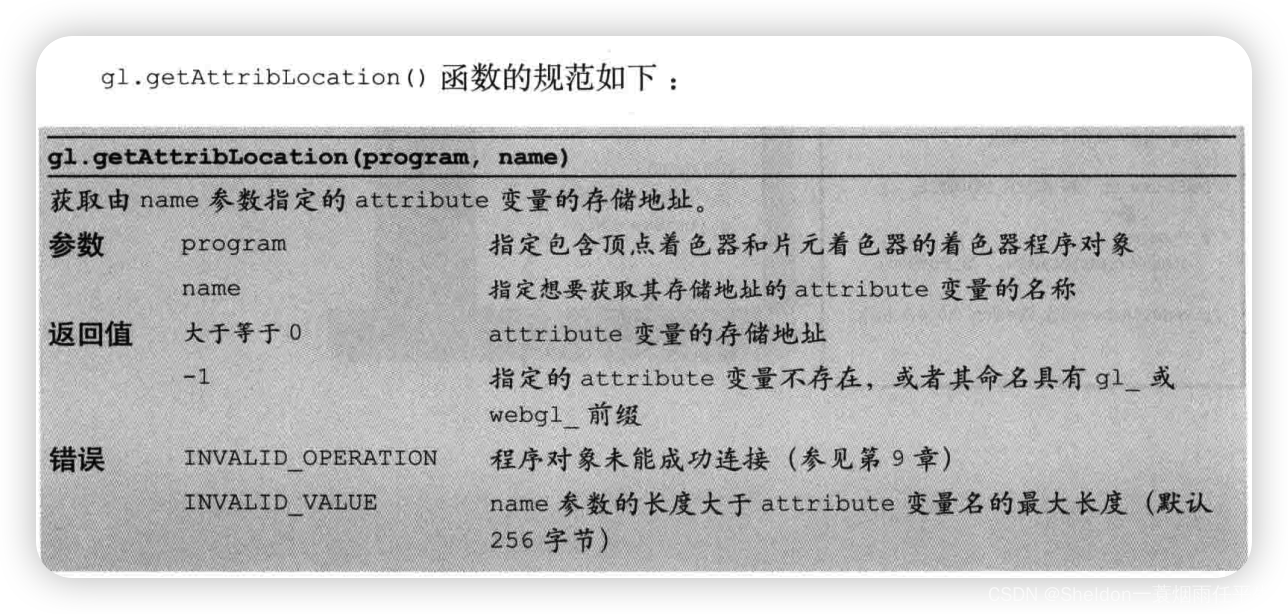
2.4.3.1 获取attribute变量——gl.getAttribLocation(program,name)
示例代码:
let a_PointSize = gl.getAttribLocation(gl.program, 'a_PointSize')
规范:
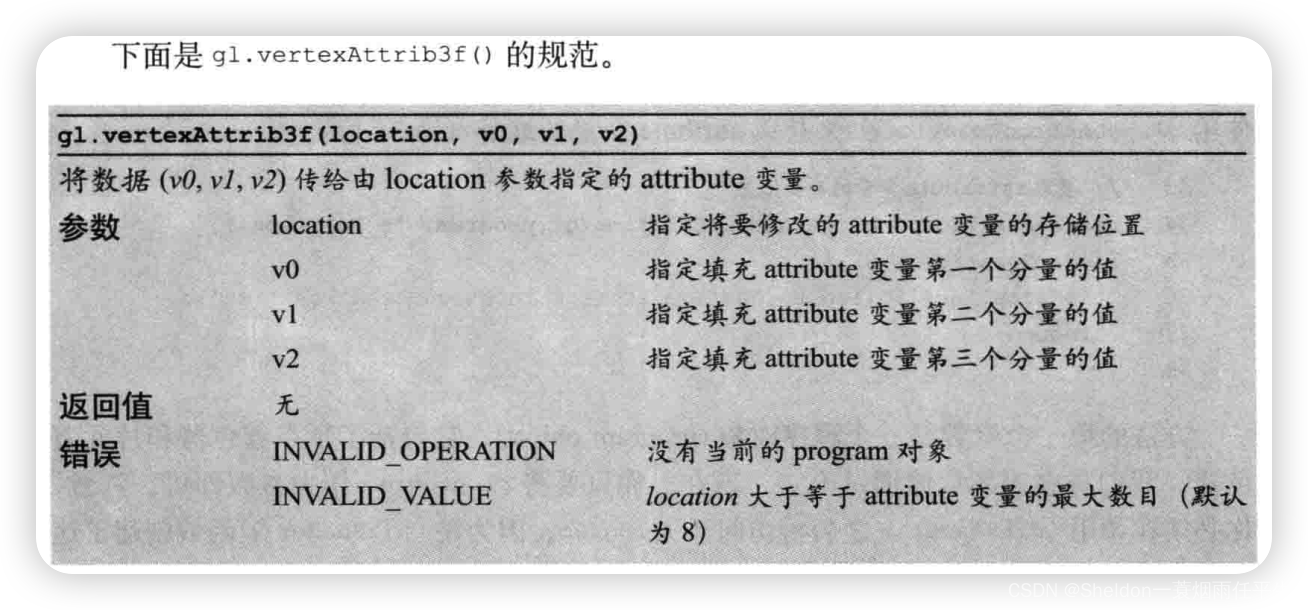
2.4.3.2 赋值attribute变量——gl.vertexAttrib3f(location, v0, v1, v2)
示例代码:
gl.vertexAttrib3f(a_Position, 0.0, 0.0, 0.0)
规范:
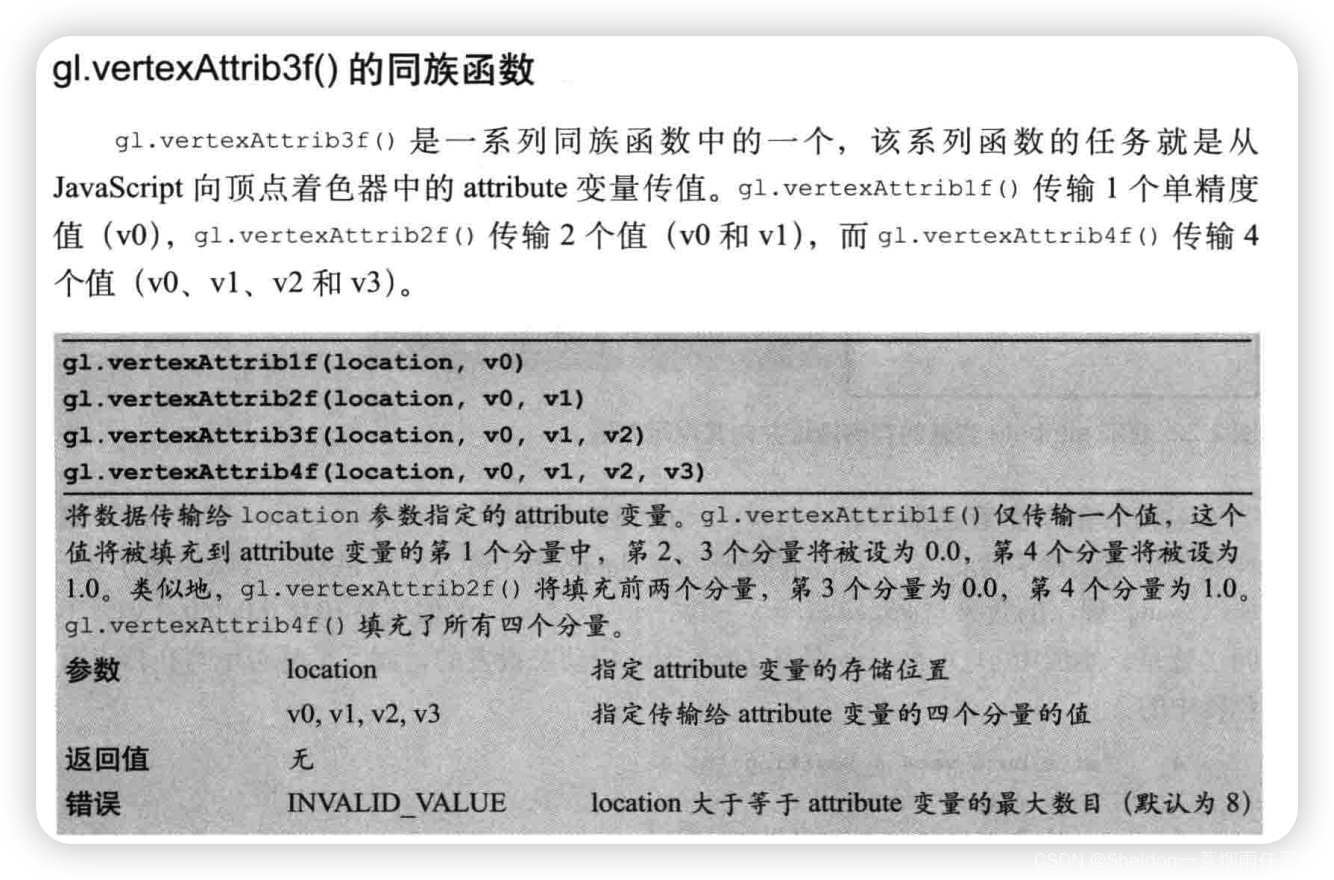
2.4.3.3 gl.vertexAttrib3f()的同族函数
2.4.4 WebGL的API命名规范
2.5 通过鼠标绘制点(画布的点击事件——canvas.onmousedown)
2.5.1 示例代码
ClickPoints/ClickPoints.html:
<!DOCTYPE html>
<html lang="en">

<head>
  <meta charset="UTF-8">
  <meta http-equiv="X-UA-Compatible" content="IE=edge">
  <meta name="viewport" content="width=device-width, initial-scale=1.0">
  <title>Document</title>
</head>

<body onload="main()">
  <canvas id="webgl" width="400" height="400">
    Please use a browser that supports 'canvas'
  </canvas>
  <script src="../../lib/webgl-utils.js"></script>
  <script src="../../lib/webgl-debug.js"></script>
  <script src="../../lib/cuon-utils.js"></script>
  <script src="./ClickPoints.js"></script>
</body>

</html>
ClickPoints/ClickPoints.js:
/**
 * 版本4(最终版本)
 * 和版本1的区别主要是两个:
 * 1、修正了WebGL的x,y坐标的获取公式
 * 2、优化点位存储方式为对象数组(这样更有利于后期点位属性的扩展)
 * 看到这里,了解了点位的存储和渲染,结合requestAnimationFrame动画就可以实现一些有趣的东西,比如贪吃蛇(../greedySnake)
 */

// 顶点着色器
const VSHADER_SOURCE =
  'attribute vec4 a_Position;\n' +
  'void main() {\n' +
  // 设置坐标
  ' gl_Position = a_Position;\n' +
  // 设置尺寸
  ' gl_PointSize = 10.0;\n' +
  '}\n'

// 片元着色器
const FSHADER_SOURCE =
  'void main() {\n' +
  // 设置颜色
  ' gl_FragColor = vec4(0.0, 1.0, 0.0, 1.0);\n' +
  '}\n'

let gl = null
function main () {
  // 获取canvas元素
  const canvas = document.getElementById('webgl')

  // 获取WebGL上下文
  gl = getWebGLContext(canvas)
  if (!gl) {
    return console.log('Failed to get the rendering context for WebGL')
  }

  // 初始化着色器
  if (!initShaders(gl, VSHADER_SOURCE, FSHADER_SOURCE)) {
    return console.log('Failed to initialize shaders')
  }

  // 获取attribute变量的存储位置
  let a_Position = gl.getAttribLocation(gl.program, 'a_Position')
  if (a_Position < 0) {
    return console.log('Failed to get the storage location of a_Position')
  }

  // 将顶点位置传输给attribute
  gl.vertexAttrib3f(a_Position, 0.0, 0.0, 0.0)

  // 注册鼠标点击事件
  canvas.onmousedown = function (ev) {
    click(ev, gl, canvas, a_Position)
  }

  // 设置canvas背景色
  gl.clearColor(0.0, 0.0, 0.0, 1.0)

  // 清空canvas
  gl.clear(gl.COLOR_BUFFER_BIT)

  // 绘制一个点
  gl.drawArrays(gl.POINTS, 0, 1)
}

// 鼠标点击位置数组
const g_points = []
function click (ev, gl, canvas, a_Position) {
  // 获取鼠标点击的x,y坐标
  let x = ev.clientX
  let y = ev.clientY
  const rect = ev.target.getBoundingClientRect()
  x = (- canvas.width / 2 + (x - rect.left)) / (canvas.width / 2)
  y = (canvas.height / 2 - (y - rect.top)) / (canvas.height / 2)
  // 将坐标存储在g_points数组中
  g_points.push({
    x: x,
    y: y
  })

  // 清空canvas
  gl.clear(gl.COLOR_BUFFER_BIT)

  for (const element of g_points) {
    gl.vertexAttrib3f(a_Position, element.x, element.y, 0.0)
    gl.drawArrays(gl.POINTS, 0, 1)
  }
}
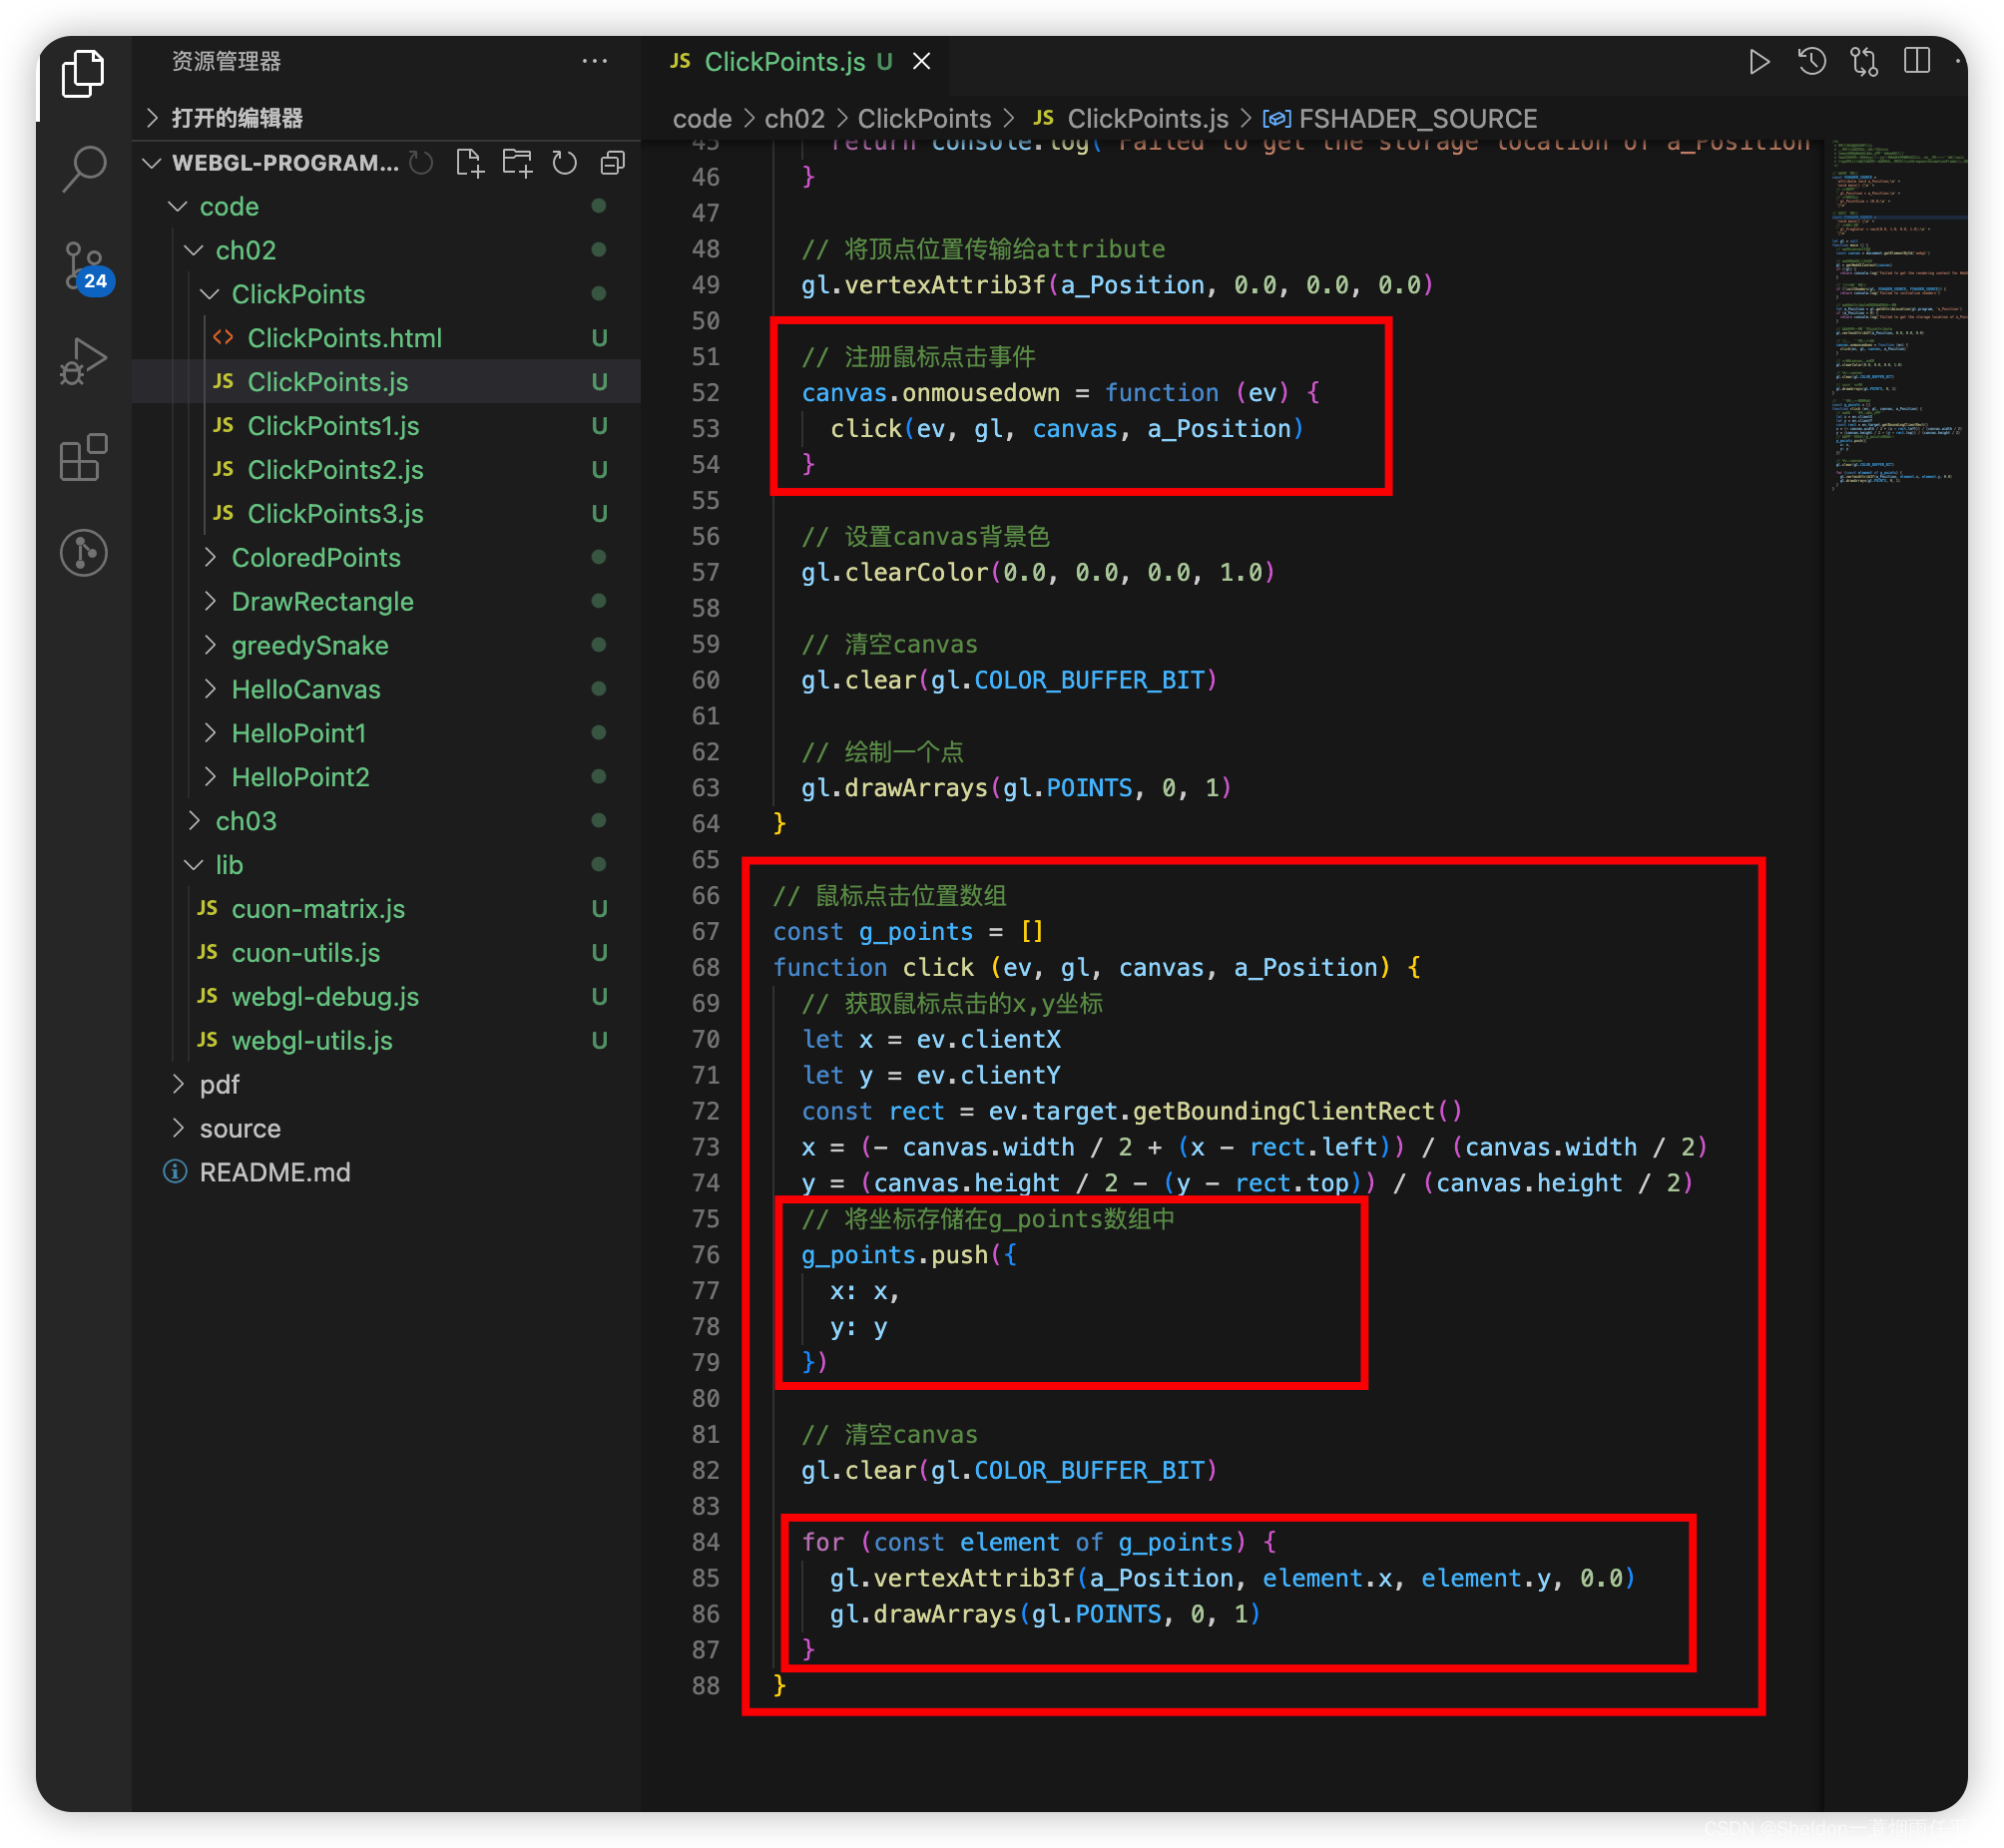
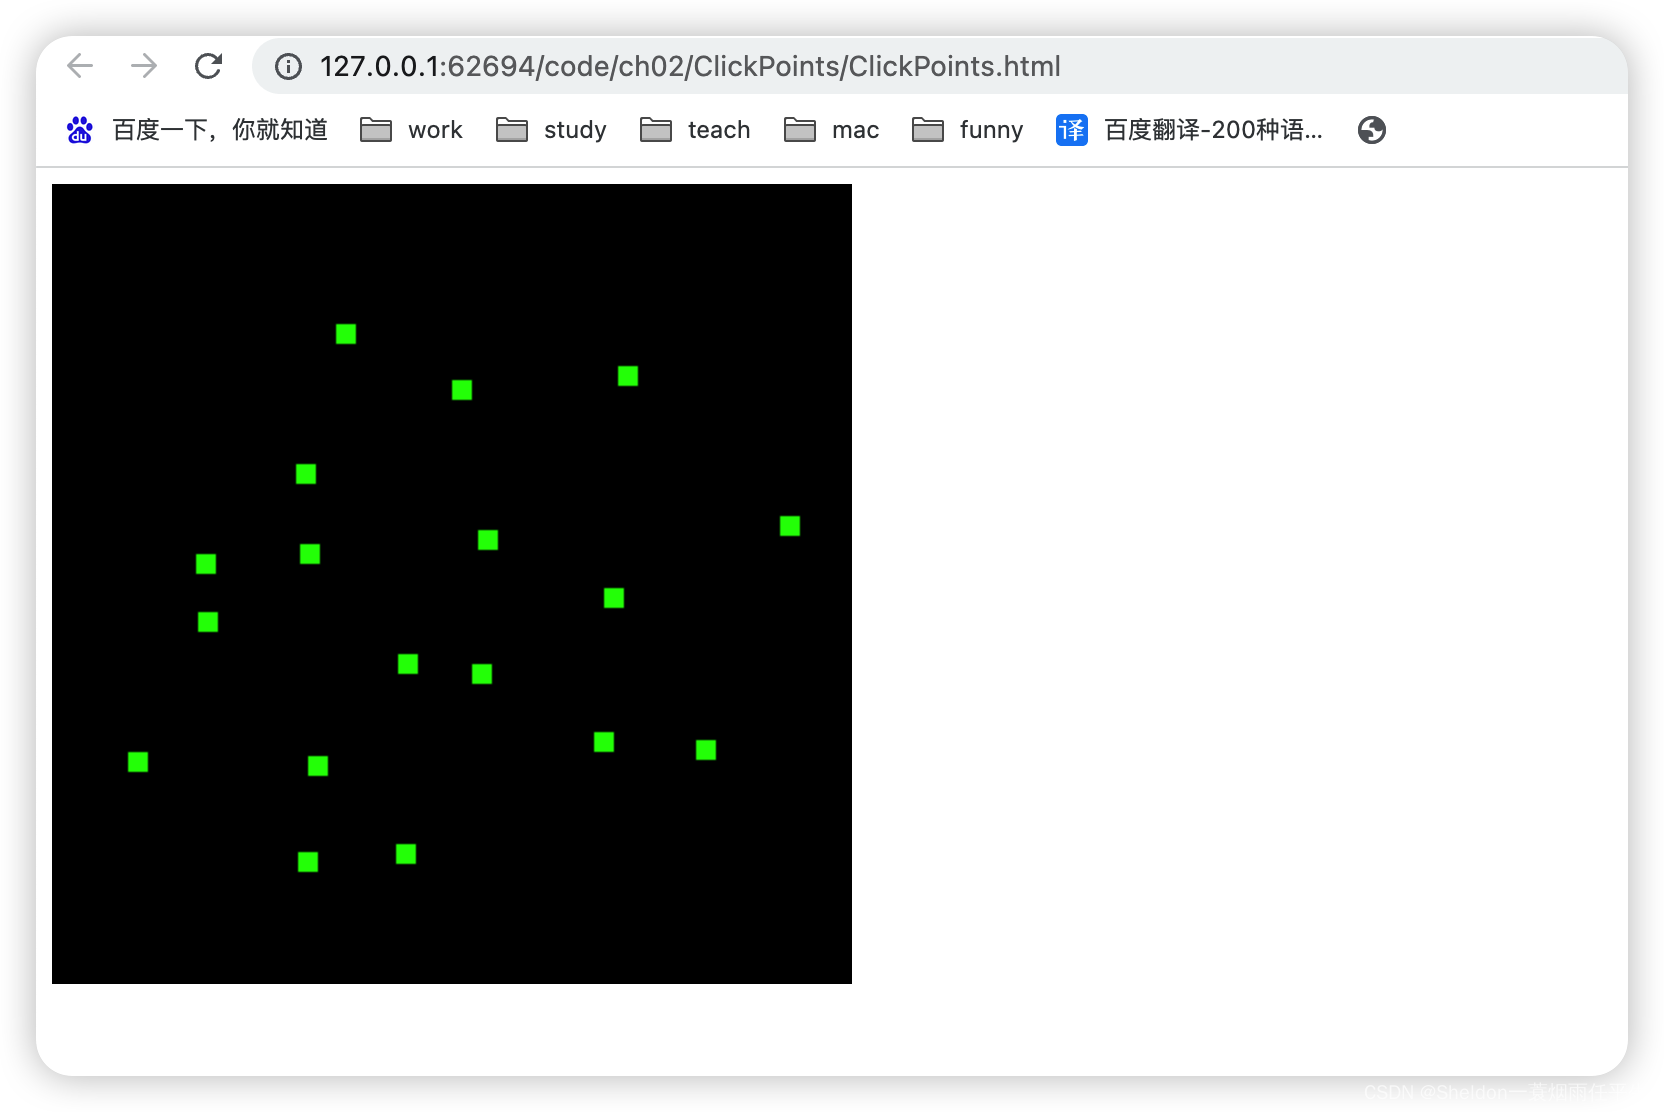
2.5.2 注册canvas鼠标点击事件(渲染多个点位)
2.5 这个示例和之前的主要区别有两个:
1、使用了canvas的点击事件—— canvas.onmousedown
2、将坐标数据存在数组中循环渲染
// 注册鼠标点击事件
  canvas.onmousedown = function (ev) {
    click(ev, gl, canvas, a_Position)
  }
具体函数如下:
// 鼠标点击位置数组
const g_points = []
function click (ev, gl, canvas, a_Position) {
  // 获取鼠标点击的x,y坐标
  let x = ev.clientX
  let y = ev.clientY
  const rect = ev.target.getBoundingClientRect()
  x = (- canvas.width / 2 + (x - rect.left)) / (canvas.width / 2)
  y = (canvas.height / 2 - (y - rect.top)) / (canvas.height / 2)
  // 将坐标存储在g_points数组中
  g_points.push({
    x: x,
    y: y
  })

  // 清空canvas
  gl.clear(gl.COLOR_BUFFER_BIT)

  for (const element of g_points) {
    gl.vertexAttrib3f(a_Position, element.x, element.y, 0.0)
    gl.drawArrays(gl.POINTS, 0, 1)
  }
}
2.6 改变点的颜色(uniform变量)
2.6.1 示例代码
因为使用方式和之前的attribute变量相似,这里就不做过多介绍了。直接看代码即可。

<!DOCTYPE html>
<html lang="en">

<head>
  <meta charset="UTF-8">
  <meta http-equiv="X-UA-Compatible" content="IE=edge">
  <meta name="viewport" content="width=device-width, initial-scale=1.0">
  <title>Document</title>
</head>

<body onload="main()">
  <canvas id="webgl" width="400" height="400">
    Please use a browser that supports 'canvas'
  </canvas>
  <script src="../../lib/webgl-utils.js"></script>
  <script src="../../lib/webgl-debug.js"></script>
  <script src="../../lib/cuon-utils.js"></script>
  <script src="./ColoredPoints.js"></script>
</body>

</html>
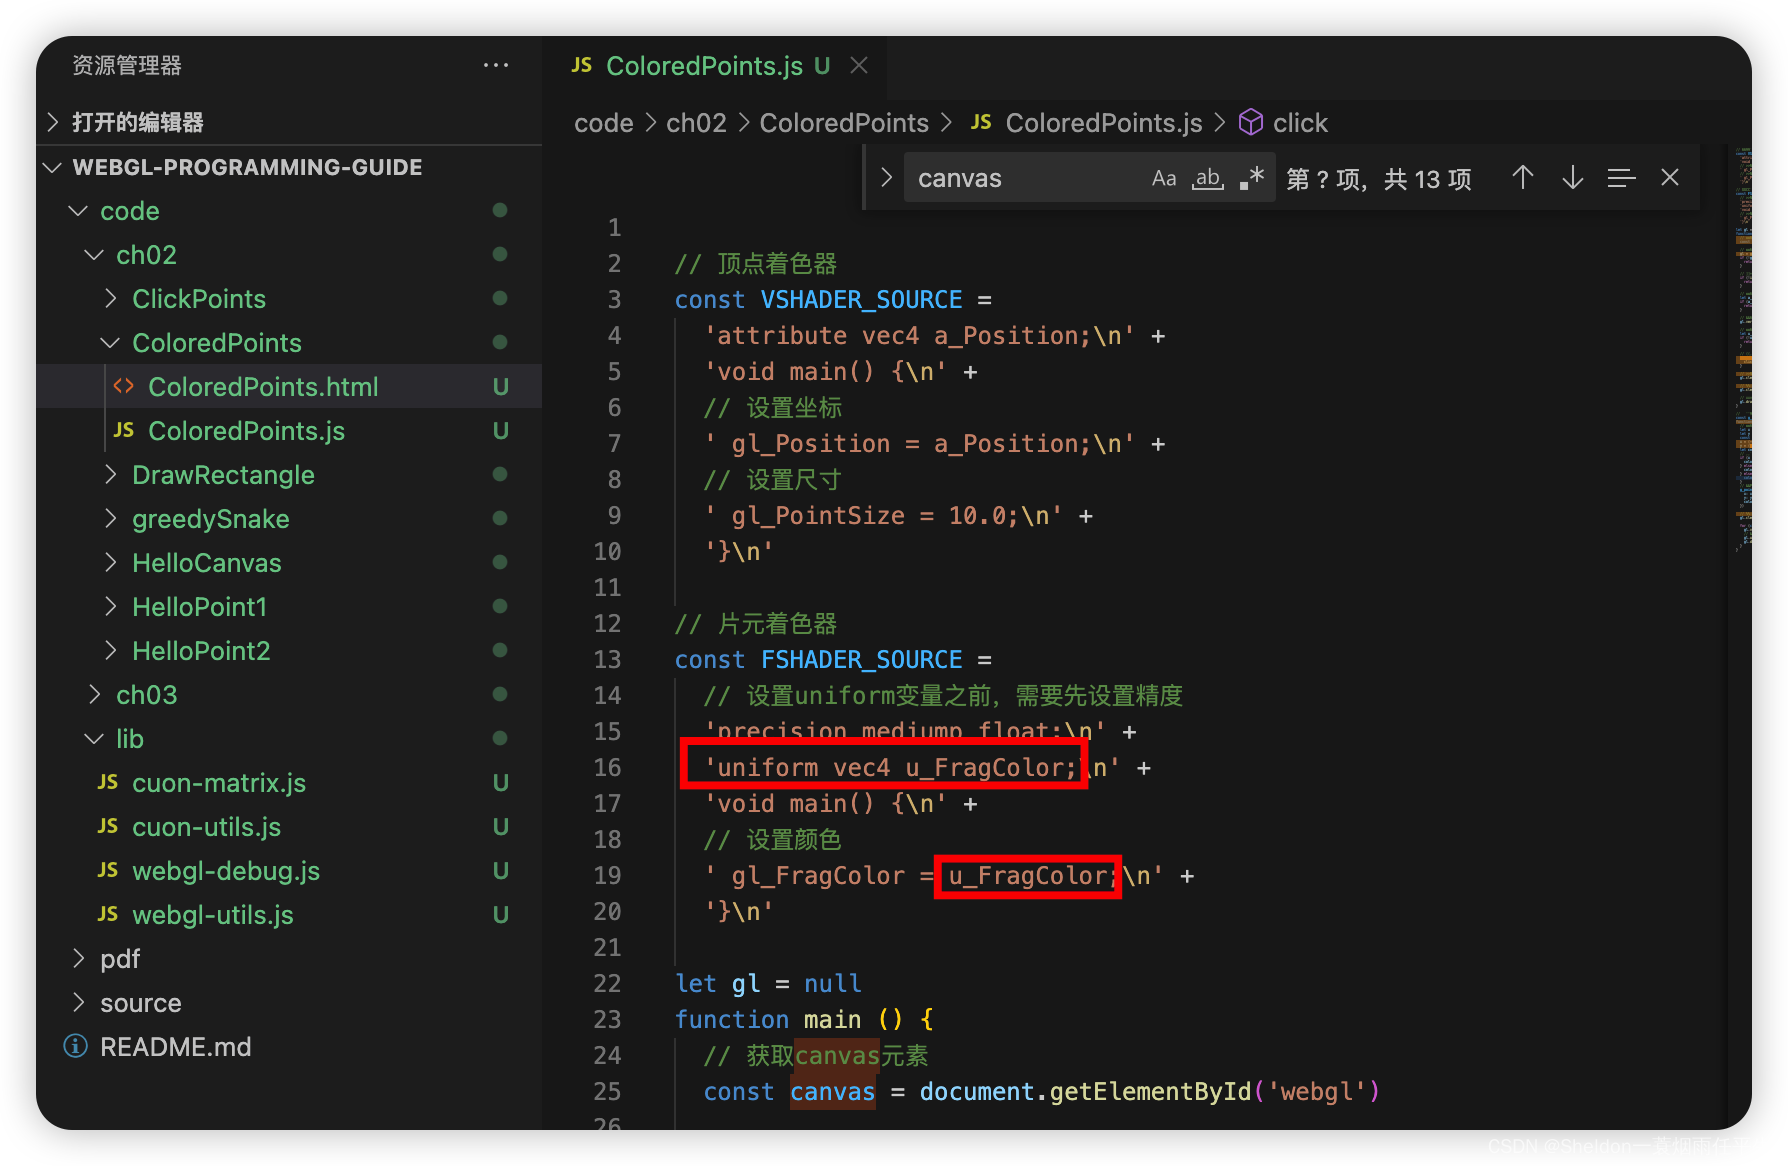
// 顶点着色器
const VSHADER_SOURCE =
'attribute vec4 a_Position;\n' +
'void main() {\n' +
// 设置坐标
' gl_Position = a_Position;\n' +
// 设置尺寸
' gl_PointSize = 10.0;\n' +
'}\n'
// 片元着色器
const FSHADER_SOURCE =
// 设置uniform变量之前,需要先设置精度
'precision mediump float;\n' +
'uniform vec4 u_FragColor;\n' +
'void main() {\n' +
// 设置颜色
' gl_FragColor = u_FragColor;\n' +
'}\n'
let gl = null
function main () {
// 获取canvas元素
const canvas = document.getElementById('webgl')
// 获取WebGL上下文
gl = getWebGLContext(canvas)
if (!gl) {
return console.log('Failed to get the rendering context for WebGL')
}
// 初始化着色器
if (!initShaders(gl, VSHADER_SOURCE, FSHADER_SOURCE)) {
return console.log('Failed to initialize shaders')
}
// 获取attribute变量的存储位置
let a_Position = gl.getAttribLocation(gl.program, 'a_Position')
if (a_Position < 0) {
return console.log('Failed to get the storage location of a_Position')
}
// 将顶点位置传输给attribute
gl.vertexAttrib3f(a_Position, 0.0, 0.0, 0.0)
// 获取u_FragColor存储地址
let u_FragColor = gl.getUniformLocation(gl.program, 'u_FragColor')
if (!u_FragColor) {
return console.log('Failed to get the storage location of u_FragColor')
}
// 注册鼠标点击事件
canvas.onmousedown = function (ev) {
click(ev, gl, canvas, a_Position, u_FragColor)
}
// 设置canvas背景色
gl.clearColor(0.0, 0.0, 0.0, 1.0)
// 清空canvas
gl.clear(gl.COLOR_BUFFER_BIT)
// 绘制一个点
gl.drawArrays(gl.POINTS, 0, 1)
}
// 鼠标点击位置数组
const g_points = []
function click (ev, gl, canvas, a_Position, u_FragColor) {
// 获取鼠标点击的x,y坐标
let x = ev.clientX
let y = ev.clientY
const rect = ev.target.getBoundingClientRect()
x = (- canvas.width / 2 + (x - rect.left)) / (canvas.width / 2)
y = (canvas.height / 2 - (y - rect.top)) / (canvas.height / 2)
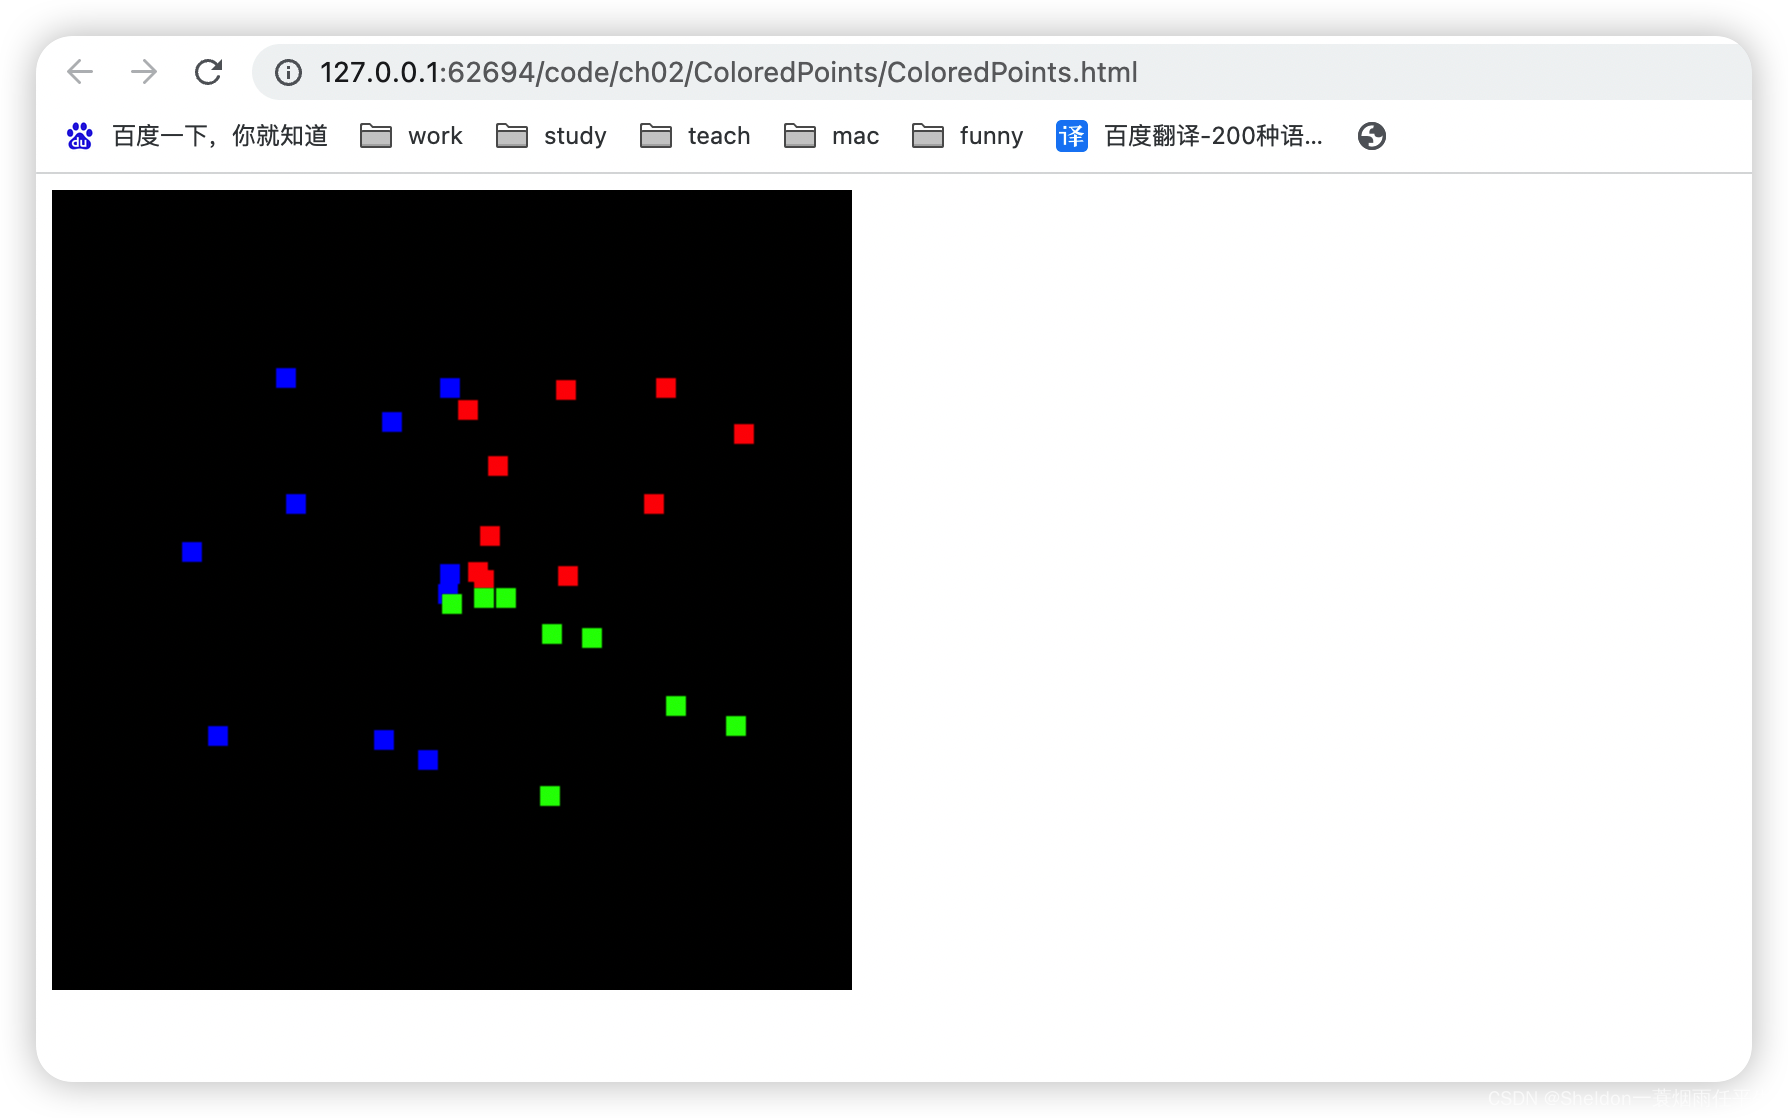
let color = null
// 第一象限时,红色
if (x >= 0.0 && y >= 0.0) {
color = [1.0, 0.0, 0.0, 1.0]
} else if (x >= 0.0 && y < 0.0) { // 第二象限时,蓝色
color = [0.0, 1.0, 0.0, 1.0]
} else { // 其他情况时,绿色
color = [0.0, 0.0, 1.0, 1.0]
}
// 将坐标存储在g_points数组中
g_points.push({
x: x,
y: y,
color: color
})
// 清空canvas
gl.clear(gl.COLOR_BUFFER_BIT)
for (const element of g_points) {
gl.vertexAttrib3f(a_Position, element.x, element.y, 0.0)
// 将颜色传入到u_FragColor中
gl.uniform4f(u_FragColor, element.color[0], element.color[1], element.color[2], element.color[3])
gl.drawArrays(gl.POINTS, 0, 1)
}
}
2.6.2 uniform存储限定符
相信大家学习了attribute存储限定符后,有可能也会尝试使用它用于设置片元着色器的颜色变量。很不幸,attribute变量只能用于顶点着色器,因此使用片元着色器时,我们需要使用uniform变量(当然也可以使用varying变量,不过那是第五章之后的内容,我们先忽略)。
2.6.3 相关API
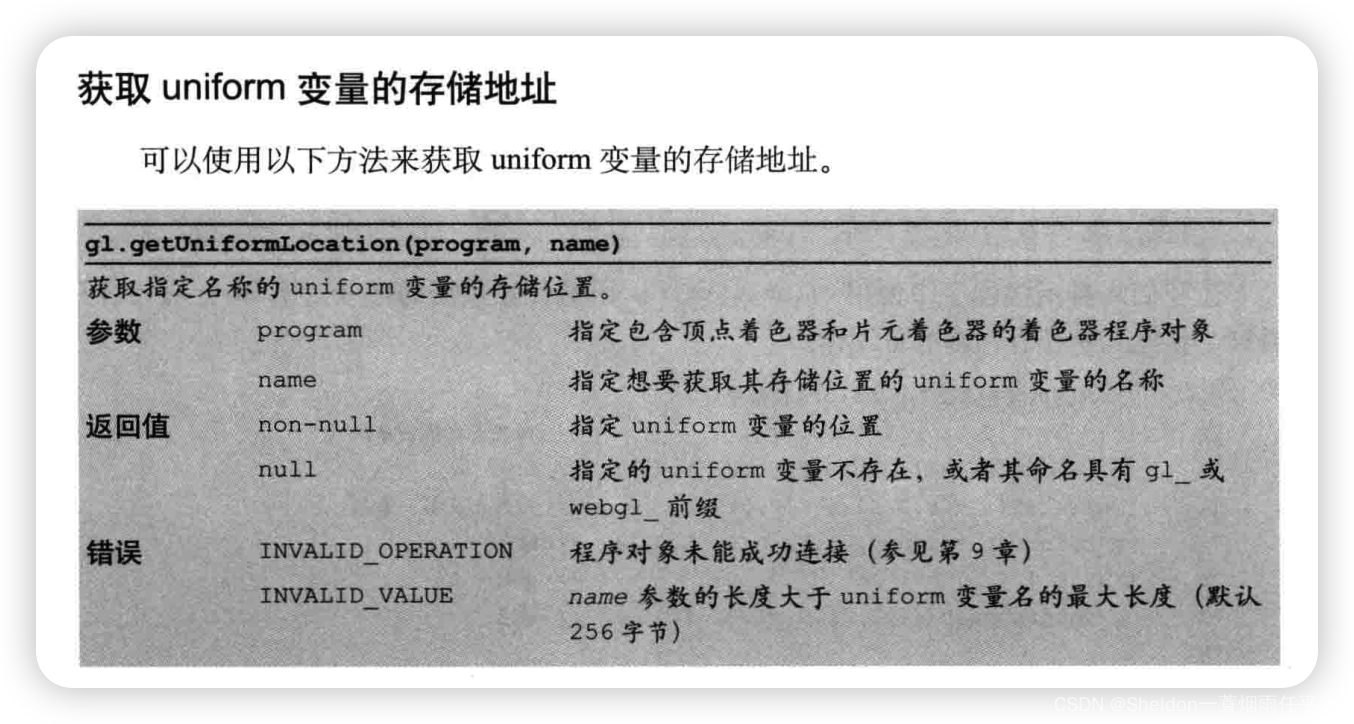
2.6.3.1 获取uniform变量的存储地址——gl.getUniformLocation(program, name)
示例代码:
// 获取u_FragColor存储地址
  let u_FragColor = gl.getUniformLocation(gl.program, 'u_FragColor')
规范:
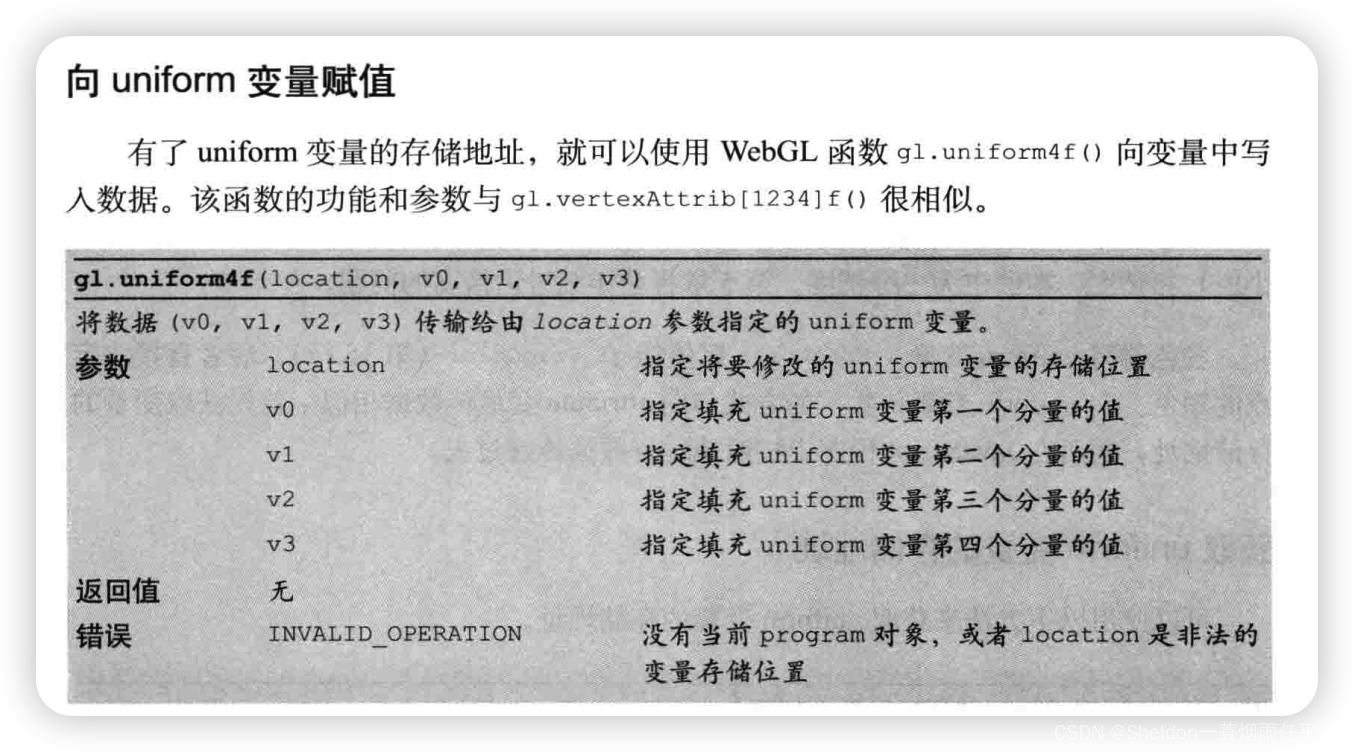
2.6.3.2 赋值uniform变量——gl.uniform4f(location, v0, v1, v2, v3)
示例代码:
// 将颜色传入到u_FragColor中
    gl.uniform4f(u_FragColor, element.color[0], element.color[1], element.color[2], element.color[3])
规范:
2.6.3.3 gl.uniform4f()的同族函数

2.8 总结
在第二章中,我们通过示例,了解了着色器(顶点着色器和片元着色器)、存储限定符及其相关函数的概念,并学会了如何使用他们进行点的位置、大小和颜色的设置,以及canvas的鼠标点击事件。
2.9 课后练习——贪吃蛇
这是书本之外的内容,有兴趣的同学可以看看,可以帮助你快速练习和掌握之前所学习的知识。
其实通过之前的学习,我们学会了如何使用WebGL进行点位的绘制和刷新,可以说已经入门了。了解到这一点,其实我们就已经可以做一些有趣的东西,比如简易版的贪吃蛇。仔细想想,我们可以利用点位的刷新来模拟蛇的绘制和移动,那具体怎么做呢?
说个题外话,知识的学习本身并不难,难的是学会知识之后,如何运用知识将自己的想法实现或者进行一些创造性的工作。同学们可以先尝试着自己做个贪吃蛇,如果实在觉得没有思路,再回来参考我的想法和代码实现。另外,觉得自己已经掌握得不错的同学,除了贪吃蛇外,还可以做一些其他游戏,比如迷宫、推纸箱、小鸟过丛林、坦克大战、炸弹人等等,它们的区别并不大,无非都是地图、人物、物品的绘制、刷新、移动以及碰撞检测。
2.9.1 游戏规则
任何游戏在制作之前,我们首先需要做的就是进行游戏规则的制定。那么贪吃蛇的游戏规则(或者游戏步骤)有哪些呢?
(1)开始时,生成一只蛇;
(2)点击上、下、左、右,蛇按照方向移动;
(3)蛇碰到地图边缘结束(地图的碰撞检测);
(4)开始时,生成100个随机大小、随机位置、随机颜色的食物;
(5)蛇移动碰到食物时,吃掉食物,长度变长;
(6)蛇的长度变大一定长时,宽度也随着变大;
之所以将食物的生成放在蛇的运动规则之后,是为了排除食物影响我们对蛇的生成、运动和地图碰撞检测的干扰。
2.9.2 游戏制作
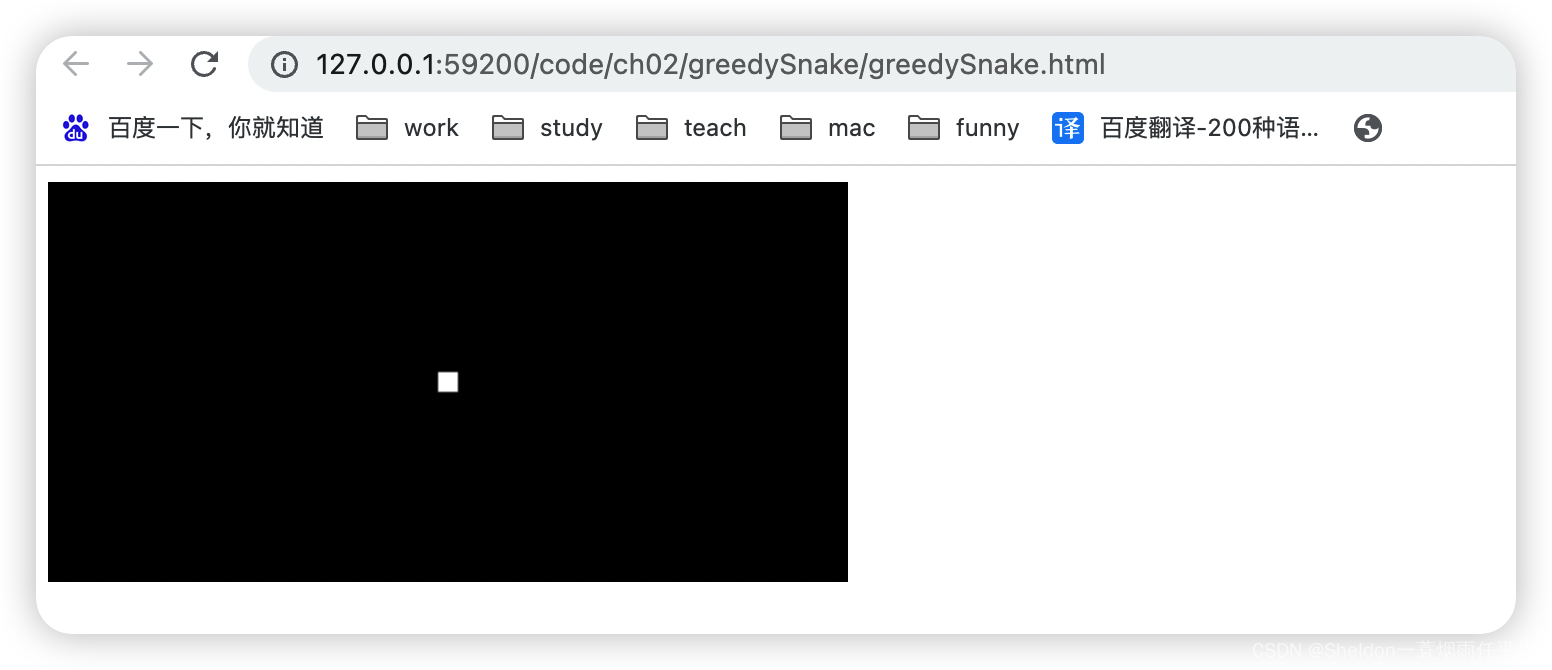
greedySnake/greedySnake.html:
<!DOCTYPE html>
<html lang="en">

<head>
  <meta charset="UTF-8">
  <meta http-equiv="X-UA-Compatible" content="IE=edge">
  <meta name="viewport" content="width=device-width, initial-scale=1.0">
  <title>Document</title>
</head>

<body onload="main()">
  <canvas id="webgl" width="400" height="200">
    Please use a browser that supports 'canvas'
  </canvas>
  <script src="../../lib/webgl-utils.js"></script>
  <script src="../../lib/webgl-debug.js"></script>
  <script src="../../lib/cuon-utils.js"></script>
  <script src="./greedySnake.js"></script>
</body>

</html>
2.9.2.1 绘制一只蛇
2.9.2.1.1 绘制效果和代码
greedySnake/greedySnake.js:
/**
* (1)开始时,生成一只蛇,可以初始化出生坐标、生长方向、生长长度;√
* (2)点击上、下、左、右,蛇按照方向移动;
* (3)蛇碰到地图边缘结束(地图的碰撞检测);
* (4)开始时,生成100个随机大小、随机位置、随机颜色的食物;
* (5)蛇移动碰到食物时,吃掉食物,长度变长;
* (6)蛇的长度变大一定长时,宽度也随着变大;
*/
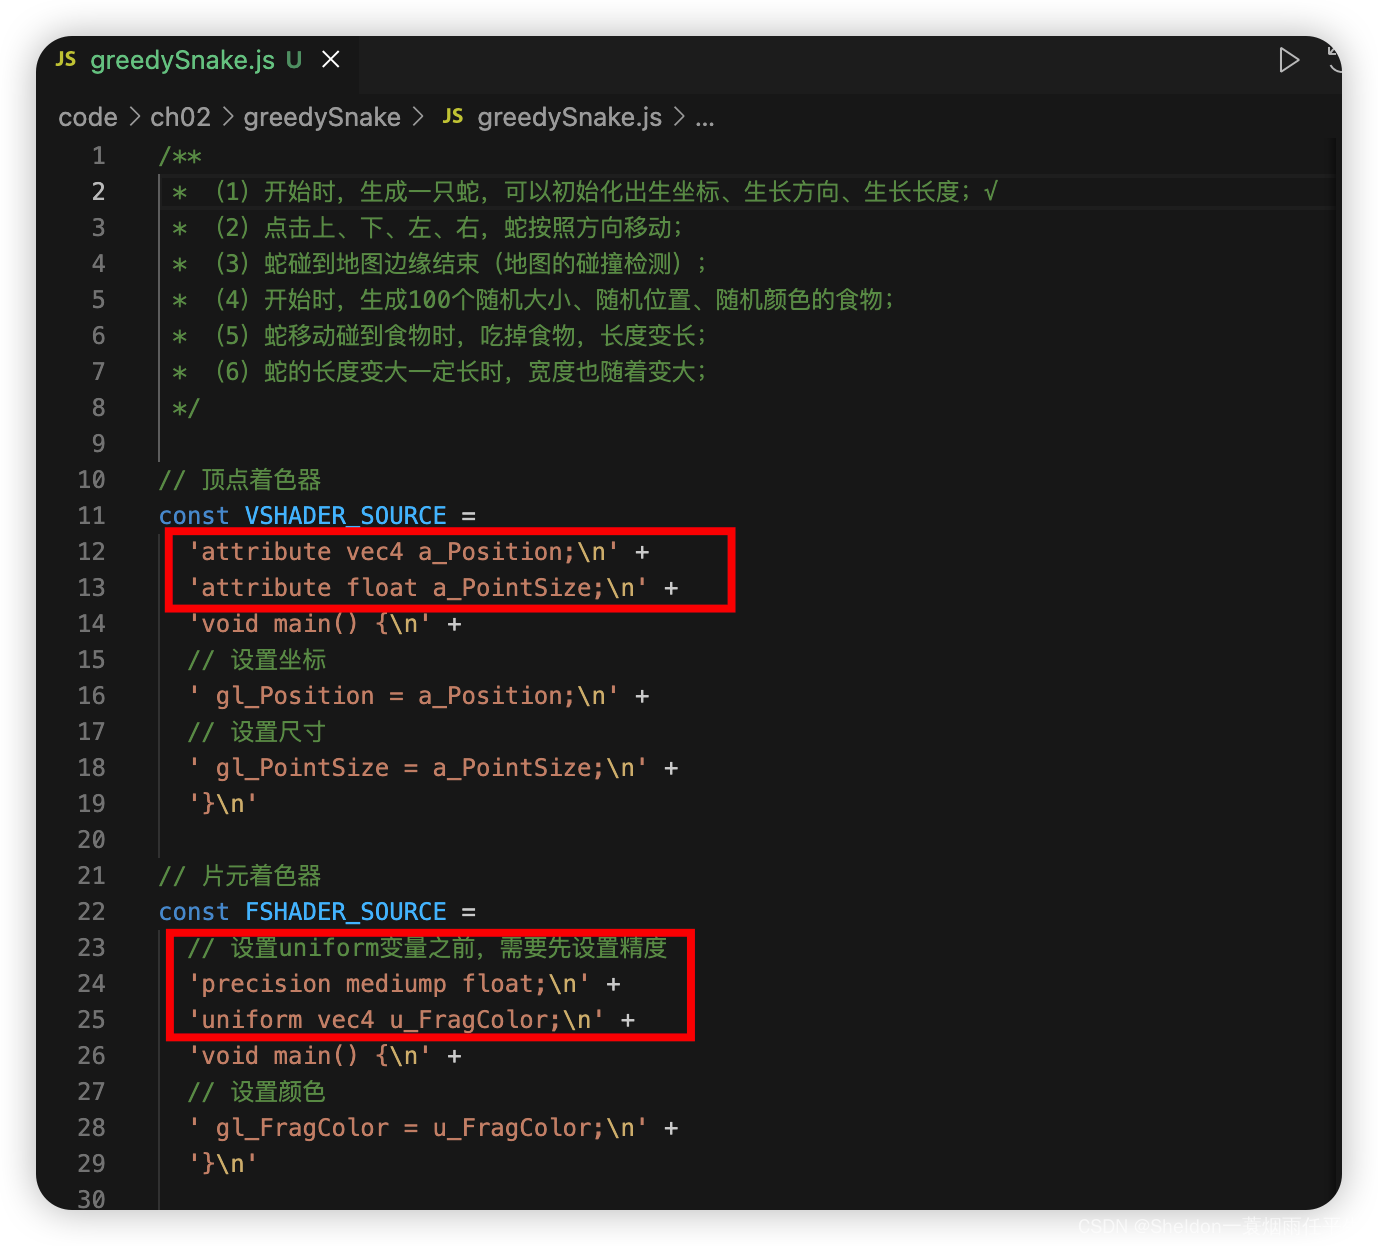
// 顶点着色器
const VSHADER_SOURCE =
'attribute vec4 a_Position;\n' +
'attribute float a_PointSize;\n' +
'void main() {\n' +
// 设置坐标
' gl_Position = a_Position;\n' +
// 设置尺寸
' gl_PointSize = a_PointSize;\n' +
'}\n'
// 片元着色器
const FSHADER_SOURCE =
// 设置uniform变量之前,需要先设置精度
'precision mediump float;\n' +
'uniform vec4 u_FragColor;\n' +
'void main() {\n' +
// 设置颜色
' gl_FragColor = u_FragColor;\n' +
'}\n'
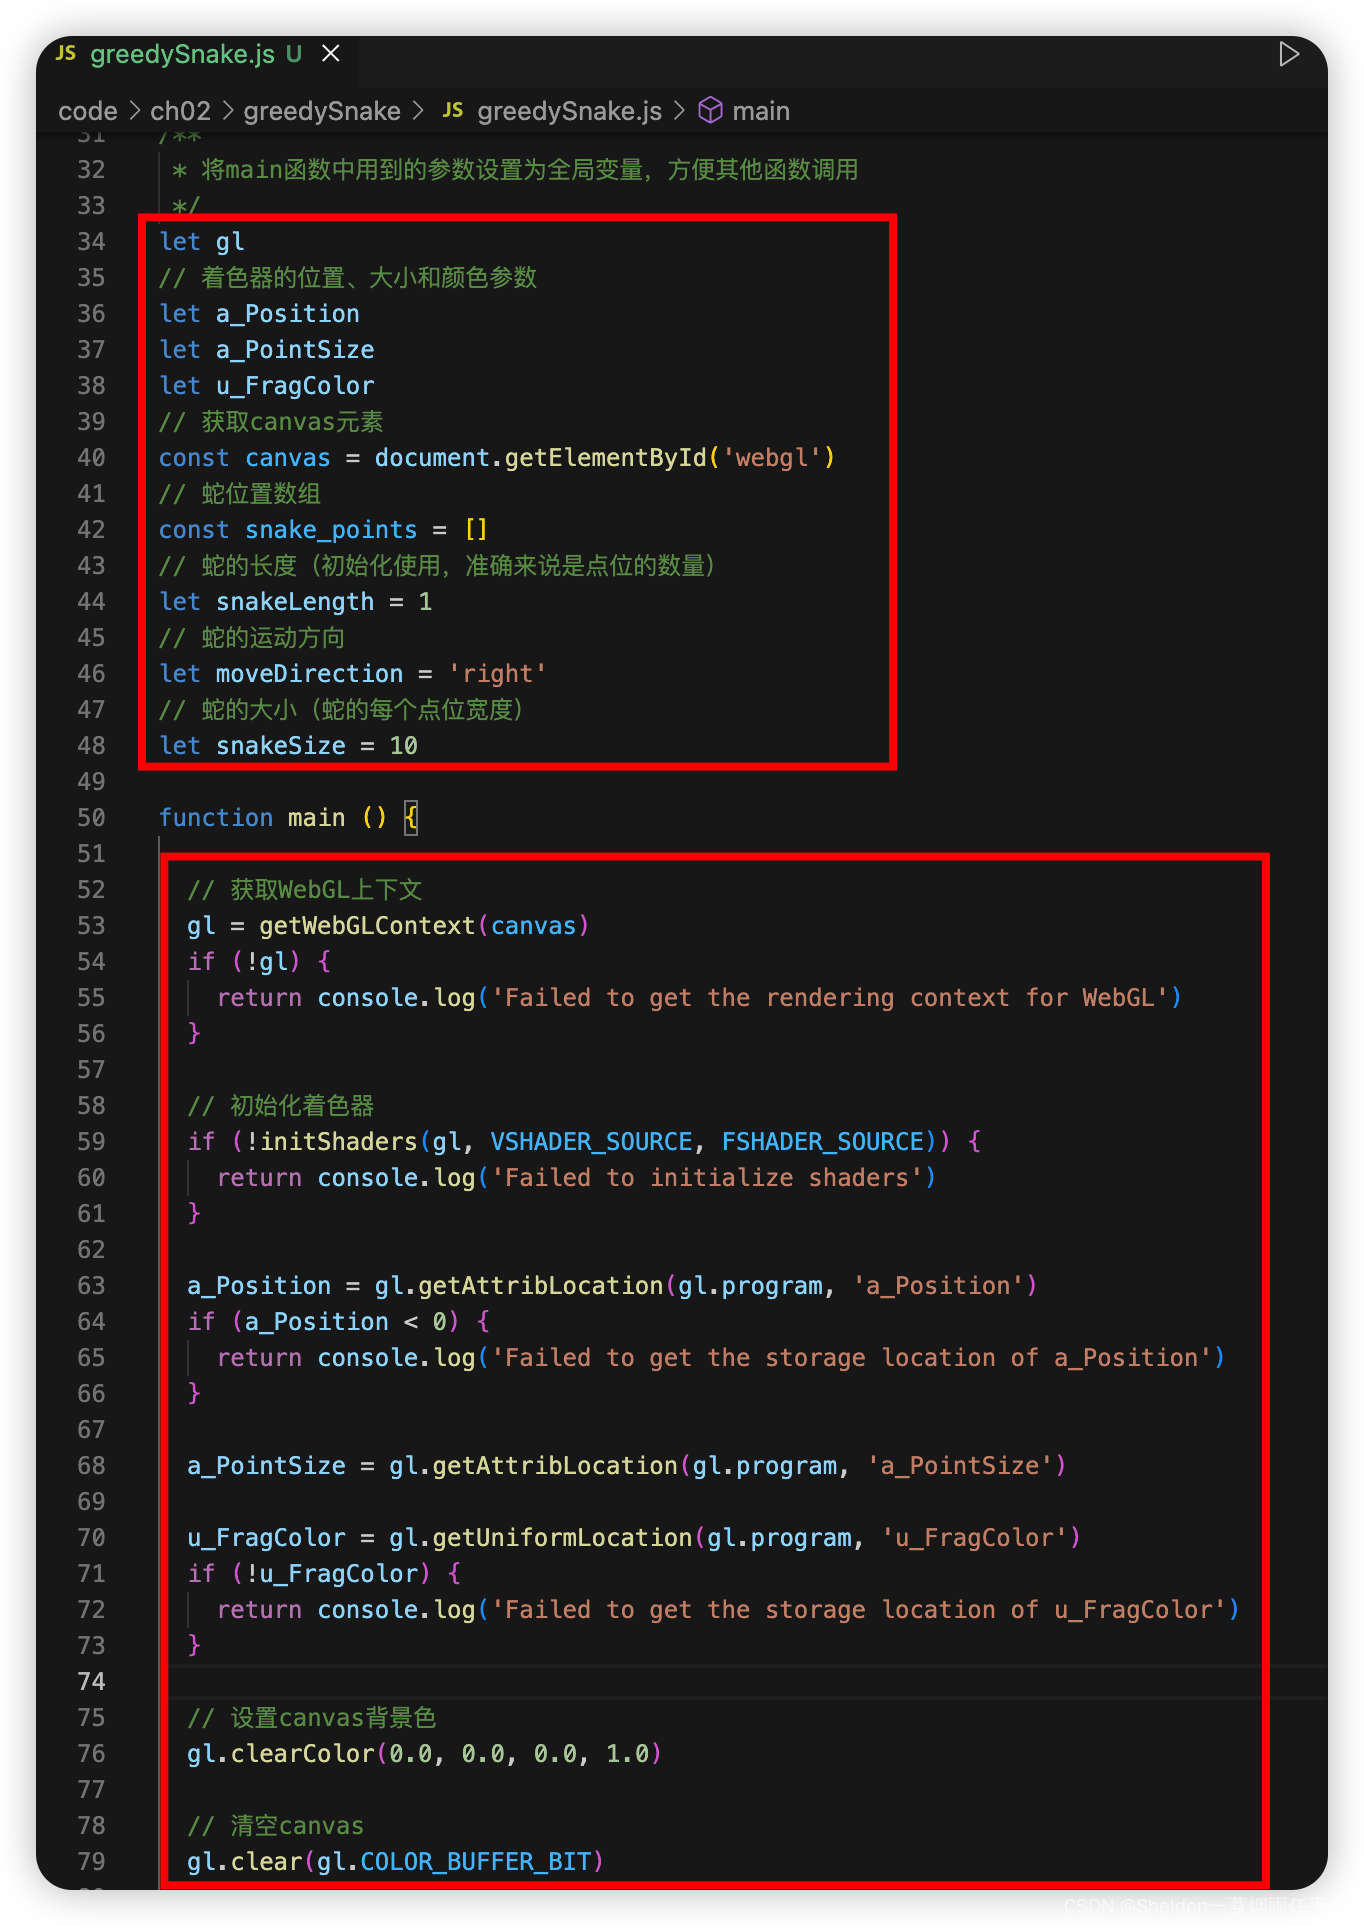
/**
* 将main函数中用到的参数设置为全局变量,方便其他函数调用
*/
let gl
// 着色器的位置、大小和颜色参数
let a_Position
let a_PointSize
let u_FragColor
// 获取canvas元素
const canvas = document.getElementById('webgl')
// 蛇位置数组
const snake_points = []
// 蛇的长度(初始化使用,准确来说是点位的数量)
let snakeLength = 1
// 蛇的运动方向
let moveDirection = 'right'
// 蛇的大小(蛇的每个点位宽度)
let snakeSize = 10
function main () {
// 获取WebGL上下文
gl = getWebGLContext(canvas)
if (!gl) {
return console.log('Failed to get the rendering context for WebGL')
}
// 初始化着色器
if (!initShaders(gl, VSHADER_SOURCE, FSHADER_SOURCE)) {
return console.log('Failed to initialize shaders')
}
a_Position = gl.getAttribLocation(gl.program, 'a_Position')
if (a_Position < 0) {
return console.log('Failed to get the storage location of a_Position')
}
a_PointSize = gl.getAttribLocation(gl.program, 'a_PointSize')
u_FragColor = gl.getUniformLocation(gl.program, 'u_FragColor')
if (!u_FragColor) {
return console.log('Failed to get the storage location of u_FragColor')
}
// 设置canvas背景色
gl.clearColor(0.0, 0.0, 0.0, 1.0)
// 清空canvas
gl.clear(gl.COLOR_BUFFER_BIT)
// 创建贪吃蛇数据
createSnake()
//
draw()
}
/**
* 创建贪吃蛇数据
* @param {number} head 蛇出生的坐标
* @param {string} direction 蛇的生长方向(up/down/left/right)
* @param {number} length 蛇的出生长度
*/
function createSnake (head = { x: 0, y: 0 }, direction = 'right', length = 1) {
snakeLength = length
moveDirection = direction
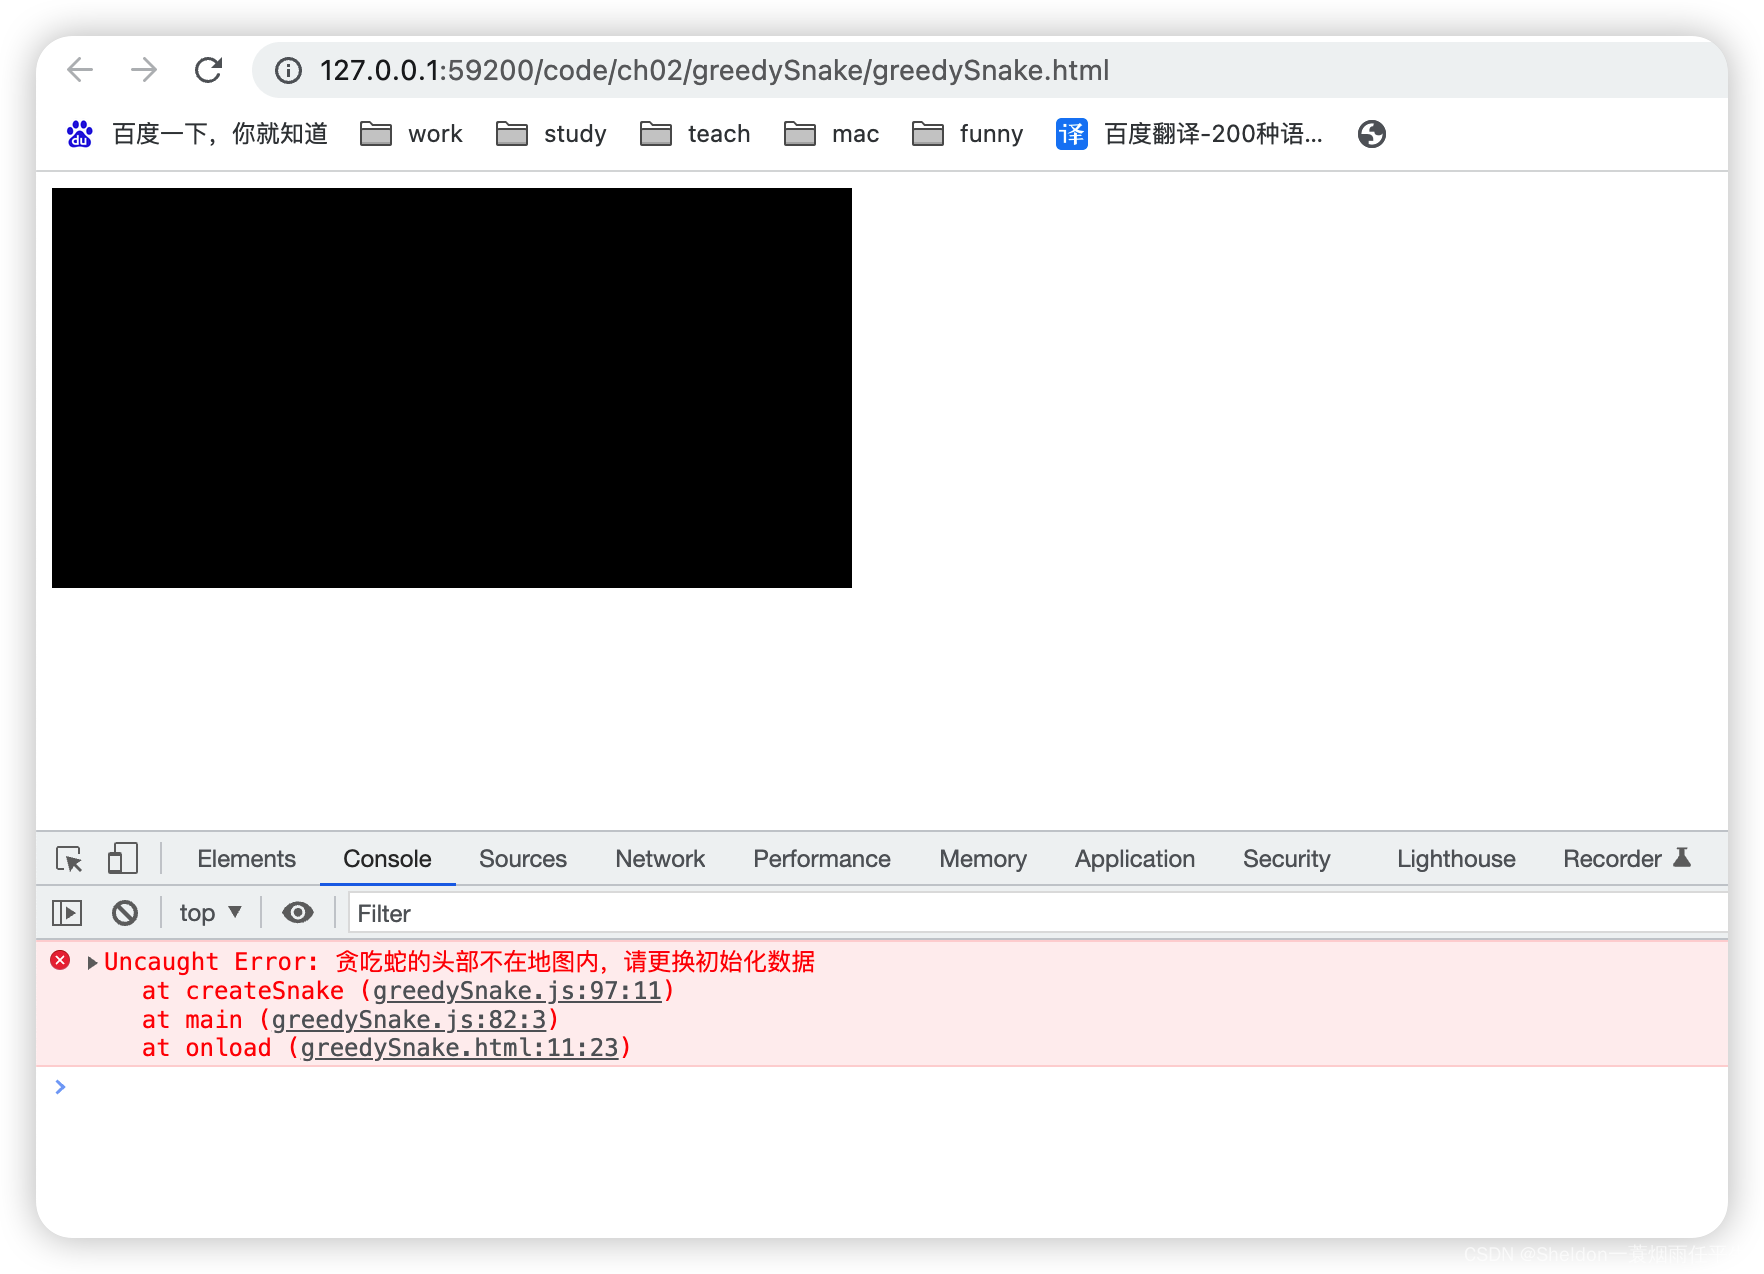
// 如果头部不在允许范围内,抛出错误
if (isBeyond(head)) {
throw new Error('贪吃蛇的头部不在地图内,请更换初始化数据')
}
snake_points.push({
x: head.x,
y: head.y
})
}
// 判断蛇的点位超出允许范围内
function isBeyond ({ x, y }) {
// 获取贪吃蛇可以存在的点位坐标
let xRange = [-canvas.width / 2 + snakeSize / 2, canvas.width / 2 - snakeSize / 2]
let yRange = [-canvas.height / 2 + snakeSize / 2, canvas.height / 2 - snakeSize / 2]
if (x < xRange[0] || x > xRange[1] || y < yRange[0] || y > yRange[1]) {
return true
} else {
return false
}
}
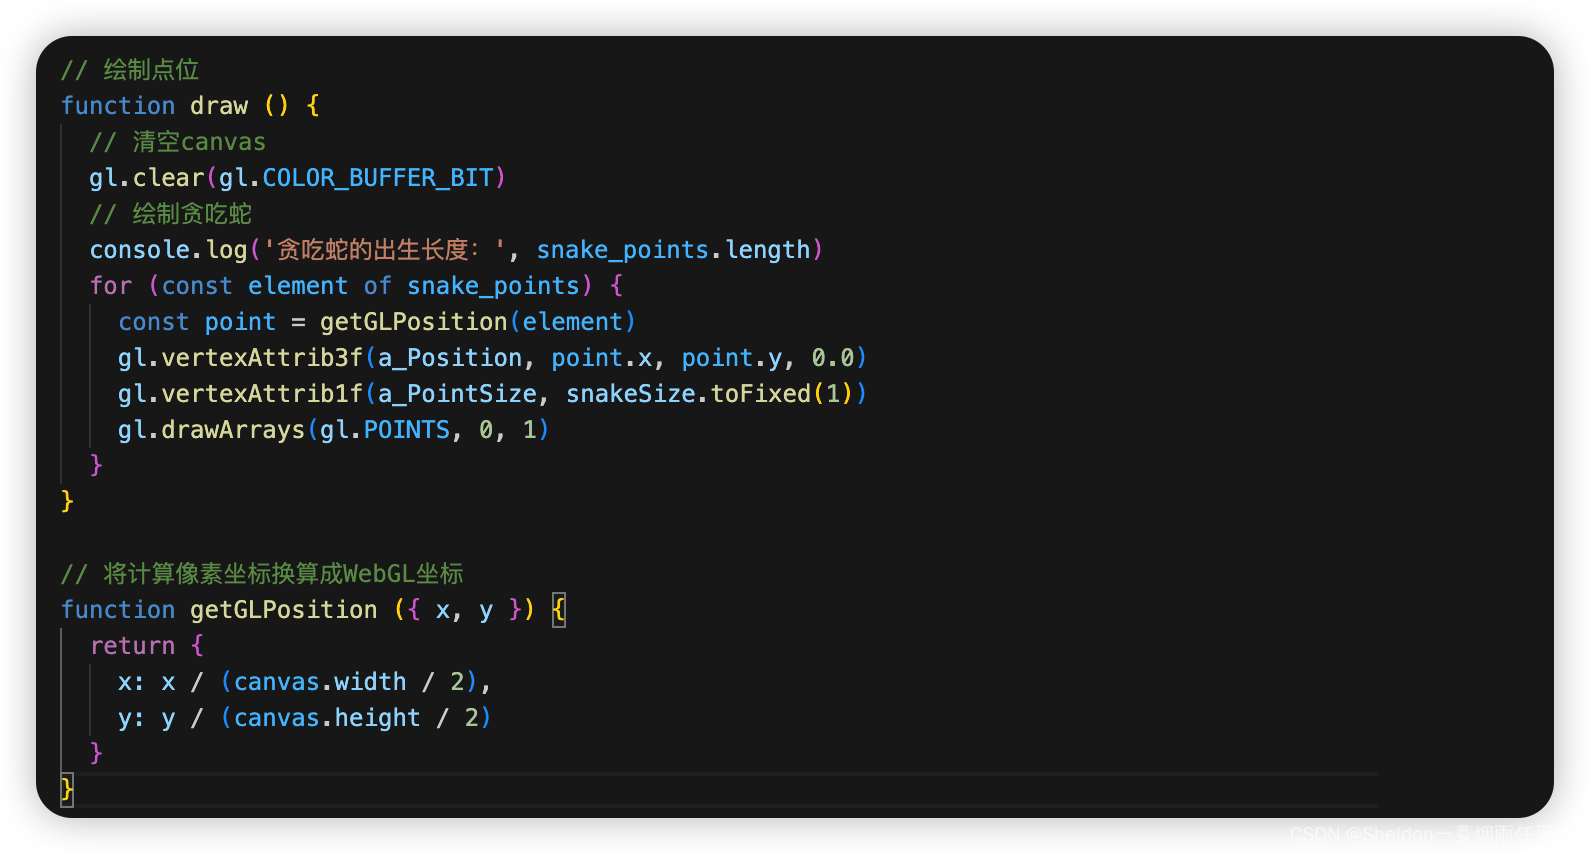
// 绘制点位
function draw () {
// 清空canvas
gl.clear(gl.COLOR_BUFFER_BIT)
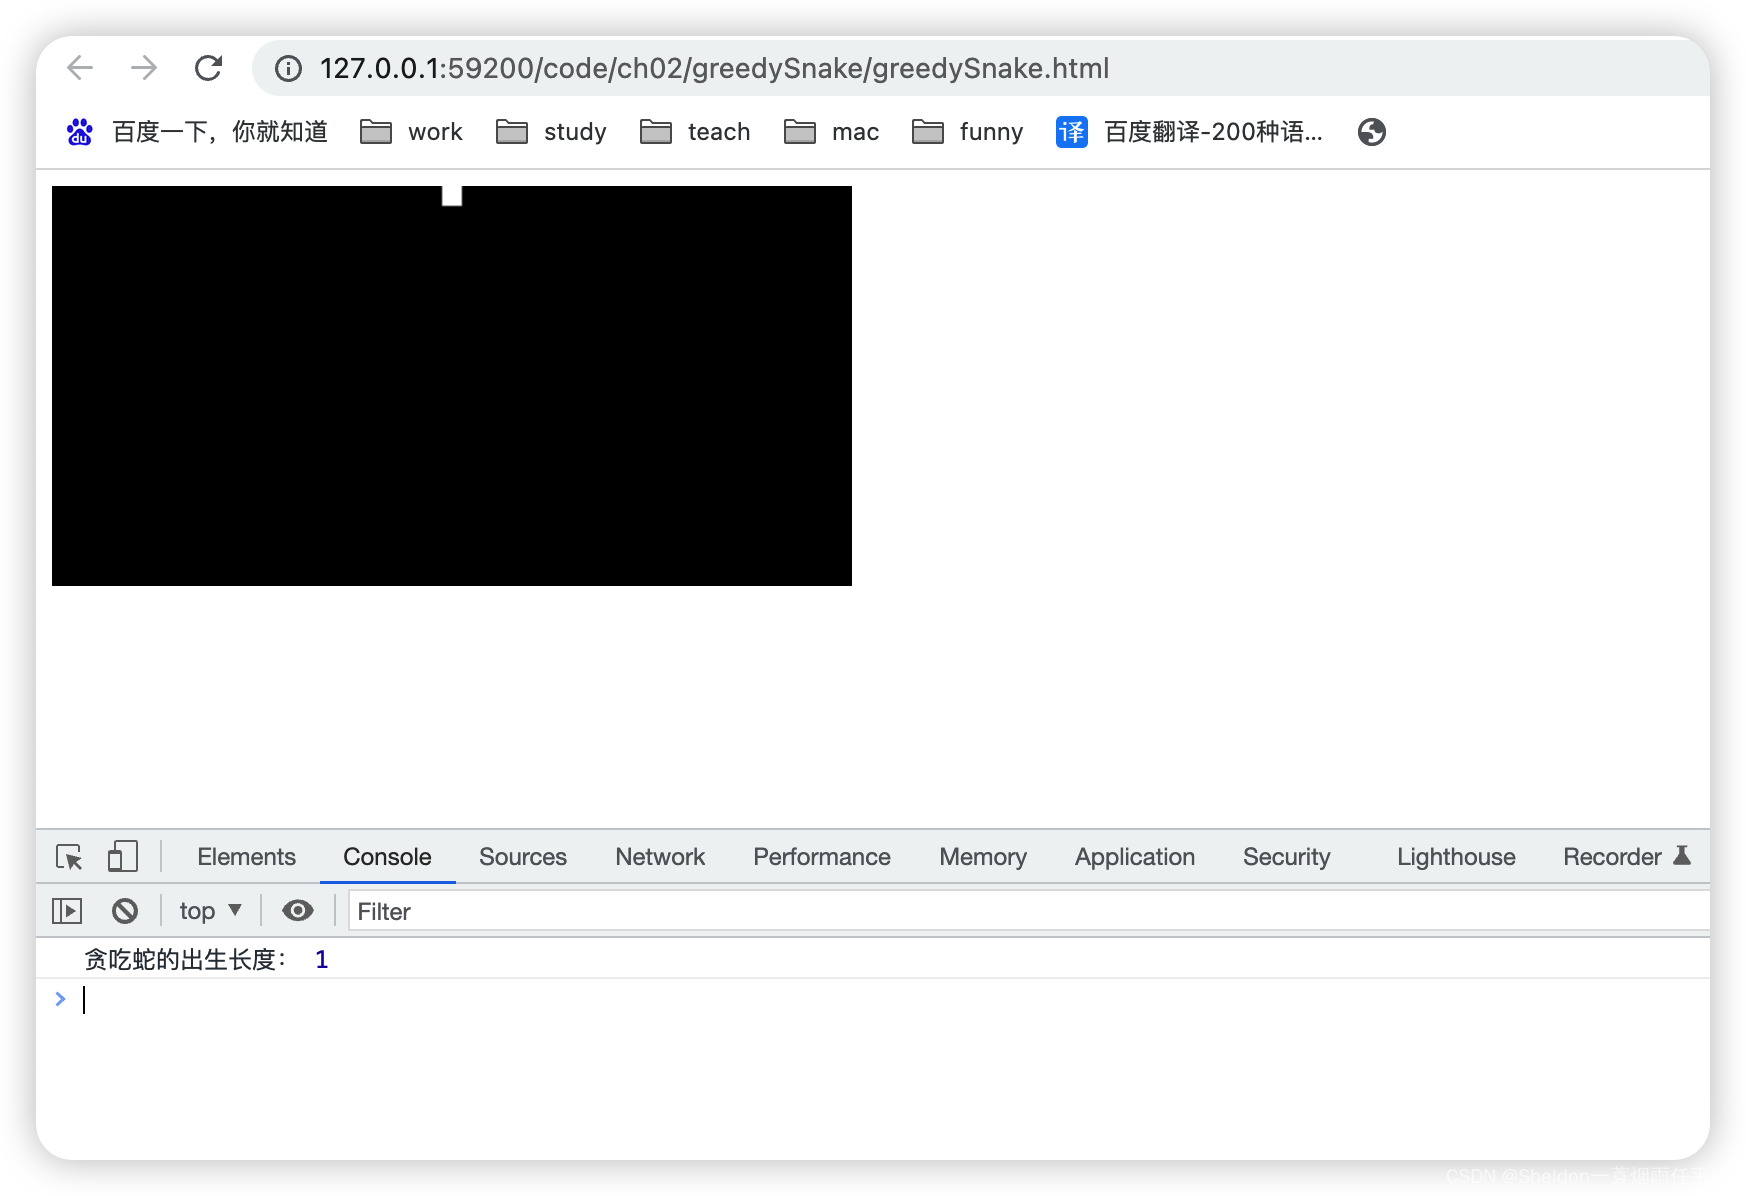
// 绘制贪吃蛇
console.log('贪吃蛇的出生长度:', snake_points.length)
for (const element of snake_points) {
const point = getGLPosition(element)
gl.vertexAttrib3f(a_Position, point.x, point.y, 0.0)
gl.vertexAttrib1f(a_PointSize, snakeSize.toFixed(1))
gl.drawArrays(gl.POINTS, 0, 1)
}
}
// 将计算像素坐标换算成WebGL坐标
function getGLPosition ({ x, y }) {
return {
x: x / (canvas.width / 2),
y: y / (canvas.height / 2)
}
}
2.9.2.1.2 步骤讲解
(1)将着色器的位置、大小和颜色设置为变量
(2)将主函数中用到的或者将来可能用到的变量设置为全局变量,并初始化画布。
(3)创建贪吃蛇数据,为了方便观察和操作,暂时只生成一个点位作为贪吃蛇(先忽略生长方向和长度)。在生成之前,需要判断点位是否在地图之外,如果是,就抛出异常;否则,正常生成点位数据。

(4)绘制贪吃蛇。
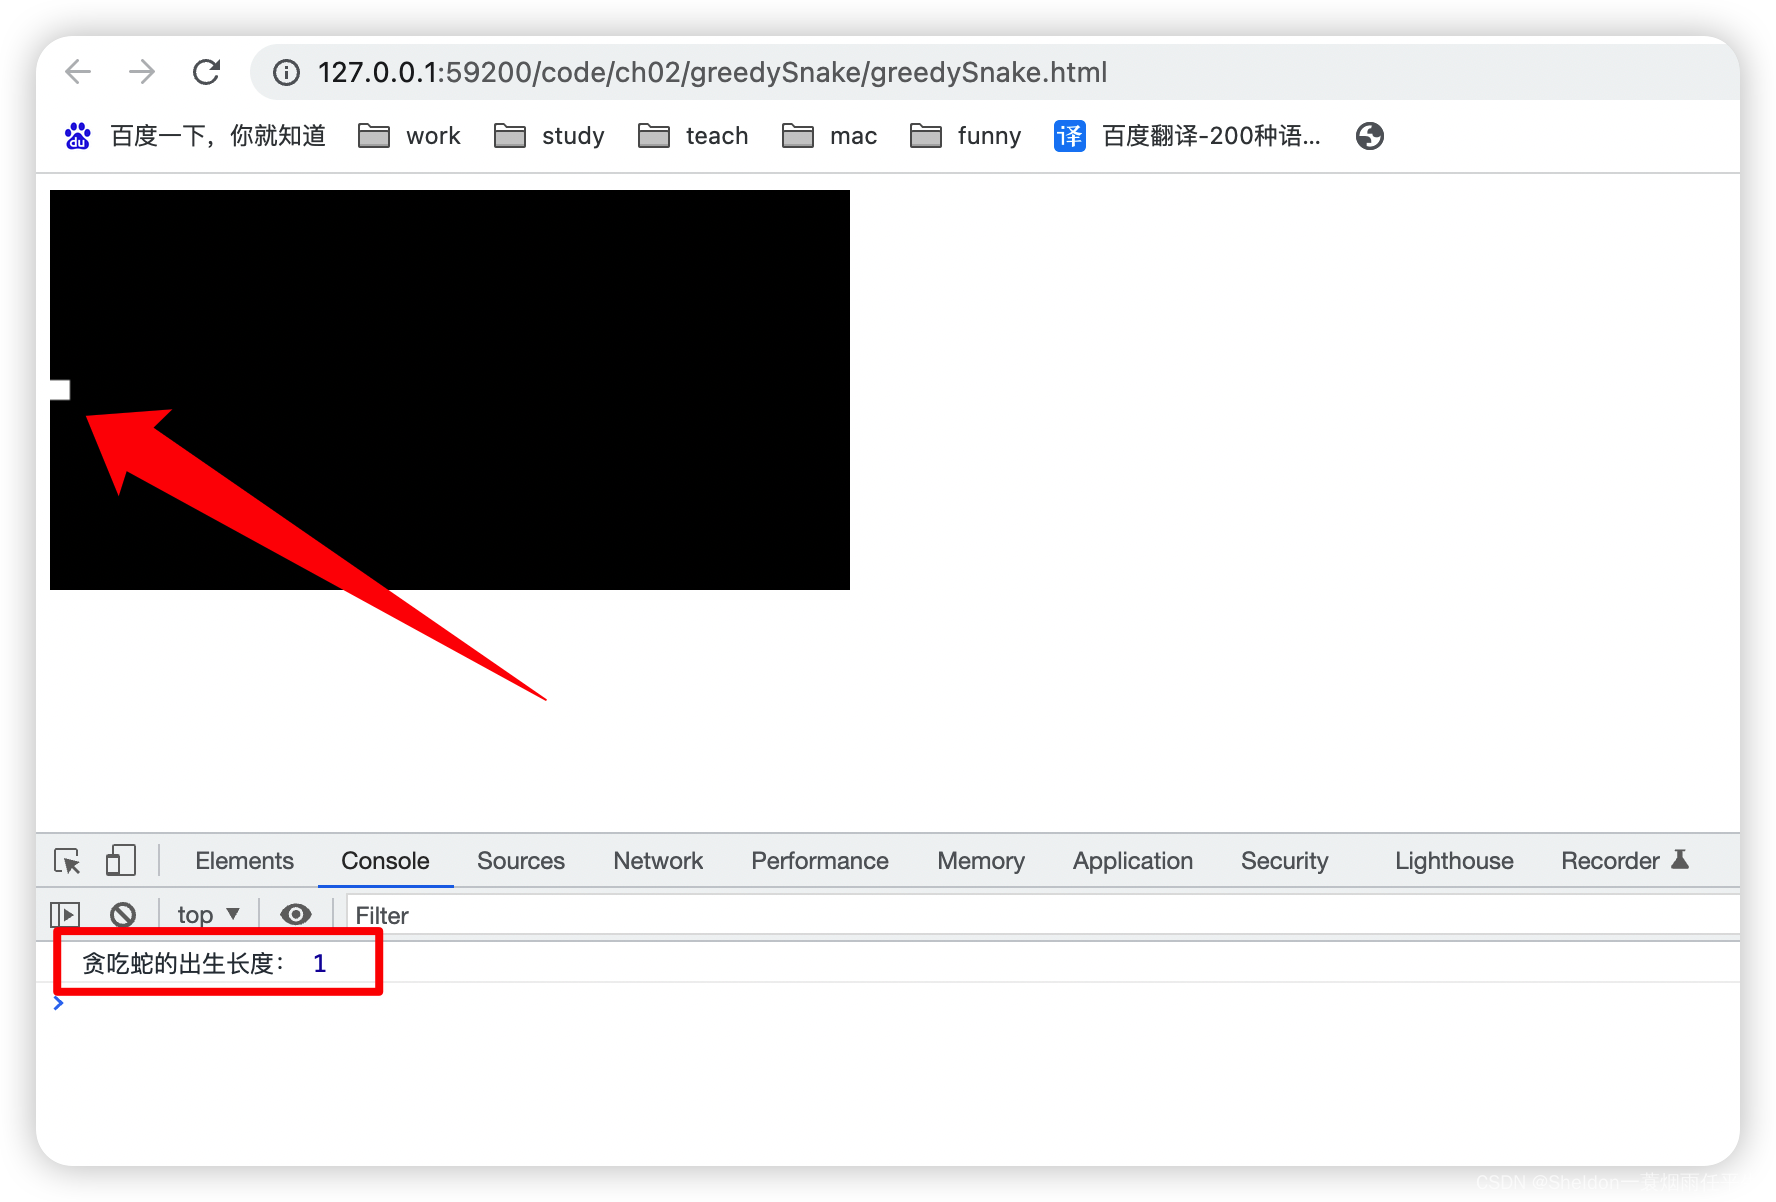
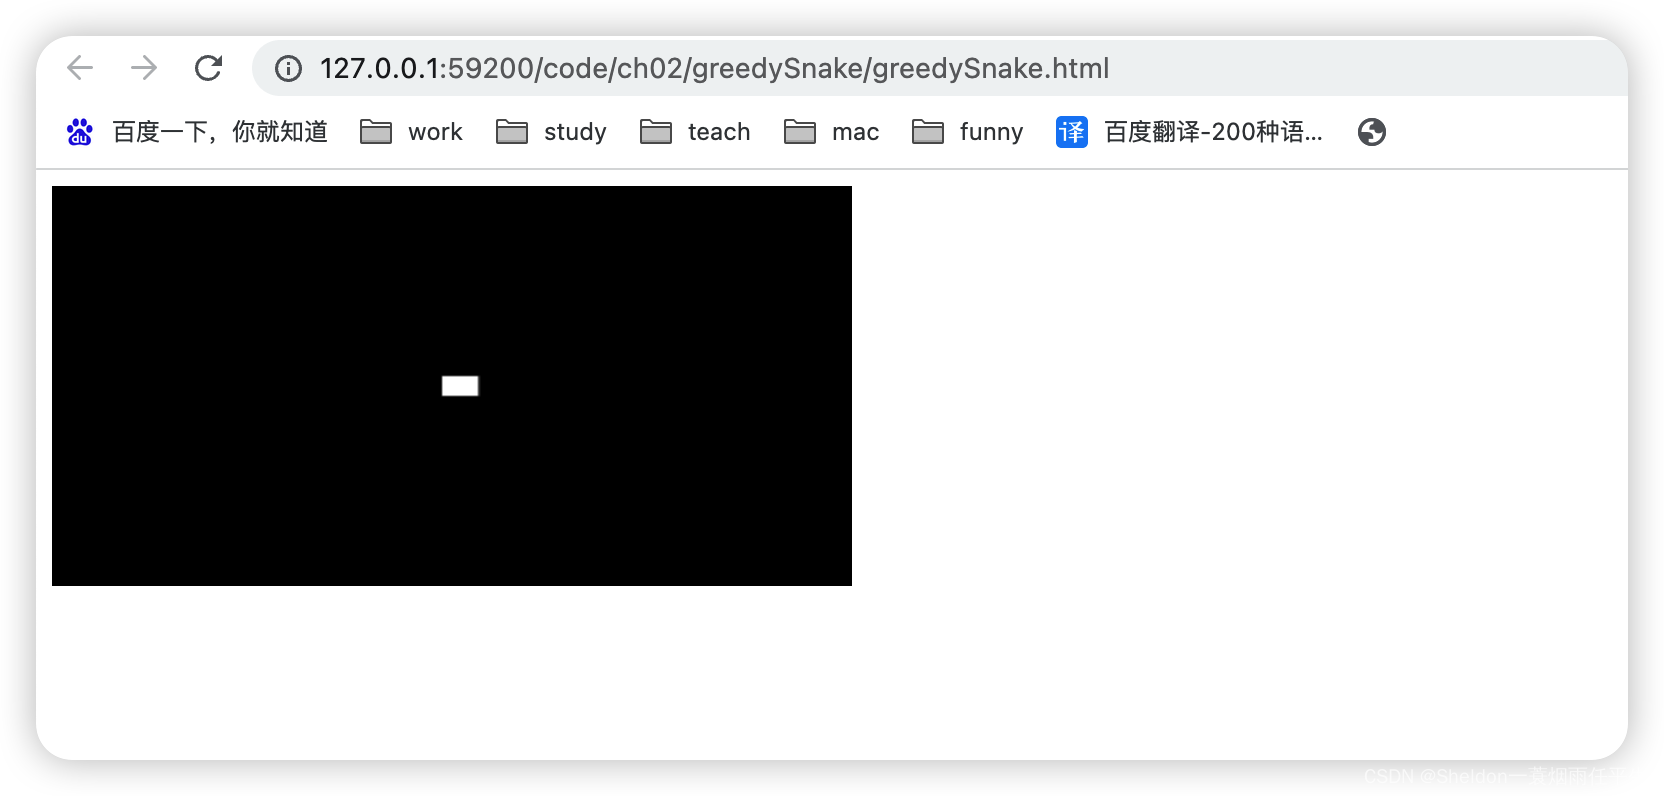
2.9.2.1 测试
(1)初始化坐标为{ x: -195, y: 0 }时,x在地图最左侧(即x = -canvas.width / 2 + snakeSize / 2)。
// 创建贪吃蛇数据
  createSnake({ x: -195, y: 0 })
(2)当初始化坐标为{ x: -196, y: 0 }时,抛出异常。
// 创建贪吃蛇数据
  createSnake({ x: -196, y: 0 })
(3)初始化坐标为{ x: 0, y: 95 }时,x在地图顶部(即y = canvas.height / 2 - snakeSize / 2)。
(4)当初始化坐标为{ x: 0, y: 96 }时,抛出异常。
// 创建贪吃蛇数据
  createSnake({ x: 0, y: 96 })

2.9.2.2 点击上、下、左、右,蛇按照方向移动
2.9.2.2.1 绘制效果和代码


/**
 * (1)开始时,生成一只蛇,可以初始化出生坐标、生长方向、生长长度;√
 * (2)点击上、下、左、右,蛇按照方向移动;
 * (3)蛇碰到地图边缘结束(地图的碰撞检测);
 * (4)开始时,生成100个随机大小、随机位置、随机颜色的食物;
 * (5)蛇移动碰到食物时,吃掉食物,长度变长;
 * (6)蛇的长度变大一定长时,宽度也随着变大;
 */

// 顶点着色器
const VSHADER_SOURCE =
  'attribute vec4 a_Position;\n' +
  'attribute float a_PointSize;\n' +
  'void main() {\n' +
  // 设置坐标
  ' gl_Position = a_Position;\n' +
  // 设置尺寸
  ' gl_PointSize = a_PointSize;\n' +
  '}\n'

// 片元着色器
const FSHADER_SOURCE =
  // 设置uniform变量之前,需要先设置精度
  'precision mediump float;\n' +
  'uniform vec4 u_FragColor;\n' +
  'void main() {\n' +
  // 设置颜色
  ' gl_FragColor = u_FragColor;\n' +
  '}\n'

/**
 * 将main函数中用到的参数设置为全局变量,方便其他函数调用
 */
let gl
// 着色器的位置、大小和颜色参数
let a_Position
let a_PointSize
let u_FragColor
// 获取canvas元素
const canvas = document.getElementById('webgl')
// 蛇位置数组
const snake_points = []
// 蛇的长度(初始化使用,准确来说是点位的数量)
let snakeLength = 1
// 蛇的运动方向
let moveDirection = 'right'
// 蛇的大小(蛇的每个点位宽度)
let snakeSize = 10

function main () {

  // 获取WebGL上下文
  gl = getWebGLContext(canvas)
  if (!gl) {
    return console.log('Failed to get the rendering context for WebGL')
  }

  // 初始化着色器
  if (!initShaders(gl, VSHADER_SOURCE, FSHADER_SOURCE)) {
    return console.log('Failed to initialize shaders')
  }

  a_Position = gl.getAttribLocation(gl.program, 'a_Position')
  if (a_Position < 0) {
    return console.log('Failed to get the storage location of a_Position')
  }

  a_PointSize = gl.getAttribLocation(gl.program, 'a_PointSize')

  u_FragColor = gl.getUniformLocation(gl.program, 'u_FragColor')
  if (!u_FragColor) {
    return console.log('Failed to get the storage location of u_FragColor')
  }

  // 设置canvas背景色
  gl.clearColor(0.0, 0.0, 0.0, 1.0)

  // 清空canvas
  gl.clear(gl.COLOR_BUFFER_BIT)

  // 创建贪吃蛇数据
  createSnake({ x: 0, y: 0 })
  draw()
}

/**
 * 创建贪吃蛇数据
 * @param {number} head 蛇出生的坐标
 * @param {string} direction 蛇的生长方向(up/down/left/right)
 * @param {number} length 蛇的出生长度
 */
function createSnake (head = { x: 0, y: 0 }, direction = 'right', length = 1) {
  snakeLength = length
  moveDirection = direction
  // 如果头部不在允许范围内,抛出错误
  if (isBeyond(head)) {
    throw new Error('贪吃蛇的头部不在地图内,请更换初始化数据')
  }
  snake_points.push({
    x: head.x,
    y: head.y
  })
}

// 判断蛇的点位超出允许范围内
function isBeyond ({ x, y }) {
  // 获取贪吃蛇可以存在的点位坐标
  let xRange = [-canvas.width / 2 + snakeSize / 2, canvas.width / 2 - snakeSize / 2]
  let yRange = [-canvas.height / 2 + snakeSize / 2, canvas.height / 2 - snakeSize / 2]
  if (x < xRange[0] || x > xRange[1] || y < yRange[0] || y > yRange[1]) {
    return true
  } else {
    return false
  }
}

// 绘制点位
function draw () {
  // 清空canvas
  gl.clear(gl.COLOR_BUFFER_BIT)
  // 绘制贪吃蛇
  for (const element of snake_points) {
    const point = getGLPosition(element)
    gl.vertexAttrib3f(a_Position, point.x, point.y, 0.0)
    gl.vertexAttrib1f(a_PointSize, snakeSize.toFixed(1))
    gl.drawArrays(gl.POINTS, 0, 1)
  }
}

// 将计算像素坐标换算成WebGL坐标
function getGLPosition ({ x, y }) {
  return {
    x: x / (canvas.width / 2),
    y: y / (canvas.height / 2)
  }
}

/**
 * 设置键盘事件
 */
// 上次点击的键位
let lastKey = ''
document.addEventListener('keydown', (e) => {
  const key = e.key
  // console.log('key', e)
  // 记录上次点击键位,避免多次触发动画
  if (key !== lastKey) {
    lastKey = key
  } else {
    return
  }
  // 设置动画方向
  if (key === 'ArrowUp') {
    moveDirection = 'up'
  } else if (key === 'ArrowDown') {
    moveDirection = 'down'
  } else if (key === 'ArrowLeft') {
    moveDirection = 'left'
  } else if (key === 'ArrowRight') {
    moveDirection = 'right'
  } else if (key === " ") {
    cancelAnimationFrame(rAFId)
    rAFId = null
    return
  }
  // 如果动画未执行,就执行动画
  if (!rAFId) {
    render()
  }
})

/**
 * 使用requestAnimationFrame方法代替setTimeout或者setInterval进行动画
 * 默认一秒60帧,即一秒运行动画60次
 */
let rAFId = null
function render (time) {
  t = 1 / 60 * 50
  // 每次移动,生成一个新的头部,删除旧的尾部
  const head = snake_points[0]
  const newHead = {
    x: head.x,
    y: head.y
  }
  if (moveDirection === 'up') {
    newHead.y = newHead.y + t
  } else if (moveDirection === 'down') {
    newHead.y = newHead.y - t
  } else if (moveDirection === 'left') {
    newHead.x = newHead.x - t
  } else if (moveDirection === 'right') {
    newHead.x = newHead.x + t
  }
  snake_points.pop()
  snake_points.unshift(newHead)
  draw()
  if (!isBeyond(newHead)) {
    rAFId = requestAnimationFrame(render)
  } else {
    console.log('time', time)
    cancelAnimationFrame(rAFId)
    rAFId = null
    alert('Game Over!')
  }
}
2.9.2.2.2 步骤讲解
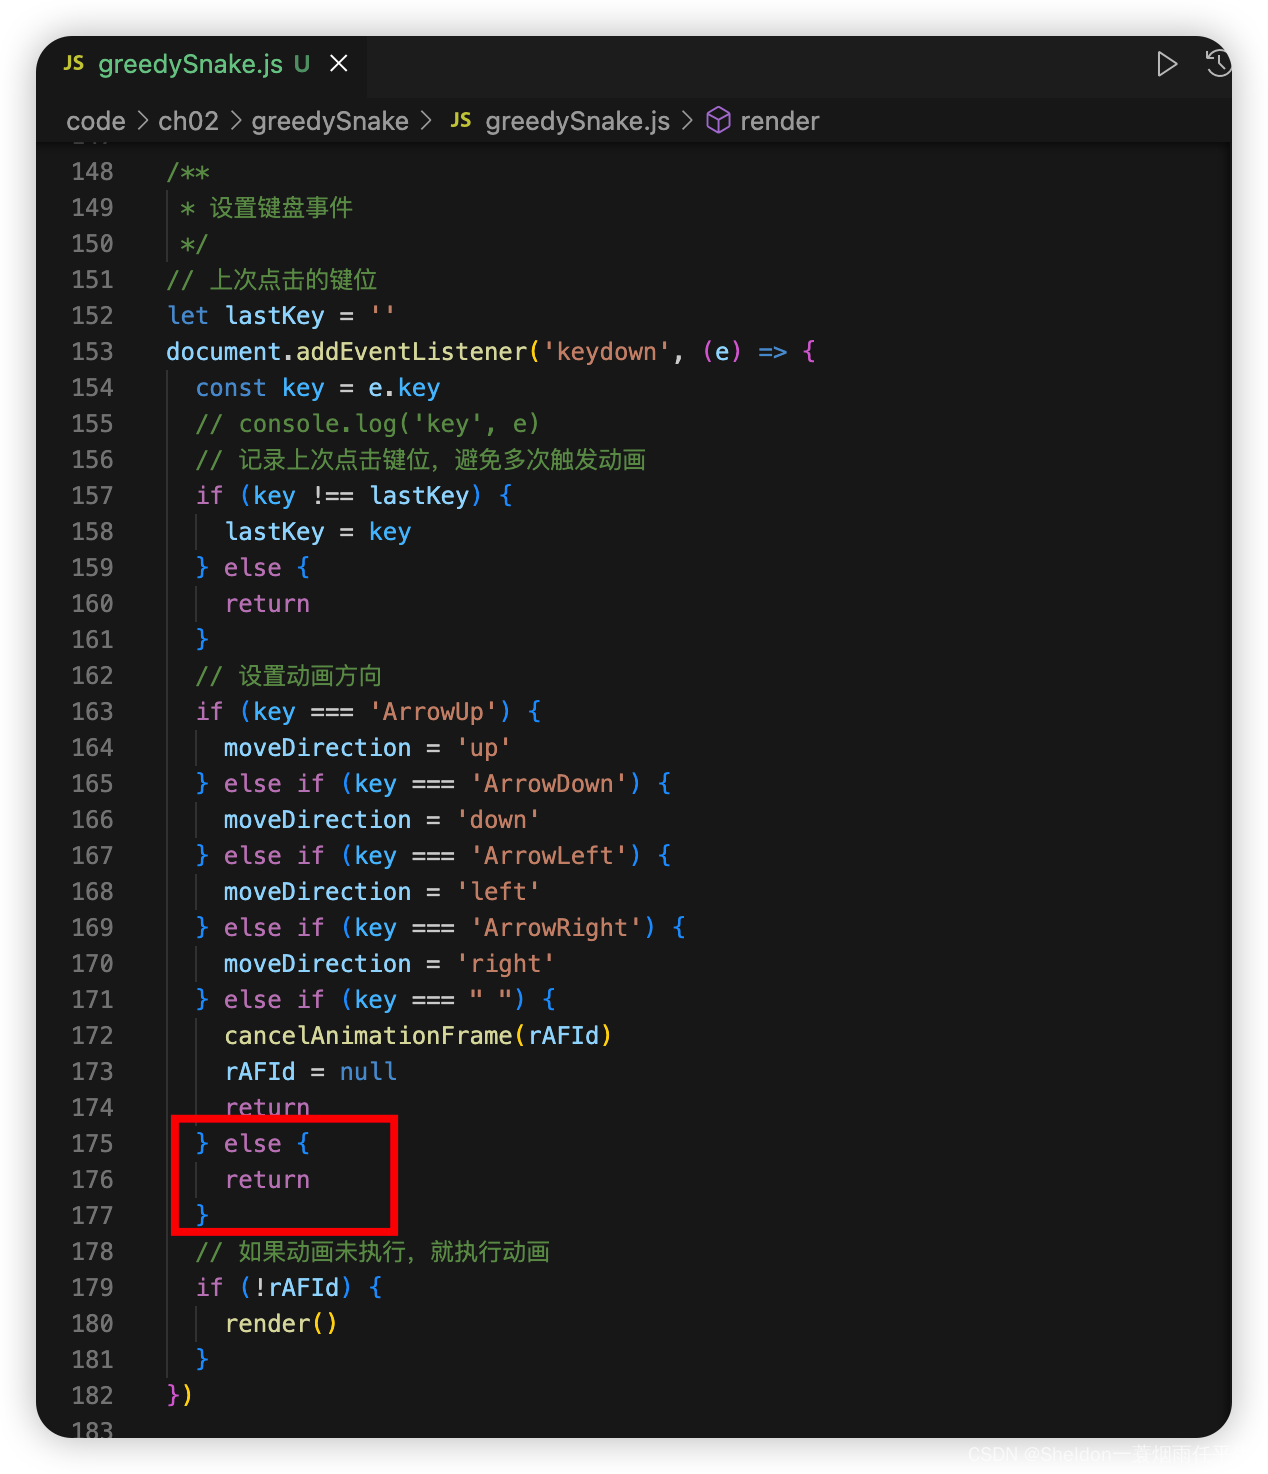
(1)设置键盘点击事件。点击上、下、左、右,设置运动方向,开始动画;点击空格,暂停动画。
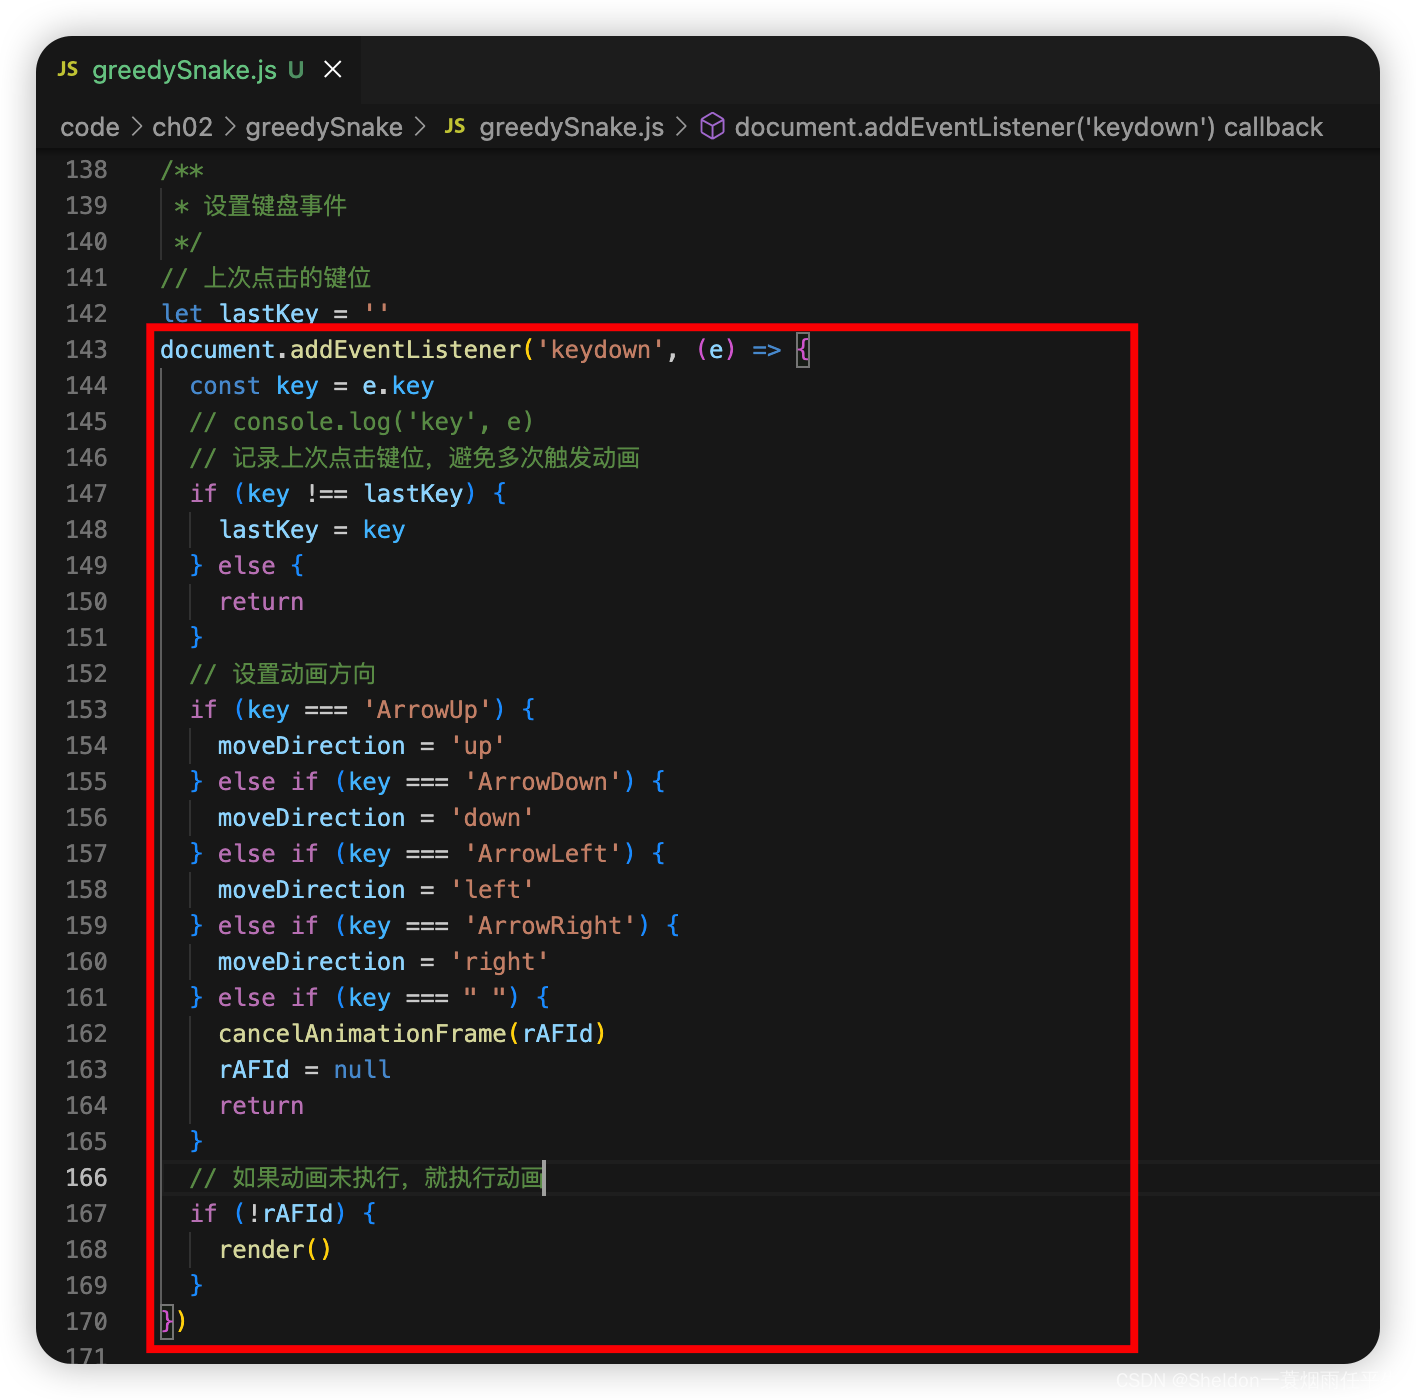
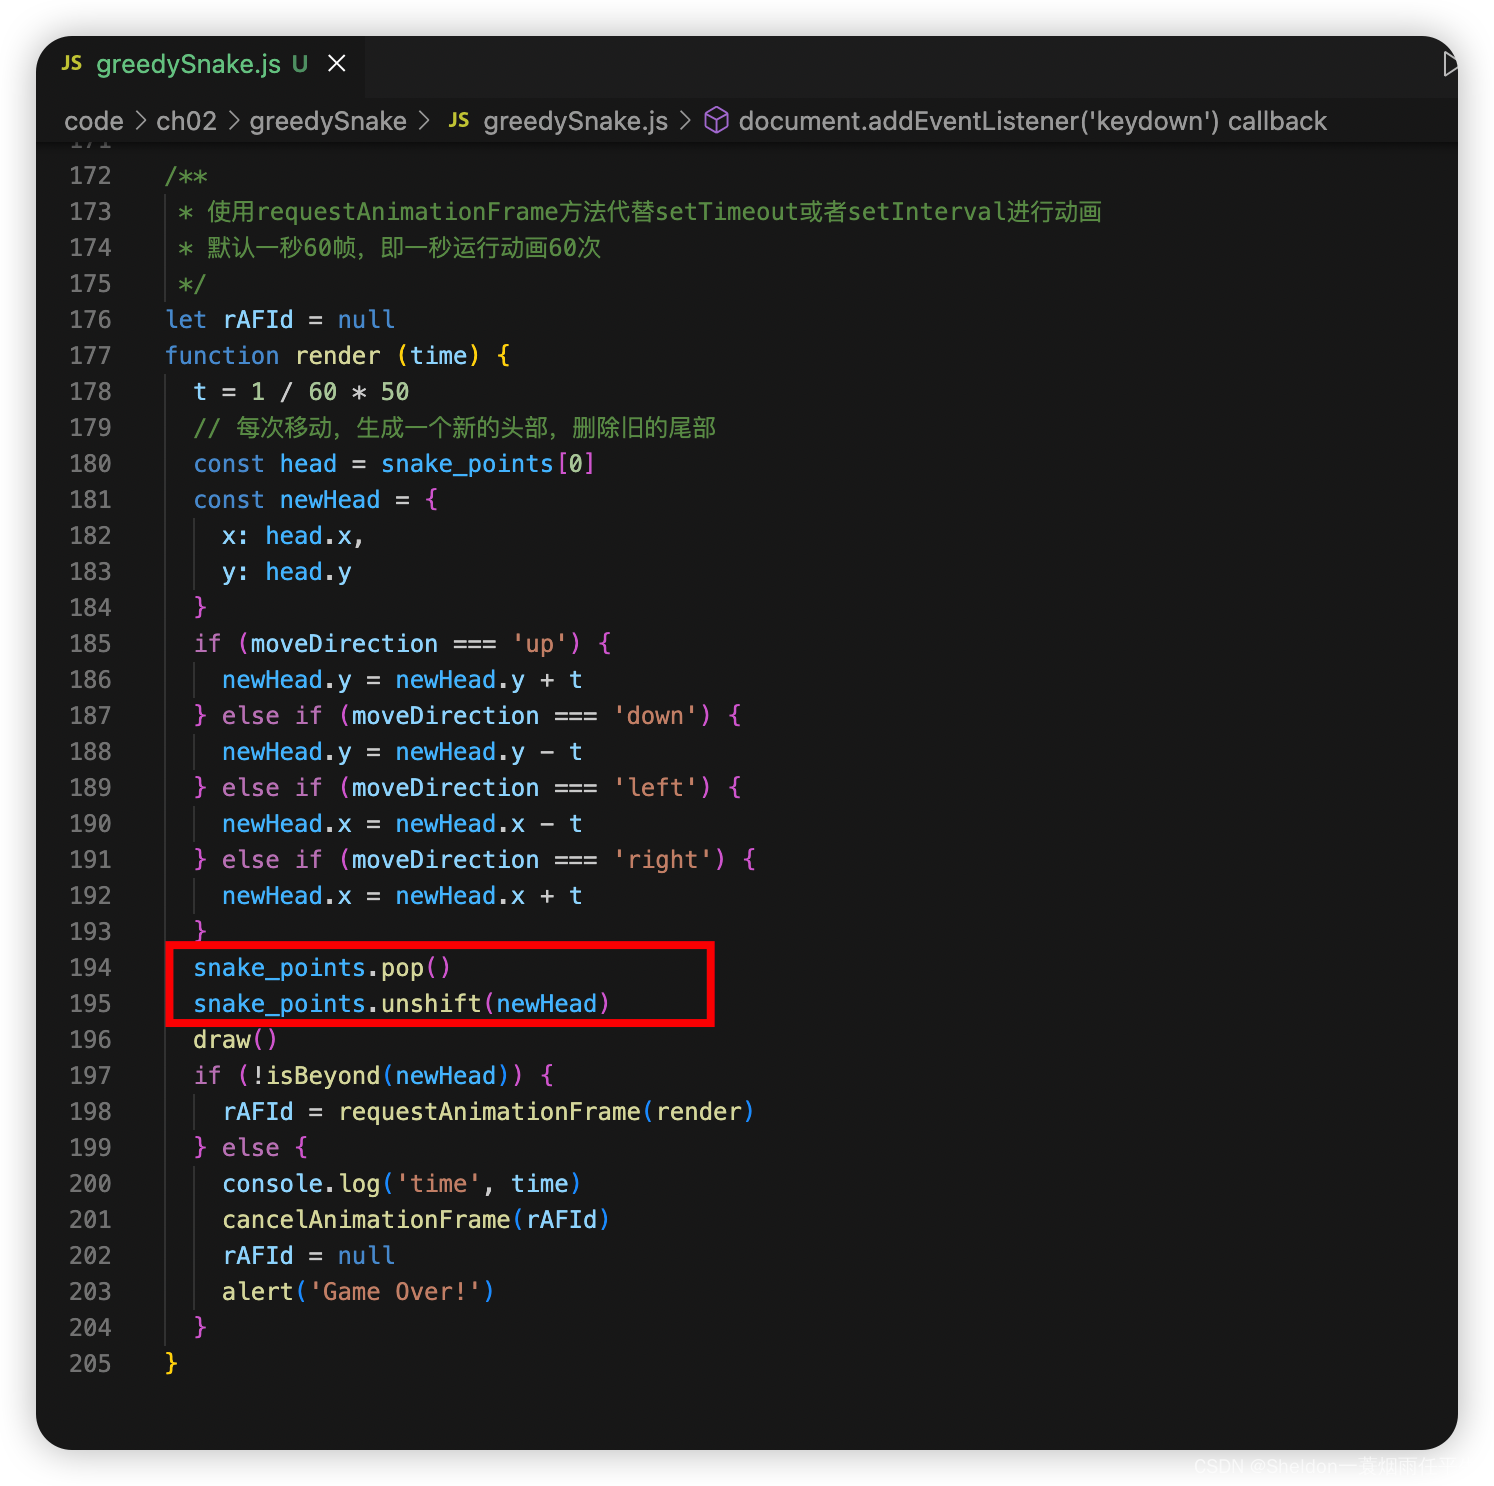
(2)设置贪吃蛇动画函数render。
主要思想就是每次移动,朝移动方向生成一个新的头部,删除旧的尾部。这也是为什么一开始就不生成固定长度的贪吃蛇的原因,因为随着蛇的运动速度(每个帧率移动的速度)变化,每个节点的间距也会发生改变。
这里使用requestAnimationFrame方法代替setTimeout或者setInterval进行动画,使之运动更加平滑。没有学习的同学,可以先百度下。
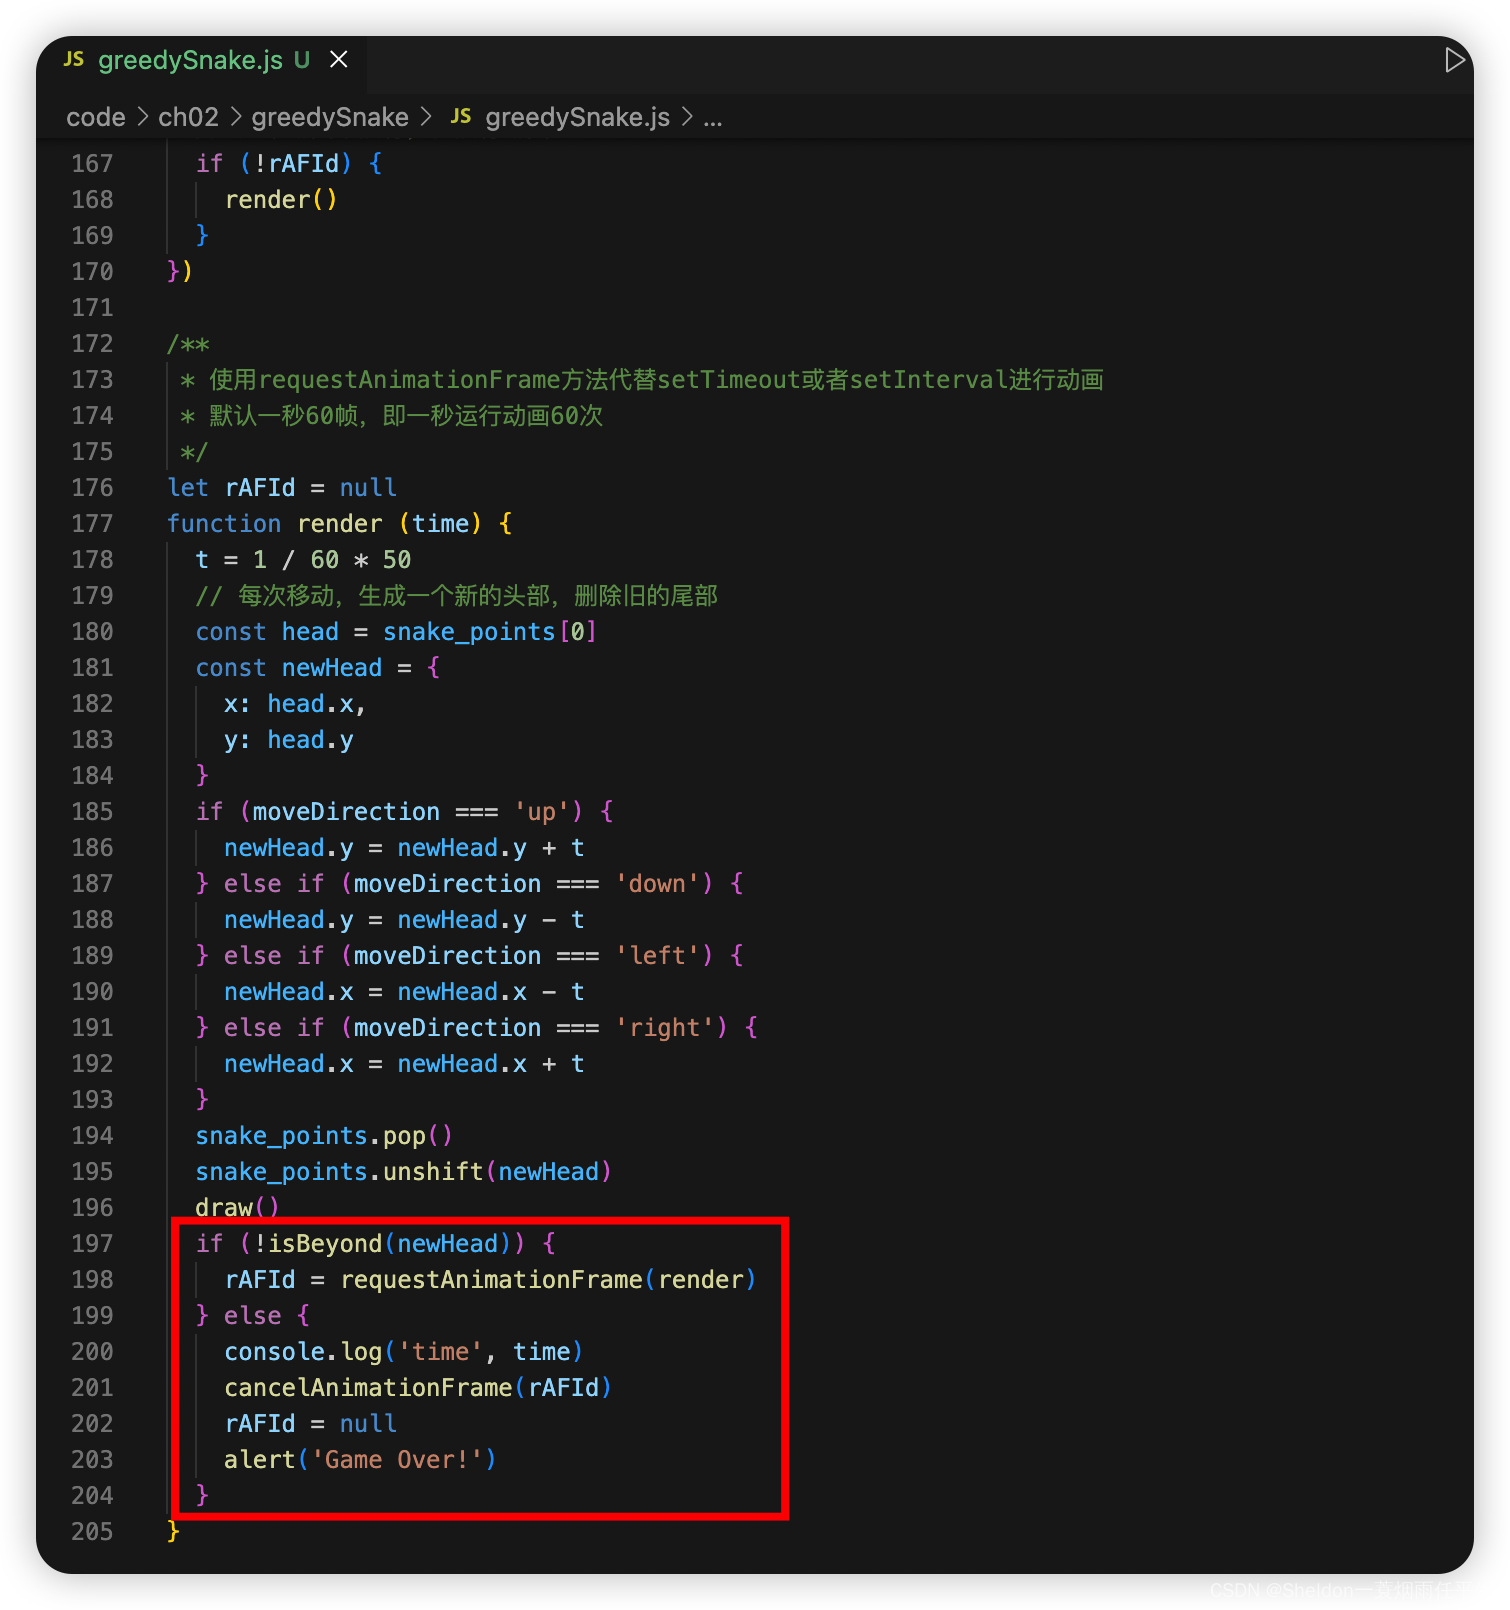
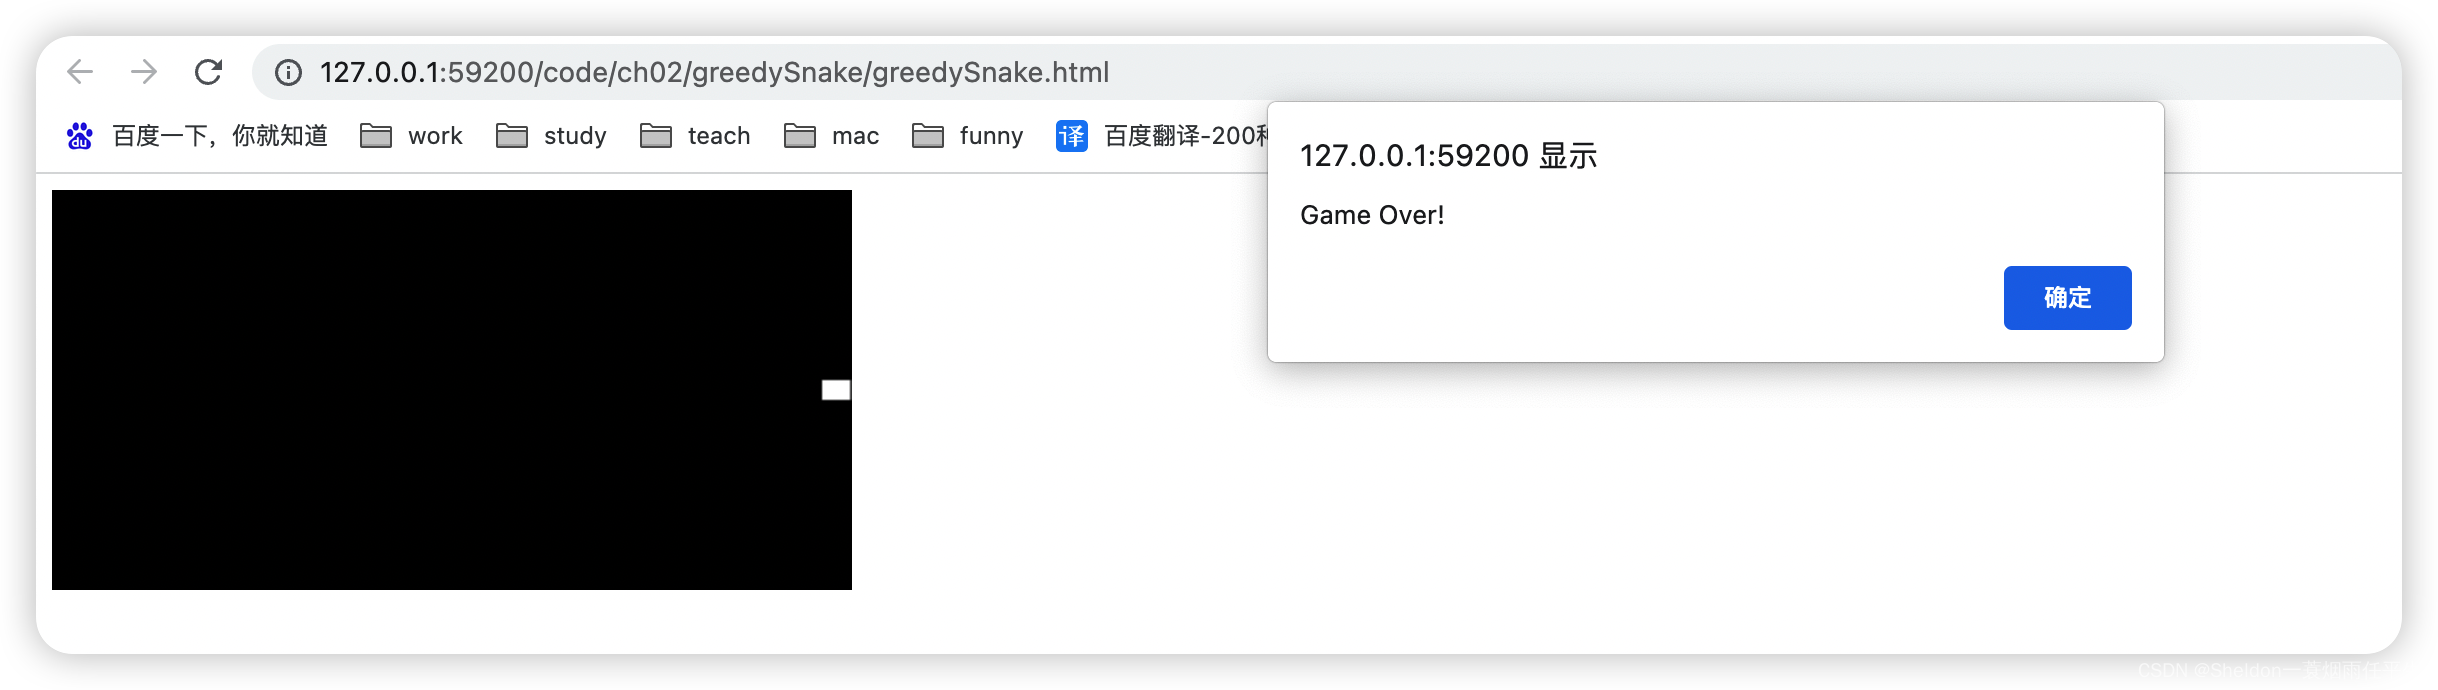
2.9.2.3 蛇碰到地图边缘结束游戏(地图的碰撞检测)
在上个步骤 2.9.2.2 中已经实现
关键代码:
if (!isBeyond(newHead)) {
    rAFId = requestAnimationFrame(render)
  } else {
    console.log('time', time)
    cancelAnimationFrame(rAFId)
    rAFId = null
    alert('Game Over!')
  }
2.9.2.4 初始化蛇的长度
2.9.2.4.1 绘制效果和代码
/**
 * (1)开始时,生成一只蛇,可以初始化出生坐标、生长方向、生长长度;√ 出生坐标
 * (2)点击上、下、左、右,蛇按照方向移动;
 * (3)蛇碰到地图边缘结束(地图的碰撞检测);
 * (4)开始时,生成100个随机大小、随机位置、随机颜色的食物;
 * (5)蛇移动碰到食物时,吃掉食物,长度变长;
 * (6)蛇的长度变大一定长时,宽度也随着变大;
 */

// 顶点着色器
const VSHADER_SOURCE =
  'attribute vec4 a_Position;\n' +
  'attribute float a_PointSize;\n' +
  'void main() {\n' +
  // 设置坐标
  ' gl_Position = a_Position;\n' +
  // 设置尺寸
  ' gl_PointSize = a_PointSize;\n' +
  '}\n'

// 片元着色器
const FSHADER_SOURCE =
  // 设置uniform变量之前,需要先设置精度
  'precision mediump float;\n' +
  'uniform vec4 u_FragColor;\n' +
  'void main() {\n' +
  // 设置颜色
  ' gl_FragColor = u_FragColor;\n' +
  '}\n'

/**
 * 将main函数中用到的参数设置为全局变量,方便其他函数调用
 */
let gl
// 着色器的位置、大小和颜色参数
let a_Position
let a_PointSize
let u_FragColor
// 获取canvas元素
const canvas = document.getElementById('webgl')
// 蛇位置数组
const snake_points = []
// 蛇的长度(初始化使用,准确来说是点位的数量)
let addLength = 0
// 蛇的运动方向
let moveDirection = 'right'
// 蛇的大小(蛇的每个点位宽度)
let snakeSize = 10
// 是否需要有成长的动画
let start = true

function main () {

  // 获取WebGL上下文
  gl = getWebGLContext(canvas)
  if (!gl) {
    return console.log('Failed to get the rendering context for WebGL')
  }

  // 初始化着色器
  if (!initShaders(gl, VSHADER_SOURCE, FSHADER_SOURCE)) {
    return console.log('Failed to initialize shaders')
  }

  a_Position = gl.getAttribLocation(gl.program, 'a_Position')
  if (a_Position < 0) {
    return console.log('Failed to get the storage location of a_Position')
  }

  a_PointSize = gl.getAttribLocation(gl.program, 'a_PointSize')

  u_FragColor = gl.getUniformLocation(gl.program, 'u_FragColor')
  if (!u_FragColor) {
    return console.log('Failed to get the storage location of u_FragColor')
  }

  // 设置canvas背景色
  gl.clearColor(0.0, 0.0, 0.0, 1.0)

  // 清空canvas
  gl.clear(gl.COLOR_BUFFER_BIT)

  // 创建贪吃蛇数据
  createSnake({ x: 0, y: 0 }, 'right', 0)
  // draw()
}

/**
 * 创建贪吃蛇数据
 * @param {number} head 蛇出生的坐标
 * @param {string} direction 蛇的生长方向(up/down/left/right)
 * @param {number} length 蛇添加的出生长度
 */
function createSnake (head = { x: 0, y: 0 }, direction = 'right', length = 0) {
  addLength = length
  moveDirection = direction
  // 如果头部不在允许范围内,抛出错误
  if (isBeyond(head)) {
    throw new Error('贪吃蛇的头部不在地图内,请更换初始化数据')
  }
  snake_points.push({
    x: head.x,
    y: head.y
  })
  draw()
  // 成长动画
  if (addLength > 0) {
    render()
  } else {
    // 终止成长
    start = false
  }
}

// 判断蛇的点位超出允许范围内
function isBeyond ({ x, y }) {
  // 获取贪吃蛇可以存在的点位坐标
  let xRange = [-canvas.width / 2 + snakeSize / 2, canvas.width / 2 - snakeSize / 2]
  let yRange = [-canvas.height / 2 + snakeSize / 2, canvas.height / 2 - snakeSize / 2]
  if (x < xRange[0] || x > xRange[1] || y < yRange[0] || y > yRange[1]) {
    return true
  } else {
    return false
  }
}

// 绘制点位
function draw () {
  // 清空canvas
  gl.clear(gl.COLOR_BUFFER_BIT)
  // 绘制贪吃蛇
  for (const element of snake_points) {
    const point = getGLPosition(element)
    gl.vertexAttrib3f(a_Position, point.x, point.y, 0.0)
    gl.vertexAttrib1f(a_PointSize, snakeSize.toFixed(1))
    gl.drawArrays(gl.POINTS, 0, 1)
  }
}

// 将计算像素坐标换算成WebGL坐标
function getGLPosition ({ x, y }) {
  return {
    x: x / (canvas.width / 2),
    y: y / (canvas.height / 2)
  }
}

/**
 * 设置键盘事件
 */
// 上次点击的键位
let lastKey = ''
document.addEventListener('keydown', (e) => {
  const key = e.key
  // console.log('key', e)
  // 记录上次点击键位,避免多次触发动画
  if (key !== lastKey) {
    lastKey = key
  } else {
    return
  }
  // 设置动画方向
  if (key === 'ArrowUp') {
    moveDirection = 'up'
  } else if (key === 'ArrowDown') {
    moveDirection = 'down'
  } else if (key === 'ArrowLeft') {
    moveDirection = 'left'
  } else if (key === 'ArrowRight') {
    moveDirection = 'right'
  } else if (key === " ") {
    cancelAnimationFrame(rAFId)
    rAFId = null
    return
  } else {
    return
  }
  // 如果动画未执行,就执行动画
  if (!rAFId) {
    render()
  }
})

/**
 * 使用requestAnimationFrame方法代替setTimeout或者setInterval进行动画
 * 默认一秒60帧,即一秒运行动画60次
 */
let rAFId = null
function render (time) {
  t = 1 / 60 * 50
  // 每次移动,生成一个新的头部,删除旧的尾部
  const head = snake_points[0]
  const newHead = {
    x: head.x,
    y: head.y
  }
  if (moveDirection === 'up') {
    newHead.y = newHead.y + t
  } else if (moveDirection === 'down') {
    newHead.y = newHead.y - t
  } else if (moveDirection === 'left') {
    newHead.x = newHead.x - t
  } else if (moveDirection === 'right') {
    newHead.x = newHead.x + t
  }
  // 如果没有需要新增,就直接删除尾巴,否则不删除,作为新增的部分
  if (addLength === 0) {
    snake_points.pop()
  } else {
    addLength--
  }
  snake_points.unshift(newHead)
  draw()
  // 如果是刚开始创建贪吃蛇,并且添加的部分已经完成,就终止成长动画
  if (start && addLength === 0) {
    cancelAnimationFrame(rAFId)
    rAFId = null
    start = false
    return
  }
  if (!isBeyond(newHead)) {
    rAFId = requestAnimationFrame(render)
  } else {
    console.log('time', time)
    cancelAnimationFrame(rAFId)
    rAFId = null
    alert('Game Over!')
  }
}
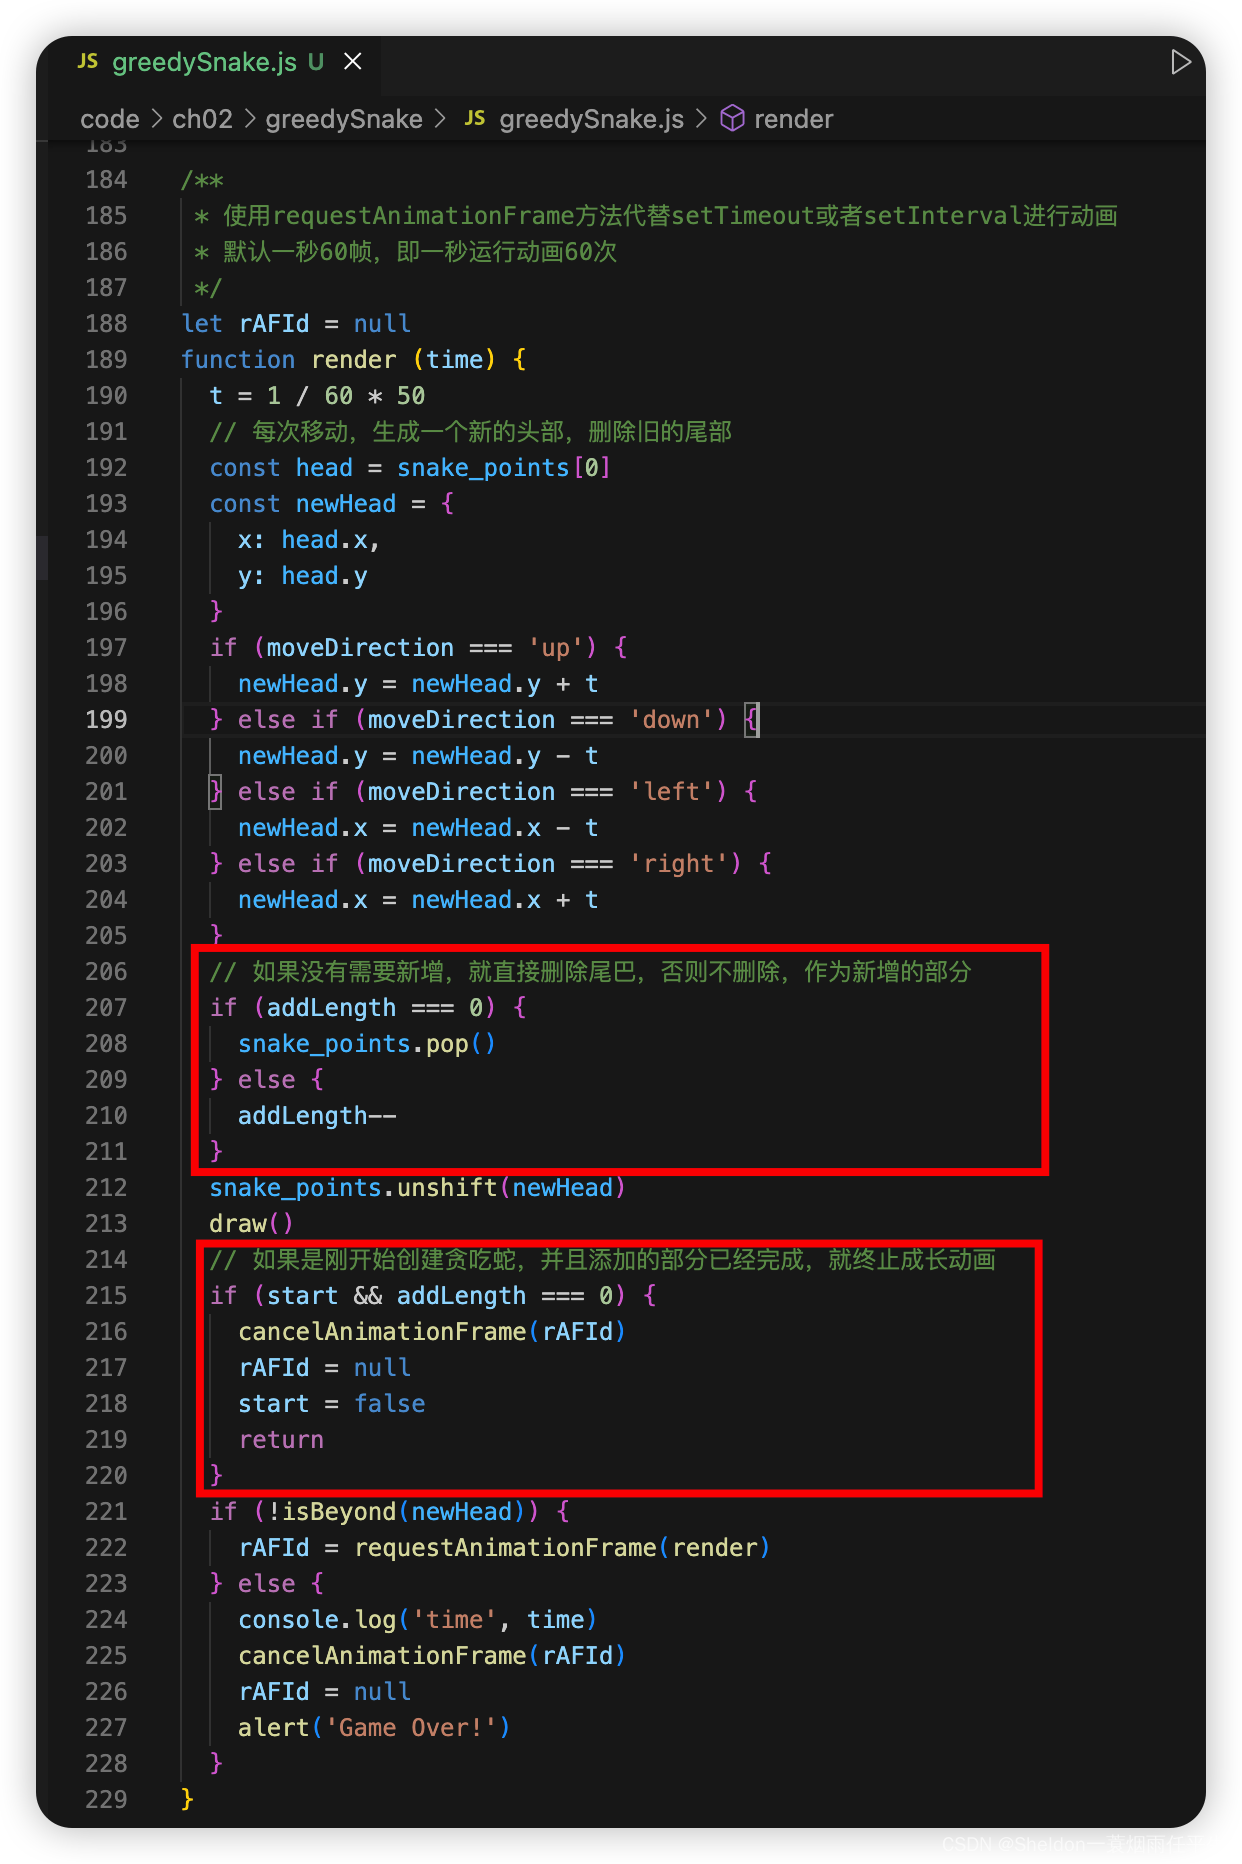
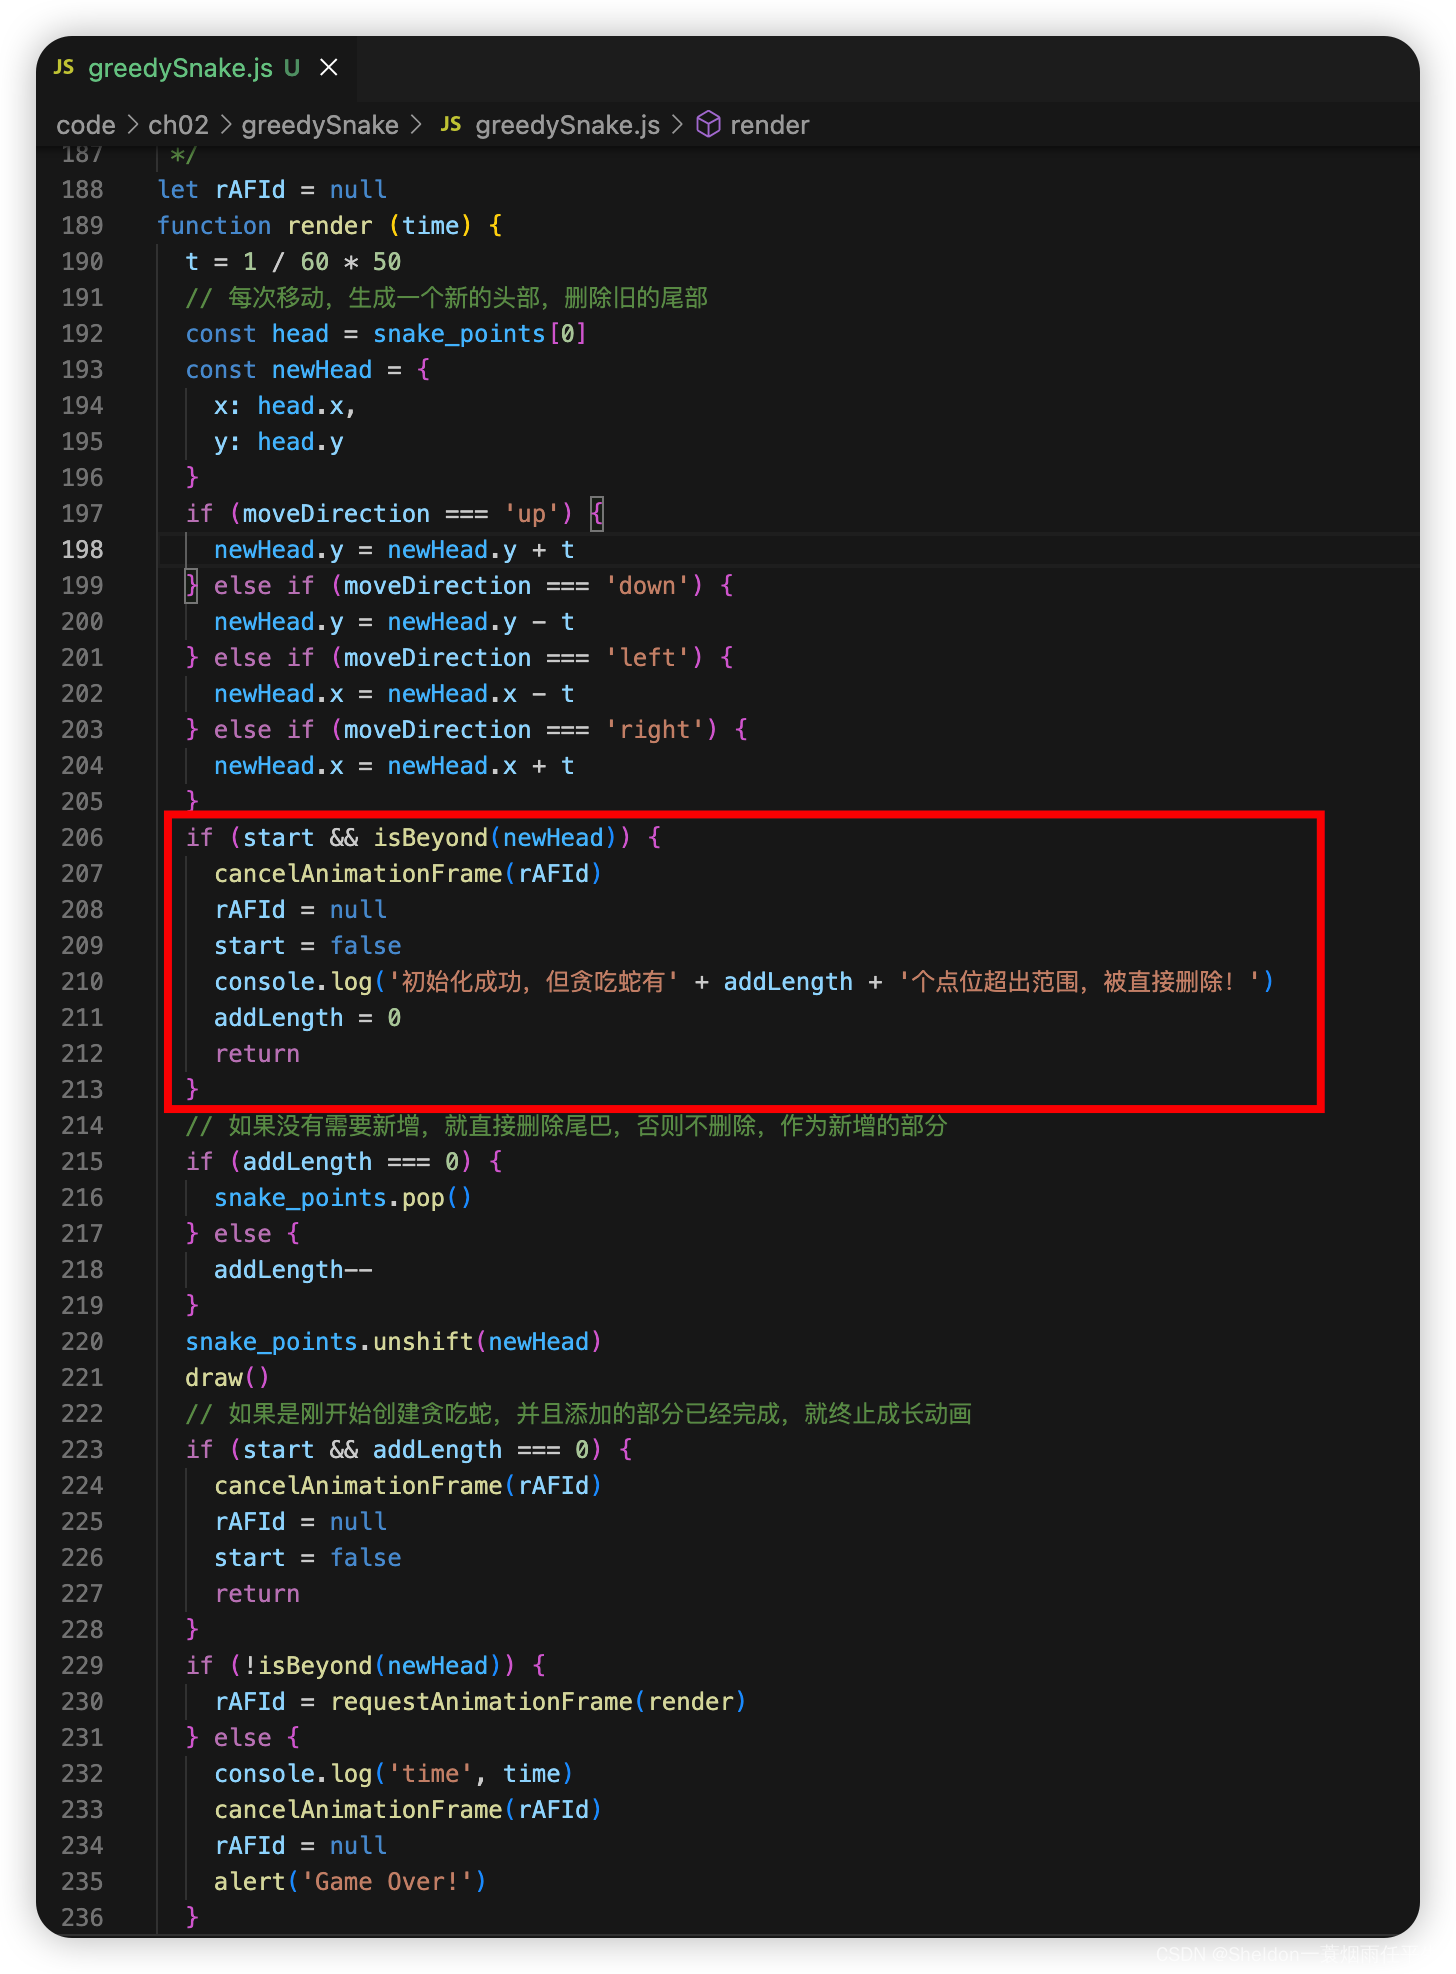
2.9.2.4.2 步骤讲解
(1)判断是否需要成长动画。
添加是否初始化成长动画的判断字段start,将贪吃蛇第一次绘制转移到createSnake()中,并在绘制后,根据addLength(原先的snakeLength字段修改,因为初始化已经有一个点了,修改为addLength更加合理)判断是否需要进行成长动画。
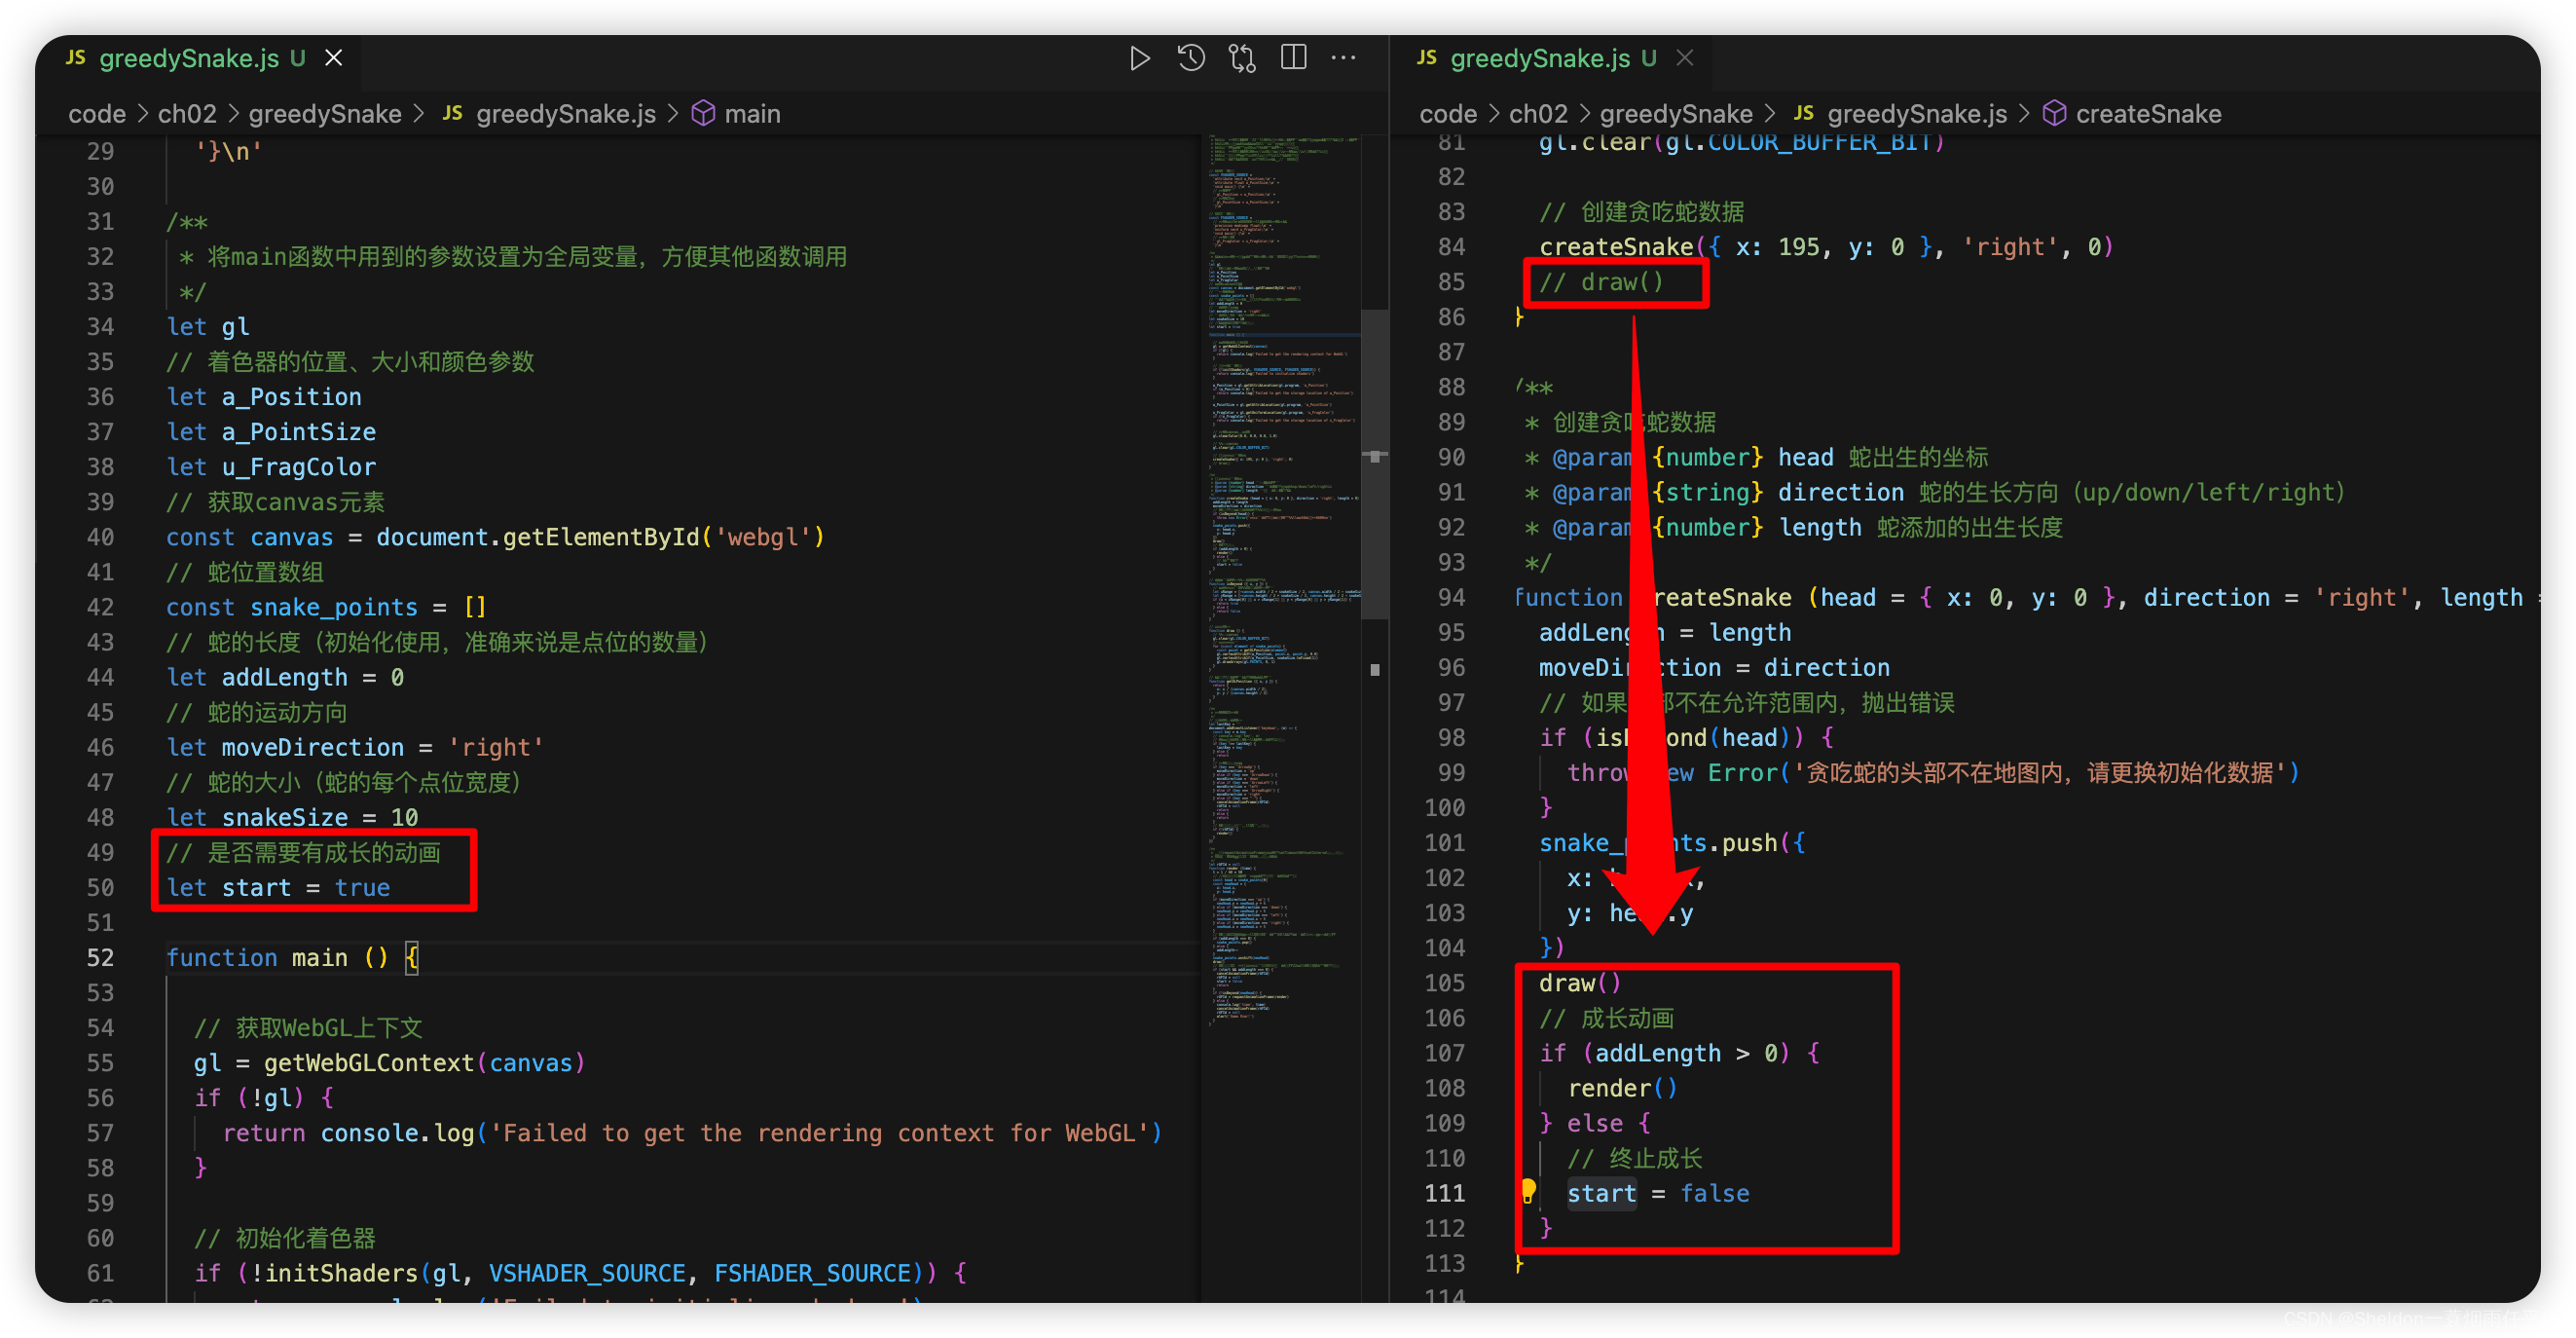
(2)贪吃蛇成长(初始化贪吃蛇长度)。
思路是,如果没有需要新增,就直接删除尾巴,否则不删除,作为新增的部分。如果是刚开始创建贪吃蛇,并且添加的部分已经完成,就终止成长动画
(3)顺便修复了为定义键位出发动画的bug。
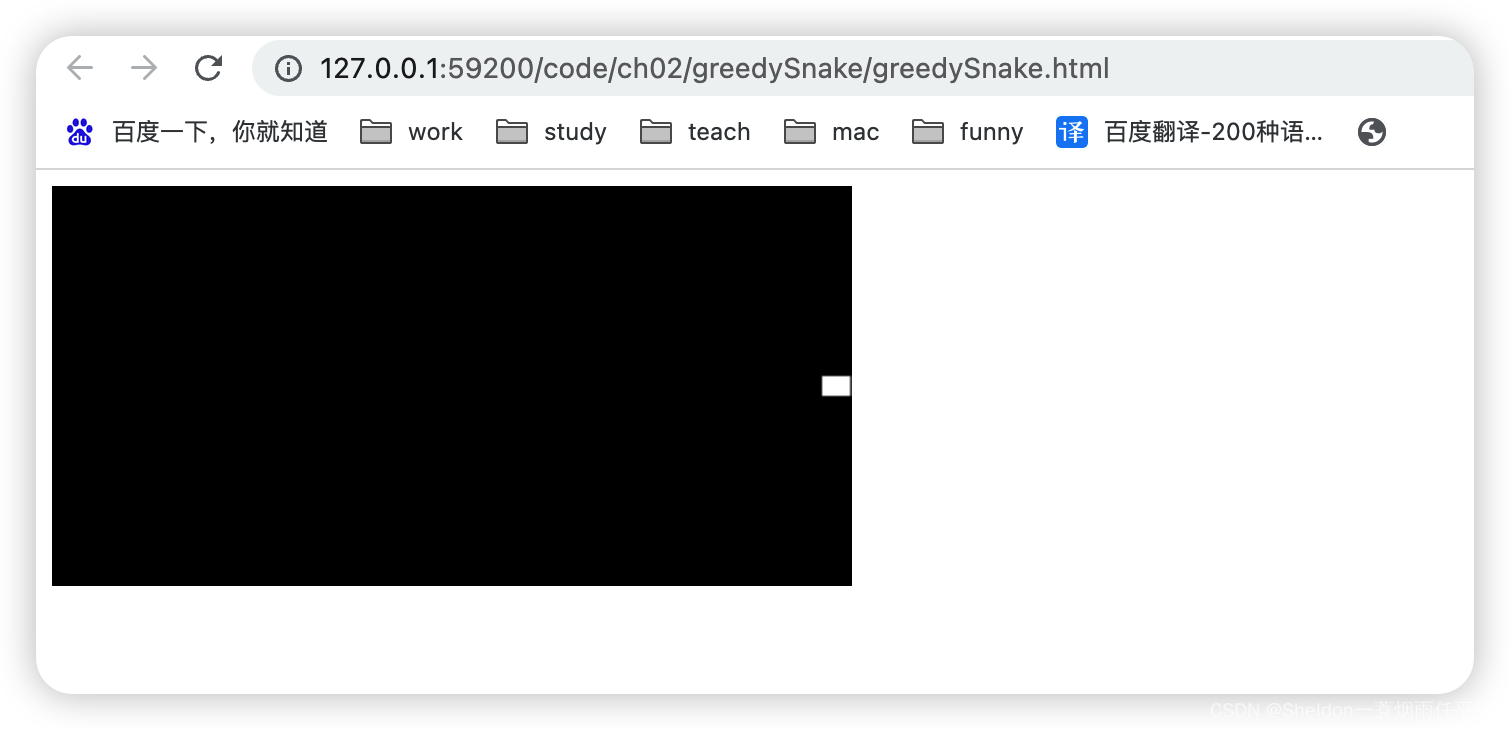
2.9.2.4.3 测试
(1)测试边缘。
发现贪吃蛇初始化增加长度后,超出或直接结束游戏。
// 创建贪吃蛇数据
  createSnake({ x: 190, y: 0 }, 'right', 10)
解决方案:将要超出时,结束成长动画。
if (start && isBeyond(newHead)) {
    cancelAnimationFrame(rAFId)
    rAFId = null
    start = false
    console.log('初始化成功,但贪吃蛇有' + addLength + '个点位超出范围,被直接删除!')
    addLength = 0
    return
  }
2.9.2.5 开始时,生成100个随机大小、随机位置、随机颜色的食物
2.9.2.5.1 绘制效果和代码
这里修改了canvas的高度,贪吃蛇的长度和大小。
/**
* (1)开始时,生成一只蛇,可以初始化出生坐标、生长方向、生长长度;√ 出生坐标
* (2)点击上、下、左、右,蛇按照方向移动;√
* (3)蛇碰到地图边缘结束(地图的碰撞检测);√
* (4)开始时,生成100个随机大小、随机位置、随机颜色的食物;
* (5)蛇移动碰到食物时,吃掉食物,长度变长;
* (6)蛇的长度变大一定长时,宽度也随着变大;
*/
// 顶点着色器
const VSHADER_SOURCE =
'attribute vec4 a_Position;\n' +
'attribute float a_PointSize;\n' +
'void main() {\n' +
// 设置坐标
' gl_Position = a_Position;\n' +
// 设置尺寸
' gl_PointSize = a_PointSize;\n' +
'}\n'
// 片元着色器
const FSHADER_SOURCE =
// 设置uniform变量之前,需要先设置精度
'precision mediump float;\n' +
'uniform vec4 u_FragColor;\n' +
'void main() {\n' +
// 设置颜色
' gl_FragColor = u_FragColor;\n' +
'}\n'
/**
* 将main函数中用到的参数设置为全局变量,方便其他函数调用
*/
let gl
// 着色器的位置、大小和颜色参数
let a_Position
let a_PointSize
let u_FragColor
// 获取canvas元素
const canvas = document.getElementById('webgl')
// 蛇位置数组
const snake_points = []
// 蛇的长度(初始化使用,准确来说是点位的数量)
let addLength = 0
// 蛇的运动方向
let moveDirection = 'right'
// 蛇的大小(蛇的每个点位宽度)
let snakeSize = 5
// 是否需要有成长的动画
let start = true
function main () {
// 获取WebGL上下文
gl = getWebGLContext(canvas)
if (!gl) {
return console.log('Failed to get the rendering context for WebGL')
}
// 初始化着色器
if (!initShaders(gl, VSHADER_SOURCE, FSHADER_SOURCE)) {
return console.log('Failed to initialize shaders')
}
a_Position = gl.getAttribLocation(gl.program, 'a_Position')
if (a_Position < 0) {
return console.log('Failed to get the storage location of a_Position')
}
a_PointSize = gl.getAttribLocation(gl.program, 'a_PointSize')
u_FragColor = gl.getUniformLocation(gl.program, 'u_FragColor')
if (!u_FragColor) {
return console.log('Failed to get the storage location of u_FragColor')
}
// 设置canvas背景色
gl.clearColor(0.0, 0.0, 0.0, 1.0)
// 清空canvas
gl.clear(gl.COLOR_BUFFER_BIT)
// 创建贪吃蛇数据
createSnake({ x: 0, y: 0 }, 'right', 20)
// 创建食物
createFoods(300, 5)
}
/**
* 创建贪吃蛇数据
* @param {number} head 蛇出生的坐标
* @param {string} direction 蛇的生长方向(up/down/left/right)
* @param {number} length 蛇添加的出生长度
*/
function createSnake (head = { x: 0, y: 0 }, direction = 'right', length = 0) {
addLength = length
moveDirection = direction
// 如果头部不在允许范围内,抛出错误
if (isBeyond(head)) {
throw new Error('贪吃蛇的头部不在地图内,请更换初始化数据')
}
snake_points.push({
x: head.x,
y: head.y
})
draw()
// 成长动画
if (addLength > 0) {
render()
} else {
// 终止成长
start = false
}
}
// 判断蛇的点位超出允许范围内
function isBeyond ({ x, y }) {
// 获取贪吃蛇可以存在的点位坐标
let xRange = [-canvas.width / 2 + snakeSize / 2, canvas.width / 2 - snakeSize / 2]
let yRange = [-canvas.height / 2 + snakeSize / 2, canvas.height / 2 - snakeSize / 2]
if (x < xRange[0] || x > xRange[1] || y < yRange[0] || y > yRange[1]) {
return true
} else {
return false
}
}
// 绘制点位
function draw () {
// 清空canvas
gl.clear(gl.COLOR_BUFFER_BIT)
// 绘制贪吃蛇
for (const element of snake_points) {
const point = getGLPosition(element)
gl.vertexAttrib3f(a_Position, point.x, point.y, 0.0)
gl.vertexAttrib1f(a_PointSize, snakeSize.toFixed(1))
gl.drawArrays(gl.POINTS, 0, 1)
}
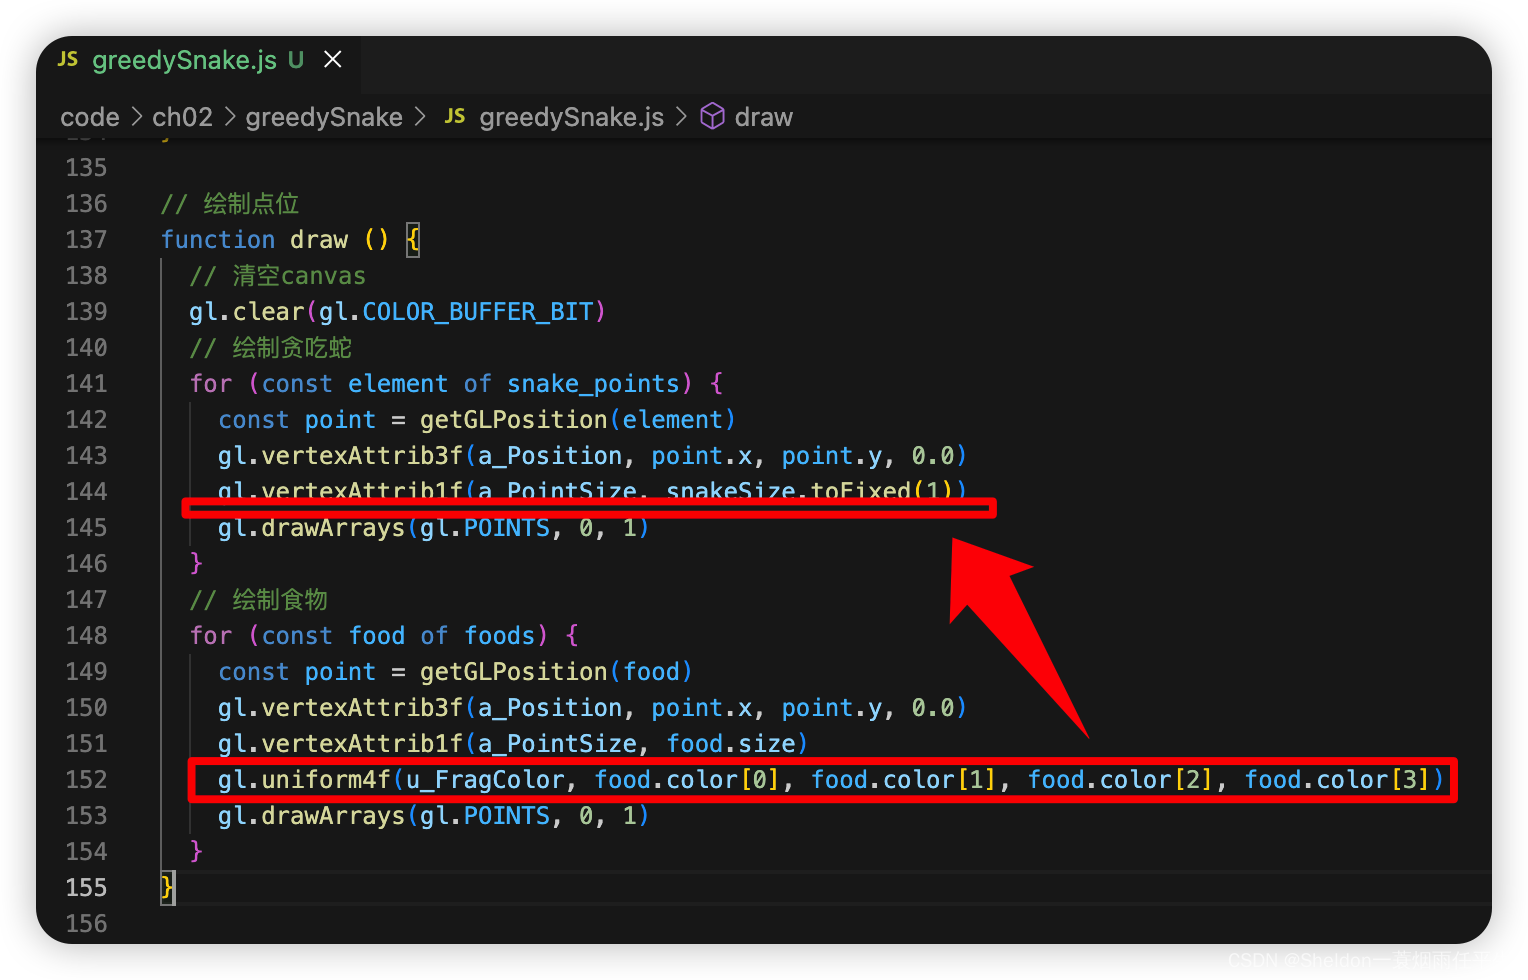
// 绘制食物
for (const food of foods) {
const point = getGLPosition(food)
gl.vertexAttrib3f(a_Position, point.x, point.y, 0.0)
gl.vertexAttrib1f(a_PointSize, food.size)
gl.uniform4f(u_FragColor, food.color[0], food.color[1], food.color[2], food.color[3])
gl.drawArrays(gl.POINTS, 0, 1)
}
}
// 将计算像素坐标换算成WebGL坐标
function getGLPosition ({ x, y }) {
return {
x: x / (canvas.width / 2),
y: y / (canvas.height / 2)
}
}
/**
* 设置键盘事件
*/
// 上次点击的键位
let lastKey = ''
document.addEventListener('keydown', (e) => {
const key = e.key
// console.log('key', e)
// 记录上次点击键位,避免多次触发动画
if (key !== lastKey) {
lastKey = key
} else {
return
}
// 设置动画方向
if (key === 'ArrowUp') {
moveDirection = 'up'
} else if (key === 'ArrowDown') {
moveDirection = 'down'
} else if (key === 'ArrowLeft') {
moveDirection = 'left'
} else if (key === 'ArrowRight') {
moveDirection = 'right'
} else if (key === " ") {
cancelAnimationFrame(rAFId)
rAFId = null
return
} else {
return
}
// 如果动画未执行,就执行动画
if (!rAFId) {
render()
}
})
/**
* 使用requestAnimationFrame方法代替setTimeout或者setInterval进行动画
* 默认一秒60帧,即一秒运行动画60次
*/
let rAFId = null
function render (time) {
t = 1 / 60 * 50
// 每次移动,生成一个新的头部,删除旧的尾部
const head = snake_points[0]
const newHead = {
x: head.x,
y: head.y
}
if (moveDirection === 'up') {
newHead.y = newHead.y + t
} else if (moveDirection === 'down') {
newHead.y = newHead.y - t
} else if (moveDirection === 'left') {
newHead.x = newHead.x - t
} else if (moveDirection === 'right') {
newHead.x = newHead.x + t
}
if (start && isBeyond(newHead)) {
cancelAnimationFrame(rAFId)
rAFId = null
start = false
console.log('初始化成功,但贪吃蛇有' + addLength + '个点位超出范围,被直接删除!')
addLength = 0
return
}
// 如果没有需要新增,就直接删除尾巴,否则不删除,作为新增的部分
if (addLength === 0) {
snake_points.pop()
} else {
addLength--
}
snake_points.unshift(newHead)
draw()
// 如果是刚开始创建贪吃蛇,并且添加的部分已经完成,就终止成长动画
if (start && addLength === 0) {
cancelAnimationFrame(rAFId)
rAFId = null
start = false
return
}
if (!isBeyond(newHead)) {
rAFId = requestAnimationFrame(render)
} else {
console.log('time', time)
cancelAnimationFrame(rAFId)
rAFId = null
alert('Game Over!')
}
}
const foods = []
/**
* 生成位置随机、大小随机、颜色随机的食物数据
* @param {number} maxSize 食物的最大大小
*/
function createFood (maxSize = 10) {
// 位置随机
let x = canvas.width / 2 - Math.random() * canvas.width
let y = canvas.height / 2 - Math.random() * canvas.height
// 大小随机
let size = Math.floor((Math.random() * maxSize) + 1);
// 颜色随机
let color = [
Number(Math.random().toFixed(1)),
Number(Math.random().toFixed(1)),
Number(Math.random().toFixed(1)),
1.0
]
foods.push({
x: x,
y: y,
size: size,
color: color
})
}
/**
* 生成指定数量的食物数据
* @param {number} number 生成的食物数量
* @param {number} maxSize 食物的最大大小
*/
function createFoods (number = 100, maxSize = 10) {
console.log('number', number)
for (let i = 0; i < number; i++) {
createFood(maxSize)
}
console.log('foods', foods)
// 绘制
draw()
}
2.9.2.5.2 步骤讲解
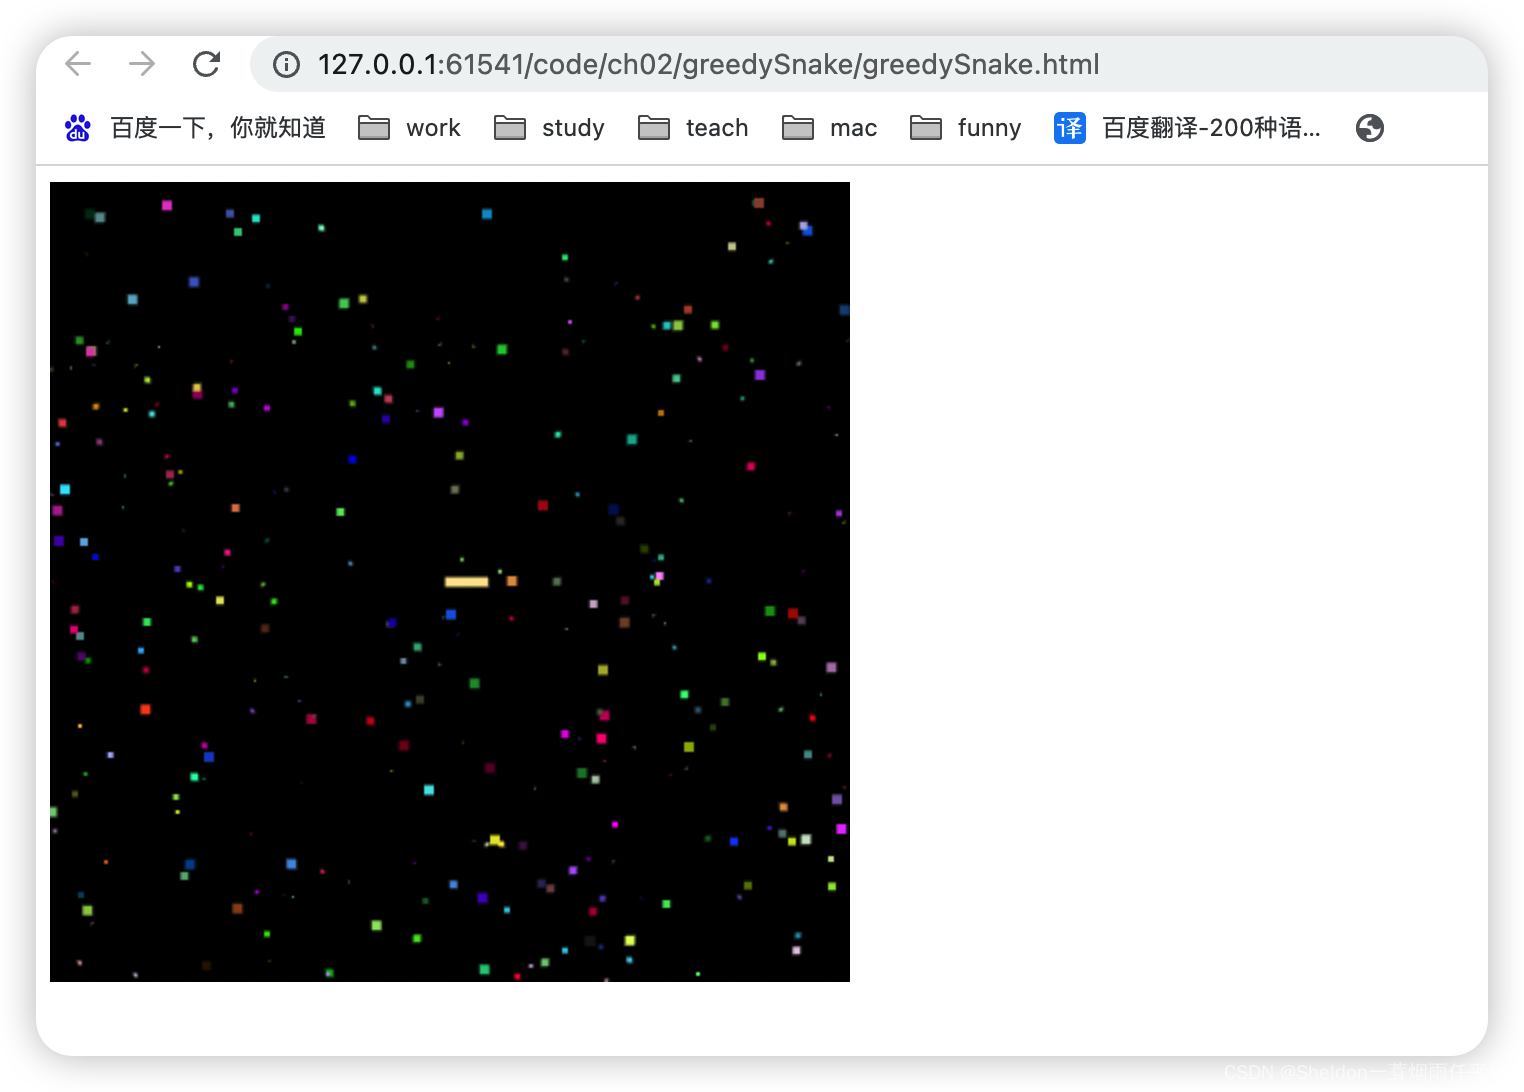
(1)创建生成食物函数,生成位置随机、大小随机、颜色随机的食物数据。
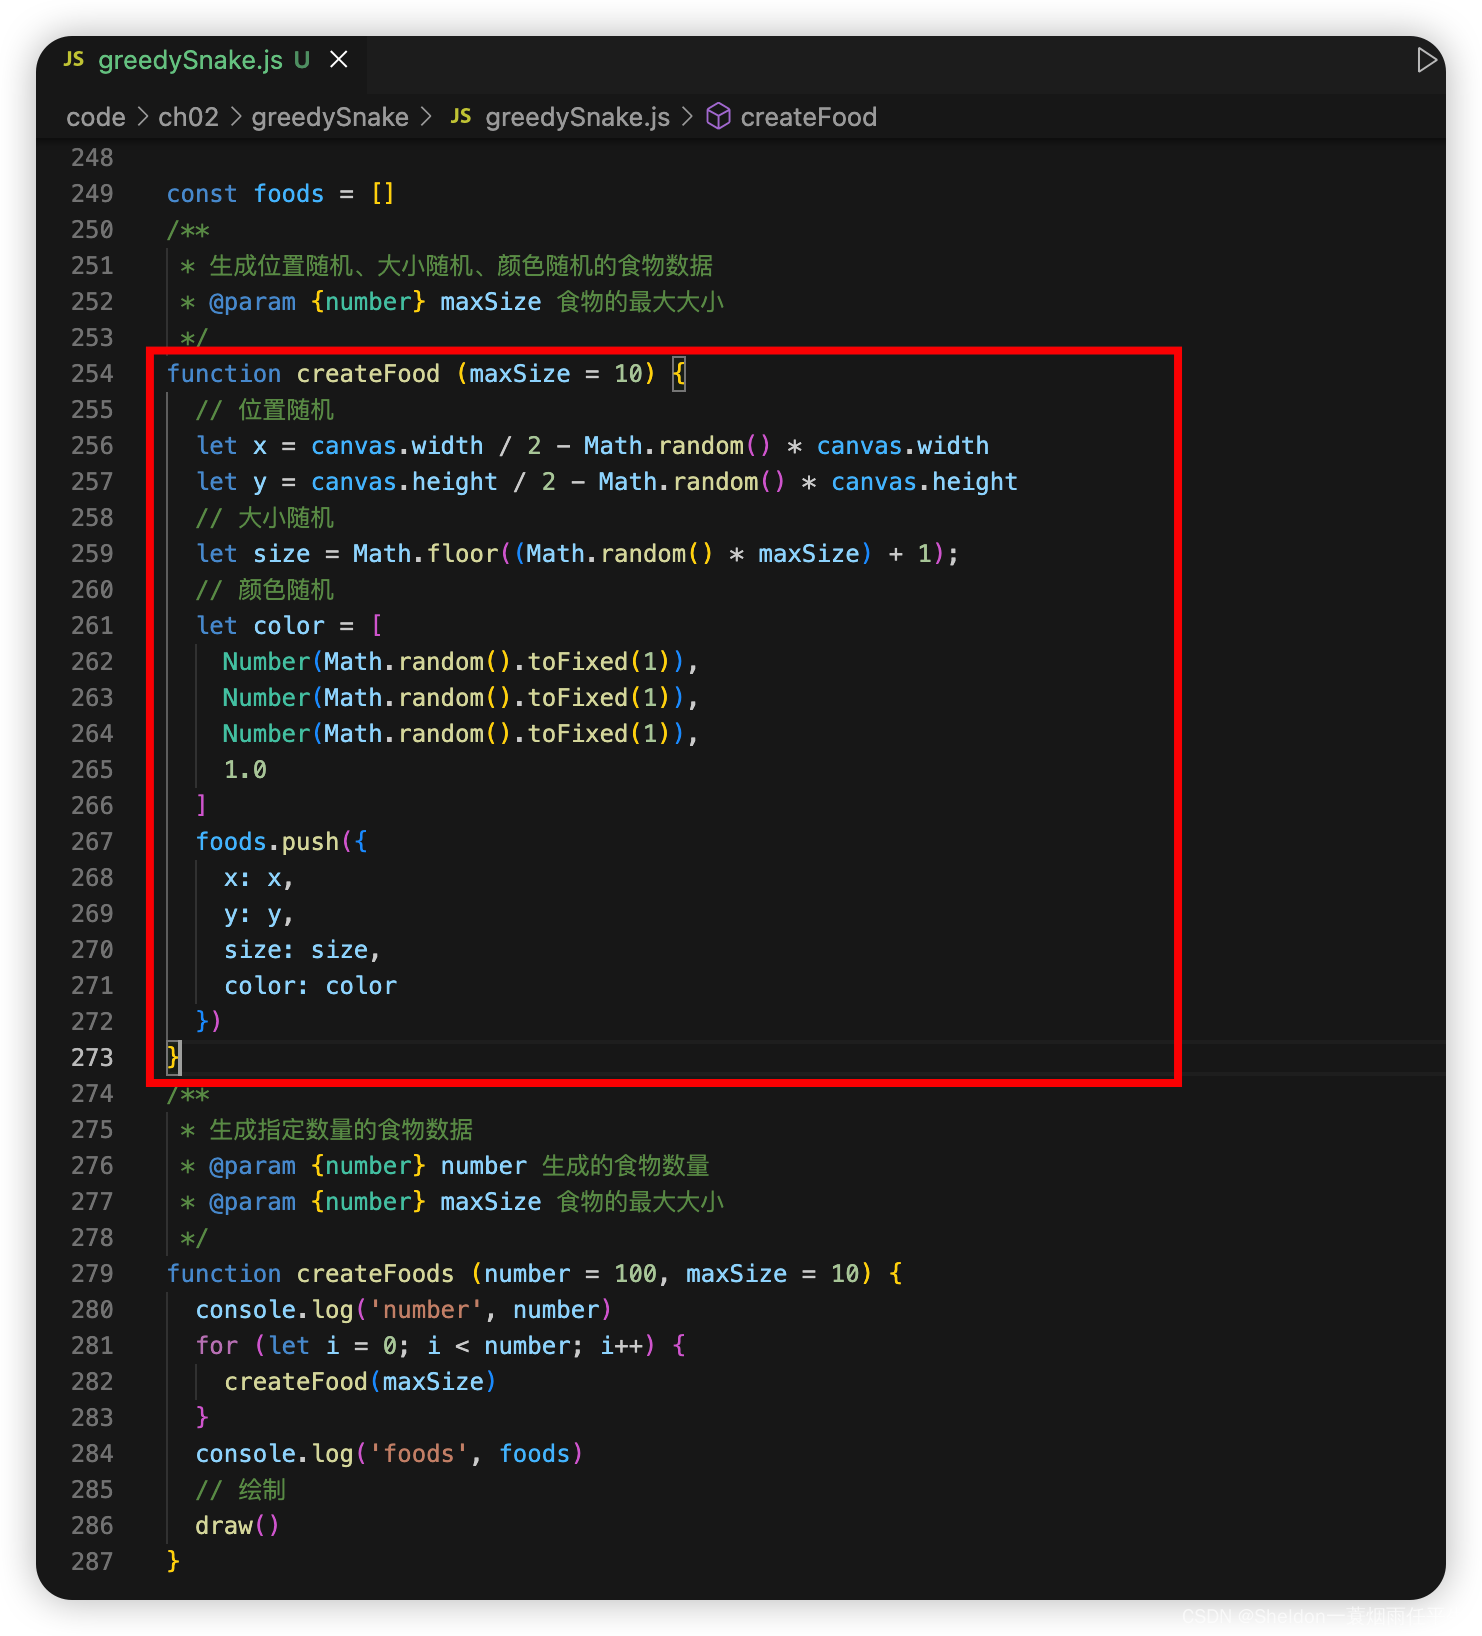
(2)创建批量生成食物函数,生成指定数量的食物。

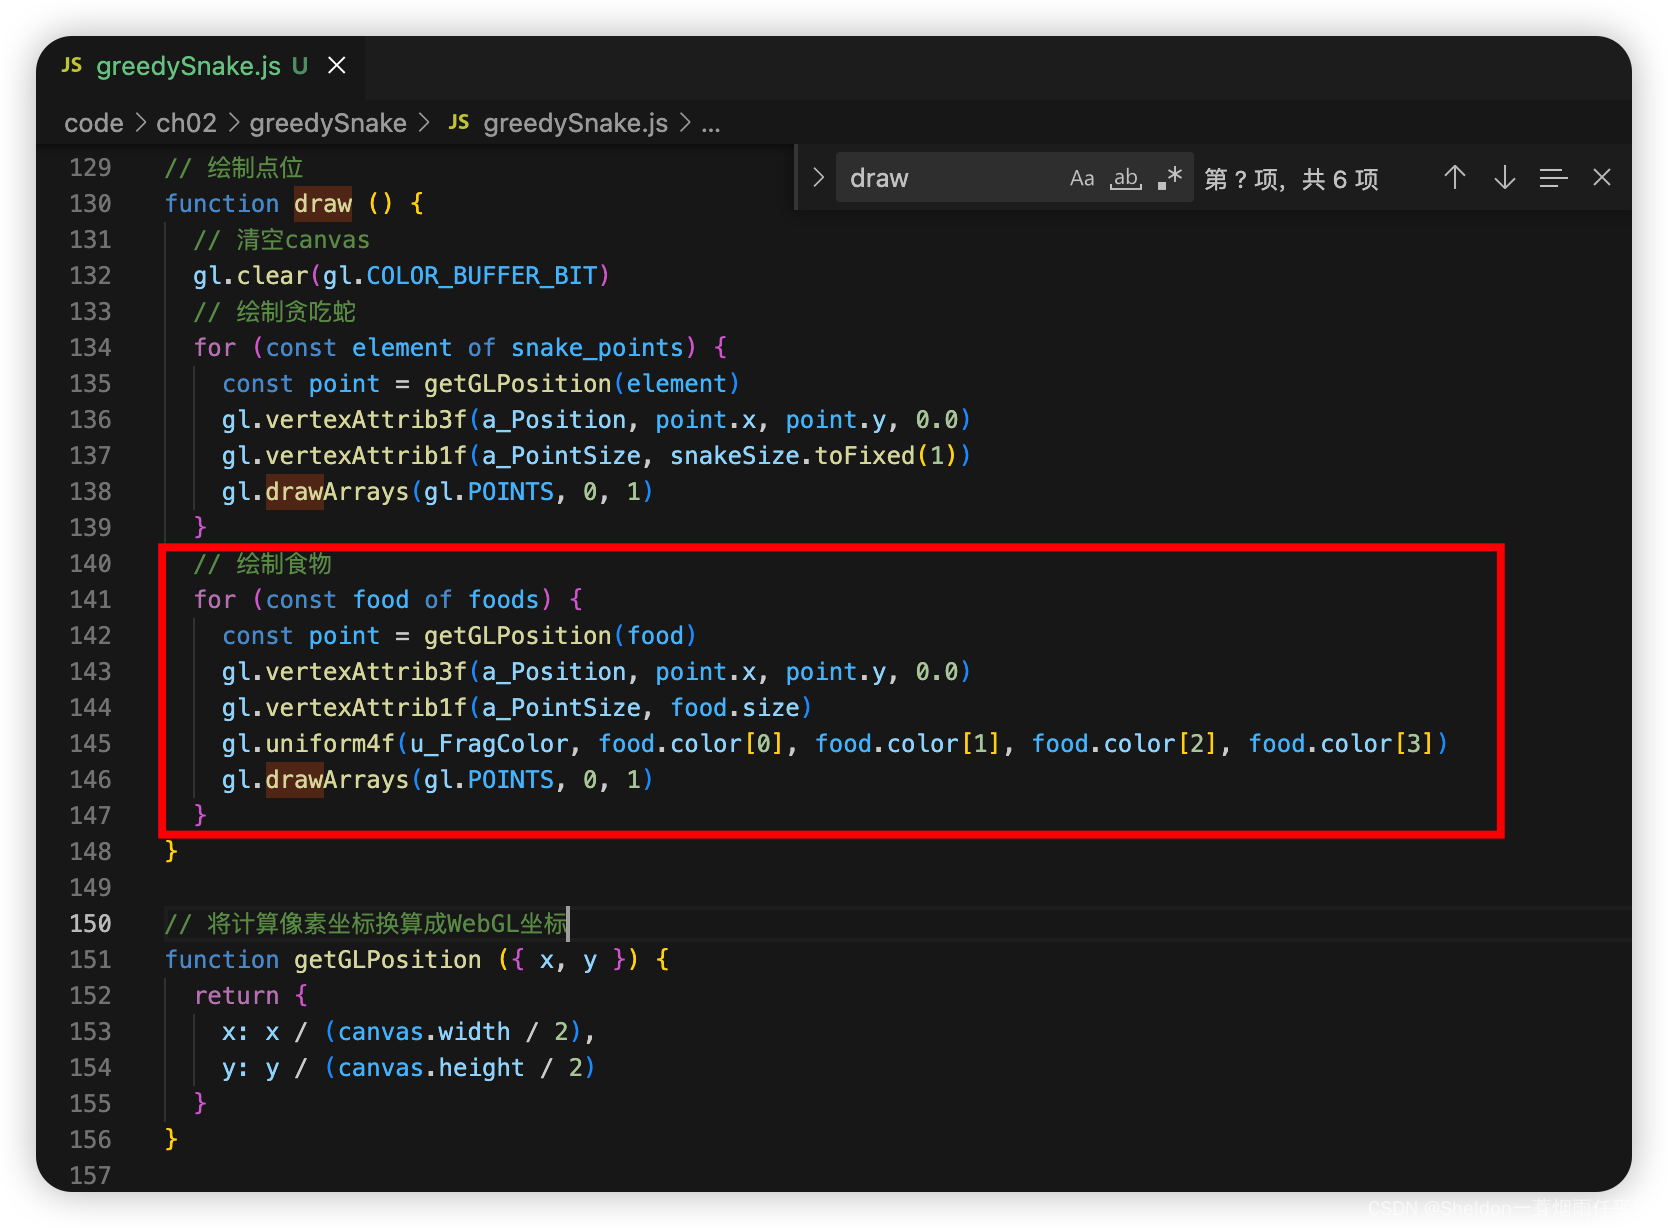
(3)绘制食物。
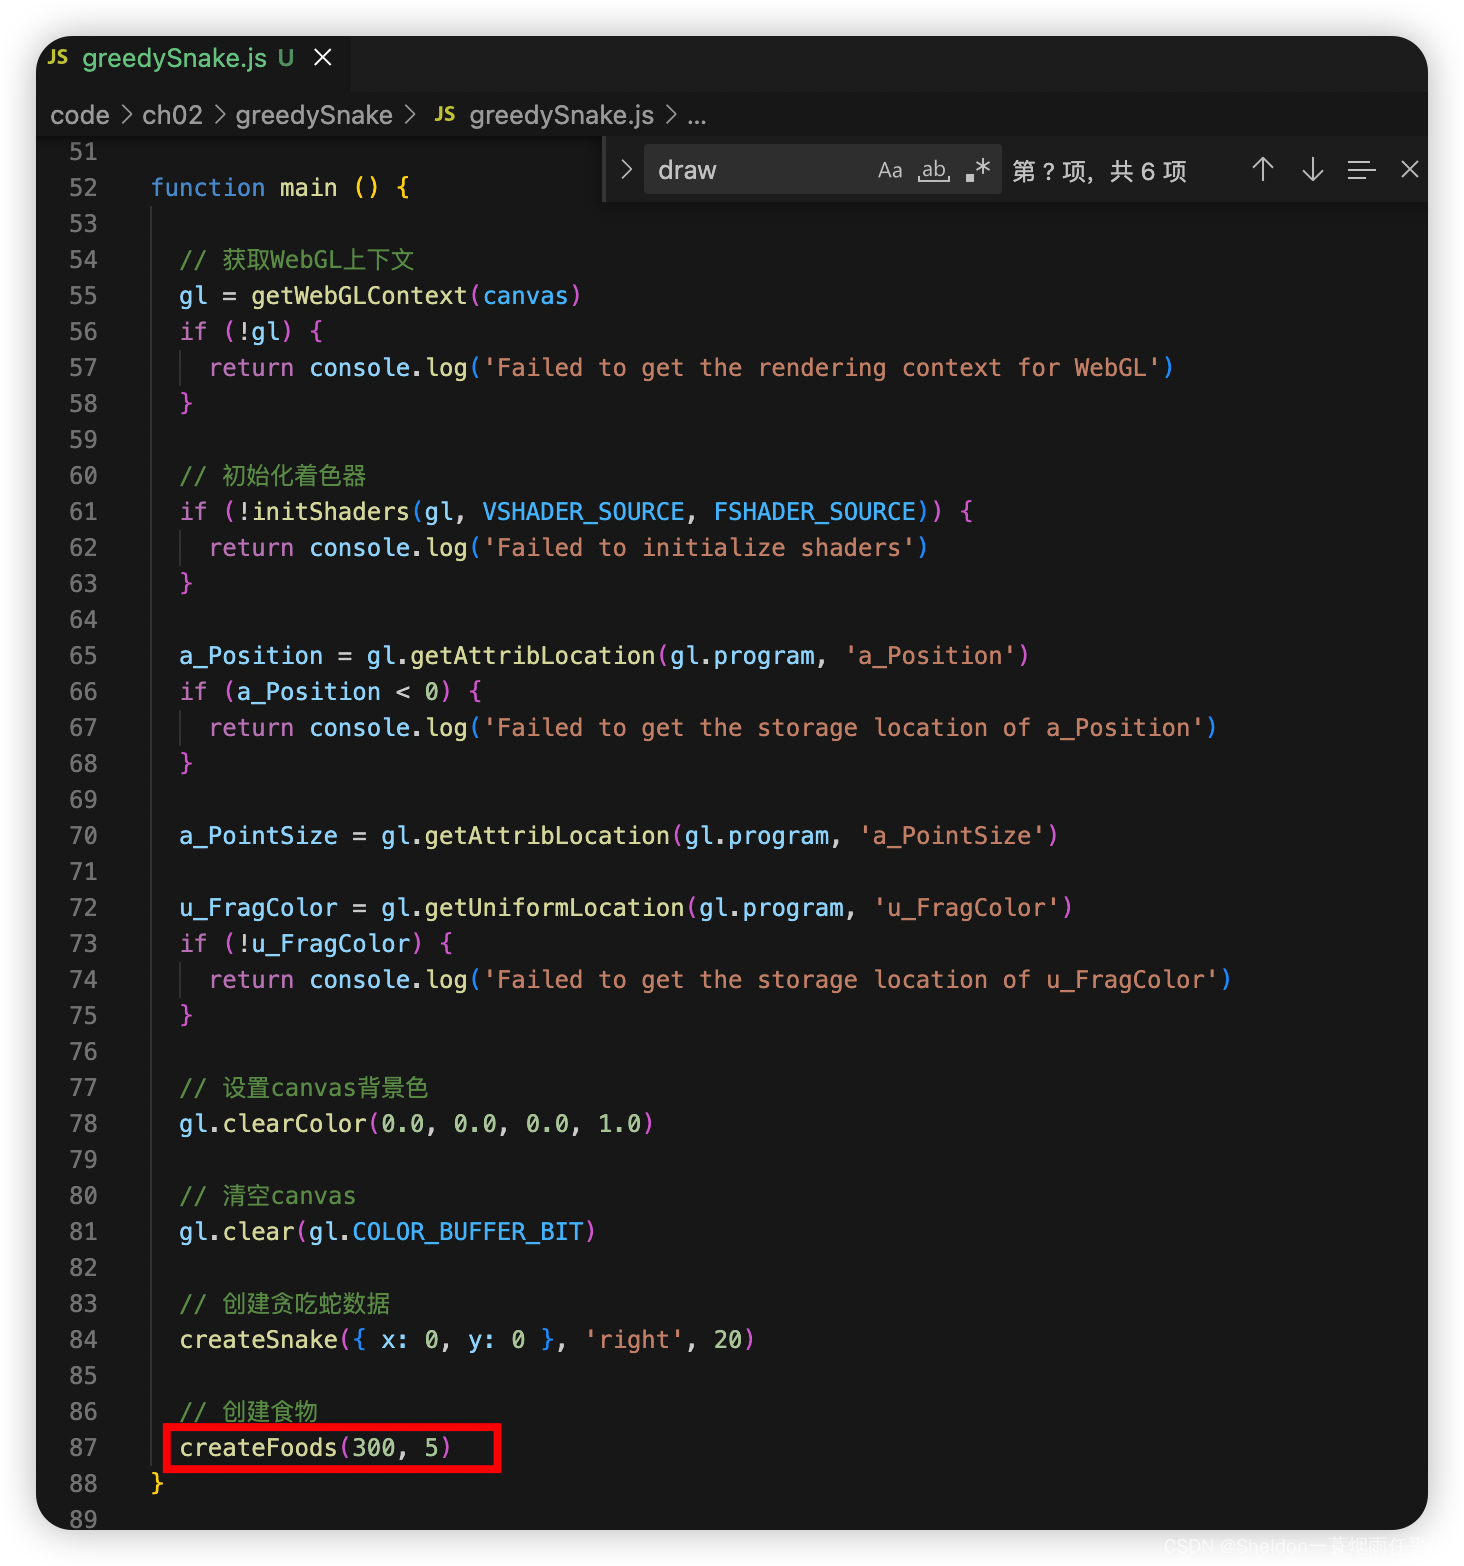
使用批量创建食物函数,创建300个最大大小为5的位置随机、大小随机、颜色随机的食物。
2.9.2.6 蛇移动碰到食物时,吃掉食物,长度变长
2.9.2.6.1 绘制效果和代码

/**
 * (1)开始时,生成一只蛇,可以初始化出生坐标、生长方向、生长长度;√ 出生坐标
 * (2)点击上、下、左、右,蛇按照方向移动;√
 * (3)蛇碰到地图边缘结束(地图的碰撞检测);√
 * (4)开始时,生成100个随机大小、随机位置、随机颜色的食物;√
 * (5)蛇移动碰到食物时,吃掉食物,长度变长;√
 * (6)蛇的长度变大一定长时,宽度也随着变大;
 */

// 顶点着色器
const VSHADER_SOURCE =
  'attribute vec4 a_Position;\n' +
  'attribute float a_PointSize;\n' +
  'void main() {\n' +
  // 设置坐标
  ' gl_Position = a_Position;\n' +
  // 设置尺寸
  ' gl_PointSize = a_PointSize;\n' +
  '}\n'

// 片元着色器
const FSHADER_SOURCE =
  // 设置uniform变量之前,需要先设置精度
  'precision mediump float;\n' +
  'uniform vec4 u_FragColor;\n' +
  'void main() {\n' +
  // 设置颜色
  ' gl_FragColor = u_FragColor;\n' +
  '}\n'

/**
 * 将main函数中用到的参数设置为全局变量,方便其他函数调用
 */
let gl
// 着色器的位置、大小和颜色参数
let a_Position
let a_PointSize
let u_FragColor
// 获取canvas元素
const canvas = document.getElementById('webgl')
// 蛇位置数组
const snake_points = []
// 蛇的长度(初始化使用,准确来说是点位的数量)
let addLength = 0
// 蛇的运动方向
let moveDirection = 'right'
// 蛇的大小(蛇的每个点位宽度)
let snakeSize = 5
// 是否需要有成长的动画
let start = true

function main () {

  // 获取WebGL上下文
  gl = getWebGLContext(canvas)
  if (!gl) {
    return console.log('Failed to get the rendering context for WebGL')
  }

  // 初始化着色器
  if (!initShaders(gl, VSHADER_SOURCE, FSHADER_SOURCE)) {
    return console.log('Failed to initialize shaders')
  }

  a_Position = gl.getAttribLocation(gl.program, 'a_Position')
  if (a_Position < 0) {
    return console.log('Failed to get the storage location of a_Position')
  }

  a_PointSize = gl.getAttribLocation(gl.program, 'a_PointSize')

  u_FragColor = gl.getUniformLocation(gl.program, 'u_FragColor')
  if (!u_FragColor) {
    return console.log('Failed to get the storage location of u_FragColor')
  }

  // 设置canvas背景色
  gl.clearColor(0.0, 0.0, 0.0, 1.0)

  // 清空canvas
  gl.clear(gl.COLOR_BUFFER_BIT)

  // 创建贪吃蛇数据
  createSnake({ x: 0, y: 0 }, 'right', 20)

  // 创建食物
  createFoods(300, 5)
}

/**
 * 创建贪吃蛇数据
 * @param {number} head 蛇出生的坐标
 * @param {string} direction 蛇的生长方向(up/down/left/right)
 * @param {number} length 蛇添加的出生长度
 */
function createSnake (head = { x: 0, y: 0 }, direction = 'right', length = 0) {
  addLength = length
  moveDirection = direction
  // 如果头部不在允许范围内,抛出错误
  if (isBeyond(head)) {
    throw new Error('贪吃蛇的头部不在地图内,请更换初始化数据')
  }
  snake_points.push({
    x: head.x,
    y: head.y
  })
  draw()
  // 成长动画
  if (addLength > 0) {
    render()
  } else {
    // 终止成长
    start = false
  }
}

// 判断蛇的点位超出允许范围内
function isBeyond ({ x, y }) {
  // 获取贪吃蛇可以存在的点位坐标
  let xRange = [-canvas.width / 2 + snakeSize / 2, canvas.width / 2 - snakeSize / 2]
  let yRange = [-canvas.height / 2 + snakeSize / 2, canvas.height / 2 - snakeSize / 2]
  if (x < xRange[0] || x > xRange[1] || y < yRange[0] || y > yRange[1]) {
    return true
  } else {
    return false
  }
}

// 绘制点位
function draw () {
  // 清空canvas
  gl.clear(gl.COLOR_BUFFER_BIT)
  // 绘制贪吃蛇
  for (const element of snake_points) {
    const point = getGLPosition(element)
    gl.vertexAttrib3f(a_Position, point.x, point.y, 0.0)
    gl.vertexAttrib1f(a_PointSize, snakeSize.toFixed(1))
    gl.drawArrays(gl.POINTS, 0, 1)
  }
  // 绘制食物
  for (const food of foods) {
    const point = getGLPosition(food)
    gl.vertexAttrib3f(a_Position, point.x, point.y, 0.0)
    gl.vertexAttrib1f(a_PointSize, food.size)
    gl.uniform4f(u_FragColor, food.color[0], food.color[1], food.color[2], food.color[3])
    gl.drawArrays(gl.POINTS, 0, 1)
  }
}

// 将计算像素坐标换算成WebGL坐标
function getGLPosition ({ x, y }) {
  return {
    x: x / (canvas.width / 2),
    y: y / (canvas.height / 2)
  }
}

/**
 * 设置键盘事件
 */
// 上次点击的键位
let lastKey = ''
document.addEventListener('keydown', (e) => {
  const key = e.key
  // console.log('key', e)
  // 记录上次点击键位,避免多次触发动画
  if (key !== lastKey) {
    lastKey = key
  } else {
    return
  }
  // 设置动画方向
  if (key === 'ArrowUp') {
    moveDirection = 'up'
  } else if (key === 'ArrowDown') {
    moveDirection = 'down'
  } else if (key === 'ArrowLeft') {
    moveDirection = 'left'
  } else if (key === 'ArrowRight') {
    moveDirection = 'right'
  } else if (key === " ") {
    cancelAnimationFrame(rAFId)
    rAFId = null
    return
  } else {
    return
  }
  // 如果动画未执行,就执行动画
  if (!rAFId) {
    render()
  }
})

/**
 * 使用requestAnimationFrame方法代替setTimeout或者setInterval进行动画
 * 默认一秒60帧,即一秒运行动画60次
 */
let rAFId = null
function render (time) {
  t = 1 / 60 * 50
  // 每次移动,生成一个新的头部,删除旧的尾部
  const head = snake_points[0]
  const newHead = {
    x: head.x,
    y: head.y
  }
  if (moveDirection === 'up') {
    newHead.y = newHead.y + t
  } else if (moveDirection === 'down') {
    newHead.y = newHead.y - t
  } else if (moveDirection === 'left') {
    newHead.x = newHead.x - t
  } else if (moveDirection === 'right') {
    newHead.x = newHead.x + t
  }
  if (start && isBeyond(newHead)) {
    cancelAnimationFrame(rAFId)
    rAFId = null
    start = false
    console.log('初始化成功,但贪吃蛇有' + addLength + '个点位超出范围,被直接删除!')
    addLength = 0
    return
  }
  // 如果没有需要新增,就直接删除尾巴,否则不删除,作为新增的部分
  if (addLength === 0) {
    snake_points.pop()
  } else {
    addLength--
  }
  snake_points.unshift(newHead)
  eatFood()
  draw()
  // 如果是刚开始创建贪吃蛇,并且添加的部分已经完成,就终止成长动画
  if (start && addLength === 0) {
    cancelAnimationFrame(rAFId)
    rAFId = null
    start = false
    return
  }
  if (!isBeyond(newHead)) {
    rAFId = requestAnimationFrame(render)
  } else {
    console.log('time', time)
    cancelAnimationFrame(rAFId)
    rAFId = null
    alert('Game Over!')
  }
}

const foods = []
/**
 * 生成位置随机、大小随机、颜色随机的食物数据
 * @param {number} maxSize 食物的最大大小
 */
function createFood (maxSize = 10) {
  // 位置随机
  let x = canvas.width / 2 - Math.random() * canvas.width
  let y = canvas.height / 2 - Math.random() * canvas.height
  // 大小随机
  let size = Math.floor((Math.random() * maxSize) + 1);
  // 颜色随机
  let color = [
    Number(Math.random().toFixed(1)),
    Number(Math.random().toFixed(1)),
    Number(Math.random().toFixed(1)),
    1.0
  ]
  foods.push({
    x: x,
    y: y,
    size: size,
    color: color
  })
}

/**
 * 生成指定数量的食物数据
 * @param {number} number 生成的食物数量
 * @param {number} maxSize 食物的最大大小
 */
function createFoods (number = 100, maxSize = 10) {
  for (let i = 0; i < number; i++) {
    createFood(maxSize)
  }
  // 绘制
  draw()
}

function collisionDetection (point1, point2) {
  // 碰撞情况的最大距离
  const maxDistance = Math.abs(point1.size / 2 + point2.size / 2)
  const xDistance = Math.abs(point1.x - point2.x)
  const yDistance = Math.abs(point1.y - point2.y)
  return (xDistance <= maxDistance) && (yDistance <= maxDistance)
}

function eatFood () {
  // 发生碰撞的食物下标
  let collisionIndex = -1
  let eatSize = 0
  for (let i = 0; i < foods.length; i++) {
    const snakeHead = {
      x: snake_points[0].x,
      y: snake_points[0].y,
      size: snakeSize
    }
    const food = foods[i]
    if (collisionDetection(snakeHead, food)) {
      collisionIndex = i
      eatSize = food.size
      break
    }
  }
  if (collisionIndex !== -1) {
    addLength = addLength + eatSize
    foods.splice(collisionIndex, 1)
  }
}
2.9.2.6.2 步骤讲解
(1)创建碰撞检测函数。
(2)创建贪吃蛇进食函数。
遍历每个食物是否和贪吃蛇的头部发生碰撞,如果碰撞,贪吃蛇吃掉食物(贪吃蛇增加的长度等于食物的大小,该食物消失)

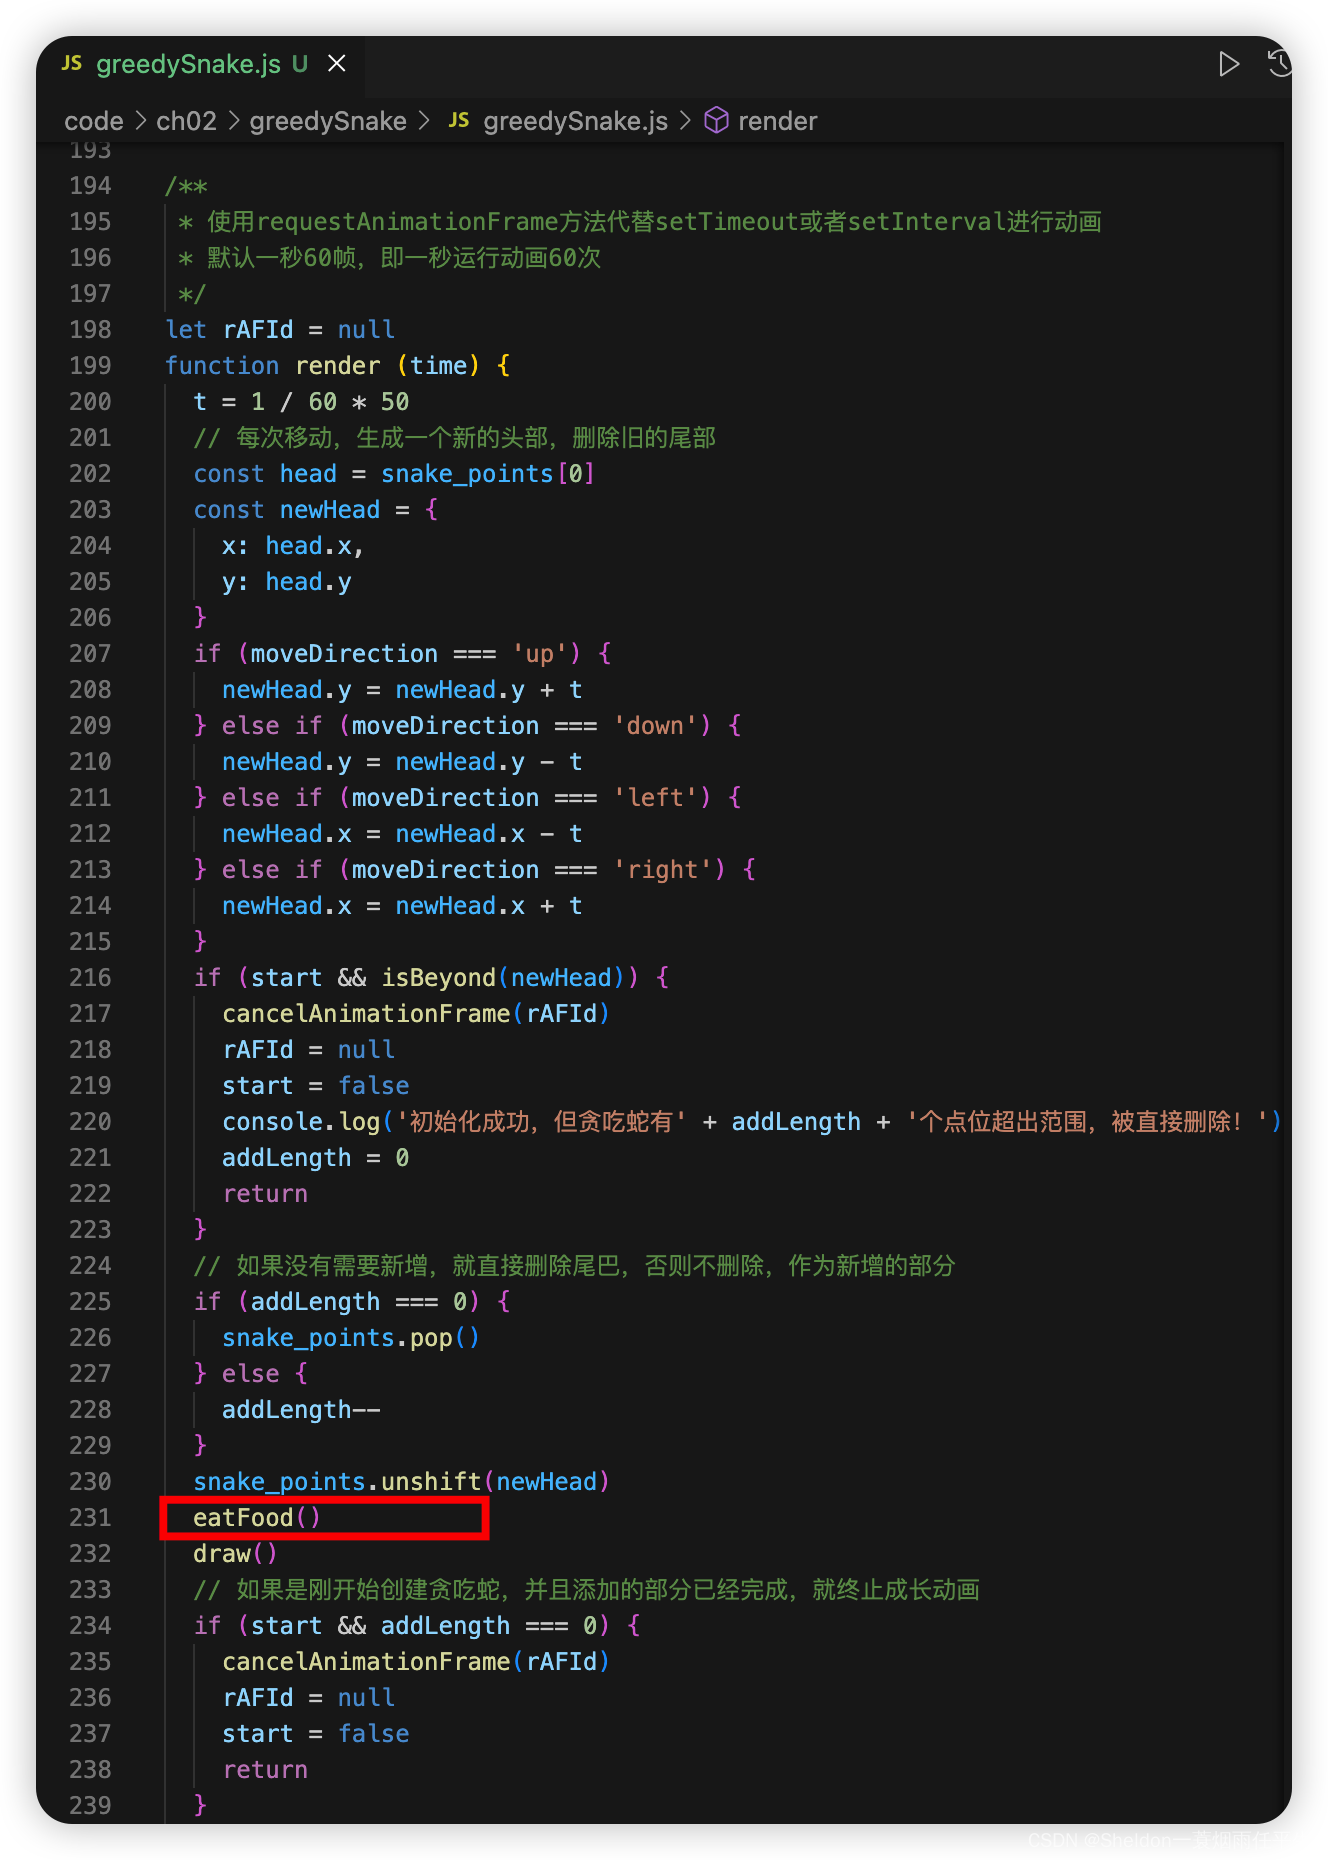
(3)在render函数中,每次生成新的贪吃蛇头部数据后,进行贪吃蛇进食。
2.9.2.7 蛇的长度变大一定长时,宽度也随着变大
2.8.2.7.1 绘制效果和代码

/**
* (1)开始时,生成一只蛇,可以初始化出生坐标、生长方向、生长长度;√ 出生坐标
* (2)点击上、下、左、右,蛇按照方向移动;√
* (3)蛇碰到地图边缘结束(地图的碰撞检测);√
* (4)开始时,生成100个随机大小、随机位置、随机颜色的食物;√
* (5)蛇移动碰到食物时,吃掉食物,长度变长;√
* (6)蛇的长度变大一定长时,宽度也随着变大;√
*/
// 顶点着色器
const VSHADER_SOURCE =
'attribute vec4 a_Position;\n' +
'attribute float a_PointSize;\n' +
'void main() {\n' +
// 设置坐标
' gl_Position = a_Position;\n' +
// 设置尺寸
' gl_PointSize = a_PointSize;\n' +
'}\n'
// 片元着色器
const FSHADER_SOURCE =
// 设置uniform变量之前,需要先设置精度
'precision mediump float;\n' +
'uniform vec4 u_FragColor;\n' +
'void main() {\n' +
// 设置颜色
' gl_FragColor = u_FragColor;\n' +
'}\n'
/**
* 将main函数中用到的参数设置为全局变量,方便其他函数调用
*/
let gl
// 着色器的位置、大小和颜色参数
let a_Position
let a_PointSize
let u_FragColor
// 获取canvas元素
const canvas = document.getElementById('webgl')
// 蛇位置数组
const snake_points = []
// 蛇的长度(初始化使用,准确来说是点位的数量)
let addLength = 0
// 蛇的运动方向
let moveDirection = 'right'
// 蛇的大小(蛇的每个点位宽度)
let snakeSize = 5
// 是否需要有成长的动画
let start = true
function main () {
// 获取WebGL上下文
gl = getWebGLContext(canvas)
if (!gl) {
return console.log('Failed to get the rendering context for WebGL')
}
// 初始化着色器
if (!initShaders(gl, VSHADER_SOURCE, FSHADER_SOURCE)) {
return console.log('Failed to initialize shaders')
}
a_Position = gl.getAttribLocation(gl.program, 'a_Position')
if (a_Position < 0) {
return console.log('Failed to get the storage location of a_Position')
}
a_PointSize = gl.getAttribLocation(gl.program, 'a_PointSize')
u_FragColor = gl.getUniformLocation(gl.program, 'u_FragColor')
if (!u_FragColor) {
return console.log('Failed to get the storage location of u_FragColor')
}
// 设置canvas背景色
gl.clearColor(0.0, 0.0, 0.0, 1.0)
// 清空canvas
gl.clear(gl.COLOR_BUFFER_BIT)
// 创建贪吃蛇数据
createSnake({ x: 0, y: 0 }, 'right', 20)
// 创建食物
createFoods(300, 5)
}
/**
* 创建贪吃蛇数据
* @param {number} head 蛇出生的坐标
* @param {string} direction 蛇的生长方向(up/down/left/right)
* @param {number} length 蛇添加的出生长度
*/
function createSnake (head = { x: 0, y: 0 }, direction = 'right', length = 0) {
addLength = length
moveDirection = direction
// 如果头部不在允许范围内,抛出错误
if (isBeyond(head)) {
throw new Error('贪吃蛇的头部不在地图内,请更换初始化数据')
}
snake_points.push({
x: head.x,
y: head.y
})
draw()
// 成长动画
if (addLength > 0) {
render()
} else {
// 终止成长
start = false
}
}
/**
* 判断蛇的点位超出允许范围内
* @param {object} {x,y} 蛇的横纵坐标
* @param {number} size 新的蛇头宽度
* @returns
*/
function isBeyond ({ x, y }, size) {
size = size ? size : snakeSize
// 获取贪吃蛇可以存在的点位坐标
let xRange = [-canvas.width / 2 + size / 2, canvas.width / 2 - size / 2]
let yRange = [-canvas.height / 2 + size / 2, canvas.height / 2 - size / 2]
if (x < xRange[0] || x > xRange[1] || y < yRange[0] || y > yRange[1]) {
return true
} else {
return false
}
}
// 绘制点位
function draw () {
// 清空canvas
gl.clear(gl.COLOR_BUFFER_BIT)
// 绘制贪吃蛇
for (const element of snake_points) {
const point = getGLPosition(element)
gl.vertexAttrib3f(a_Position, point.x, point.y, 0.0)
gl.vertexAttrib1f(a_PointSize, snakeSize.toFixed(1))
gl.drawArrays(gl.POINTS, 0, 1)
}
// 绘制食物
for (const food of foods) {
const point = getGLPosition(food)
gl.vertexAttrib3f(a_Position, point.x, point.y, 0.0)
gl.vertexAttrib1f(a_PointSize, food.size)
gl.uniform4f(u_FragColor, food.color[0], food.color[1], food.color[2], food.color[3])
gl.drawArrays(gl.POINTS, 0, 1)
}
}
// 将计算像素坐标换算成WebGL坐标
function getGLPosition ({ x, y }) {
return {
x: x / (canvas.width / 2),
y: y / (canvas.height / 2)
}
}
/**
* 设置键盘事件
*/
// 上次点击的键位
let lastKey = ''
document.addEventListener('keydown', (e) => {
const key = e.key
// console.log('key', e)
// 记录上次点击键位,避免多次触发动画
if (key !== lastKey) {
lastKey = key
} else {
return
}
// 设置动画方向
if (key === 'ArrowUp') {
moveDirection = 'up'
} else if (key === 'ArrowDown') {
moveDirection = 'down'
} else if (key === 'ArrowLeft') {
moveDirection = 'left'
} else if (key === 'ArrowRight') {
moveDirection = 'right'
} else if (key === " ") {
cancelAnimationFrame(rAFId)
rAFId = null
return
} else {
return
}
// 如果动画未执行,就执行动画
if (!rAFId) {
render()
}
})
/**
* 使用requestAnimationFrame方法代替setTimeout或者setInterval进行动画
* 默认一秒60帧,即一秒运行动画60次
*/
let rAFId = null
function render (time) {
t = 1 / 60 * 50
// 每次移动,生成一个新的头部,删除旧的尾部
const head = snake_points[0]
const newHead = {
x: head.x,
y: head.y
}
if (moveDirection === 'up') {
newHead.y = newHead.y + t
} else if (moveDirection === 'down') {
newHead.y = newHead.y - t
} else if (moveDirection === 'left') {
newHead.x = newHead.x - t
} else if (moveDirection === 'right') {
newHead.x = newHead.x + t
}
if (start && isBeyond(newHead)) {
cancelAnimationFrame(rAFId)
rAFId = null
start = false
console.log('初始化成功,但贪吃蛇有' + addLength + '个点位超出范围,被直接删除!')
addLength = 0
return
}
// 如果没有需要新增,就直接删除尾巴,否则不删除,作为新增的部分
if (addLength === 0) {
snake_points.pop()
} else {
addLength--
}
snake_points.unshift(newHead)
eatFood()
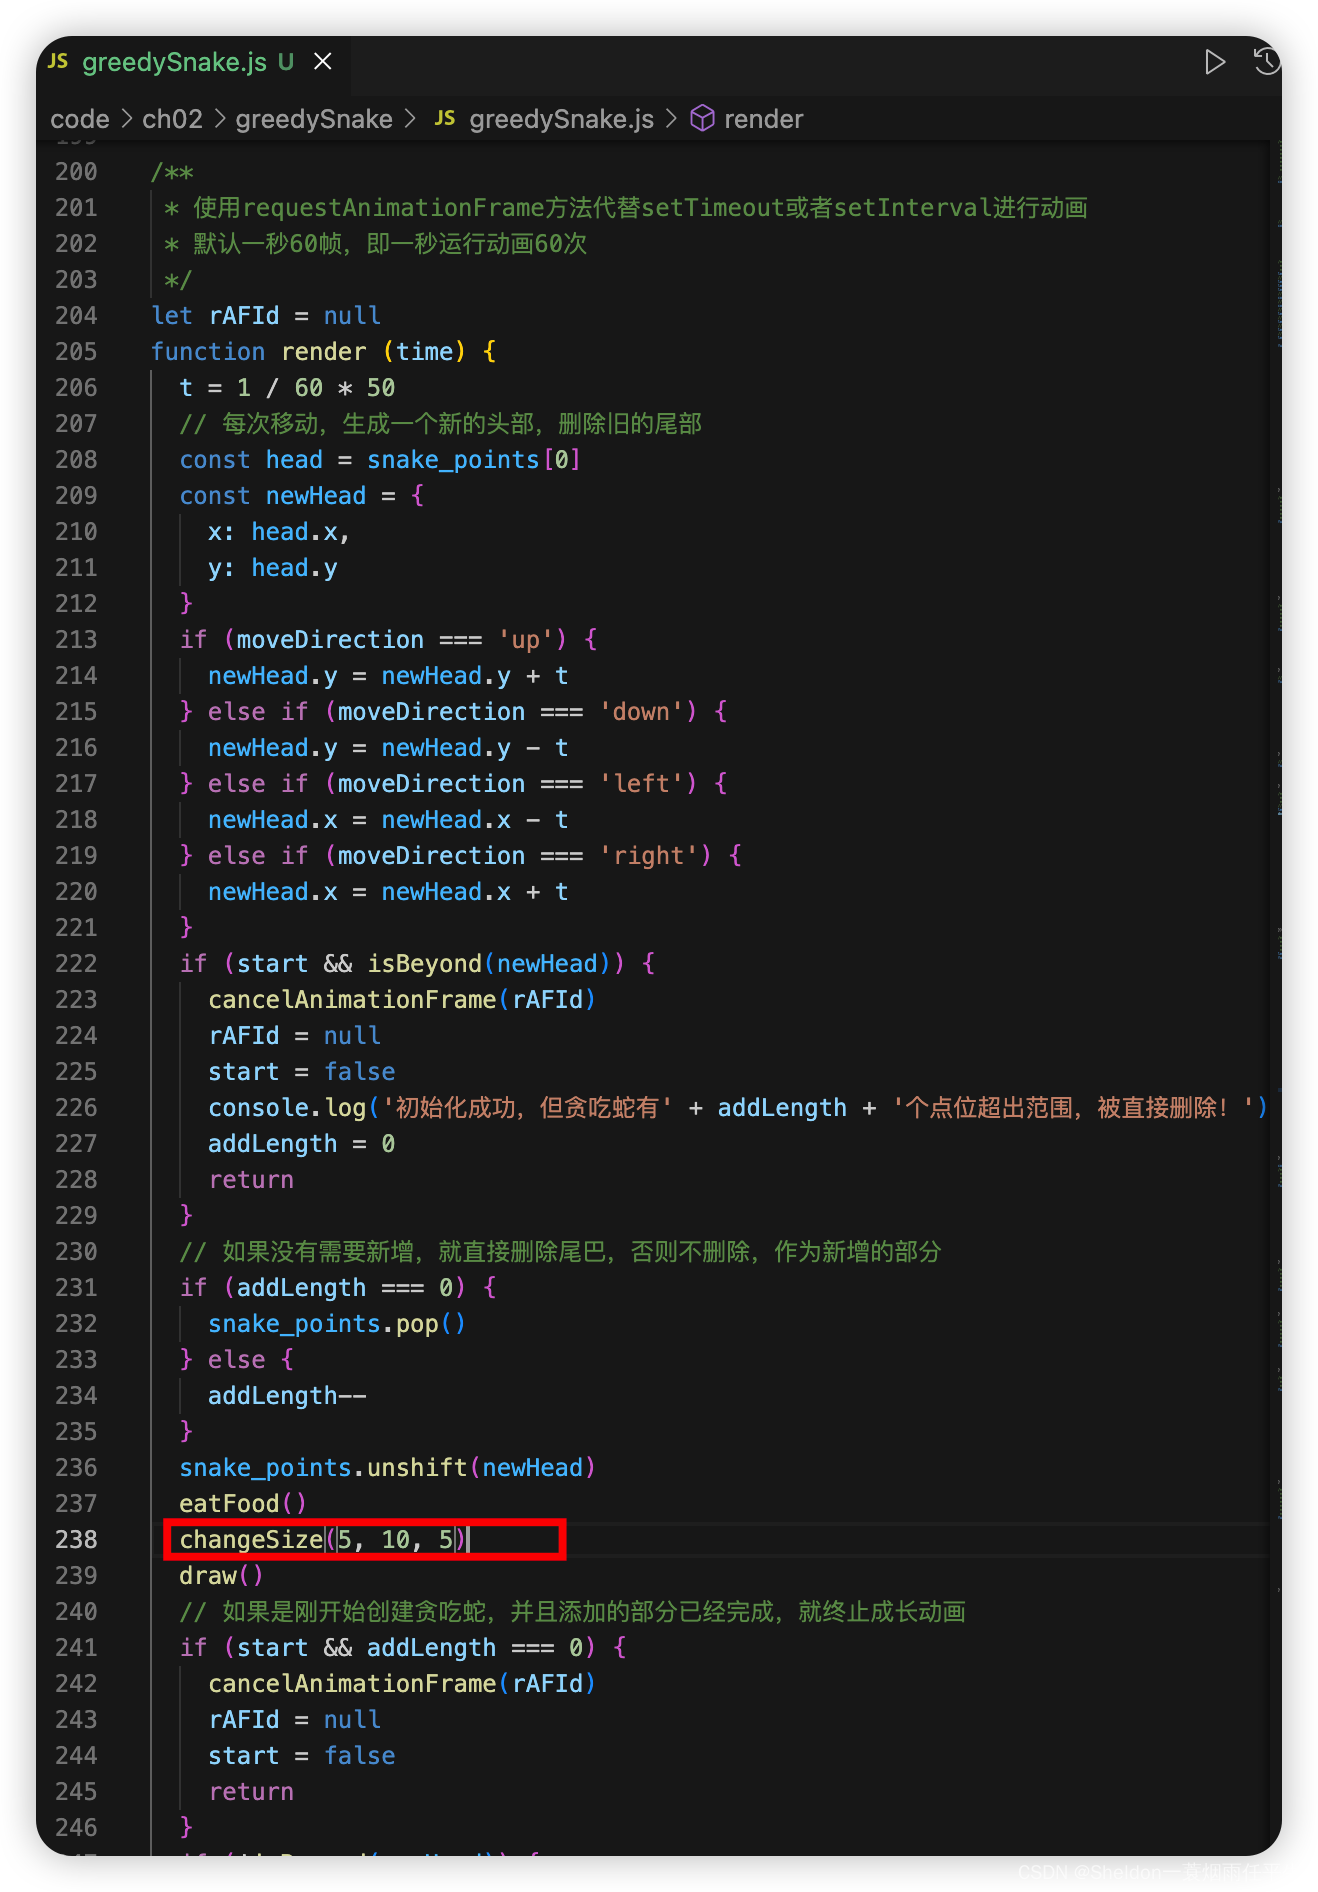
changeSize(5, 10, 5)
draw()
// 如果是刚开始创建贪吃蛇,并且添加的部分已经完成,就终止成长动画
if (start && addLength === 0) {
cancelAnimationFrame(rAFId)
rAFId = null
start = false
return
}
if (!isBeyond(newHead)) {
rAFId = requestAnimationFrame(render)
} else {
console.log('time', time)
cancelAnimationFrame(rAFId)
rAFId = null
alert('Game Over!')
}
}
const foods = []
/**
* 生成位置随机、大小随机、颜色随机的食物数据
* @param {number} maxSize 食物的最大大小
*/
function createFood (maxSize = 10) {
// 位置随机
let x = canvas.width / 2 - Math.random() * canvas.width
let y = canvas.height / 2 - Math.random() * canvas.height
// 大小随机
let size = Math.floor((Math.random() * maxSize) + 1);
// 颜色随机
let color = [
Number(Math.random().toFixed(1)),
Number(Math.random().toFixed(1)),
Number(Math.random().toFixed(1)),
1.0
]
foods.push({
x: x,
y: y,
size: size,
color: color
})
}
/**
* 生成指定数量的食物数据
* @param {number} number 生成的食物数量
* @param {number} maxSize 食物的最大大小
*/
function createFoods (number = 100, maxSize = 10) {
for (let i = 0; i < number; i++) {
createFood(maxSize)
}
// 绘制
draw()
}
/**
* 碰撞检测(适用于正方形),发生碰撞返回true,否则返回false
* @param {object} point1
* @param {object} point2
* @returns
*/
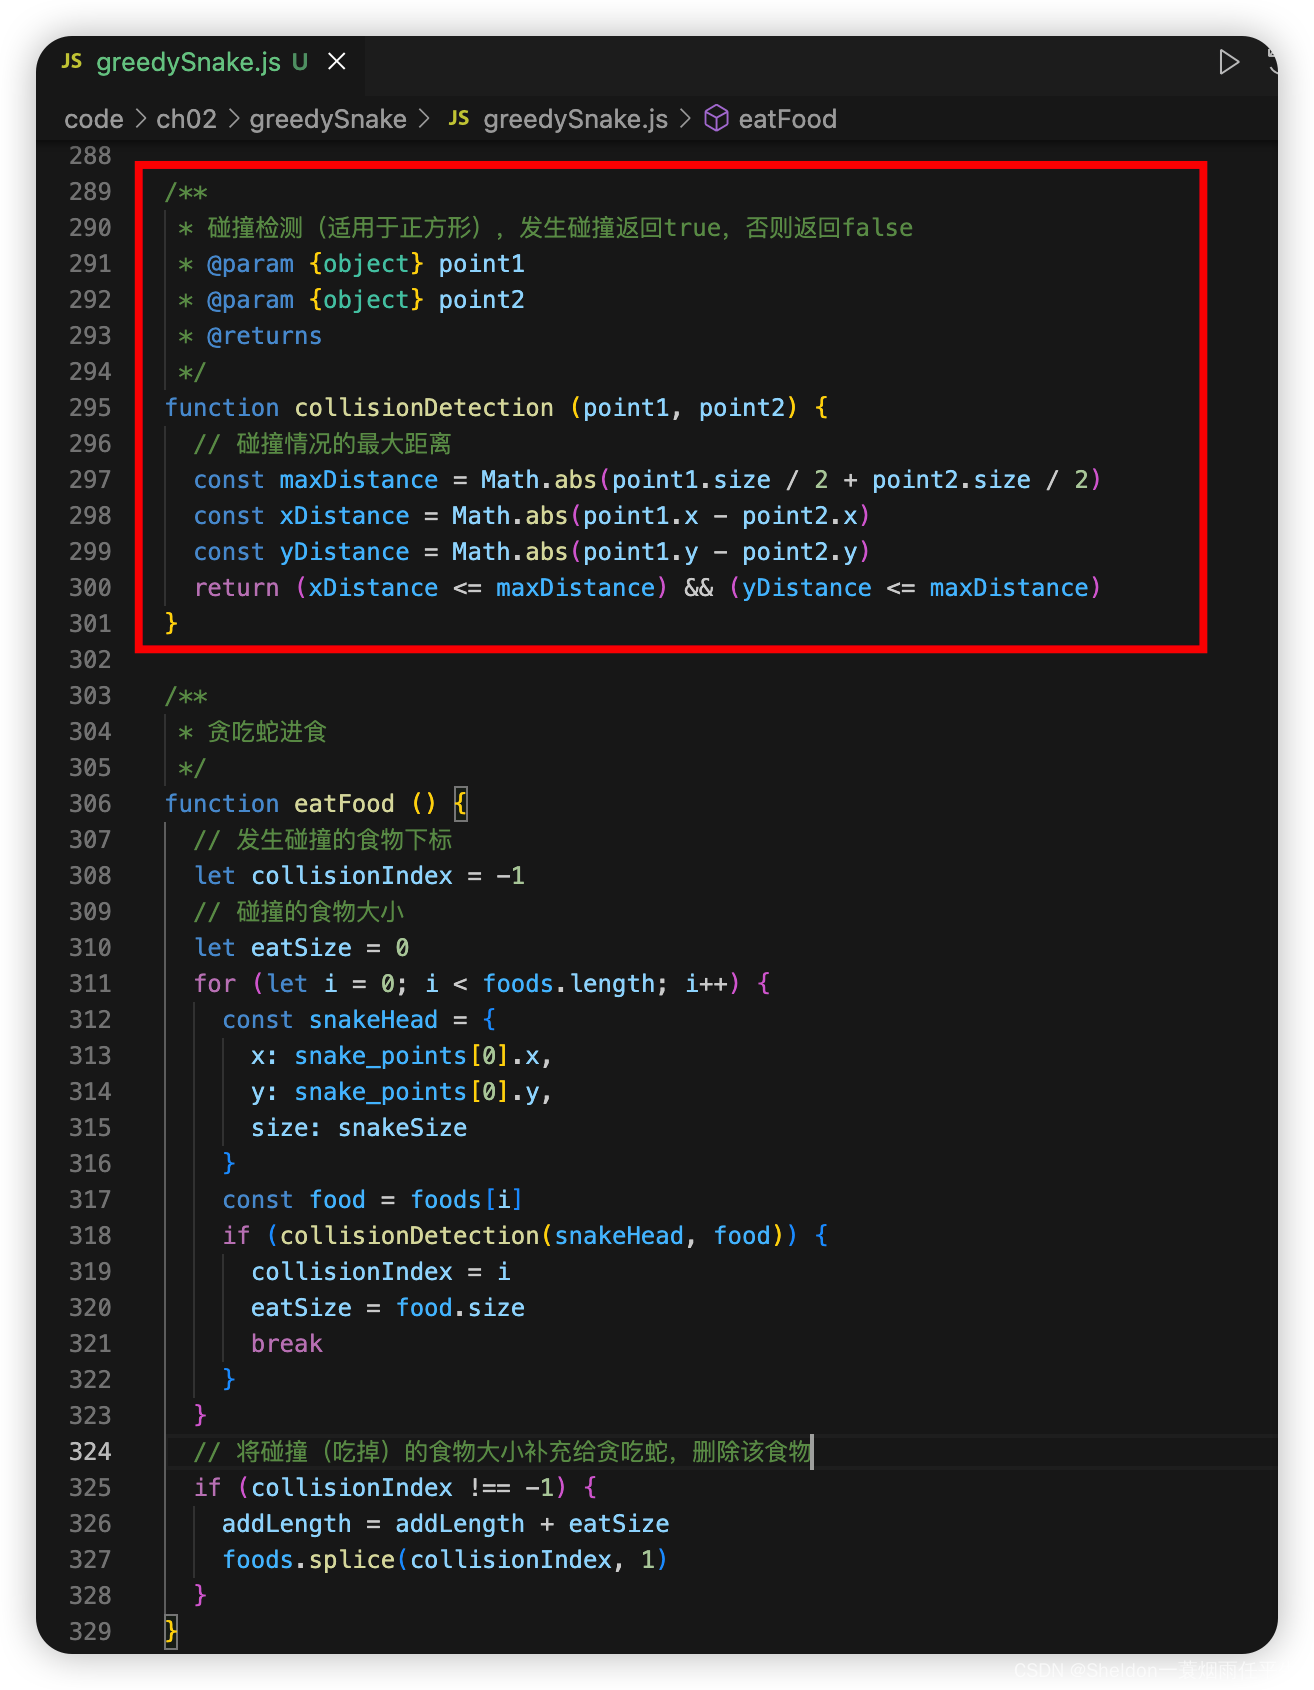
function collisionDetection (point1, point2) {
// 碰撞情况的最大距离
const maxDistance = Math.abs(point1.size / 2 + point2.size / 2)
const xDistance = Math.abs(point1.x - point2.x)
const yDistance = Math.abs(point1.y - point2.y)
return (xDistance <= maxDistance) && (yDistance <= maxDistance)
}
/**
* 贪吃蛇进食
*/
function eatFood () {
// 发生碰撞的食物下标
let collisionIndex = -1
// 碰撞的食物大小
let eatSize = 0
for (let i = 0; i < foods.length; i++) {
const snakeHead = {
x: snake_points[0].x,
y: snake_points[0].y,
size: snakeSize
}
const food = foods[i]
if (collisionDetection(snakeHead, food)) {
collisionIndex = i
eatSize = food.size
break
}
}
// 将碰撞(吃掉)的食物大小补充给贪吃蛇,删除该食物
if (collisionIndex !== -1) {
addLength = addLength + eatSize
foods.splice(collisionIndex, 1)
}
}
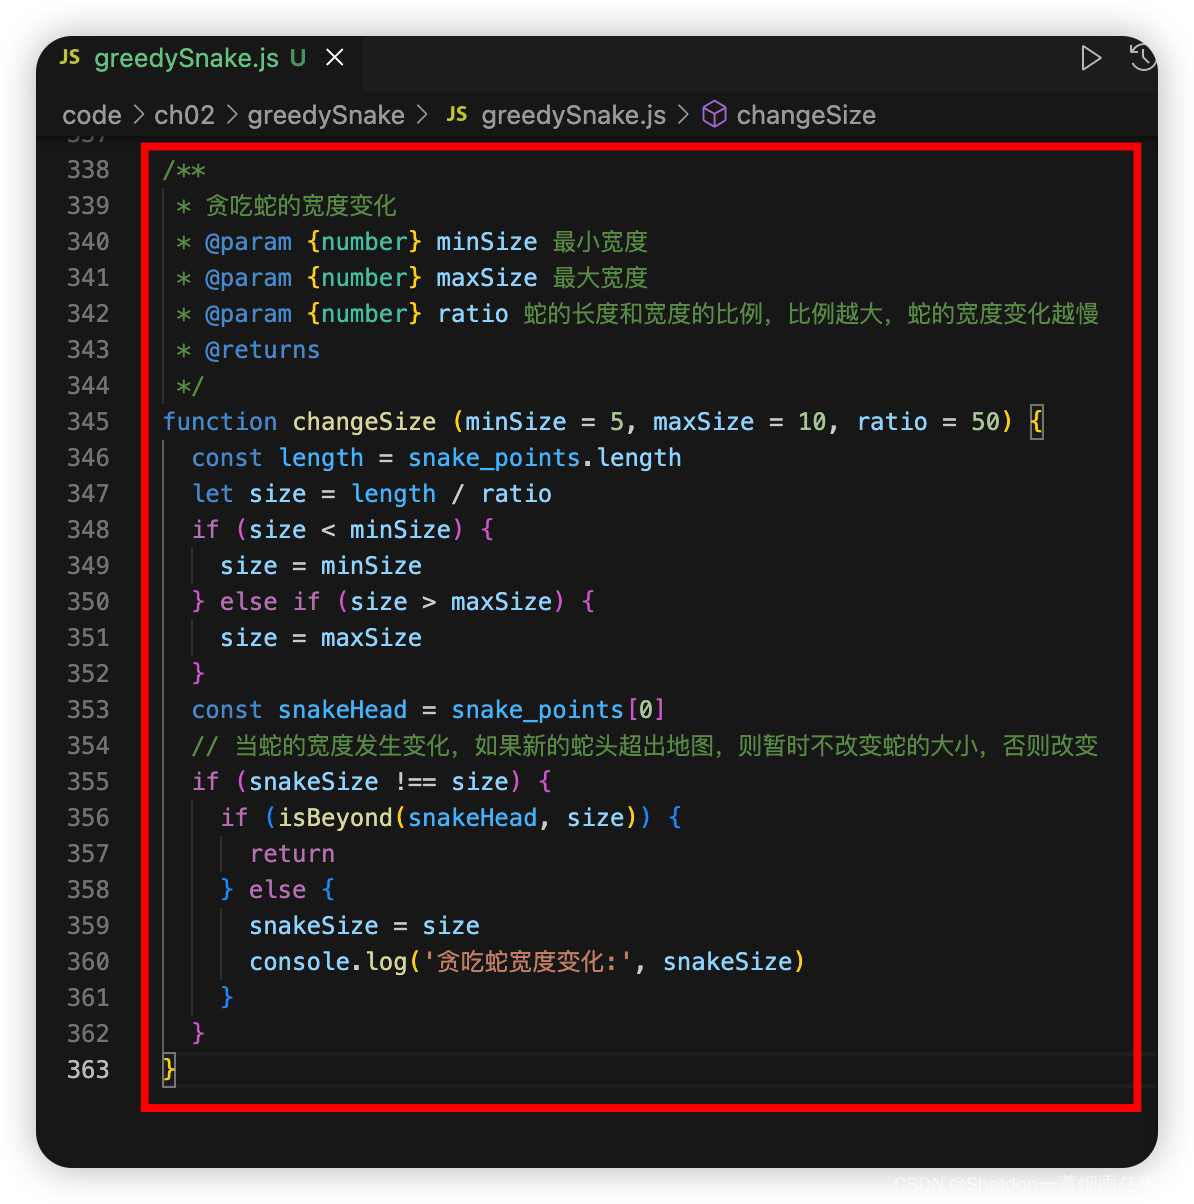
/**
* 贪吃蛇的宽度变化
* @param {number} minSize 最小宽度
* @param {number} maxSize 最大宽度
* @param {number} ratio 蛇的长度和宽度的比例,比例越大,蛇的宽度变化越慢
* @returns
*/
function changeSize (minSize = 5, maxSize = 10, ratio = 50) {
const length = snake_points.length
let size = length / ratio
if (size < minSize) {
size = minSize
} else if (size > maxSize) {
size = maxSize
}
const snakeHead = snake_points[0]
// 当蛇的宽度发生变化,如果新的蛇头超出地图,则暂时不改变蛇的大小,否则改变
if (snakeSize !== size) {
if (isBeyond(snakeHead, size)) {
return
} else {
snakeSize = size
console.log('贪吃蛇宽度变化:', snakeSize)
}
}
}
2.8.2.7.2 步骤讲解
(1)改造点位超出判断函数,支持传入参数。

(2)创建改变贪吃蛇宽度函数。
(3)贪吃蛇吃完食物后,使用最新的贪吃蛇数据判断变化宽度。
注意:为了演示,这里changeSize(5, 10, 5)的ratio(比例)故意设置很小,这样就会导致贪吃蛇宽度变化速度急剧加速。正常情况下,默认即可。
假设食物的最大宽度是5,则平均值是(5+1)/ 2 = 3;假设贪吃蛇的初始长度为21,宽度变化比例是50,则贪吃蛇宽度开始变化时,吃到的食物数量应该为 (50 * 5 - 21)/ 3 ≈ 77 个;那么贪吃蛇达到最大宽度10时,吃的食物数量应该为 (50 * 10 - 21)/ 3 ≈ 160 个。如果是两只蛇,当食物数量约为320个时,完美情况下,都能达到10的宽度。
2.9.2.8 食物的数量随着时间的推移而增多
2.9.2.8.1 绘制效果和代码

/**
 * (1)开始时,生成一只蛇,可以初始化出生坐标、生长方向、生长长度;√ 出生坐标
 * (2)点击上、下、左、右,蛇按照方向移动;√
 * (3)蛇碰到地图边缘结束(地图的碰撞检测);√
 * (4)开始时,生成100个随机大小、随机位置、随机颜色的食物;√
 * (5)蛇移动碰到食物时,吃掉食物,长度变长;√
 * (6)蛇的长度变大一定长时,宽度也随着变大;√
 * (7)食物的数量随着时间的推移而增多;
 */

// 顶点着色器
const VSHADER_SOURCE =
  'attribute vec4 a_Position;\n' +
  'attribute float a_PointSize;\n' +
  'void main() {\n' +
  // 设置坐标
  ' gl_Position = a_Position;\n' +
  // 设置尺寸
  ' gl_PointSize = a_PointSize;\n' +
  '}\n'

// 片元着色器
const FSHADER_SOURCE =
  // 设置uniform变量之前,需要先设置精度
  'precision mediump float;\n' +
  'uniform vec4 u_FragColor;\n' +
  'void main() {\n' +
  // 设置颜色
  ' gl_FragColor = u_FragColor;\n' +
  '}\n'

/**
 * 将main函数中用到的参数设置为全局变量,方便其他函数调用
 */
let gl
// 着色器的位置、大小和颜色参数
let a_Position
let a_PointSize
let u_FragColor
// 获取canvas元素
const canvas = document.getElementById('webgl')
// 蛇位置数组
const snake_points = []
// 蛇的长度(初始化使用,准确来说是点位的数量)
let addLength = 0
// 蛇的运动方向
let moveDirection = 'right'
// 蛇的大小(蛇的每个点位宽度)
let snakeSize = 5
// 是否需要有成长的动画
let start = true

function main () {

  // 获取WebGL上下文
  gl = getWebGLContext(canvas)
  if (!gl) {
    return console.log('Failed to get the rendering context for WebGL')
  }

  // 初始化着色器
  if (!initShaders(gl, VSHADER_SOURCE, FSHADER_SOURCE)) {
    return console.log('Failed to initialize shaders')
  }

  a_Position = gl.getAttribLocation(gl.program, 'a_Position')
  if (a_Position < 0) {
    return console.log('Failed to get the storage location of a_Position')
  }

  a_PointSize = gl.getAttribLocation(gl.program, 'a_PointSize')

  u_FragColor = gl.getUniformLocation(gl.program, 'u_FragColor')
  if (!u_FragColor) {
    return console.log('Failed to get the storage location of u_FragColor')
  }

  // 设置canvas背景色
  gl.clearColor(0.0, 0.0, 0.0, 1.0)

  // 清空canvas
  gl.clear(gl.COLOR_BUFFER_BIT)

  // 创建贪吃蛇数据
  createSnake({ x: 0, y: 0 }, 'right', 20)

  // 创建食物
  createFoods(300, 5)
}

/**
 * 创建贪吃蛇数据
 * @param {number} head 蛇出生的坐标
 * @param {string} direction 蛇的生长方向(up/down/left/right)
 * @param {number} length 蛇添加的出生长度
 */
function createSnake (head = { x: 0, y: 0 }, direction = 'right', length = 0) {
  addLength = length
  moveDirection = direction
  // 如果头部不在允许范围内,抛出错误
  if (isBeyond(head)) {
    throw new Error('贪吃蛇的头部不在地图内,请更换初始化数据')
  }
  snake_points.push({
    x: head.x,
    y: head.y
  })
  draw()
  // 成长动画
  if (addLength > 0) {
    render()
  } else {
    // 终止成长
    start = false
  }
}

/**
 * 判断蛇的点位超出允许范围内
 * @param {object} {x,y} 蛇的横纵坐标
 * @param {number} size 新的蛇头宽度
 * @returns
 */
function isBeyond ({ x, y }, size) {
  size = size ? size : snakeSize
  // 获取贪吃蛇可以存在的点位坐标
  let xRange = [-canvas.width / 2 + size / 2, canvas.width / 2 - size / 2]
  let yRange = [-canvas.height / 2 + size / 2, canvas.height / 2 - size / 2]
  if (x < xRange[0] || x > xRange[1] || y < yRange[0] || y > yRange[1]) {
    return true
  } else {
    return false
  }
}

// 绘制点位
function draw () {
  // 清空canvas
  gl.clear(gl.COLOR_BUFFER_BIT)
  // 绘制贪吃蛇
  for (const element of snake_points) {
    const point = getGLPosition(element)
    gl.vertexAttrib3f(a_Position, point.x, point.y, 0.0)
    gl.vertexAttrib1f(a_PointSize, snakeSize.toFixed(1))
    gl.drawArrays(gl.POINTS, 0, 1)
  }
  // 绘制食物
  for (const food of foods) {
    const point = getGLPosition(food)
    gl.vertexAttrib3f(a_Position, point.x, point.y, 0.0)
    gl.vertexAttrib1f(a_PointSize, food.size)
    gl.uniform4f(u_FragColor, food.color[0], food.color[1], food.color[2], food.color[3])
    gl.drawArrays(gl.POINTS, 0, 1)
  }
}

// 将计算像素坐标换算成WebGL坐标
function getGLPosition ({ x, y }) {
  return {
    x: x / (canvas.width / 2),
    y: y / (canvas.height / 2)
  }
}

/**
 * 设置键盘事件
 */
// 上次点击的键位
let lastKey = ''
document.addEventListener('keydown', (e) => {
  const key = e.key
  // console.log('key', e)
  // 记录上次点击键位,避免多次触发动画
  if (key !== lastKey) {
    lastKey = key
  } else {
    return
  }
  // 设置动画方向
  if (key === 'ArrowUp') {
    moveDirection = 'up'
  } else if (key === 'ArrowDown') {
    moveDirection = 'down'
  } else if (key === 'ArrowLeft') {
    moveDirection = 'left'
  } else if (key === 'ArrowRight') {
    moveDirection = 'right'
  } else if (key === " ") {
    cancelAnimationFrame(rAFId)
    rAFId = null
    return
  } else {
    return
  }
  // 如果动画未执行,就执行动画
  if (!rAFId) {
    render()
  }
})

/**
 * 使用requestAnimationFrame方法代替setTimeout或者setInterval进行动画
 * 默认一秒60帧,即一秒运行动画60次
 */
let rAFId = null
let foodInterTime = 0
function render (time) {
  // 每隔1s,生成一个食物
  const systemLoopTime = time ? time / 1000 % 1 : 0
  if (systemLoopTime >= foodInterTime) {
    foodInterTime = systemLoopTime
  } else {
    foodInterTime = 0
    createFood()
  }
  t = 1 / 60 * 50
  // 每次移动,生成一个新的头部,删除旧的尾部
  const head = snake_points[0]
  const newHead = {
    x: head.x,
    y: head.y
  }
  if (moveDirection === 'up') {
    newHead.y = newHead.y + t
  } else if (moveDirection === 'down') {
    newHead.y = newHead.y - t
  } else if (moveDirection === 'left') {
    newHead.x = newHead.x - t
  } else if (moveDirection === 'right') {
    newHead.x = newHead.x + t
  }
  if (start && isBeyond(newHead)) {
    cancelAnimationFrame(rAFId)
    rAFId = null
    start = false
    console.log('初始化成功,但贪吃蛇有' + addLength + '个点位超出范围,被直接删除!')
    addLength = 0
    return
  }
  // 如果没有需要新增,就直接删除尾巴,否则不删除,作为新增的部分
  if (addLength === 0) {
    snake_points.pop()
  } else {
    addLength--
  }
  snake_points.unshift(newHead)
  eatFood()
  changeSize(5, 10, 50)
  draw()
  // 如果是刚开始创建贪吃蛇,并且添加的部分已经完成,就终止成长动画
  if (start && addLength === 0) {
    cancelAnimationFrame(rAFId)
    rAFId = null
    start = false
    return
  }
  if (!isBeyond(newHead)) {
    rAFId = requestAnimationFrame(render)
  } else {
    console.log('time', time)
    cancelAnimationFrame(rAFId)
    rAFId = null
    alert('Game Over!')
  }
}

const foods = []
/**
 * 生成位置随机、大小随机、颜色随机的食物数据
 * @param {number} maxSize 食物的最大大小
 */
function createFood (maxSize = 10) {
  // 位置随机
  let x = canvas.width / 2 - Math.random() * canvas.width
  let y = canvas.height / 2 - Math.random() * canvas.height
  // 大小随机
  let size = Math.floor((Math.random() * maxSize) + 1);
  // 颜色随机
  let color = [
    Number(Math.random().toFixed(1)),
    Number(Math.random().toFixed(1)),
    Number(Math.random().toFixed(1)),
    1.0
  ]
  foods.push({
    x: x,
    y: y,
    size: size,
    color: color
  })
}

/**
 * 生成指定数量的食物数据
 * @param {number} number 生成的食物数量
 * @param {number} maxSize 食物的最大大小
 */
function createFoods (number = 100, maxSize = 10) {
  for (let i = 0; i < number; i++) {
    createFood(maxSize)
  }
  // 绘制
  draw()
}

/**
 * 碰撞检测(适用于正方形),发生碰撞返回true,否则返回false
 * @param {object} point1
 * @param {object} point2
 * @returns
 */
function collisionDetection (point1, point2) {
  // 碰撞情况的最大距离
  const maxDistance = Math.abs(point1.size / 2 + point2.size / 2)
  const xDistance = Math.abs(point1.x - point2.x)
  const yDistance = Math.abs(point1.y - point2.y)
  return (xDistance <= maxDistance) && (yDistance <= maxDistance)
}

/**
 * 贪吃蛇进食
 */
function eatFood () {
  // 发生碰撞的食物下标
  let collisionIndex = -1
  // 碰撞的食物大小
  let eatSize = 0
  for (let i = 0; i < foods.length; i++) {
    const snakeHead = {
      x: snake_points[0].x,
      y: snake_points[0].y,
      size: snakeSize
    }
    const food = foods[i]
    if (collisionDetection(snakeHead, food)) {
      collisionIndex = i
      eatSize = food.size
      break
    }
  }
  // 将碰撞(吃掉)的食物大小补充给贪吃蛇,删除该食物
  if (collisionIndex !== -1) {
    addLength = addLength + eatSize
    foods.splice(collisionIndex, 1)
  }
}

/**
 * 贪吃蛇的宽度变化
 * @param {number} minSize 最小宽度
 * @param {number} maxSize 最大宽度
 * @param {number} ratio 蛇的长度和宽度的比例,比例越大,蛇的宽度变化越慢
 * @returns
 */
function changeSize (minSize = 5, maxSize = 10, ratio = 50) {
  const length = snake_points.length
  let size = length / ratio
  if (size < minSize) {
    size = minSize
  } else if (size > maxSize) {
    size = maxSize
  }
  const snakeHead = snake_points[0]
  // 当蛇的宽度发生变化,如果新的蛇头超出地图,则暂时不改变蛇的大小,否则改变
  if (snakeSize !== size) {
    if (isBeyond(snakeHead, size)) {
      return
    } else {
      snakeSize = size
      console.log('贪吃蛇宽度变化:', snakeSize)
    }
  }
}
2.9.2.8.2 步骤讲解
(1)根据系统时间,每隔1秒,生成1个食物。
为了演示明显,使用默认食物最大宽度10,并且1秒就生成一个。建议根据实际情况进行调整,比如每隔5秒生成一个最大宽度为5的食物。不过也可以使用默认最大宽度10,作为惊喜(游戏中的变数),当后期游戏制作增加至二人或者多人,并且添加蛇与蛇之间的碰撞检测时,不确定的大食物就成为夺得胜利的关键因素之一。
当然这里的间隔时间和食物最大宽度,也可以根据系统时间的变化而变化,从而改变游戏的剧烈程度。

(2)贪吃蛇颜色变化。
这里其实并没有做多余的设置,纯粹是因为每次生成食物都会改变画笔的颜色,而贪吃蛇本身没有设置颜色,因此会随着最新生成的食物颜色变化而变化。如果不喜欢这个设定,可以在绘制函数中学习绘制食物部分,将贪吃蛇的绘制颜色写死或者按照自定义的规律进行变化。
2.9.2.9 扩展
有兴趣的同学,可以将贪吃蛇的游戏玩法和规则可以继续扩展,比如
(1)贪吃蛇的移动速度随着长度的变化而变化;
(2)双击方向键,贪吃蛇可以在短时间内获取加速的能力;
(3)增加贪吃蛇的数量,形成二人或者多人游戏(设置其他键位进行操作,比如WASD),头部碰撞到其他玩家,宣布死亡,并且变为食物;
(4)普通限时模式:限定时间内活下来,并且累计长度最长的玩家获胜;
(5)猎杀模式:杀死其他所有玩家获胜;
(6)单机模式:生成有限个贪吃蛇机器人,机器人能够感知最近的食物进行进食;玩家杀死所有机器人即为获胜;
(7)无限模式:随着时间推移,一直生成贪吃蛇机器人,机器人不仅能够感知附近食物进行进食,还能猎杀其他机器人或者玩家。直到所有玩家被机器人杀死,游戏结束,记录玩家当前长度作为分数。
(8)道具战争模式:随着时间的推移,不定时地生成道具,比如能够短时间内突破贪吃蛇的最大宽度、获得短时间的无敌能力、获得短时间的隐身能力(但是期间无法和其他贪吃蛇互相猎杀)
(9)甚至在学习后面的章节后,可以制作一个3D版本的贪吃蛇。
(10)还可以使用node.js将游戏数据使用文件或者数据库进行存储,达到存档的目的。
…
正如之前所说,掌握知识的多少很多时候并不会限制我们的思考,游戏的有趣之处在于玩法和规则的创造,而不是掌握更多的渲染方式。工作也是一样,知识是我们工作的基础,但是对于业务的思考才是真正有趣的地方。
3.第三章 绘制和变换三角形
3.1 绘制多个点
3.1.1 示例代码
MultiPoint/MultiPoint.html:
<!DOCTYPE html>
<html lang="en">

<head>
  <meta charset="UTF-8">
  <meta http-equiv="X-UA-Compatible" content="IE=edge">
  <meta name="viewport" content="width=device-width, initial-scale=1.0">
  <title>Document</title>
</head>

<body onload="main()">
  <canvas id="webgl" width="400" height="400">
    Please use a browser that supports 'canvas'
  </canvas>
  <script src="../../lib/webgl-utils.js"></script>
  <script src="../../lib/webgl-debug.js"></script>
  <script src="../../lib/cuon-utils.js"></script>
  <script src="./MultiPoint.js"></script>
</body>

</html>
MultiPoint/MultiPoint.js:
// 顶点着色器
const VSHADER_SOURCE =
  'attribute vec4 a_Position;\n' +
  'void main() {\n' +
  // 设置坐标
  ' gl_Position = a_Position;\n' +
  // 设置尺寸
  ' gl_PointSize = 10.0;\n' +
  '}\n'

// 片元着色器
const FSHADER_SOURCE =
  // 设置uniform变量之前,需要先设置精度
  'precision mediump float;\n' +
  'uniform vec4 u_FragColor;\n' +
  'void main() {\n' +
  // 设置颜色
  ' gl_FragColor = u_FragColor;\n' +
  '}\n'

let gl = null
function main () {
  // 获取canvas元素
  const canvas = document.getElementById('webgl')

  // 获取WebGL上下文
  gl = getWebGLContext(canvas)
  if (!gl) {
    return console.log('Failed to get the rendering context for WebGL')
  }

  // 初始化着色器
  if (!initShaders(gl, VSHADER_SOURCE, FSHADER_SOURCE)) {
    return console.log('Failed to initialize shaders')
  }

  // 获取attribute变量的存储位置
  let a_Position = gl.getAttribLocation(gl.program, 'a_Position')
  if (a_Position < 0) {
    return console.log('Failed to get the storage location of a_Position')
  }

  // 将顶点位置传输给attribute
  gl.vertexAttrib3f(a_Position, 0.0, 0.0, 0.0)

  let u_FragColor = gl.getUniformLocation(gl.program, 'u_FragColor')
  if (!u_FragColor) {
    return console.log('Failed to get the storage location of u_FragColor')
  }

  // 设置顶点位置
  let n = initVertexBuffers(gl)
  console.log(n)
  if (n < 0) {
    return console.log('Failed to set the postion of vertices')
  }

  // 设置canvas背景色
  gl.clearColor(0.0, 0.0, 0.0, 1.0)

  // 清空canvas
  gl.clear(gl.COLOR_BUFFER_BIT)

  // 绘制一个点
  gl.drawArrays(gl.POINTS, 0, n)
}

function initVertexBuffers (gl) {
  let vertices = new Float32Array([
    0.0, 0.5, -0.5, -0.5, 0.0, -0.5
  ])
  // 点的个数
  let n = 3

  // 1、创建缓冲区对象
  let vertexBuffer = gl.createBuffer()
  if (!vertexBuffer) {
    console.log('Failed to create the buffer object')
    return -1
  }

  // 2、绑定缓冲区对象(将缓冲区对象绑定到目标()
  gl.bindBuffer(gl.ARRAY_BUFFER, vertexBuffer)
  // 3、将数据写入缓冲区对象
  gl.bufferData(gl.ARRAY_BUFFER, vertices, gl.STATIC_DRAW)

  let a_Position = gl.getAttribLocation(gl.program, 'a_Position')

  // 4、将缓冲区对象分配给一个atrribute变量(缓冲区对象分配给a_Position)
  gl.vertexAttribPointer(a_Position, 2, gl.FLOAT, false, 0, 0)

  // 5、开启attribute变量(连接a_Position变量与分配给它的缓冲区对象)
  gl.enableVertexAttribArray(a_Position)

  return n
}
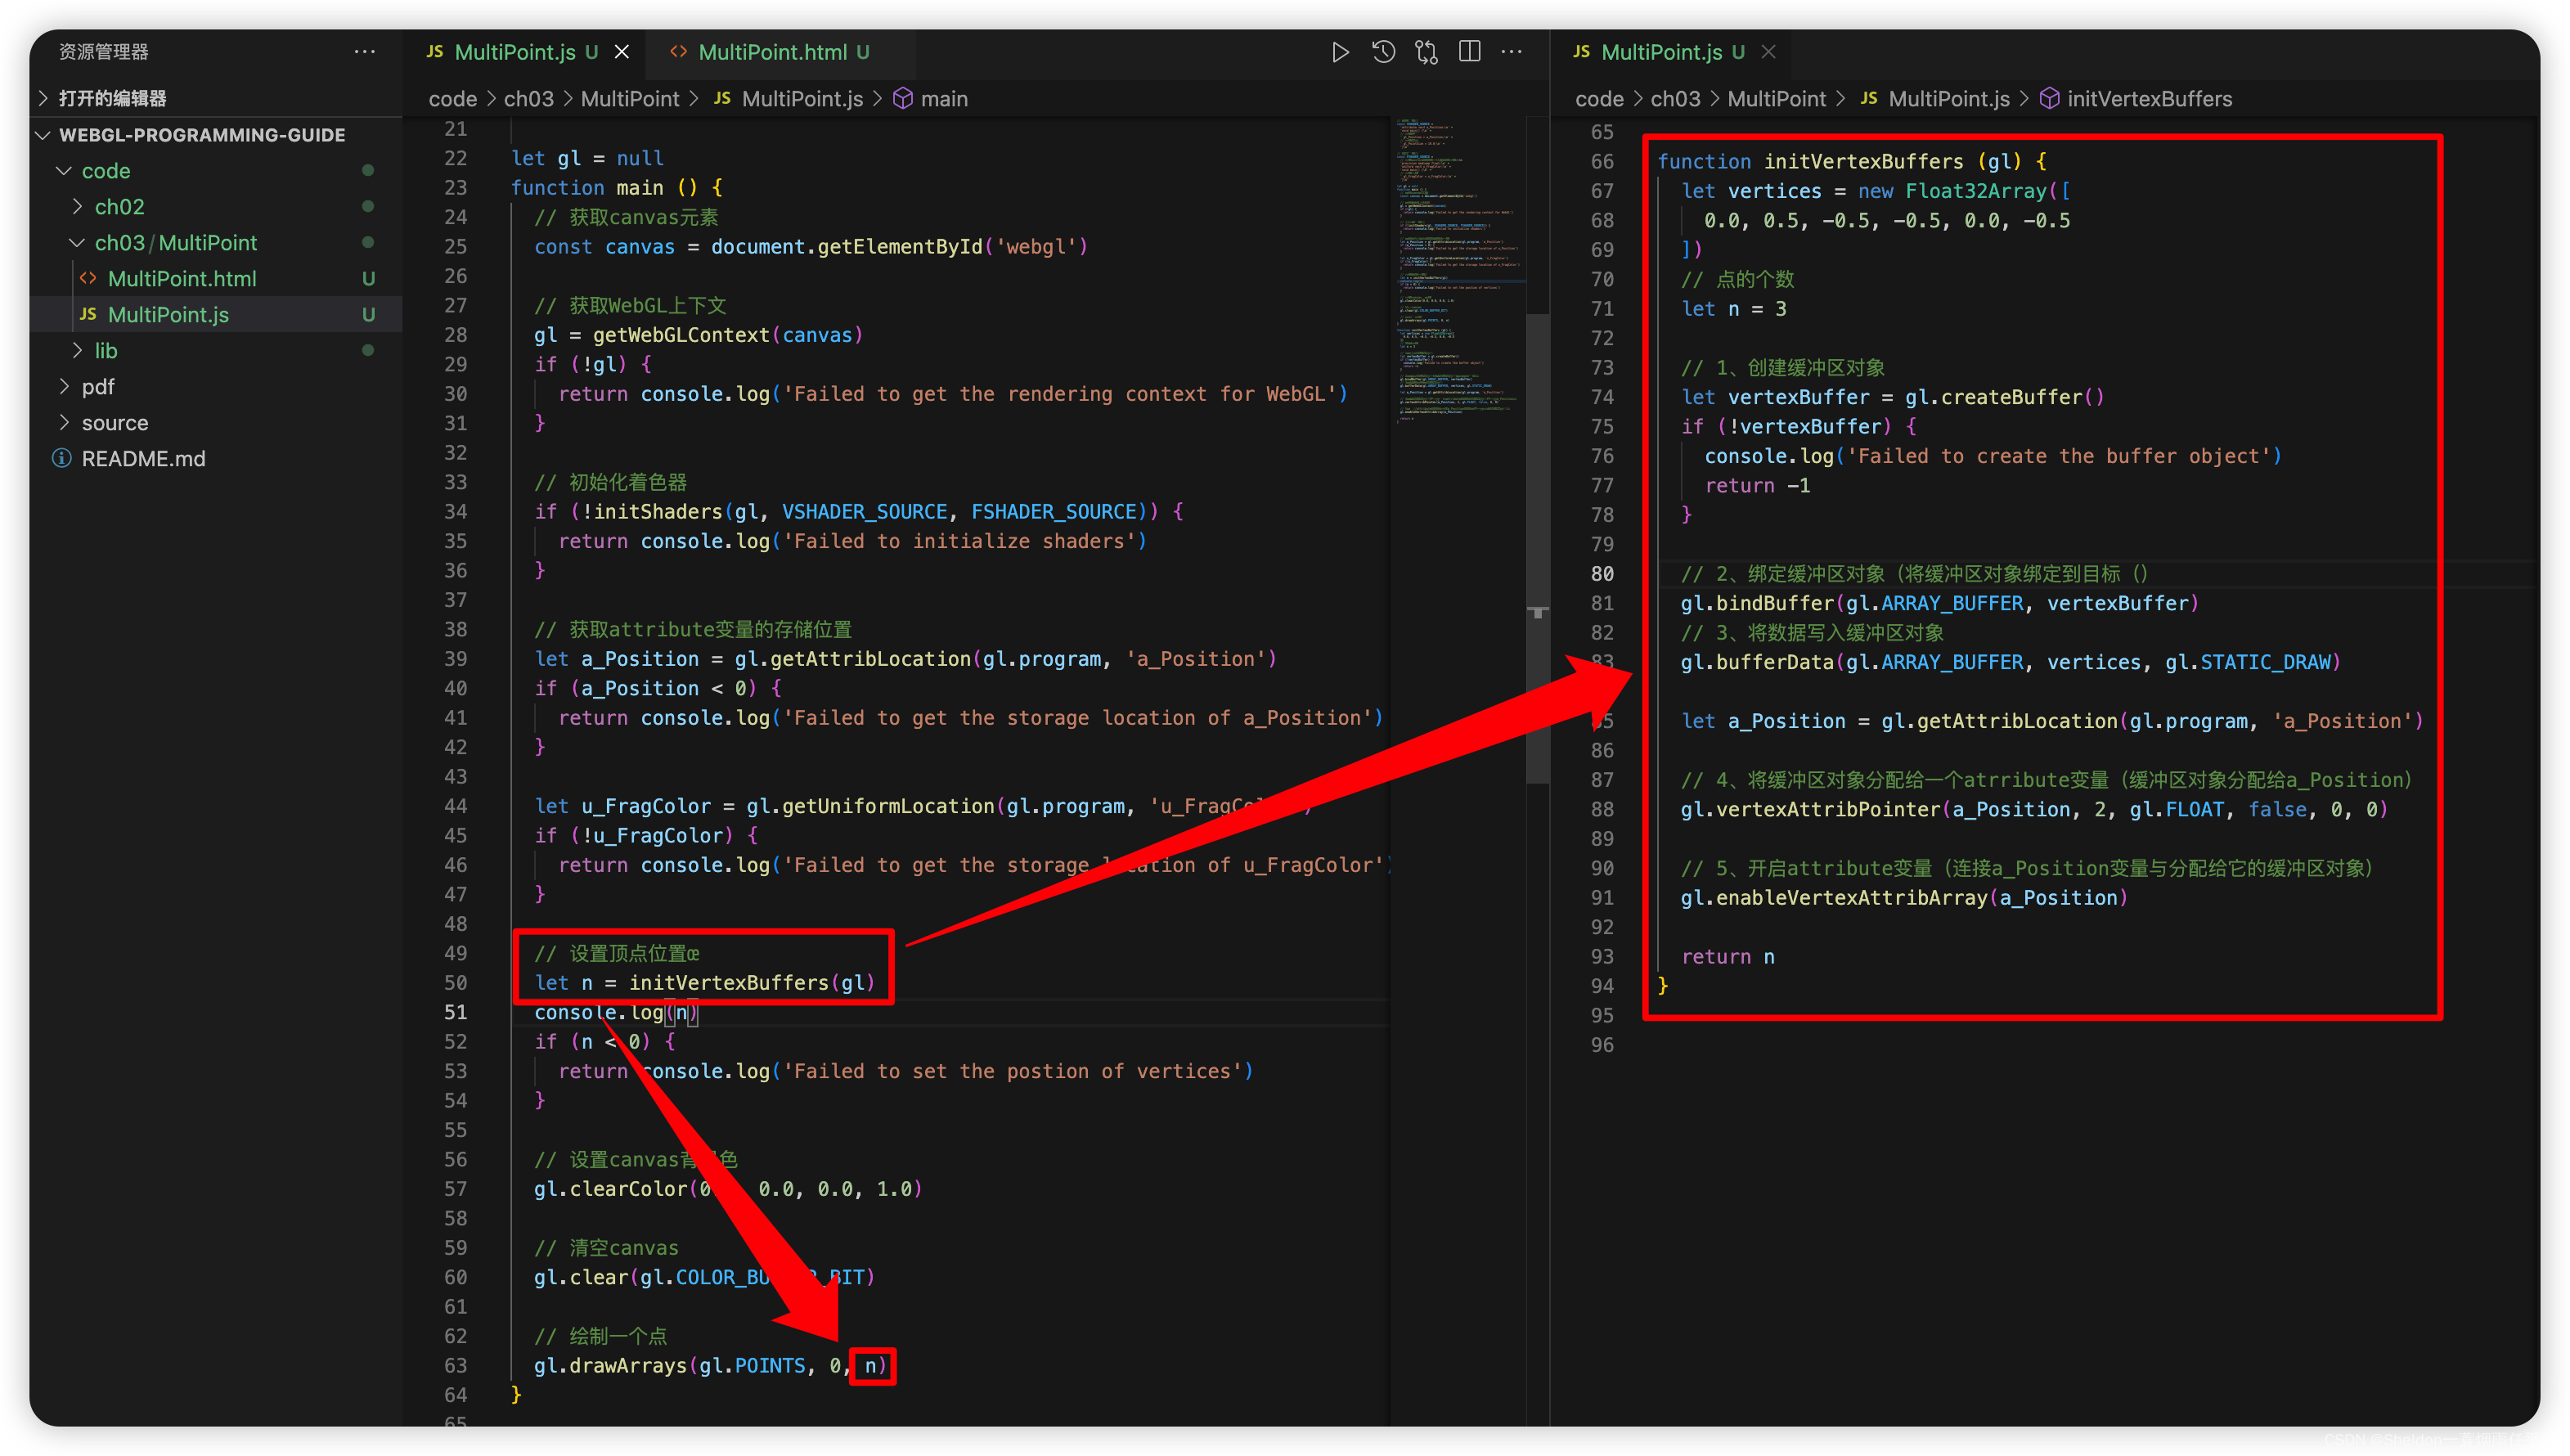
因为本篇文章讲解的是多点位的绘制,所以暂时不对颜色进行设置。言归正传,这个示例和之前的绘制多个点位区别在于,我们摒弃了多次循环渲染单个点位的方式,而是使用了缓冲区对象将多个点位同时分配给a_Position,并在渲染的最后一步gl.drawArrays,明确告诉它需要渲染的点位个数进行渲染。关键代码和步骤在于initVertexBuffers()这个函数。
3.1.2 相关概念
let vertices = new Float32Array([
    0.0, 0.5, -0.5, -0.5, 0.0, -0.5
  ])
3.1.2.1 定型数组(typed array,有的书中也叫类型化数组)
3.1.2.1.1 目的
为了绘制三维图形,WebGL通常需要处理大量相同类型的数据,例如顶点的坐标和颜色数据。为了优化性能,WebGL为每种基本数据引入了一种特殊的数组(定型数组)。浏览器事先知道数组中的数据类型,所以处理起来就更有效率。
3.1.2.1.2 历史
《JavaScript高级程序设计》中的解释更为透彻:在WebGL的早期版本中,因为JavaScript数组原生数组出现了性能问题。图形驱动程序API通常不需要以JavaScript默认双精度浮点格式传递给他们数值,而这恰恰是JavaScript数组在内存中的格式。因此,每次WebGL与JavaScript运行之间传递数组时,WebGL绑定都需要在目标环境分配新数组,以其当前格式迭代数组,将数值转型为新数组中的适当格式,而这要花费很多时间。
而Mozilla为解决这个问题实现了CanvasFloatArray。这是一个提供JavaScript接口的、C语言风格的浮点值数组。JavaScript运行时使用这个类型可以分配、读取和写入数组。这个数组可以直接传给底层图形API,也可以从底层获取到。 最终,CanvasFloatArray变成了Float32Array(单精度32位浮点数,每个元素占4个字节),也就是今天定型数组中可用的第一个“类型”。
值得注意的是,JavaScript并没有“TypedArray”类型,定型数组(typed array)是ECMAScript新增的结构,它指的是一种特殊的包含数值类型的数组。
3.1.2.1.3 WebGL使用的各种类型化数组
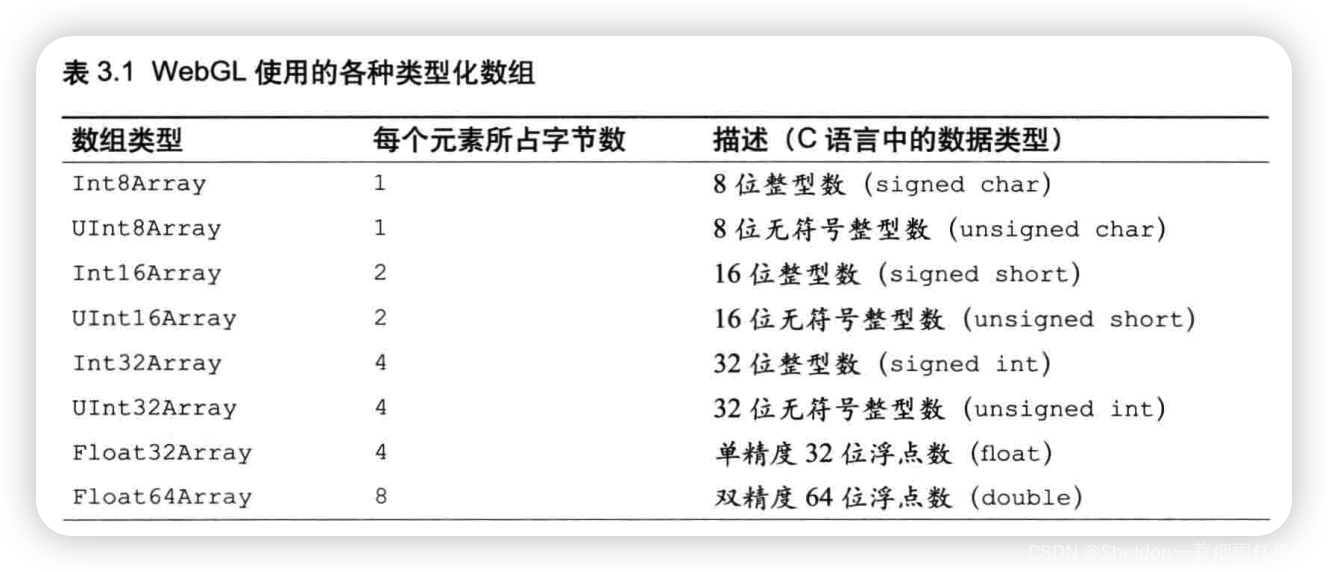
3.1.2.1.4 类型化数组的方法、属性和常量
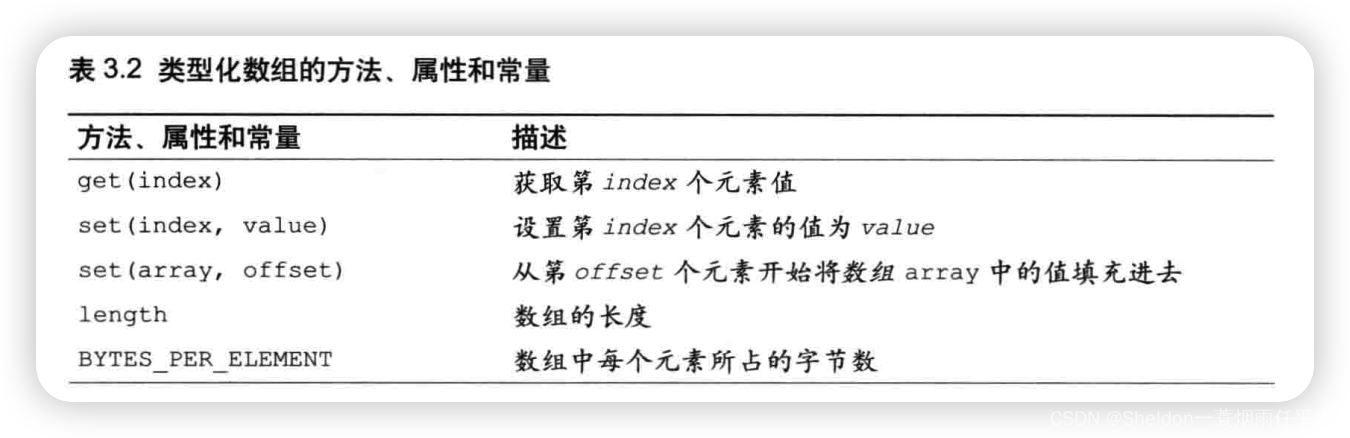
3.1.2.1.5 创建方式(使用new运算符)
创建定型数组的唯一方式就是使用new运算符
let vertices = new Float32Array([
    0.0, 0.5, -0.5, -0.5, 0.0, -0.5
  ])
也可以创建一个指定长度的空的定型数组,比如:
let vertices = new Float32Array(4)
3.1.2.2 缓冲区对象
缓冲区对象是WebGL系统中的一块存储区,你可以在缓冲区对象中保存想要绘制的所有顶点的数据。
先创建一个缓冲区,然后向缓冲区写入顶点数据,这样你就能一次性地像顶点着色器传入多个顶点的attribute变量的数据。
3.1.3 使用缓冲区对象(相关API)
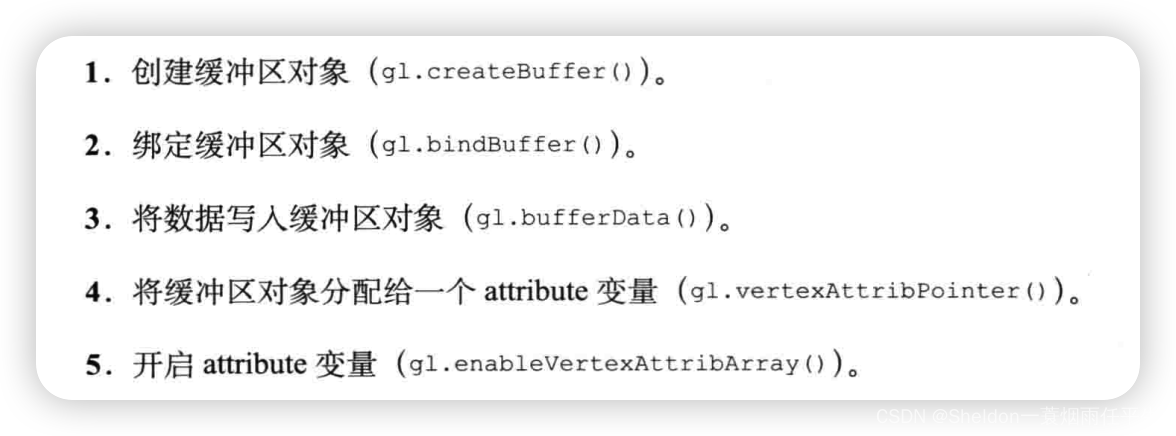
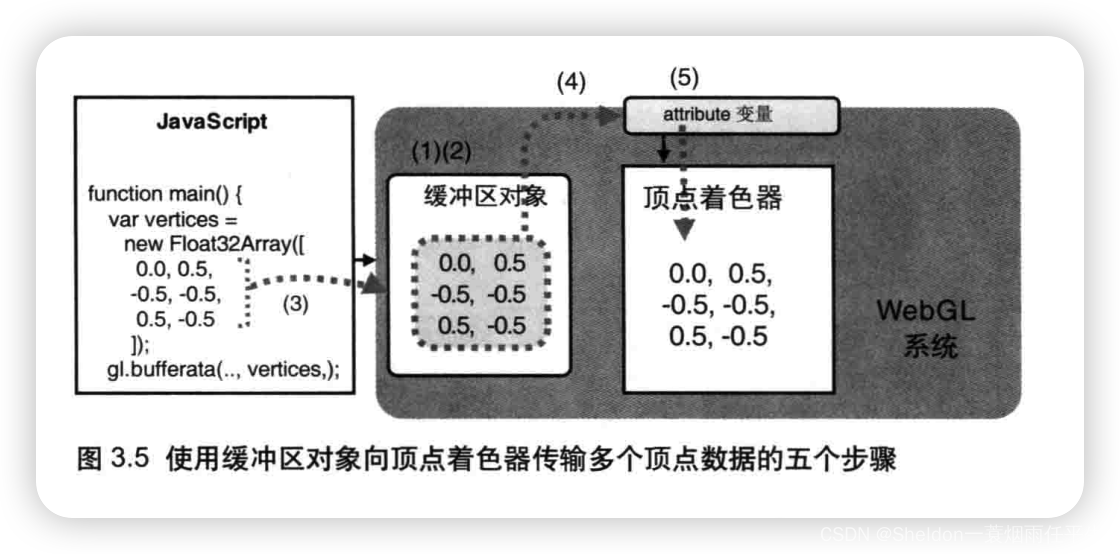
3.1.3.1 创建缓冲区对象—— gl.createBuffer()
// 1、创建缓冲区对象
  let vertexBuffer = gl.createBuffer()
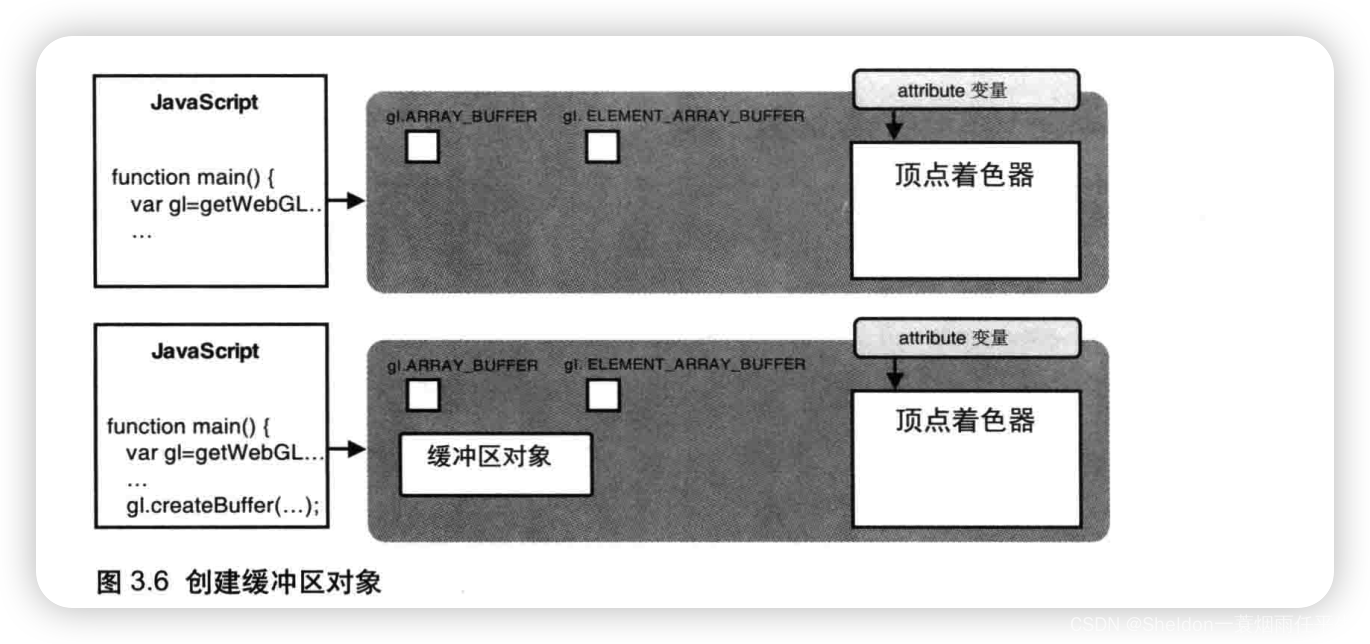
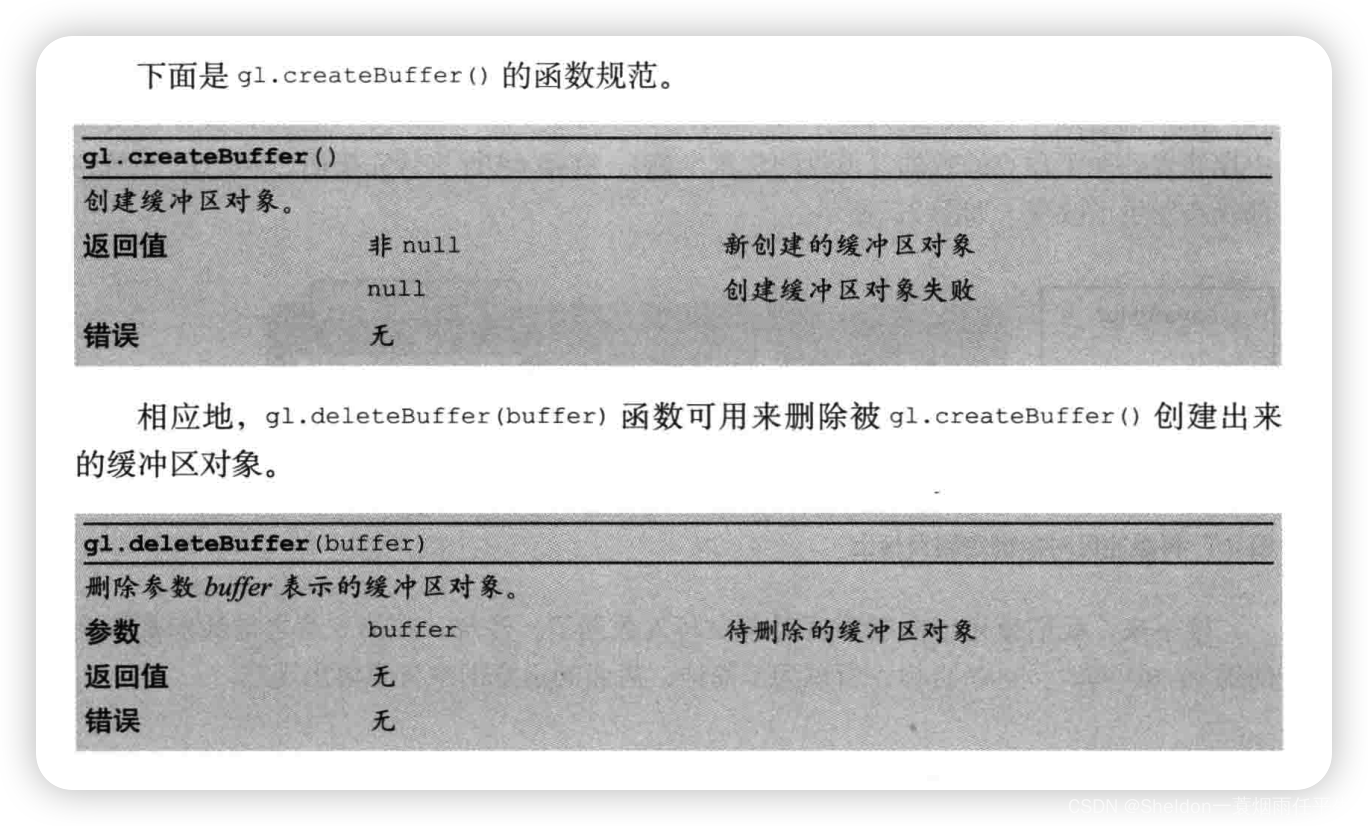
3.1.3.2 绑定缓冲区对象——gl.bindBuffer()
// 2、绑定缓冲区对象(将缓冲区对象绑定到目标()
  gl.bindBuffer(gl.ARRAY_BUFFER, vertexBuffer)
将缓冲区对象绑定到目标上,这里的“目标”指的是缓冲区对象的用途。
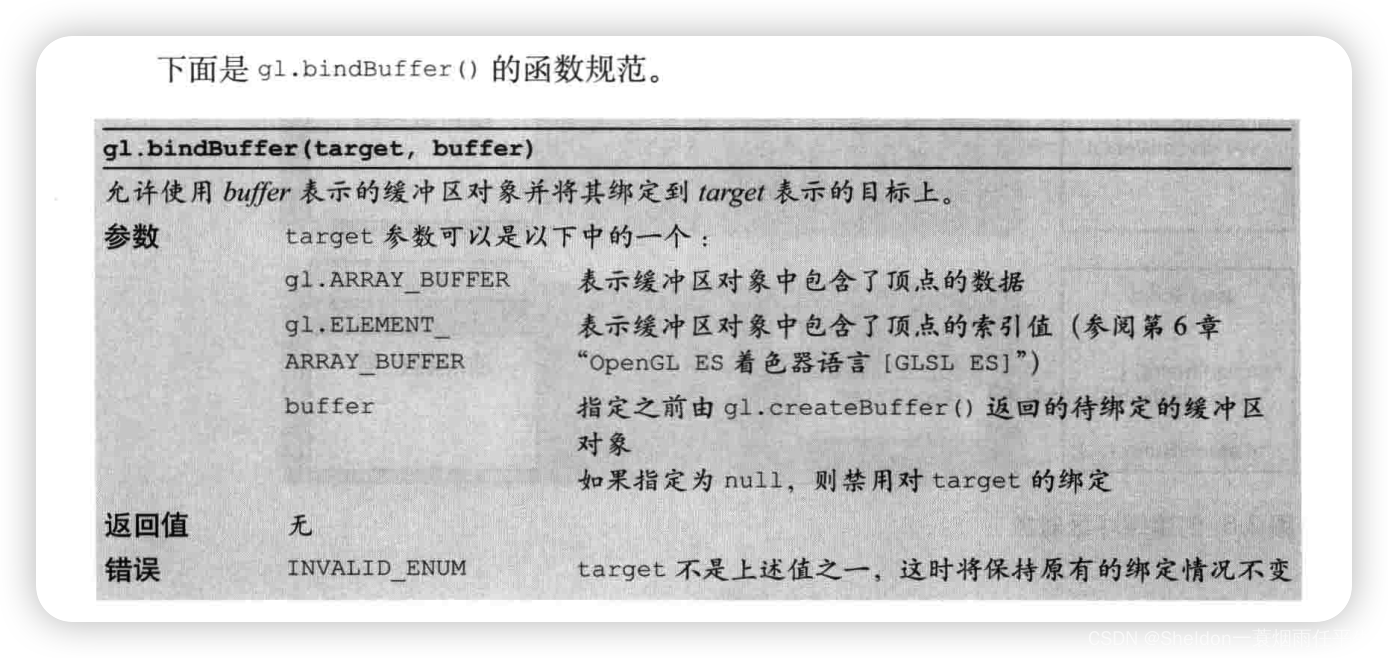
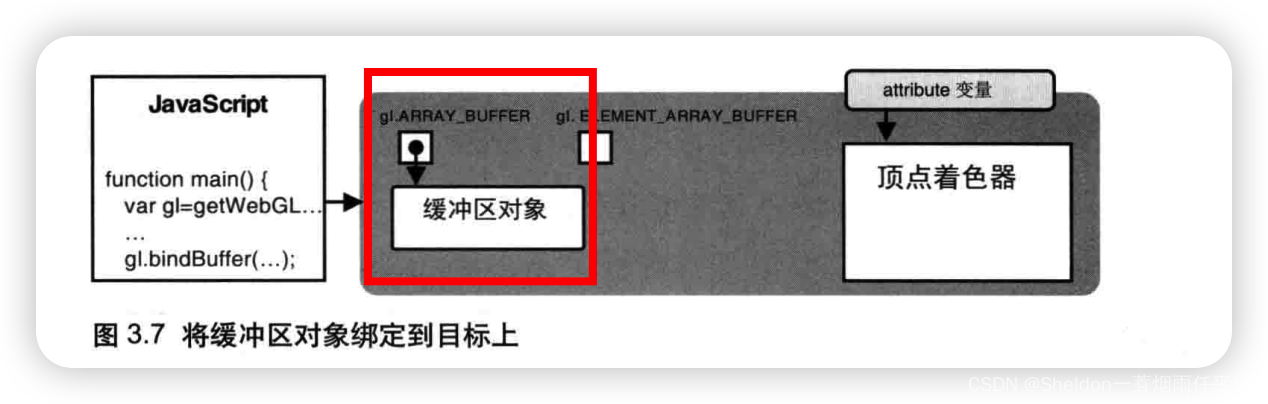
3.1.3.3 将数据写入缓冲区对象——gl.bufferData()
// 3、将数据写入缓冲区对象
  gl.bufferData(gl.ARRAY_BUFFER, vertices, gl.STATIC_DRAW)
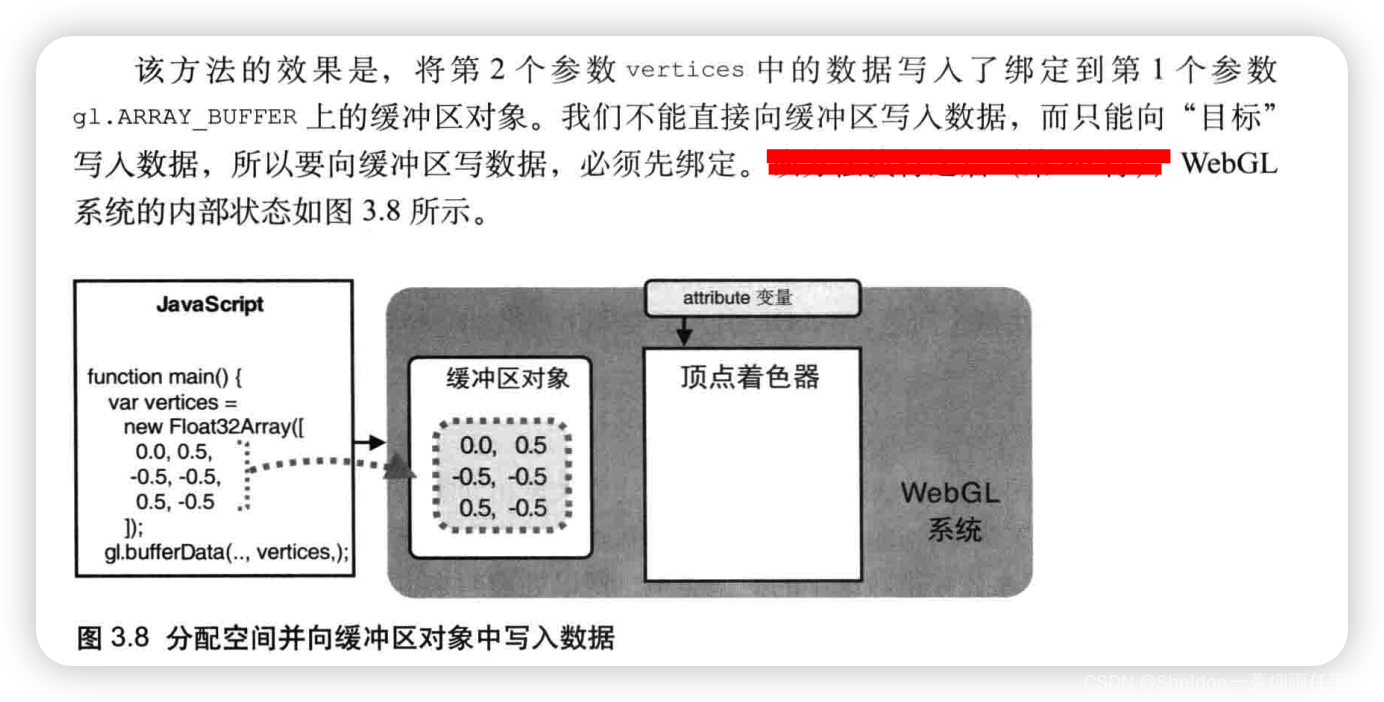
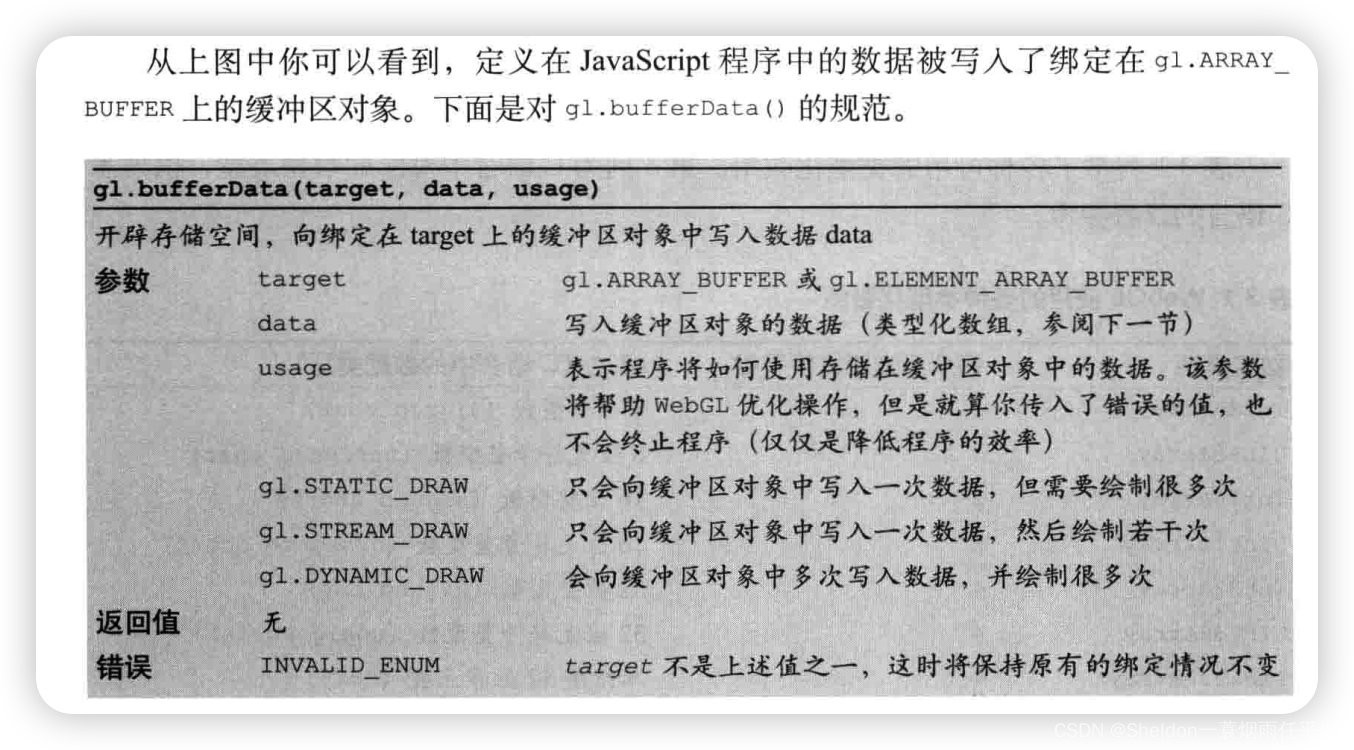
3.1.3.4 将缓冲区对象分配给一个atrribute变量——gl.vertexAttribPointer()
// 4、将缓冲区对象分配给一个atrribute变量(缓冲区对象分配给a_Position)
  gl.vertexAttribPointer(a_Position, 2, gl.FLOAT, false, 0, 0)

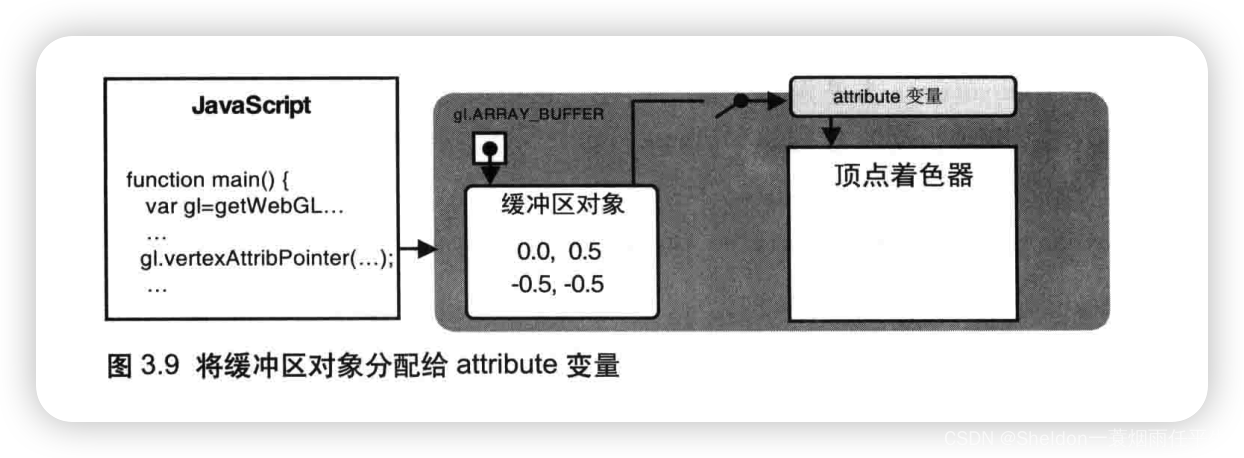
3.1.3.5 开启attribute变量——gl.enableVertexAttribArray()
// 5、开启attribute变量(连接a_Position变量与分配给它的缓冲区对象)
  gl.enableVertexAttribArray(a_Position)
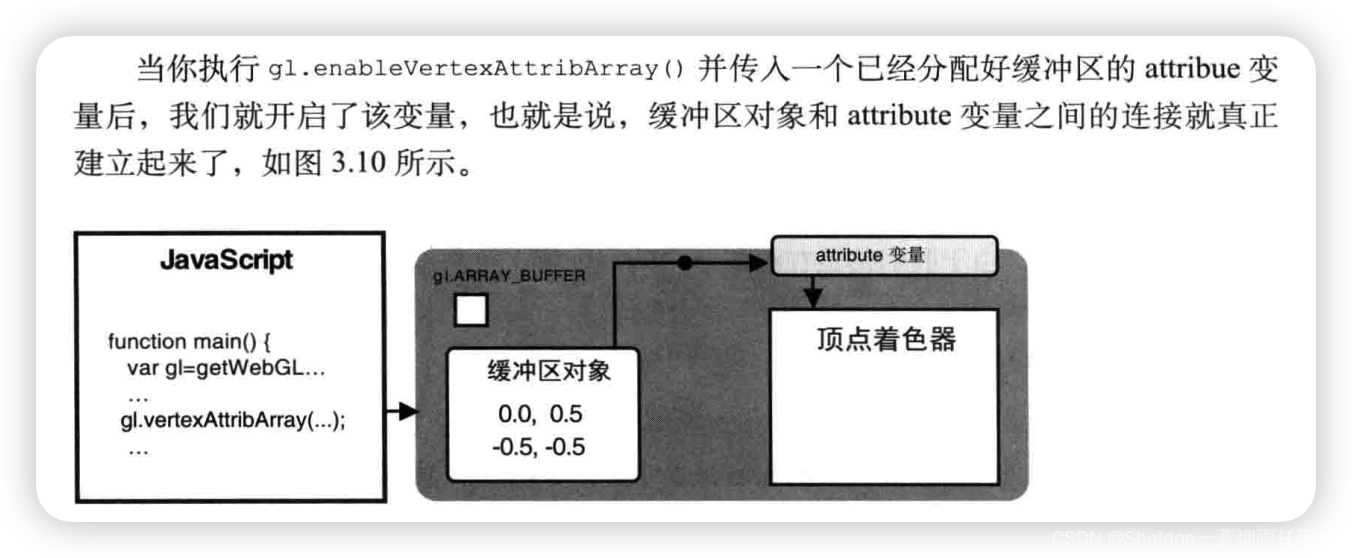
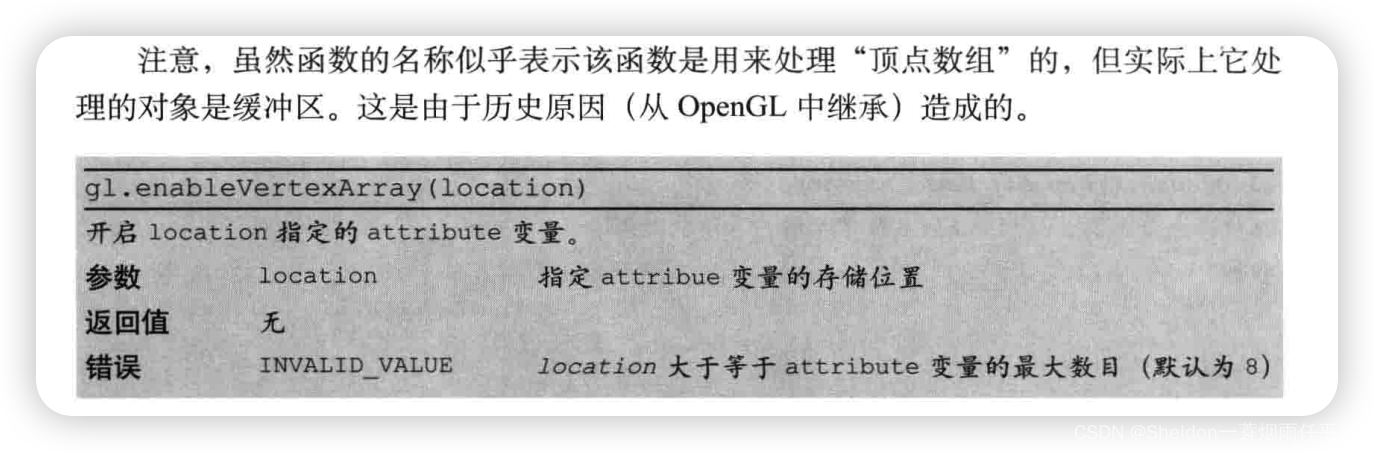
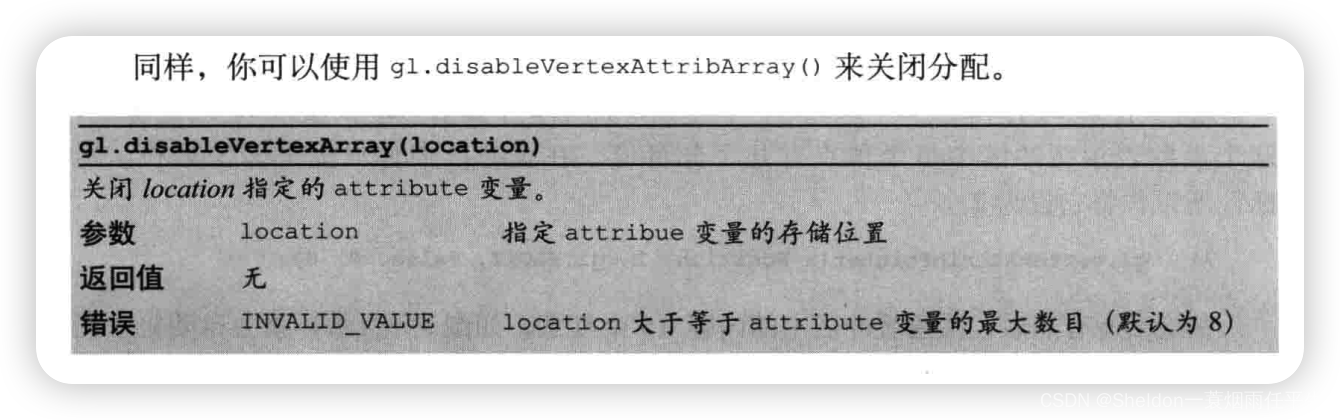
3.1.4 回顾gl.drawArrays()
// 绘制一个点
  gl.drawArrays(gl.POINTS, 0, n)
第一个参数gl.POINTS代表绘制的是点,第二个参数0代表从第1个顶点开始绘制,第三个参数n是3,代表绘制3个点,所以顶点着色器执行了3次。
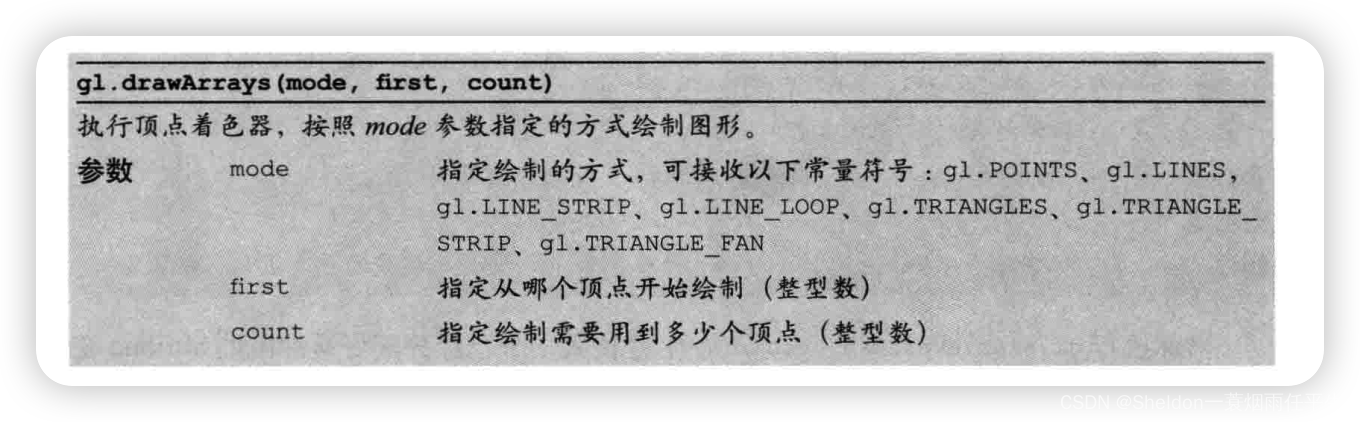
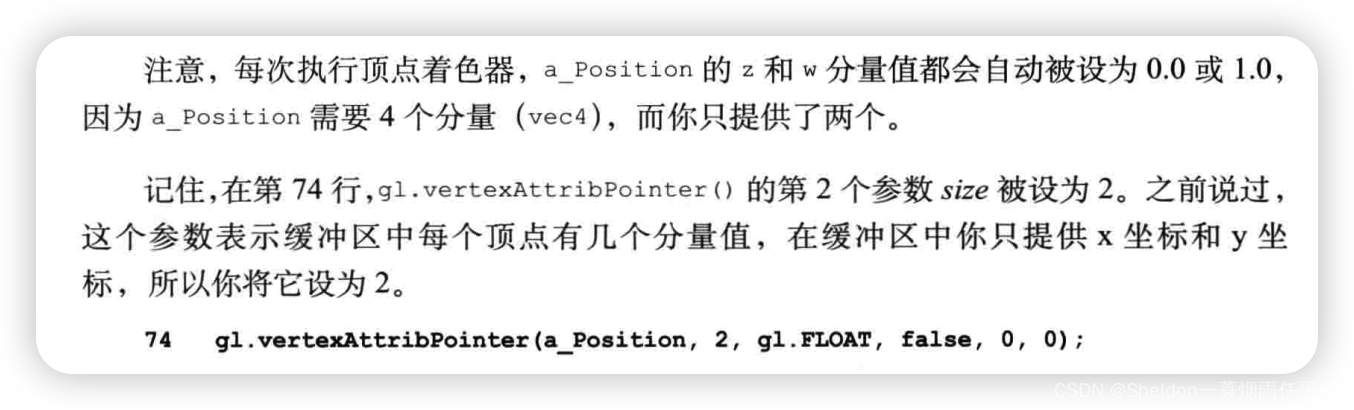
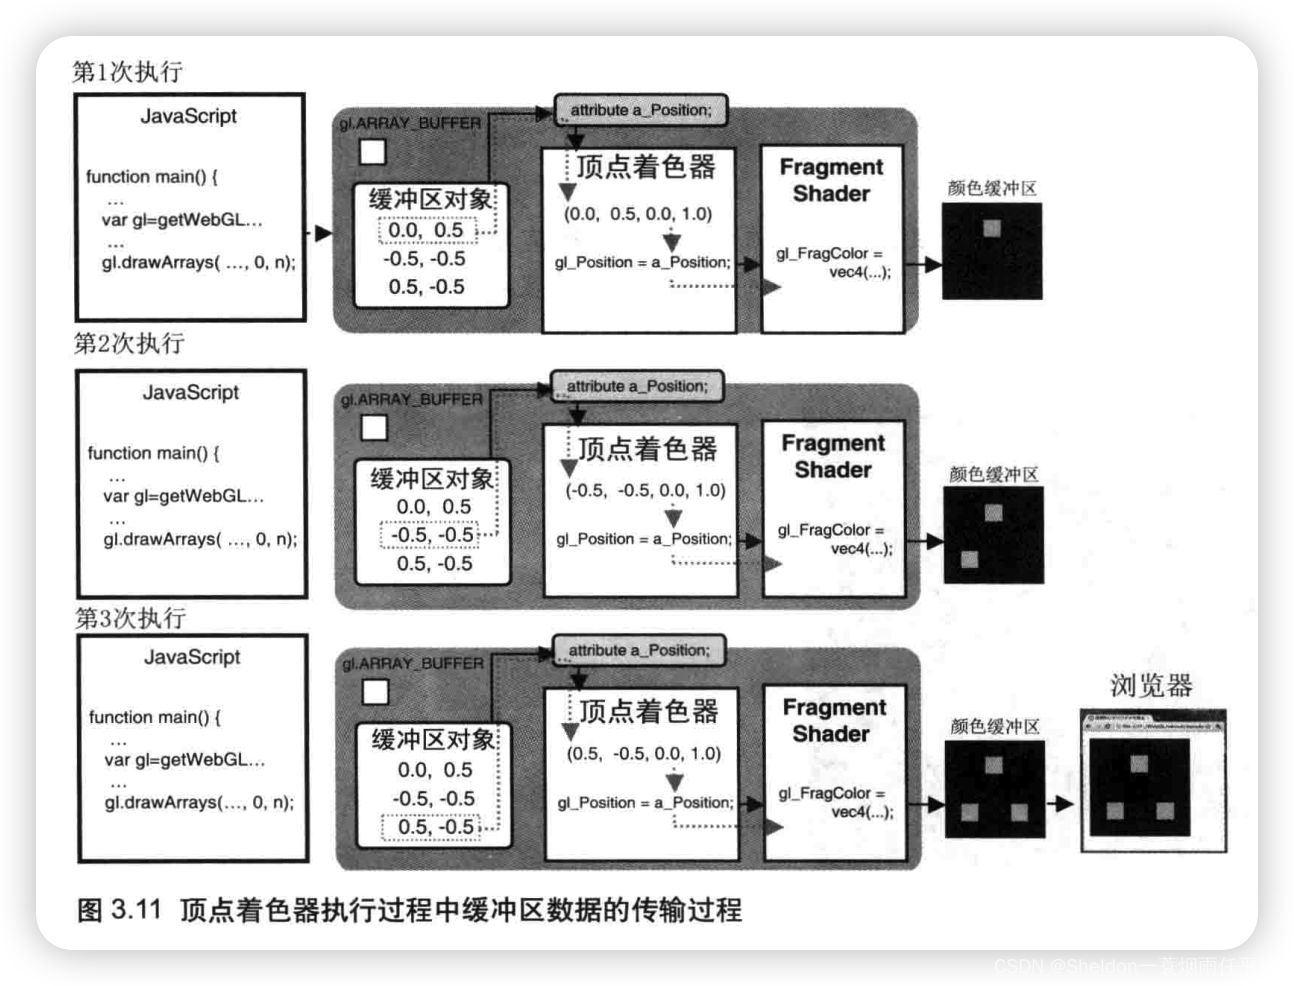 、
、
3.1.5 程序实验
3.1.5.1 定型数组长度过短
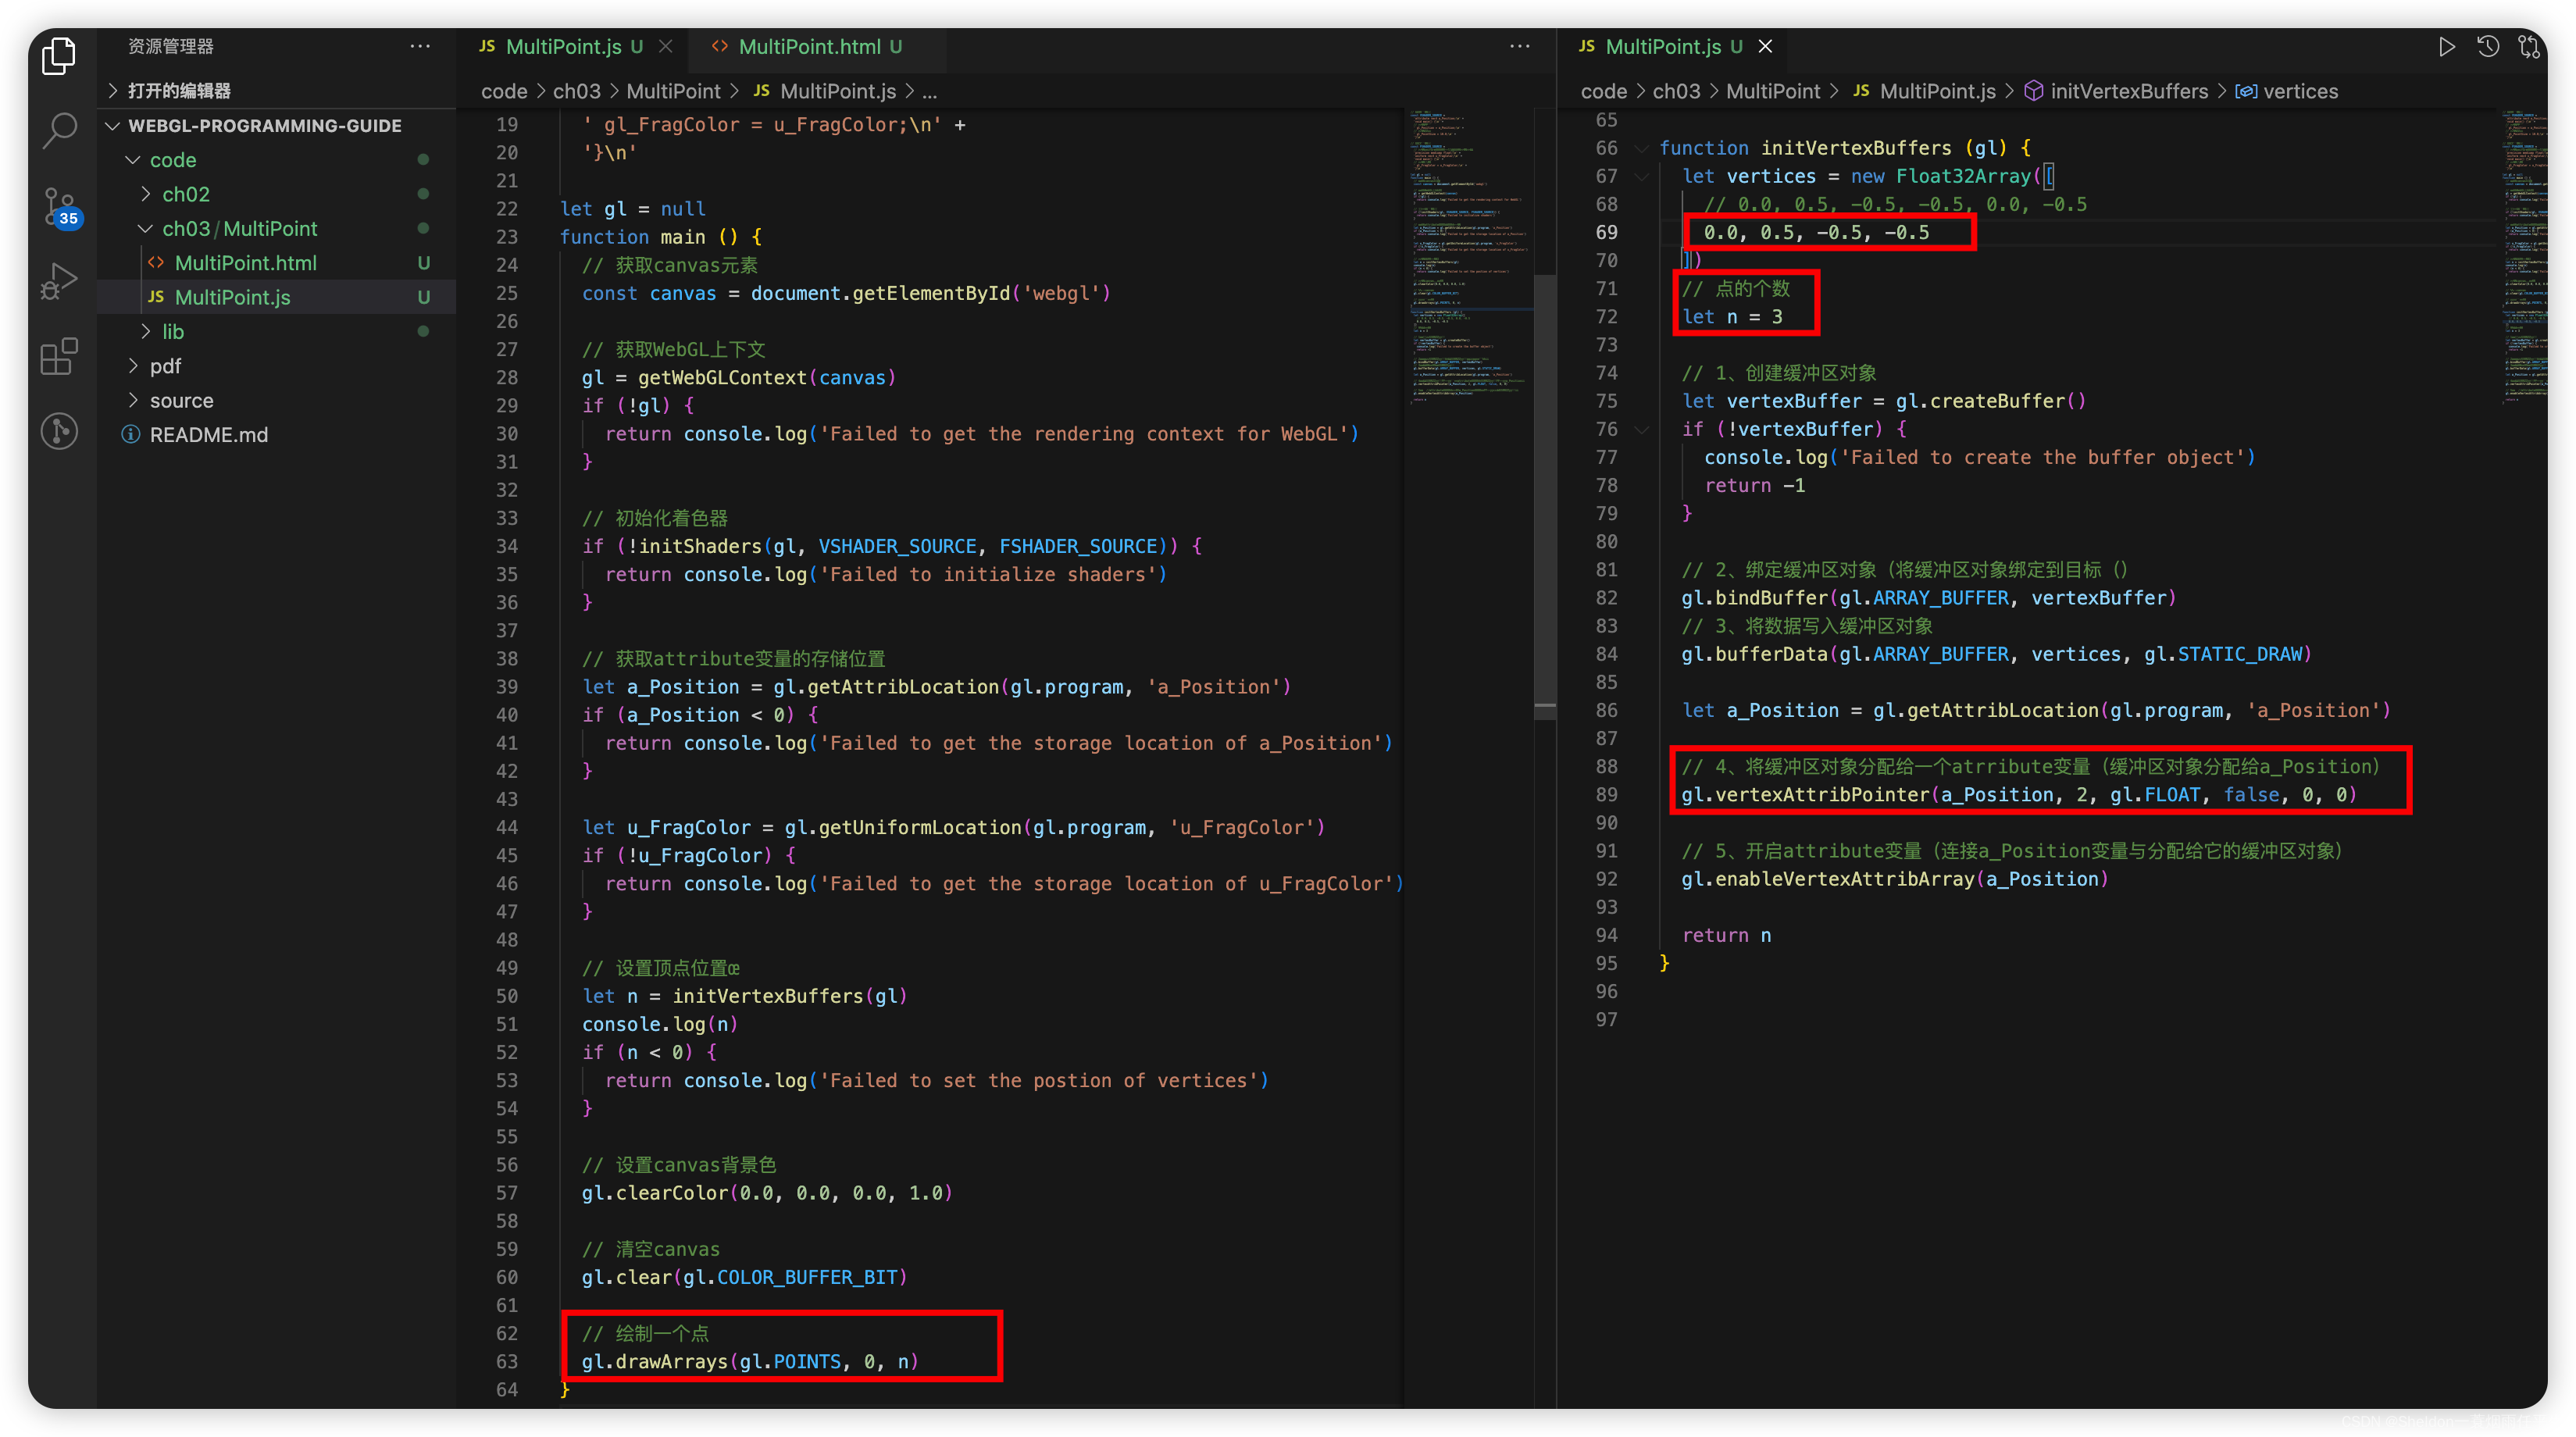
如图可知,当被绑定到缓冲区对象的定型数组长度过短时,无法被gl.drawArrays绘制,并且报出警告。
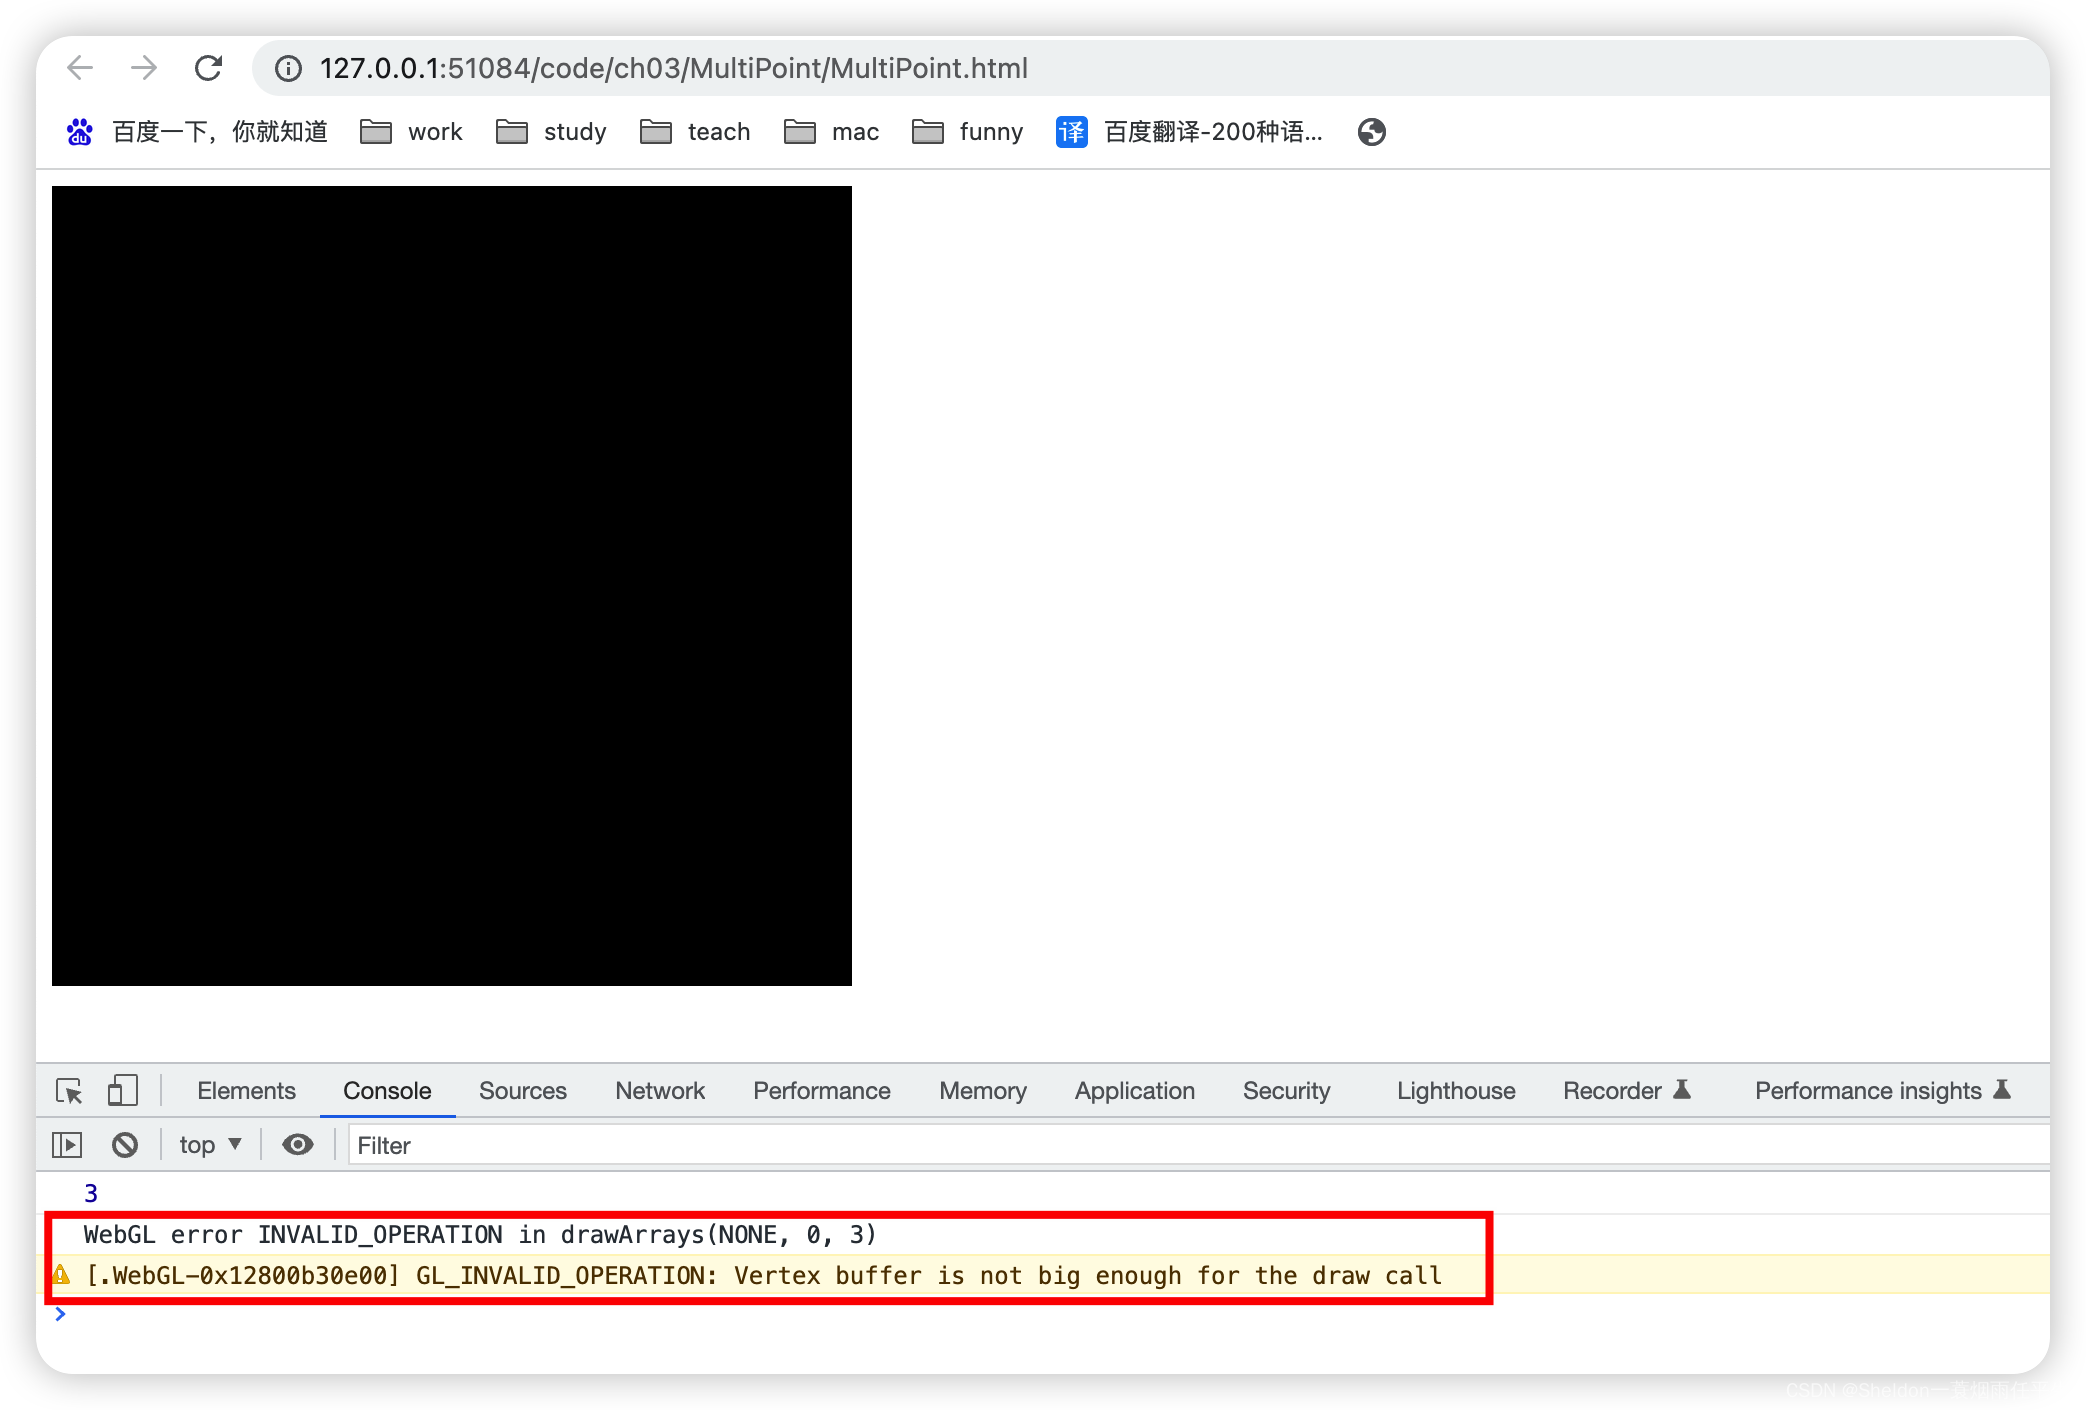
3.1.5.2 定型数组长度过长
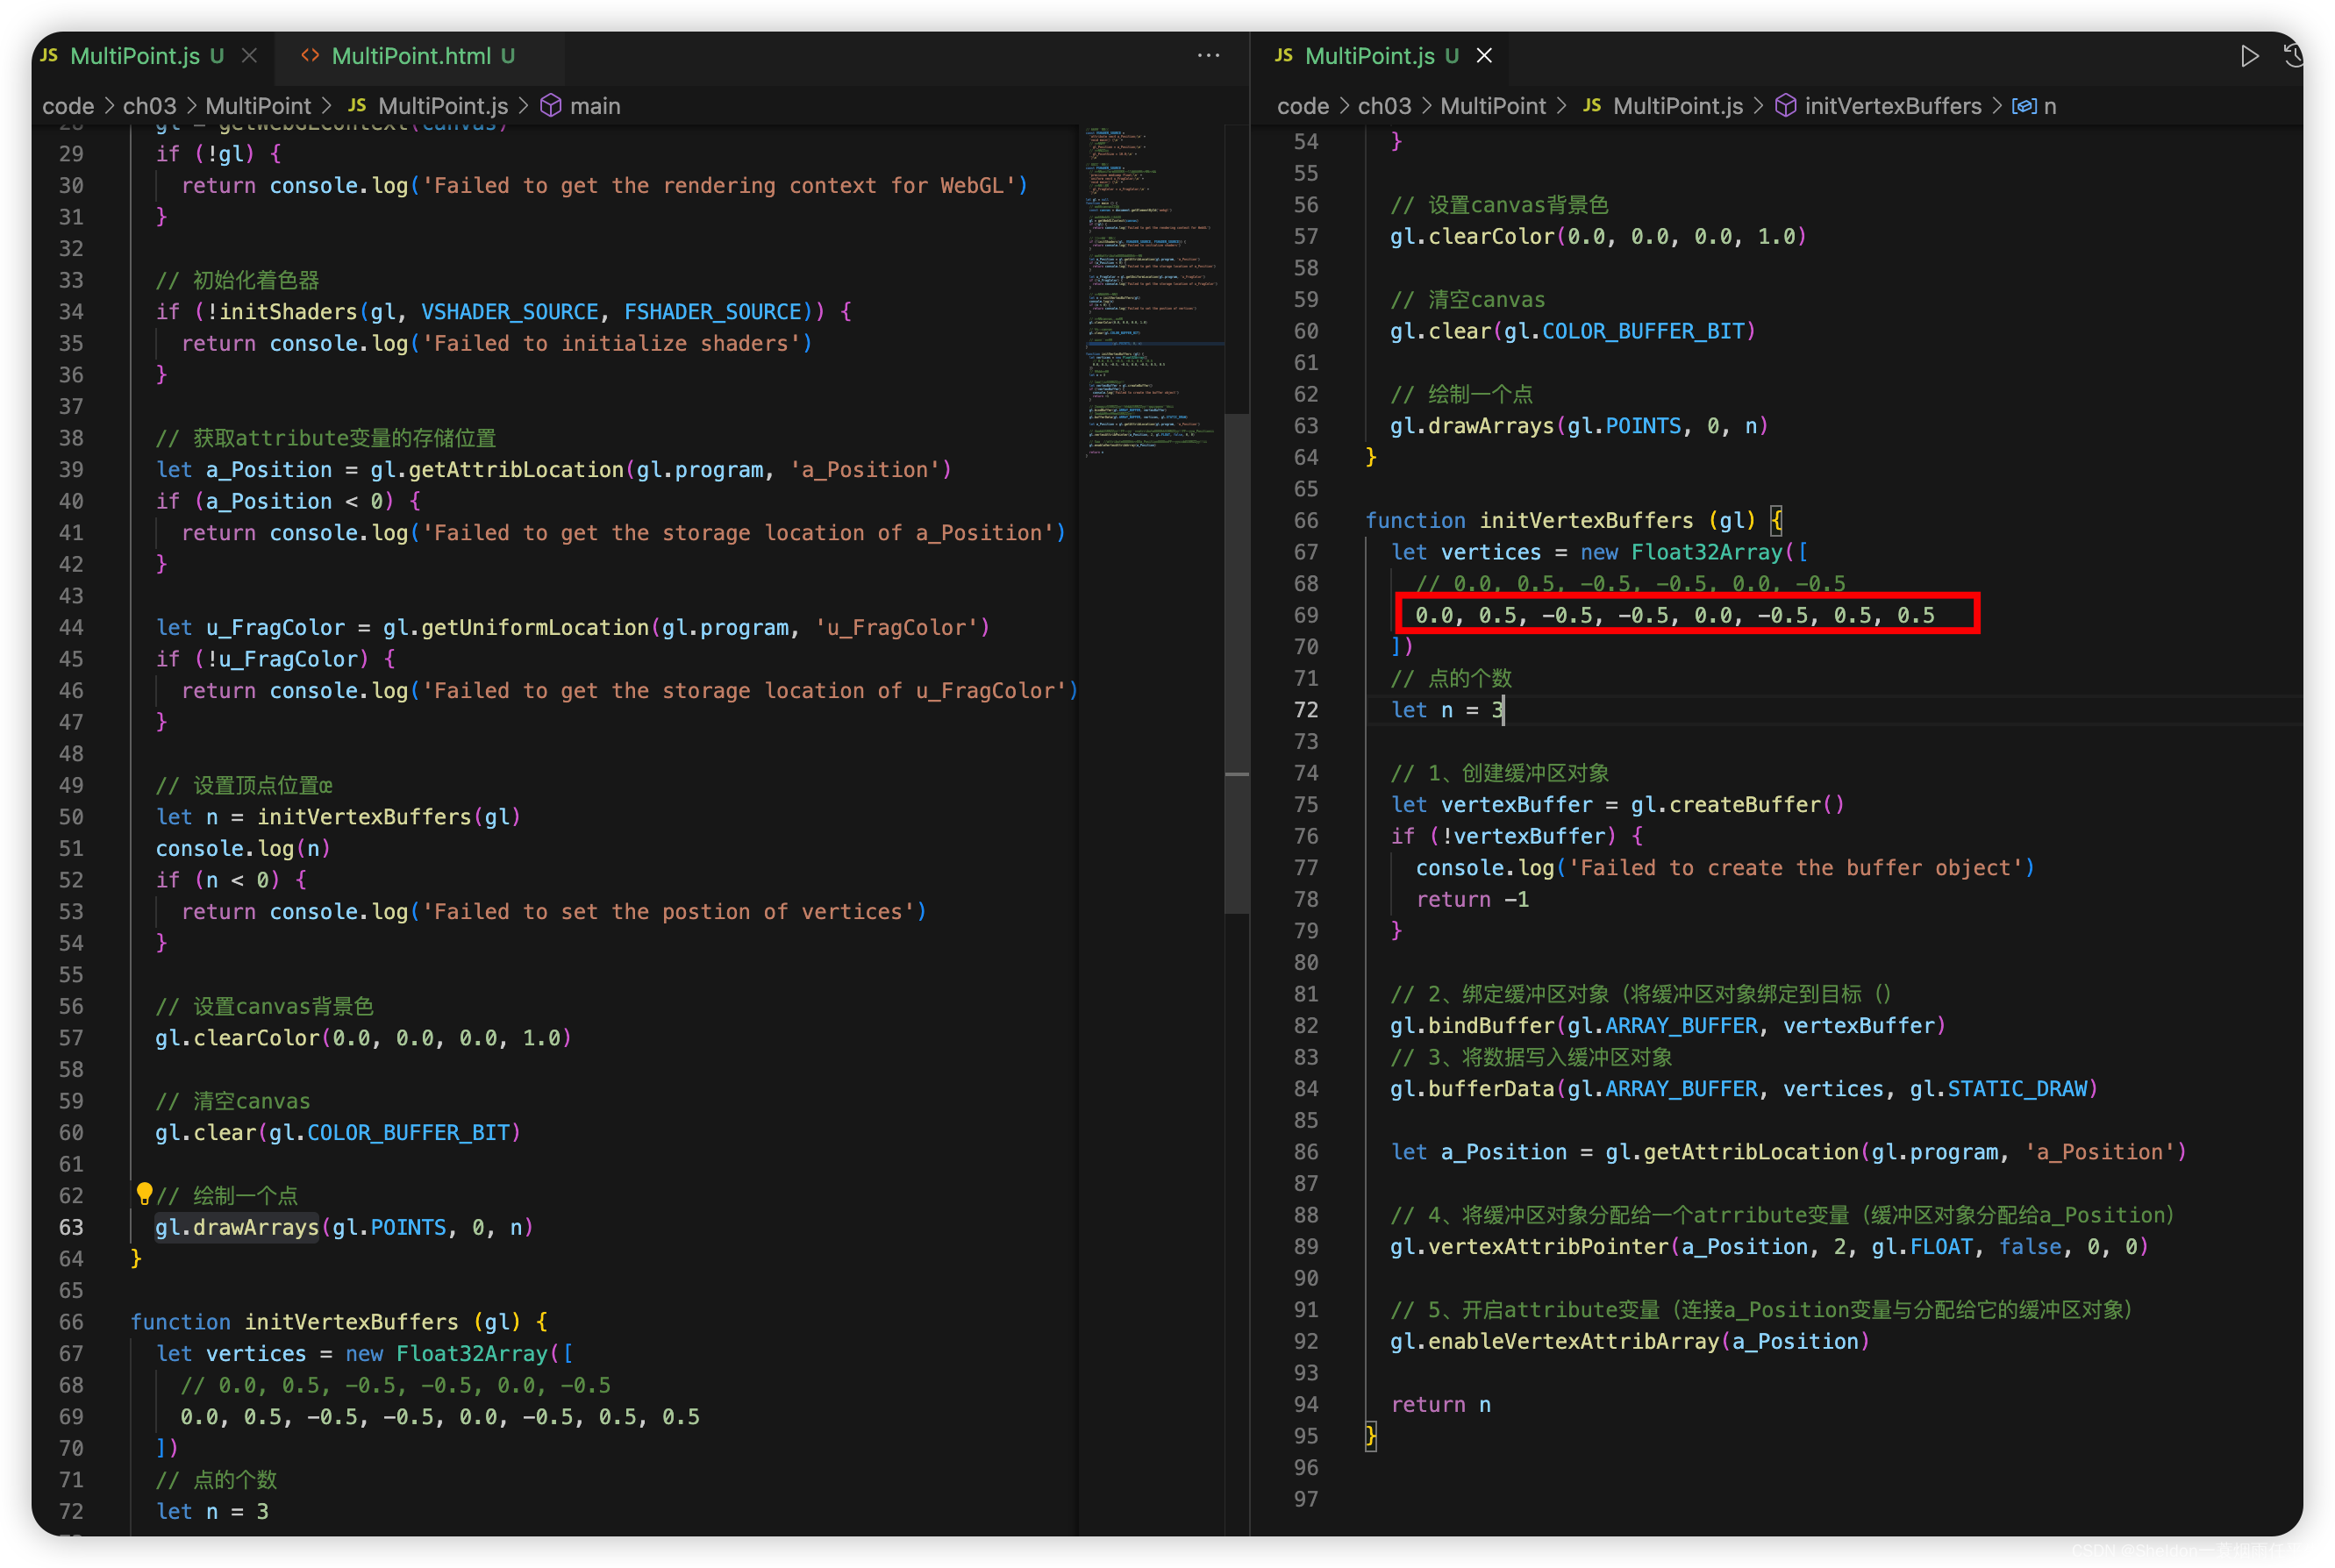
可以看到,缓冲区多出的部分并不会被渲染出来,但并不影响前3个点的绘制。
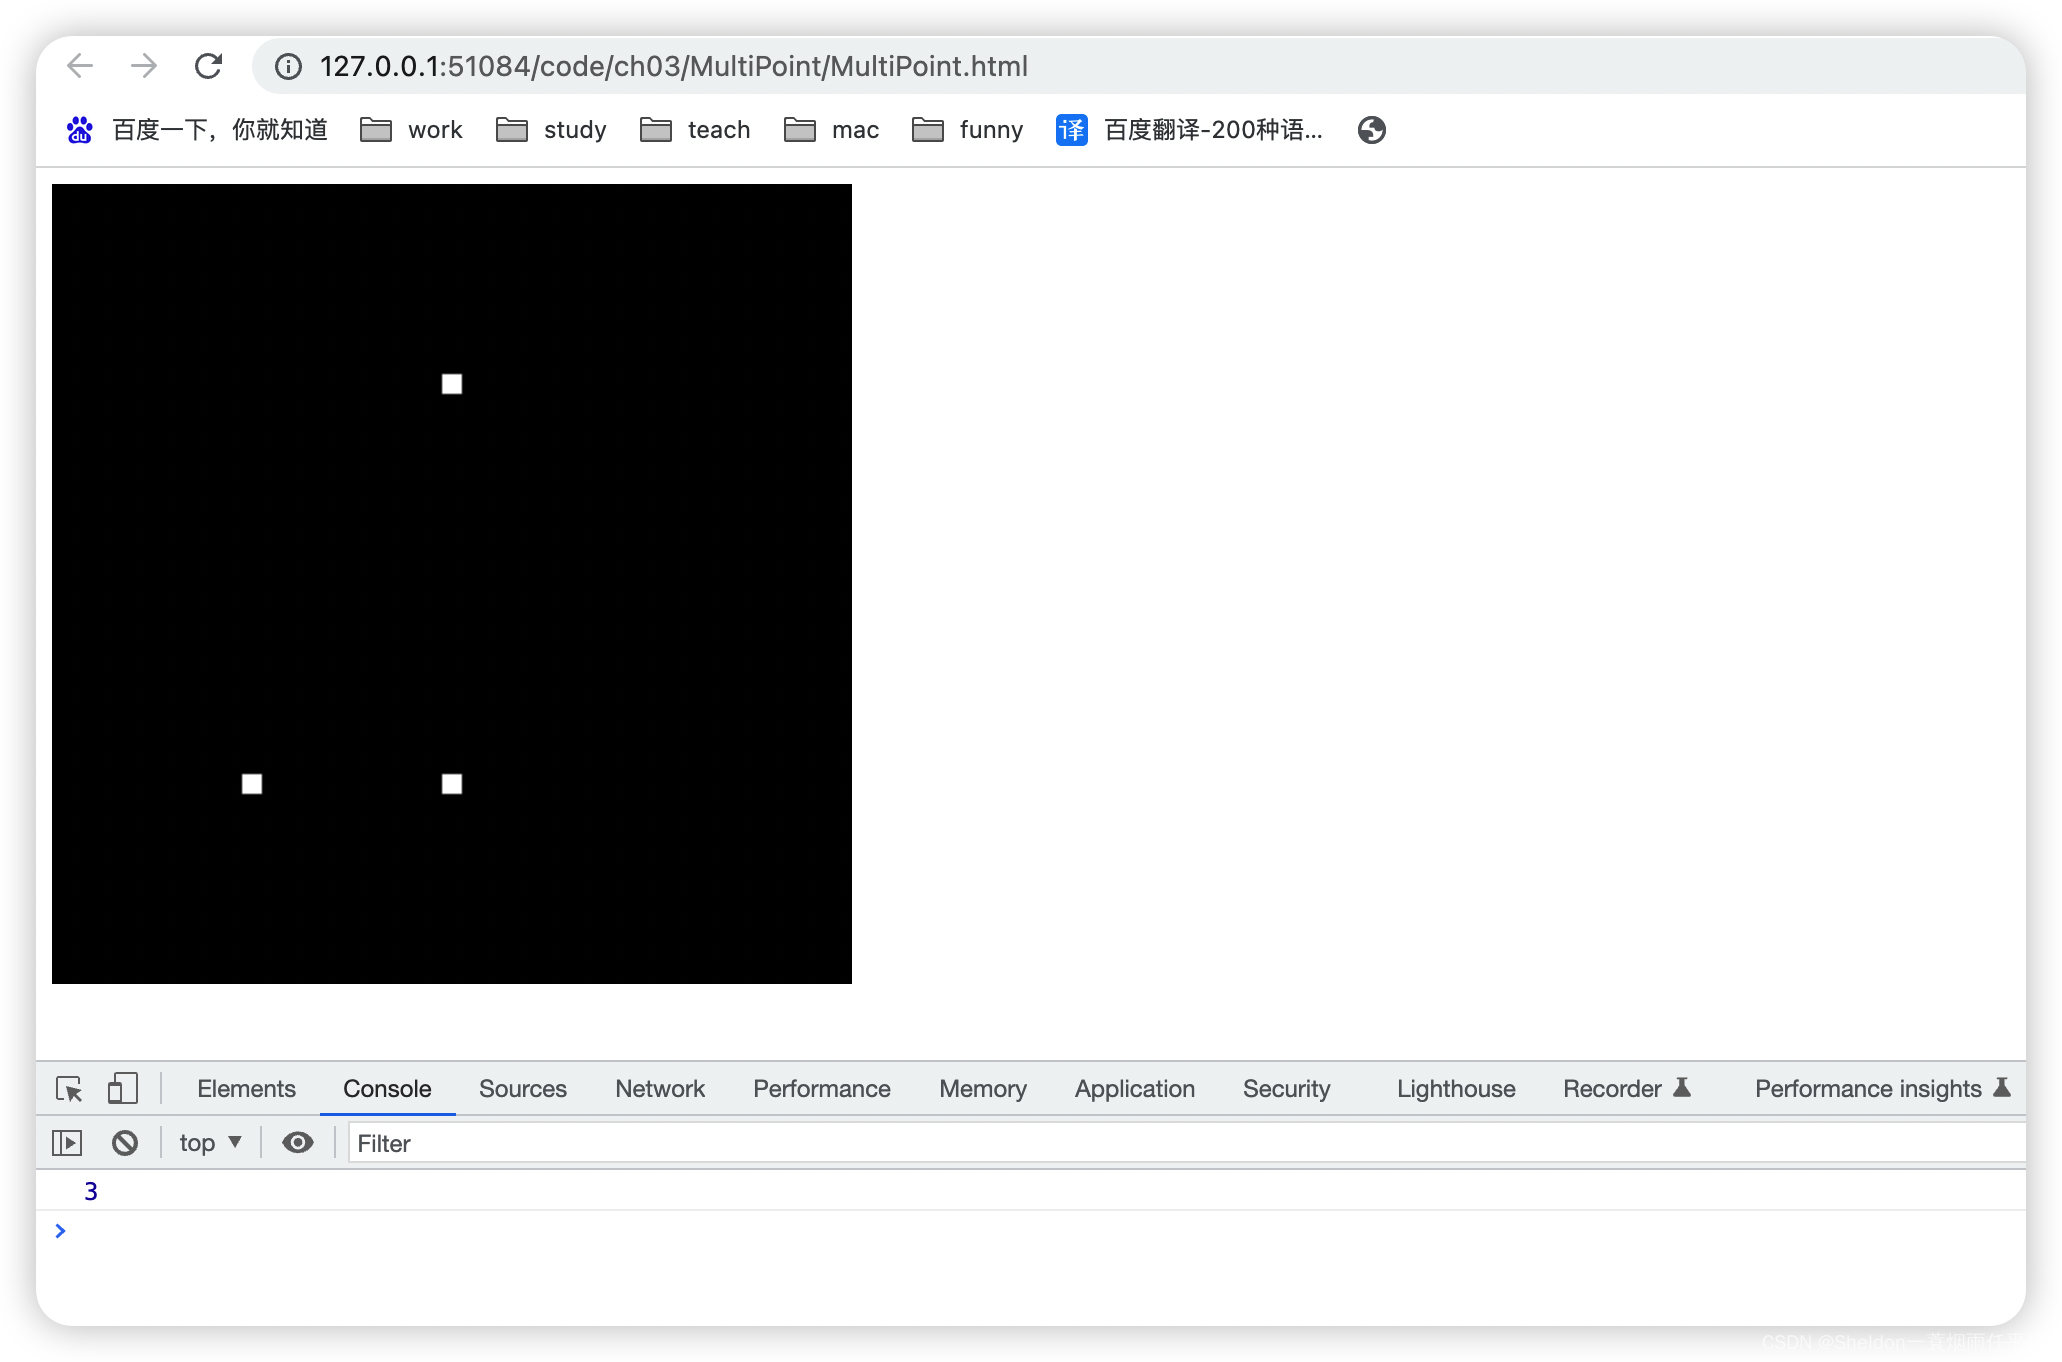
3.1.5.3 修改gl.drawArrays()参数 first 和 count
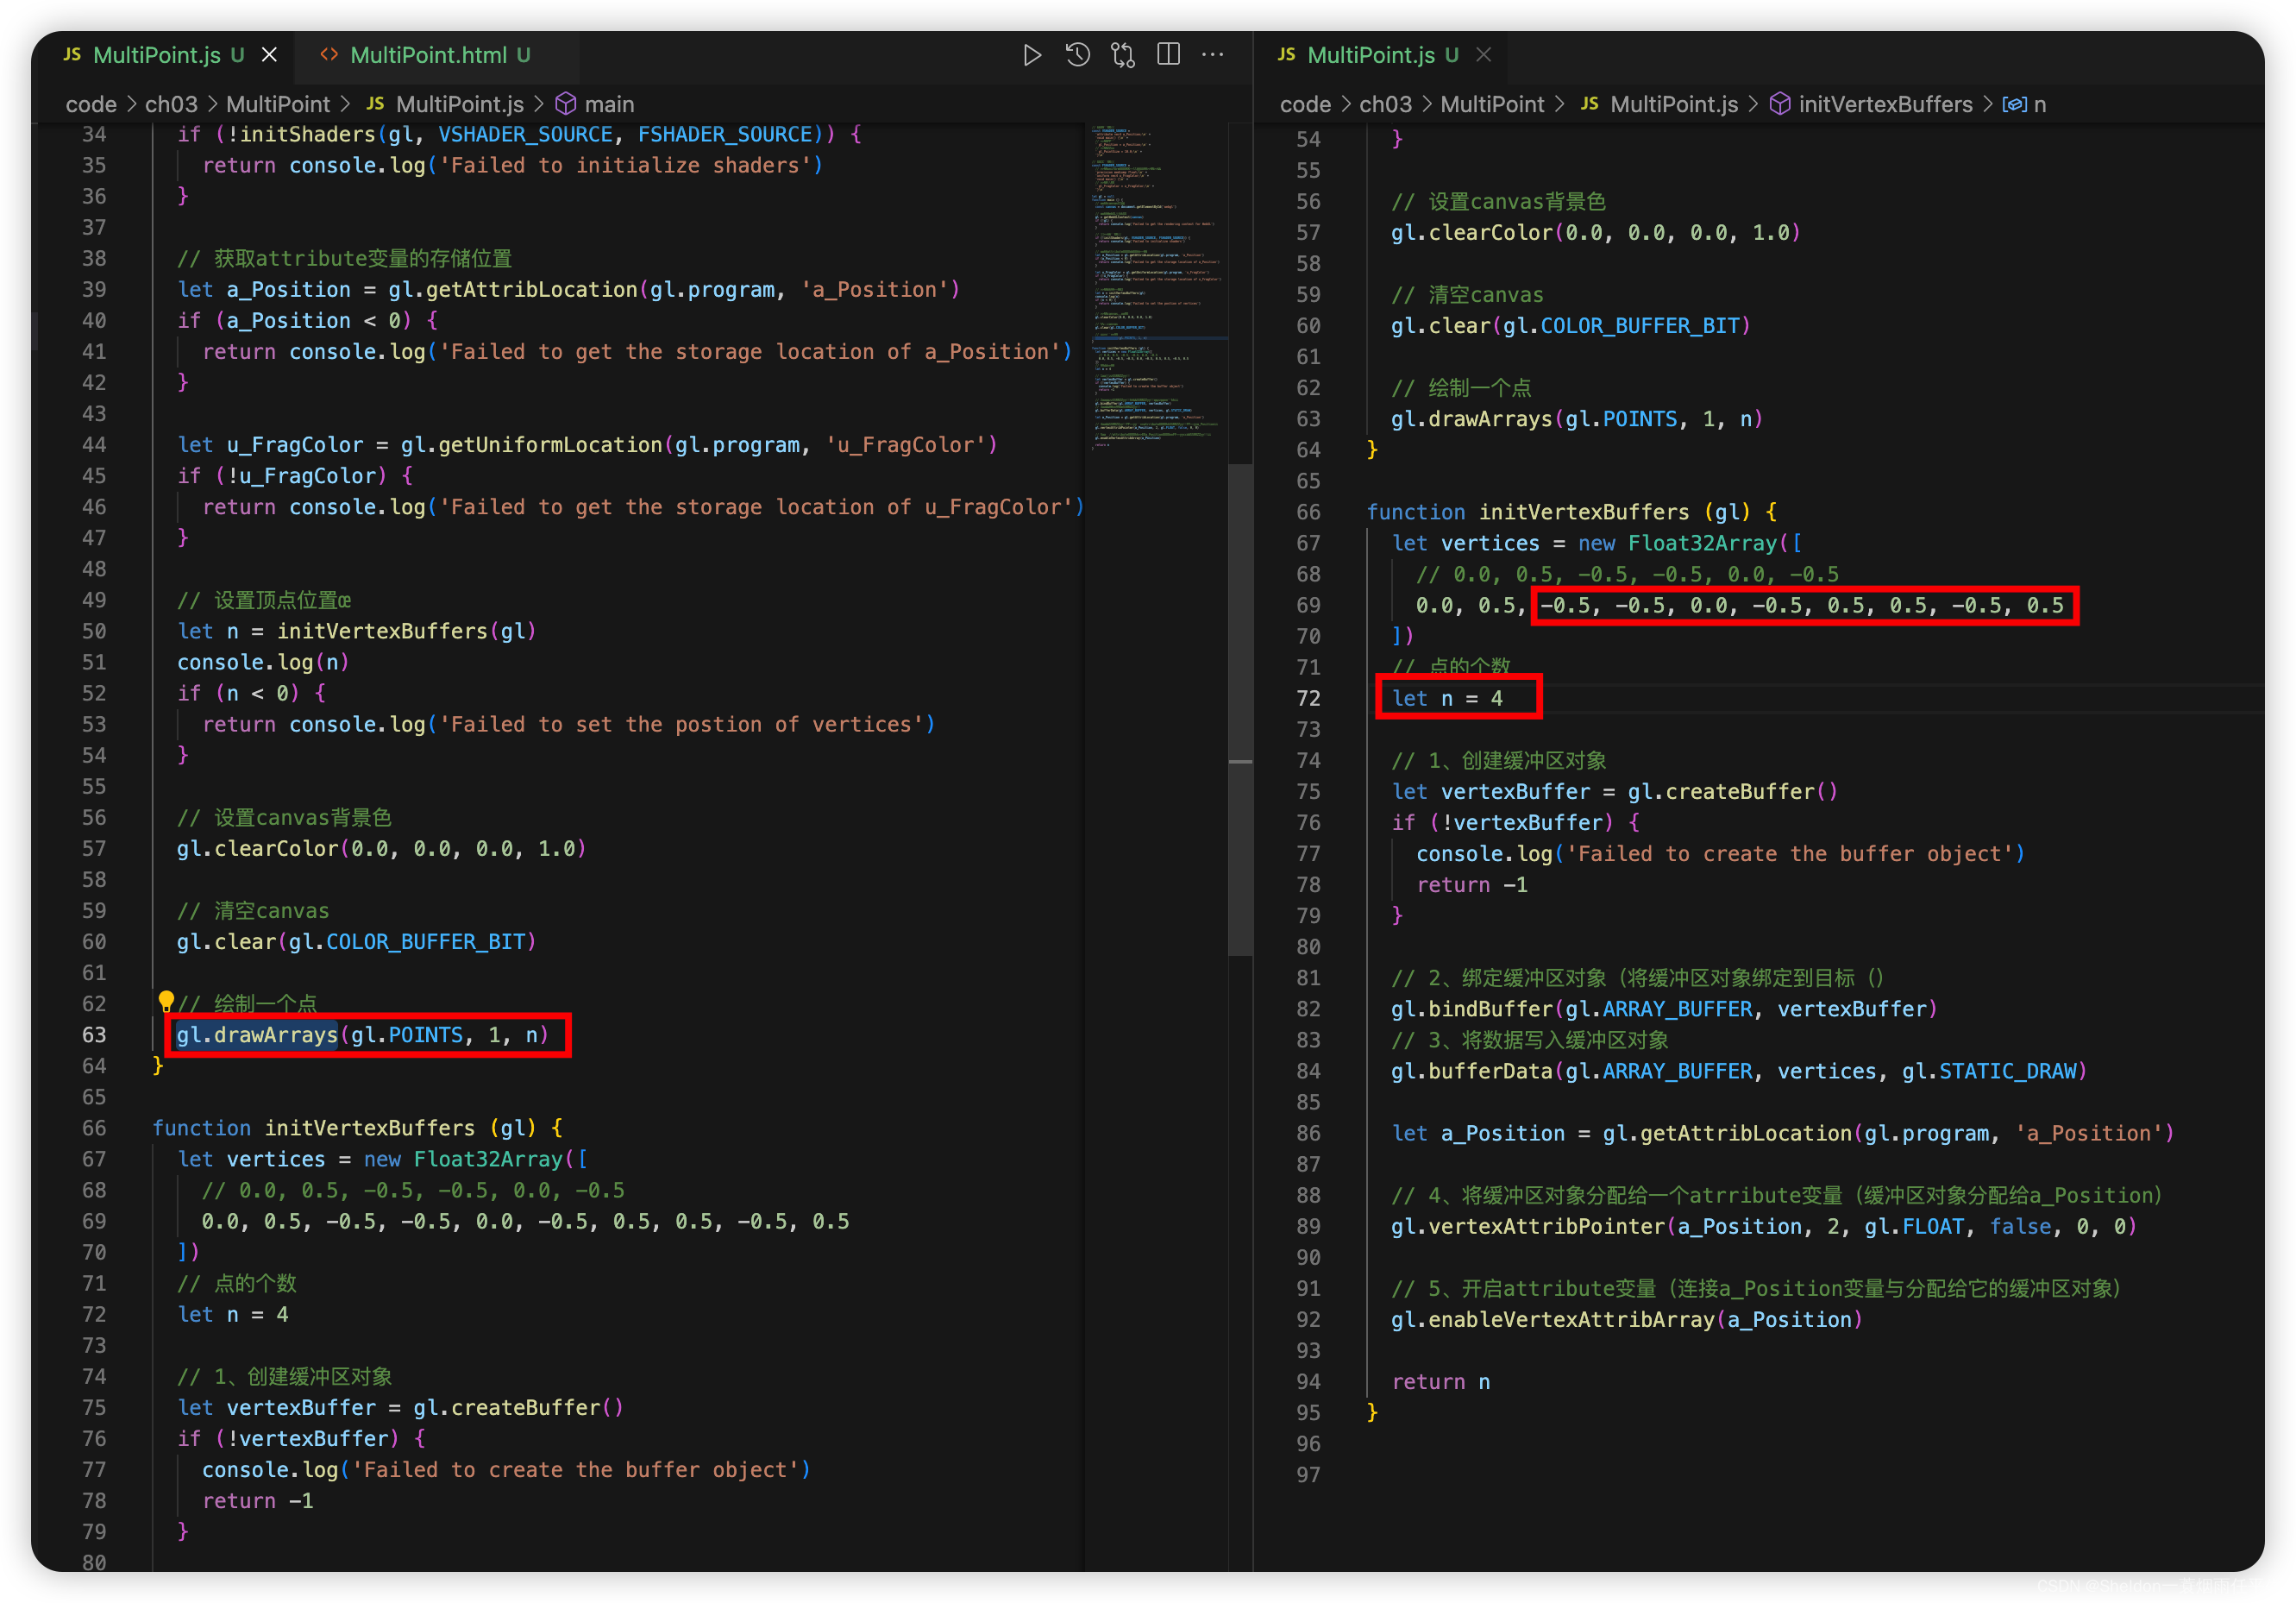
可以看到,后4个点都被绘制出来了。
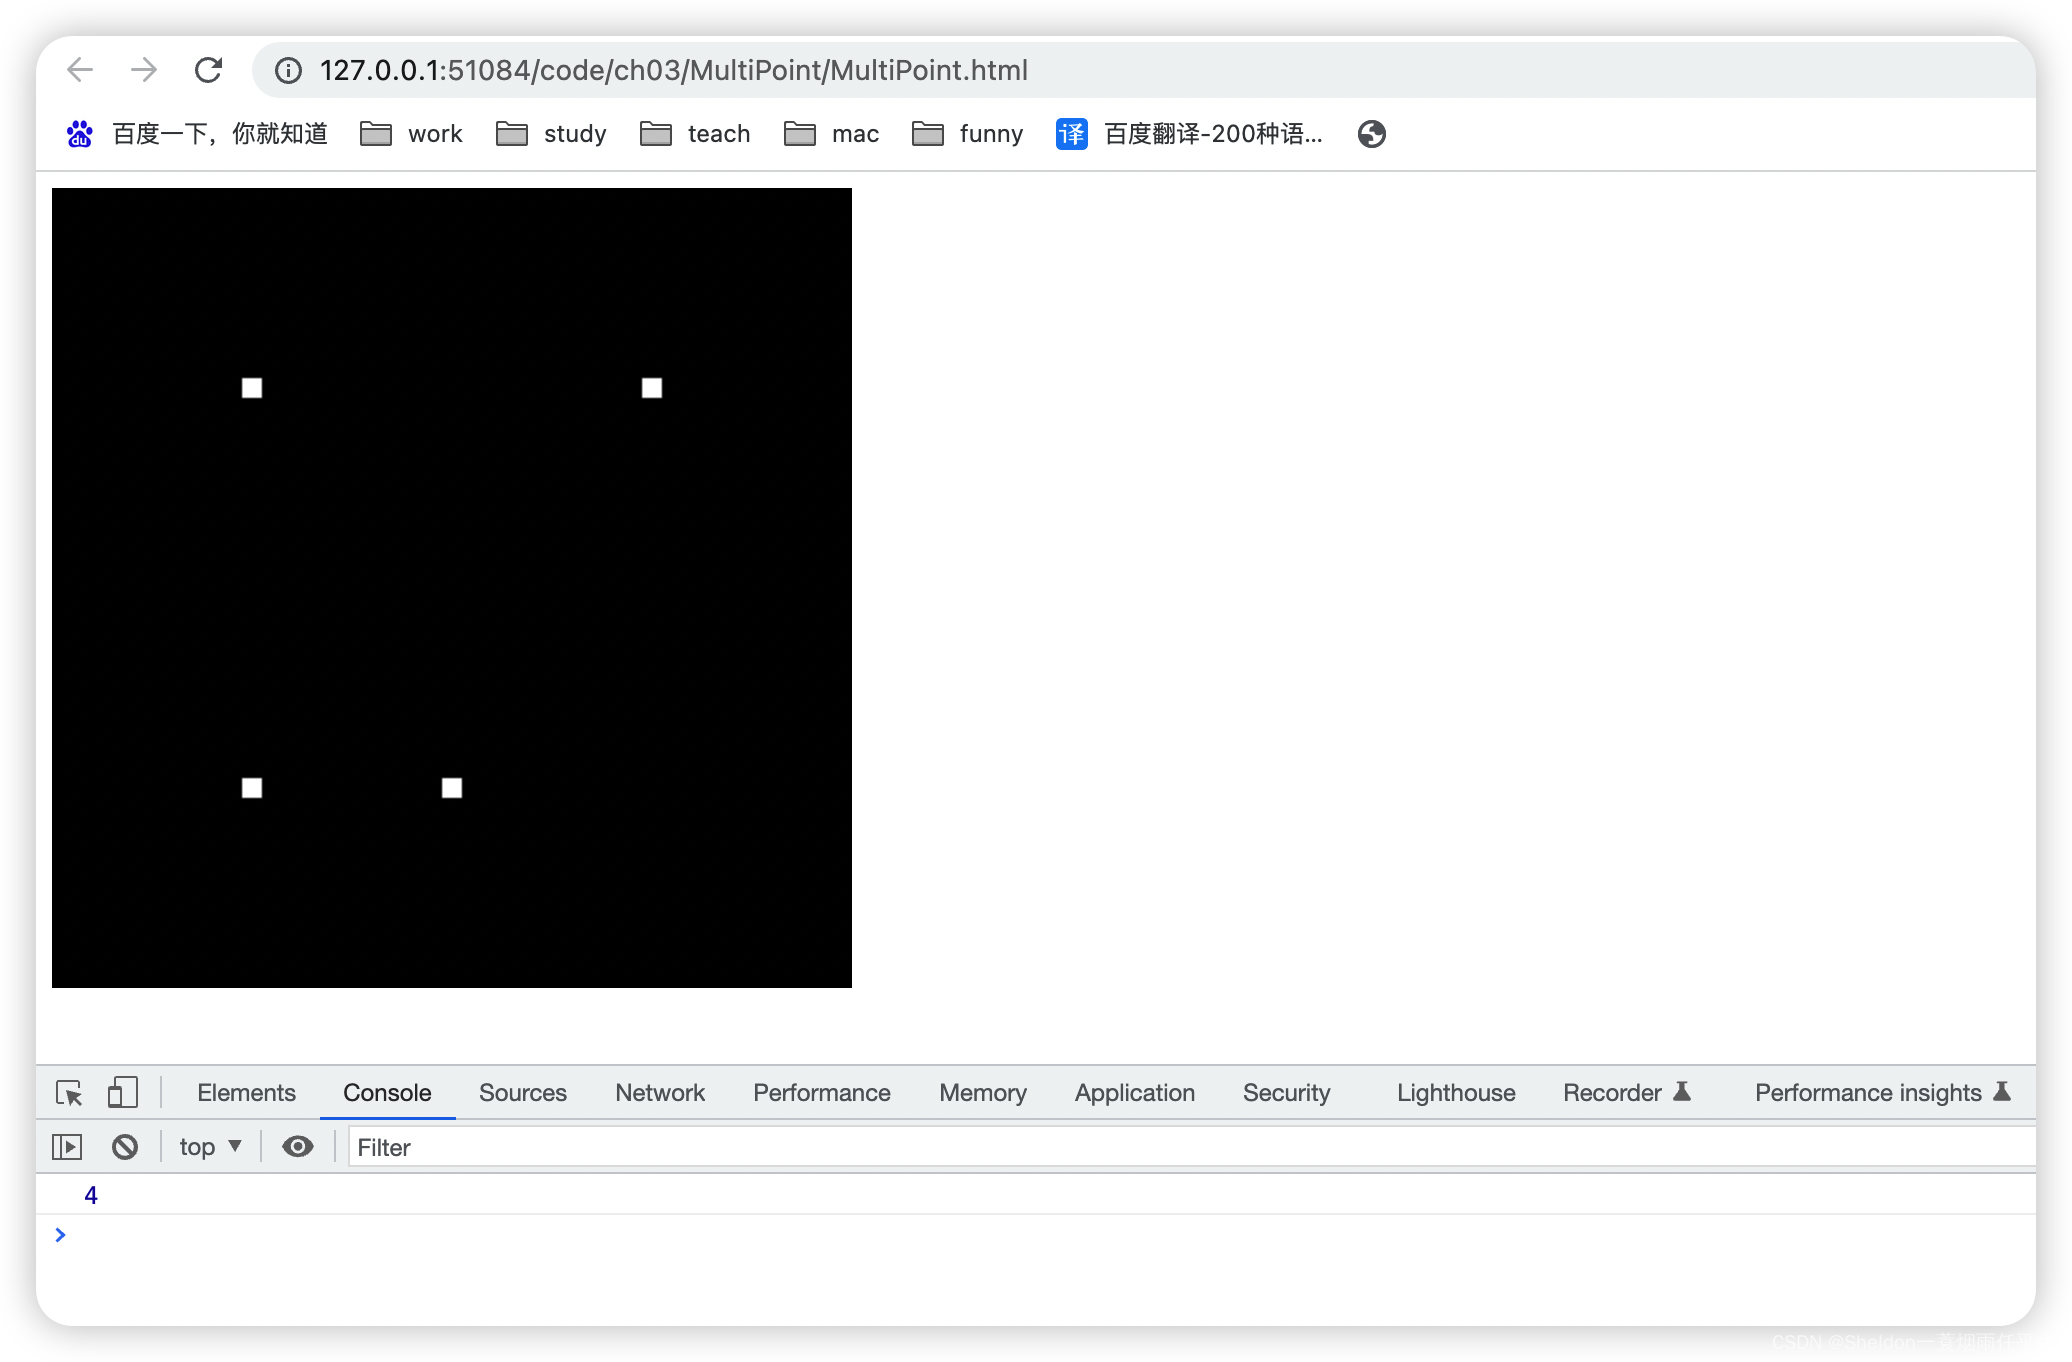
3.2 WebGL基本图形——点、线段、线条、回路、三角形、三角带和三角扇
3.2.1 基本图形介绍
WebGL可以直接绘制的图形(也叫做WebGL基本图形)有7种,它们分别是点、线段、线条、回路、三角形、三角带和三角扇。
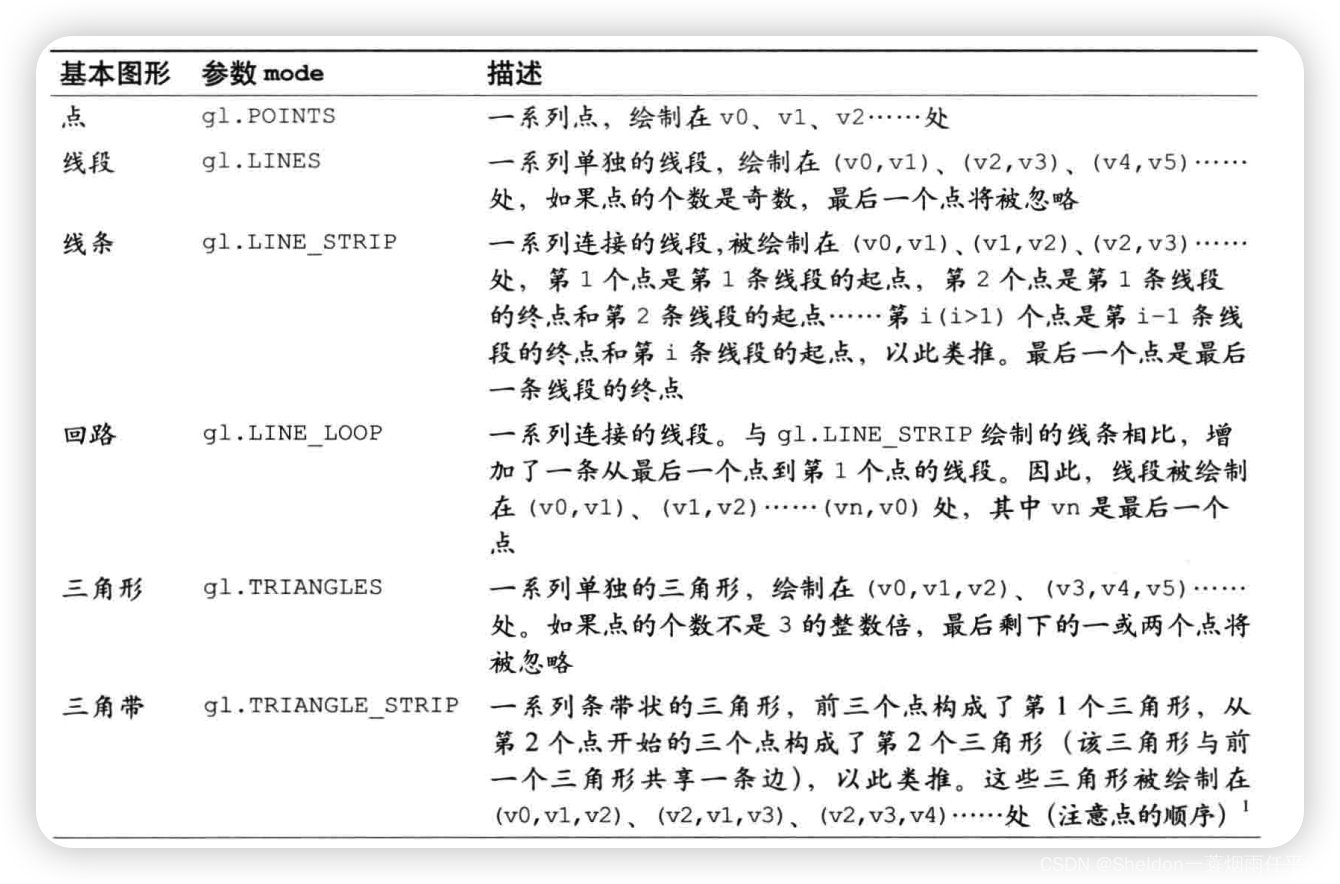
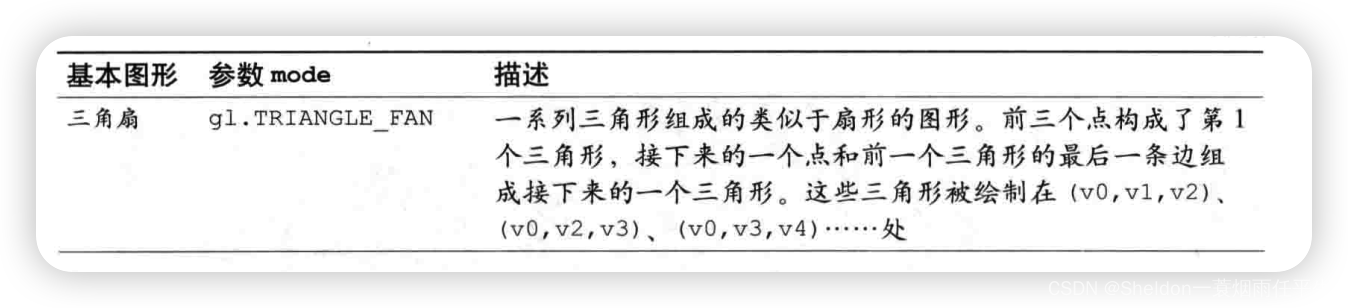
他们绘制的图形大致如下:
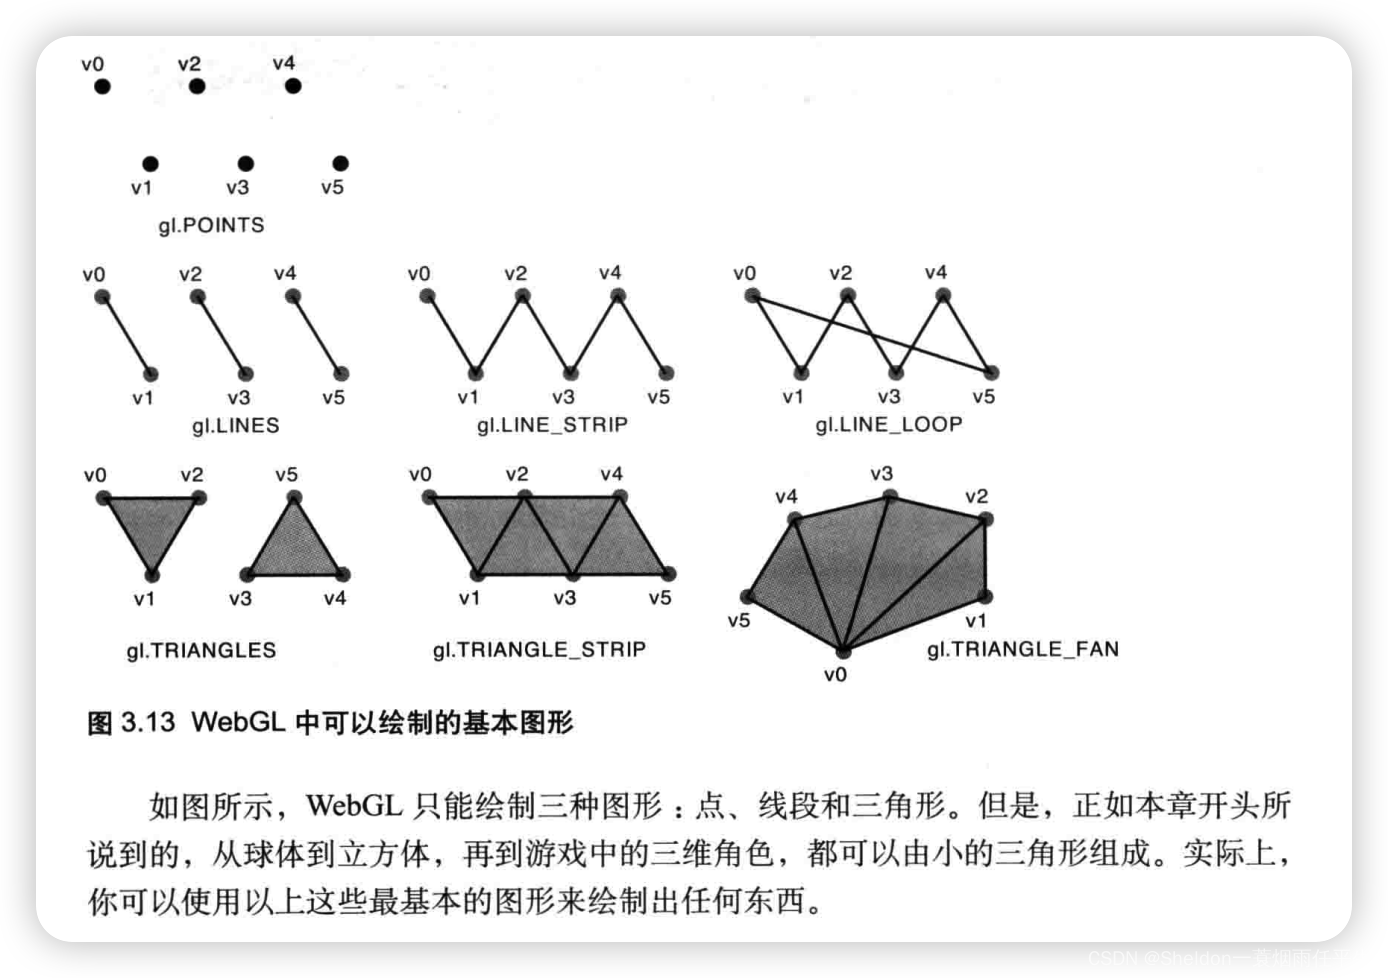
3.2.2 基本图形绘制实验
让我们对之前的示例稍作改造。
3.2.2.1 点——gl.POINTS
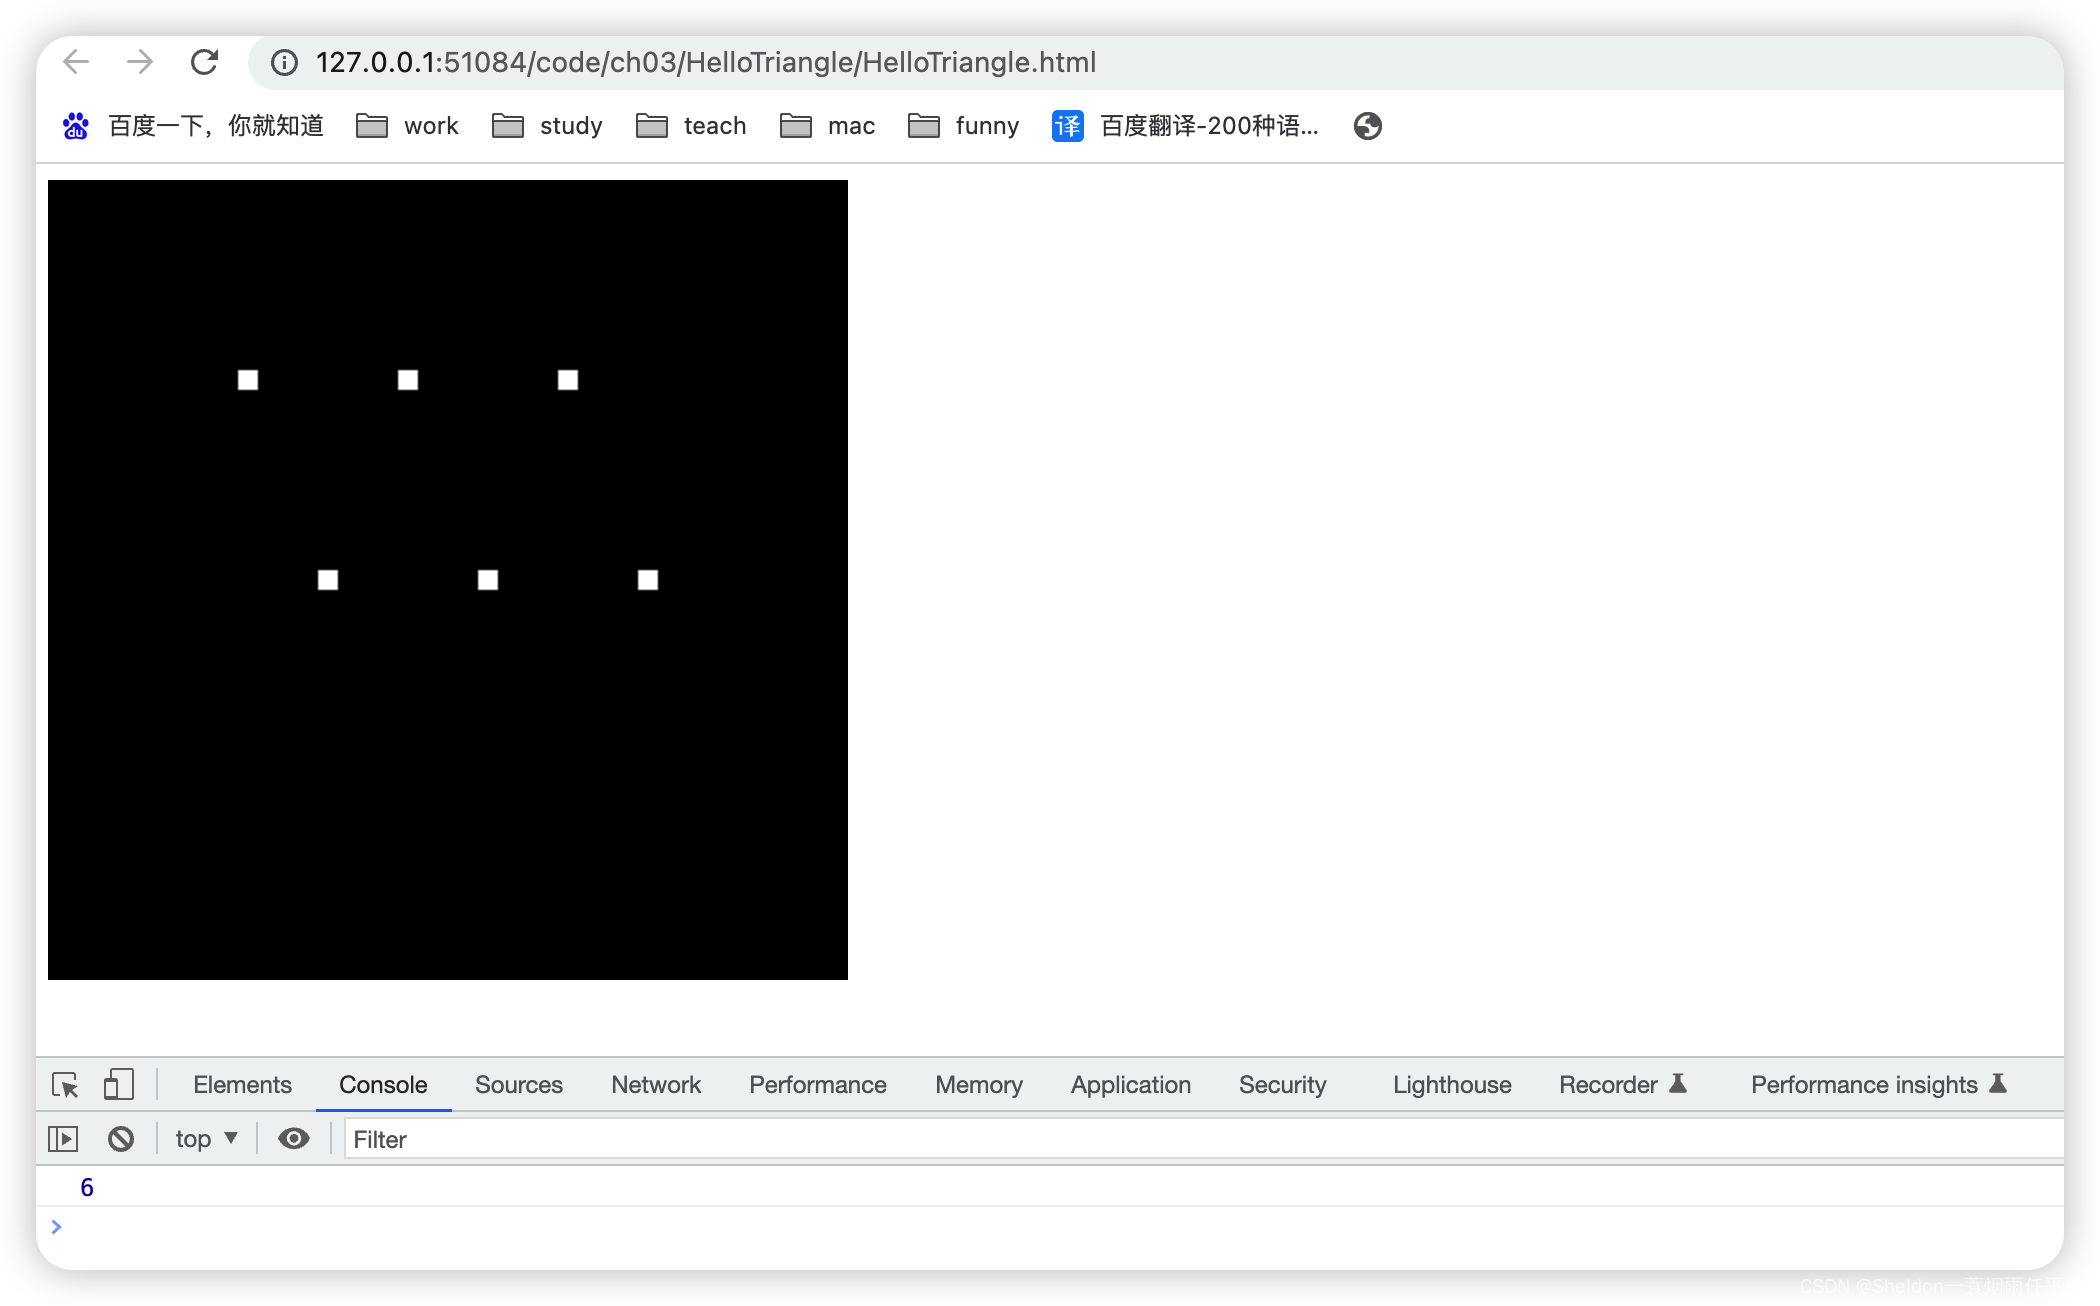
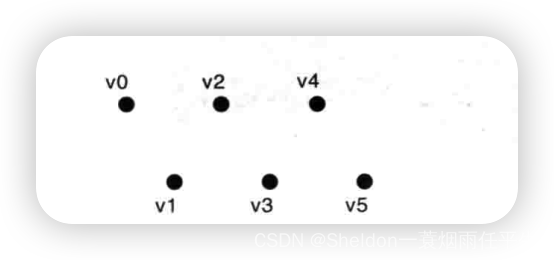
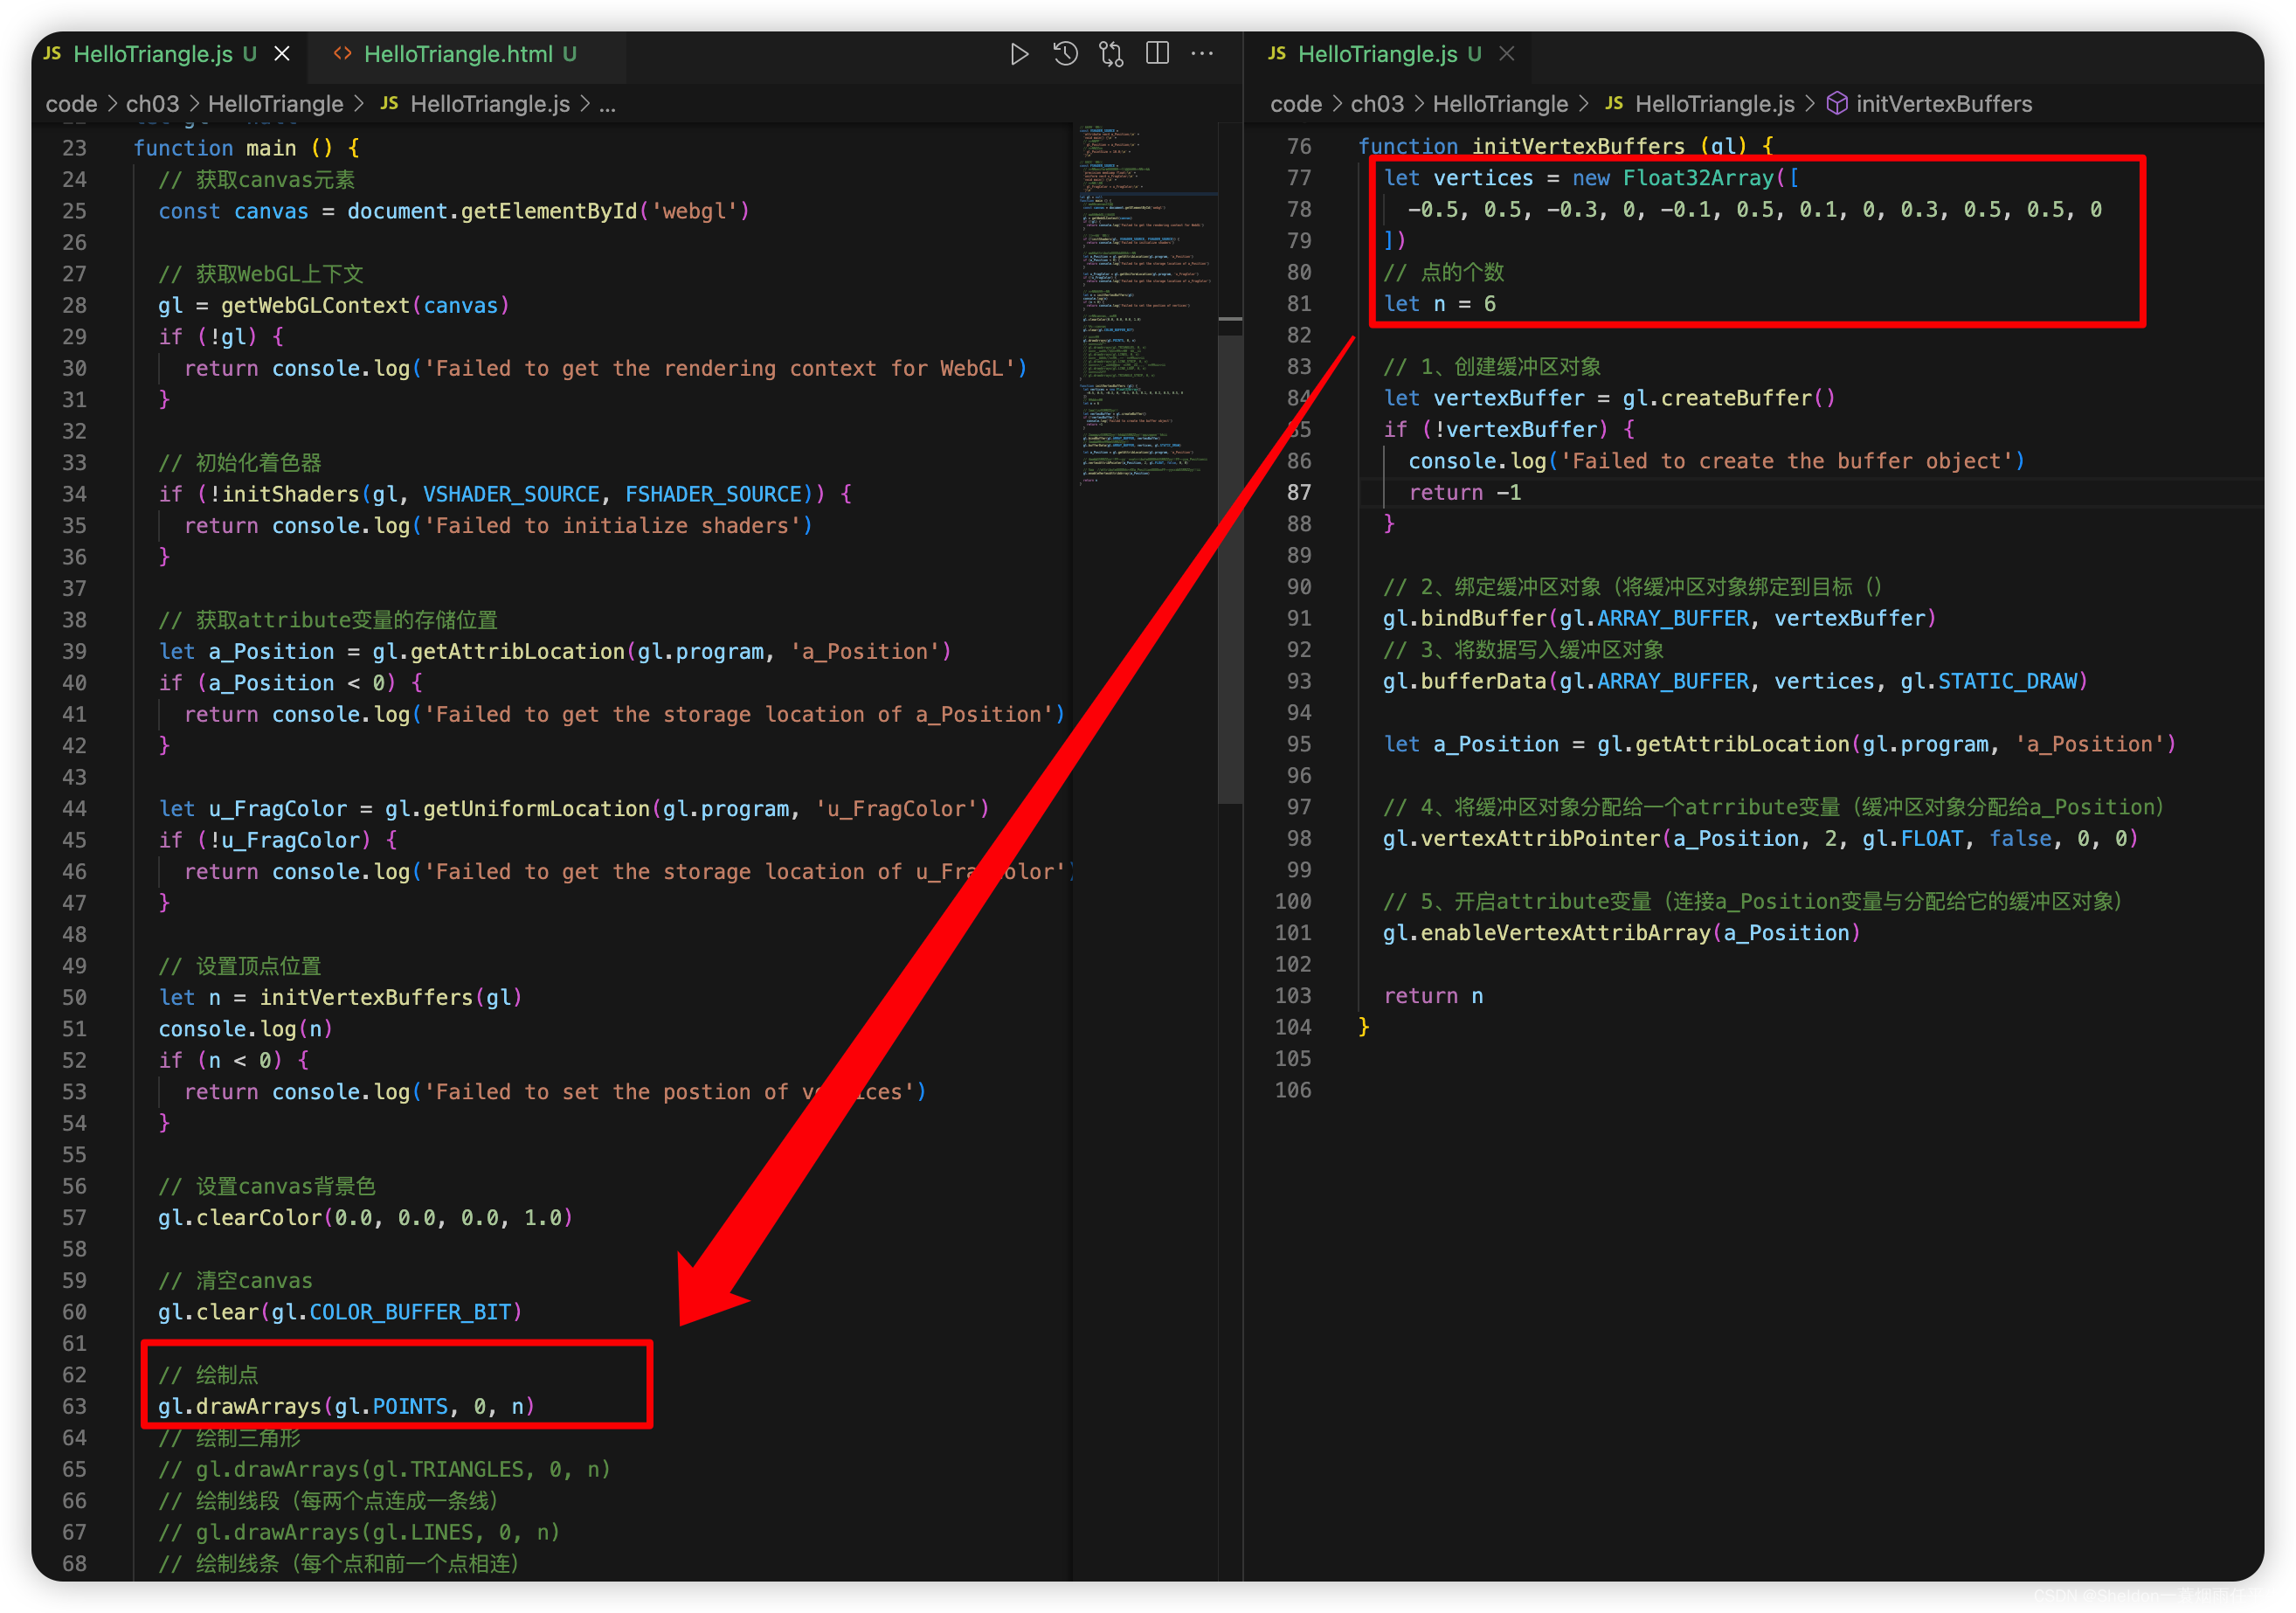
// 顶点着色器
const VSHADER_SOURCE =
  'attribute vec4 a_Position;\n' +
  'void main() {\n' +
  // 设置坐标
  ' gl_Position = a_Position;\n' +
  // 设置尺寸
  ' gl_PointSize = 10.0;\n' +
  '}\n'

// 片元着色器
const FSHADER_SOURCE =
  // 设置uniform变量之前,需要先设置精度
  'precision mediump float;\n' +
  'uniform vec4 u_FragColor;\n' +
  'void main() {\n' +
  // 设置颜色
  ' gl_FragColor = u_FragColor;\n' +
  '}\n'

let gl = null
function main () {
  // 获取canvas元素
  const canvas = document.getElementById('webgl')

  // 获取WebGL上下文
  gl = getWebGLContext(canvas)
  if (!gl) {
    return console.log('Failed to get the rendering context for WebGL')
  }

  // 初始化着色器
  if (!initShaders(gl, VSHADER_SOURCE, FSHADER_SOURCE)) {
    return console.log('Failed to initialize shaders')
  }

  // 获取attribute变量的存储位置
  let a_Position = gl.getAttribLocation(gl.program, 'a_Position')
  if (a_Position < 0) {
    return console.log('Failed to get the storage location of a_Position')
  }

  let u_FragColor = gl.getUniformLocation(gl.program, 'u_FragColor')
  if (!u_FragColor) {
    return console.log('Failed to get the storage location of u_FragColor')
  }

  // 设置顶点位置
  let n = initVertexBuffers(gl)
  console.log(n)
  if (n < 0) {
    return console.log('Failed to set the postion of vertices')
  }

  // 设置canvas背景色
  gl.clearColor(0.0, 0.0, 0.0, 1.0)

  // 清空canvas
  gl.clear(gl.COLOR_BUFFER_BIT)

  // 绘制点
  gl.drawArrays(gl.POINTS, 0, n)
  // 绘制三角形
  // gl.drawArrays(gl.TRIANGLES, 0, n)
  // 绘制线段(每两个点连成一条线)
  // gl.drawArrays(gl.LINES, 0, n)
  // 绘制线条(每个点和前一个点相连)
  // gl.drawArrays(gl.LINE_STRIP, 0, n)
  // 绘制回路线段(最后一个点也会和第一个点相连)
  // gl.drawArrays(gl.LINE_LOOP, 0, n)
  // 绘制三角带
  // gl.drawArrays(gl.TRIANGLE_STRIP, 0, n)
}

function initVertexBuffers (gl) {
  let vertices = new Float32Array([
    -0.5, 0.5, -0.3, 0, -0.1, 0.5, 0.1, 0, 0.3, 0.5, 0.5, 0
  ])
  // 点的个数
  let n = 6

  // 1、创建缓冲区对象
  let vertexBuffer = gl.createBuffer()
  if (!vertexBuffer) {
    console.log('Failed to create the buffer object')
    return -1
  }

  // 2、绑定缓冲区对象(将缓冲区对象绑定到目标()
  gl.bindBuffer(gl.ARRAY_BUFFER, vertexBuffer)
  // 3、将数据写入缓冲区对象
  gl.bufferData(gl.ARRAY_BUFFER, vertices, gl.STATIC_DRAW)

  let a_Position = gl.getAttribLocation(gl.program, 'a_Position')

  // 4、将缓冲区对象分配给一个atrribute变量(缓冲区对象分配给a_Position)
  gl.vertexAttribPointer(a_Position, 2, gl.FLOAT, false, 0, 0)

  // 5、开启attribute变量(连接a_Position变量与分配给它的缓冲区对象)
  gl.enableVertexAttribArray(a_Position)

  return n
}
3.2.2.2 线段——gl.LINES
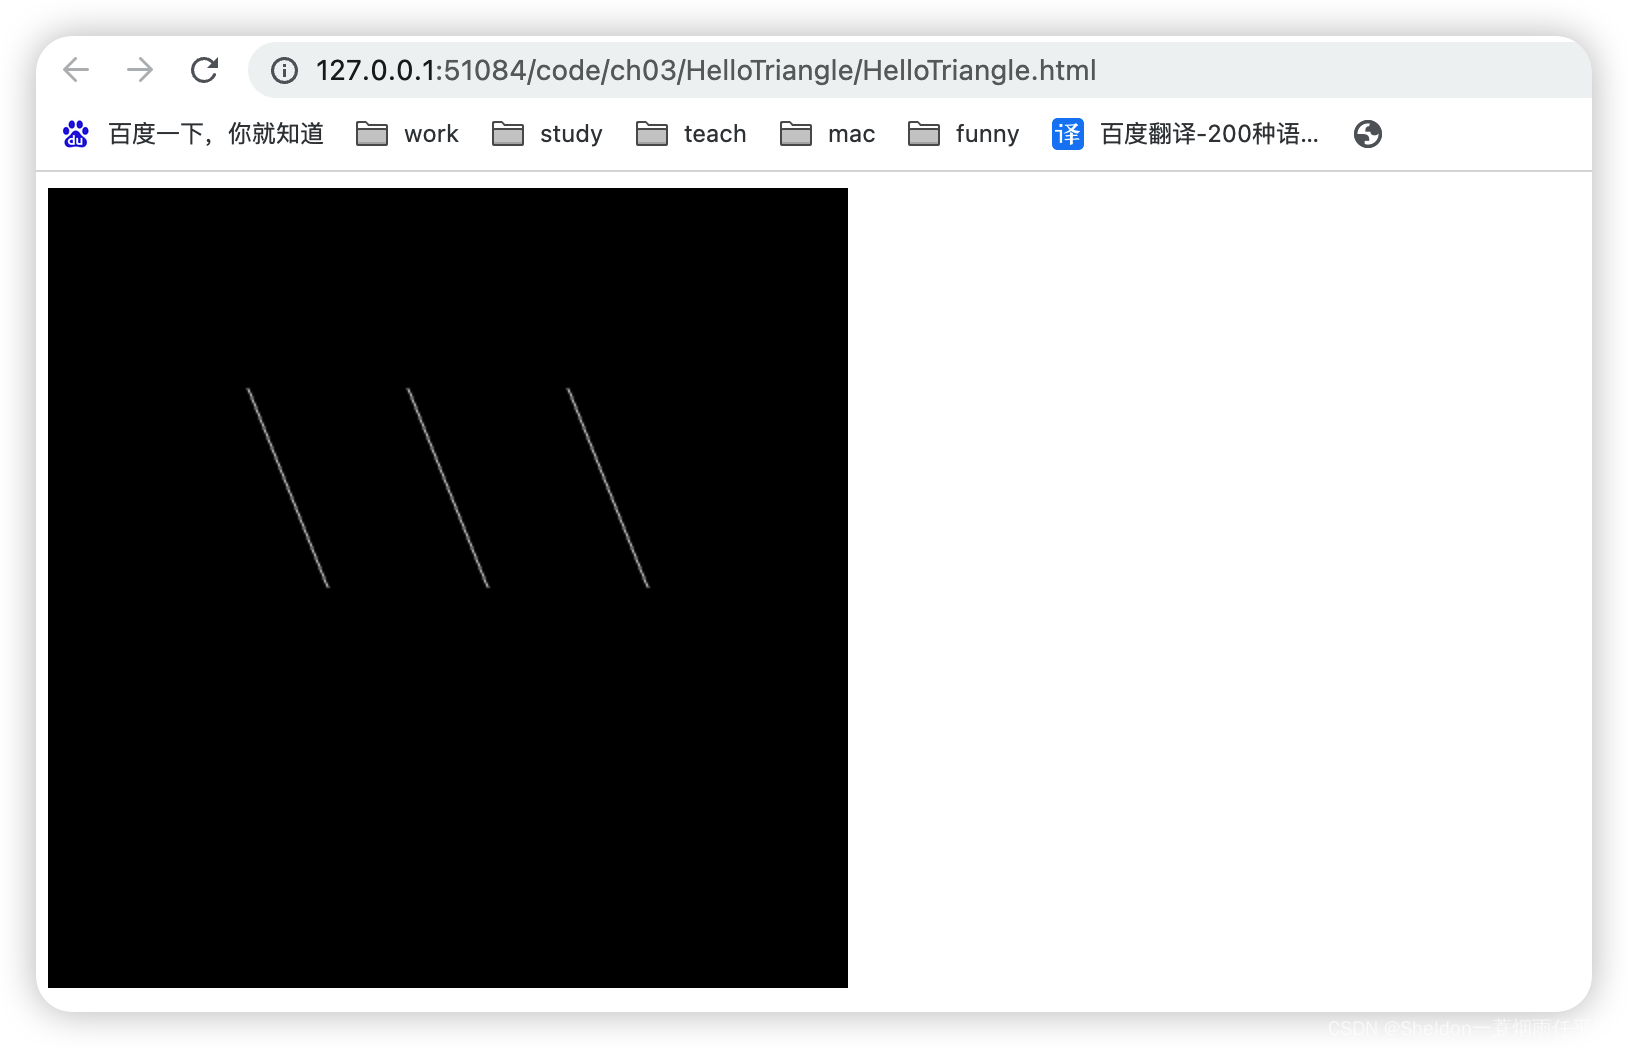
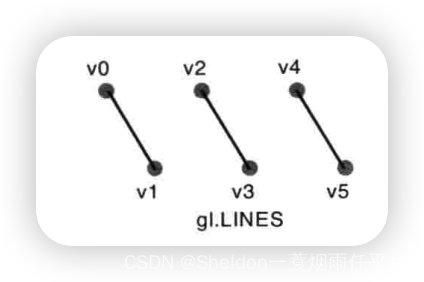
gl_PointSize只对绘制点有效,因此在绘制其他图形时,可以直接删除相关代码。
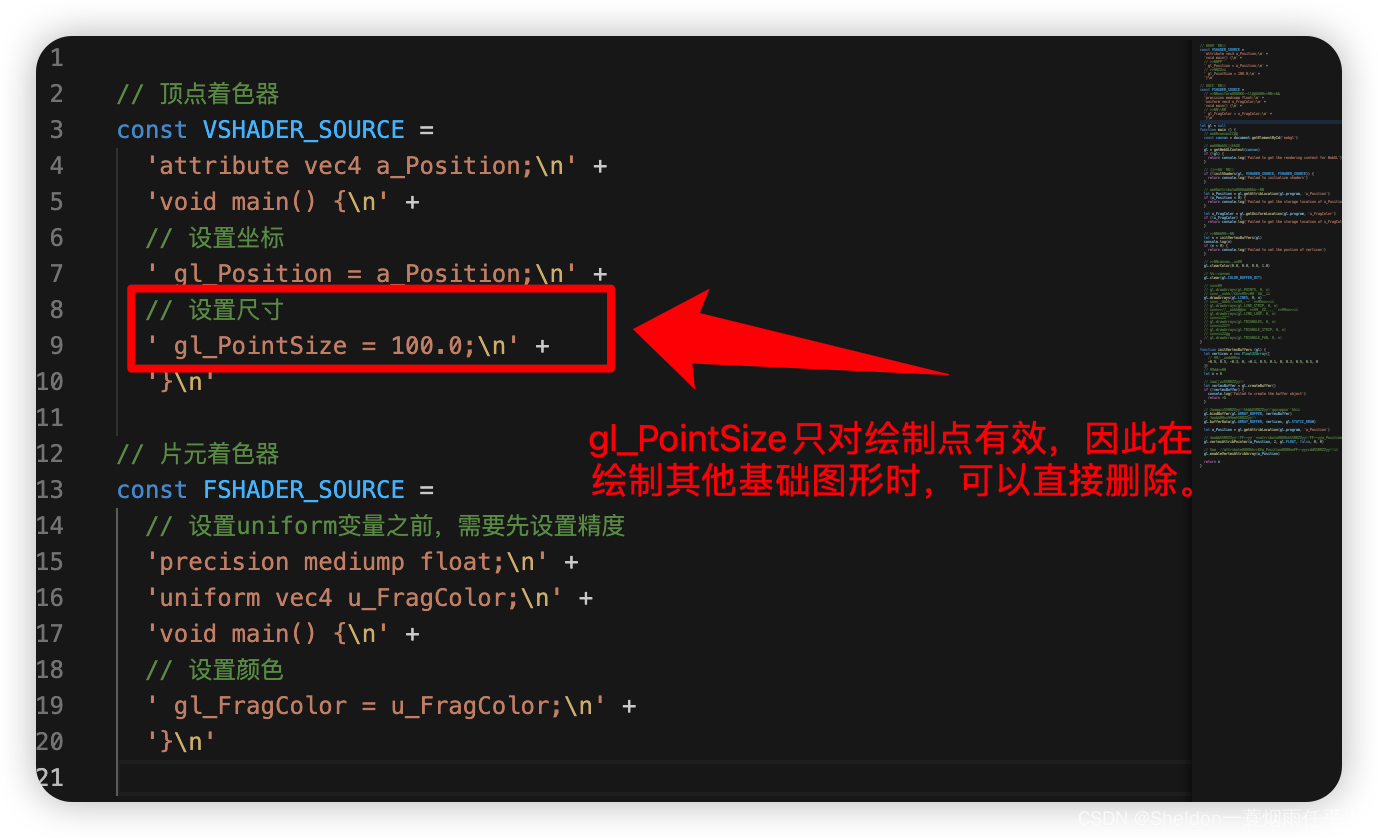
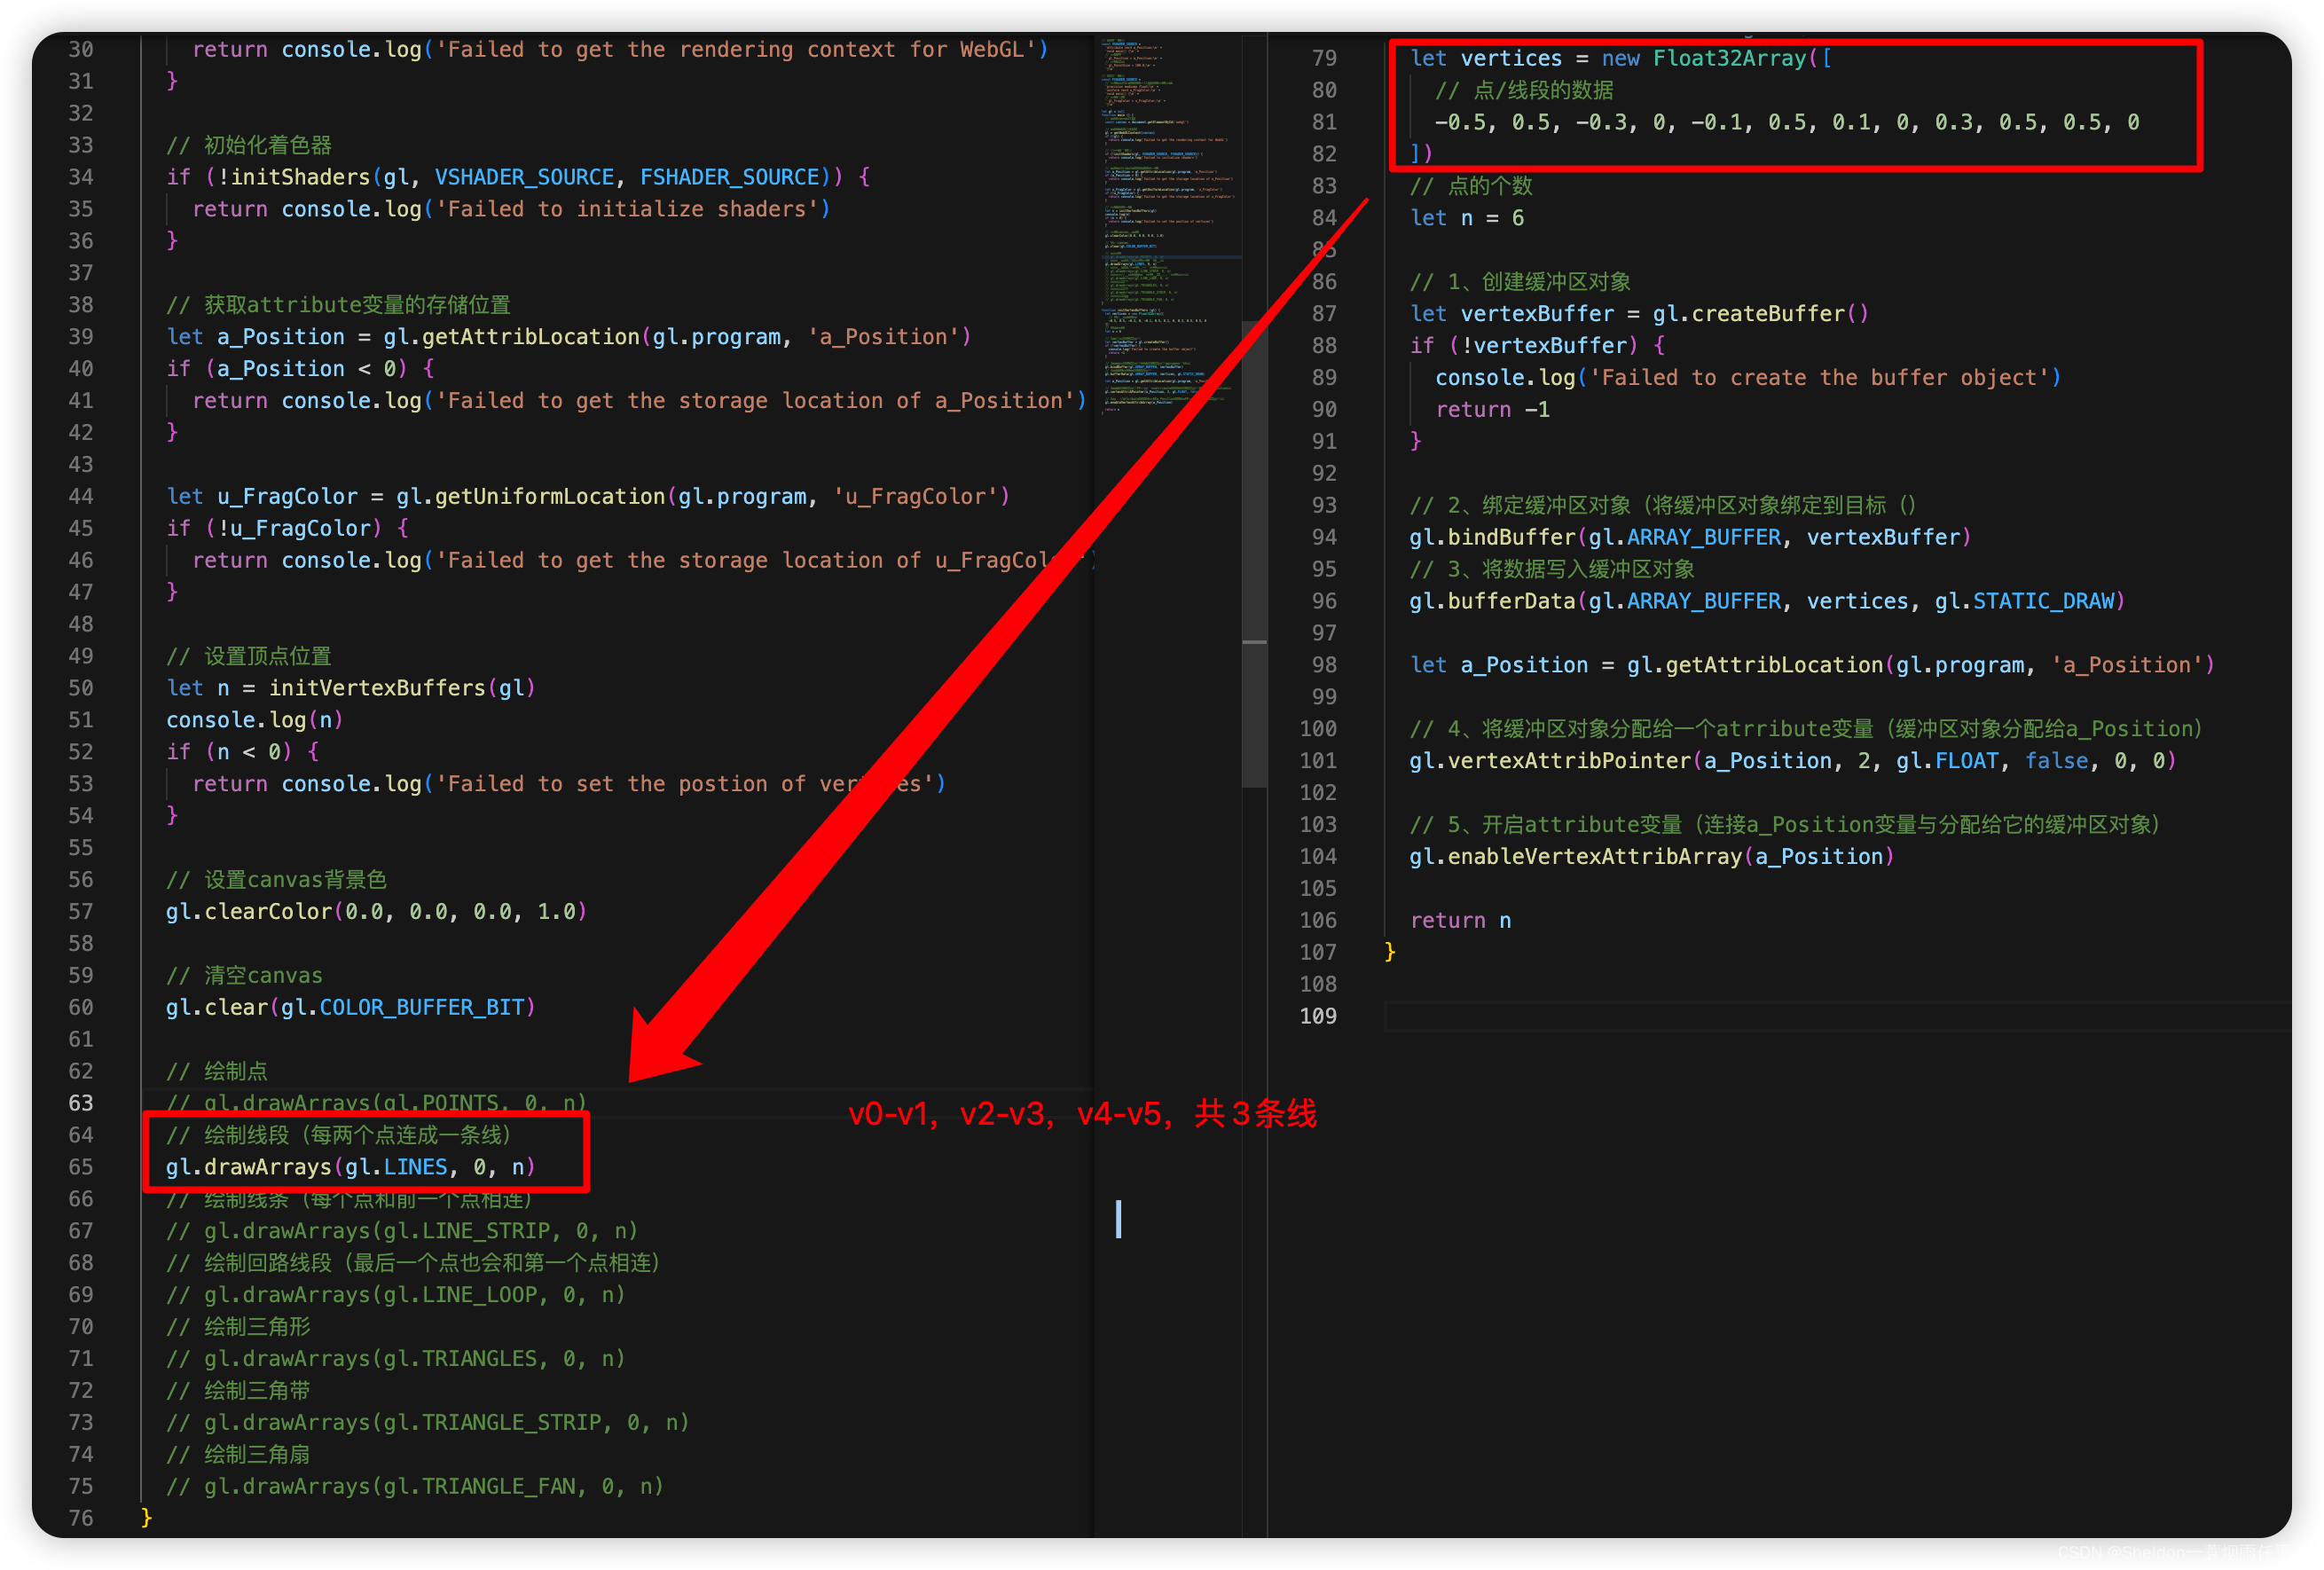
// 顶点着色器
const VSHADER_SOURCE =
  'attribute vec4 a_Position;\n' +
  'void main() {\n' +
  // 设置坐标
  ' gl_Position = a_Position;\n' +
  // 设置尺寸
  ' gl_PointSize = 100.0;\n' +
  '}\n'

// 片元着色器
const FSHADER_SOURCE =
  // 设置uniform变量之前,需要先设置精度
  'precision mediump float;\n' +
  'uniform vec4 u_FragColor;\n' +
  'void main() {\n' +
  // 设置颜色
  ' gl_FragColor = u_FragColor;\n' +
  '}\n'

let gl = null
function main () {
  // 获取canvas元素
  const canvas = document.getElementById('webgl')

  // 获取WebGL上下文
  gl = getWebGLContext(canvas)
  if (!gl) {
    return console.log('Failed to get the rendering context for WebGL')
  }

  // 初始化着色器
  if (!initShaders(gl, VSHADER_SOURCE, FSHADER_SOURCE)) {
    return console.log('Failed to initialize shaders')
  }

  // 获取attribute变量的存储位置
  let a_Position = gl.getAttribLocation(gl.program, 'a_Position')
  if (a_Position < 0) {
    return console.log('Failed to get the storage location of a_Position')
  }

  let u_FragColor = gl.getUniformLocation(gl.program, 'u_FragColor')
  if (!u_FragColor) {
    return console.log('Failed to get the storage location of u_FragColor')
  }

  // 设置顶点位置
  let n = initVertexBuffers(gl)
  console.log(n)
  if (n < 0) {
    return console.log('Failed to set the postion of vertices')
  }

  // 设置canvas背景色
  gl.clearColor(0.0, 0.0, 0.0, 1.0)

  // 清空canvas
  gl.clear(gl.COLOR_BUFFER_BIT)

  // 绘制点
  // gl.drawArrays(gl.POINTS, 0, n)
  // 绘制线段(每两个点连成一条线)
  gl.drawArrays(gl.LINES, 0, n)
  // 绘制线条(每个点和前一个点相连)
  // gl.drawArrays(gl.LINE_STRIP, 0, n)
  // 绘制回路线段(最后一个点也会和第一个点相连)
  // gl.drawArrays(gl.LINE_LOOP, 0, n)
  // 绘制三角形
  // gl.drawArrays(gl.TRIANGLES, 0, n)
  // 绘制三角带
  // gl.drawArrays(gl.TRIANGLE_STRIP, 0, n)
  // 绘制三角扇
  // gl.drawArrays(gl.TRIANGLE_FAN, 0, n)
}

function initVertexBuffers (gl) {
  let vertices = new Float32Array([
    // 点/线段的数据
    -0.5, 0.5, -0.3, 0, -0.1, 0.5, 0.1, 0, 0.3, 0.5, 0.5, 0
  ])
  // 点的个数
  let n = 6

  // 1、创建缓冲区对象
  let vertexBuffer = gl.createBuffer()
  if (!vertexBuffer) {
    console.log('Failed to create the buffer object')
    return -1
  }

  // 2、绑定缓冲区对象(将缓冲区对象绑定到目标()
  gl.bindBuffer(gl.ARRAY_BUFFER, vertexBuffer)
  // 3、将数据写入缓冲区对象
  gl.bufferData(gl.ARRAY_BUFFER, vertices, gl.STATIC_DRAW)

  let a_Position = gl.getAttribLocation(gl.program, 'a_Position')

  // 4、将缓冲区对象分配给一个atrribute变量(缓冲区对象分配给a_Position)
  gl.vertexAttribPointer(a_Position, 2, gl.FLOAT, false, 0, 0)

  // 5、开启attribute变量(连接a_Position变量与分配给它的缓冲区对象)
  gl.enableVertexAttribArray(a_Position)

  return n
}
3.2.2.3 线条——gl.LINE_STRIP
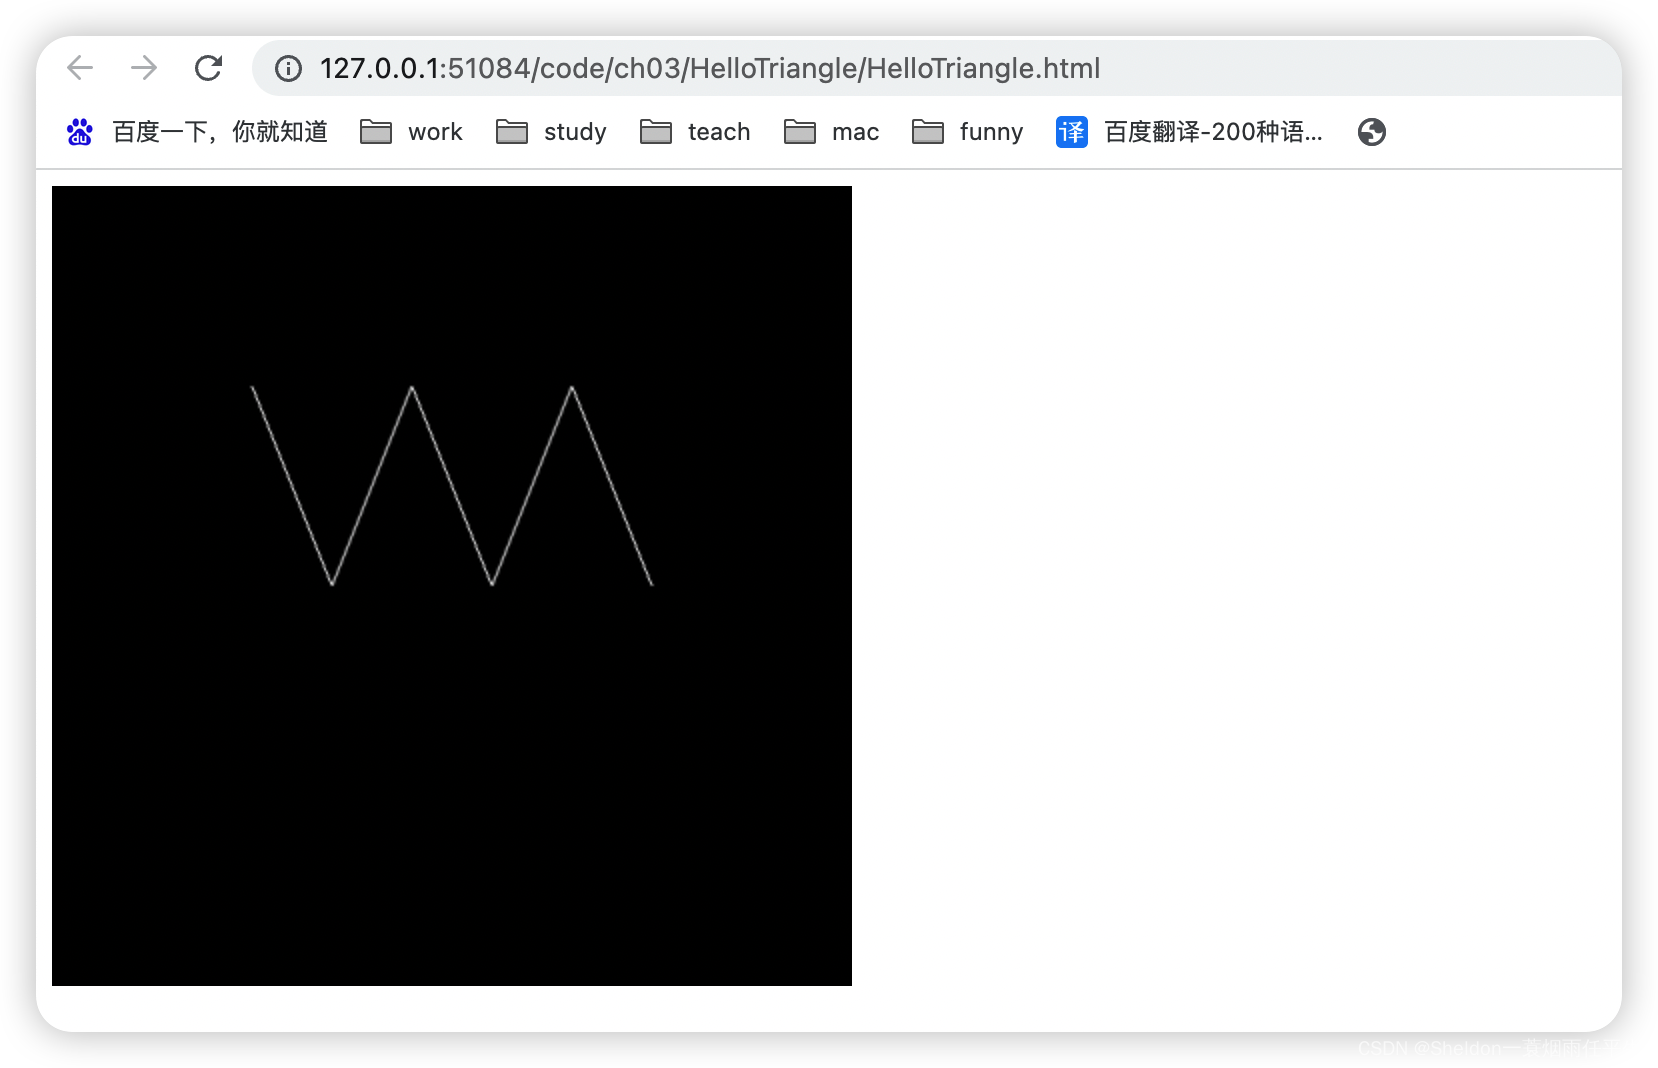
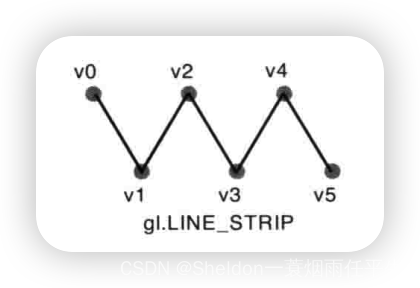
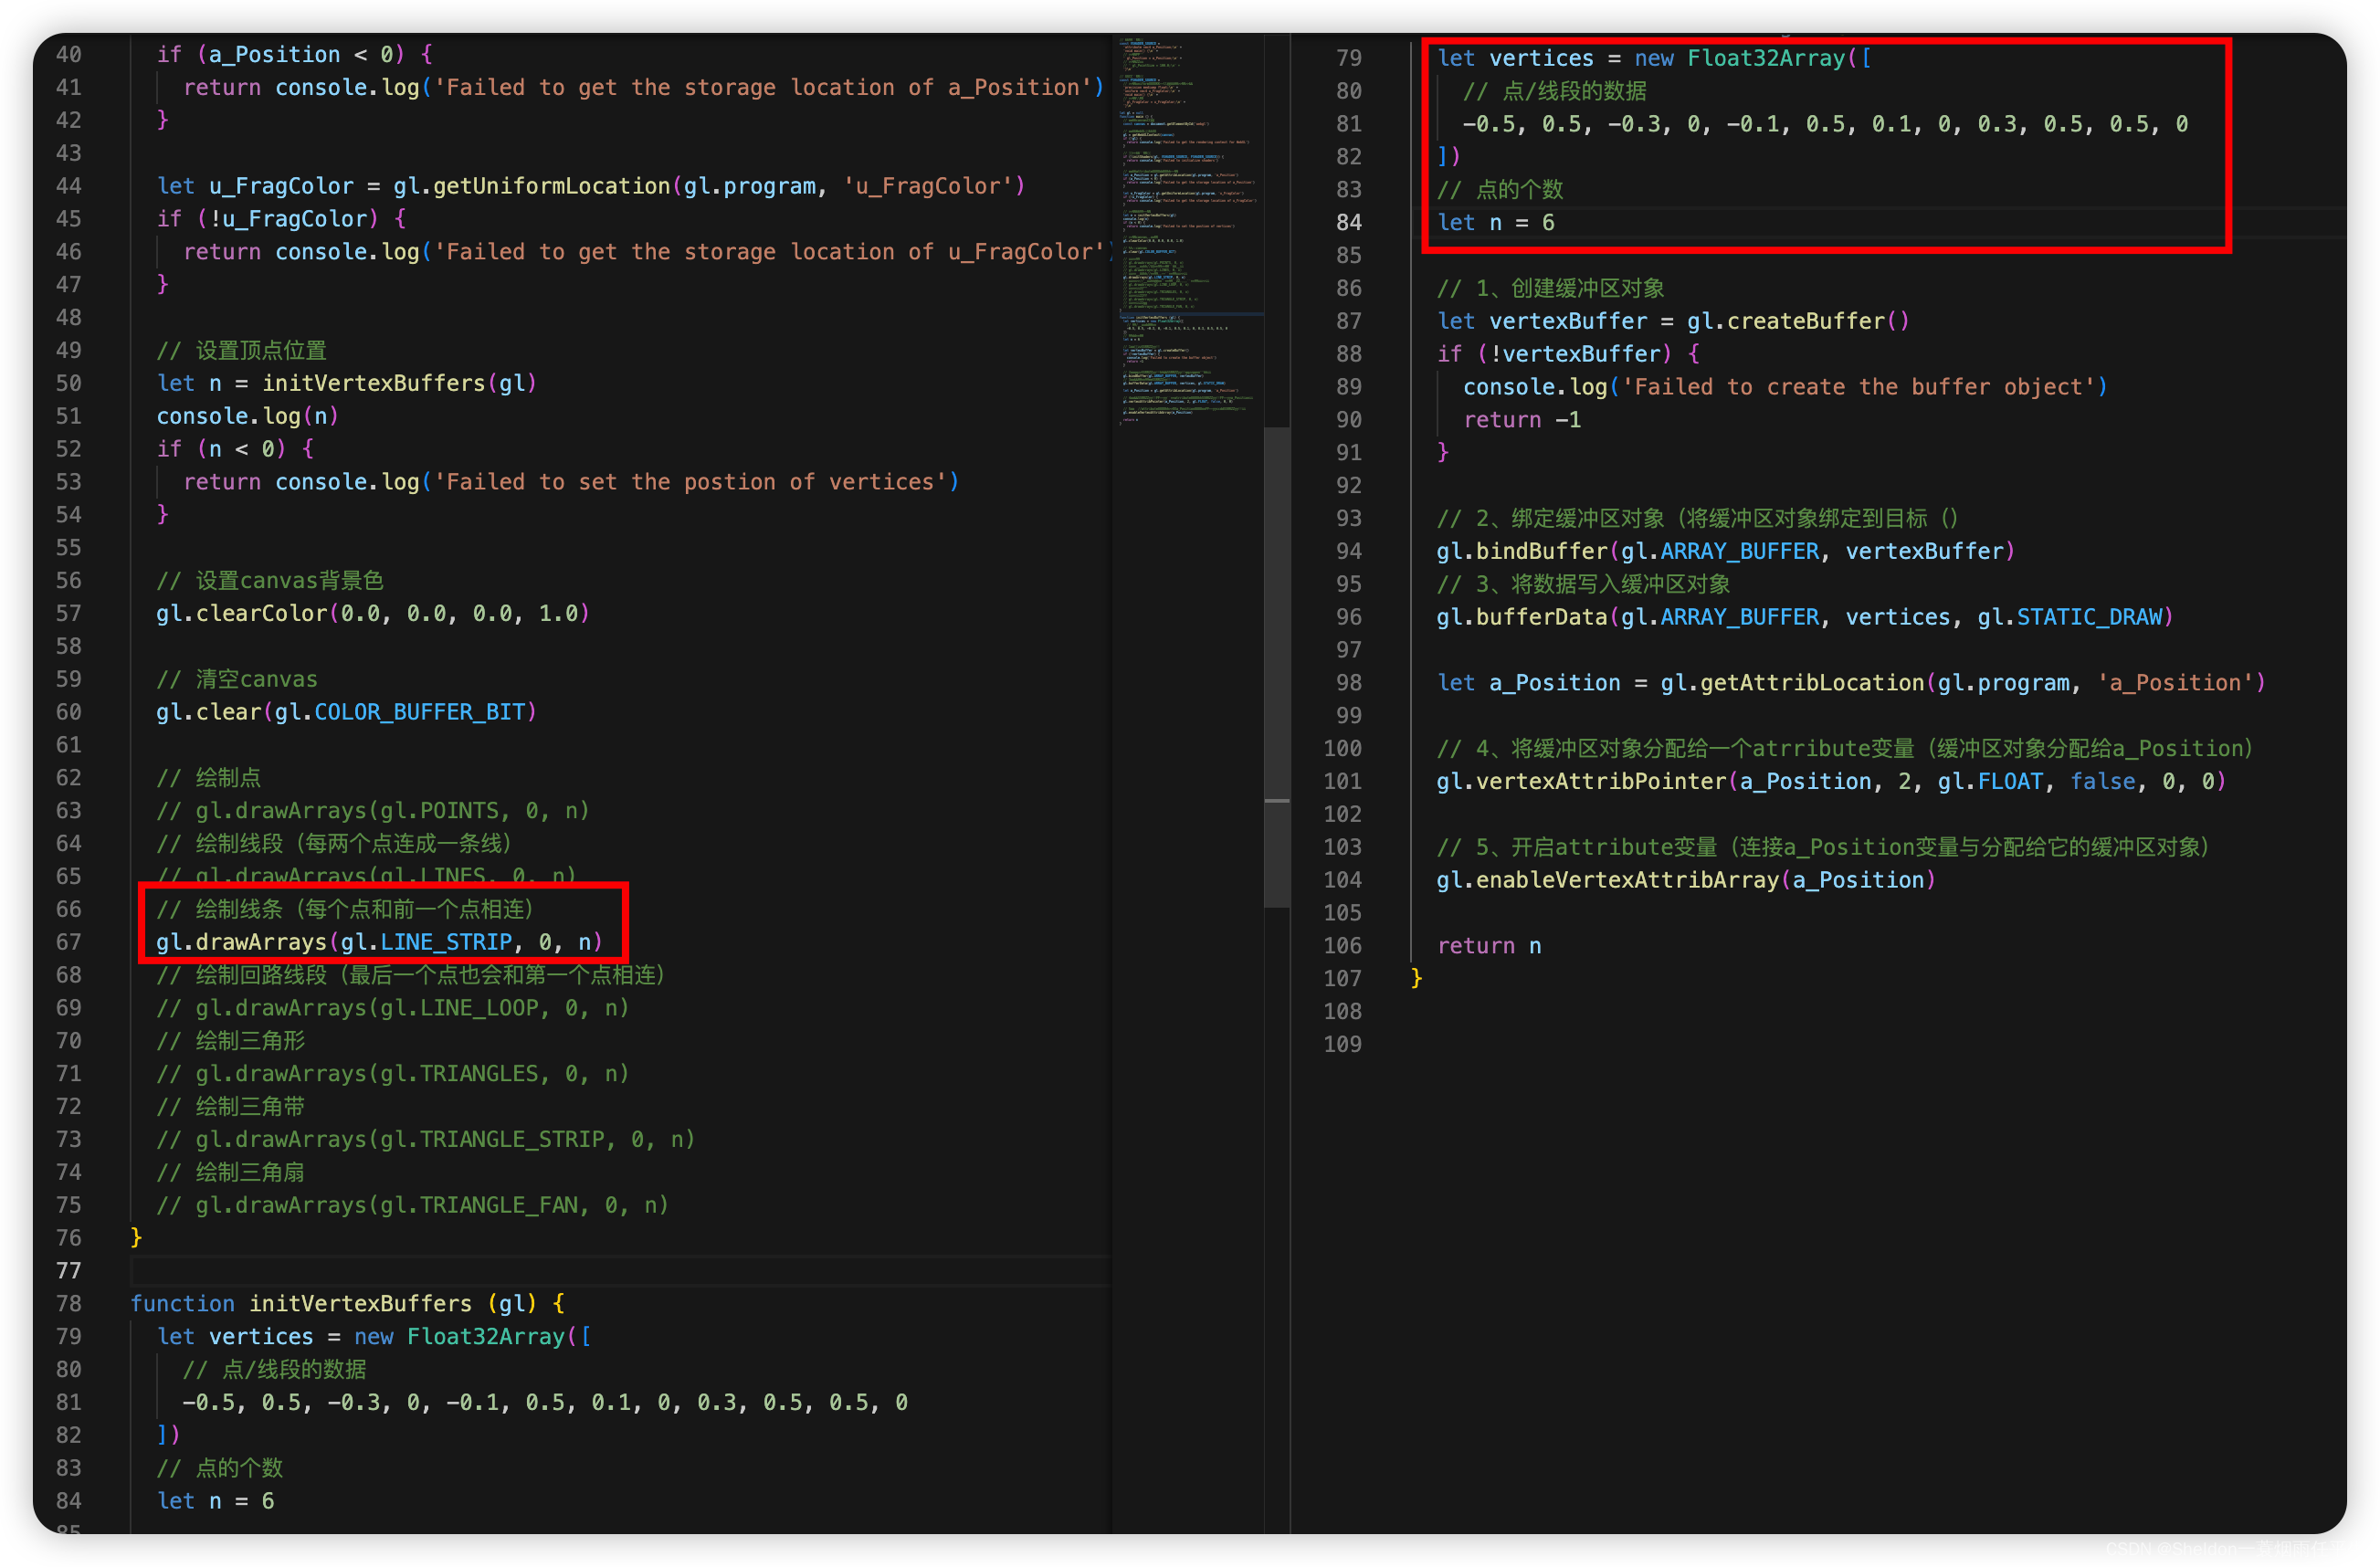
代码类似,就不重复写了。
3.2.2.4 回路——gl.LINE_LOOP
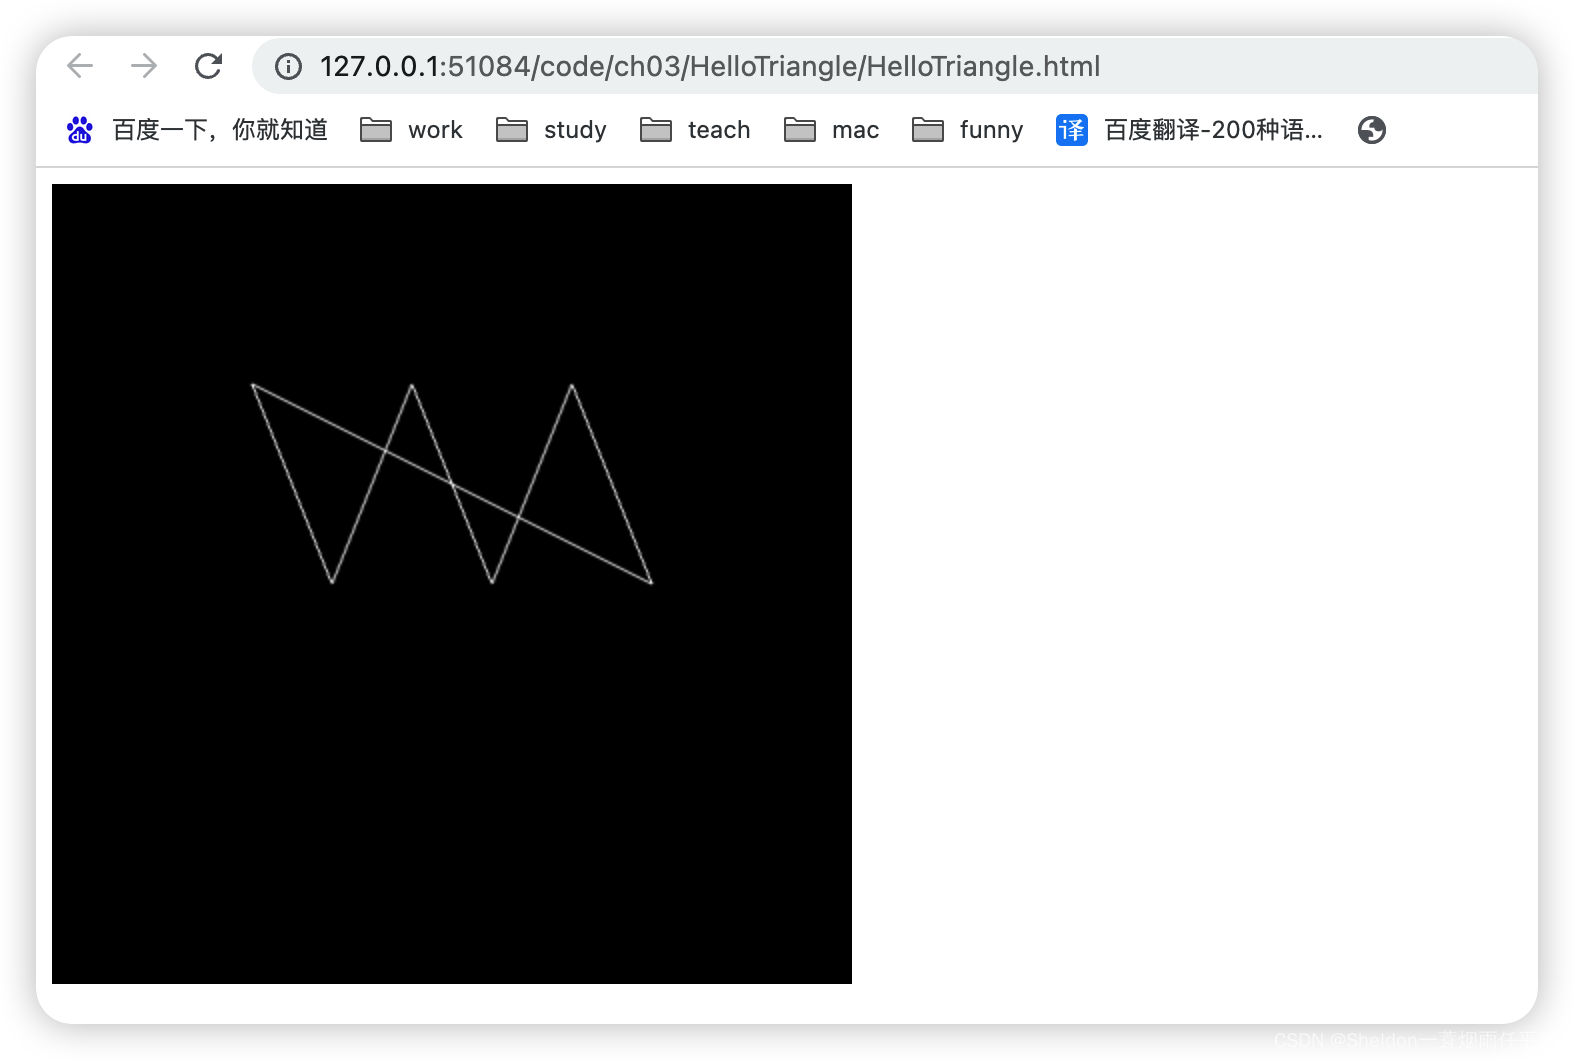
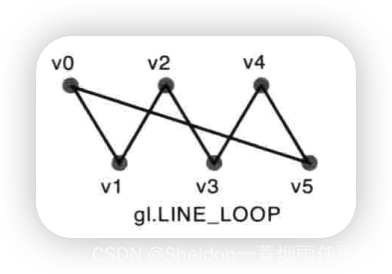

3.2.2.5 三角形——gl.TRIANGLES
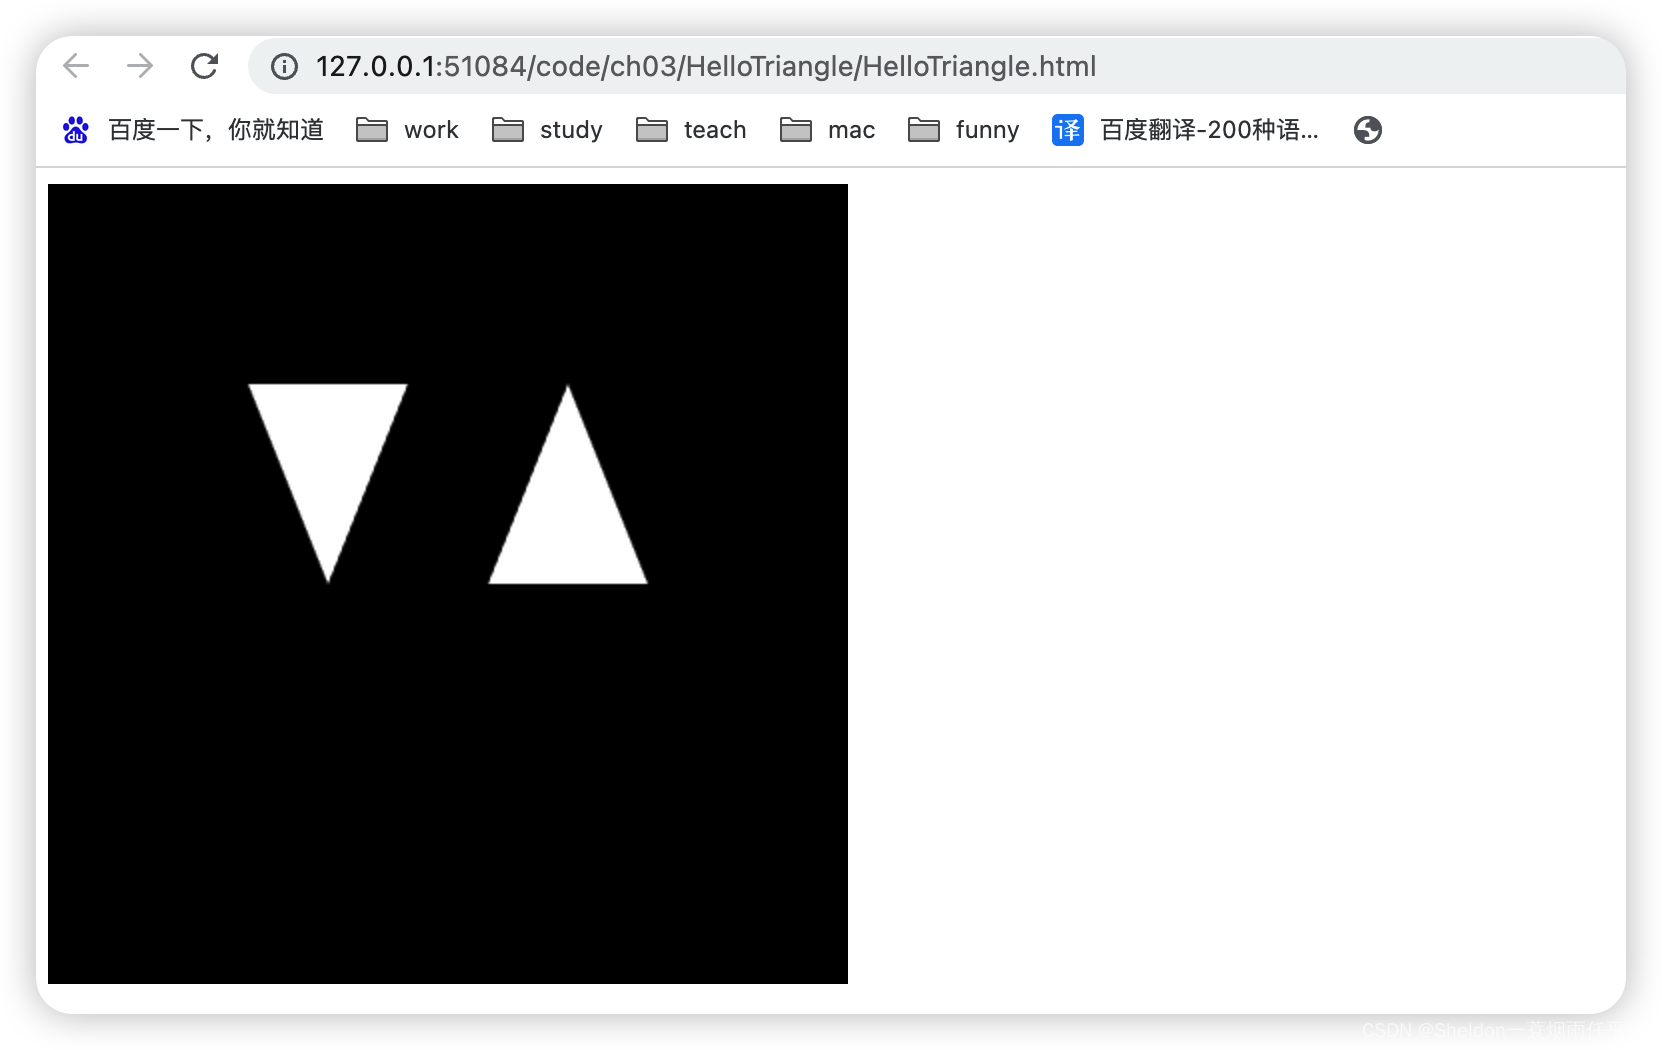
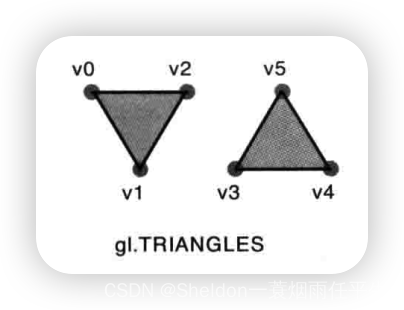
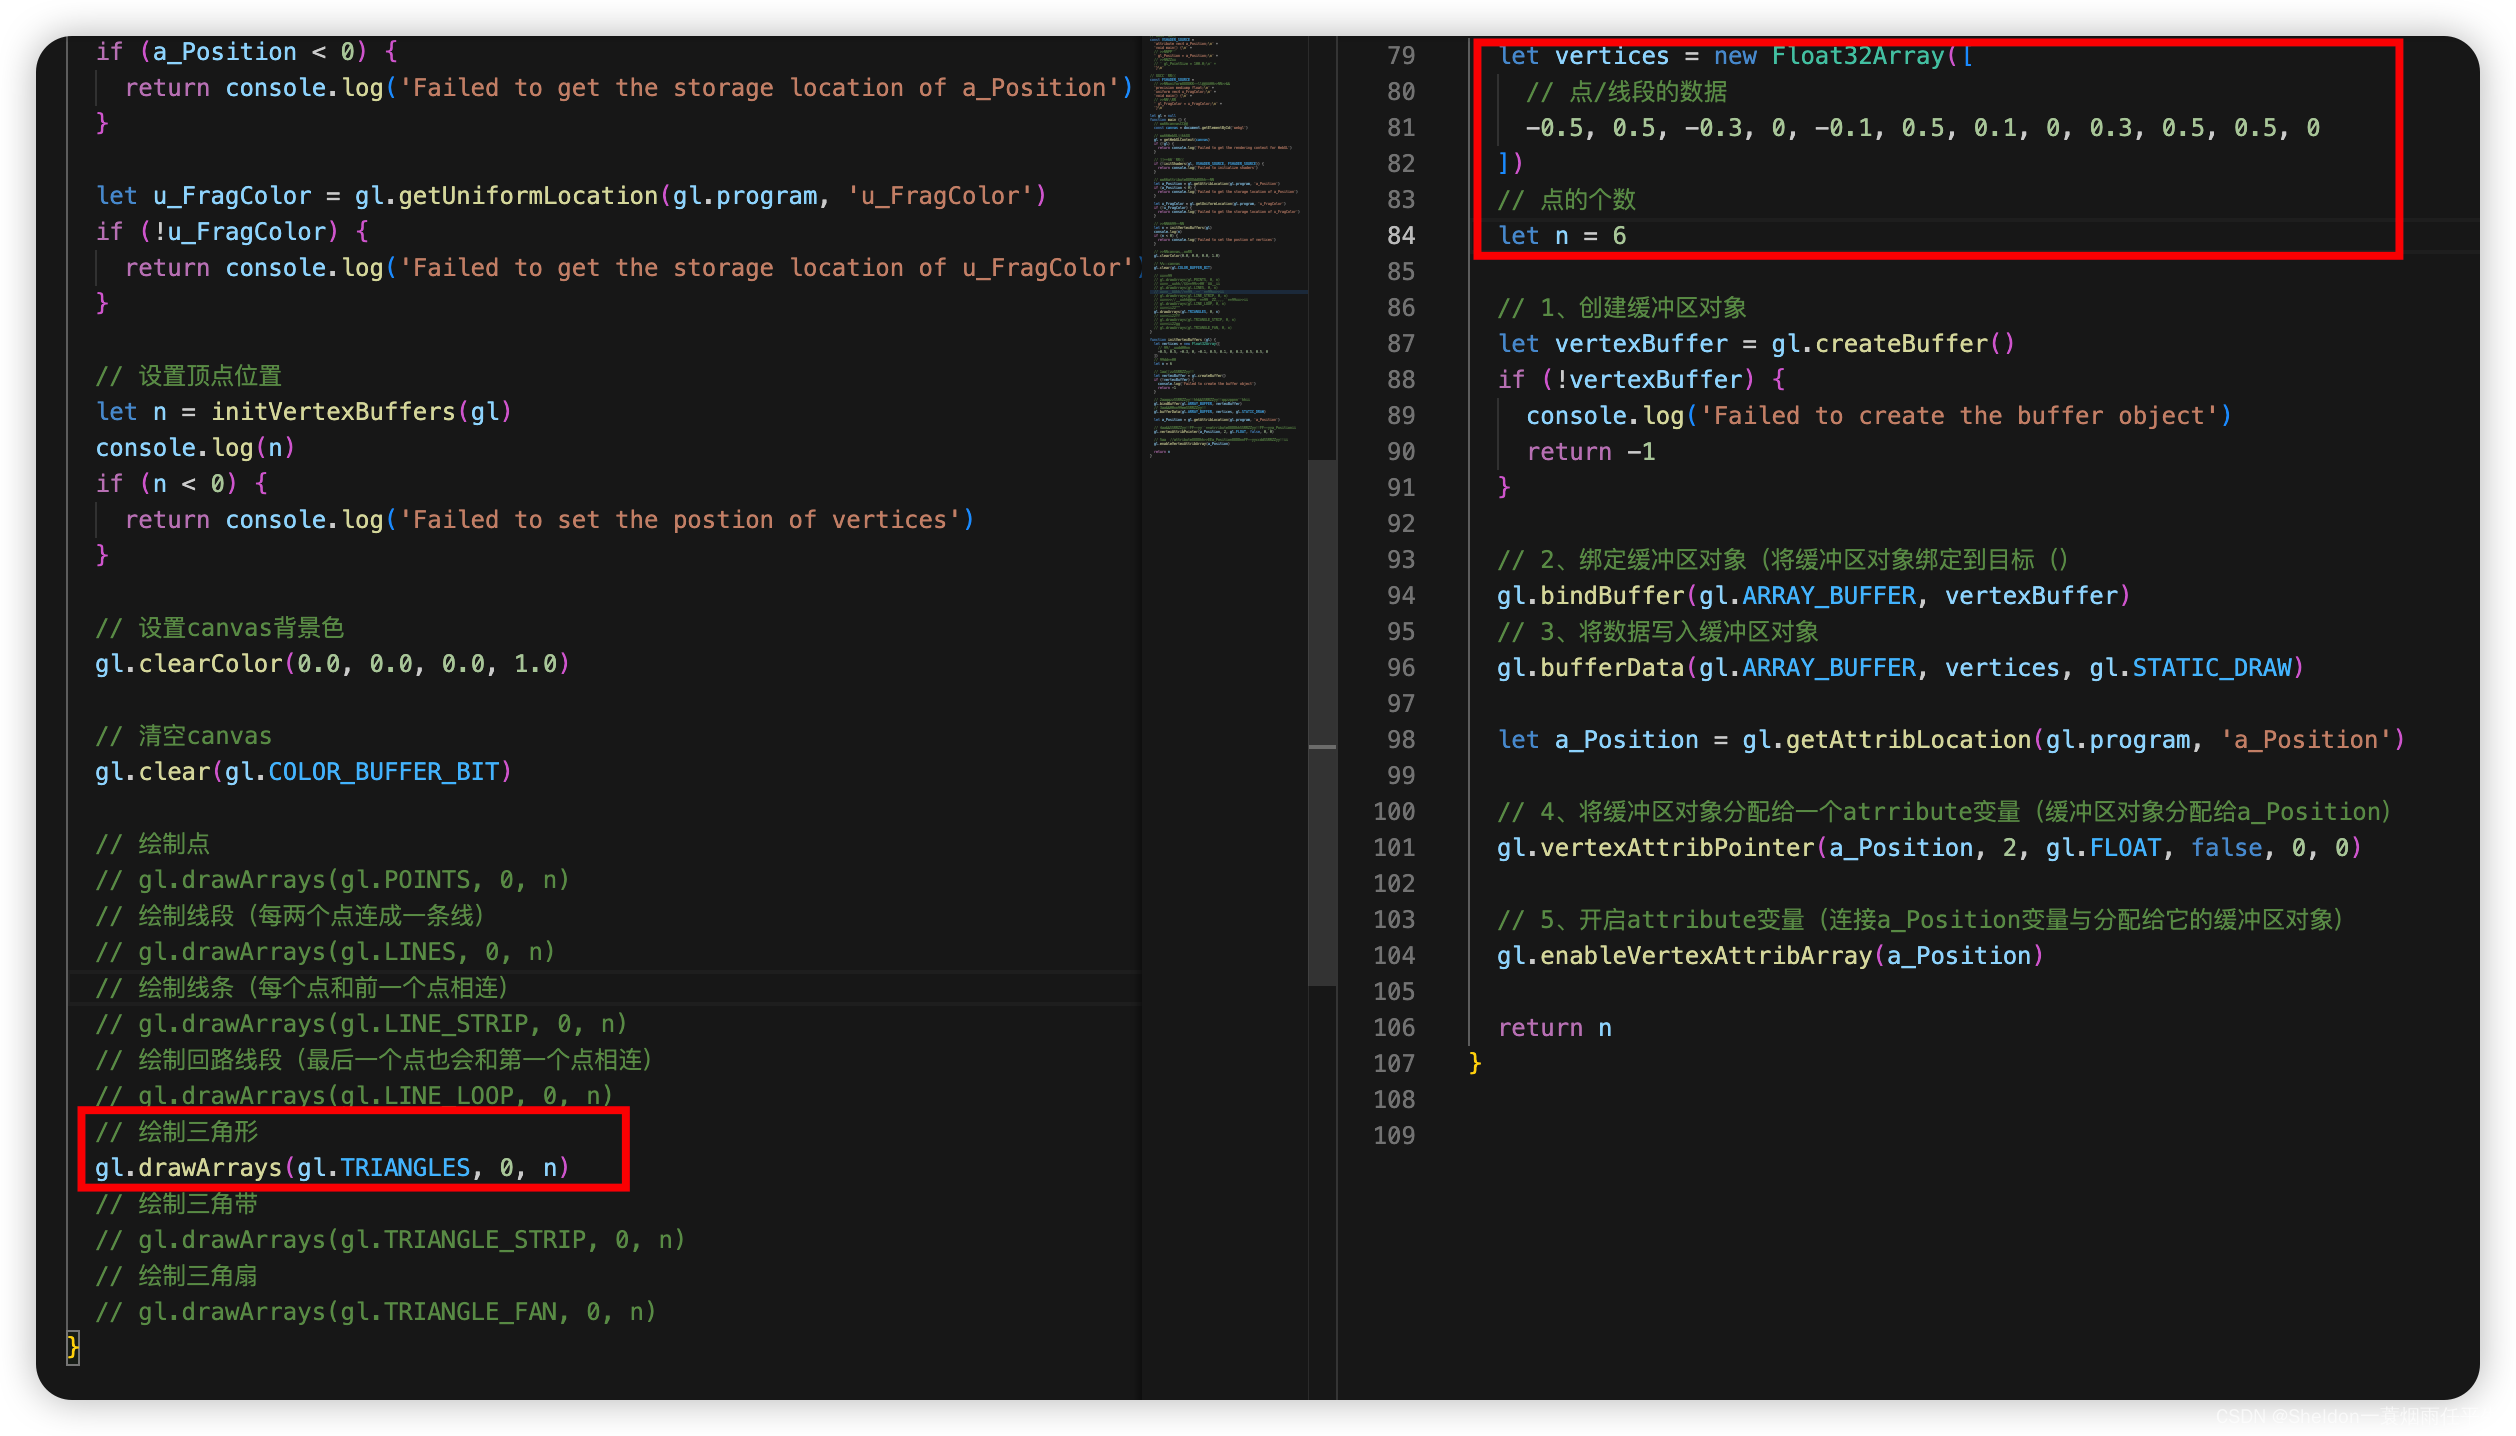
3.2.2.6 三角带——gl.TRIANGLE_STRIP
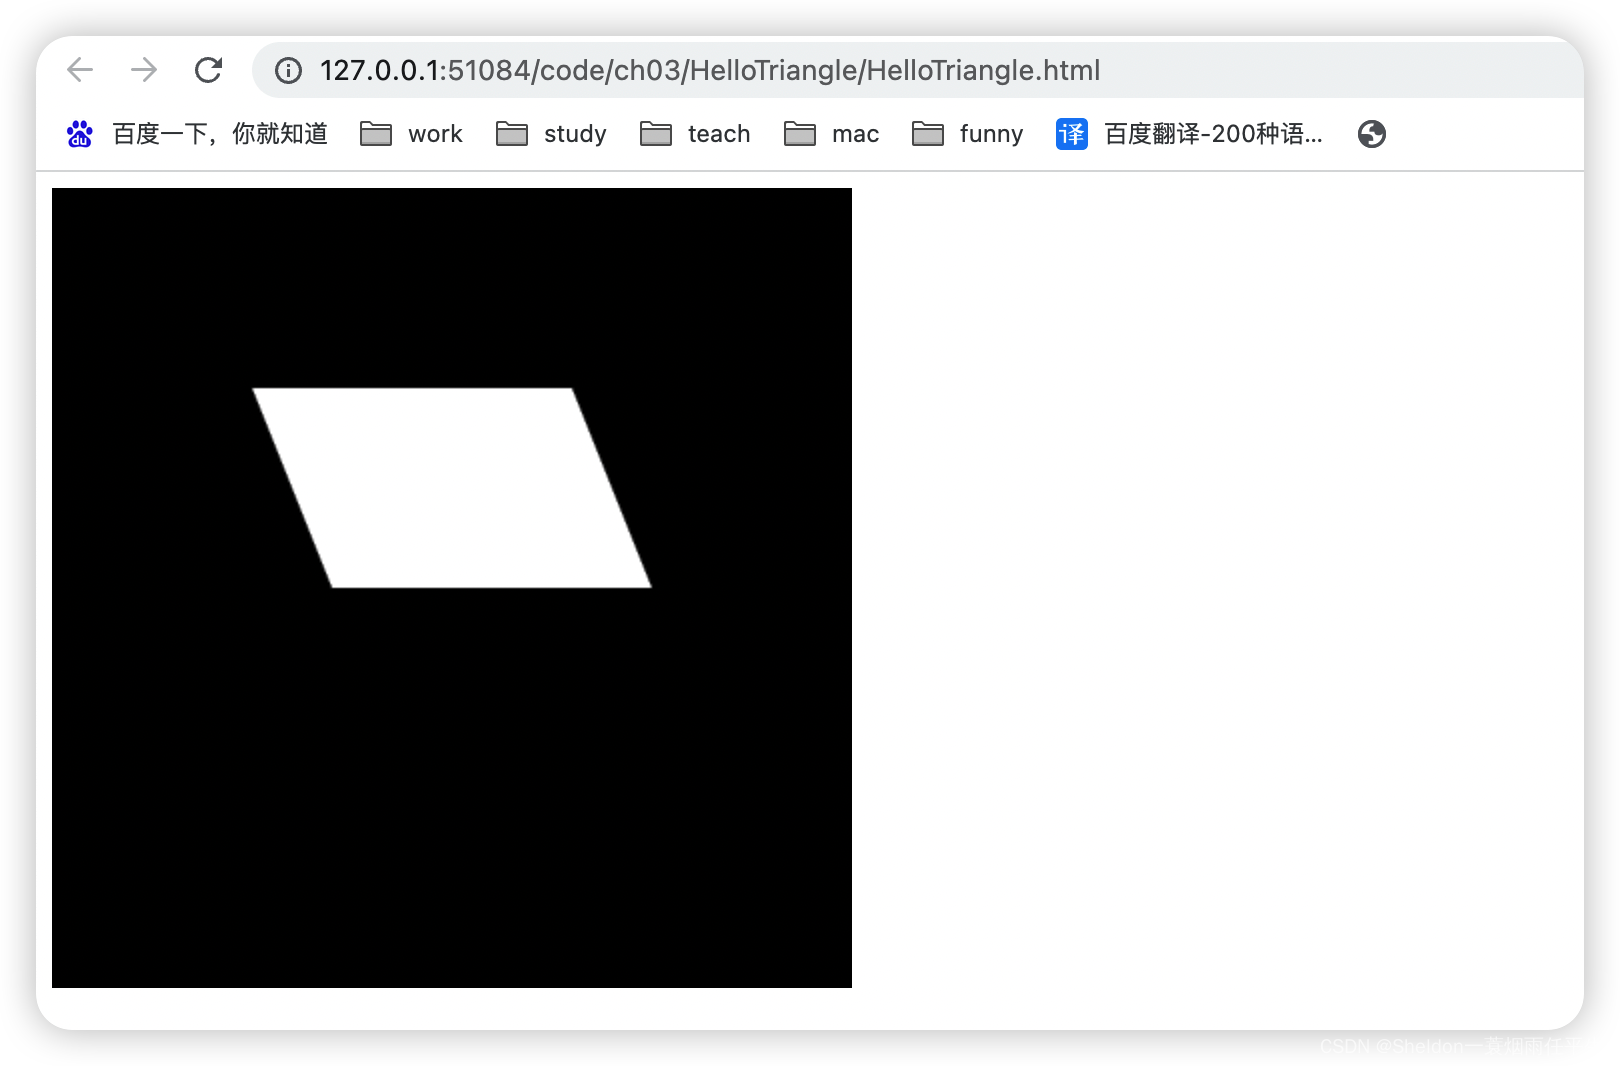
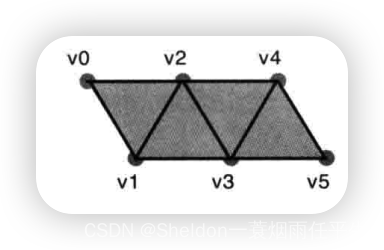
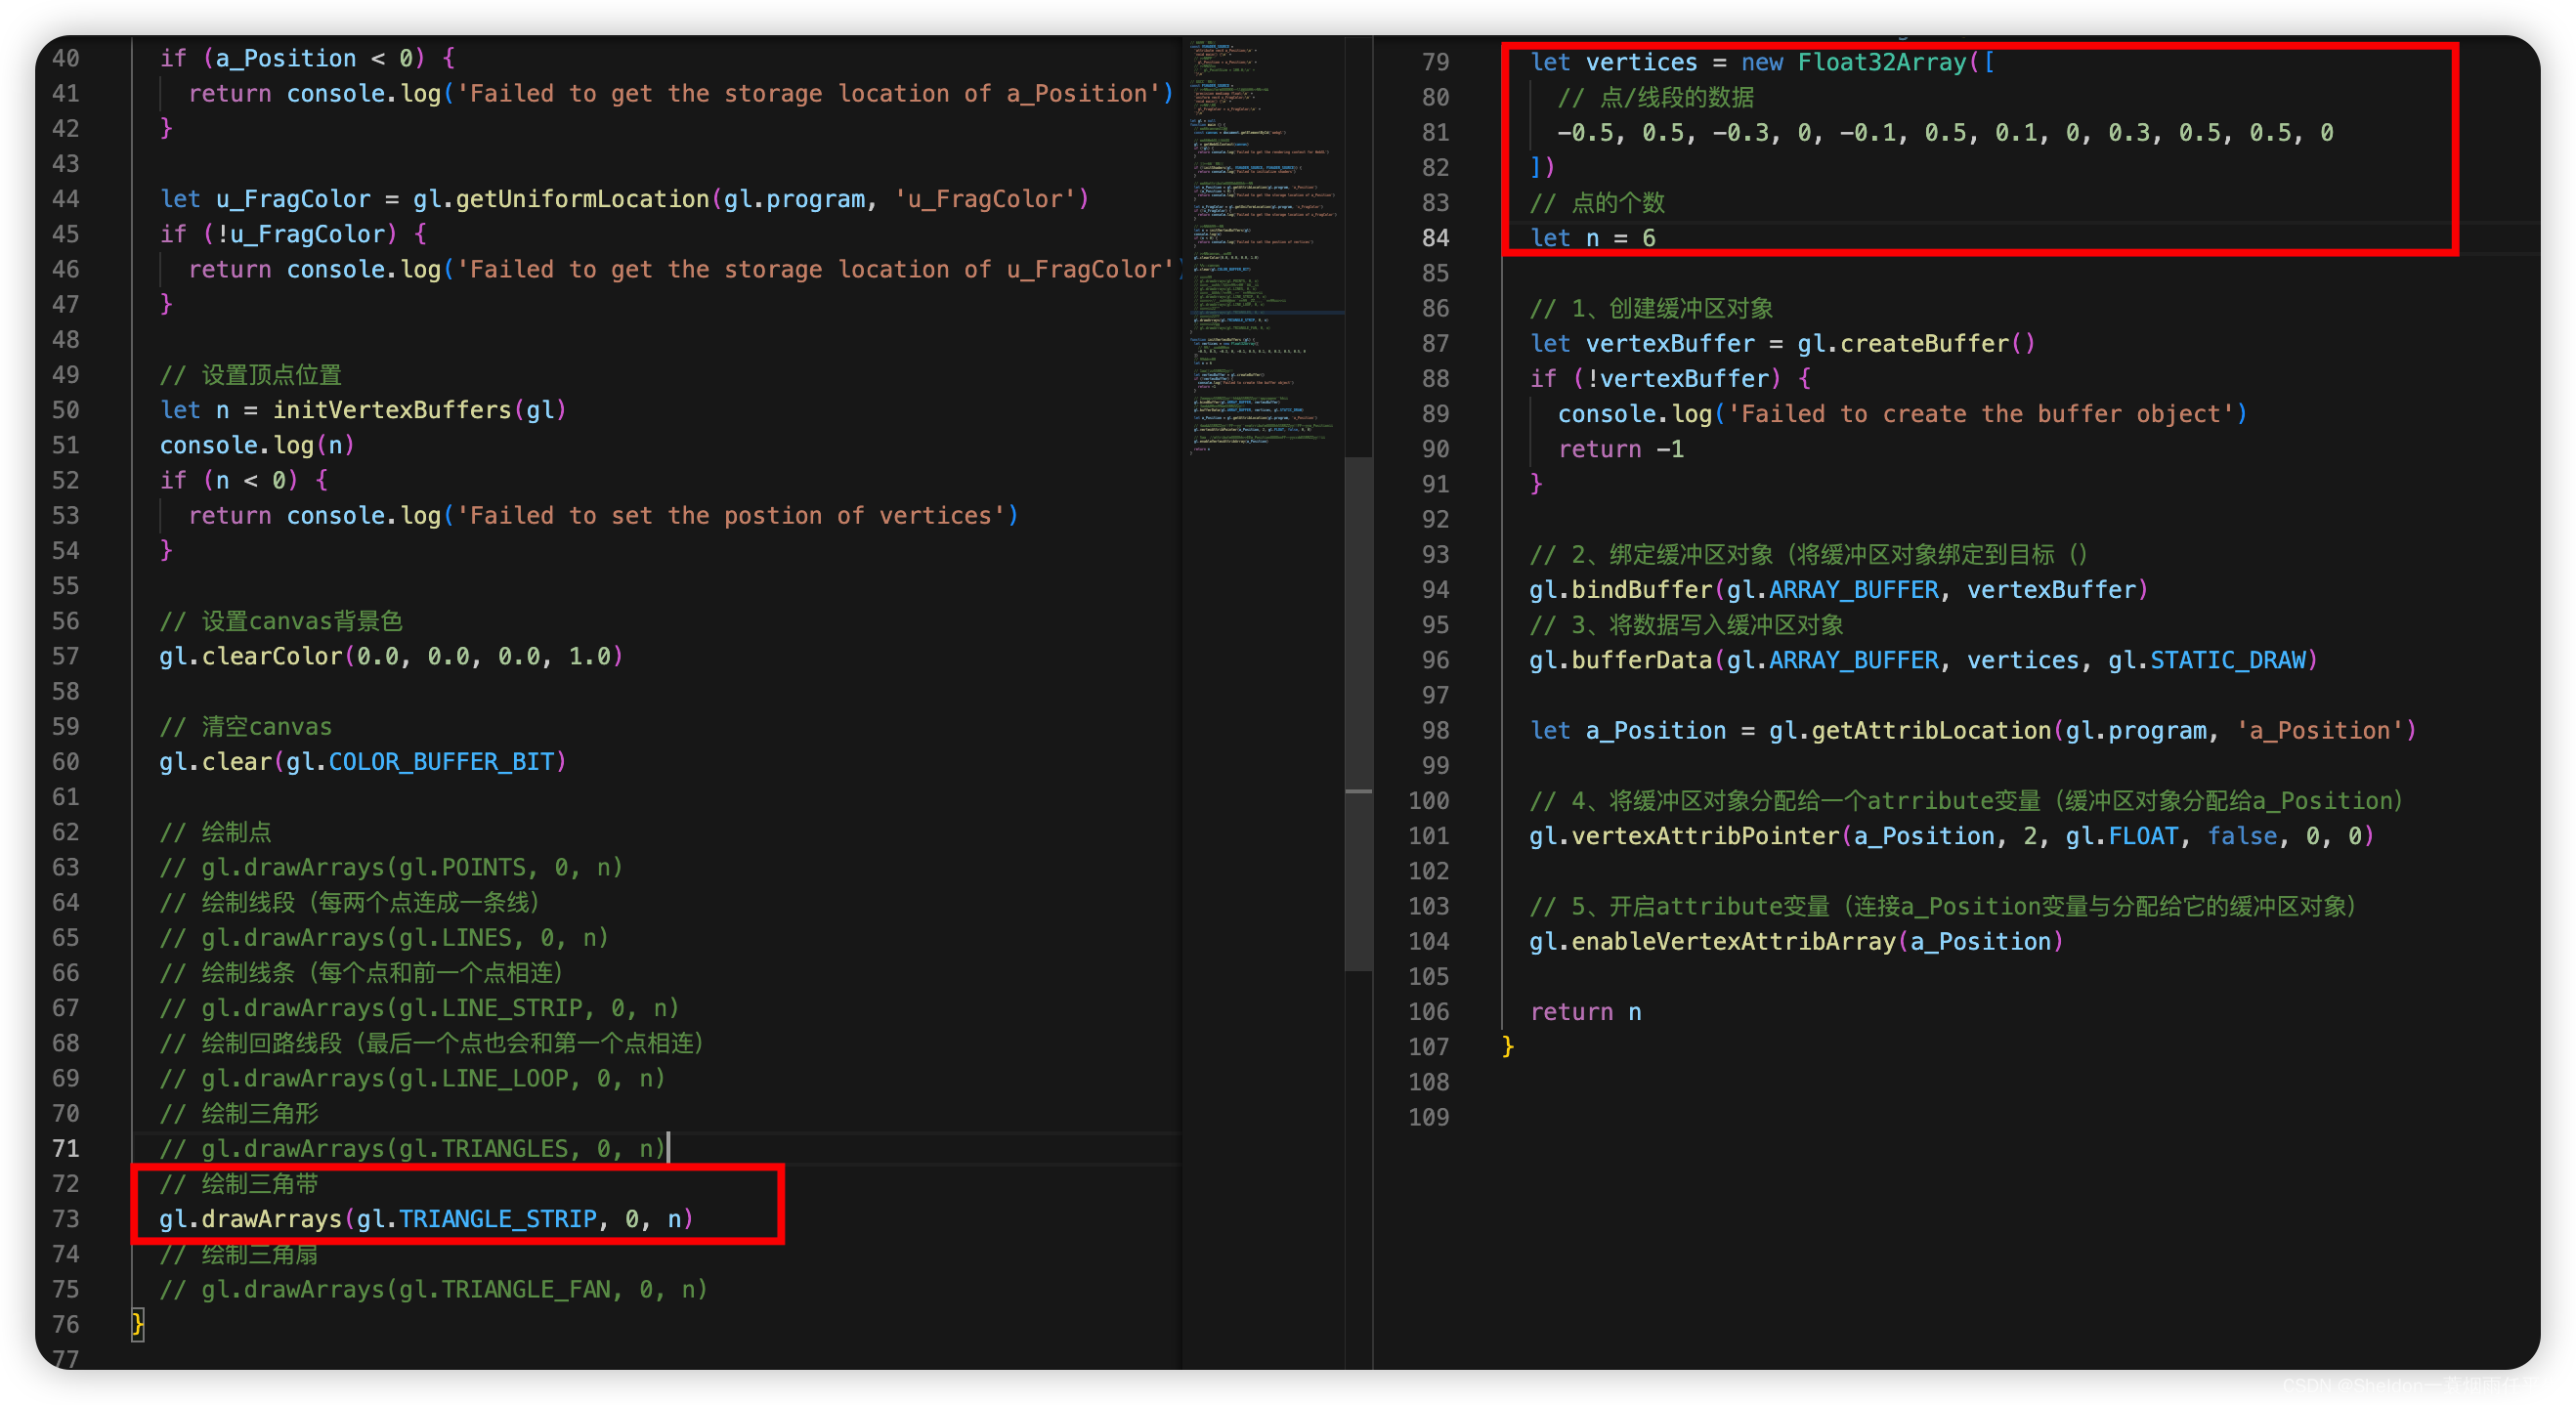
3.2.2.6 三角扇——gl.TRIANGLE_FAN
如果直接该类型,不改变点位,显示如下:
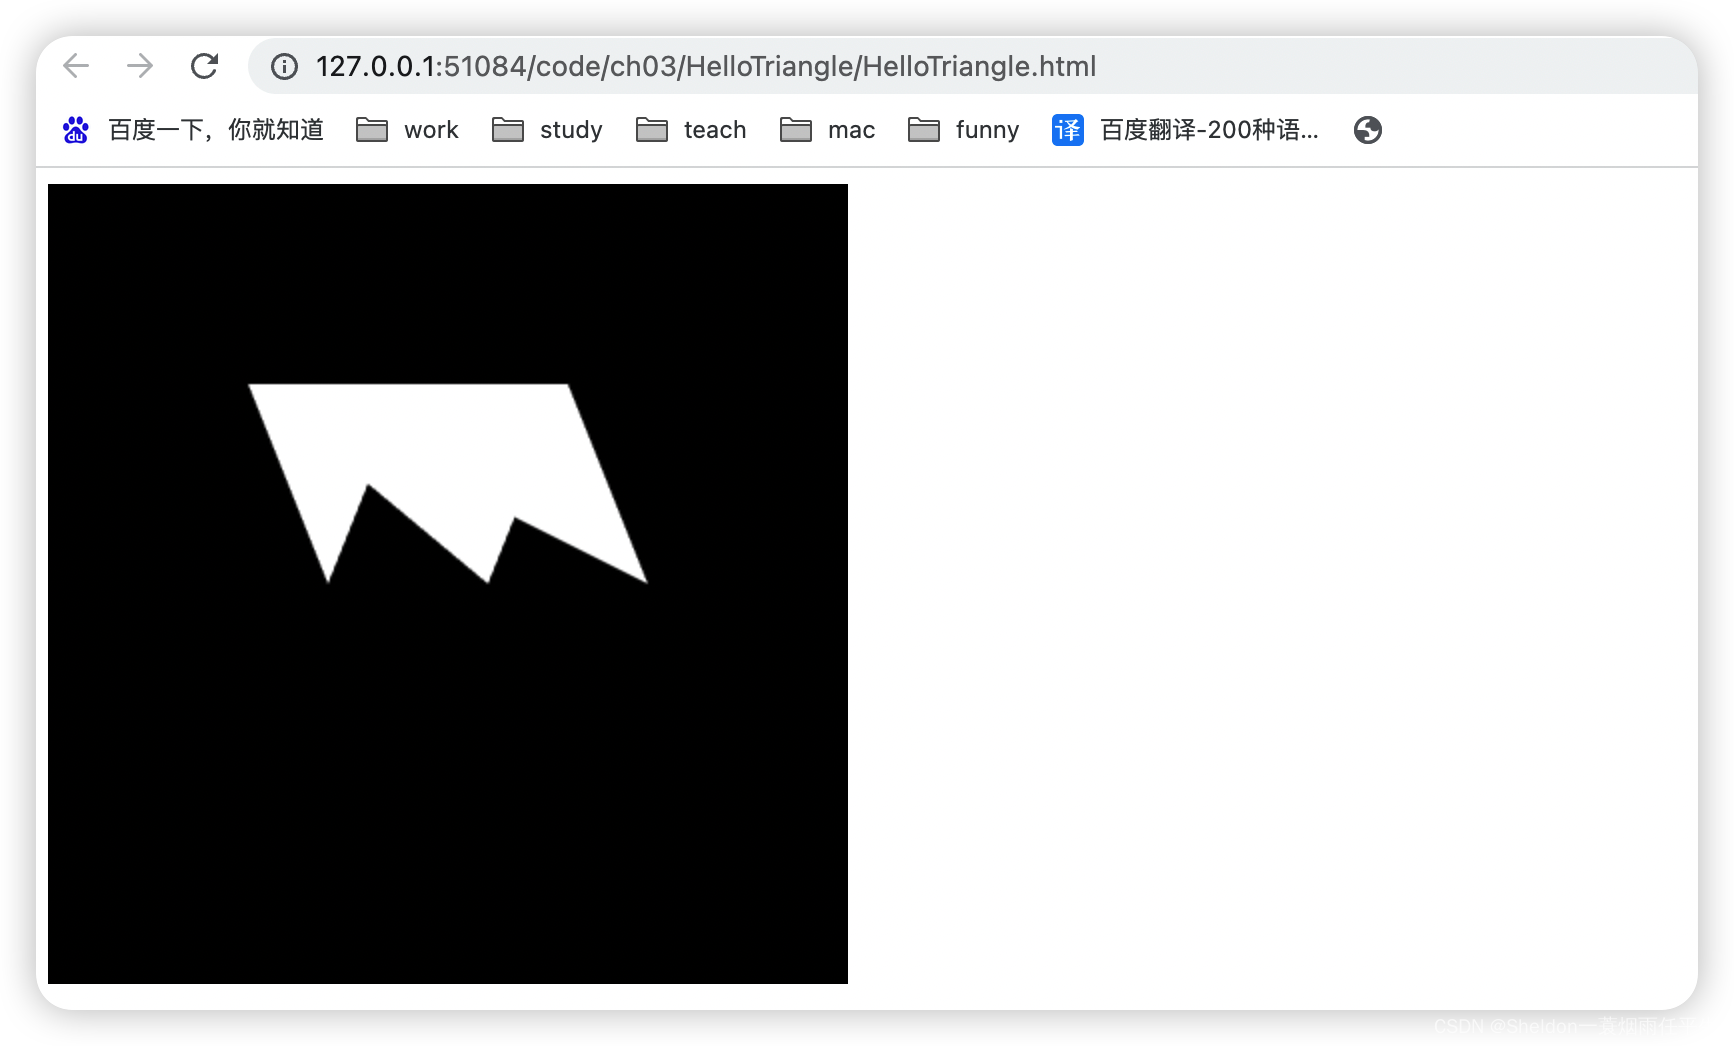
不利于观察,所以改变一下点的位置:
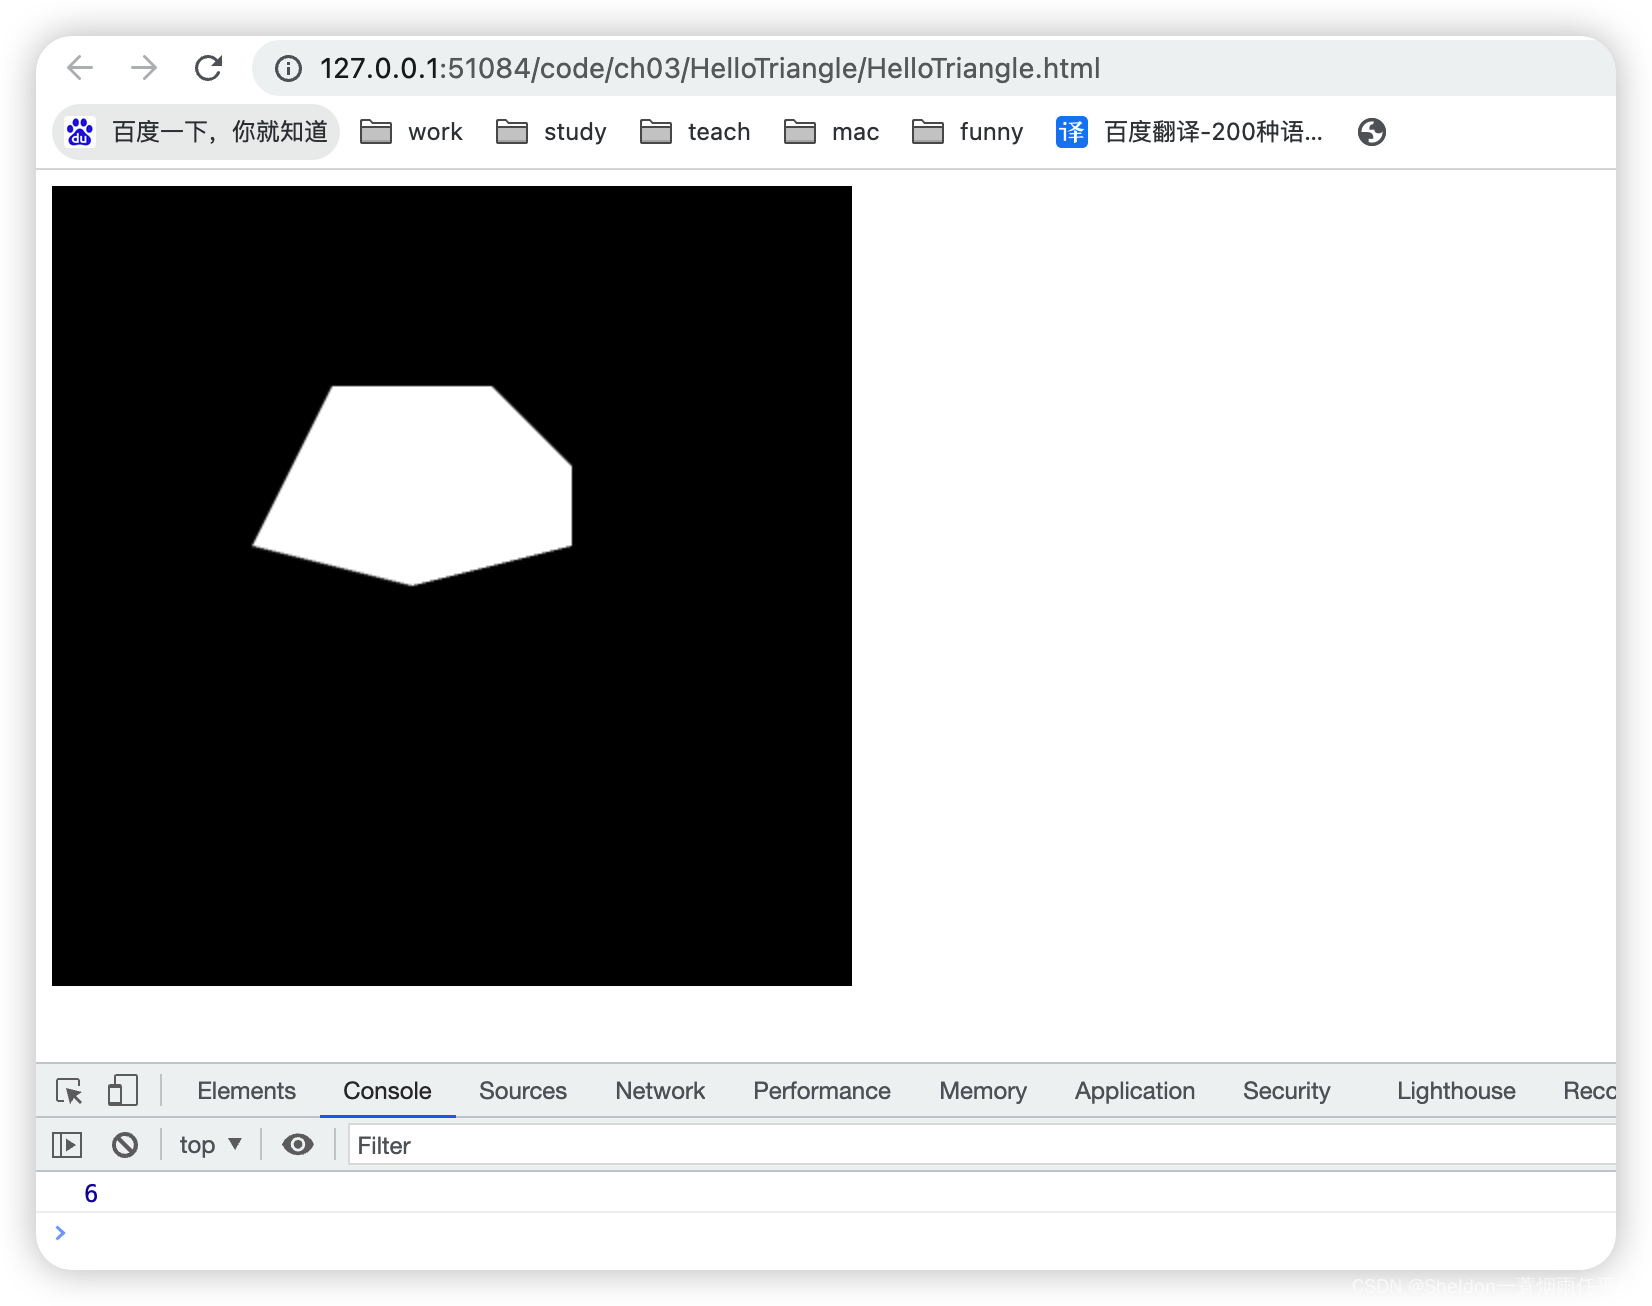
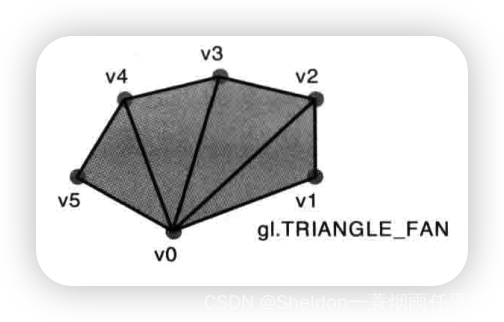
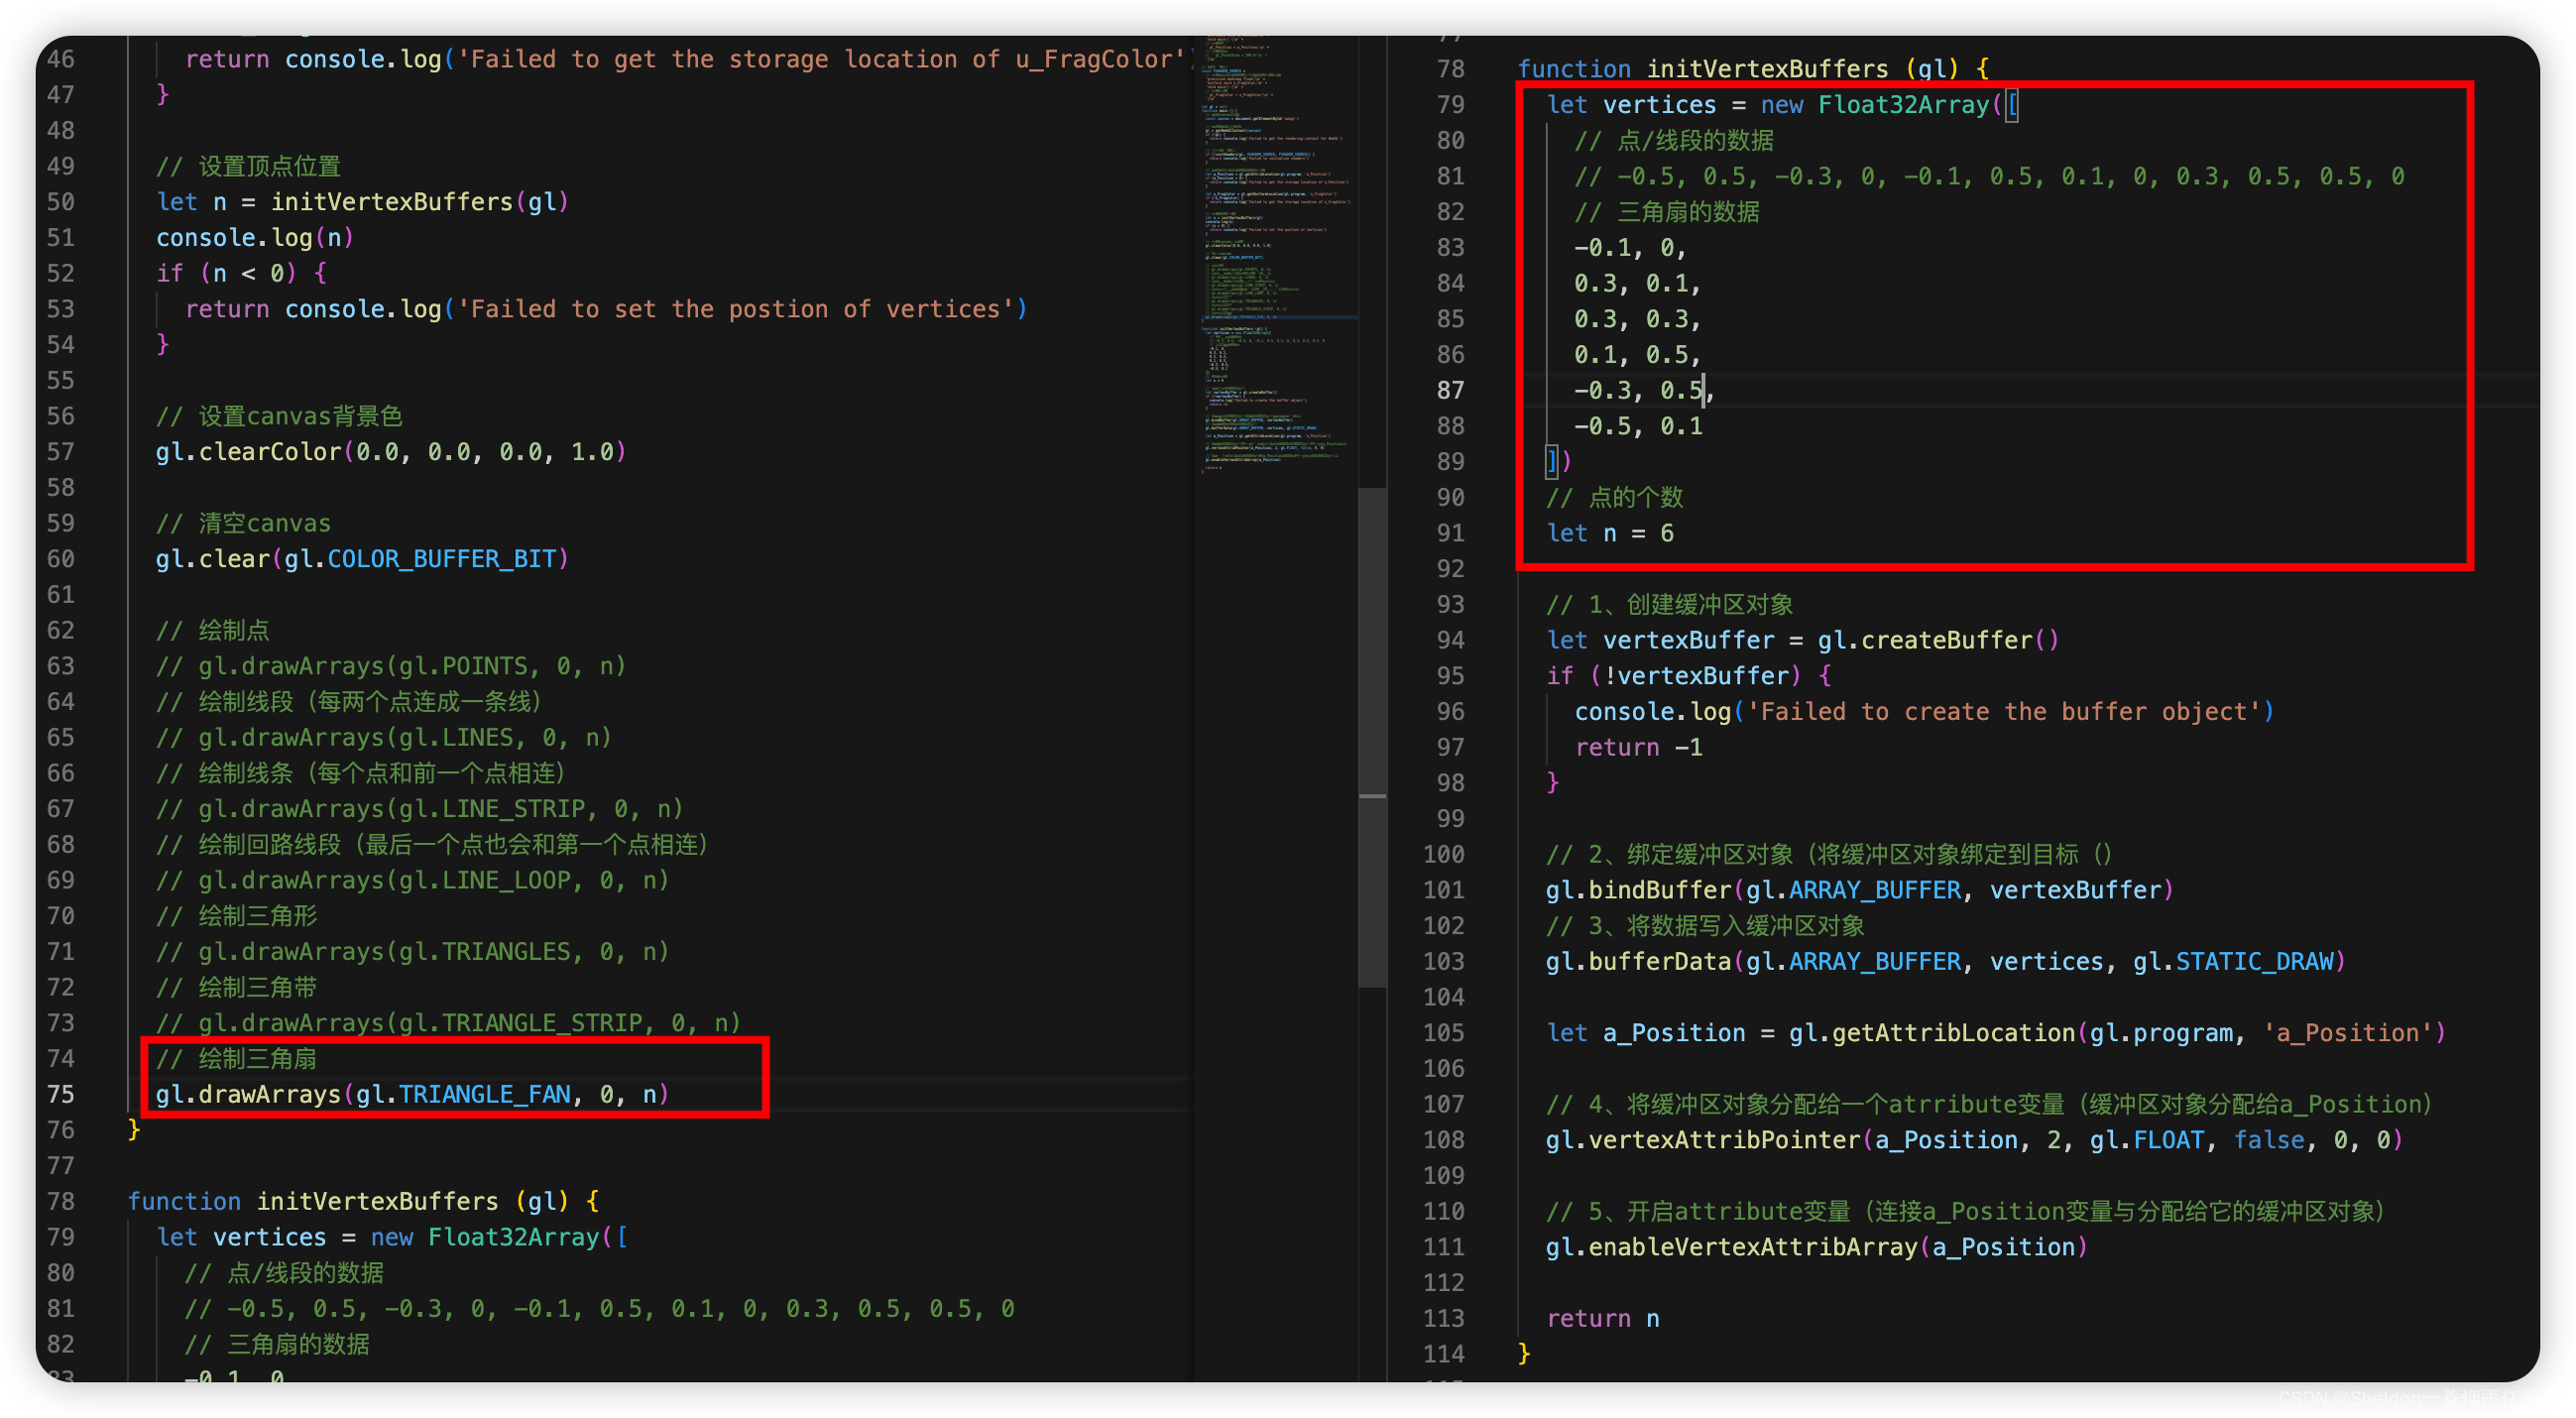
3.2.3 基本图形组成其他图形
3.2.3.1 矩形/长方形
(1)使用三角带绘制矩形,使用的点位最少,为4个。
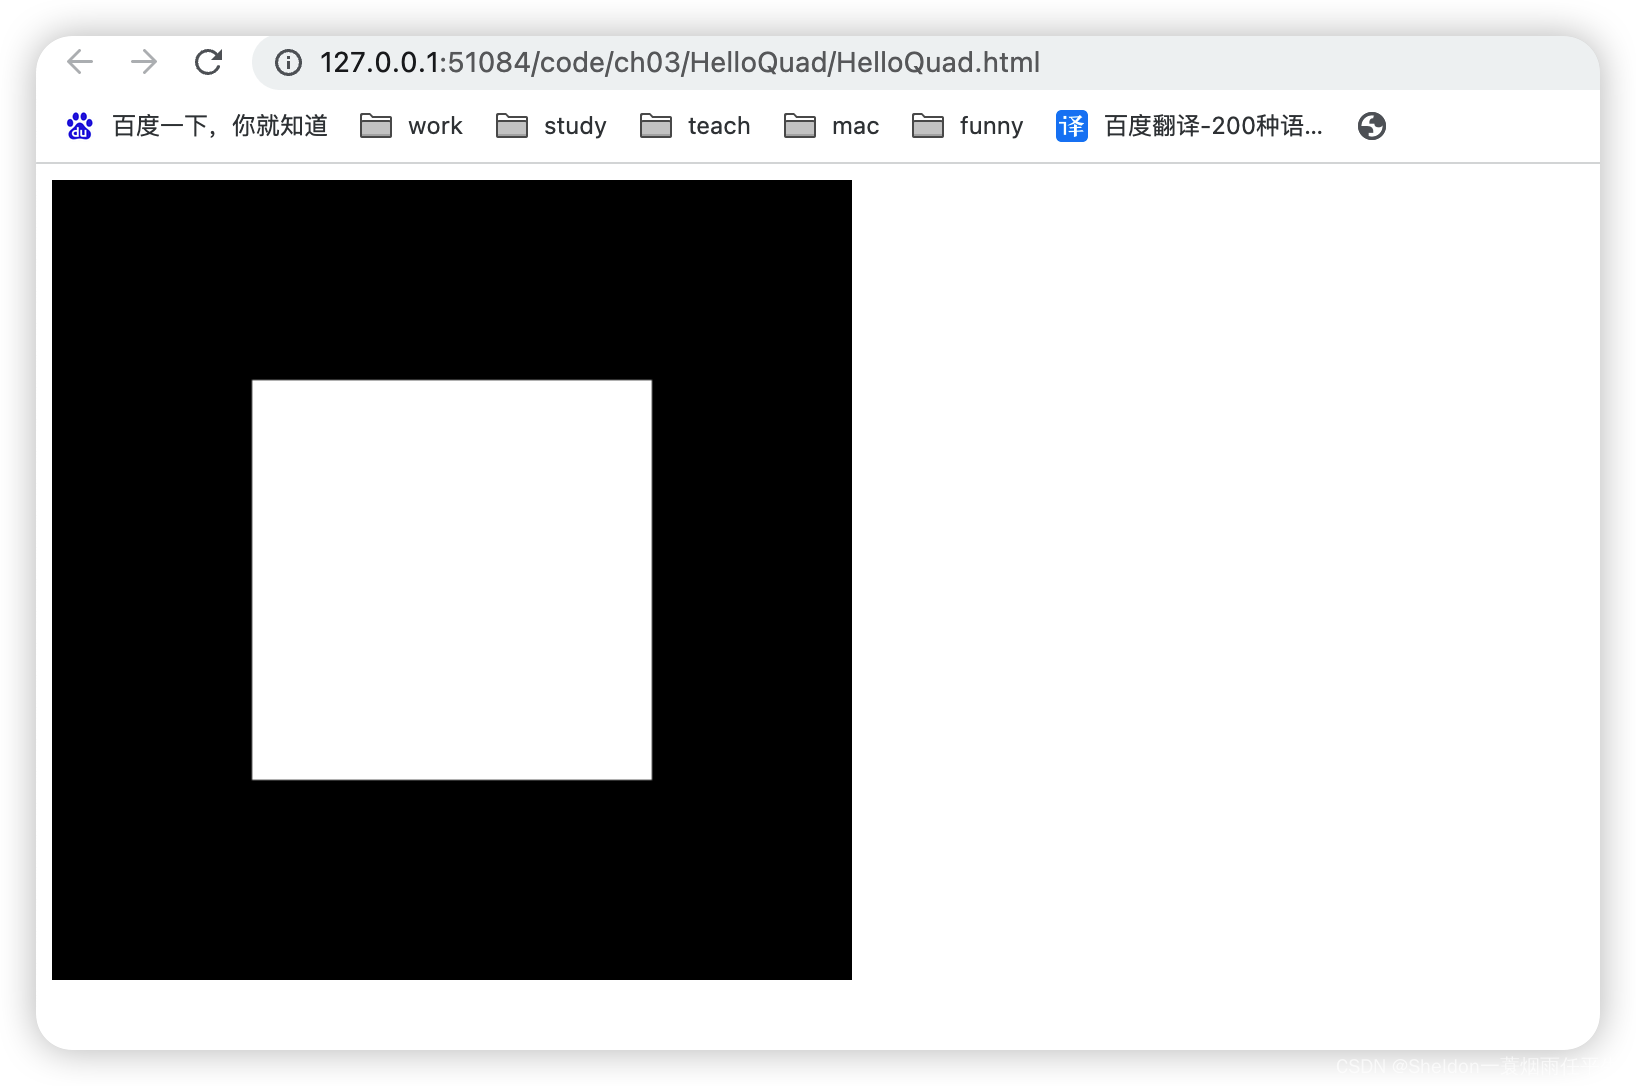
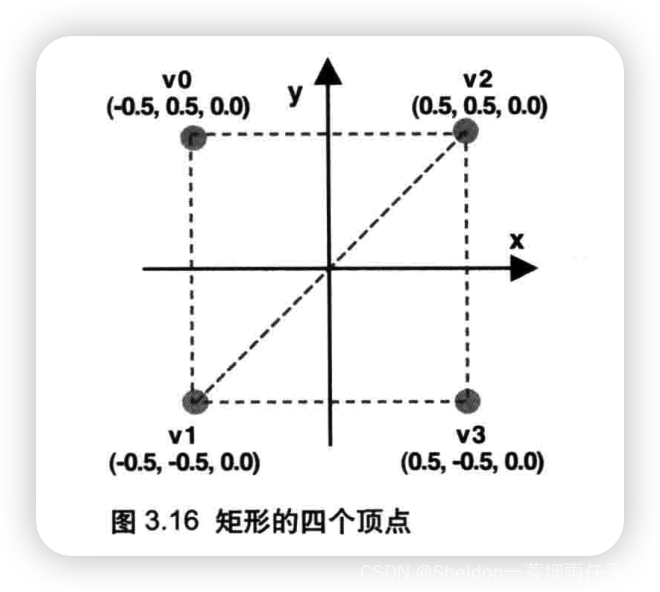
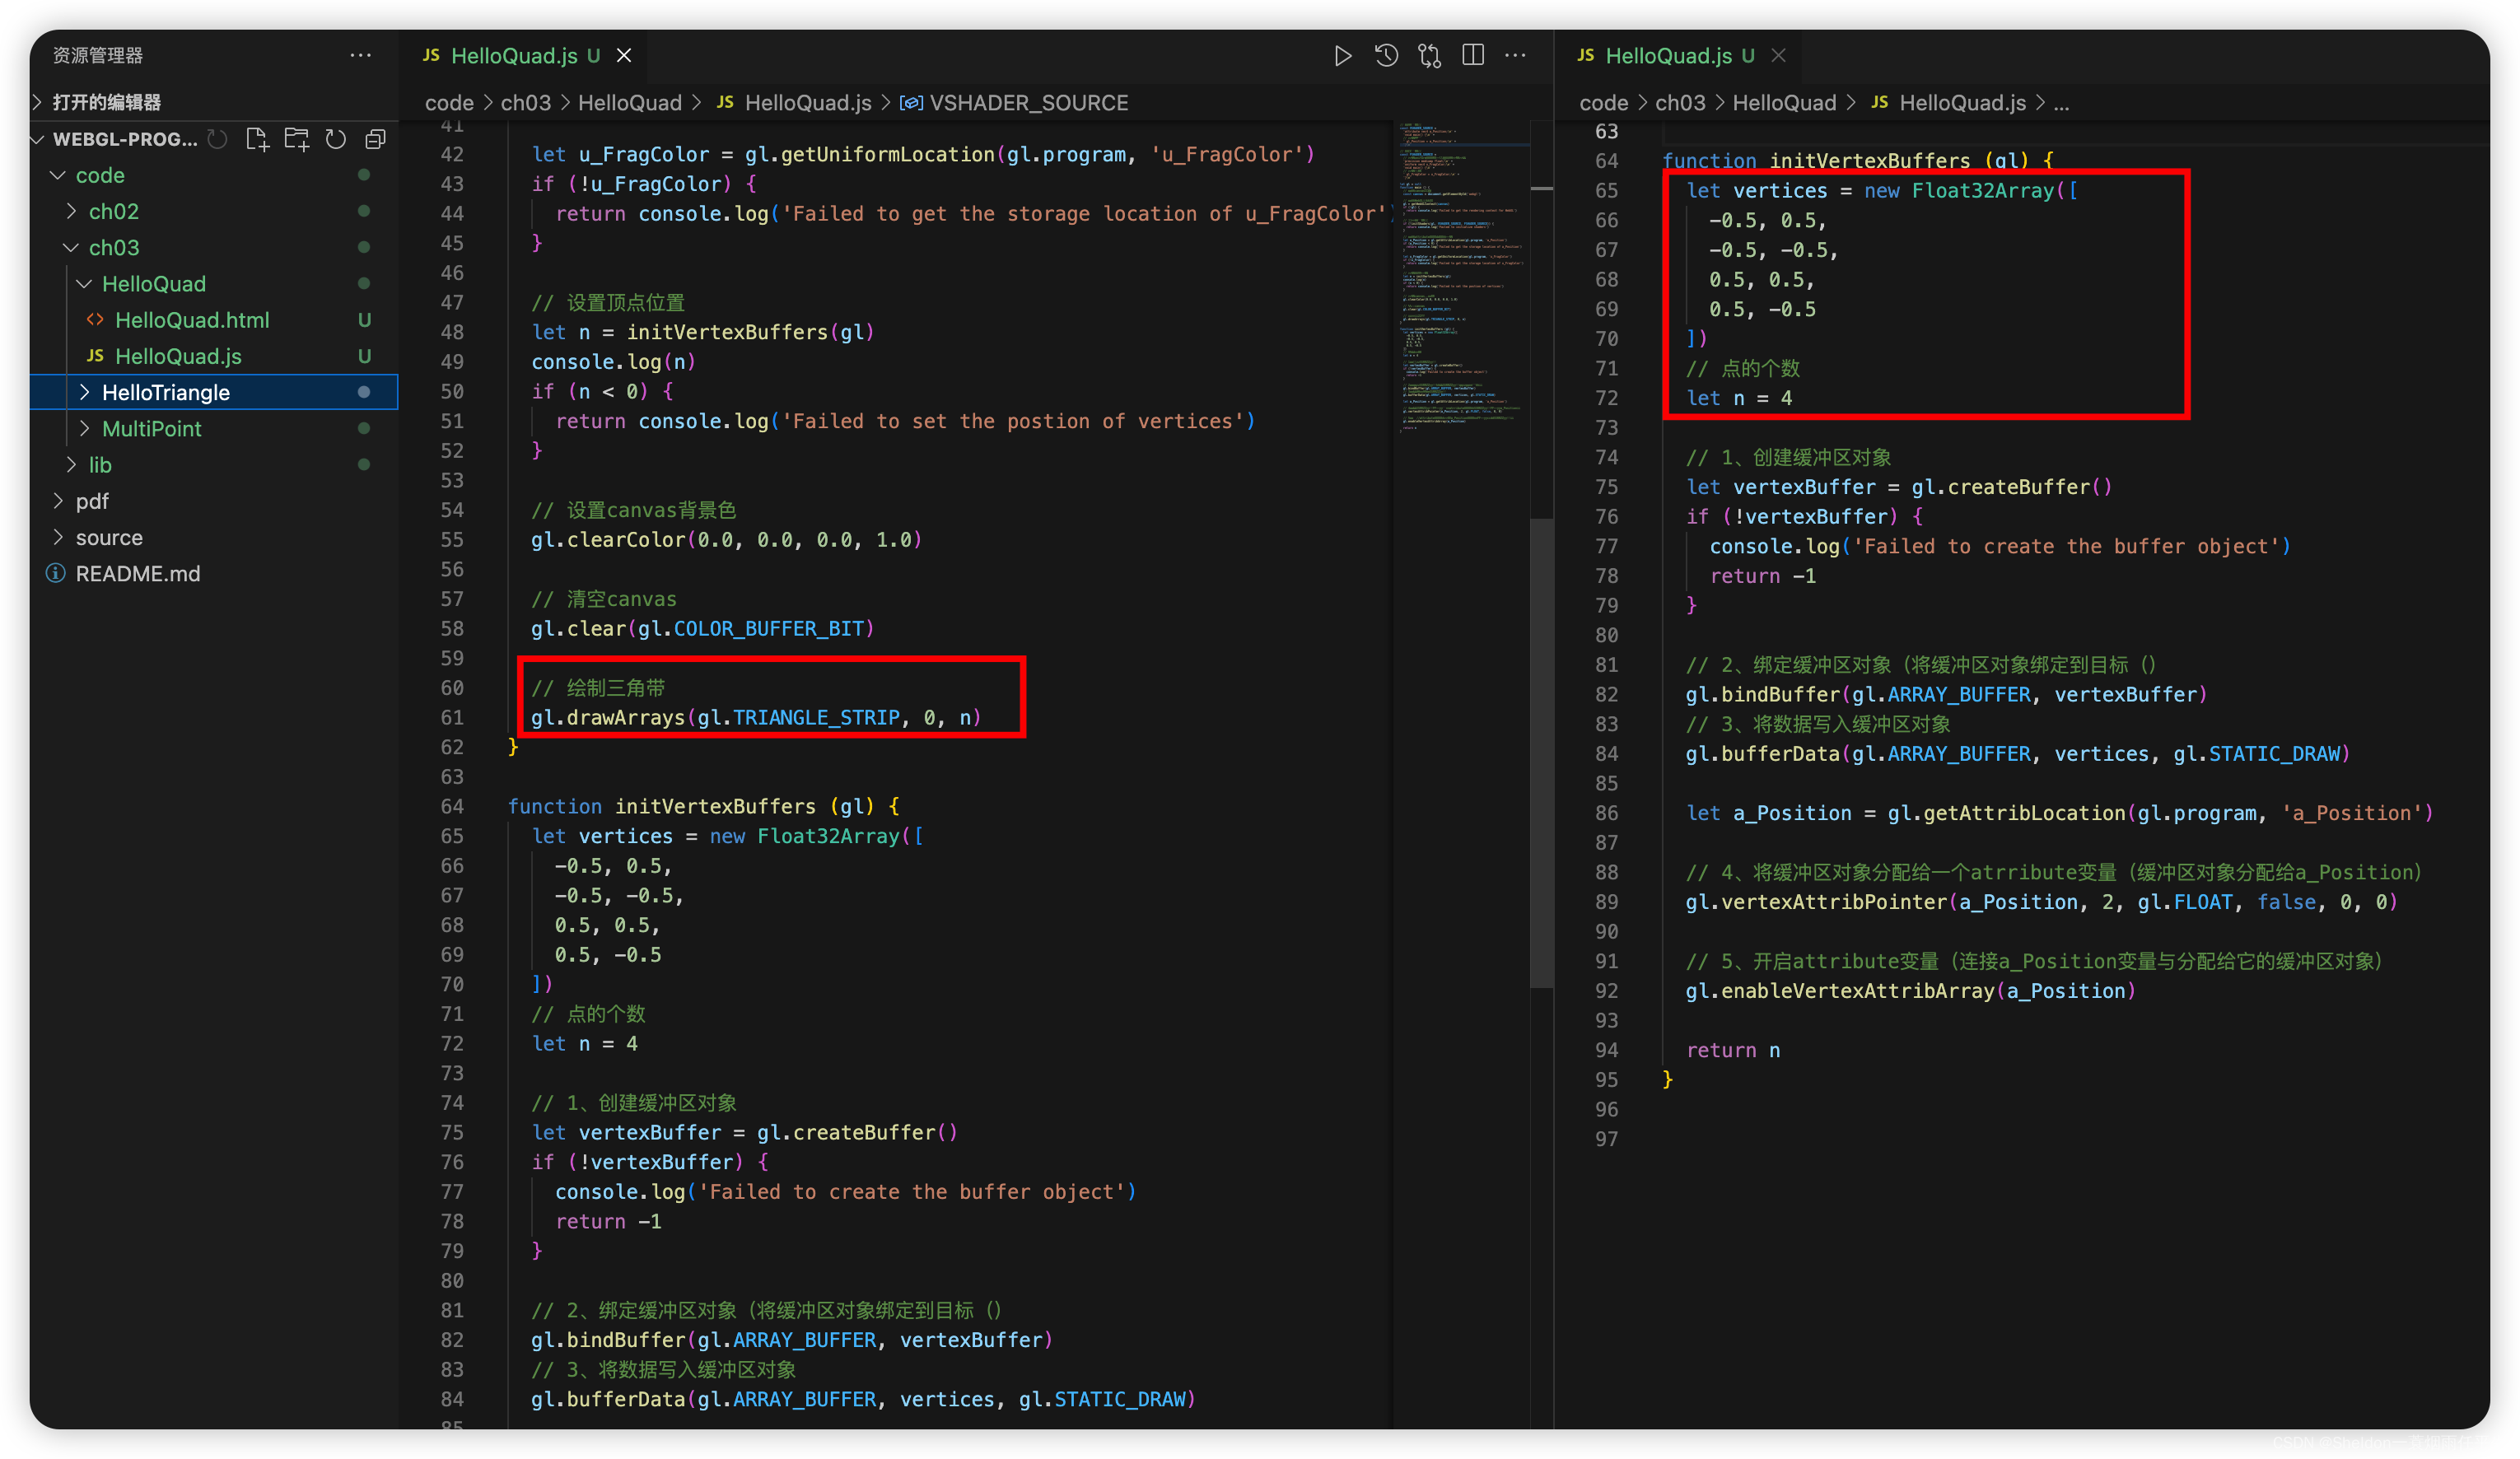
// 顶点着色器
const VSHADER_SOURCE =
  'attribute vec4 a_Position;\n' +
  'void main() {\n' +
  // 设置坐标
  ' gl_Position = a_Position;\n' +
  '}\n'

// 片元着色器
const FSHADER_SOURCE =
  // 设置uniform变量之前,需要先设置精度
  'precision mediump float;\n' +
  'uniform vec4 u_FragColor;\n' +
  'void main() {\n' +
  // 设置颜色
  ' gl_FragColor = u_FragColor;\n' +
  '}\n'

let gl = null
function main () {
  // 获取canvas元素
  const canvas = document.getElementById('webgl')

  // 获取WebGL上下文
  gl = getWebGLContext(canvas)
  if (!gl) {
    return console.log('Failed to get the rendering context for WebGL')
  }

  // 初始化着色器
  if (!initShaders(gl, VSHADER_SOURCE, FSHADER_SOURCE)) {
    return console.log('Failed to initialize shaders')
  }

  // 获取attribute变量的存储位置
  let a_Position = gl.getAttribLocation(gl.program, 'a_Position')
  if (a_Position < 0) {
    return console.log('Failed to get the storage location of a_Position')
  }

  let u_FragColor = gl.getUniformLocation(gl.program, 'u_FragColor')
  if (!u_FragColor) {
    return console.log('Failed to get the storage location of u_FragColor')
  }

  // 设置顶点位置
  let n = initVertexBuffers(gl)
  console.log(n)
  if (n < 0) {
    return console.log('Failed to set the postion of vertices')
  }

  // 设置canvas背景色
  gl.clearColor(0.0, 0.0, 0.0, 1.0)

  // 清空canvas
  gl.clear(gl.COLOR_BUFFER_BIT)

  // 绘制三角带
  gl.drawArrays(gl.TRIANGLE_STRIP, 0, n)
}

function initVertexBuffers (gl) {
  let vertices = new Float32Array([
    -0.5, 0.5,
    -0.5, -0.5,
    0.5, 0.5,
    0.5, -0.5
  ])
  // 点的个数
  let n = 4

  // 1、创建缓冲区对象
  let vertexBuffer = gl.createBuffer()
  if (!vertexBuffer) {
    console.log('Failed to create the buffer object')
    return -1
  }

  // 2、绑定缓冲区对象(将缓冲区对象绑定到目标()
  gl.bindBuffer(gl.ARRAY_BUFFER, vertexBuffer)
  // 3、将数据写入缓冲区对象
  gl.bufferData(gl.ARRAY_BUFFER, vertices, gl.STATIC_DRAW)

  let a_Position = gl.getAttribLocation(gl.program, 'a_Position')

  // 4、将缓冲区对象分配给一个atrribute变量(缓冲区对象分配给a_Position)
  gl.vertexAttribPointer(a_Position, 2, gl.FLOAT, false, 0, 0)

  // 5、开启attribute变量(连接a_Position变量与分配给它的缓冲区对象)
  gl.enableVertexAttribArray(a_Position)

  return n
}
(2)当然你也可以使用其他WebGL基础图形进行矩形的绘制,比如使用三角形——gl.TRIANGLES绘制矩形,但是这样就需要6个点位。

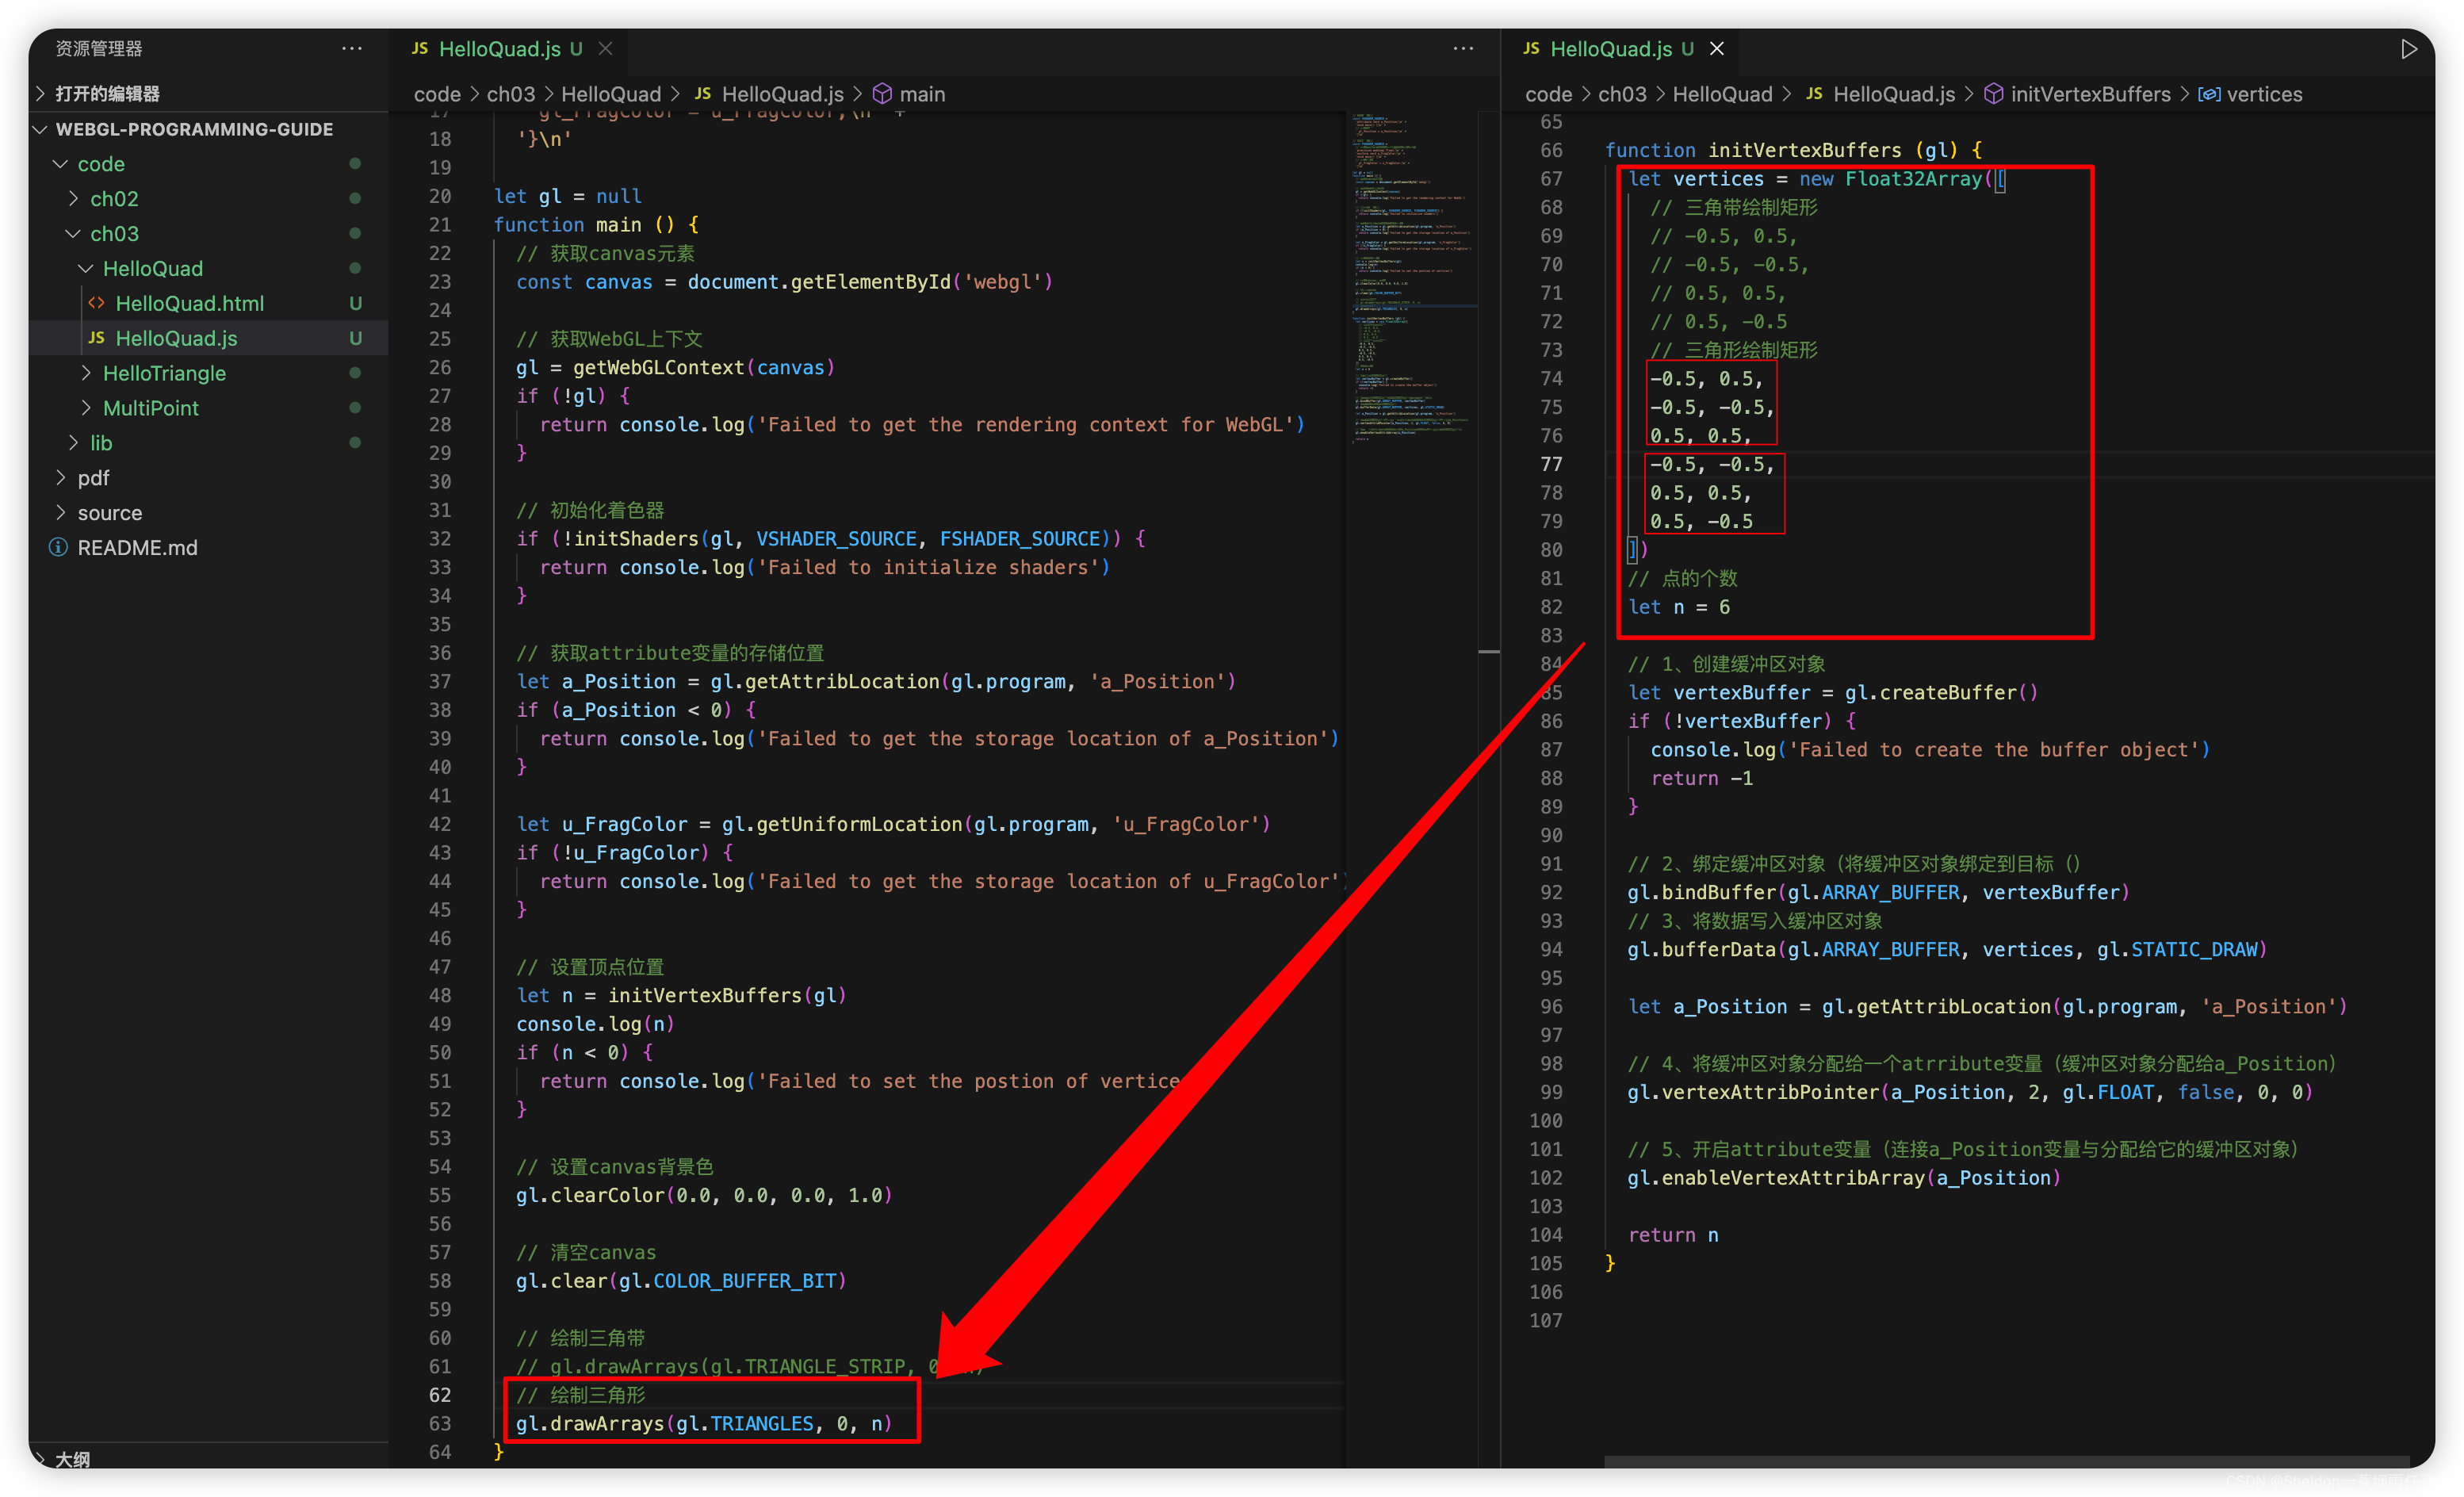
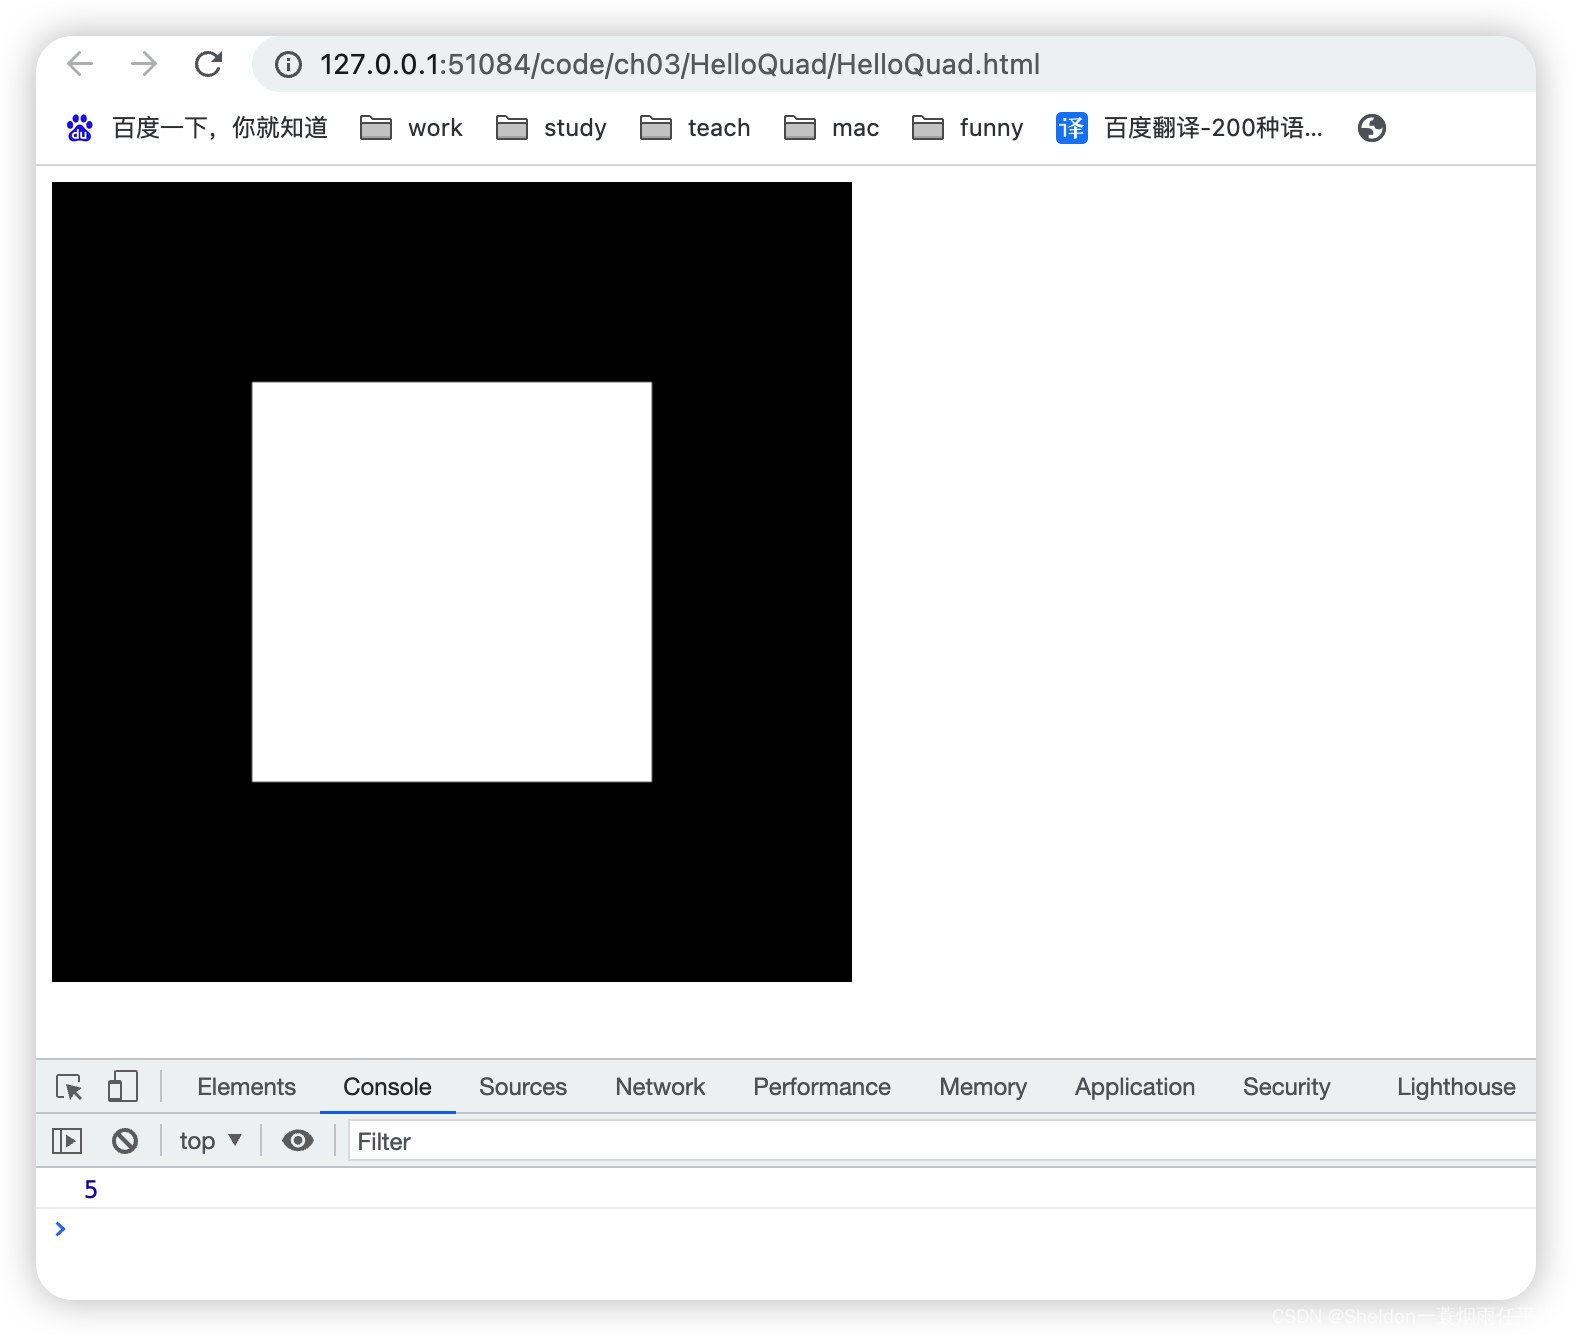
(3)三角扇——gl.TRIANGLE_FAN,就需要至少5个点位进行绘制。
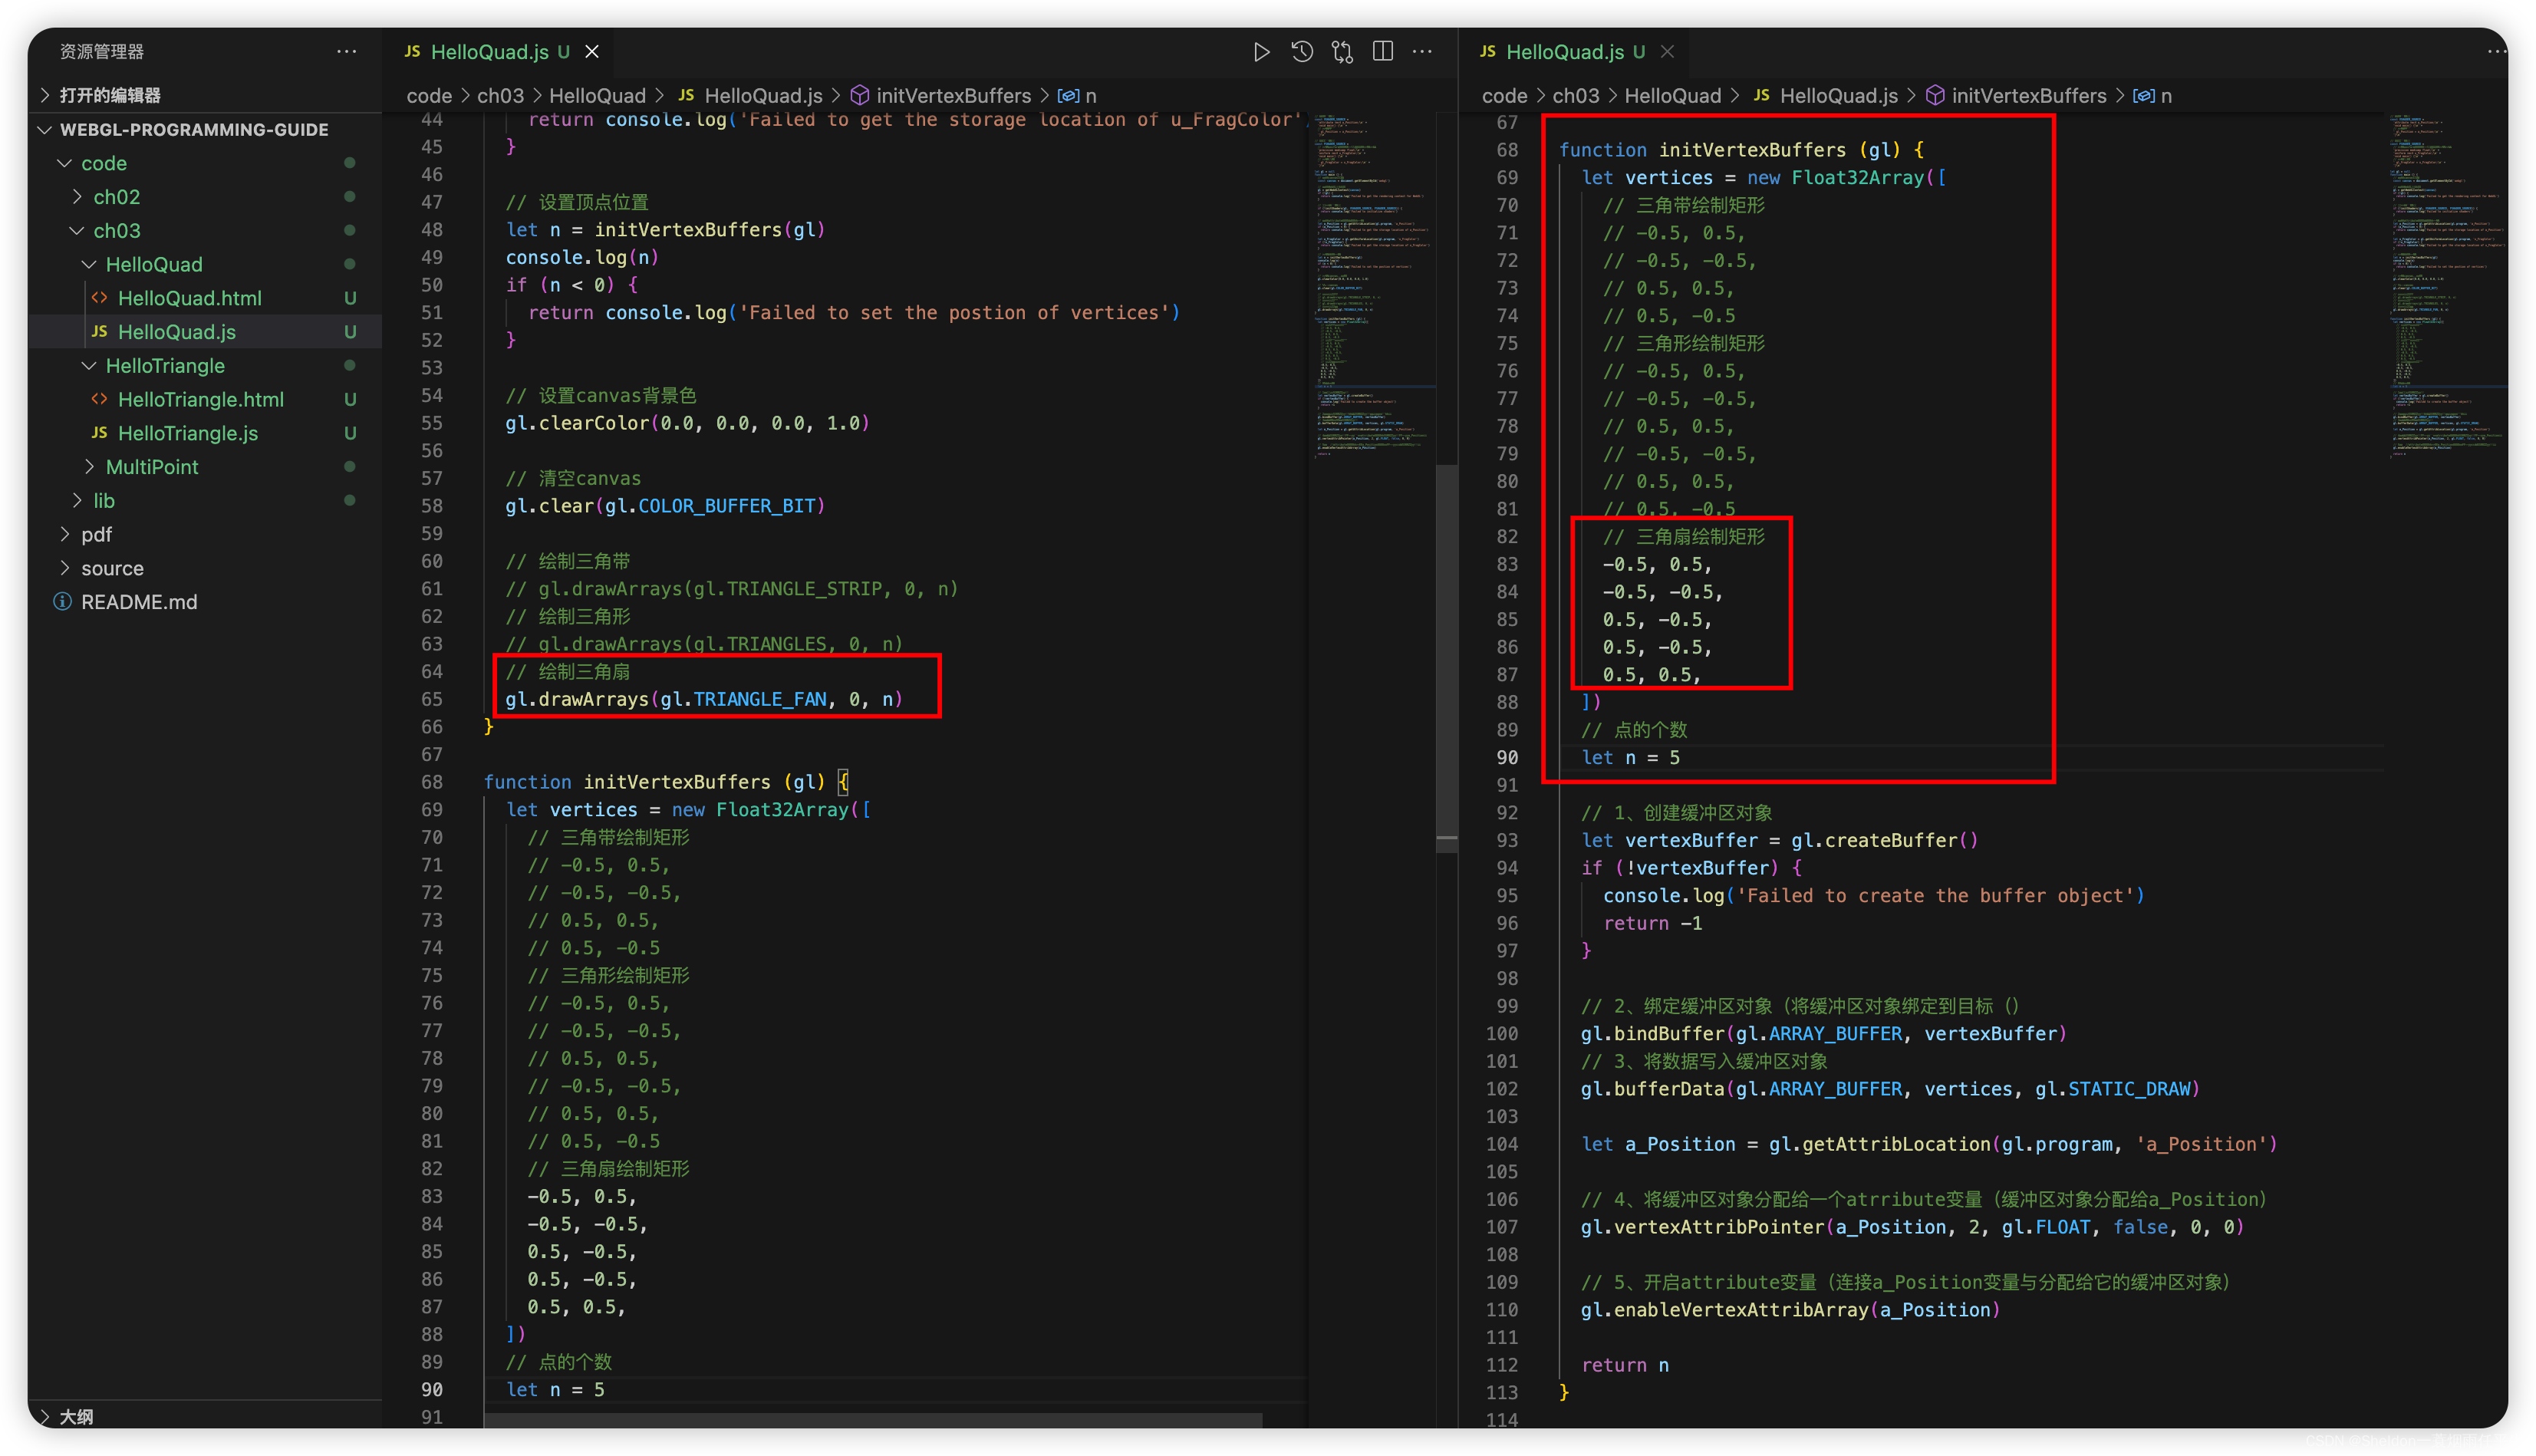
3.2.3.2 绘制多边形/圆形
原本按照官方的例子,我们接下来应该要绘制一个飘带。

但是我觉得过于简单,对于同学们无法起到一个有效练习的程度。所以不如做点有意思的,比如多边形的动态绘制。
经过之前的学习,我们已经掌握了WebGL的7种基本图形绘制方式:
(1)gl.POINTS用于绘制点(可以是单个,也可以是多个);
(2)gl.LINES、gl.LINE_STRIP、gl.LINE_LOOP用于绘制线;
(3)gl.TRIANGLES、gl.TRIANGLE_STRIP、gl.TRIANGLE_FAN用于绘制面。
如果要绘制多边形,通过简单的了解和思考,我们可以想到,gl.TRIANGLES只适合绘制多个分开的单个三角形,gl.TRIANGLE_STRIP适合绘制菱形、梯形等图形,而gl.TRIANGLE_FAN则适合绘制多边形(扇形或者其他具有共同中心点的多个三角形组成的图形)。因此本小节使用gl.TRIANGLE_FAN进行编程。
3.2.3.2.1 设计思路
(1)动态设置多边形边数,如果没有设置,默认100;
(2)将360度(在数学上表示为2𝜋,代码中表示为 2 * Math.PI)按照边数等比分割;
(3)使用边数循环,获取每个顶点的度数、cos值(对应x)和sin值(对应y);
(4)将 (0,0) 点做为扇形中心点,多边形的第一个点 (1,0) 做为闭环点(就是最后一个点);
(5)使用(3)(4)两步获取到的点结合 gl.drawArrays(gl.TRIANGLE_FAN, 0, n) 绘制多边形。
因为本节(3.2.3)主要是讲解WebGL基本图形的拓展,所以对css没有做过多的美化,精益求精的同学,可以进行优化,比如:
(1)将工具栏部分设置为fixed,固定在浏览器或者canvas的右上角;
(2)将input和button转换为slider,每次滑动触发绘制;
(3)添加中心点坐标的设置;
(4)添加半径的设置;
…
3.2.3.2.2 绘制效果和代码
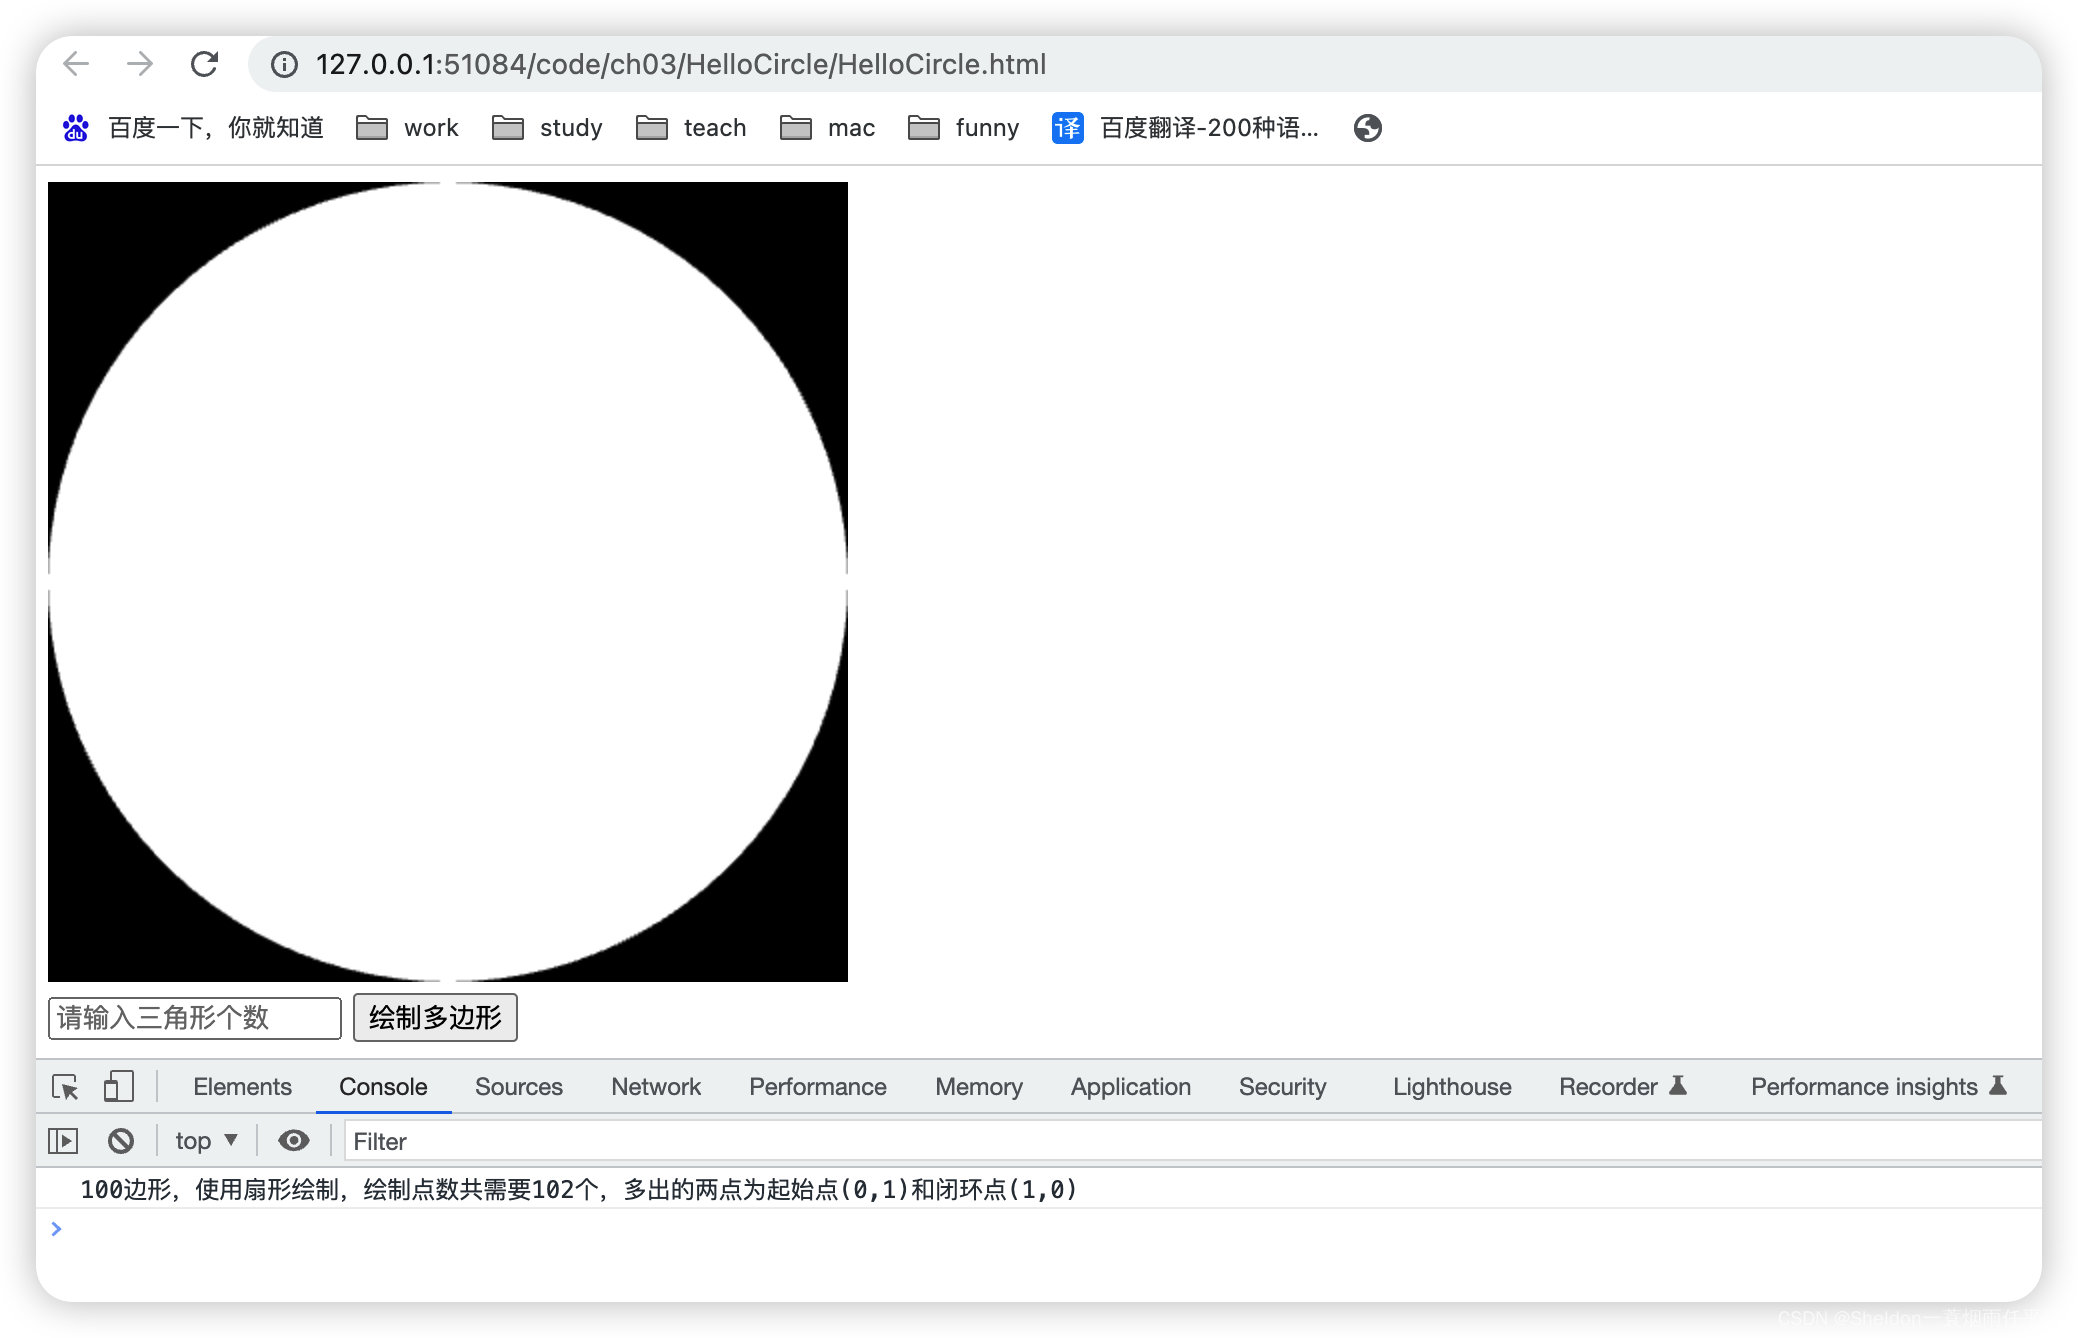
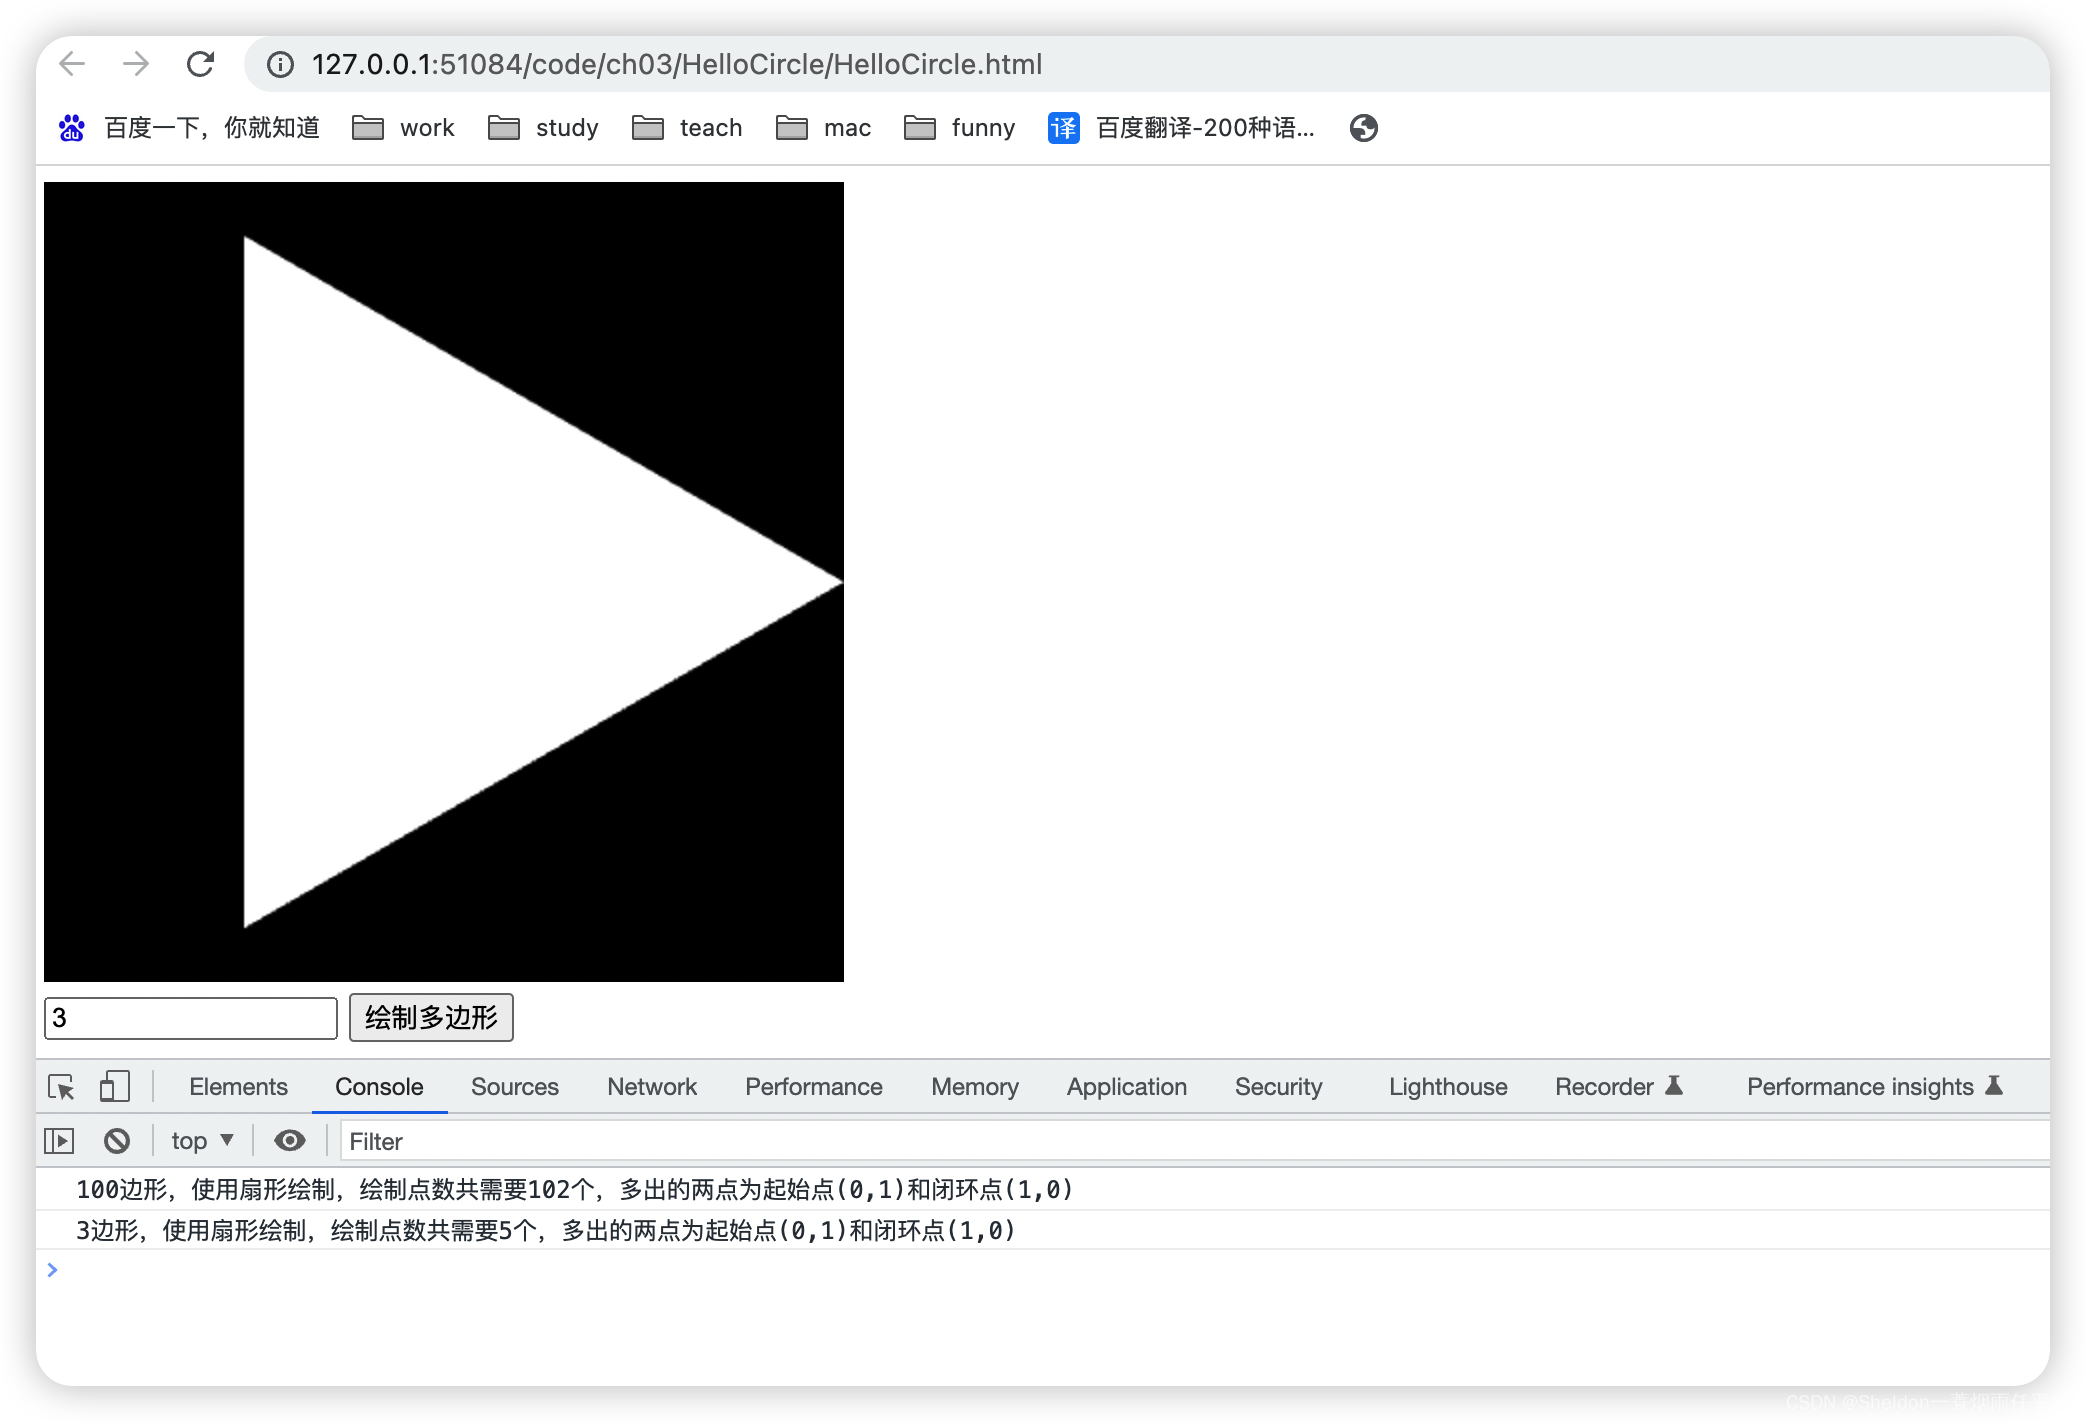
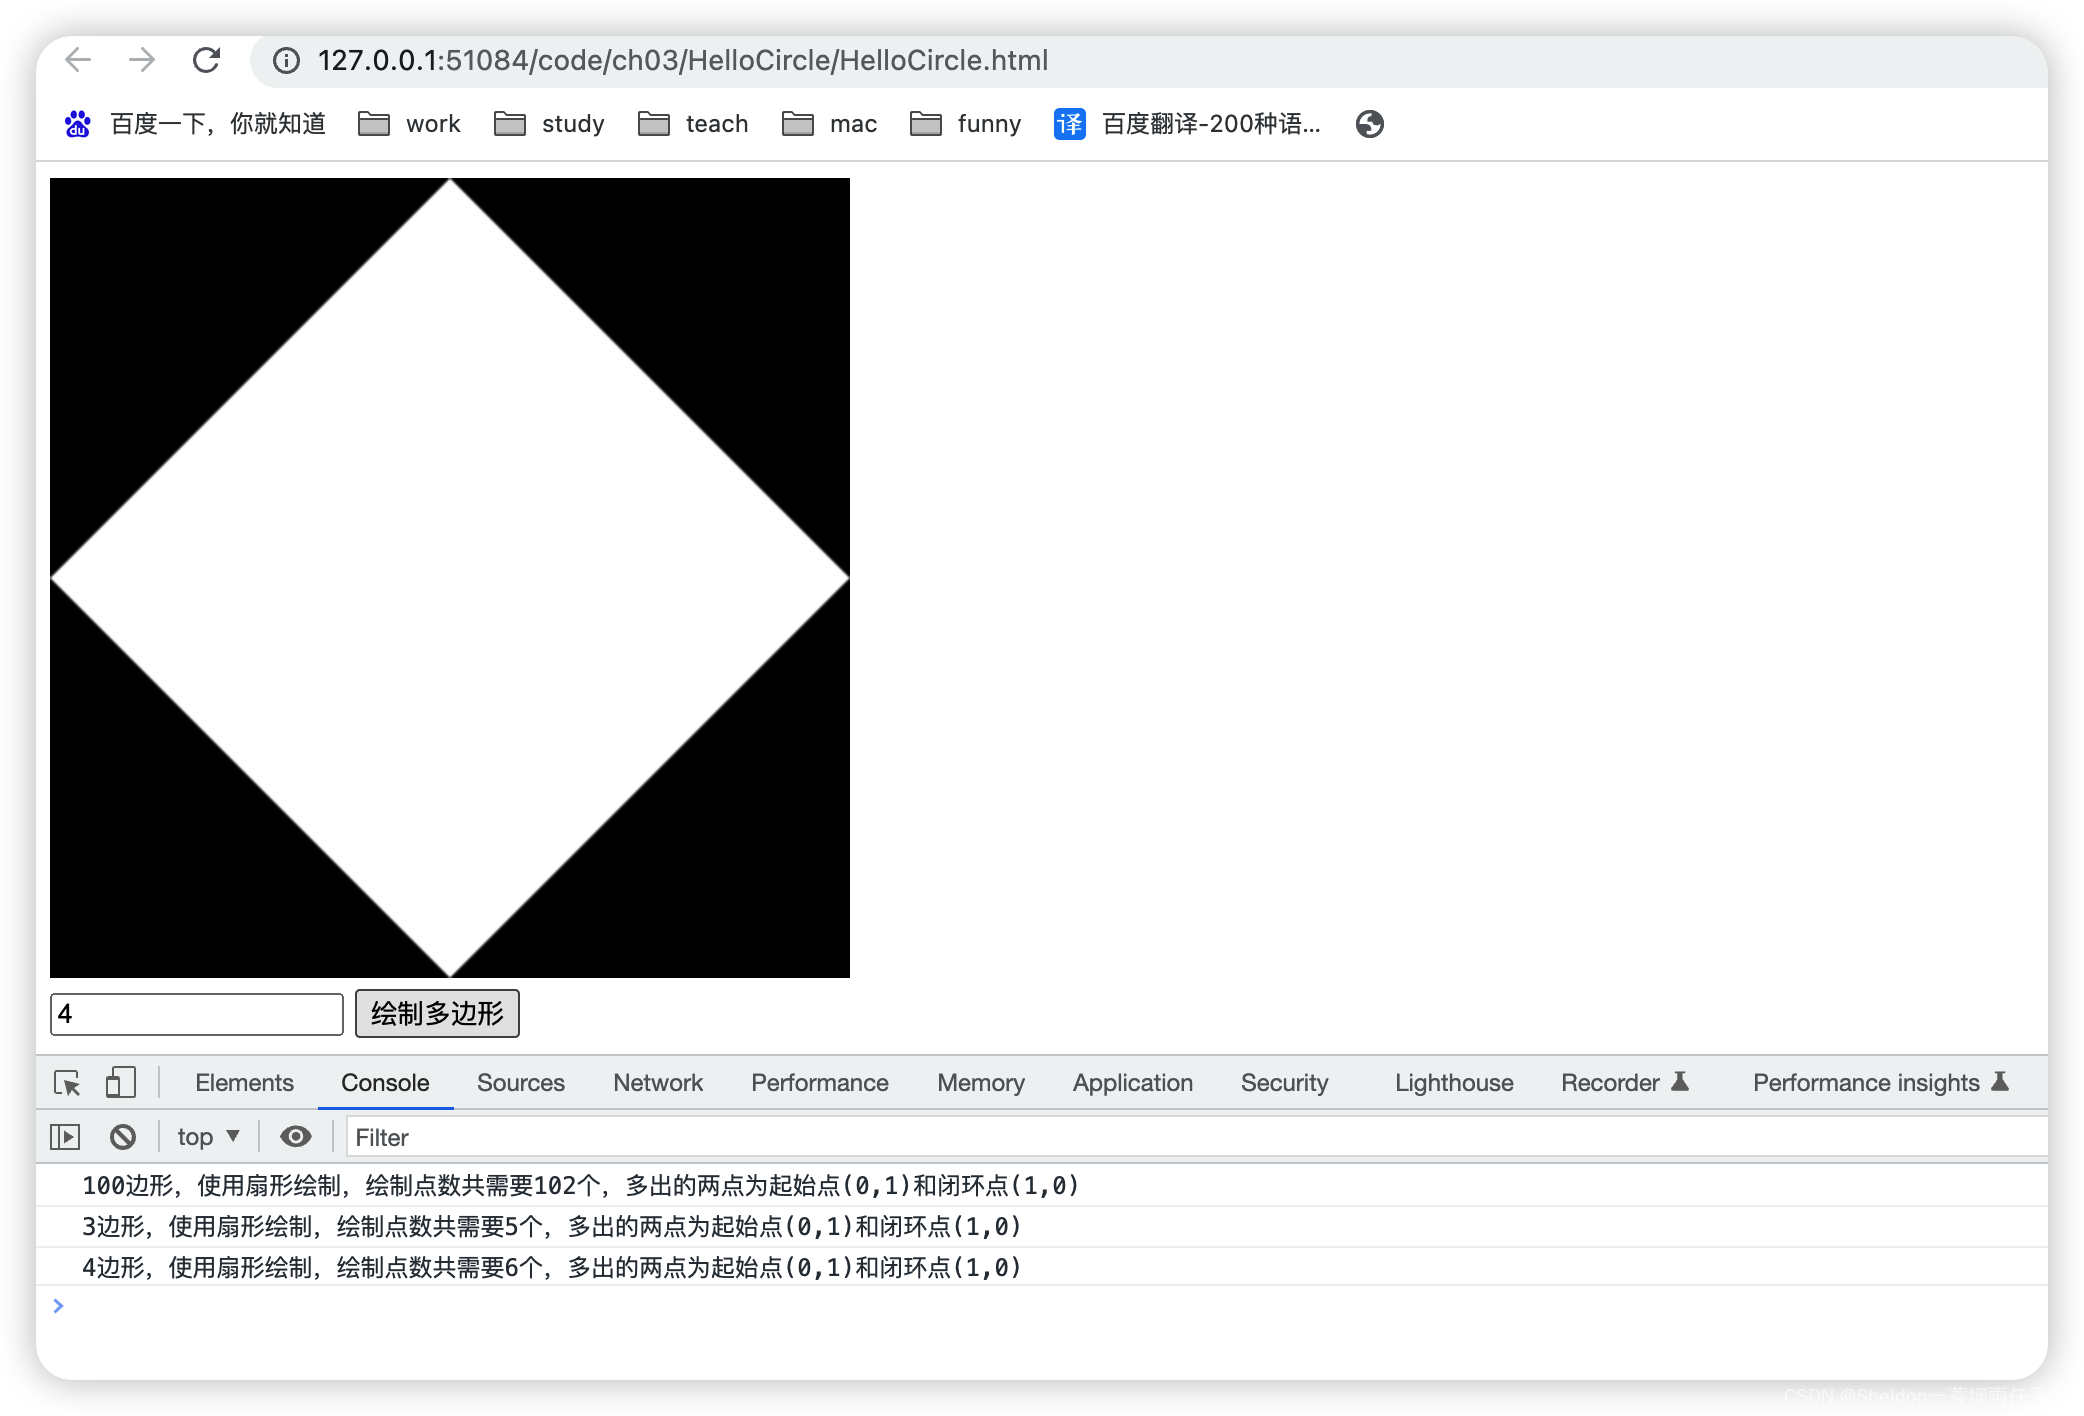
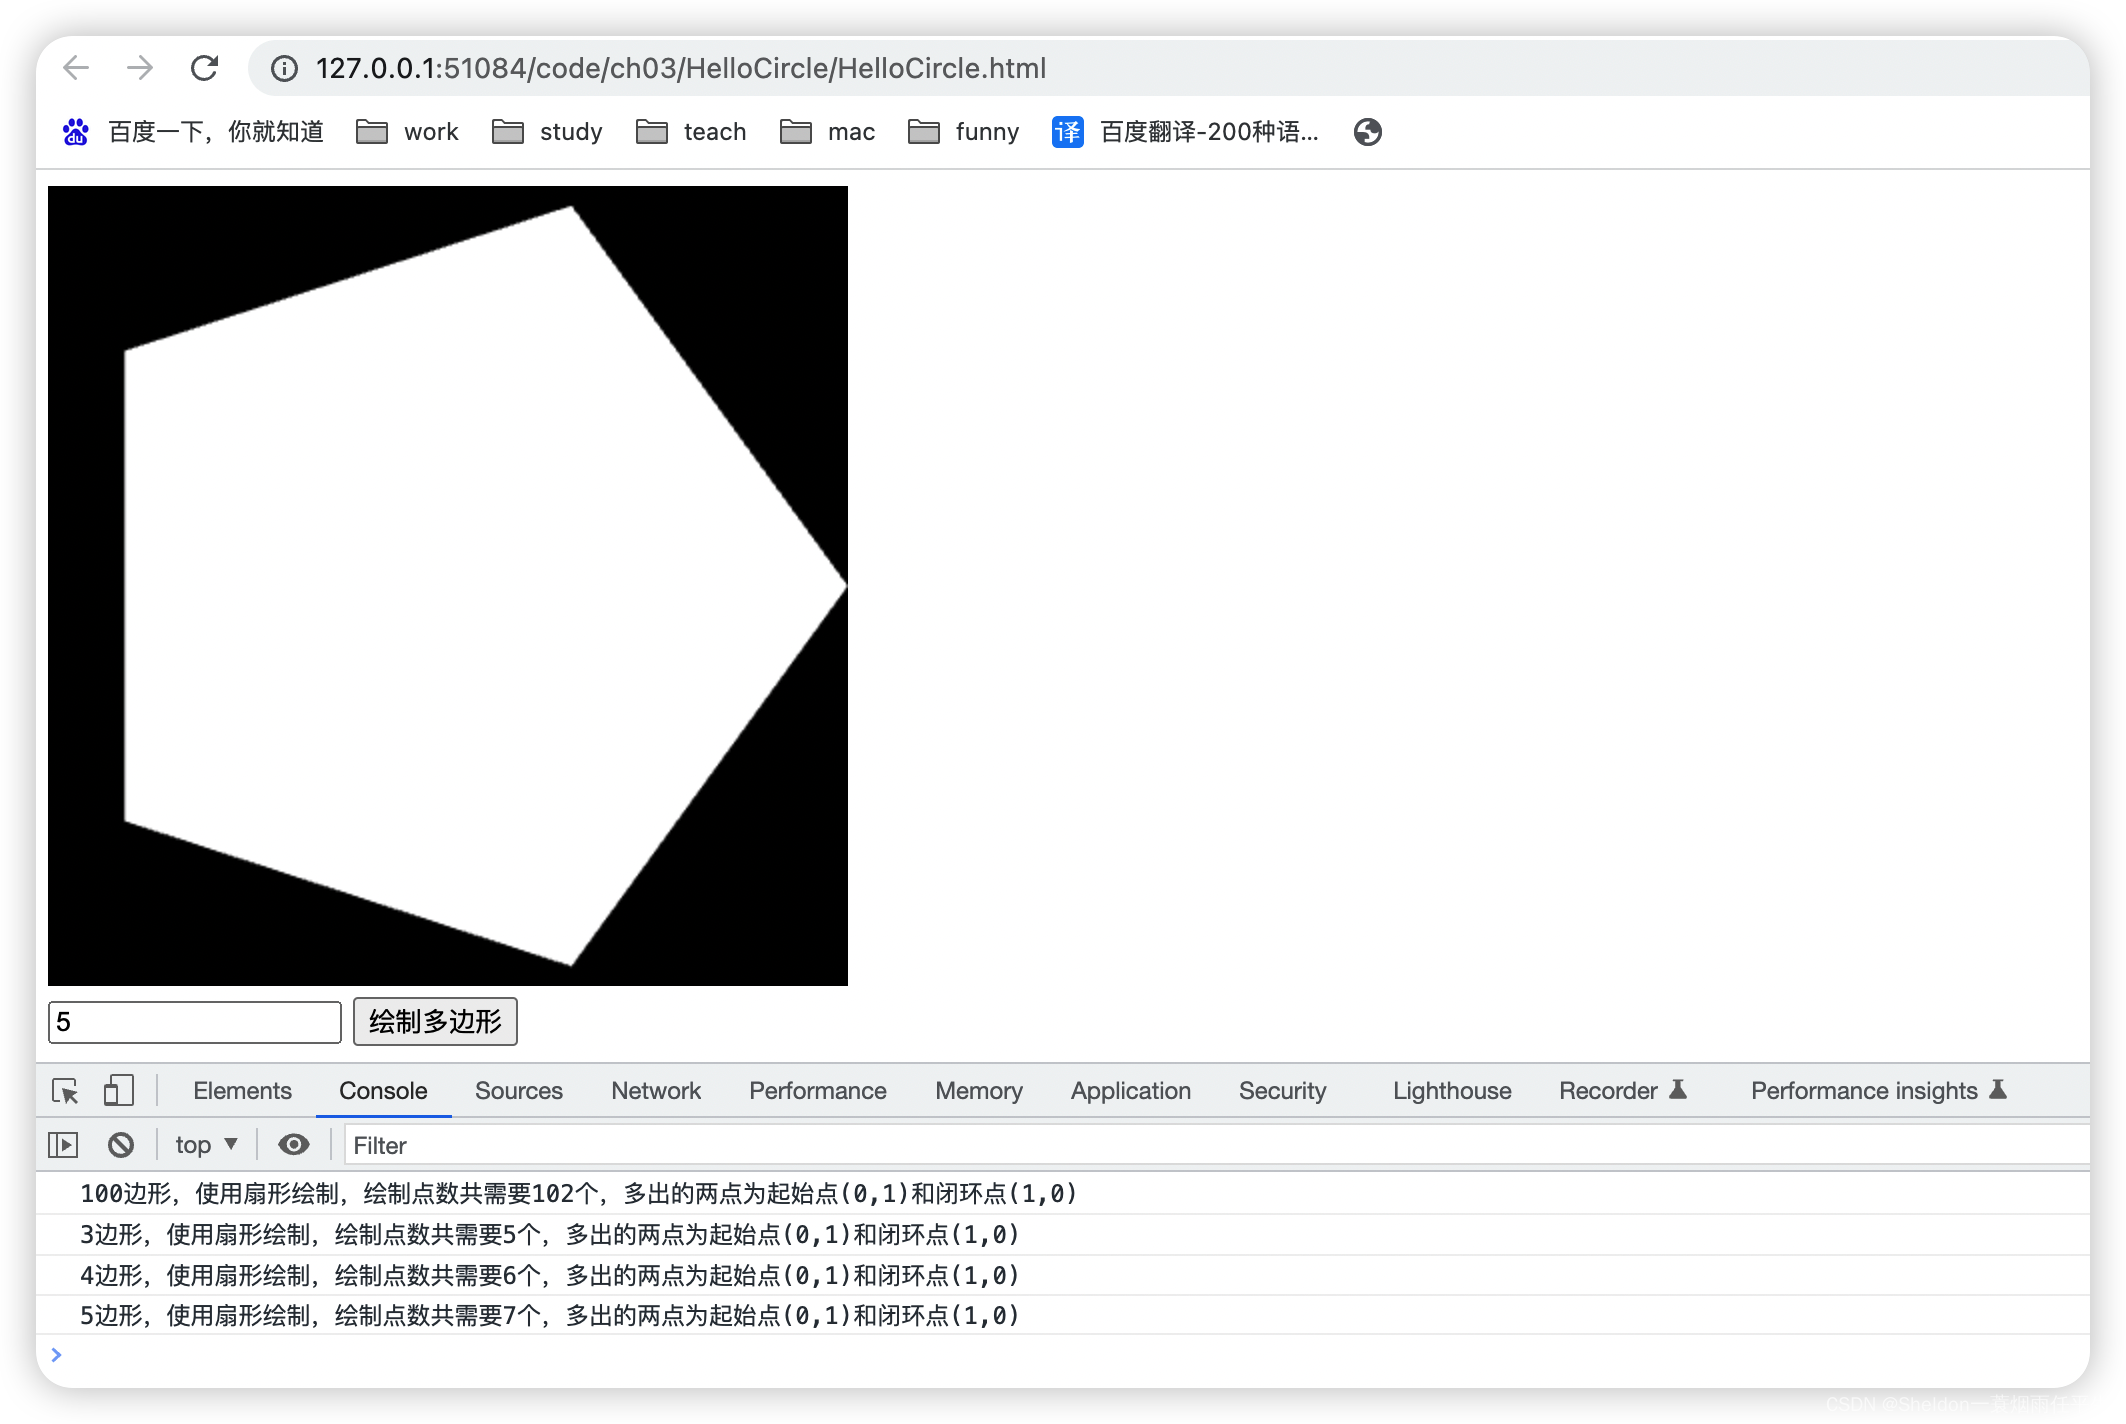
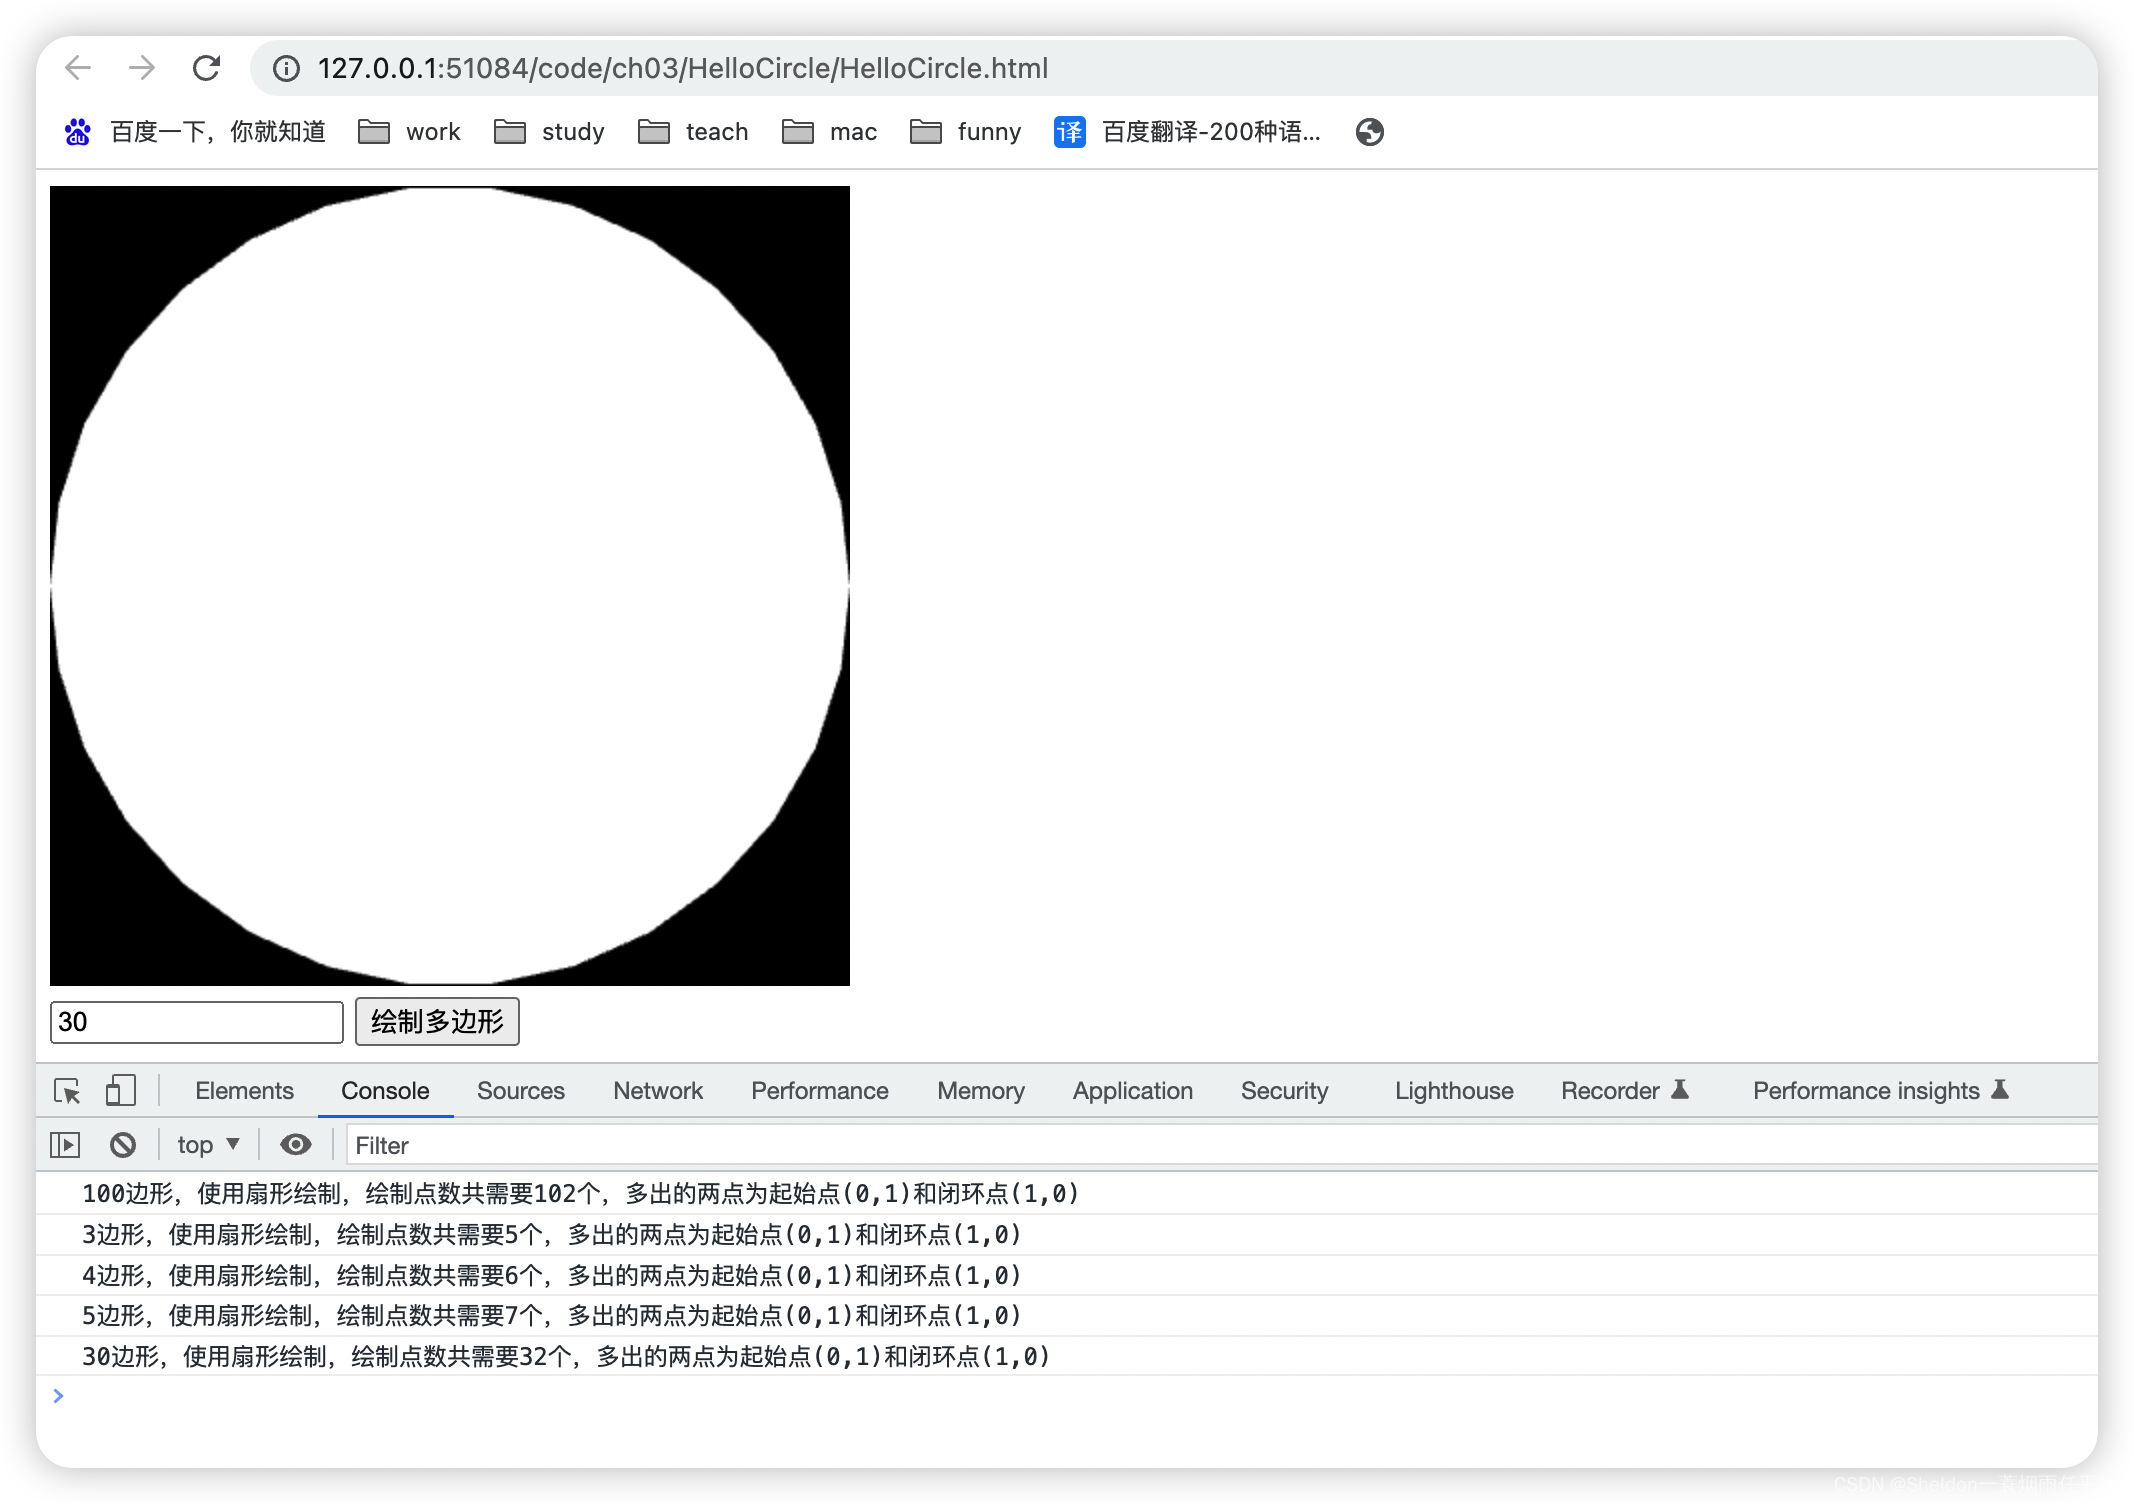
可以看到,随着边数的增加,多边形之间的锯齿感越来越小,当数量达到一定程度时,人眼就很难发现,从而无限趋近于圆形。
HelloCircle/HelloCircle.html:
<html lang="en">

<head>
  <meta charset="UTF-8">
  <meta http-equiv="X-UA-Compatible" content="IE=edge">
  <meta name="viewport" content="width=device-width, initial-scale=1.0">
  <title>Document</title>
</head>

<body οnlοad="main()">
  <canvas id="webgl" width="400" height="400">
    Please use a browser that supports 'canvas'
  </canvas>
  <div class="tools-con">
    <input id="num" type="number" placeholder="请输入三角形个数">
    <button id="draw-btn">绘制多边形</button>
  </div>
  <script src="../../lib/webgl-utils.js"></script>
  <script src="../../lib/webgl-debug.js"></script>
  <script src="../../lib/cuon-utils.js"></script>
  <script src="./HelloCircle.js"></script>
</body>

</html>
HelloCircle/HelloCircle.js:
// 顶点着色器
const VSHADER_SOURCE =
  'attribute vec4 a_Position;\n' +
  'void main() {\n' +
  // 设置坐标
  ' gl_Position = a_Position;\n' +
  '}\n'

// 片元着色器
const FSHADER_SOURCE =
  // 设置uniform变量之前,需要先设置精度
  'precision mediump float;\n' +
  'uniform vec4 u_FragColor;\n' +
  'void main() {\n' +
  // 设置颜色
  ' gl_FragColor = u_FragColor;\n' +
  '}\n'

let gl = null
function main () {
  // 获取canvas元素
  const canvas = document.getElementById('webgl')

  // 获取WebGL上下文
  gl = getWebGLContext(canvas)
  if (!gl) {
    return console.log('Failed to get the rendering context for WebGL')
  }

  // 初始化着色器
  if (!initShaders(gl, VSHADER_SOURCE, FSHADER_SOURCE)) {
    return console.log('Failed to initialize shaders')
  }

  // 获取attribute变量的存储位置
  let a_Position = gl.getAttribLocation(gl.program, 'a_Position')
  if (a_Position < 0) {
    return console.log('Failed to get the storage location of a_Position')
  }

  let u_FragColor = gl.getUniformLocation(gl.program, 'u_FragColor')
  if (!u_FragColor) {
    return console.log('Failed to get the storage location of u_FragColor')
  }

  const drawBtn = document.getElementById('draw-btn')
  drawBtn.onclick = function () {
    draw()
  }
  draw()
}

function draw () {
  // 设置顶点位置
  let n = initVertexBuffers(gl)
  if (n < 0) {
    return console.log('Failed to set the postion of vertices')
  }

  // 设置canvas背景色
  gl.clearColor(0.0, 0.0, 0.0, 1.0)

  // 清空canvas
  gl.clear(gl.COLOR_BUFFER_BIT)

  // 绘制三角扇
  gl.drawArrays(gl.TRIANGLE_FAN, 0, n)
}

function initVertexBuffers (gl) {
  const num = Number(document.getElementById('num').value)
  // 中心点即为扇形
  const points = [0, 0]
  // 获取多边形边数,默认100边
  const length = num ? num : 100
  if (!length || length < 3) {
    return console.log('The number of edges of the original polygon should be bigger than three')
  }
  for (let i = 0; i < length; i++) {
    const angle = 2 * Math.PI / length * i
    const x = Math.cos(angle)
    const y = Math.sin(angle)
    points.push(x)
    points.push(y)
  }
  // 因为无论多边形边数多少,第一个边的点位一定是(1,0),因此最后一个点位也要是(1,0),这样才能形成一个闭环
  points.push(1)
  points.push(0)
  let vertices = new Float32Array(points)
  // 点的个数 = 多边形边数 + 中心点 + 闭环点
  let n = length + 2
  console.log(`${length}边形,使用扇形绘制,绘制点数共需要${n}个,多出的两点为起始点(0,1)和闭环点(1,0)`)

  // 1、创建缓冲区对象
  let vertexBuffer = gl.createBuffer()
  if (!vertexBuffer) {
    console.log('Failed to create the buffer object')
    return -1
  }

  // 2、绑定缓冲区对象(将缓冲区对象绑定到目标()
  gl.bindBuffer(gl.ARRAY_BUFFER, vertexBuffer)
  // 3、将数据写入缓冲区对象
  gl.bufferData(gl.ARRAY_BUFFER, vertices, gl.STATIC_DRAW)

  let a_Position = gl.getAttribLocation(gl.program, 'a_Position')

  // 4、将缓冲区对象分配给一个atrribute变量(缓冲区对象分配给a_Position)
  gl.vertexAttribPointer(a_Position, 2, gl.FLOAT, false, 0, 0)

  // 5、开启attribute变量(连接a_Position变量与分配给它的缓冲区对象)
  gl.enableVertexAttribArray(a_Position)

  return n
}
3.3 移动、旋转和缩放
变换:图形的移动、旋转和缩放,在WebGL中统称为变换(transformations)或仿射变换(affine transformations)。
3.3.1 移动(平移)
移动前:
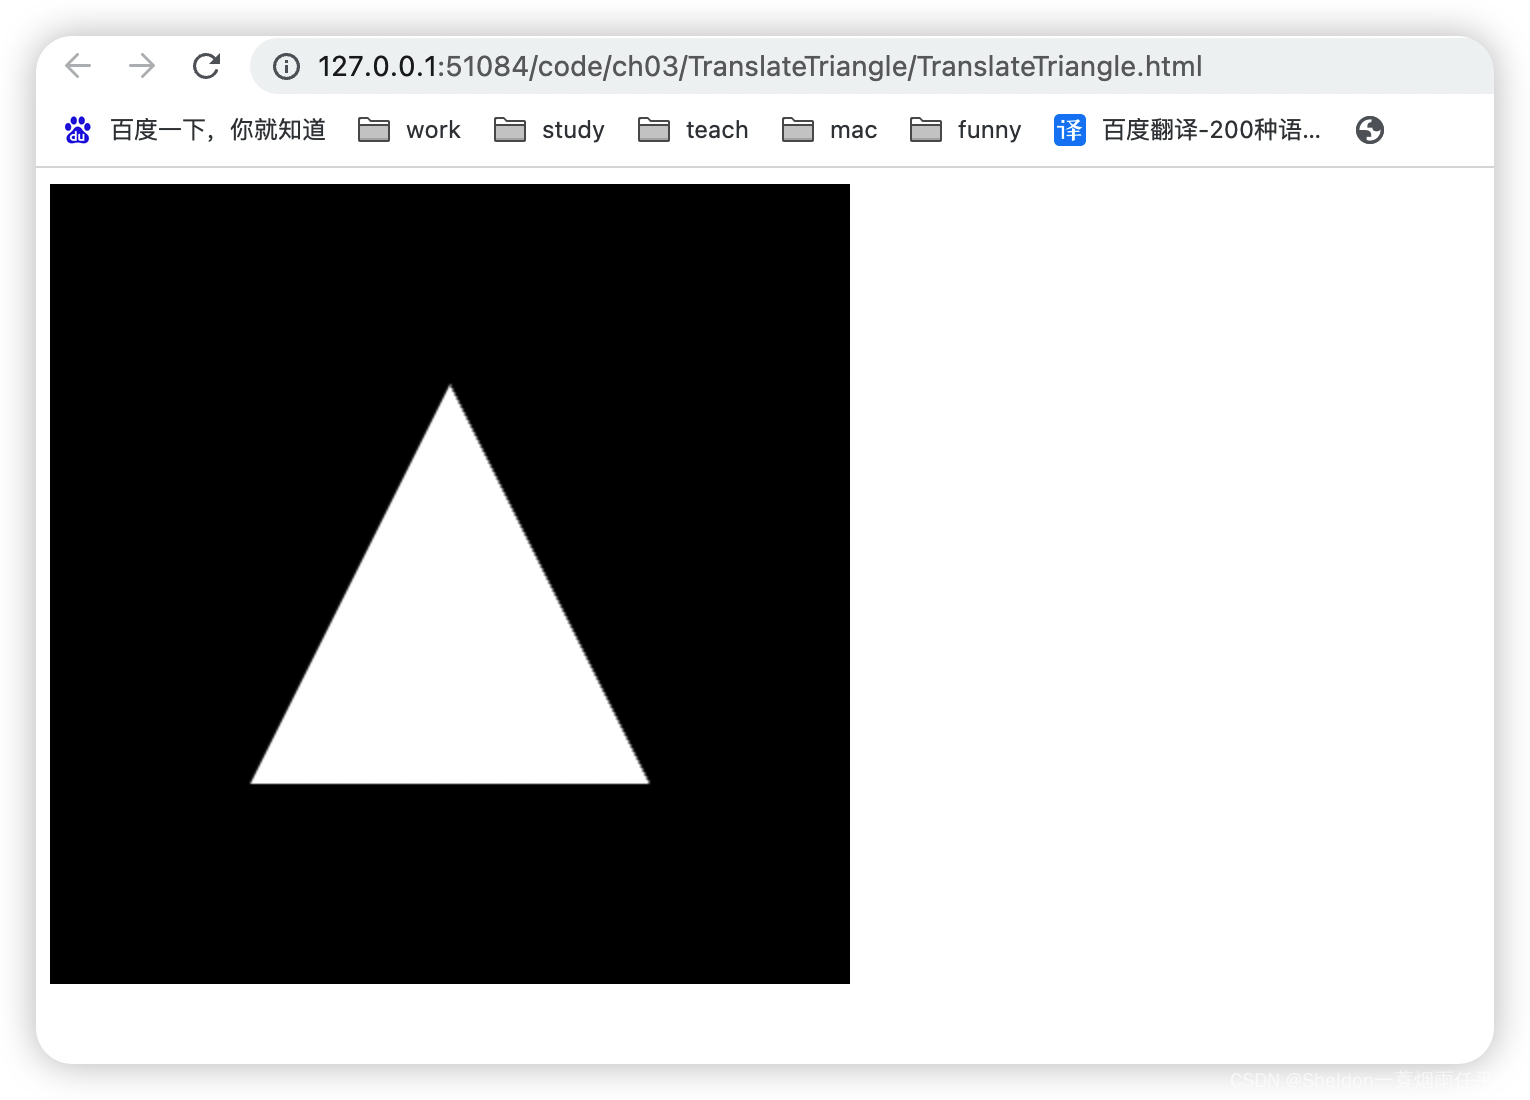
移动后:
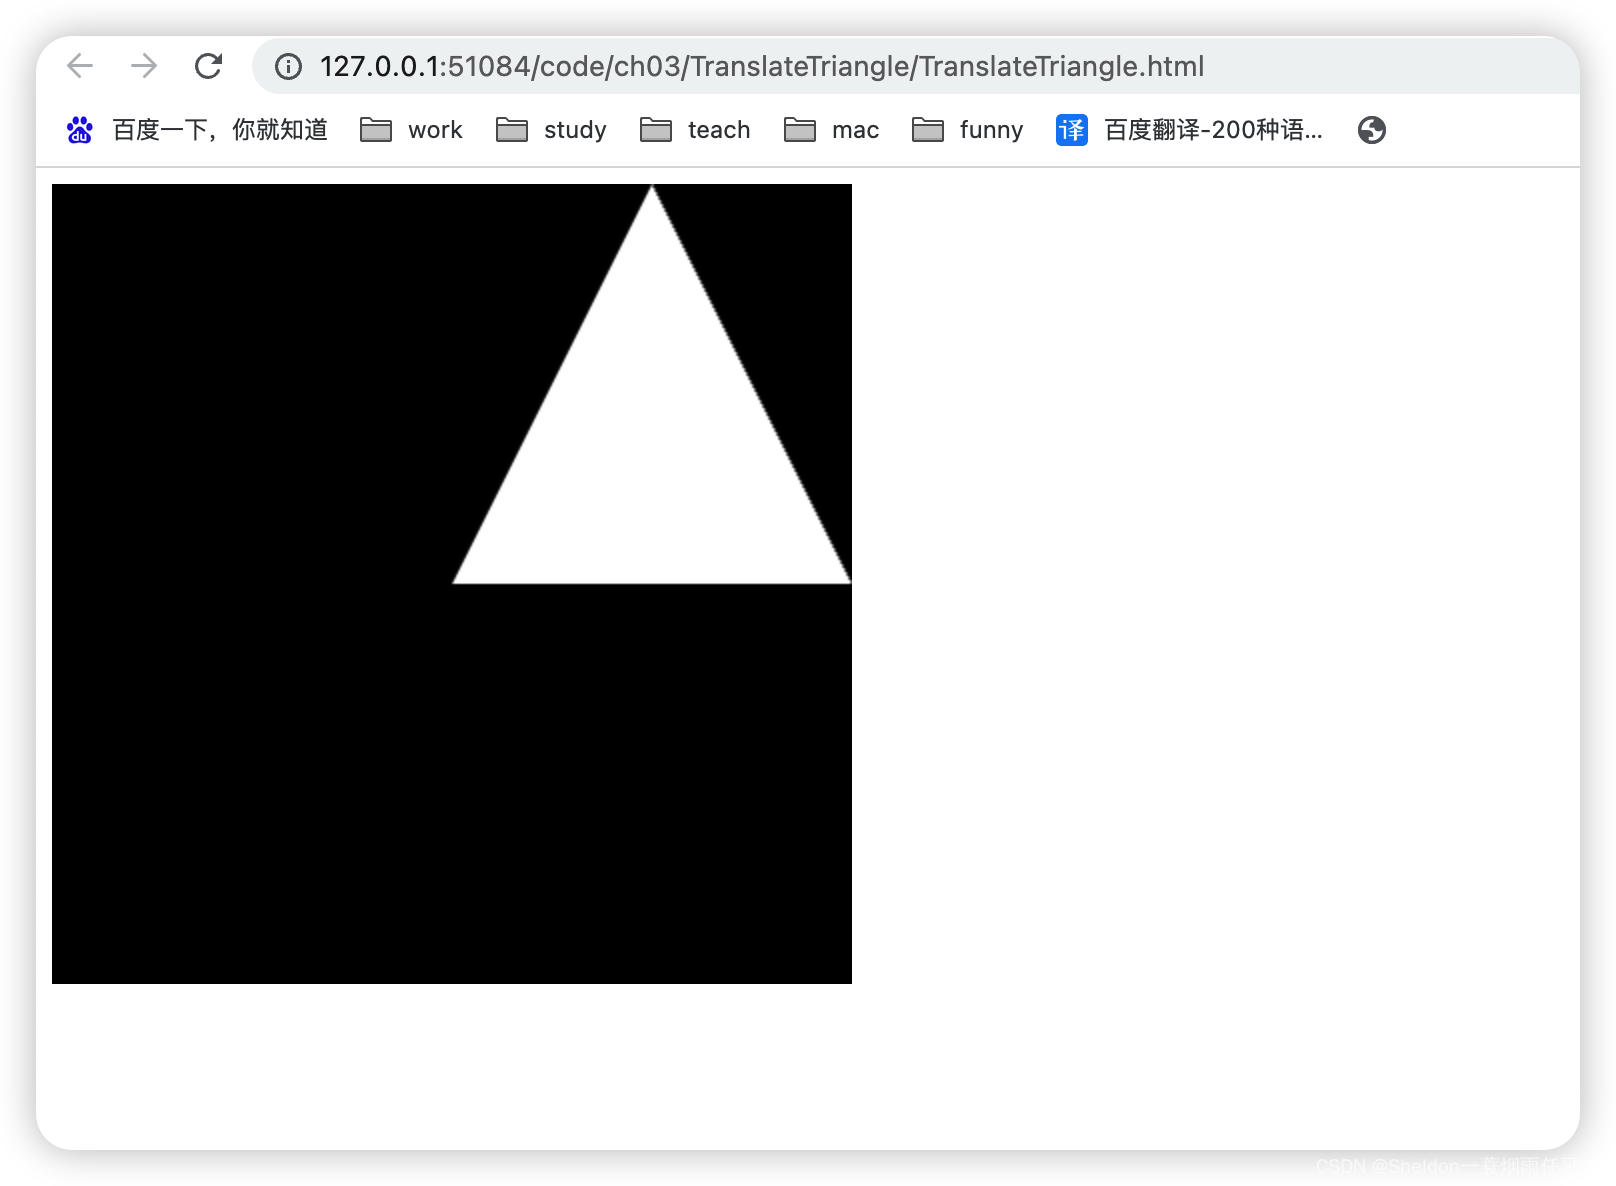
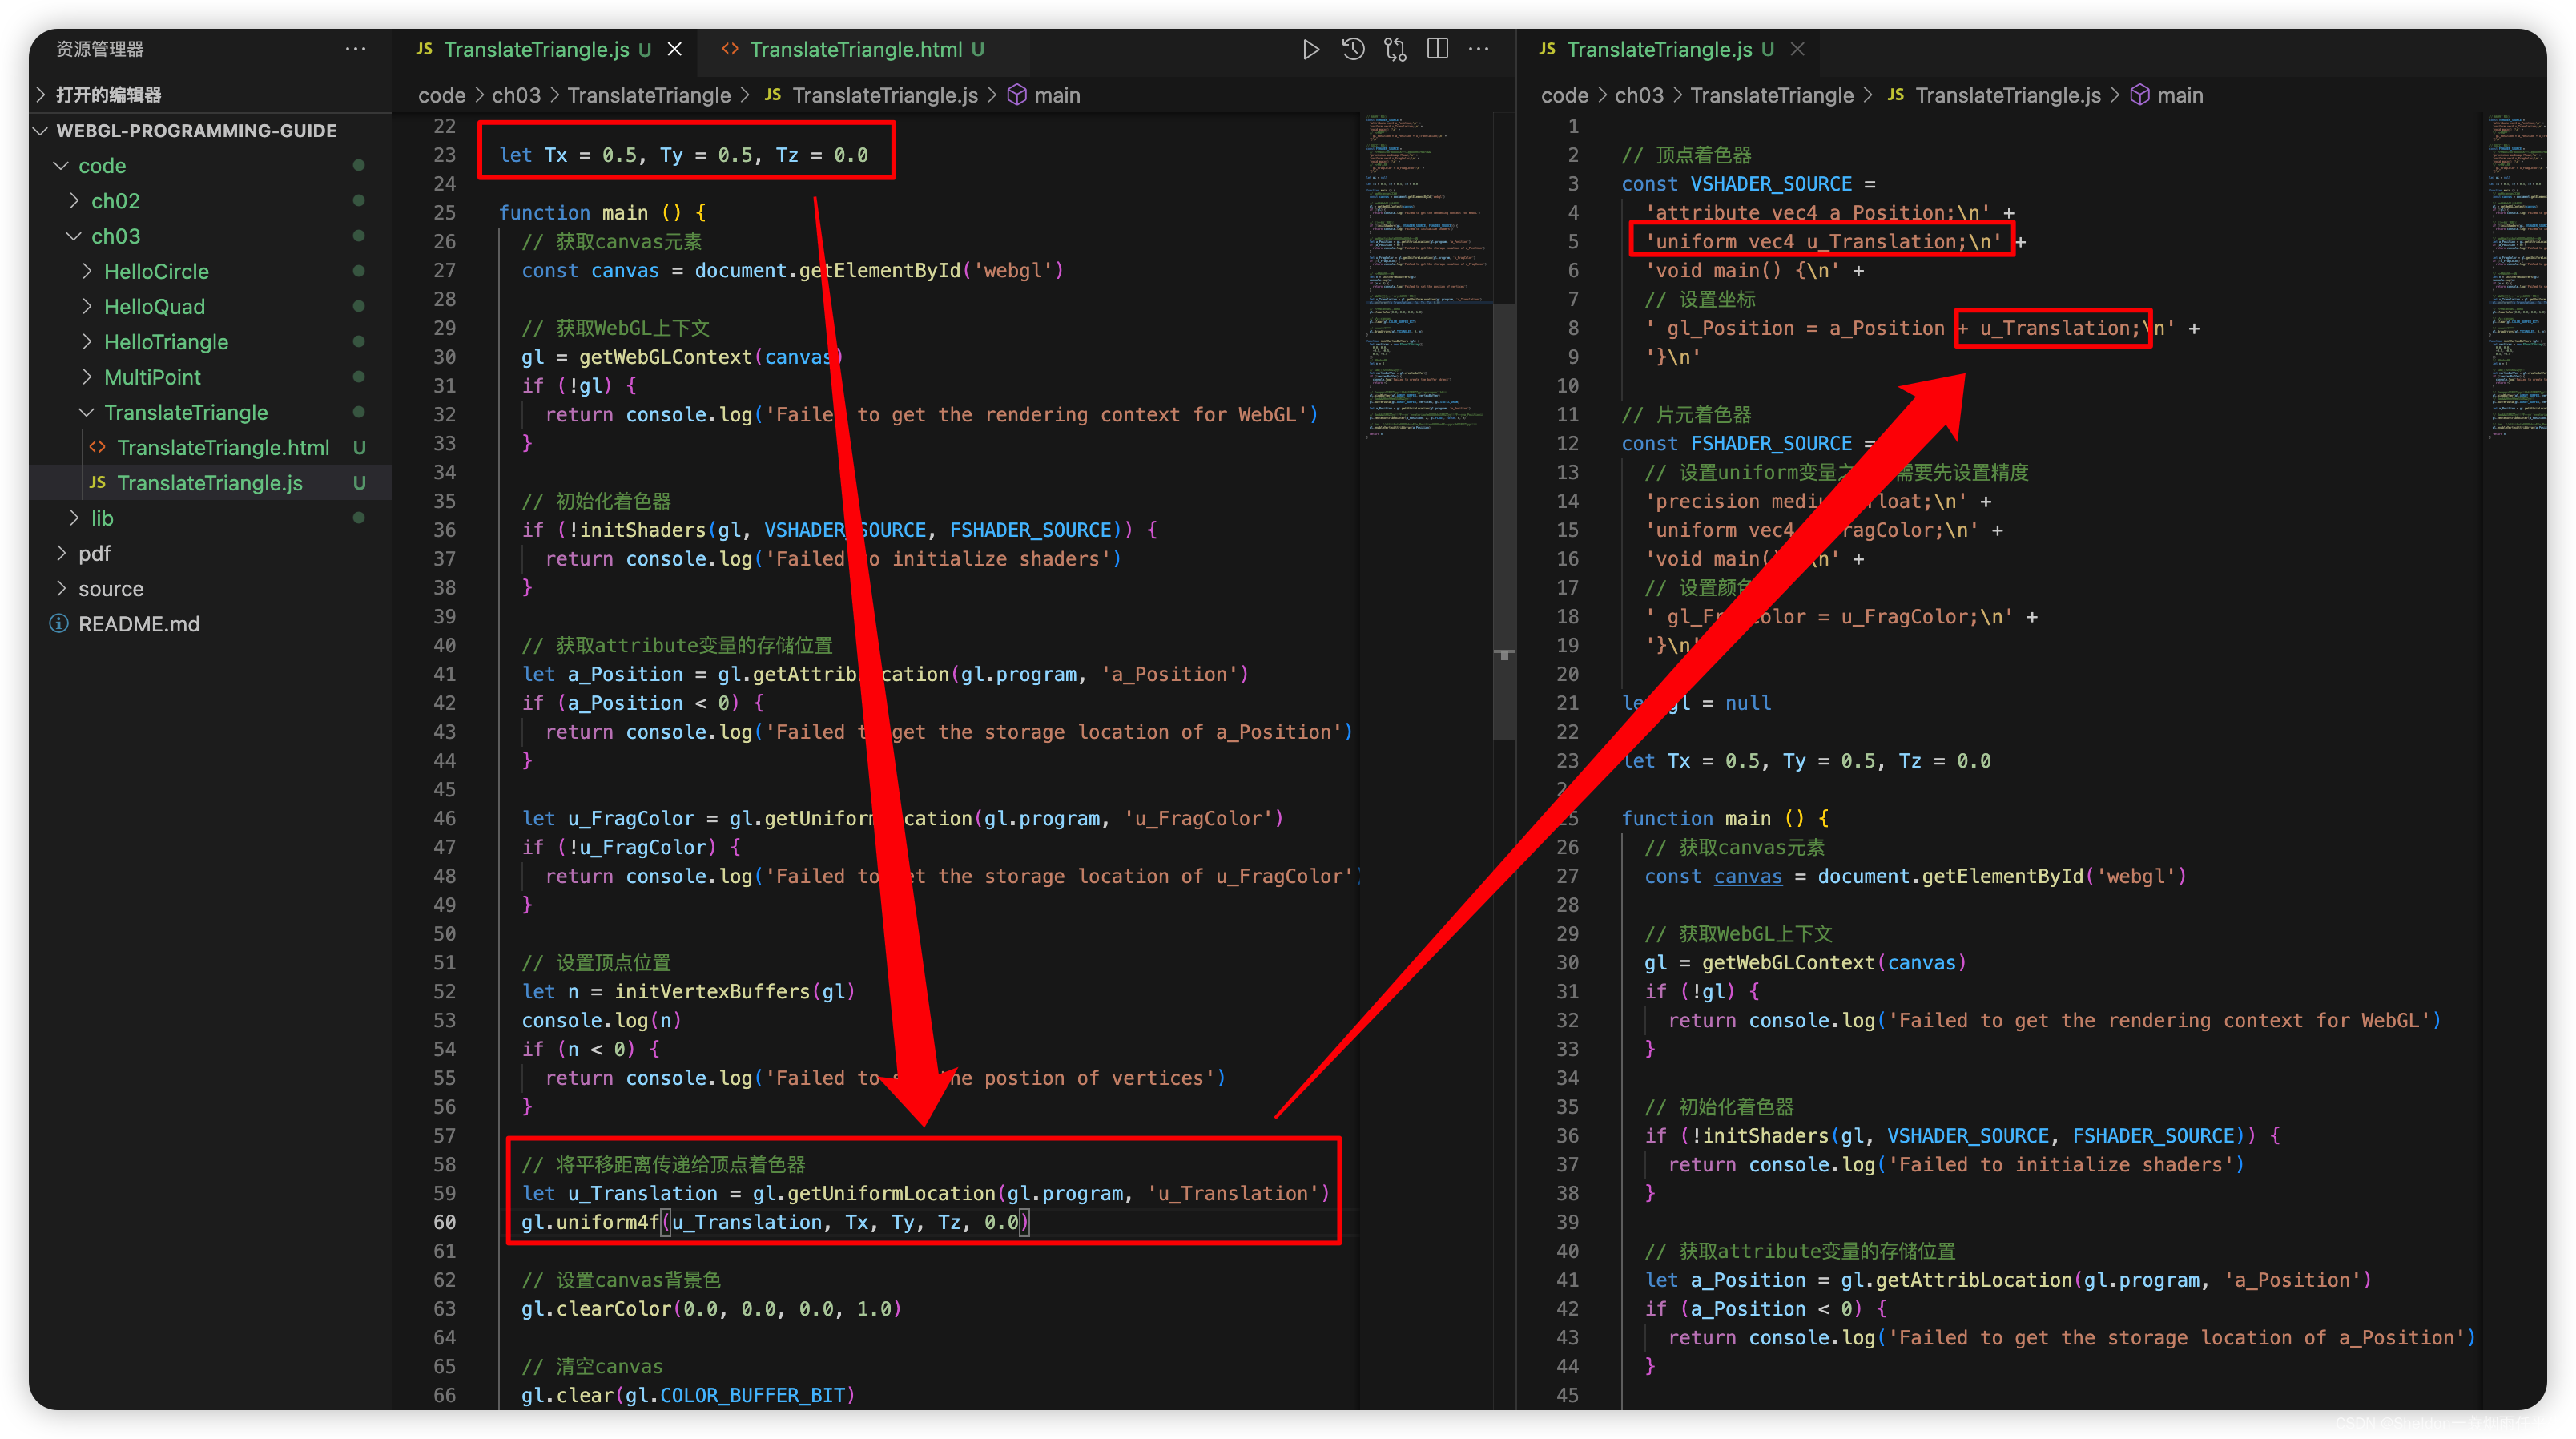
平移图形的原理很简单,就是将图形的每个点位加上相同的分量即可。
可以注意到gl.uniform4f(u_Translation, Tx, Ty, Tz, 0.0)接受的齐次坐标最后一个分量是0.0,按照之前说的,齐次坐标的最后一位应该是1.0才能表示三维坐标?那为什么这里是0.0呢?
那是因为GLSL ES中的赋值等运算只能发生在相同类型之间,a_Position和u_Translation都是vec4类型,gl_Position = a_Position + u_Translation这段代码直接将二者相加,相加后的最后一个分量正是1.0
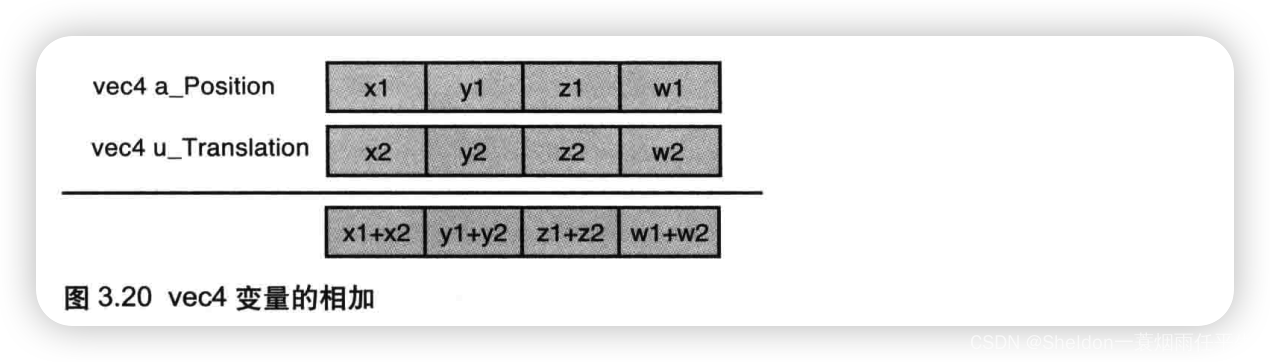
而调用gl.drawArrays(gl.TRIANGLES, 0, n)每次都会执行3步:
(1)将顶点坐标传给a_Position;
(2)将a_Position加上u_Translation;
(3)结果赋值给gl_Position。
TranslateTriangle/TranslateTriangle.html:
<!DOCTYPE html>
<html lang="en">

<head>
  <meta charset="UTF-8">
  <meta http-equiv="X-UA-Compatible" content="IE=edge">
  <meta name="viewport" content="width=device-width, initial-scale=1.0">
  <title>Document</title>
</head>

<body onload="main()">
  <canvas id="webgl" width="400" height="400">
    Please use a browser that supports 'canvas'
  </canvas>
  <script src="../../lib/webgl-utils.js"></script>
  <script src="../../lib/webgl-debug.js"></script>
  <script src="../../lib/cuon-utils.js"></script>
  <script src="./TranslateTriangle.js"></script>
</body>

</html>
TranslateTriangle/TranslateTriangle.js:
// 顶点着色器
const VSHADER_SOURCE =
  'attribute vec4 a_Position;\n' +
  'uniform vec4 u_Translation;\n' +
  'void main() {\n' +
  // 设置坐标
  ' gl_Position = a_Position + u_Translation;\n' +
  '}\n'

// 片元着色器
const FSHADER_SOURCE =
  // 设置uniform变量之前,需要先设置精度
  'precision mediump float;\n' +
  'uniform vec4 u_FragColor;\n' +
  'void main() {\n' +
  // 设置颜色
  ' gl_FragColor = u_FragColor;\n' +
  '}\n'

let gl = null

let Tx = 0.5, Ty = 0.5, Tz = 0.0

function main () {
  // 获取canvas元素
  const canvas = document.getElementById('webgl')

  // 获取WebGL上下文
  gl = getWebGLContext(canvas)
  if (!gl) {
    return console.log('Failed to get the rendering context for WebGL')
  }

  // 初始化着色器
  if (!initShaders(gl, VSHADER_SOURCE, FSHADER_SOURCE)) {
    return console.log('Failed to initialize shaders')
  }

  // 获取attribute变量的存储位置
  let a_Position = gl.getAttribLocation(gl.program, 'a_Position')
  if (a_Position < 0) {
    return console.log('Failed to get the storage location of a_Position')
  }

  let u_FragColor = gl.getUniformLocation(gl.program, 'u_FragColor')
  if (!u_FragColor) {
    return console.log('Failed to get the storage location of u_FragColor')
  }

  // 设置顶点位置
  let n = initVertexBuffers(gl)
  console.log(n)
  if (n < 0) {
    return console.log('Failed to set the postion of vertices')
  }

  // 将平移距离传递给顶点着色器
  let u_Translation = gl.getUniformLocation(gl.program, 'u_Translation')
  gl.uniform4f(u_Translation, Tx, Ty, Tz, 0.0)

  // 设置canvas背景色
  gl.clearColor(0.0, 0.0, 0.0, 1.0)

  // 清空canvas
  gl.clear(gl.COLOR_BUFFER_BIT)

  // 绘制三角形
  gl.drawArrays(gl.TRIANGLES, 0, n)
}

function initVertexBuffers (gl) {
  let vertices = new Float32Array([
    0.0, 0.5,
    -0.5, -0.5,
    0.5, -0.5
  ])
  // 点的个数
  let n = 3

  // 1、创建缓冲区对象
  let vertexBuffer = gl.createBuffer()
  if (!vertexBuffer) {
    console.log('Failed to create the buffer object')
    return -1
  }

  // 2、绑定缓冲区对象(将缓冲区对象绑定到目标()
  gl.bindBuffer(gl.ARRAY_BUFFER, vertexBuffer)
  // 3、将数据写入缓冲区对象
  gl.bufferData(gl.ARRAY_BUFFER, vertices, gl.STATIC_DRAW)

  let a_Position = gl.getAttribLocation(gl.program, 'a_Position')

  // 4、将缓冲区对象分配给一个atrribute变量(缓冲区对象分配给a_Position)
  gl.vertexAttribPointer(a_Position, 2, gl.FLOAT, false, 0, 0)

  // 5、开启attribute变量(连接a_Position变量与分配给它的缓冲区对象)
  gl.enableVertexAttribArray(a_Position)

  return n
}
3.3.2 旋转

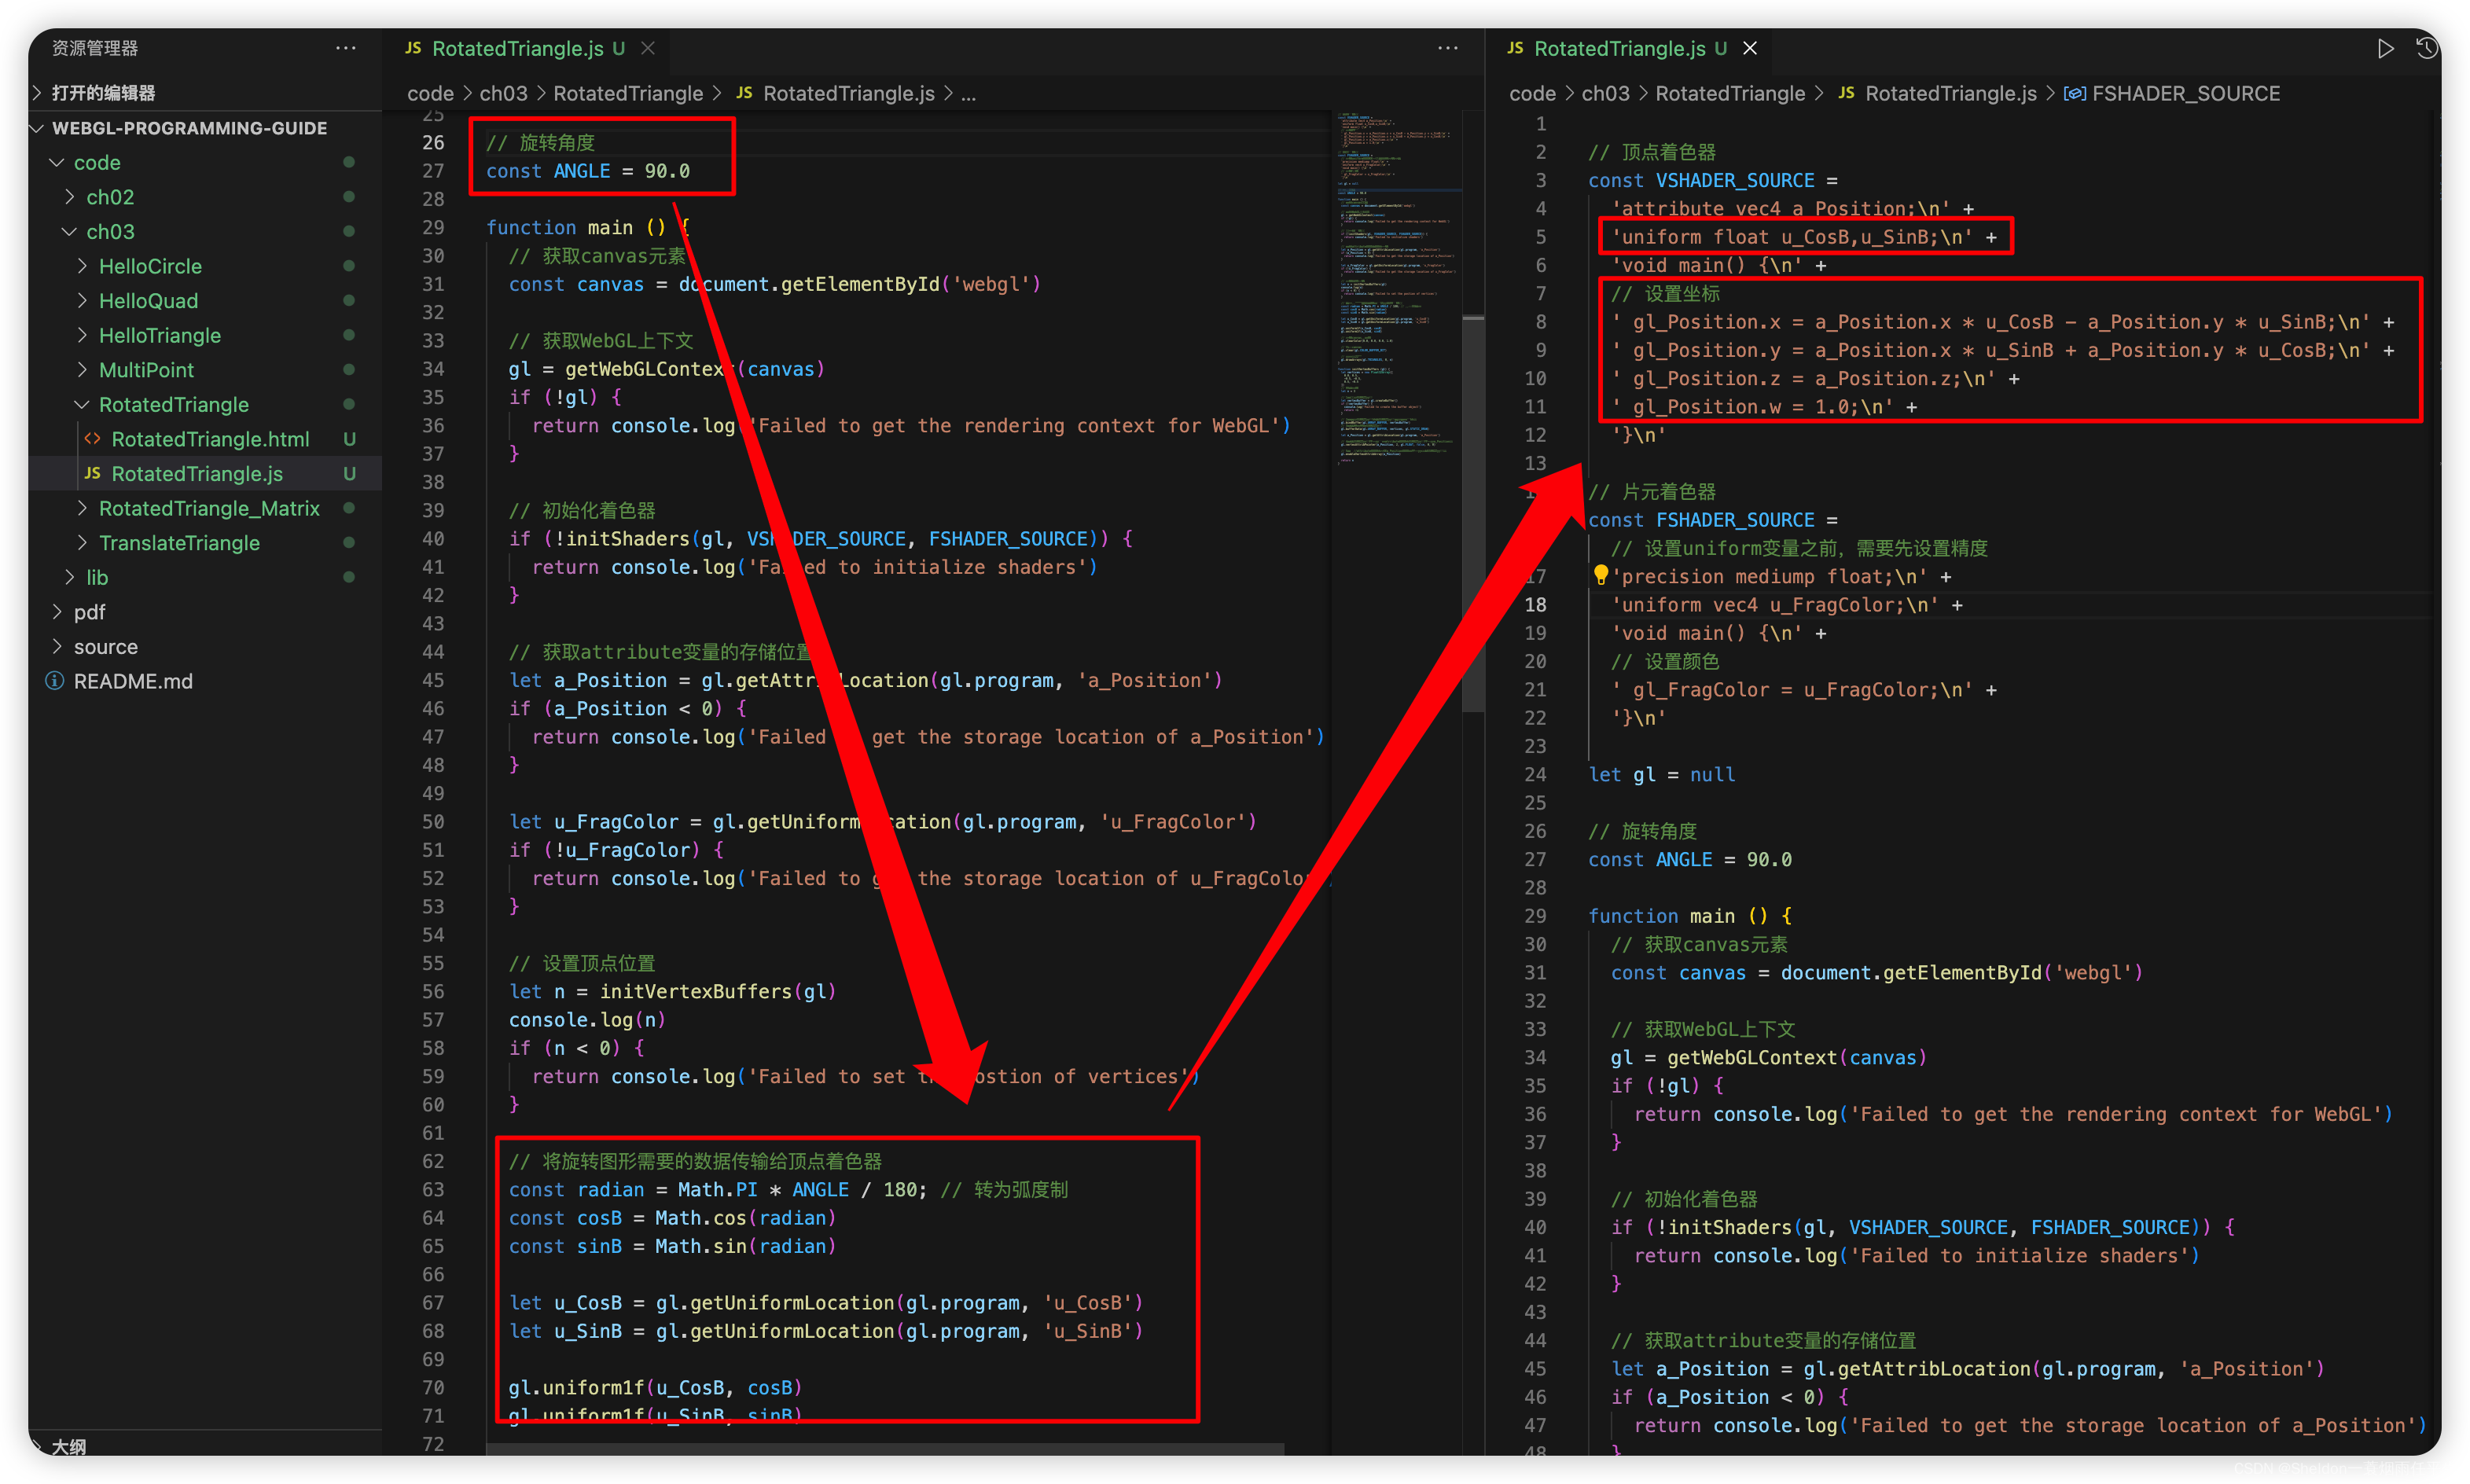
旋转相对平移来说,会复杂一些。要旋转,我们需要3个步骤:
(1)确定旋转轴;
(2)顺时针旋转还是逆时针旋转;
(3)旋转多少度。
因为WebGL默认遵守右手法则确定方向,所以当我们握紧右手时,手指的方向因为是逆时针,所以逆时针就是我们的正方向。因此正旋转也被称为右手法则旋转。
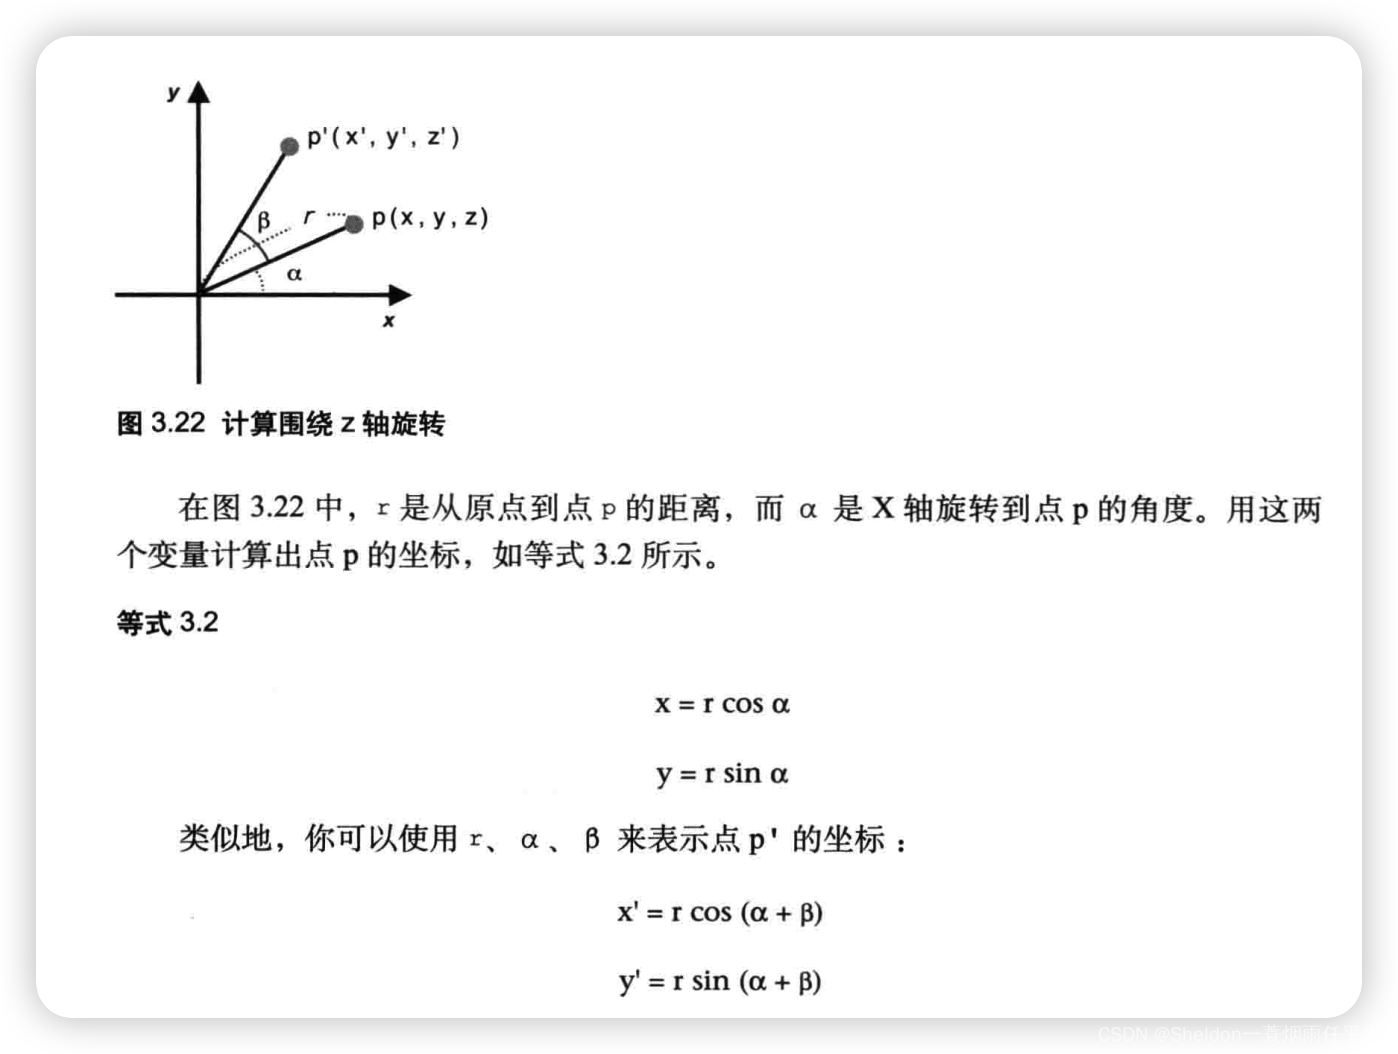
利用两角和公式可得:
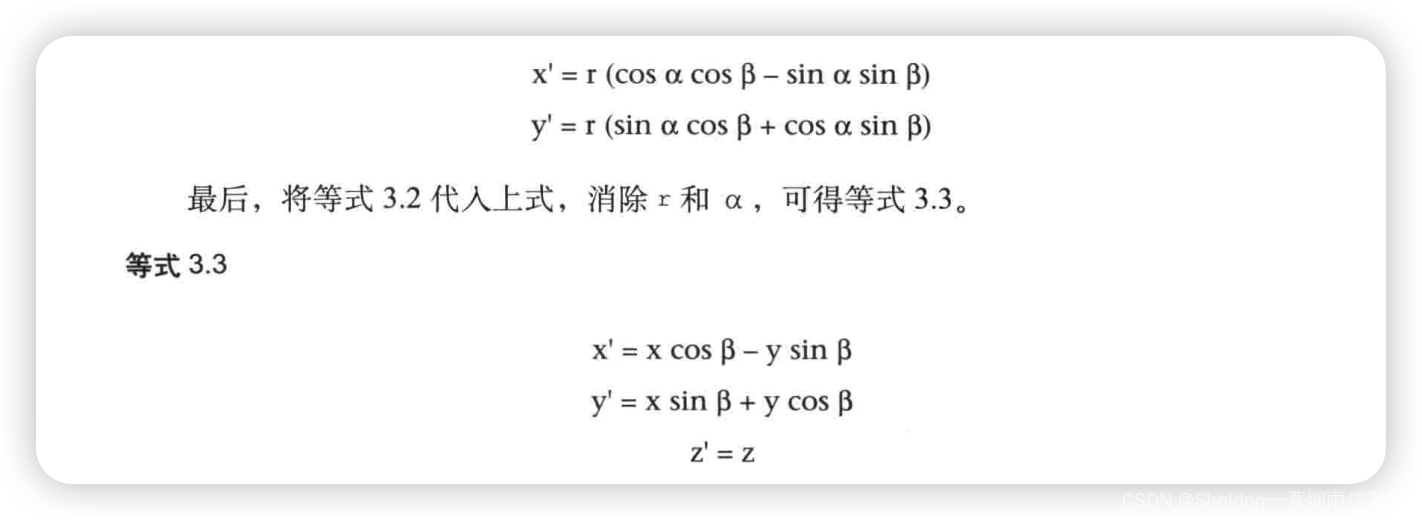
RotatedTriangle/RotatedTriangle.js:
// 顶点着色器
const VSHADER_SOURCE =
  'attribute vec4 a_Position;\n' +
  'uniform float u_CosB,u_SinB;\n' +
  'void main() {\n' +
  // 设置坐标
  ' gl_Position.x = a_Position.x * u_CosB - a_Position.y * u_SinB;\n' +
  ' gl_Position.y = a_Position.x * u_SinB + a_Position.y * u_CosB;\n' +
  ' gl_Position.z = a_Position.z;\n' +
  ' gl_Position.w = 1.0;\n' +
  '}\n'

// 片元着色器
const FSHADER_SOURCE =
  // 设置uniform变量之前,需要先设置精度
  'precision mediump float;\n' +
  'uniform vec4 u_FragColor;\n' +
  'void main() {\n' +
  // 设置颜色
  ' gl_FragColor = u_FragColor;\n' +
  '}\n'

let gl = null

// 旋转角度
const ANGLE = 90.0

function main () {
  // 获取canvas元素
  const canvas = document.getElementById('webgl')

  // 获取WebGL上下文
  gl = getWebGLContext(canvas)
  if (!gl) {
    return console.log('Failed to get the rendering context for WebGL')
  }

  // 初始化着色器
  if (!initShaders(gl, VSHADER_SOURCE, FSHADER_SOURCE)) {
    return console.log('Failed to initialize shaders')
  }

  // 获取attribute变量的存储位置
  let a_Position = gl.getAttribLocation(gl.program, 'a_Position')
  if (a_Position < 0) {
    return console.log('Failed to get the storage location of a_Position')
  }

  let u_FragColor = gl.getUniformLocation(gl.program, 'u_FragColor')
  if (!u_FragColor) {
    return console.log('Failed to get the storage location of u_FragColor')
  }

  // 设置顶点位置
  let n = initVertexBuffers(gl)
  console.log(n)
  if (n < 0) {
    return console.log('Failed to set the postion of vertices')
  }

  // 将旋转图形需要的数据传输给顶点着色器
  const radian = Math.PI * ANGLE / 180; // 转为弧度制
  const cosB = Math.cos(radian)
  const sinB = Math.sin(radian)

  let u_CosB = gl.getUniformLocation(gl.program, 'u_CosB')
  let u_SinB = gl.getUniformLocation(gl.program, 'u_SinB')

  gl.uniform1f(u_CosB, cosB)
  gl.uniform1f(u_SinB, sinB)

  // 设置canvas背景色
  gl.clearColor(0.0, 0.0, 0.0, 1.0)

  // 清空canvas
  gl.clear(gl.COLOR_BUFFER_BIT)

  // 绘制三角形
  gl.drawArrays(gl.TRIANGLES, 0, n)
}

function initVertexBuffers (gl) {
  let vertices = new Float32Array([
    0.0, 0.5,
    -0.5, -0.5,
    0.5, -0.5
  ])
  // 点的个数
  let n = 3

  // 1、创建缓冲区对象
  let vertexBuffer = gl.createBuffer()
  if (!vertexBuffer) {
    console.log('Failed to create the buffer object')
    return -1
  }

  // 2、绑定缓冲区对象(将缓冲区对象绑定到目标()
  gl.bindBuffer(gl.ARRAY_BUFFER, vertexBuffer)
  // 3、将数据写入缓冲区对象
  gl.bufferData(gl.ARRAY_BUFFER, vertices, gl.STATIC_DRAW)

  let a_Position = gl.getAttribLocation(gl.program, 'a_Position')

  // 4、将缓冲区对象分配给一个atrribute变量(缓冲区对象分配给a_Position)
  gl.vertexAttribPointer(a_Position, 2, gl.FLOAT, false, 0, 0)

  // 5、开启attribute变量(连接a_Position变量与分配给它的缓冲区对象)
  gl.enableVertexAttribArray(a_Position)

  return n
}
3.3.3 变换矩阵
3.3.3.1 为什么需要变换矩阵?
对于简单的变换(比如平移和旋转),我们可以通过数学表达式进行实现。但是一旦情况变得复杂,比如旋转后平移,那么我们就需要进行讲两个等式进行叠加,从而获得一个新的等式,在顶点着色器中实现。如果每次面对新的情形都这样做,明显很不合理。所以,我们就需要借助另一个数学工具——变换矩阵(Transformation matrix)来完成这项工作。
3.3.3.2 变换矩阵是什么
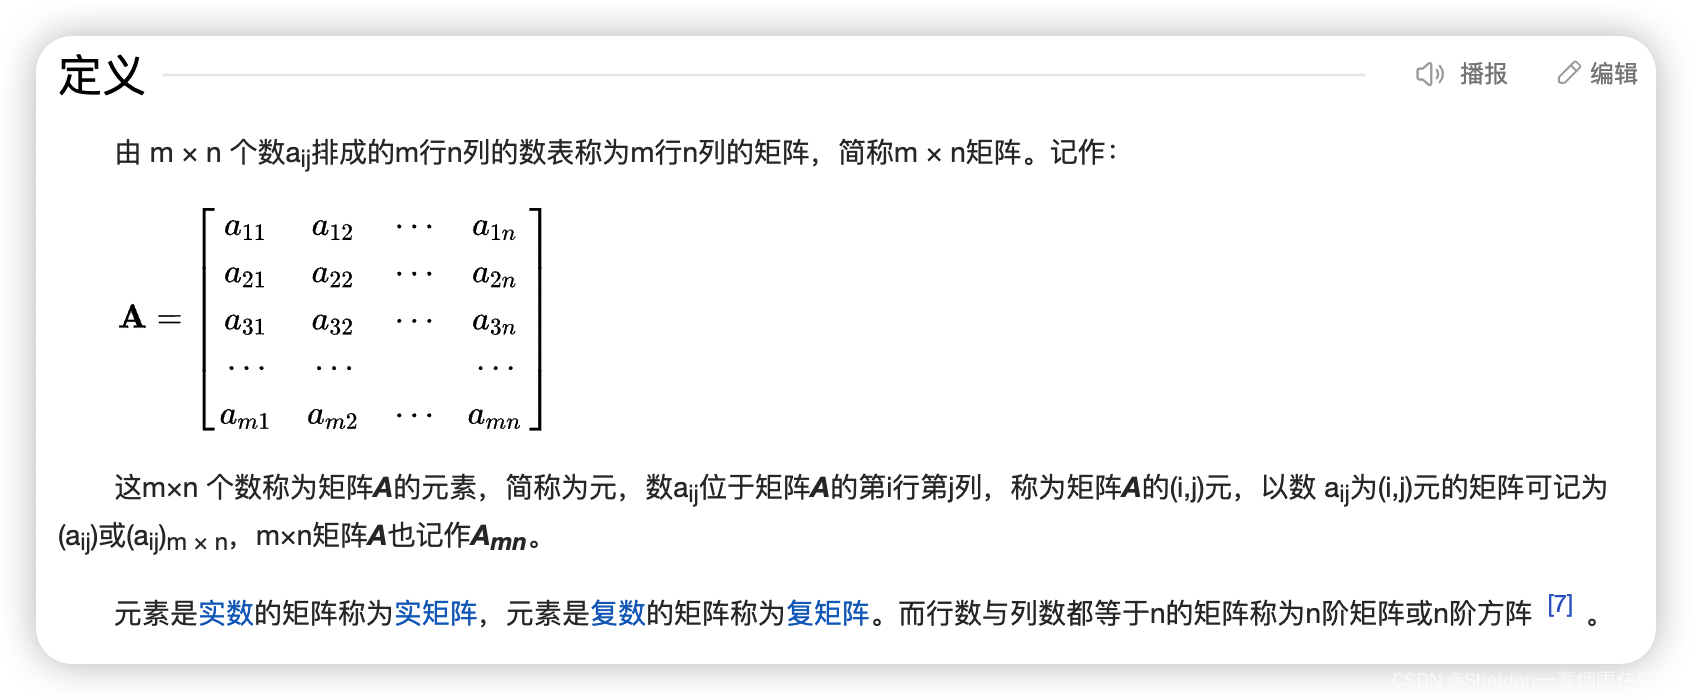
这是百度百科上对于矩阵的定义。
说句题外话,在理工科同学们的大学课程——线性代数或者高数中,都涉及到矩阵方面的知识。在这方面,还是比较有优势的。但是对于没有学过矩阵相关课程的同学也没关系,不需要一听说是大学课程就有畏难心理。WebGL对于大学生来说也是新的知识,我们都已经学过来了,矩阵也没什么区别,并且涉及到的内容也很简单。
3.3.3.3 矩阵的乘法
因为本小节的内容只涉及到矩阵的乘法,所以先不对矩阵的基本运算、行列式等相关知识进行介绍和学习了。

总结一下C = AB的运算规则:
C的第一行第一列 = A的第一行 * B的第一列;
C的第一行第二列 = A的等一行 * B的第二列;
…
C的第二行第一列 = A的第二行 * B的第一列;
C的第二行第二列 = A的第二行 * B的第二列;
…
C的第m行第p列 = A的第m行 * B的第p列;
其实就是A每一行的每个数字(总数就是A的列数)都要和B每一列的每个数字(总数就是B的行数)一一相乘,这也是为什么A的列数和B的行数相等时,矩阵的乘法才能被定义的原因。
3.3.3.4 旋转矩阵
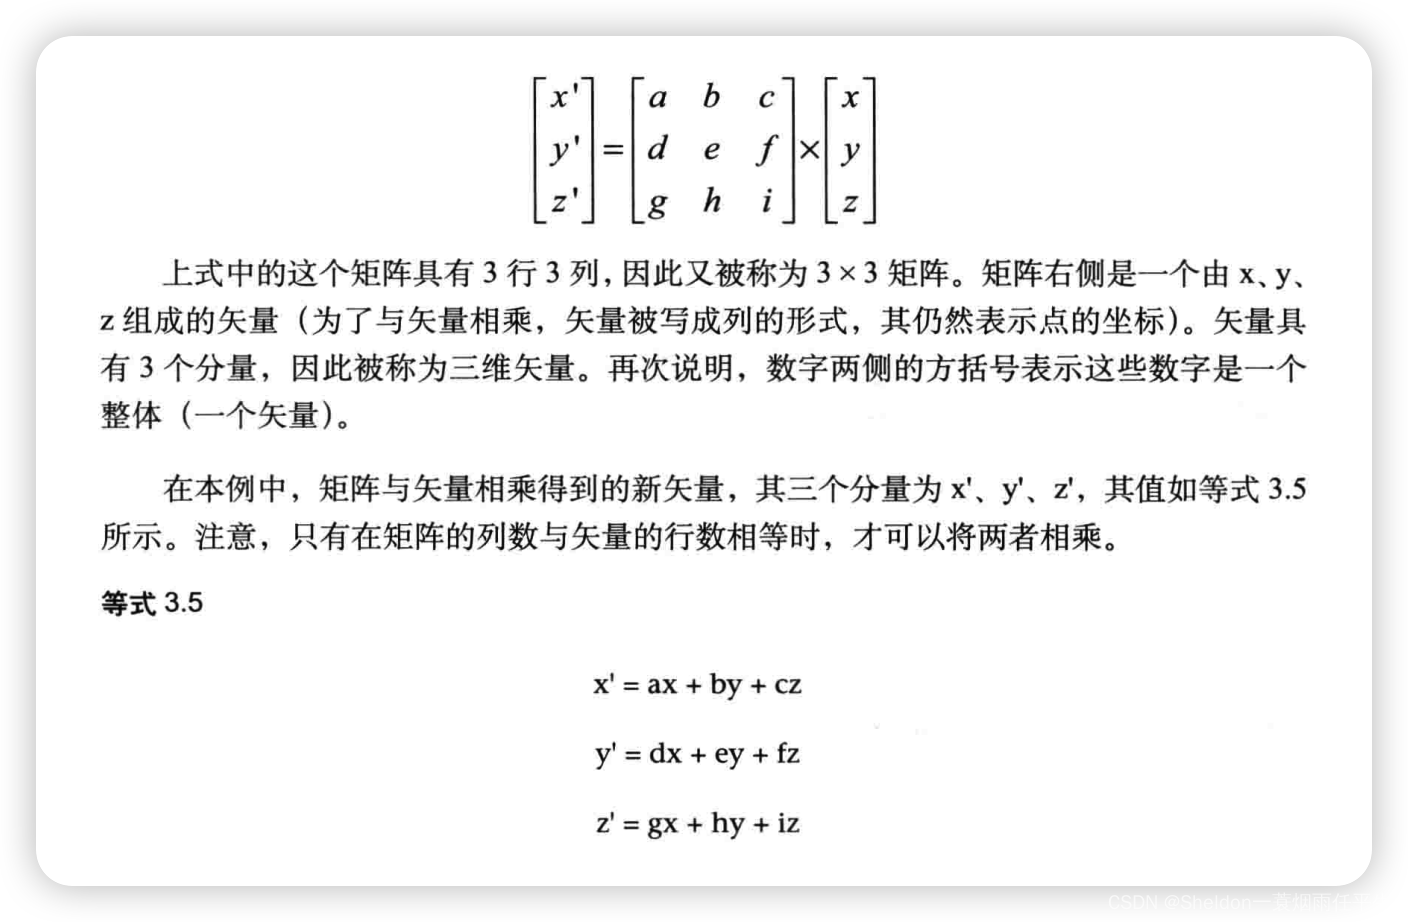
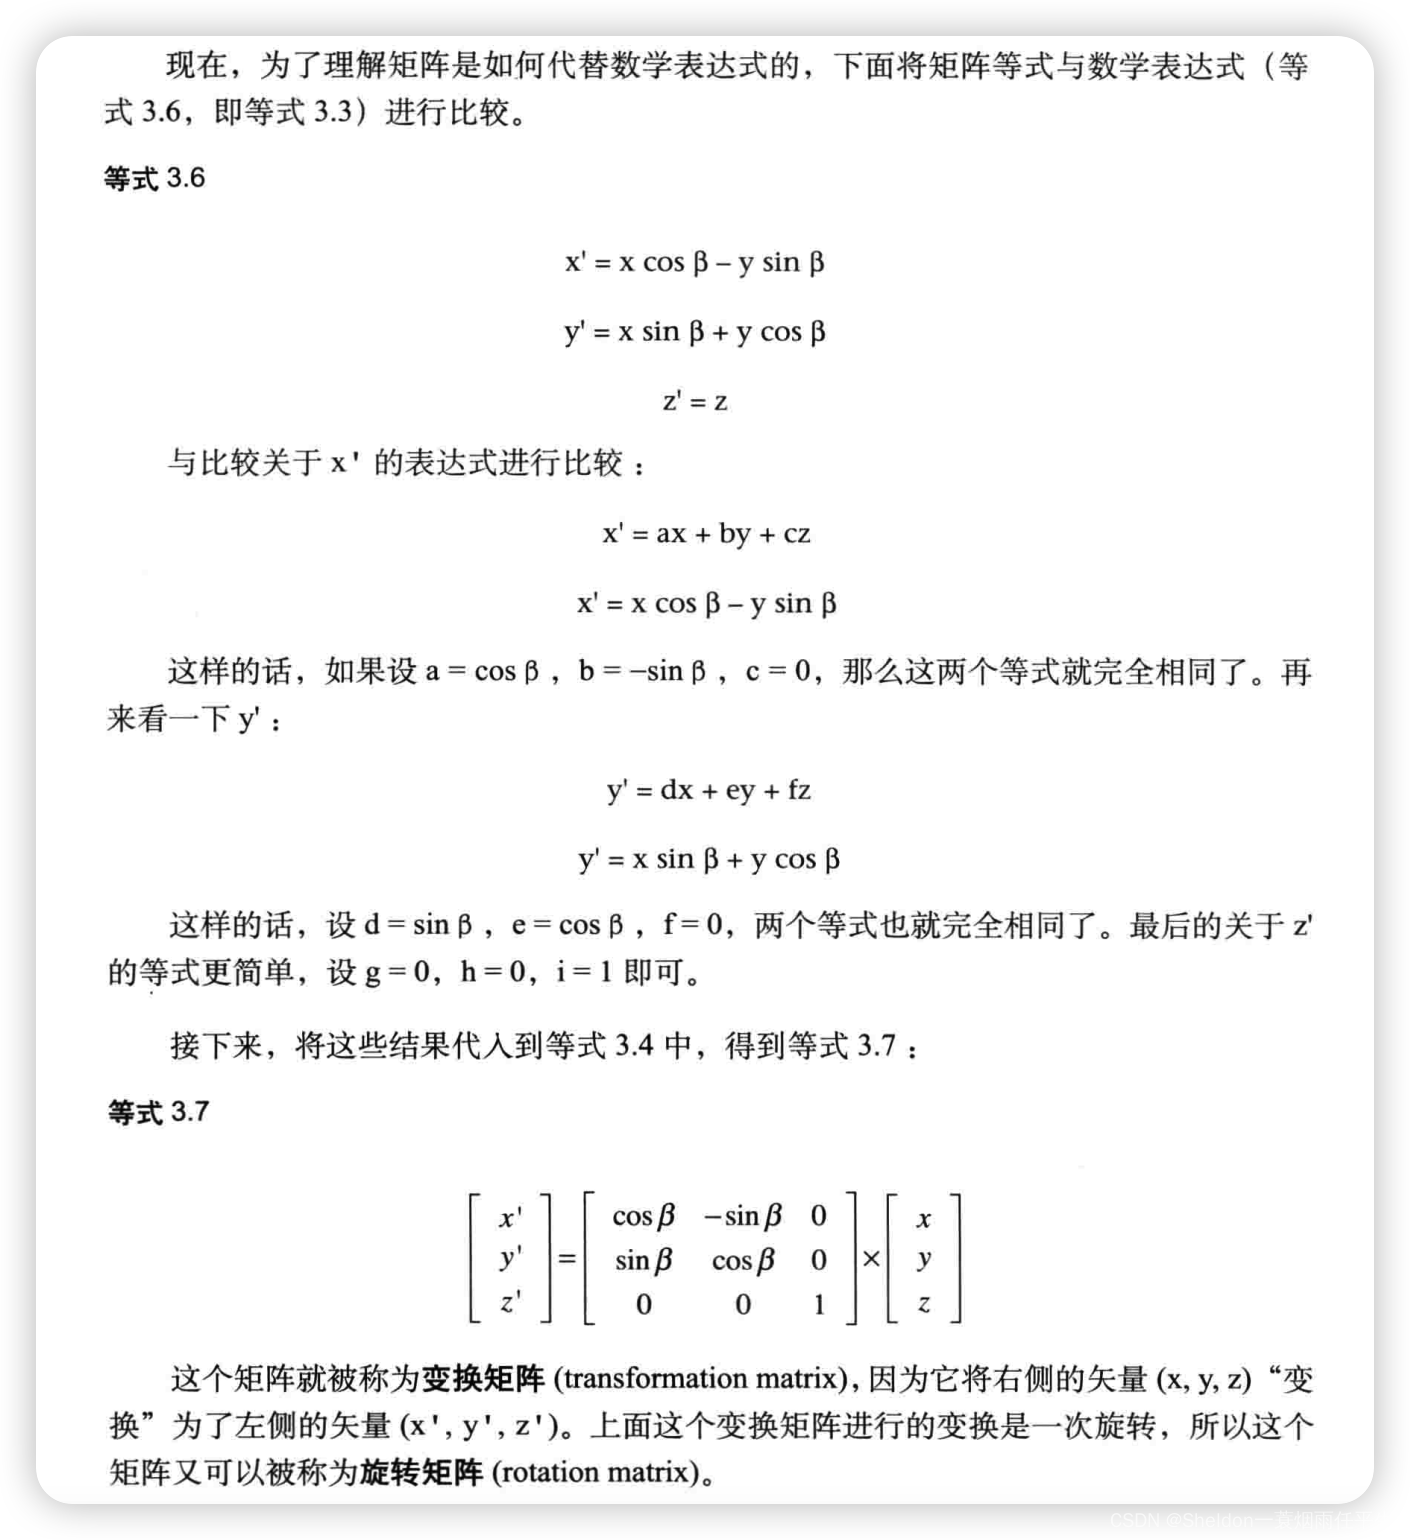
3.3.3.5 平移矩阵
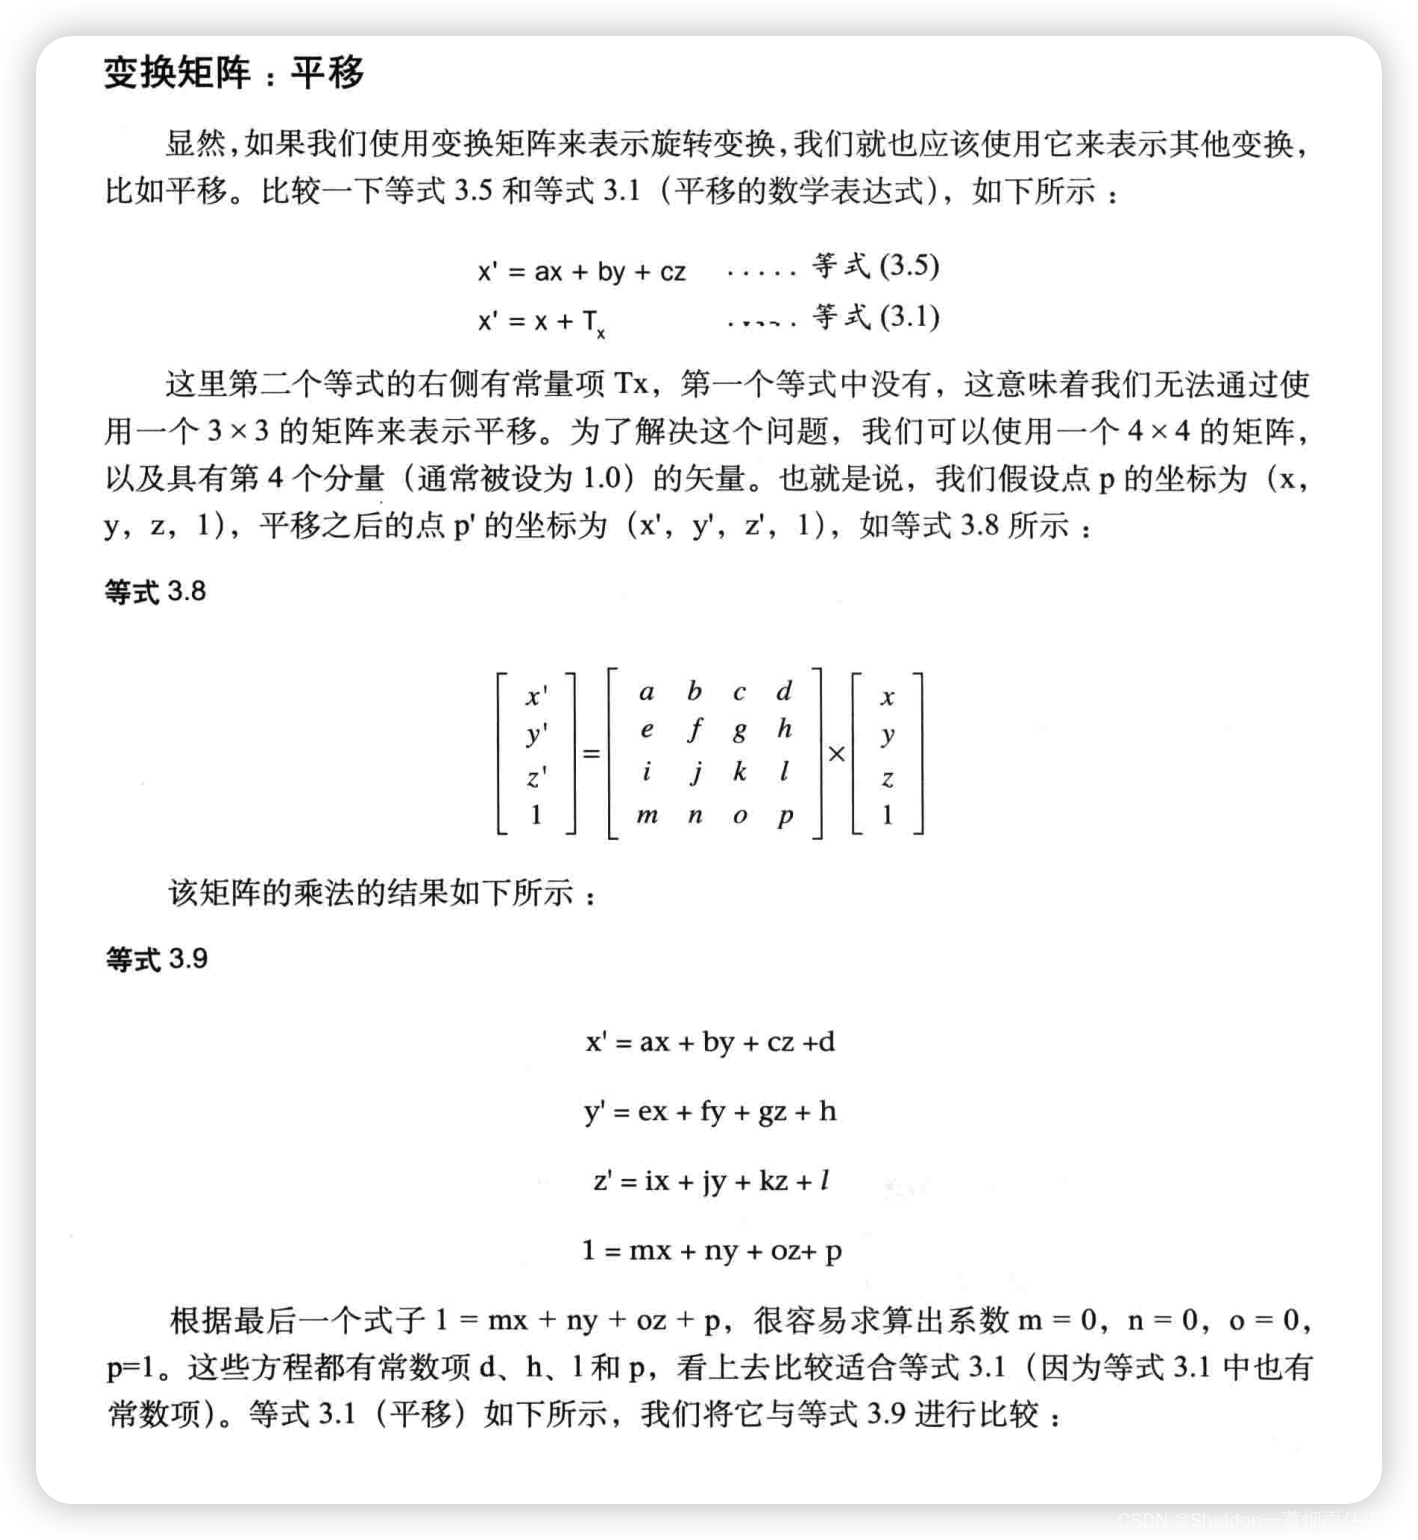
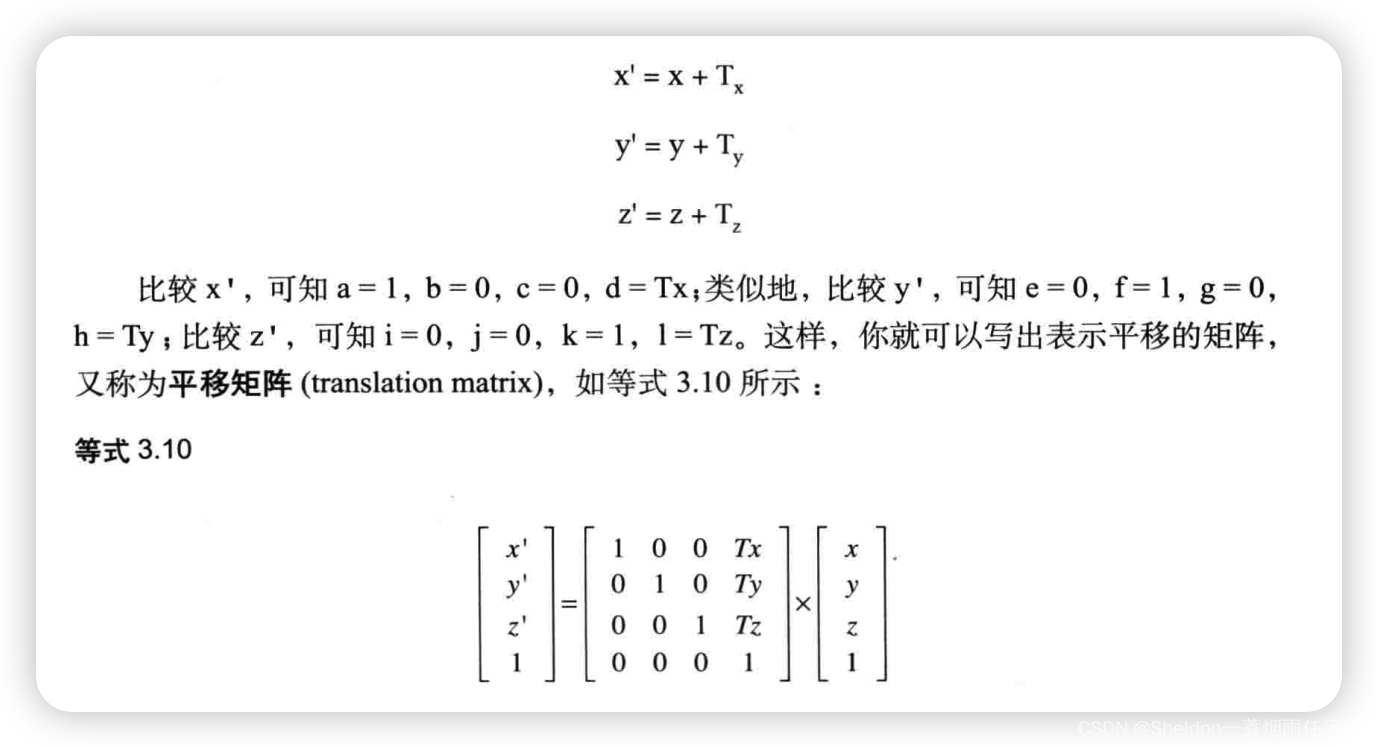
3.3.3.6 旋转平移矩阵(4 * 4 矩阵)
简单归纳一下,旋转矩阵:

平移矩阵:

回想一下,矩阵的目的是帮我们把一个点通过矩阵的运算计算出变换之后的坐标。
旋转矩阵:
x’ = cos𝛽 x - sin𝛽 y
y’ = sin𝛽 x + cos 𝛽 y
z’ = z
平移矩阵:
x’ = x + Tx
y’ = y + Ty
z’ = z + Tz
1 = 1
那先旋转后平移呢?(其实就是把旋转后的 x、y’、z’ 代入到平移矩阵中 x、y、z中即可)不难得出,
x’ = cos𝛽 x - sin𝛽 y + Tx
y’ = sin𝛽 x + cos𝛽 y + Ty
z’ = z + Tz
1 = 1
所以旋转平移矩阵就是
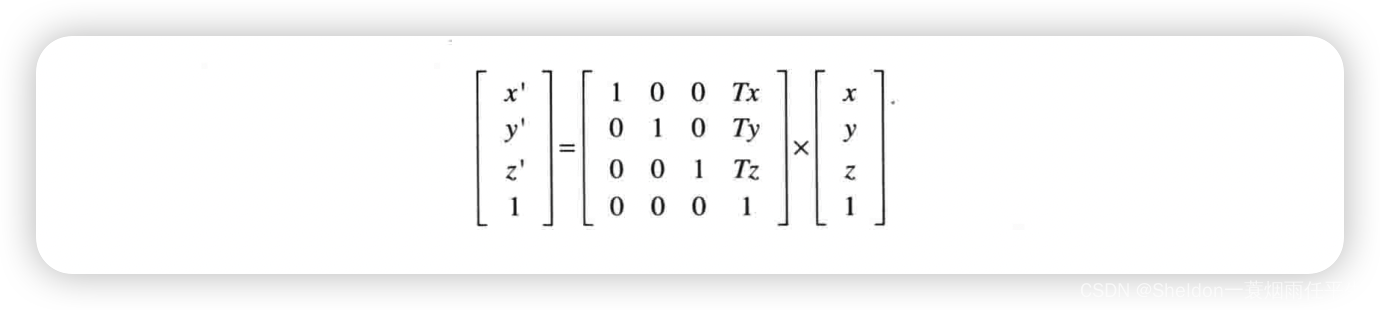
3.3.3.7 平移旋转矩阵(4 * 4 矩阵)
那如果是先平移后旋转呢?变换后的矩阵是否和先旋转后平移的矩阵相同呢?让我们使用矩阵验证下。
平移矩阵:
x’ = x + Tx
y’ = y + Ty
z’ = z + Tz
1 = 1
旋转矩阵:
x’ = cos𝛽 x - sin𝛽 y
y’ = sin𝛽 x + cos 𝛽 y
z’ = z
先平移后旋转,不难得出
x’ = cos𝛽 (x + Tx) - sin𝛽 (y + Ty) = cos𝛽 x - sin𝛽 y + (cos𝛽 Tx - sin𝛽 Ty)
y’ = sin𝛽 (x + Tx) + cos 𝛽 (y + Ty) = sin𝛽 x + cos 𝛽 y + (sin𝛽 Tx + cos 𝛽 Ty)
z’ = z + Tz
1 = 1

3.3.3.8 结论:旋转平移矩阵 ≠ 平移旋转矩阵
很明显,先旋转后平移和先平移后旋转的矩阵并不相同,这是为什么呢?很多人包括我都会下意识地以为一定会相同,但是事实并不是如此。因为我们忽略了一点,这里的旋转指的是围绕着原点进行旋转,而不是图形本身的几何中心。这么一想,是不是就豁然开朗了呢。
3.3.3.9 WebGL的旋转矩阵运算——使用 4 * 4 矩阵
因为矩阵运算如此方便,所以WebGL内部也实现了变换矩阵的运算。我们知道,顶点着色器中的点是齐次坐标(4个分量),所以在进行矩阵运算时,就需要满足 4 * 4 的规格。比如之前的旋转矩阵(3 * 3规格)
就需要换成 4 * 4规格
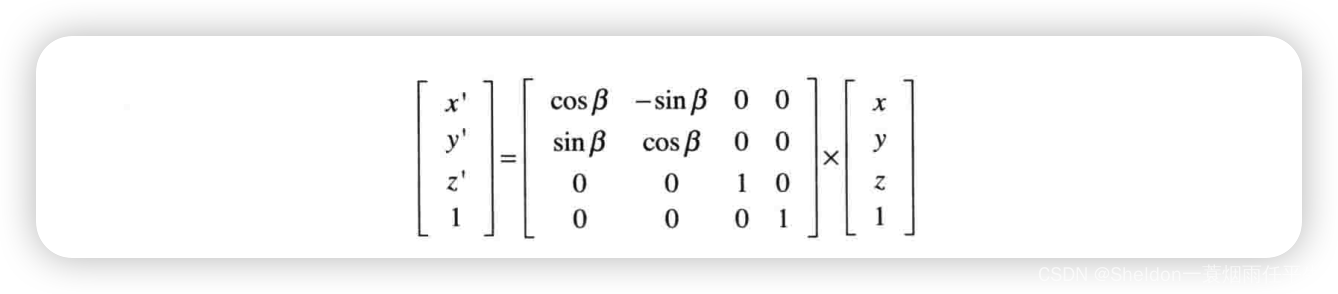
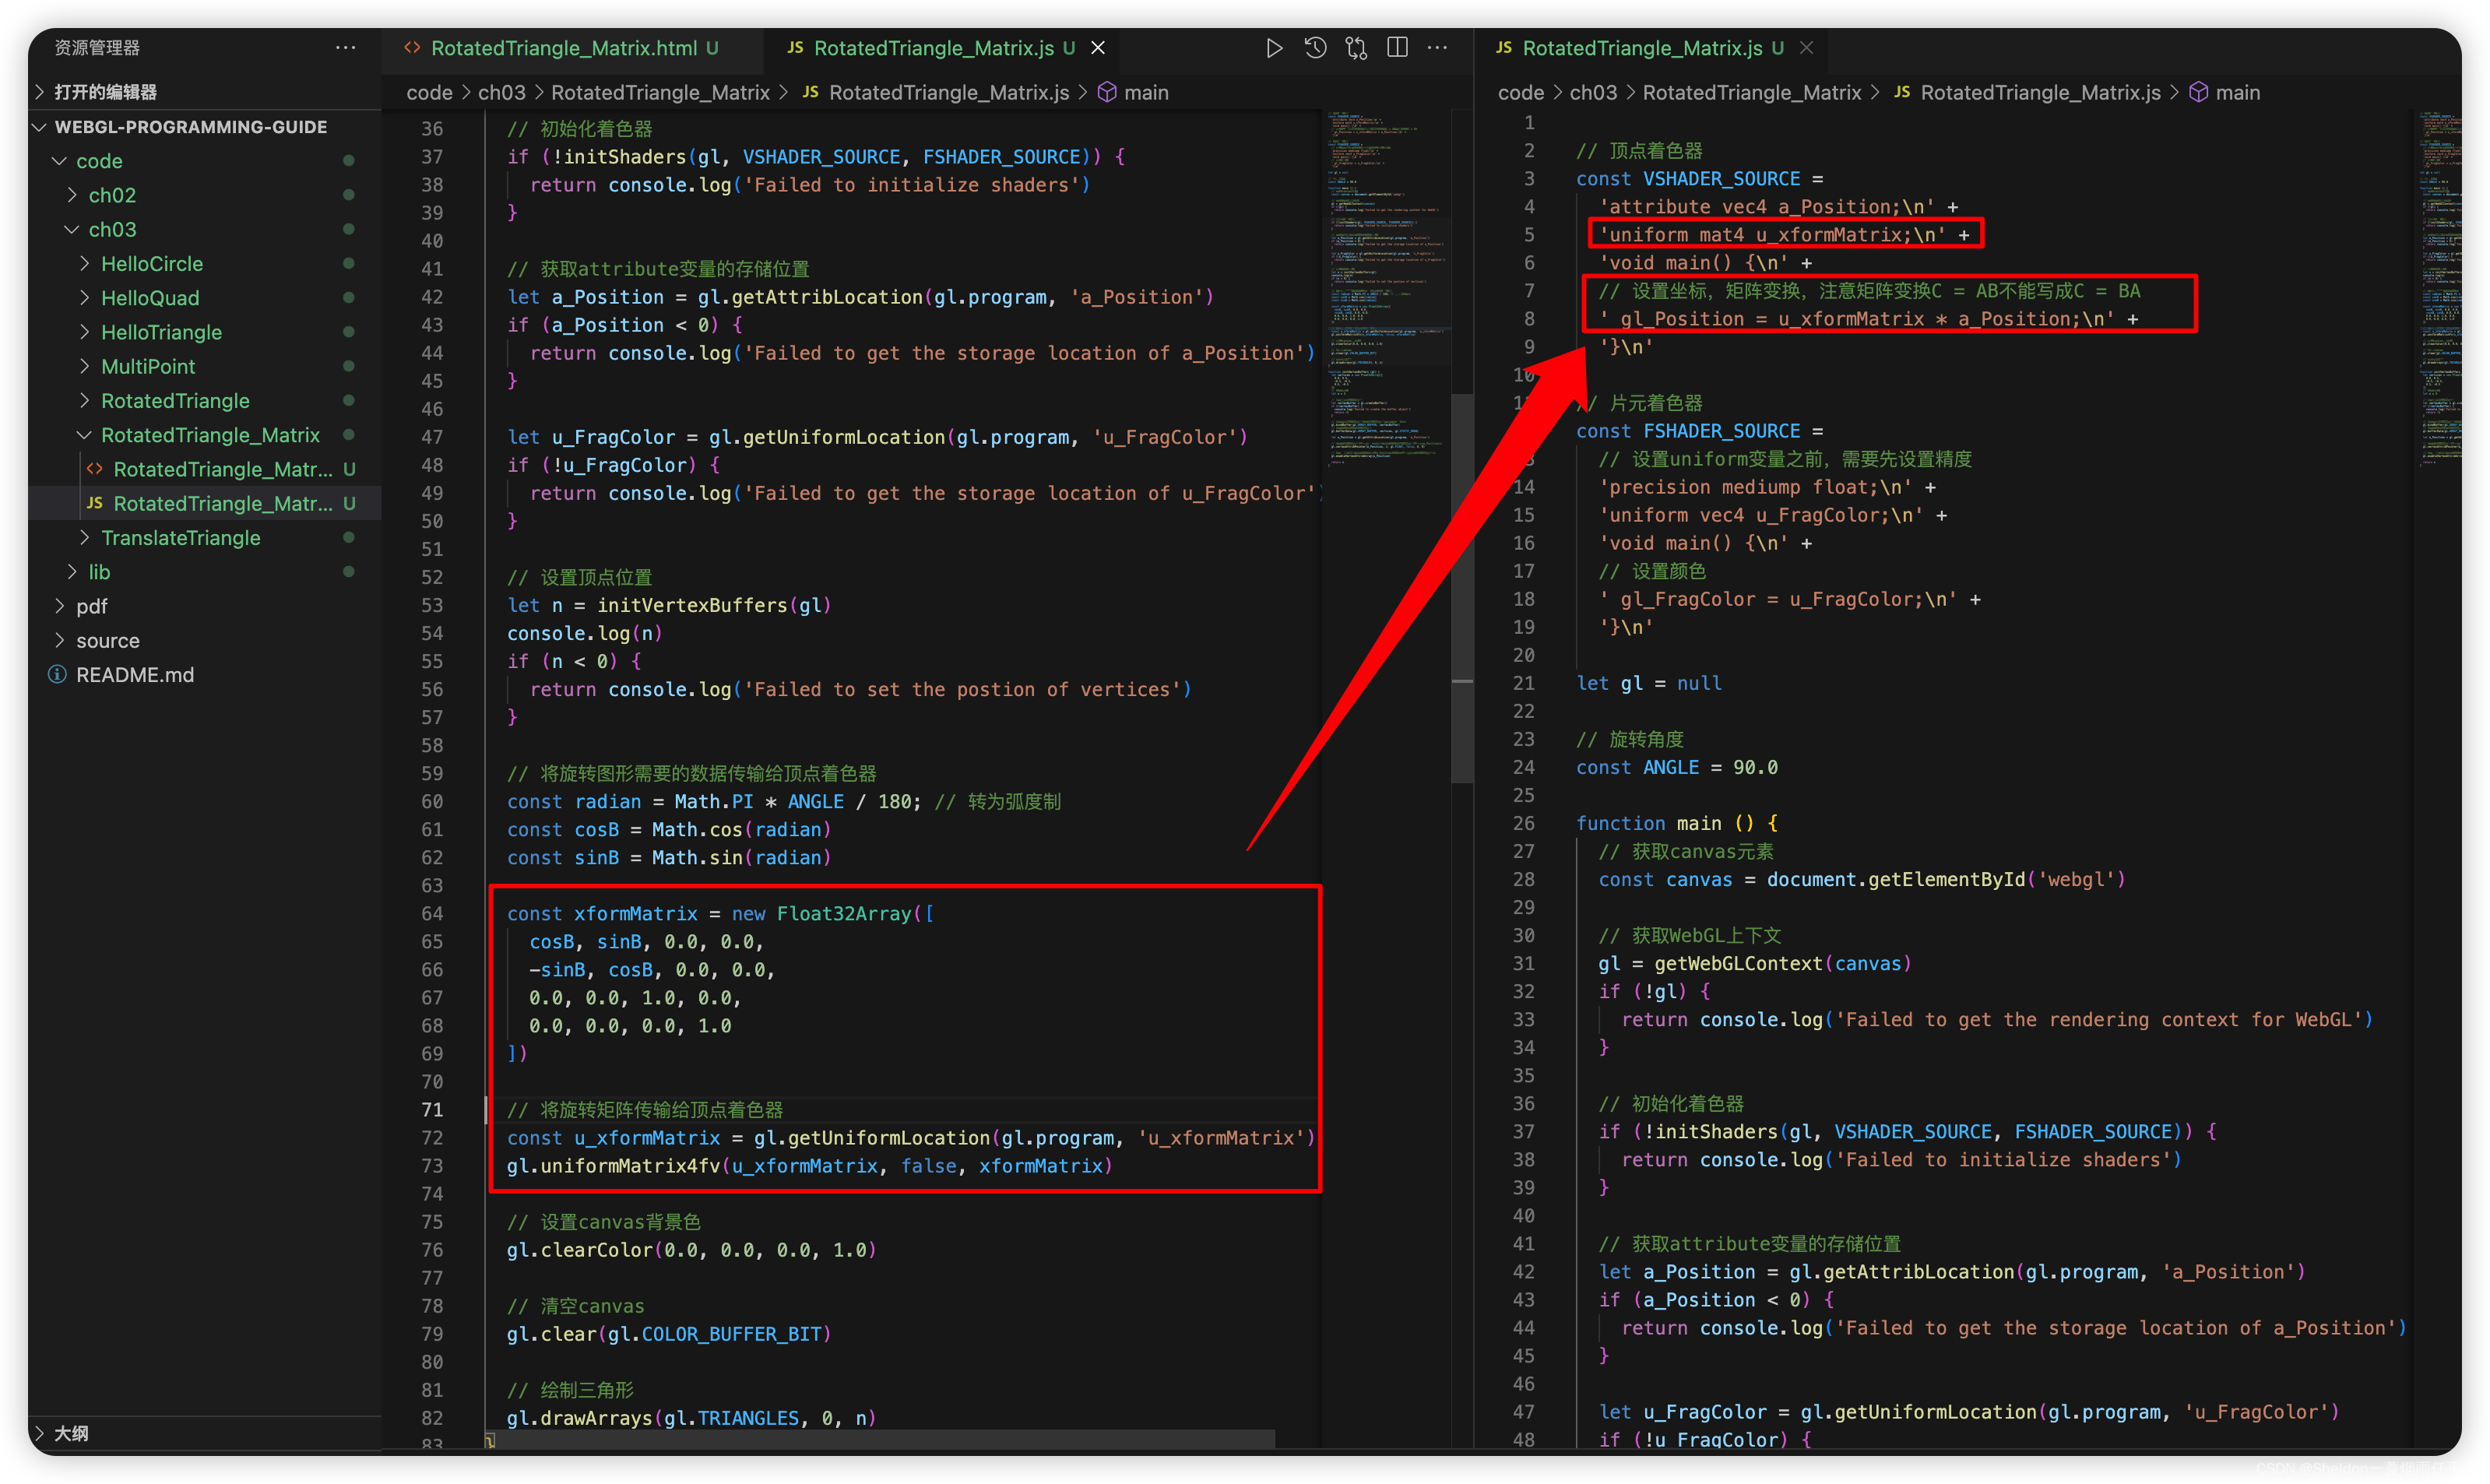
注意:这里顶点着色器使用了新的类型mat4(矩阵Matrix的缩写)
uniform mat4 u_xformMatrix;
但是JavaScript中并没有矩阵类型,所以我们需要使用定型数组Float32Array。并且WebGL中,矩阵元素是按列主序的,换句话说,就是行列和数学中的矩阵是相反的。
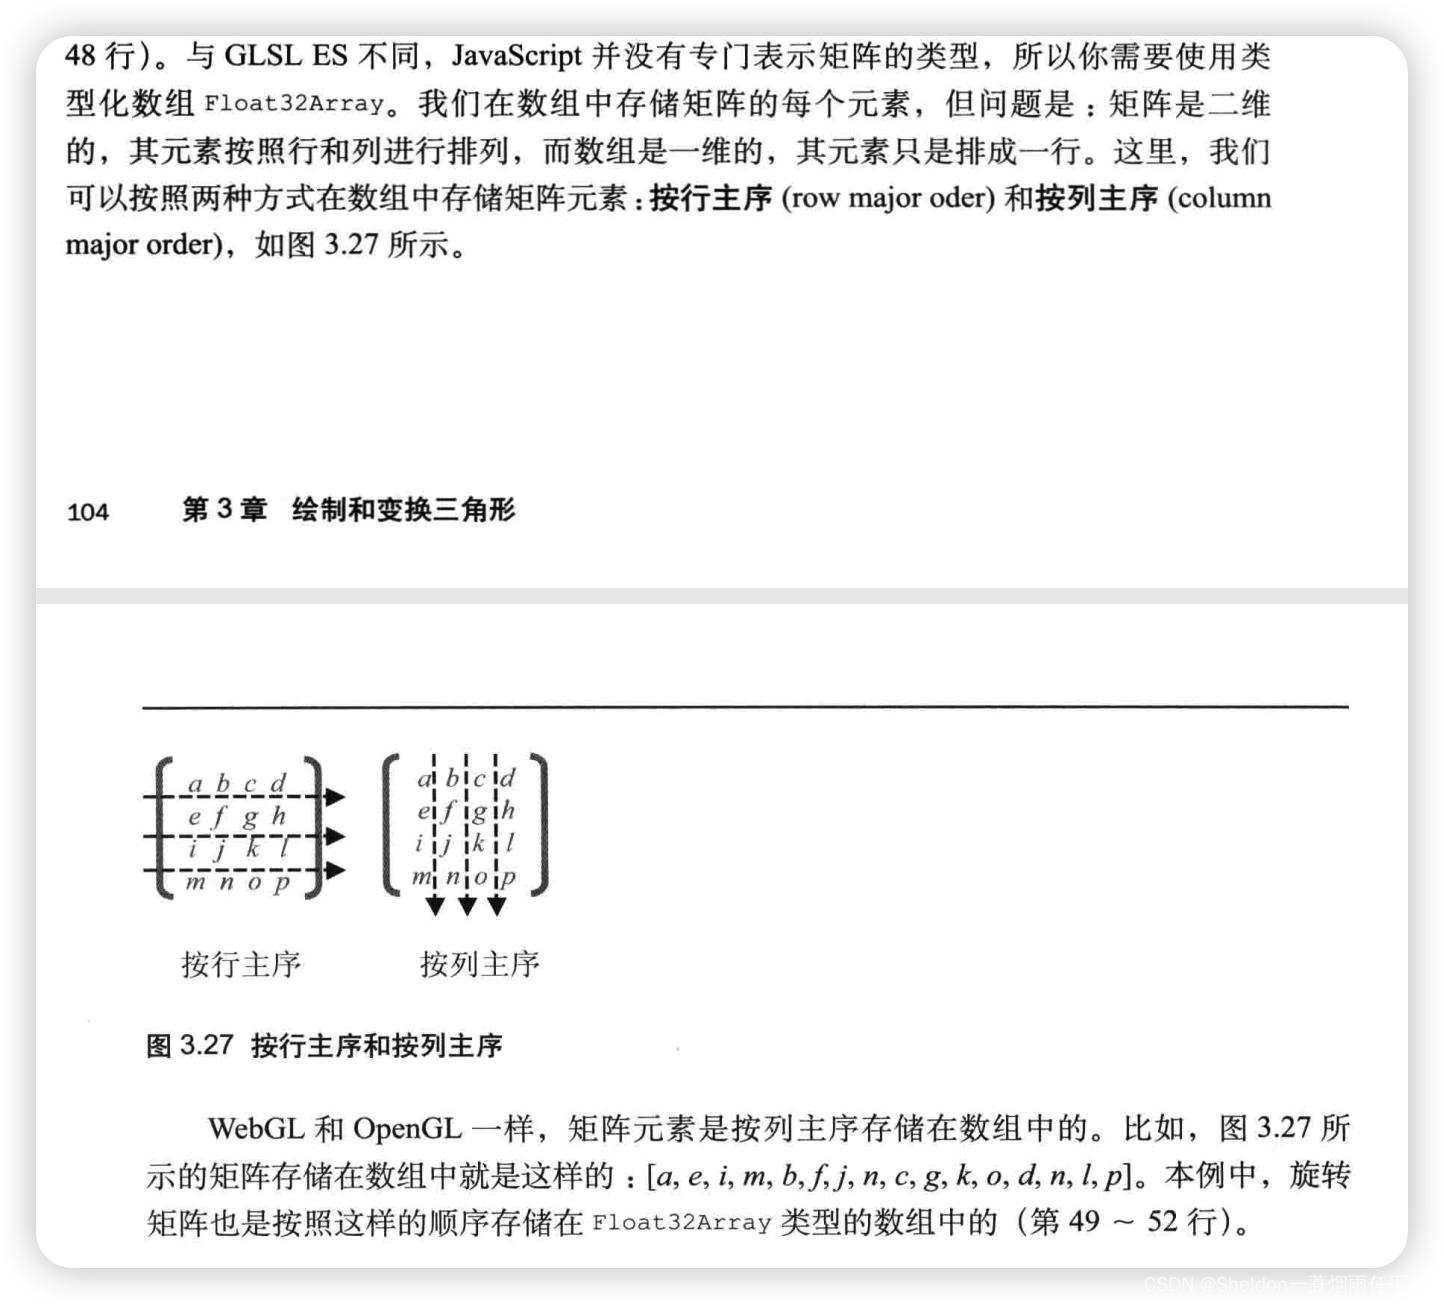
RotatedTriangle_Matrix.js:
// 顶点着色器
const VSHADER_SOURCE =
  'attribute vec4 a_Position;\n' +
  'uniform mat4 u_xformMatrix;\n' +
  'void main() {\n' +
  // 设置坐标,矩阵变换,注意矩阵变换C = AB不能写成C = BA
  ' gl_Position = u_xformMatrix * a_Position;\n' +
  '}\n'

// 片元着色器
const FSHADER_SOURCE =
  // 设置uniform变量之前,需要先设置精度
  'precision mediump float;\n' +
  'uniform vec4 u_FragColor;\n' +
  'void main() {\n' +
  // 设置颜色
  ' gl_FragColor = u_FragColor;\n' +
  '}\n'

let gl = null

// 旋转角度
const ANGLE = 90.0

function main () {
  // 获取canvas元素
  const canvas = document.getElementById('webgl')

  // 获取WebGL上下文
  gl = getWebGLContext(canvas)
  if (!gl) {
    return console.log('Failed to get the rendering context for WebGL')
  }

  // 初始化着色器
  if (!initShaders(gl, VSHADER_SOURCE, FSHADER_SOURCE)) {
    return console.log('Failed to initialize shaders')
  }

  // 获取attribute变量的存储位置
  let a_Position = gl.getAttribLocation(gl.program, 'a_Position')
  if (a_Position < 0) {
    return console.log('Failed to get the storage location of a_Position')
  }

  let u_FragColor = gl.getUniformLocation(gl.program, 'u_FragColor')
  if (!u_FragColor) {
    return console.log('Failed to get the storage location of u_FragColor')
  }

  // 设置顶点位置
  let n = initVertexBuffers(gl)
  console.log(n)
  if (n < 0) {
    return console.log('Failed to set the postion of vertices')
  }

  // 将旋转图形需要的数据传输给顶点着色器
  const radian = Math.PI * ANGLE / 180; // 转为弧度制
  const cosB = Math.cos(radian)
  const sinB = Math.sin(radian)

  const xformMatrix = new Float32Array([
    cosB, sinB, 0.0, 0.0,
    -sinB, cosB, 0.0, 0.0,
    0.0, 0.0, 1.0, 0.0,
    0.0, 0.0, 0.0, 1.0
  ])

  // 将旋转矩阵传输给顶点着色器
  const u_xformMatrix = gl.getUniformLocation(gl.program, 'u_xformMatrix')
  gl.uniformMatrix4fv(u_xformMatrix, false, xformMatrix)

  // 设置canvas背景色
  gl.clearColor(0.0, 0.0, 0.0, 1.0)

  // 清空canvas
  gl.clear(gl.COLOR_BUFFER_BIT)

  // 绘制三角形
  gl.drawArrays(gl.TRIANGLES, 0, n)
}

function initVertexBuffers (gl) {
  let vertices = new Float32Array([
    0.0, 0.5,
    -0.5, -0.5,
    0.5, -0.5
  ])
  // 点的个数
  let n = 3

  // 1、创建缓冲区对象
  let vertexBuffer = gl.createBuffer()
  if (!vertexBuffer) {
    console.log('Failed to create the buffer object')
    return -1
  }

  // 2、绑定缓冲区对象(将缓冲区对象绑定到目标()
  gl.bindBuffer(gl.ARRAY_BUFFER, vertexBuffer)
  // 3、将数据写入缓冲区对象
  gl.bufferData(gl.ARRAY_BUFFER, vertices, gl.STATIC_DRAW)

  let a_Position = gl.getAttribLocation(gl.program, 'a_Position')

  // 4、将缓冲区对象分配给一个atrribute变量(缓冲区对象分配给a_Position)
  gl.vertexAttribPointer(a_Position, 2, gl.FLOAT, false, 0, 0)

  // 5、开启attribute变量(连接a_Position变量与分配给它的缓冲区对象)
  gl.enableVertexAttribArray(a_Position)

  return n
}
3.3.3.10 WebGL的平移矩阵运算
和旋转矩阵运算的代码几乎相同,只是在变量和矩阵做了改动。
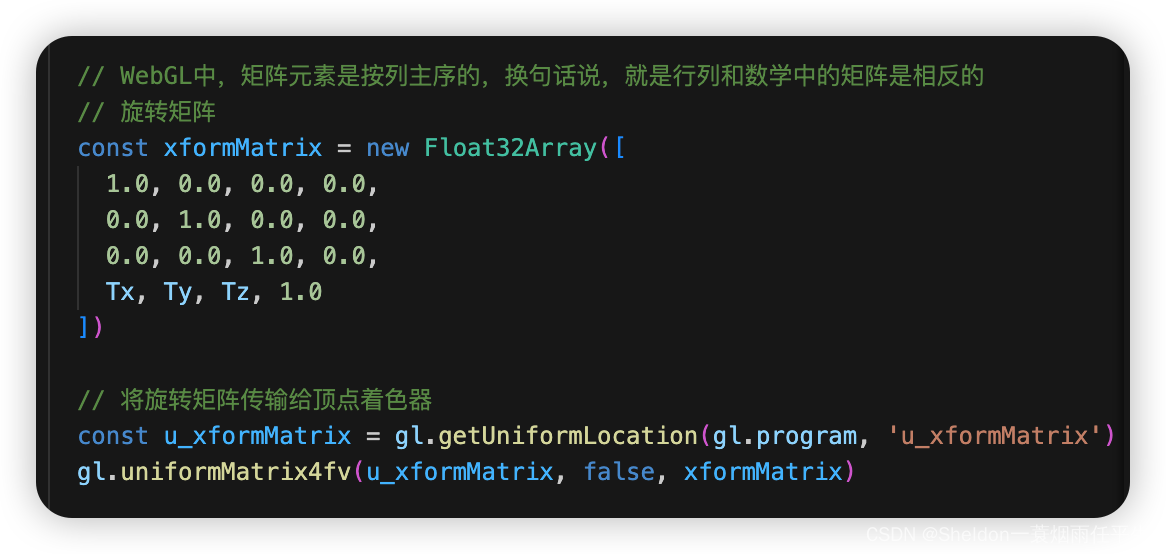
// WebGL中,矩阵元素是按列主序的,换句话说,就是行列和数学中的矩阵是相反的
// 旋转矩阵
const xformMatrix = new Float32Array([
  1.0, 0.0, 0.0, 0.0,
  0.0, 1.0, 0.0, 0.0,
  0.0, 0.0, 1.0, 0.0,
  Tx, Ty, Tz, 1.0
])
3.3.4 缩放
学习了WebGL的矩阵运算之后,再进行缩放就显得尤为简单了。
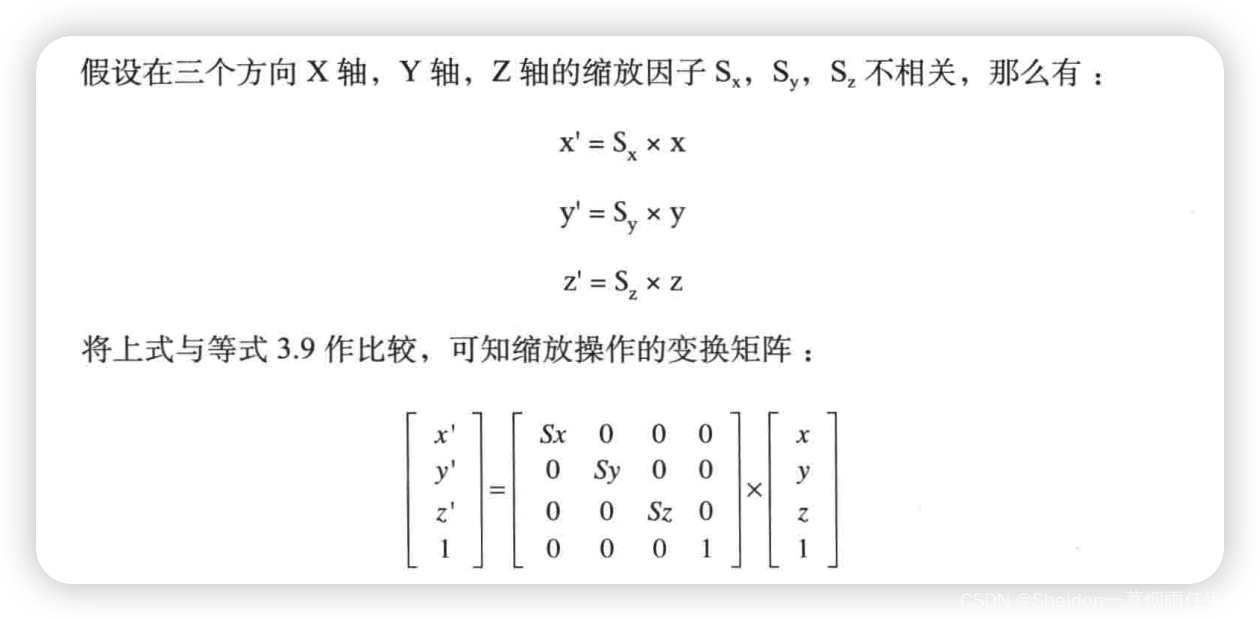
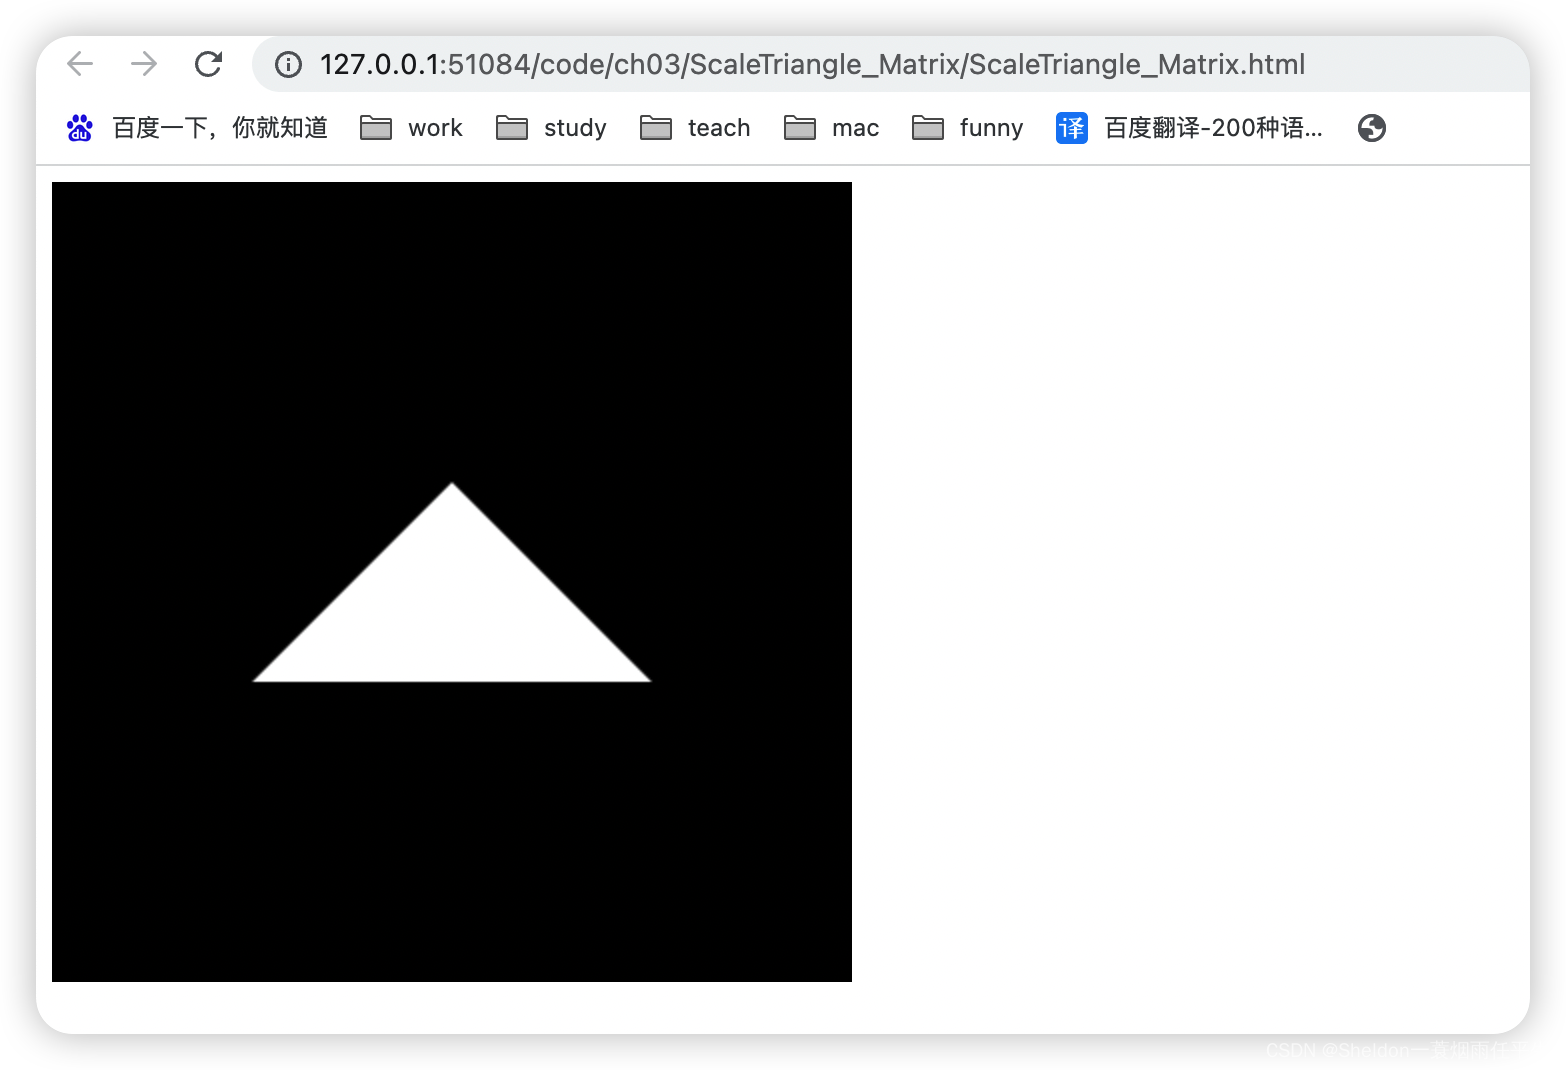

关键代码:
// WebGL中,矩阵元素是按列主序的,换句话说,就是行列和数学中的矩阵是相反的
// 旋转矩阵
const xformMatrix = new Float32Array([
  Sx, 0.0, 0.0, 0.0,
  0.0, Sy, 0.0, 0.0,
  0.0, 0.0, Sz, 0.0,
  0, 0, 0, 1.0
])
4.第四章 高级变换和动画基础
4.1 矩阵函数库
4.1.1 初识矩阵函数库
在OpenGL中,我们无须手动创建变换矩阵的每个元素,因为OpenGL提供了一系列函数用于帮助我们创建变换矩阵。比如通过调用glTranslatef(5,80,30)就可以创建一个平移矩阵。
但是WebGL没有提供类似的矩阵函数,所以我们只能自己编写或者使用别人已经写好的矩阵库。本书的作者就专门编写了JavaScript函数库coun-matrix.js,用于创建矩阵。
lib/coun-matrix.js:
// cuon-matrix.js (c) 2012 kanda and matsuda
/**
 * This is a class treating 4x4 matrix.
 * This class contains the function that is equivalent to OpenGL matrix stack.
 * The matrix after conversion is calculated by multiplying a conversion matrix from the right.
 * The matrix is replaced by the calculated result.
 */

/**
 * Constructor of Matrix4
 * If opt_src is specified, new matrix is initialized by opt_src.
 * Otherwise, new matrix is initialized by identity matrix.
 * @param opt_src source matrix(option)
 */
var Matrix4 = function(opt_src) {
  var i, s, d;
  if (opt_src && typeof opt_src === 'object' && opt_src.hasOwnProperty('elements')) {
    s = opt_src.elements;
    d = new Float32Array(16);
    for (i = 0; i < 16; ++i) {
      d[i] = s[i];
    }
    this.elements = d;
  } else {
    this.elements = new Float32Array([1,0,0,0, 0,1,0,0, 0,0,1,0, 0,0,0,1]);
  }
};

/**
 * Set the identity matrix.
 * @return this
 */
Matrix4.prototype.setIdentity = function() {
  var e = this.elements;
  e[0] = 1;   e[4] = 0;   e[8]  = 0;   e[12] = 0;
  e[1] = 0;   e[5] = 1;   e[9]  = 0;   e[13] = 0;
  e[2] = 0;   e[6] = 0;   e[10] = 1;   e[14] = 0;
  e[3] = 0;   e[7] = 0;   e[11] = 0;   e[15] = 1;
  return this;
};

/**
 * Copy matrix.
 * @param src source matrix
 * @return this
 */
Matrix4.prototype.set = function(src) {
  var i, s, d;

  s = src.elements;
  d = this.elements;

  if (s === d) {
    return;
  }

  for (i = 0; i < 16; ++i) {
    d[i] = s[i];
  }

  return this;
};

/**
 * Multiply the matrix from the right.
 * @param other The multiply matrix
 * @return this
 */
Matrix4.prototype.concat = function(other) {
  var i, e, a, b, ai0, ai1, ai2, ai3;

  // Calculate e = a * b
  e = this.elements;
  a = this.elements;
  b = other.elements;

  // If e equals b, copy b to temporary matrix.
  if (e === b) {
    b = new Float32Array(16);
    for (i = 0; i < 16; ++i) {
      b[i] = e[i];
    }
  }

  for (i = 0; i < 4; i++) {
    ai0=a[i];  ai1=a[i+4];  ai2=a[i+8];  ai3=a[i+12];
    e[i]    = ai0 * b[0]  + ai1 * b[1]  + ai2 * b[2]  + ai3 * b[3];
    e[i+4]  = ai0 * b[4]  + ai1 * b[5]  + ai2 * b[6]  + ai3 * b[7];
    e[i+8]  = ai0 * b[8]  + ai1 * b[9]  + ai2 * b[10] + ai3 * b[11];
    e[i+12] = ai0 * b[12] + ai1 * b[13] + ai2 * b[14] + ai3 * b[15];
  }

  return this;
};
Matrix4.prototype.multiply = Matrix4.prototype.concat;

/**
 * Multiply the three-dimensional vector.
 * @param pos  The multiply vector
 * @return The result of multiplication(Float32Array)
 */
Matrix4.prototype.multiplyVector3 = function(pos) {
  var e = this.elements;
  var p = pos.elements;
  var v = new Vector3();
  var result = v.elements;

  result[0] = p[0] * e[0] + p[1] * e[4] + p[2] * e[ 8] + e[12];
  result[1] = p[0] * e[1] + p[1] * e[5] + p[2] * e[ 9] + e[13];
  result[2] = p[0] * e[2] + p[1] * e[6] + p[2] * e[10] + e[14];

  return v;
};

/**
 * Multiply the four-dimensional vector.
 * @param pos  The multiply vector
 * @return The result of multiplication(Float32Array)
 */
Matrix4.prototype.multiplyVector4 = function(pos) {
  var e = this.elements;
  var p = pos.elements;
  var v = new Vector4();
  var result = v.elements;

  result[0] = p[0] * e[0] + p[1] * e[4] + p[2] * e[ 8] + p[3] * e[12];
  result[1] = p[0] * e[1] + p[1] * e[5] + p[2] * e[ 9] + p[3] * e[13];
  result[2] = p[0] * e[2] + p[1] * e[6] + p[2] * e[10] + p[3] * e[14];
  result[3] = p[0] * e[3] + p[1] * e[7] + p[2] * e[11] + p[3] * e[15];

  return v;
};

/**
 * Transpose the matrix.
 * @return this
 */
Matrix4.prototype.transpose = function() {
  var e, t;

  e = this.elements;

  t = e[ 1];  e[ 1] = e[ 4];  e[ 4] = t;
  t = e[ 2];  e[ 2] = e[ 8];  e[ 8] = t;
  t = e[ 3];  e[ 3] = e[12];  e[12] = t;
  t = e[ 6];  e[ 6] = e[ 9];  e[ 9] = t;
  t = e[ 7];  e[ 7] = e[13];  e[13] = t;
  t = e[11];  e[11] = e[14];  e[14] = t;

  return this;
};

/**
 * Calculate the inverse matrix of specified matrix, and set to this.
 * @param other The source matrix
 * @return this
 */
Matrix4.prototype.setInverseOf = function(other) {
  var i, s, d, inv, det;

  s = other.elements;
  d = this.elements;
  inv = new Float32Array(16);

  inv[0]  =   s[5]*s[10]*s[15] - s[5] *s[11]*s[14] - s[9] *s[6]*s[15]
            + s[9]*s[7] *s[14] + s[13]*s[6] *s[11] - s[13]*s[7]*s[10];
  inv[4]  = - s[4]*s[10]*s[15] + s[4] *s[11]*s[14] + s[8] *s[6]*s[15]
            - s[8]*s[7] *s[14] - s[12]*s[6] *s[11] + s[12]*s[7]*s[10];
  inv[8]  =   s[4]*s[9] *s[15] - s[4] *s[11]*s[13] - s[8] *s[5]*s[15]
            + s[8]*s[7] *s[13] + s[12]*s[5] *s[11] - s[12]*s[7]*s[9];
  inv[12] = - s[4]*s[9] *s[14] + s[4] *s[10]*s[13] + s[8] *s[5]*s[14]
            - s[8]*s[6] *s[13] - s[12]*s[5] *s[10] + s[12]*s[6]*s[9];

  inv[1]  = - s[1]*s[10]*s[15] + s[1] *s[11]*s[14] + s[9] *s[2]*s[15]
            - s[9]*s[3] *s[14] - s[13]*s[2] *s[11] + s[13]*s[3]*s[10];
  inv[5]  =   s[0]*s[10]*s[15] - s[0] *s[11]*s[14] - s[8] *s[2]*s[15]
            + s[8]*s[3] *s[14] + s[12]*s[2] *s[11] - s[12]*s[3]*s[10];
  inv[9]  = - s[0]*s[9] *s[15] + s[0] *s[11]*s[13] + s[8] *s[1]*s[15]
            - s[8]*s[3] *s[13] - s[12]*s[1] *s[11] + s[12]*s[3]*s[9];
  inv[13] =   s[0]*s[9] *s[14] - s[0] *s[10]*s[13] - s[8] *s[1]*s[14]
            + s[8]*s[2] *s[13] + s[12]*s[1] *s[10] - s[12]*s[2]*s[9];

  inv[2]  =   s[1]*s[6]*s[15] - s[1] *s[7]*s[14] - s[5] *s[2]*s[15]
            + s[5]*s[3]*s[14] + s[13]*s[2]*s[7]  - s[13]*s[3]*s[6];
  inv[6]  = - s[0]*s[6]*s[15] + s[0] *s[7]*s[14] + s[4] *s[2]*s[15]
            - s[4]*s[3]*s[14] - s[12]*s[2]*s[7]  + s[12]*s[3]*s[6];
  inv[10] =   s[0]*s[5]*s[15] - s[0] *s[7]*s[13] - s[4] *s[1]*s[15]
            + s[4]*s[3]*s[13] + s[12]*s[1]*s[7]  - s[12]*s[3]*s[5];
  inv[14] = - s[0]*s[5]*s[14] + s[0] *s[6]*s[13] + s[4] *s[1]*s[14]
            - s[4]*s[2]*s[13] - s[12]*s[1]*s[6]  + s[12]*s[2]*s[5];

  inv[3]  = - s[1]*s[6]*s[11] + s[1]*s[7]*s[10] + s[5]*s[2]*s[11]
            - s[5]*s[3]*s[10] - s[9]*s[2]*s[7]  + s[9]*s[3]*s[6];
  inv[7]  =   s[0]*s[6]*s[11] - s[0]*s[7]*s[10] - s[4]*s[2]*s[11]
            + s[4]*s[3]*s[10] + s[8]*s[2]*s[7]  - s[8]*s[3]*s[6];
  inv[11] = - s[0]*s[5]*s[11] + s[0]*s[7]*s[9]  + s[4]*s[1]*s[11]
            - s[4]*s[3]*s[9]  - s[8]*s[1]*s[7]  + s[8]*s[3]*s[5];
  inv[15] =   s[0]*s[5]*s[10] - s[0]*s[6]*s[9]  - s[4]*s[1]*s[10]
            + s[4]*s[2]*s[9]  + s[8]*s[1]*s[6]  - s[8]*s[2]*s[5];

  det = s[0]*inv[0] + s[1]*inv[4] + s[2]*inv[8] + s[3]*inv[12];
  if (det === 0) {
    return this;
  }

  det = 1 / det;
  for (i = 0; i < 16; i++) {
    d[i] = inv[i] * det;
  }

  return this;
};

/**
 * Calculate the inverse matrix of this, and set to this.
 * @return this
 */
Matrix4.prototype.invert = function() {
  return this.setInverseOf(this);
};

/**
 * Set the orthographic projection matrix.
 * @param left The coordinate of the left of clipping plane.
 * @param right The coordinate of the right of clipping plane.
 * @param bottom The coordinate of the bottom of clipping plane.
 * @param top The coordinate of the top top clipping plane.
 * @param near The distances to the nearer depth clipping plane. This value is minus if the plane is to be behind the viewer.
 * @param far The distances to the farther depth clipping plane. This value is minus if the plane is to be behind the viewer.
 * @return this
 */
Matrix4.prototype.setOrtho = function(left, right, bottom, top, near, far) {
  var e, rw, rh, rd;

  if (left === right || bottom === top || near === far) {
    throw 'null frustum';
  }

  rw = 1 / (right - left);
  rh = 1 / (top - bottom);
  rd = 1 / (far - near);

  e = this.elements;

  e[0]  = 2 * rw;
  e[1]  = 0;
  e[2]  = 0;
  e[3]  = 0;

  e[4]  = 0;
  e[5]  = 2 * rh;
  e[6]  = 0;
  e[7]  = 0;

  e[8]  = 0;
  e[9]  = 0;
  e[10] = -2 * rd;
  e[11] = 0;

  e[12] = -(right + left) * rw;
  e[13] = -(top + bottom) * rh;
  e[14] = -(far + near) * rd;
  e[15] = 1;

  return this;
};

/**
 * Multiply the orthographic projection matrix from the right.
 * @param left The coordinate of the left of clipping plane.
 * @param right The coordinate of the right of clipping plane.
 * @param bottom The coordinate of the bottom of clipping plane.
 * @param top The coordinate of the top top clipping plane.
 * @param near The distances to the nearer depth clipping plane. This value is minus if the plane is to be behind the viewer.
 * @param far The distances to the farther depth clipping plane. This value is minus if the plane is to be behind the viewer.
 * @return this
 */
Matrix4.prototype.ortho = function(left, right, bottom, top, near, far) {
  return this.concat(new Matrix4().setOrtho(left, right, bottom, top, near, far));
};

/**
 * Set the perspective projection matrix.
 * @param left The coordinate of the left of clipping plane.
 * @param right The coordinate of the right of clipping plane.
 * @param bottom The coordinate of the bottom of clipping plane.
 * @param top The coordinate of the top top clipping plane.
 * @param near The distances to the nearer depth clipping plane. This value must be plus value.
 * @param far The distances to the farther depth clipping plane. This value must be plus value.
 * @return this
 */
Matrix4.prototype.setFrustum = function(left, right, bottom, top, near, far) {
  var e, rw, rh, rd;

  if (left === right || top === bottom || near === far) {
    throw 'null frustum';
  }
  if (near <= 0) {
    throw 'near <= 0';
  }
  if (far <= 0) {
    throw 'far <= 0';
  }

  rw = 1 / (right - left);
  rh = 1 / (top - bottom);
  rd = 1 / (far - near);

  e = this.elements;

  e[ 0] = 2 * near * rw;
  e[ 1] = 0;
  e[ 2] = 0;
  e[ 3] = 0;

  e[ 4] = 0;
  e[ 5] = 2 * near * rh;
  e[ 6] = 0;
  e[ 7] = 0;

  e[ 8] = (right + left) * rw;
  e[ 9] = (top + bottom) * rh;
  e[10] = -(far + near) * rd;
  e[11] = -1;

  e[12] = 0;
  e[13] = 0;
  e[14] = -2 * near * far * rd;
  e[15] = 0;

  return this;
};

/**
 * Multiply the perspective projection matrix from the right.
 * @param left The coordinate of the left of clipping plane.
 * @param right The coordinate of the right of clipping plane.
 * @param bottom The coordinate of the bottom of clipping plane.
 * @param top The coordinate of the top top clipping plane.
 * @param near The distances to the nearer depth clipping plane. This value must be plus value.
 * @param far The distances to the farther depth clipping plane. This value must be plus value.
 * @return this
 */
Matrix4.prototype.frustum = function(left, right, bottom, top, near, far) {
  return this.concat(new Matrix4().setFrustum(left, right, bottom, top, near, far));
};

/**
 * Set the perspective projection matrix by fovy and aspect.
 * @param fovy The angle between the upper and lower sides of the frustum.
 * @param aspect The aspect ratio of the frustum. (width/height)
 * @param near The distances to the nearer depth clipping plane. This value must be plus value.
 * @param far The distances to the farther depth clipping plane. This value must be plus value.
 * @return this
 */
Matrix4.prototype.setPerspective = function(fovy, aspect, near, far) {
  var e, rd, s, ct;

  if (near === far || aspect === 0) {
    throw 'null frustum';
  }
  if (near <= 0) {
    throw 'near <= 0';
  }
  if (far <= 0) {
    throw 'far <= 0';
  }

  fovy = Math.PI * fovy / 180 / 2;
  s = Math.sin(fovy);
  if (s === 0) {
    throw 'null frustum';
  }

  rd = 1 / (far - near);
  ct = Math.cos(fovy) / s;

  e = this.elements;

  e[0]  = ct / aspect;
  e[1]  = 0;
  e[2]  = 0;
  e[3]  = 0;

  e[4]  = 0;
  e[5]  = ct;
  e[6]  = 0;
  e[7]  = 0;

  e[8]  = 0;
  e[9]  = 0;
  e[10] = -(far + near) * rd;
  e[11] = -1;

  e[12] = 0;
  e[13] = 0;
  e[14] = -2 * near * far * rd;
  e[15] = 0;

  return this;
};

/**
 * Multiply the perspective projection matrix from the right.
 * @param fovy The angle between the upper and lower sides of the frustum.
 * @param aspect The aspect ratio of the frustum. (width/height)
 * @param near The distances to the nearer depth clipping plane. This value must be plus value.
 * @param far The distances to the farther depth clipping plane. This value must be plus value.
 * @return this
 */
Matrix4.prototype.perspective = function(fovy, aspect, near, far) {
  return this.concat(new Matrix4().setPerspective(fovy, aspect, near, far));
};

/**
 * Set the matrix for scaling.
 * @param x The scale factor along the X axis
 * @param y The scale factor along the Y axis
 * @param z The scale factor along the Z axis
 * @return this
 */
Matrix4.prototype.setScale = function(x, y, z) {
  var e = this.elements;
  e[0] = x;  e[4] = 0;  e[8]  = 0;  e[12] = 0;
  e[1] = 0;  e[5] = y;  e[9]  = 0;  e[13] = 0;
  e[2] = 0;  e[6] = 0;  e[10] = z;  e[14] = 0;
  e[3] = 0;  e[7] = 0;  e[11] = 0;  e[15] = 1;
  return this;
};

/**
 * Multiply the matrix for scaling from the right.
 * @param x The scale factor along the X axis
 * @param y The scale factor along the Y axis
 * @param z The scale factor along the Z axis
 * @return this
 */
Matrix4.prototype.scale = function(x, y, z) {
  var e = this.elements;
  e[0] *= x;  e[4] *= y;  e[8]  *= z;
  e[1] *= x;  e[5] *= y;  e[9]  *= z;
  e[2] *= x;  e[6] *= y;  e[10] *= z;
  e[3] *= x;  e[7] *= y;  e[11] *= z;
  return this;
};

/**
 * Set the matrix for translation.
 * @param x The X value of a translation.
 * @param y The Y value of a translation.
 * @param z The Z value of a translation.
 * @return this
 */
Matrix4.prototype.setTranslate = function(x, y, z) {
  var e = this.elements;
  e[0] = 1;  e[4] = 0;  e[8]  = 0;  e[12] = x;
  e[1] = 0;  e[5] = 1;  e[9]  = 0;  e[13] = y;
  e[2] = 0;  e[6] = 0;  e[10] = 1;  e[14] = z;
  e[3] = 0;  e[7] = 0;  e[11] = 0;  e[15] = 1;
  return this;
};

/**
 * Multiply the matrix for translation from the right.
 * @param x The X value of a translation.
 * @param y The Y value of a translation.
 * @param z The Z value of a translation.
 * @return this
 */
Matrix4.prototype.translate = function(x, y, z) {
  var e = this.elements;
  e[12] += e[0] * x + e[4] * y + e[8]  * z;
  e[13] += e[1] * x + e[5] * y + e[9]  * z;
  e[14] += e[2] * x + e[6] * y + e[10] * z;
  e[15] += e[3] * x + e[7] * y + e[11] * z;
  return this;
};

/**
 * Set the matrix for rotation.
 * The vector of rotation axis may not be normalized.
 * @param angle The angle of rotation (degrees)
 * @param x The X coordinate of vector of rotation axis.
 * @param y The Y coordinate of vector of rotation axis.
 * @param z The Z coordinate of vector of rotation axis.
 * @return this
 */
Matrix4.prototype.setRotate = function(angle, x, y, z) {
  var e, s, c, len, rlen, nc, xy, yz, zx, xs, ys, zs;

  angle = Math.PI * angle / 180;
  e = this.elements;

  s = Math.sin(angle);
  c = Math.cos(angle);

  if (0 !== x && 0 === y && 0 === z) {
    // Rotation around X axis
    if (x < 0) {
      s = -s;
    }
    e[0] = 1;  e[4] = 0;  e[ 8] = 0;  e[12] = 0;
    e[1] = 0;  e[5] = c;  e[ 9] =-s;  e[13] = 0;
    e[2] = 0;  e[6] = s;  e[10] = c;  e[14] = 0;
    e[3] = 0;  e[7] = 0;  e[11] = 0;  e[15] = 1;
  } else if (0 === x && 0 !== y && 0 === z) {
    // Rotation around Y axis
    if (y < 0) {
      s = -s;
    }
    e[0] = c;  e[4] = 0;  e[ 8] = s;  e[12] = 0;
    e[1] = 0;  e[5] = 1;  e[ 9] = 0;  e[13] = 0;
    e[2] =-s;  e[6] = 0;  e[10] = c;  e[14] = 0;
    e[3] = 0;  e[7] = 0;  e[11] = 0;  e[15] = 1;
  } else if (0 === x && 0 === y && 0 !== z) {
    // Rotation around Z axis
    if (z < 0) {
      s = -s;
    }
    e[0] = c;  e[4] =-s;  e[ 8] = 0;  e[12] = 0;
    e[1] = s;  e[5] = c;  e[ 9] = 0;  e[13] = 0;
    e[2] = 0;  e[6] = 0;  e[10] = 1;  e[14] = 0;
    e[3] = 0;  e[7] = 0;  e[11] = 0;  e[15] = 1;
  } else {
    // Rotation around another axis
    len = Math.sqrt(x*x + y*y + z*z);
    if (len !== 1) {
      rlen = 1 / len;
      x *= rlen;
      y *= rlen;
      z *= rlen;
    }
    nc = 1 - c;
    xy = x * y;
    yz = y * z;
    zx = z * x;
    xs = x * s;
    ys = y * s;
    zs = z * s;

    e[ 0] = x*x*nc +  c;
    e[ 1] = xy *nc + zs;
    e[ 2] = zx *nc - ys;
    e[ 3] = 0;

    e[ 4] = xy *nc - zs;
    e[ 5] = y*y*nc +  c;
    e[ 6] = yz *nc + xs;
    e[ 7] = 0;

    e[ 8] = zx *nc + ys;
    e[ 9] = yz *nc - xs;
    e[10] = z*z*nc +  c;
    e[11] = 0;

    e[12] = 0;
    e[13] = 0;
    e[14] = 0;
    e[15] = 1;
  }

  return this;
};

/**
 * Multiply the matrix for rotation from the right.
 * The vector of rotation axis may not be normalized.
 * @param angle The angle of rotation (degrees)
 * @param x The X coordinate of vector of rotation axis.
 * @param y The Y coordinate of vector of rotation axis.
 * @param z The Z coordinate of vector of rotation axis.
 * @return this
 */
Matrix4.prototype.rotate = function(angle, x, y, z) {
  return this.concat(new Matrix4().setRotate(angle, x, y, z));
};

/**
 * Set the viewing matrix.
 * @param eyeX, eyeY, eyeZ The position of the eye point.
 * @param centerX, centerY, centerZ The position of the reference point.
 * @param upX, upY, upZ The direction of the up vector.
 * @return this
 */
Matrix4.prototype.setLookAt = function(eyeX, eyeY, eyeZ, centerX, centerY, centerZ, upX, upY, upZ) {
  var e, fx, fy, fz, rlf, sx, sy, sz, rls, ux, uy, uz;

  fx = centerX - eyeX;
  fy = centerY - eyeY;
  fz = centerZ - eyeZ;

  // Normalize f.
  rlf = 1 / Math.sqrt(fx*fx + fy*fy + fz*fz);
  fx *= rlf;
  fy *= rlf;
  fz *= rlf;

  // Calculate cross product of f and up.
  sx = fy * upZ - fz * upY;
  sy = fz * upX - fx * upZ;
  sz = fx * upY - fy * upX;

  // Normalize s.
  rls = 1 / Math.sqrt(sx*sx + sy*sy + sz*sz);
  sx *= rls;
  sy *= rls;
  sz *= rls;

  // Calculate cross product of s and f.
  ux = sy * fz - sz * fy;
  uy = sz * fx - sx * fz;
  uz = sx * fy - sy * fx;

  // Set to this.
  e = this.elements;
  e[0] = sx;
  e[1] = ux;
  e[2] = -fx;
  e[3] = 0;

  e[4] = sy;
  e[5] = uy;
  e[6] = -fy;
  e[7] = 0;

  e[8] = sz;
  e[9] = uz;
  e[10] = -fz;
  e[11] = 0;

  e[12] = 0;
  e[13] = 0;
  e[14] = 0;
  e[15] = 1;

  // Translate.
  return this.translate(-eyeX, -eyeY, -eyeZ);
};

/**
 * Multiply the viewing matrix from the right.
 * @param eyeX, eyeY, eyeZ The position of the eye point.
 * @param centerX, centerY, centerZ The position of the reference point.
 * @param upX, upY, upZ The direction of the up vector.
 * @return this
 */
Matrix4.prototype.lookAt = function(eyeX, eyeY, eyeZ, centerX, centerY, centerZ, upX, upY, upZ) {
  return this.concat(new Matrix4().setLookAt(eyeX, eyeY, eyeZ, centerX, centerY, centerZ, upX, upY, upZ));
};

/**
 * Multiply the matrix for project vertex to plane from the right.
 * @param plane The array[A, B, C, D] of the equation of plane "Ax + By + Cz + D = 0".
 * @param light The array which stored coordinates of the light. if light[3]=0, treated as parallel light.
 * @return this
 */
Matrix4.prototype.dropShadow = function(plane, light) {
  var mat = new Matrix4();
  var e = mat.elements;

  var dot = plane[0] * light[0] + plane[1] * light[1] + plane[2] * light[2] + plane[3] * light[3];

  e[ 0] = dot - light[0] * plane[0];
  e[ 1] =     - light[1] * plane[0];
  e[ 2] =     - light[2] * plane[0];
  e[ 3] =     - light[3] * plane[0];

  e[ 4] =     - light[0] * plane[1];
  e[ 5] = dot - light[1] * plane[1];
  e[ 6] =     - light[2] * plane[1];
  e[ 7] =     - light[3] * plane[1];

  e[ 8] =     - light[0] * plane[2];
  e[ 9] =     - light[1] * plane[2];
  e[10] = dot - light[2] * plane[2];
  e[11] =     - light[3] * plane[2];

  e[12] =     - light[0] * plane[3];
  e[13] =     - light[1] * plane[3];
  e[14] =     - light[2] * plane[3];
  e[15] = dot - light[3] * plane[3];

  return this.concat(mat);
}

/**
 * Multiply the matrix for project vertex to plane from the right.(Projected by parallel light.)
 * @param normX, normY, normZ The normal vector of the plane.(Not necessary to be normalized.)
 * @param planeX, planeY, planeZ The coordinate of arbitrary points on a plane.
 * @param lightX, lightY, lightZ The vector of the direction of light.(Not necessary to be normalized.)
 * @return this
 */
Matrix4.prototype.dropShadowDirectionally = function(normX, normY, normZ, planeX, planeY, planeZ, lightX, lightY, lightZ) {
  var a = planeX * normX + planeY * normY + planeZ * normZ;
  return this.dropShadow([normX, normY, normZ, -a], [lightX, lightY, lightZ, 0]);
};

/**
 * Constructor of Vector3
 * If opt_src is specified, new vector is initialized by opt_src.
 * @param opt_src source vector(option)
 */
var Vector3 = function(opt_src) {
  var v = new Float32Array(3);
  if (opt_src && typeof opt_src === 'object') {
    v[0] = opt_src[0]; v[1] = opt_src[1]; v[2] = opt_src[2];
  }
  this.elements = v;
}

/**
  * Normalize.
  * @return this
  */
Vector3.prototype.normalize = function() {
  var v = this.elements;
  var c = v[0], d = v[1], e = v[2], g = Math.sqrt(c*c+d*d+e*e);
  if(g){
    if(g == 1)
        return this;
   } else {
     v[0] = 0; v[1] = 0; v[2] = 0;
     return this;
   }
   g = 1/g;
   v[0] = c*g; v[1] = d*g; v[2] = e*g;
   return this;
};

/**
 * Constructor of Vector4
 * If opt_src is specified, new vector is initialized by opt_src.
 * @param opt_src source vector(option)
 */
var Vector4 = function(opt_src) {
  var v = new Float32Array(4);
  if (opt_src && typeof opt_src === 'object') {
    v[0] = opt_src[0]; v[1] = opt_src[1]; v[2] = opt_src[2]; v[3] = opt_src[3];
  }
  this.elements = v;
}
4.1.2 详解矩阵函数库
4.1.2.1 矩阵构造函数
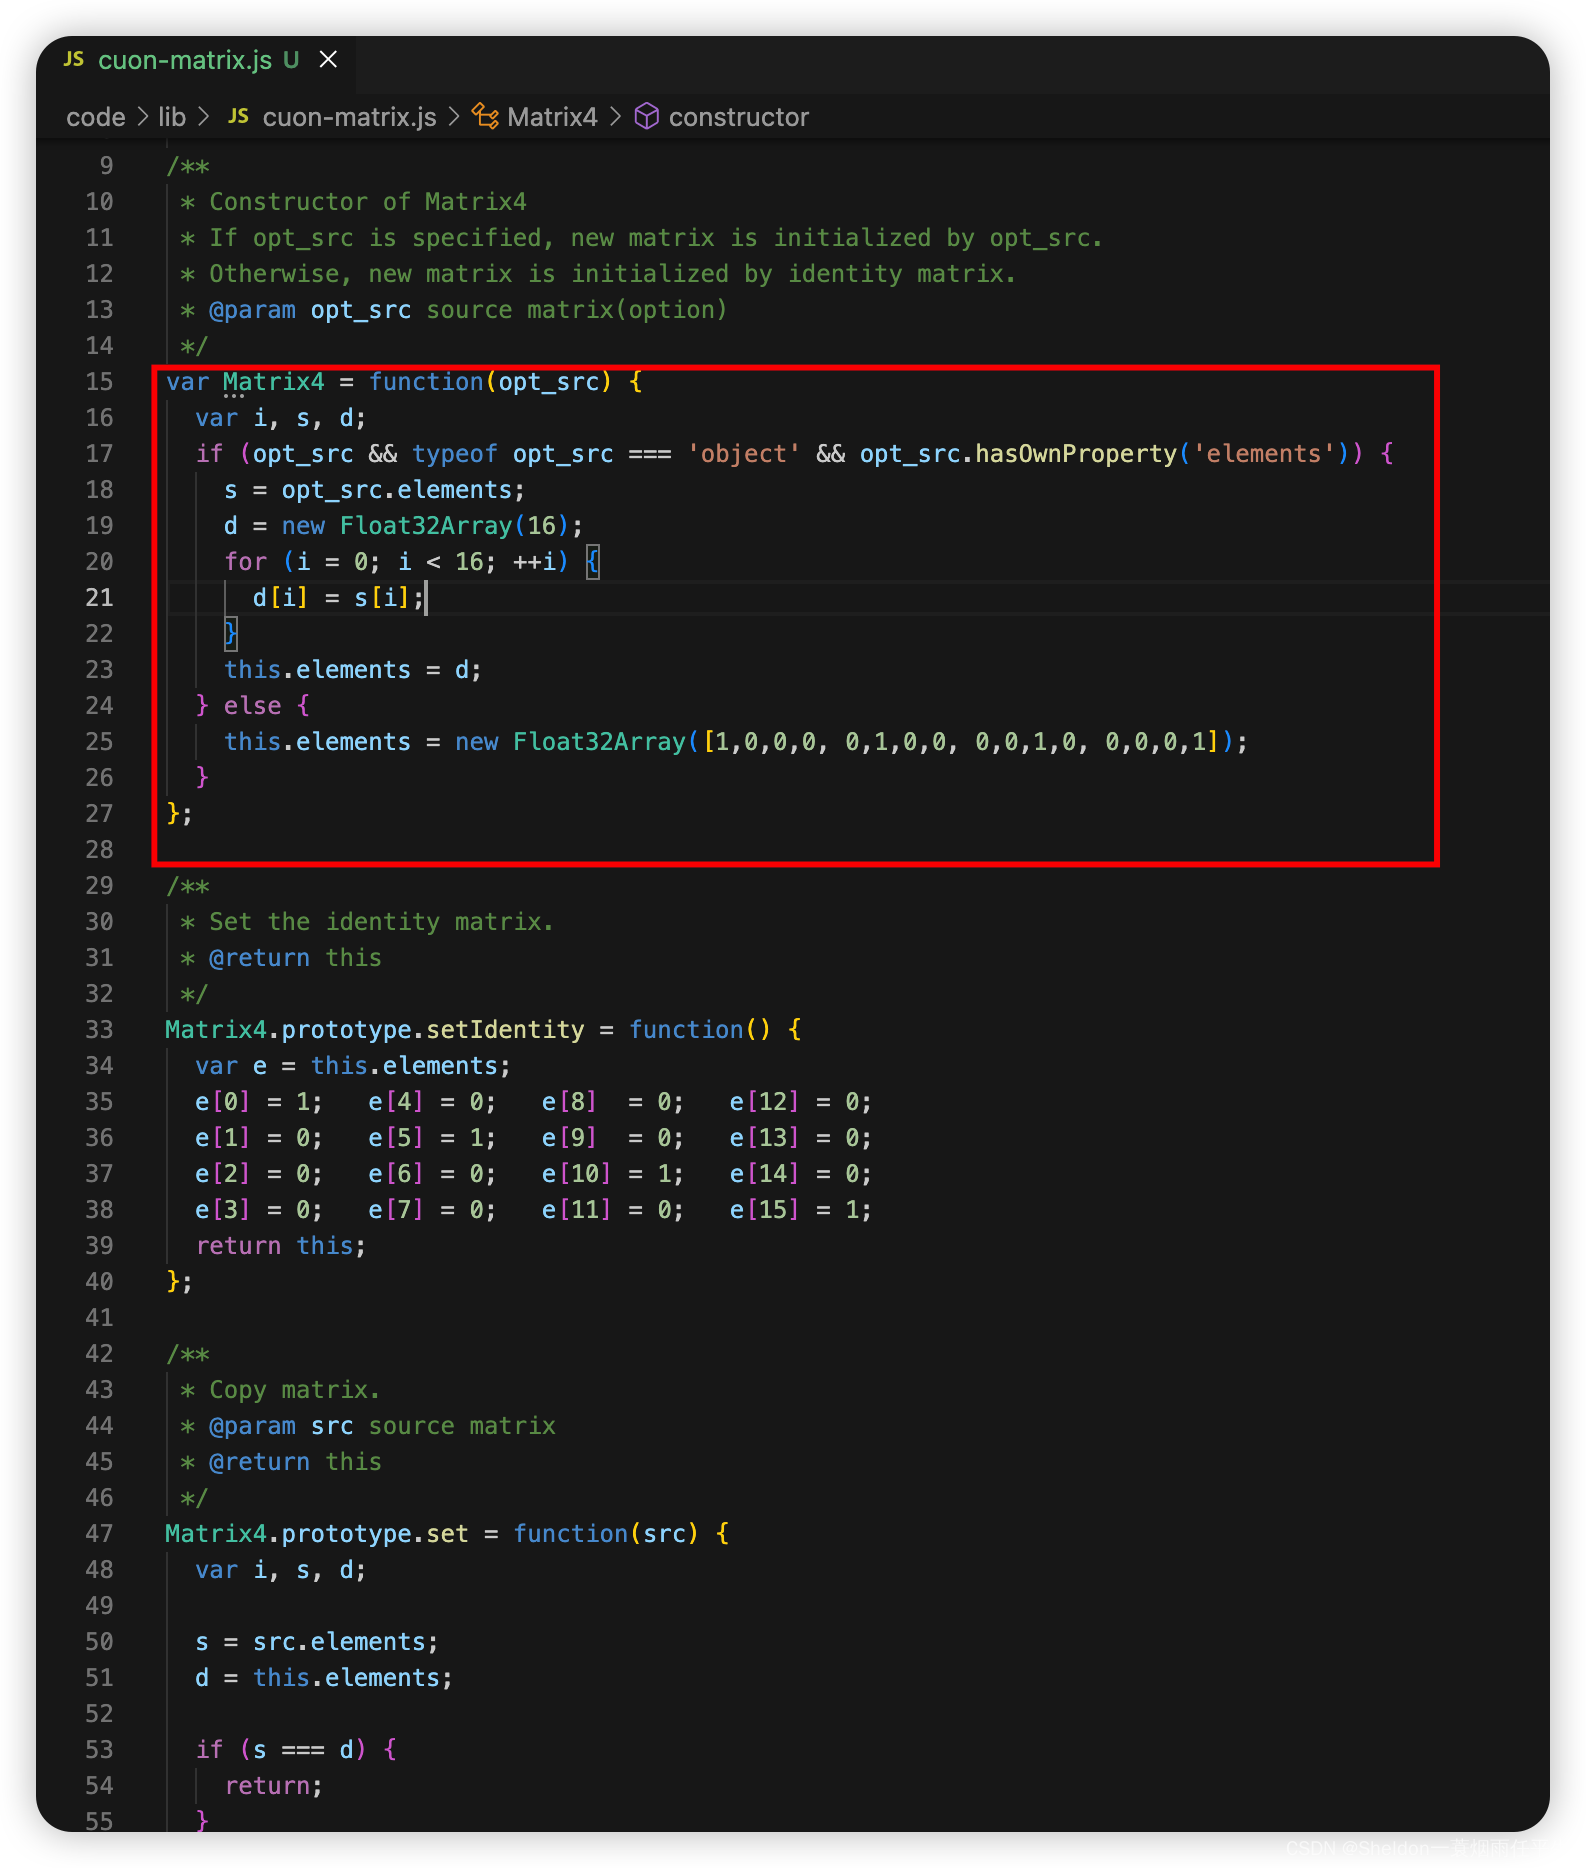
可以看到,矩阵库的内容其实并不复杂。首先是矩阵的构造函数(函数也是对象),只有一个元素elements,是一个定型数组,用于存放矩阵数据。
支持传入参数opt_src,如果传入,就以数组opt_src.elements作为矩阵的内容;如果不传,默认创建一个不产生任何变换的矩阵:
[1,0,0,0,
 0,1,0,0,
 0,0,1,0,
 0,0,0,1]
换成等式,相当于:
x’ = x,
y’ = y,
z’ = z,
w’ = w’
4.1.2.2 矩阵函数原型链
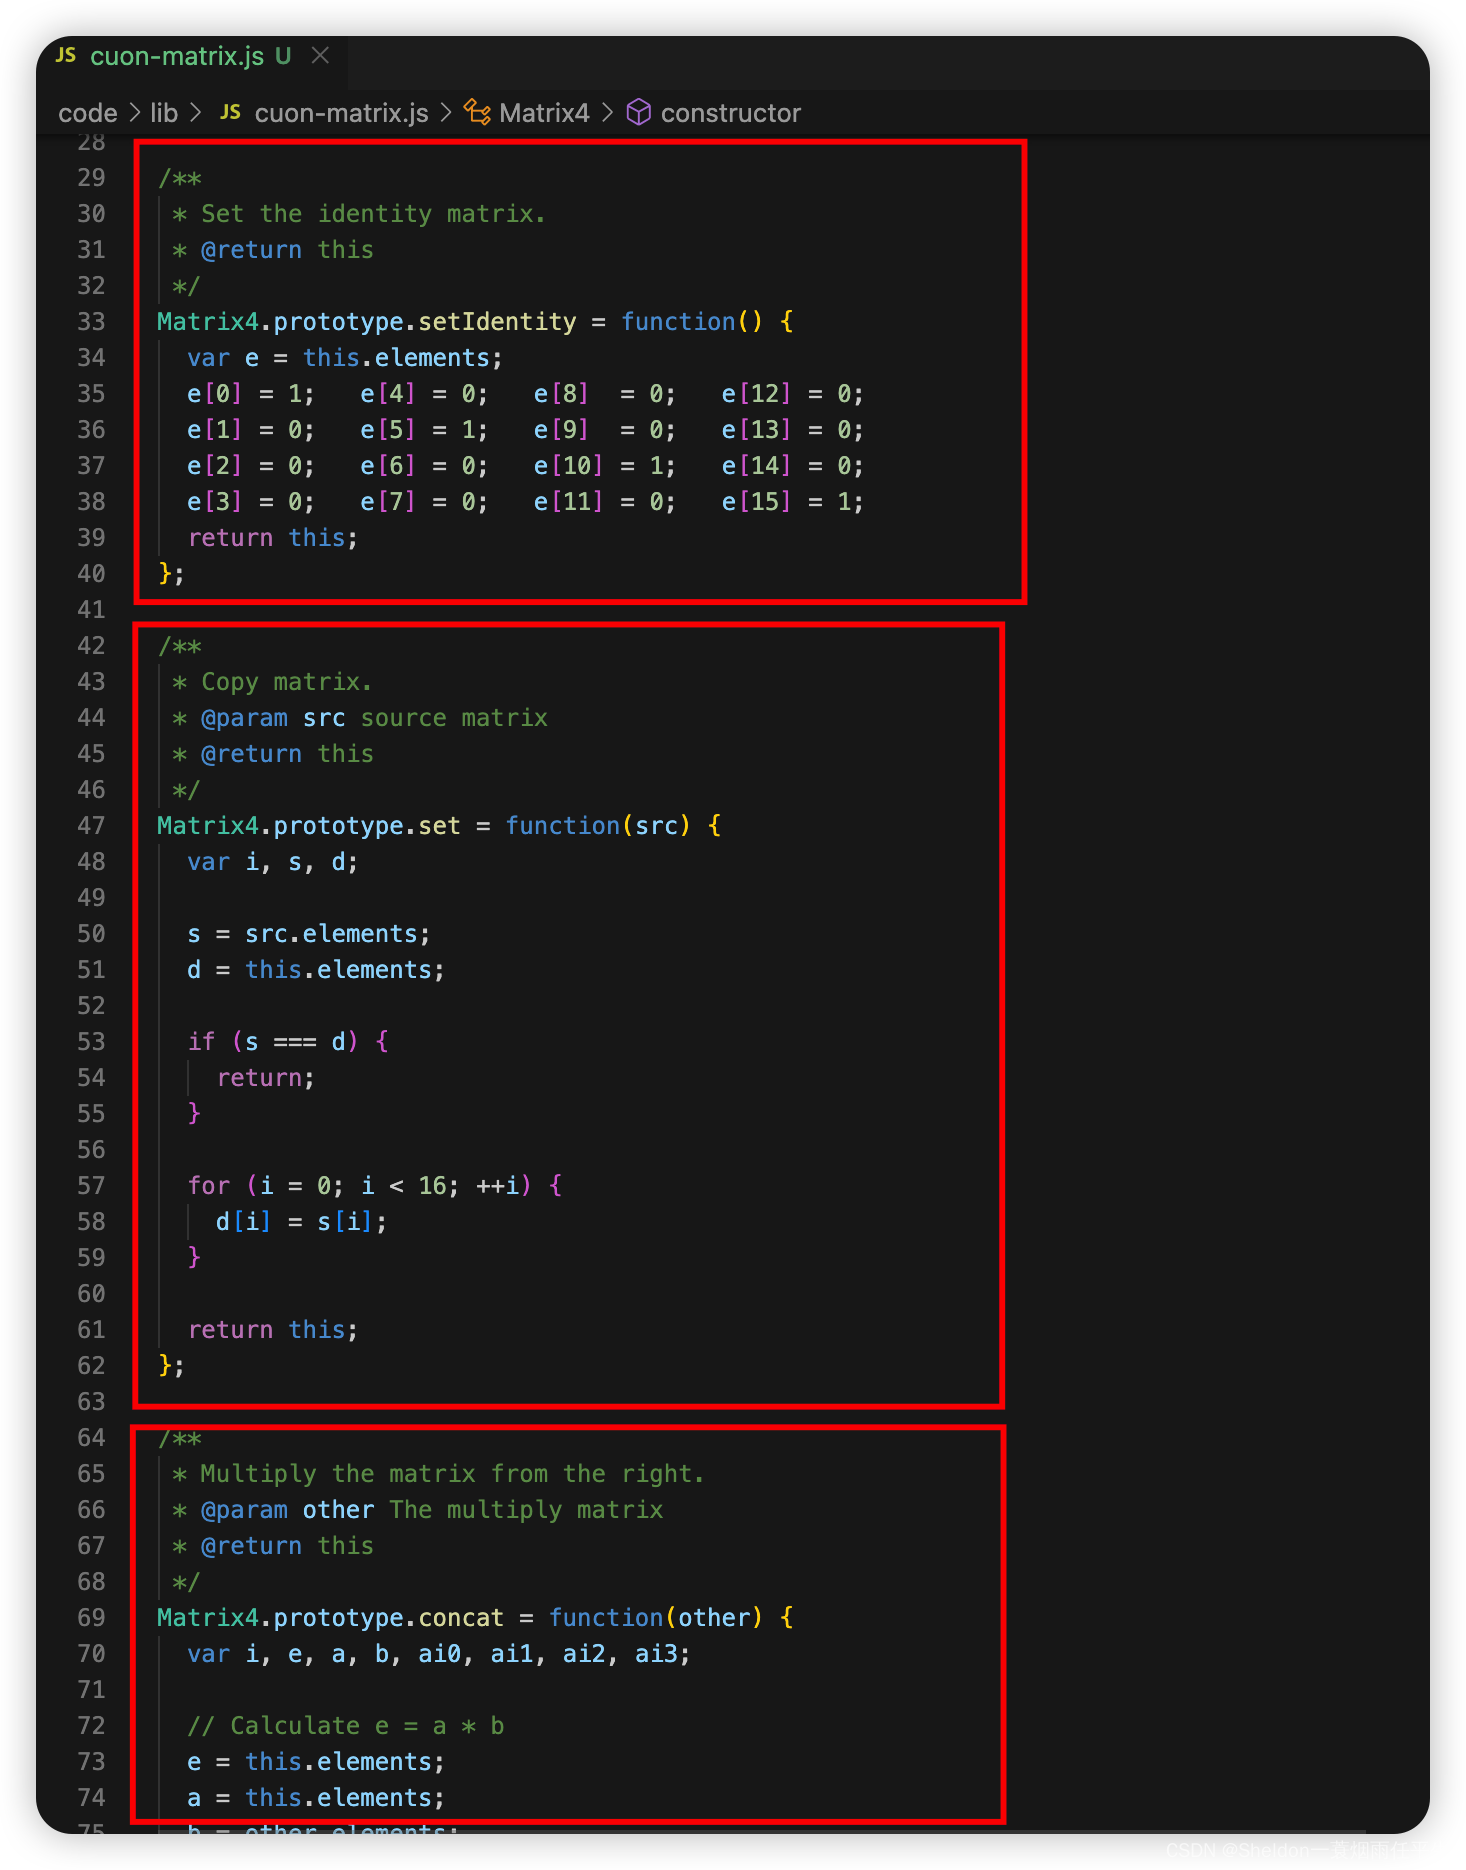
在接下来的内容中都是寄放在原型链中的关于矩阵的函数。比如:
(1)Matrix4.prototype.setIdentity () 将矩阵恢复成一个不产生任何变换的矩阵;
(2)Matrix4.prototype.set (src) 复制其他矩阵。将传入对象的元素element复制给自己的element;
(3)Matrix4.prototype.concat (other) 将两个矩阵相乘,得到一个新的矩阵。
第一列第一行 = 左边的第一列 * 右边的第一行
第一列第二行 = 左边的第一列 * 右边的第二行
…
第二列第一行 = 左边的第二列 * 右边的第一行
第二列第二行 = 左边的第二列 * 右边的第二行
…
第p列第m行 = 左边的第p列 * 右边的第m行
在这里大家可能会疑惑,矩阵的乘法 C = AB,明明是

新的第m行第p列 = 左边的第m行 * 右边的第p列。但是别忘了WebGL中的矩阵是按列主序的,和数学中的矩阵排序行列相反。
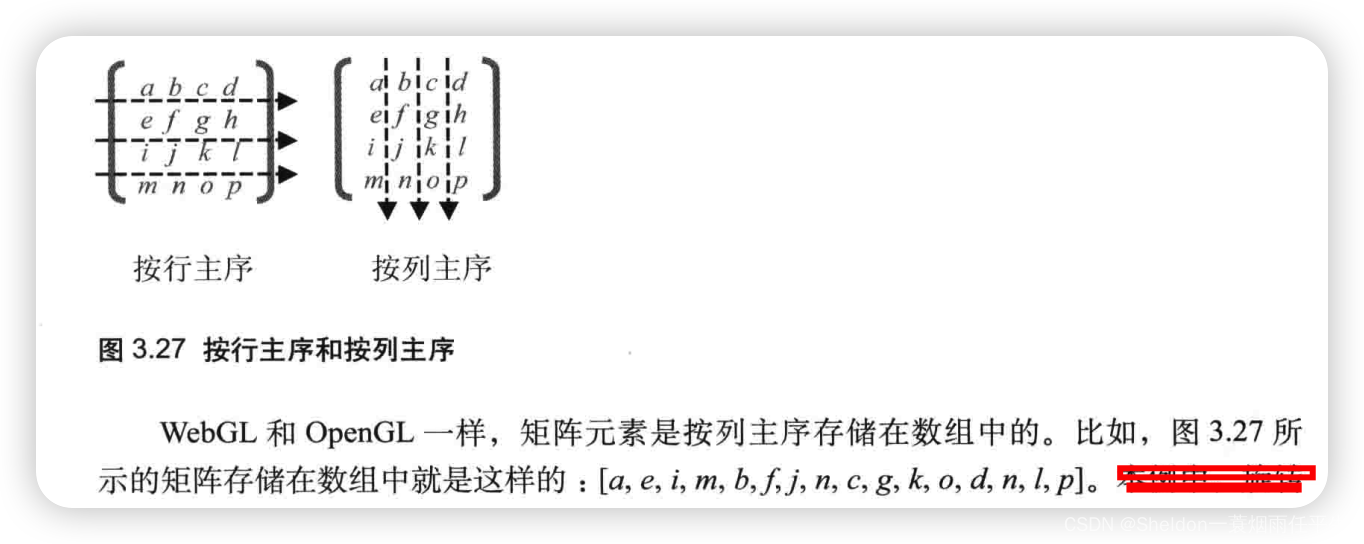
因此,在WebGL中的矩阵运算就变成了:新的第p列第m行 = 左边的第p列 * 右边的第m行
…
其实,明白了矩阵库中矩阵的创建和运算方式后,有兴趣的同学们完全可以自行创建一个更适合自己的矩阵库,或者在以上的矩阵库基础上加以改良。
4.1.3 使用矩阵库
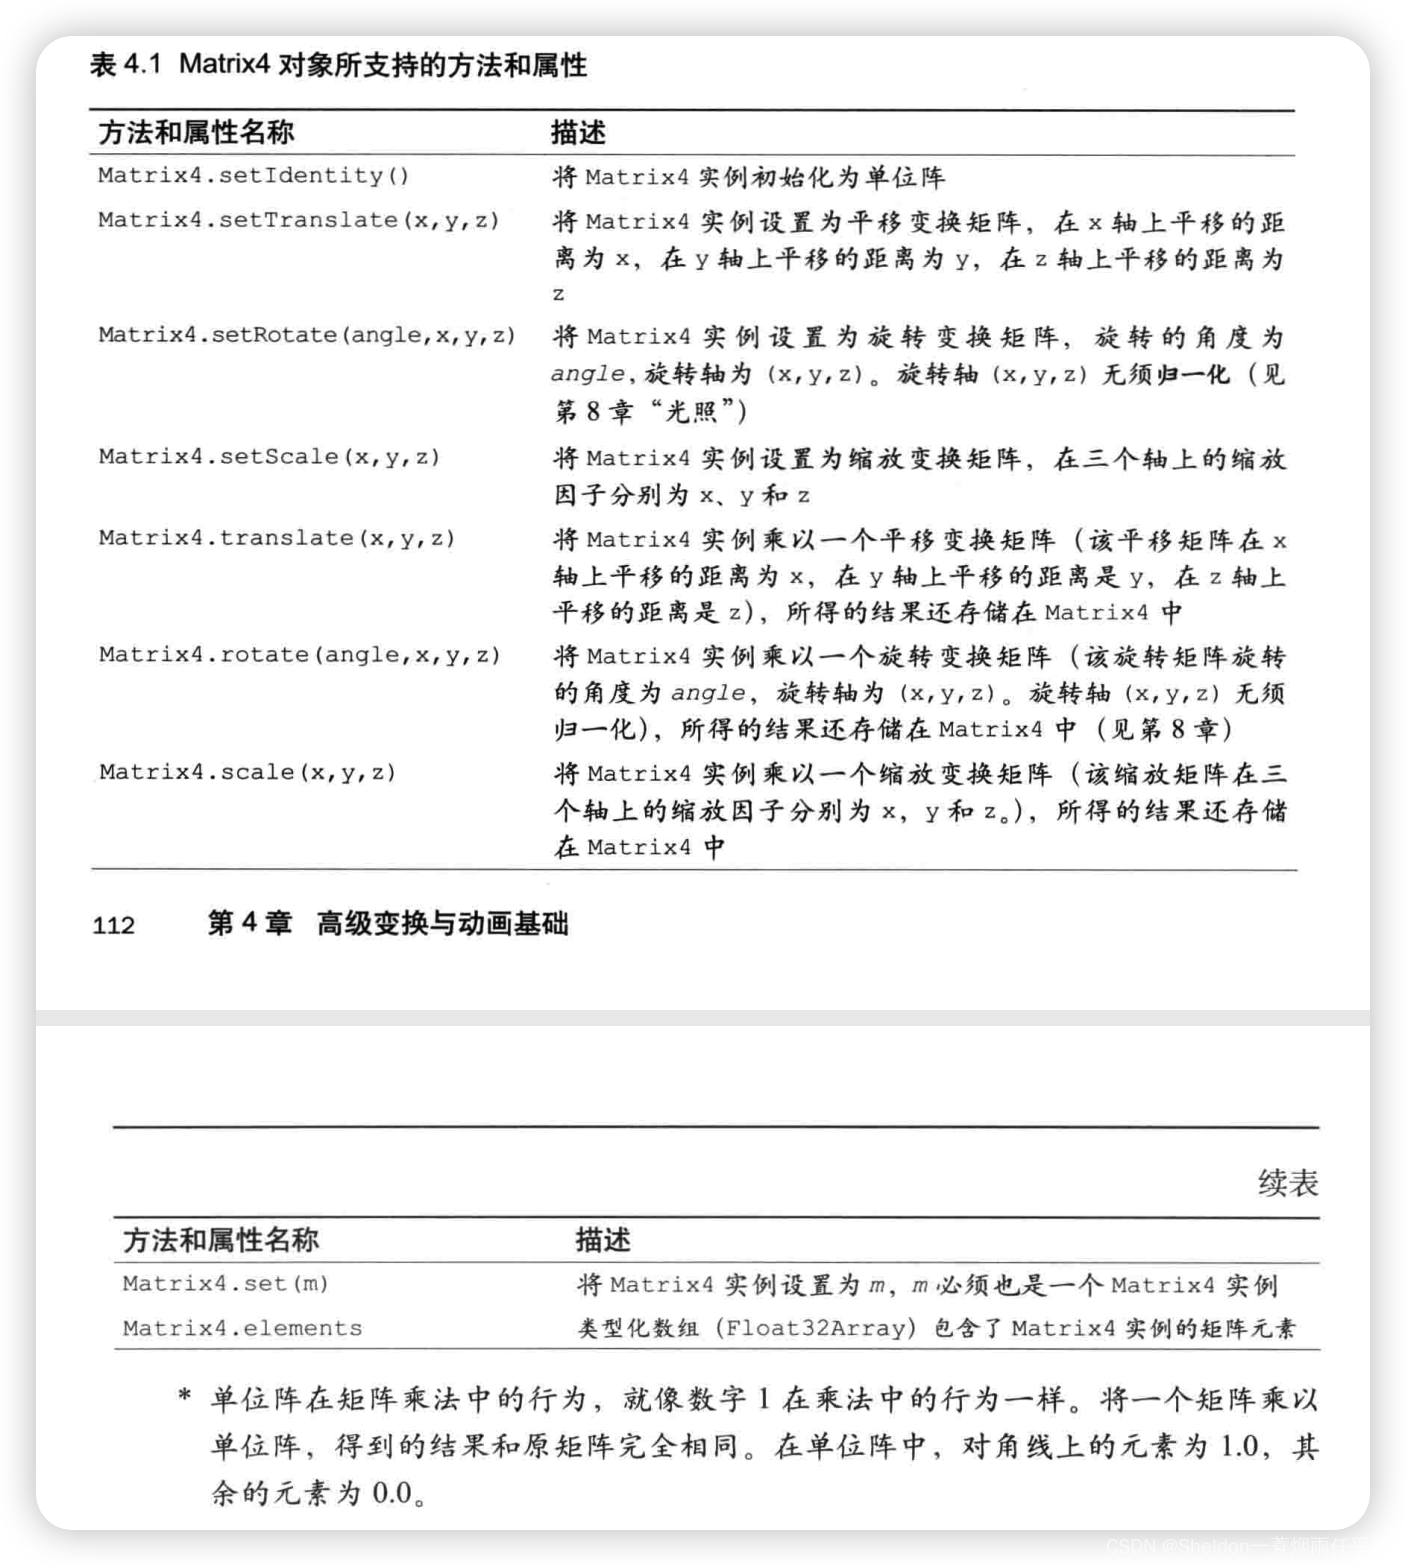
4.1.3.1 矩阵函数——setRotate(angle, x, y, z)
4.1.3.1.1 源码解析
/**
 * Set the matrix for rotation.
 * The vector of rotation axis may not be normalized.
 * @param angle The angle of rotation (degrees)
 * @param x The X coordinate of vector of rotation axis.
 * @param y The Y coordinate of vector of rotation axis.
 * @param z The Z coordinate of vector of rotation axis.
 * @return this
 */
Matrix4.prototype.setRotate = function(angle, x, y, z) {
  var e, s, c, len, rlen, nc, xy, yz, zx, xs, ys, zs;

  angle = Math.PI * angle / 180;
  e = this.elements;

  s = Math.sin(angle);
  c = Math.cos(angle);

  if (0 !== x && 0 === y && 0 === z) {
    // Rotation around X axis
    if (x < 0) {
      s = -s;
    }
    e[0] = 1;  e[4] = 0;  e[ 8] = 0;  e[12] = 0;
    e[1] = 0;  e[5] = c;  e[ 9] =-s;  e[13] = 0;
    e[2] = 0;  e[6] = s;  e[10] = c;  e[14] = 0;
    e[3] = 0;  e[7] = 0;  e[11] = 0;  e[15] = 1;
  } else if (0 === x && 0 !== y && 0 === z) {
    // Rotation around Y axis
    if (y < 0) {
      s = -s;
    }
    e[0] = c;  e[4] = 0;  e[ 8] = s;  e[12] = 0;
    e[1] = 0;  e[5] = 1;  e[ 9] = 0;  e[13] = 0;
    e[2] =-s;  e[6] = 0;  e[10] = c;  e[14] = 0;
    e[3] = 0;  e[7] = 0;  e[11] = 0;  e[15] = 1;
  } else if (0 === x && 0 === y && 0 !== z) {
    // Rotation around Z axis
    if (z < 0) {
      s = -s;
    }
    e[0] = c;  e[4] =-s;  e[ 8] = 0;  e[12] = 0;
    e[1] = s;  e[5] = c;  e[ 9] = 0;  e[13] = 0;
    e[2] = 0;  e[6] = 0;  e[10] = 1;  e[14] = 0;
    e[3] = 0;  e[7] = 0;  e[11] = 0;  e[15] = 1;
  } else {
    // Rotation around another axis
    len = Math.sqrt(x*x + y*y + z*z);
    if (len !== 1) {
      rlen = 1 / len;
      x *= rlen;
      y *= rlen;
      z *= rlen;
    }
    nc = 1 - c;
    xy = x * y;
    yz = y * z;
    zx = z * x;
    xs = x * s;
    ys = y * s;
    zs = z * s;

    e[ 0] = x*x*nc +  c;
    e[ 1] = xy *nc + zs;
    e[ 2] = zx *nc - ys;
    e[ 3] = 0;

    e[ 4] = xy *nc - zs;
    e[ 5] = y*y*nc +  c;
    e[ 6] = yz *nc + xs;
    e[ 7] = 0;

    e[ 8] = zx *nc + ys;
    e[ 9] = yz *nc - xs;
    e[10] = z*z*nc +  c;
    e[11] = 0;

    e[12] = 0;
    e[13] = 0;
    e[14] = 0;
    e[15] = 1;
  }

  return this;
};
从源码中,不难看出,当x轴、y轴