本章概要
- 表单处理
- Vuex 与组合 API
- 模块
16.8 表单处理
在表单控件上通常会使用 v-model 指令进行数据绑定,如果绑定的数据是 Vuex 中的状态数据,就会遇到一些问题。看以下代码:
form.html
<div id="app">
    <my-component></my-component>
</div>

<script src="https://unpkg.com/vue@next"></script>
<script src="https://unpkg.com/vuex@next"></script>
<script>
    const app = Vue.createApp({});
    const store = Vuex.createStore({
        state(){
            return {
                message:"gogogo"
            }
        },
        mutatioins:{
            updations:{
                updateMessage(state,msg){
                    state.message = msg;
                }
            }
        }
    })

    app.component('myComponent',{
        component:Vuex.mapState([
            'message'
        ]),
        template:'<input type="text" v-model="message">'
    })

    app.use(store).mount('#app')
</script>
当在文本控件中输入值时,v-model 会试图直接修改 message 属性的值,这将引发一个警告:[Vue warn] :Write operation failed: computed property “message” is readonly ,这是由 v-model 的数据双向绑定机制决定的。我们希望在用户输入数据时,调用 mutation() 处理函数修改 store 中的状态 message ,从而实现计算属性 message 的更新,那么可以采用两种方式来实现。
(1)通过 input 元素使用 v-bind 绑定 value 属性,然后使用 v-on 监听 input 或 change 事件,在事件处理函数中提交 mutation 。修改 form.html 的代码,如下:
...
app.component('myComponent',{
  component:Vuex.mapState([
    'message'
  ]),
  methods:{
    updateMessage(e){
      this.$store.commit('updateMessage',e.target.value)
    }
  },
  template:'<input type="text" :value="message" @input="updateMessage">'
})
...
这种方式相当于自己实现了 v-model 指令,代码有些繁琐。如果还是想用 v-model,那么可以使用第二种方式。
(2)计算属性可以提供一个 setter 用于计算属性的修改。可以在 set() 函数中提交 mutations。如下:
...
app.component('myComponent',{
    computed:{
        message:{
            get() {
                return this.$store.state.message;
            },
            set(value){
                this.$store.commit('updateMessage',value)
            }
        }
    },
    template:'<input type="text" v-model="message">'
})
...
16.9 Vuex 与组合 API
要在 setup() 函数中访问 store,可以调用 useStore() 函数,这与在选项 API 中通过 this.store 访问 store 是等价的。如下:
import {useStore} from 'vuex'

export default {
  setup(){
    const store = useStore()
  }
}
如果要访问 state 和 getters ,则需要使用 computed() 函数创建计算属性,以保持响应性,这相当于使用选项 API 创建计算属性。如下:
import { computed } from 'vue'
import { useStore } from 'vuex'

export default {
  setup(){
    const store = useStore()

    return {
      // 在computed() 函数中访问状态
      count:computed(() => store.state.count),
      // 在conputed() 函数中访问 getters
      double:computed(() => store.getters.double)
    }
  }
}
要访问 mutation 和 action ,只需要在 setup() 函数中调用 store 对象的 commit() 和 dispatch() 函数,如下:
import { useStore } from 'vuex'

export default{
  setup(){
    const store = useStore()

    return {
      // 访问 mutation
      increment:() => store.commit('increment'),

      // 访问 action
      asyncIncrement:() => store.dispatch('asyncIncrement')
    }
  }
}
16.10 模块
Vuex 使用单一状态树,应用程序的所有状态都包含在一个大的对象中,当应用变得复杂时,store 对象就会变得非常臃肿。
为了解决这个问题,Vuex 允许将 store 划分为多个模块,每个模块都可以包含自己的 state、mutations、actions、getters 及嵌套的子模块。例如:
const moduleA = {
  state:() => ({...}),
  mutations:{...},
  actions:{...},
  getters:{...}
}

const moduleB = {
  state:() => ({}),
  mutations:{...},
  actions:{...}
}

const store = createStore({
  modules:{
    a:moduleA,
    b:moduleB
  }
})

store.state.a   // -> moudleA 的状态
store.state.b   // -> moudleB 的状态
对于模块内部的 mutations 和 getters ,接收的第1个参数是模块的局部状态对象。如下:
const moduleA = {
  state:() => ({
    count:0
  }),
  mutations:{
    increment(state){
      // state 对象是局部模块状态
      state.count++
    }
  },

  getters:{
    doubleCount(state){
      return state.count * 2
    }
  }
}
同样地,对于模块内部的 actions ,局部状态通过 context.state 暴露出来,根节点状态则为 context.rootState。如下:
const moduleA = {
  // ...
  actions:{
    incrementIfOddOnRootSum({state,commit,rootState}){
      if((state.count + rootState.count) % 2 === 1 ){
        commit('increment')
      }
    }
  }
}
对于模块内部的 getters ,根节点状态将作为第 3 个参数暴露出来。如下:
const moduleA = {
  // ...
  getters:{
    sumWithRootCount(state,getters,rootState){
      return state.count + rootState.count
    }
  }
}
在一个大型项目中,如果 store 模块划分较多,Vuex 建议项目结构按照以下形式组织。
|—— store
    	|———— index.js   # 组装模块并导出 store 的地方
    	|———— actions.js   # 根级别的 actions
    	|———— mutations.js   # 根级别的 mutations
    	|———— modules
          	|————cart.js   # 购物车模块
          	|————products.js   # 产品模块
在默认情况下,模块内部的 action、mutation 和 getters 是注册在全局命名空间下的,这使多个模块能够对同一 mutation 或 action 做出响应。
如果希望模块具有更高的封装度和复用性,则可以通过添加 namespaced:true 的方式使其成为带命名空间的模块。当模块被注册后,它的所有 mutation、action 和 getters 都会根据模块注册的路径自动命名。
例如:
const store = createStore({
  modules:{
    account:{
      namespaced:true,
      // 模块内容(module assets)
      // 模块的状态已经是嵌套的,使用 namespaced 选项不会对其产生影响
      state:() => ({...}),
      getters:{
        isAdmin() {...} // -> gettters['account/isAdmin']
      },
      actions:{
        login() {...} // -> dispatch('account/login')
      },
      mutations:{
        login(){...} // -> commit('account/login')
      },

      // 嵌套模块
      modules:{
        // 继承父模块的命名空间
        myPage:{
          state:() => ({...}),
          getters:{
            profile(){...} // -> getters['account/profile']
          }
        },
        // 进一步嵌套命名空间
        posts:{
          namespaced:true,
          state:()=>({...}),
          getters:{
            popular(){...} //-> getters['account/post/popular']
          }
        }
      }
    }
  }
})
启用了命名空间的 getters 和 actions 会接收本地的 getters、dispatch 和 commit 。换句话说,在同一模块内使用模块内容(module assets)时不需要添加前缀。在命名空间和非命名空间之间切换不会影响模块内的代码。
在带有命名空间的模块内如果要使用全局 state 和 getters,rootState 和 rootGetters 会作为第 3 和 第 4 个参数传入 getter() 函数,也会通过 context 对象的属性传入 action() 函数。如果在全局命名空间内分发 action 或提交 mutation,则将 { root:true } 作为第 3 个参数传给 dispatch() 或 commit() 方法即可。如下:
modules:{
    foo:{
        namespaced:true,
        getters:{
            // 在foo模块中,getters已经被本地化
            // 使用getters 的第三个参数 rootState 访问全局state
            // 使用 getters 的第四个参数 rootGetters 访问全局 getters
            someGetter(state,getters,rootState,rootGetters){
                getters.someOtherGetter   // -> 'foo/someOtherGetter'
                rootGetters.someOtherGetter   // -> 'someOtherGetter'
                rootGetters['bar/someOtherGetter']   // -> 'bar/someOtherGetter'
            },
            someOtherGetter:state => {...}
        },
        actions:{
            // 在这个模块中,dispatch 和 commit 也被本地化了
            // 他们可以接收 root 选项以访问dispatch 或 commit
            someAction({dispatch,commit,getters,rootGetters}){
                getters.someGetter   // -> 'foo/someGetter'
                rootGetters:someGetter   // -> 'someGetter'
                rootGetters['bar/someGetter']   // -> 'bar/someGetter'

                dispatch('someOtherAction')   // -> 'foo/someOtherAction'
                dispatch('someOtherAction',null,{root:true})   // -> 'someOtherActioin'

                commit('someMutation')   // -> 'foo/someMutation'
                commit('someMutation',null,{root:true})   // -> 'someMutation'
            },
            someOtherAction(ctx,payload){...}
        }
    }
}
如果需要在带命名空间的模块内注册全局 action,可以将其标记为 root:true ,并将这个 action 的定义放到函数 handler() 中。例如:
{
  actions:{
    someOtherAction({dispatch}){
      dispatch('someAction')
    }
  },
  modules:{
    foo:{
      namespaced:true,
      actioins:{
        someAction:{
          root:true,
          handler(namespacedContext,payload){...}   // -> 'someAction'
        }
      }
    }
  }
}
在组件内使用 mapState() 、mapGetters()、mapActions() 和 mapMutations() 这些辅助函数绑定带命名空间的模块时,写起来可能比较烦琐。如下:
computed:{
  ...mapState({
    a:state => state.some.nested.module.a,
    b:state => state.some.nested.module.b
  }),
  ...mapGetters([
    'some/nested/module/someGetter',   // -> this['some/nested/module/someGetter']
    'some/nested/module/someOtherGetter'   // -> this['some/nested/module/someOtherGetter']
  ])
},
methods:{
  ...mapActions([
    'some/nested/module/foo',   // -> this['some/nested/module/foo']()
    'some/nested/module/bar'   // -> this['some/nested/module/bar']()
  ])
}
在这种情况下,可以将带命名空间的模块名字作为第 1 个参数传递个上述函数,这样所有绑定都会自动使用该模块作为上下文。于是上面的例子可以简化为如下代码:
computed:{
  ...mapState('some/nested/module',{
    a:state => state.a,
    b:state => state.b
  }),
  ...mapGetters('some/nested/module',[
    'someGetter',   // -> this.someGetter
    'someOtherGetter'   // -> this.someOtherGetter
  ])
},
methods:{
  ...mapActions('some/nested/module',[
    'foo',   // -> this.foo()
    'bar'   // -> this.bar()
  ])
}
此外,还可以使用 createNamespacedHelpers() 方法创建命名空间的辅助函数。它返回一个对象,该对象有与给定命名空间值绑定的新的组件绑定辅助函数。如下:
import { createNamespacedHelpers } from 'vuex'

const { mapState,mapActions } = createNamespacedHelpers('some/nested/module')

export default{
  computed:{
    computed:{
      // 在 some/nested/module 中查找
      ...mapState({
        a:state => state.a,
        b:state => state.b
      })
    },
    methods:{
      // 在some/nested/module 中查找
      ...mapActions([
        'foo',
        'bar'
      ])
    }
  }
}
为了对待带命名空间的模块的访问有更直观的认知,下面给出一个简单的示例。
先给出两个带命名空间的模块定义。如下:
const ModuleA = {
  namespaced:true,
  state(){
    return {
      message:'hello vue'
    }
  },
  mutations:{
    updateMessage(state,newMsg){
      state.message = newMsg;
    }
  },
  actions:{
    changeMessage({commit},newMsg){
      commit('updateMessage',newMsg);
    }
  },
  getters:{
    reversedMessage(state){
      return state.message.split('').reverse().join('');
    }
  }
}

const ModuleB = {
  namespaced:true,
  state(){
    return{
      count:0
    }
  },
  mutations:{
    increment:{
      state.count++
    }
  }
}
ModuleA 和 ModuleB 都使用了 namespaced 选项并设置为 true,从而变成具有命名空间的模块。
ModuleA 中的 state、mutations、actions 和 getters 一个都不少,简单起见,ModuleB 只有 state 和 mutations。
接下来在 Store 实例中注册模块。如下:
const store = Vuex.createStore({
  modules:{
    msg:ModuleA,
    another:ModuleB
  }
})
根据模块注册时的名字访问模块。例如,要访问 ModuleA 中的状态,应该使用 msg 名字访问。如下:
this.$store.state.msg.message
// 或者
this.$store.state['msg'].message
模块注册时,也可以根据应用的需要,为名字添加任意前缀。如下:
const store = Vuex.createStore({
  modules:{
    'user/msg':ModuleA,
    another:ModuleB
  }
})
这是要访问 ModuleA 中的状态,需要使用 user/msg。如下:
this.$store.state['user/msg'].message
最后看在组件内如何访问带命名空间的模块。如下:
Modules.html
<!DOCTYPE html>
<html>

<head>
    <meta charset="UTF-8">
</head>

<body>
    <div id="app">
        <my-component></my-component>
    </div>
    <script src="https://unpkg.com/vue@next"></script>
    <script src="https://unpkg.com/vuex@next"></script>
    <script>
        const app = Vue.createApp({});
        const ModuleA = {
            namespaced: true,
            state() {
                return {
                    message: 'Hello Vue.js'
                }
            },
            mutations: {
                updateMessage(state, newMsg) {
                    state.message = newMsg;
                }
            },
            actions: {
                changeMessage({ commit }, newMsg) {
                    commit('updateMessage', newMsg);
                }
            },
            getters: {
                reversedMessage(state) {
                    return state.message.split('').reverse().join('');
                }
            }
        }

        const ModuleB = {
            namespaced: true,
            state() {
                return {
                    count: 0
                }
            },
            mutations: {
                increment(state) {
                    state.count++;
                }
            }
        }
        const store = Vuex.createStore({
            modules: {
                msg: ModuleA,
                another: ModuleB
            }
        })

        app.component('MyComponent', {
            data() {
                return {
                    message: ''
                }
            },
            computed: {
                ...Vuex.mapState({
                    msg() {
                        return this.$store.state['msg'].message;
                    }
                }),
                // 将模块的名字作为第一个参数传递给mapState
                ...Vuex.mapState('another', [
                    // 将this.count映射为 store.state['another'].count
                    'count',
                ]),
                reversedMessage() {
                    return this.$store.getters['msg/reversedMessage'];
                }
            },
            methods: {
                // 将模块的名字作为第一个参数传递给mapMutations
                ...Vuex.mapMutations('msg', [
                    // 将this.updateMessage()映射为this.$store.commit('msg/increment')
                    'updateMessage',
                ]),
                add() {
                    this.$store.commit('another/increment')
                },
                changeMessage() {
                    this.$store.dispatch('msg/changeMessage', this.message)
                },
                // 等价于
                /*...Vuex.mapActions('msg', [
                  // 将this.changeMessage(message)映射为this.$store.dispatch('msg/changeMessage', message)
                    'changeMessage',
                ]),*/

            },
            template: `
	        <div>
	          <p>
	            <span>消息:{{ msg }}</span>
	            <span>反转的消息:{{ reversedMessage }}</span>
	          </p>
	          <p>
	            <input type="text" v-model="message">
	            <button @click="changeMessage()">修改内容</button>
	          </p>
	          <p>
	            <span>计数:{{ count }}</span>
	            <button @click="add">增加计数</button>
	          </p>
	        </div>`
        });

        app.use(store).mount('#app')
    </script>
</body>

</html>
如果使用注释中的代码,需要将【修改内容】按钮的代码修改为如下代码:
<button @click="changeMessage(message)">修改内容</button>
从上述代码可以看出,对于带命名空间的模块访问,最简单的方式是使用辅助函数进行映射,并将模块的名字作为第一个参数传递进去,这样不仅简答,而且不会出错。
以上页面渲染的效果如下:

下面将购物车程序按模块组织,首先在 store 目录下新建一个 modules 文件夹,在该文件夹下继续新建一个文件 cart.js,这个文件将作为购物车的模块文件,所有与购物车相关的状态管理都放到 cart 模块中。
如果以后还有其他模块,如 users 模块,可以在 modules 目录下新建 users.js 文件,所有与用户相关的状态管理可以放到 users 模块中。
将 store/index.js 文件中与购物车状态管理相关的代码复制到 cart.js 中,并指定选项 namespaced:true ,让cart 成为带命名空间的模块。如下:
store/modules/cart.js
import books from '@/data/books.js'

const cart = {
    namespaced:true,
    state(){
        return {
            items:books
        }
    },
    mutations:{
        pushItemToCart (state,book){
            state.items.push(book);
        },
        deleteItem (state,id){
            // 根据提交的 id 载荷,查找是否存在相同 id 的商品,返回商品的索引
            let index = state.items.findIndex(item => item.id === id);
            if(index>0){
                state.items.splice(index,1);
            }
        },
        incrementItemCount(state,{id,count}){
            let item = state.items.find(item => item.id === id);
            if(item){
                item.count += count; //如果count 为1,则加1;如果 count 为 -1 则减 1
            }
        }
    },
    getters:{
        cartItemPrice(state){
            return function (id){
                let item = state.items.find(item => item.id === id);
                if(item){
                    return item.price * item.count;
                }
            }
        },
        cartTotalPrice(state){
            return state.items.reduce((total,item) => {
                return total + item.price * item.count;
            },0)
        }
    },
    actions:{
        addItemToCart(context,book){
            let item = context.state.items.find(item => item.id === book.id);
            // 如果添加的商品已经再购物车中存在,则只增加购物车中商品的数量
            if(item){
                context.commit('incrementItemCount',book);
            }
            // 如果添加的商品是新商品,则加入购物车中
            else{
                context.commit('pushItemToCart',book);
            }
        }
    }
}

export default cart
接下来修改 store 目录下的 index.js 文件,使用mmodules 选项注册 cart 模块。如下:
store/index.js
import { createStore } from "vuex";
import cart from '@/store/modules/cart.js'

const store = createStore({
    modules:{
        cart
    }
})

export default store;
最后修改 Cart.vue ,将带命名空间的模块名字 cart 作为第一个参数传递给 mapXxx() 等辅助函数,让所有绑定都自动使用 cart 模块作为上下文。修改后的代码如下:
cart.vue
<template>
    <div>
        <table>
            <tr>
                <td>商品编号</td>
                <td><input type="text" v-model.number="id" /></td>
            </tr>
            <tr>
                <td>商品名称</td>
                <td><input type="text" v-model.number="title" /></td>
            </tr>
            <tr>
                <td>商品价格</td>
                <td><input type="text" v-model.number="price" /></td>
            </tr>
            <tr>
                <td>数量</td>
                <td><input type="text" v-model.number="quantity" /></td>
            </tr>
            <tr>
                <td colspan="2"><button @click="addCart">加入购物车</button></td>
            </tr>
        </table>
        <table>
            <thead>
                <tr>
                    <th>编号</th>
                    <th>商品名称</th>
                    <th>价格</th>
                    <th>数量</th>
                    <th>金额</th>
                    <th>操作</th>
                </tr>
            </thead>
            <tbody>
                <tr v-for="book in books" :key="book.id">
                    <td>{{ book.id }}</td>
                    <td>{{ book.title }}</td>
                    <td>{{ book.price }}</td>
                    <td>
                        <button :disabled="book.count === 0" @click="increment({ id: book.id, count: -1 })">-</button>
                        {{ book.count }}
                        <button @click="increment({ id: book.id, count: 1 })">+</button>
                    </td>
                    <td>{{ itemPrice(book.id) }}</td>
                    <td><button @click="deleteItem(book.id)">删除</button></td>
                </tr>
            </tbody>
        </table>
        <span>总价:¥{{ totalPrice }}</span>
    </div>
</template>
<script>
import { mapMutations, mapState, mapGetters,mapActions } from 'vuex';

export default {
    data() {
        return {
            id: null,
            title: '',
            price: '',
            quantity: 1
        }
    },
    computed: {
        // books() {
        //     return this.$store.state.items;
        // },
        ...mapState('cart',{
            books: 'items'
        }),
        ...mapGetters('cart',{
            itemPrice: 'cartItemPrice',
            totalPrice: 'cartTotalPrice'
        }),
    },
    methods: {
        ...mapMutations('cart',{
            addItemToCart: 'pushItemToCart',
            increment: 'incrementItemCount'
        }),
        ...mapMutations('cart',[
            'deleteItem'
        ]),
        ...mapActions('cart',[
            'addItemToCart'
        ]),
        addCart() {
            // this.$store.commit('pushItemToCart', {
            this.addItemToCart({
                id: this.id,
                title: this.title,
                price: this.price,
                count: this.quantity
            })
            this.id = '';
            this.title = '';
            this.price = '';
        },
    }
}
</script>
<style scoped>
div {
    width: 800px;
}

table {
    border: 1px solid black;
    width: 100%;
    margin-top: 20px;
}

th {
    height: 50px;
}

th,
td {
    border-bottom: 1px solid #ddd;
    text-align: center;
}

span {
    float: right;
}
</style>
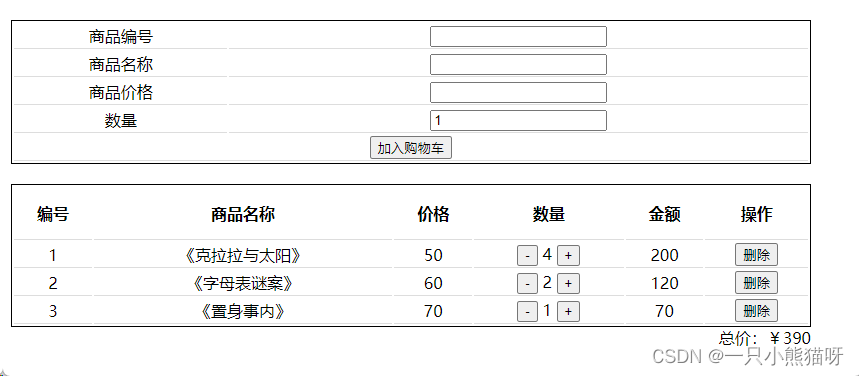
此时再次运行项目,一切正常。如下:
