vector类创建对象
/*vector类创建对象*/
#if 1
#define _CRT_SECURE_NO_WARNINGS
 #include <iostream>
using namespace std;
#include <vector>
#include <algorithm>
#include <crtdbg.h>


class Date {
    public:
        Date(int year = 1900, int month = 1, int day = 1)
            : _year(year)
            , _month(month)
            , _day(day)
        {}

    private:
        int _year;
        int _month;
        int _day;
 };

//创建对象
void TestVector1() {
    vector<int> v1(10, 5);
    vector<int> v2(10);
    vector<Date> v3(10);
    vector<int> v4{ 1, 2, 3 };  // C++11

    vector<int> vec; // 创建一个空的int类型vector
    vector<int> vec2(10); // 创建一个包含10个初始化为0的int元素的vector
    vector<int> vec3(10, 1); // 创建一个包含10个初始化为1的int元素的vector
    vector<int> vec4{1, 2, 3, 4, 5}; // 列表初始化
    vector<int> vec5(vec4.begin(), vec4.end()); // 范围初始化
    vector<int> vec6(vec4); // 拷贝初始化

}
#endif
进入调试可以看到变量已经创建成功,里面的具体情况如下图所示。

vector类capacity的扩容规律
/*vector类capacity的扩容规律*/
#if 0
/*
 1. vs中:vector是按照1.5倍方式扩容  linux下是按照2倍方式扩容
 2. 放元素时如果已经知道大概要放多少个元素,可以提前将空间设置好
 避免:一边插入一边扩容效率低下
 */
#define _CRT_SECURE_NO_WARNINGS
 #include <iostream>
using namespace std;
#include <vector>
#include <algorithm>
#include <crtdbg.h>

void TestVector2() {
    vector<int> v;
    v.reserve(10);
//    v.reserve(100);提前分配空间
    size_t cap = v.capacity();

    for (size_t i = 0; i < 100; ++i) {
        v.push_back(i);
        if (cap != v.capacity()) {
            cap = v.capacity();
            cout << cap << endl;
        }
    }
 }
int main(){
    TestVector2();
 }
#endif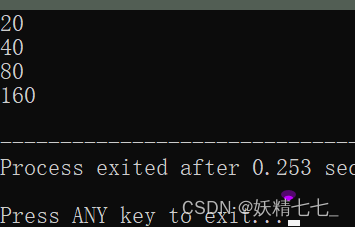
这段代码演示了如何在C++中使用std::vector,特别关注其动态扩容的行为,并提供了一个实用的建议,即如果预先知道将要存储的元素数量,可以使用reserve方法来提前分配足够的空间,以避免在添加元素时频繁的动态扩容操作,从而提高效率。
代码解释
vector<int> v; 创建了一个名为v的空vector,用于存储int类型的元素。
v.reserve(10); 使用reserve方法为v预先分配足够的空间,以存储至少10个int类型的元素。这是基于先前的建议:如果已知将要存储的元素数量,预先分配空间可以提高效率。
size_t cap = v.capacity(); 初始化cap变量,用于存储v当前的容量。
接下来的循环中,通过push_back方法向v中添加了100个整数(从0到99)。每次添加元素后,都会检查v的容量是否发生变化:
如果容量发生变化(意味着vector进行了扩容),则更新cap变量,并输出新的容量值。
扩容机制
代码中的注释提到了std::vector扩容机制的平台相关性:
在Visual Studio(VS)环境下,std::vector通常按照1.5倍的方式扩容。
在Linux环境下,std::vector可能按照2倍的方式扩容。
这种差异意味着在不同的平台上,相同的代码可能会有不同的内存使用和性能表现。
vector访问元素的方式
/*vector访问元素的方式*/
#if 1
#define _CRT_SECURE_NO_WARNINGS
 #include <iostream>
using namespace std;
#include <vector>
#include <algorithm>
#include <crtdbg.h>
void TestVector3() {
    vector<int> v{ 1, 2, 3, 4, 5 };
    cout << v.front() << endl;
    cout << v.back() << endl;
    v.front() = 10;
    v.back() = 50;

    cout << v[13] << endl;
    cout << v.at(14) << endl;

    v.clear();
    cout << v.front() << endl;
    cout << v.back() << endl;
 }
int main(){
    TestVector3();
 }
#endif
注释16、17、19行的代码,运行代码。
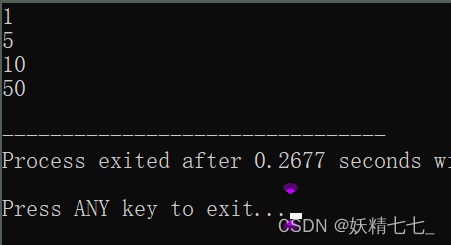
v.front()返回v对象第一个元素,v.back()返回v对象最后一个元素。
注释19行的代码,运行代码。

v[13]访问下标为13的元素,越界访问,但是不会检查范围。
v.at(14)访问下标为14的元素,越界访问,会报错,会检查范围,报错后,后面的代码不会再运行。
assign用法,用数组代替vector内容
/*已经存在的vector对象,用一个数组代替vector内容*/
#if 1
#define _CRT_SECURE_NO_WARNINGS
 #include <iostream>
using namespace std;
#include <vector>
#include <algorithm>
#include <crtdbg.h>

void TestVector4() {
    vector<int> v(3, 5);

    int array[] = { 1, 2, 3, 4, 5 };
//     v = array;  编译失败

    v.clear();
    for (int i = 0; i <(int)(sizeof(array) / sizeof(array[0])); ++i)
    {
         v[i] = array[i];   // 越界
         v.push_back(array[i]);
    }

    v.assign(array, array + sizeof(array) / sizeof(array[0]));

     v.assign(10, 5);
}
int main(){
    TestVector4();
 }
#endif
注释20,23,25行代码,运行代码。
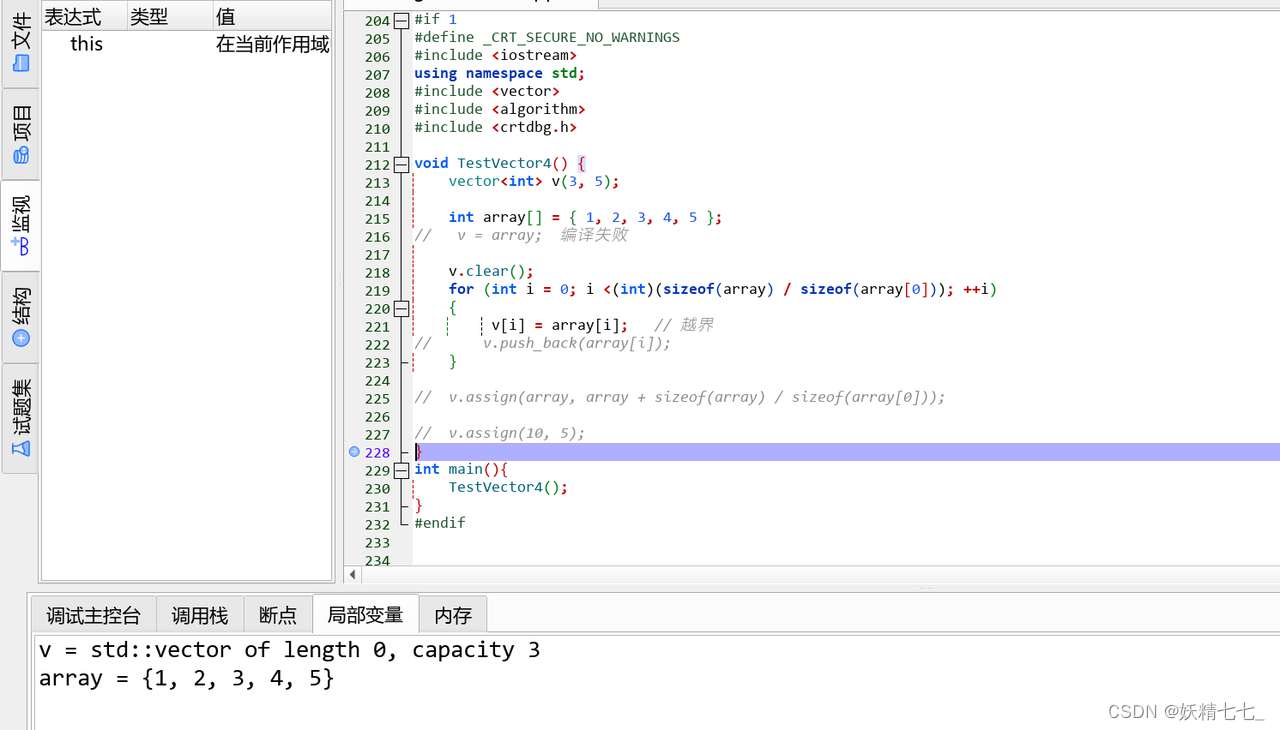
调试代码运行到结尾,发现v对象中length和capacity没有变化,原因很简单,我们只是简单修改v对象对应位置的值,但是v对象还有length和capacity成员变量需要改变。
注释19,23,25行代码,运行代码。

注释17-21,25行代码,运行代码。

v.assign(array, array + sizeof(array) / sizeof(array[0]));用array数组的0位置到结尾,代替v里面的内容。
注释17-21,23行代码,运行代码。

vec4.assign(5, 10); 将vector中的内容替换为5个10
vector的插入操作insert探究
/*vector插入操作insert探究*/
#if 1
#define _CRT_SECURE_NO_WARNINGS
 #include <iostream>
using namespace std;
#include <vector>
#include <algorithm>
#include <crtdbg.h>
void TestVector5() {
    vector<int> v{ 1, 2, 3 };
    v.insert(v.begin(), 0);
    v.insert(v.end(), 4);

    // 0 1 2 3 4
    // 在1号元素的位置插入10个5
    v.insert(v.begin() + 1, 10, 5);

    // 要在data元素所在的位置插入array数组
    int data;
    cin >> data;

    int array[] = { 10, 20, 30 };
//    vector<int>::iterator pos = find(v.begin(), v.end(), data);
    auto pos = find(v.begin(), v.end(), data);
    if (pos != v.end()) {
        v.insert(pos, array, array + sizeof(array) / sizeof(array[0]));
    }

}
int main() {
    TestVector5();
 }
#endif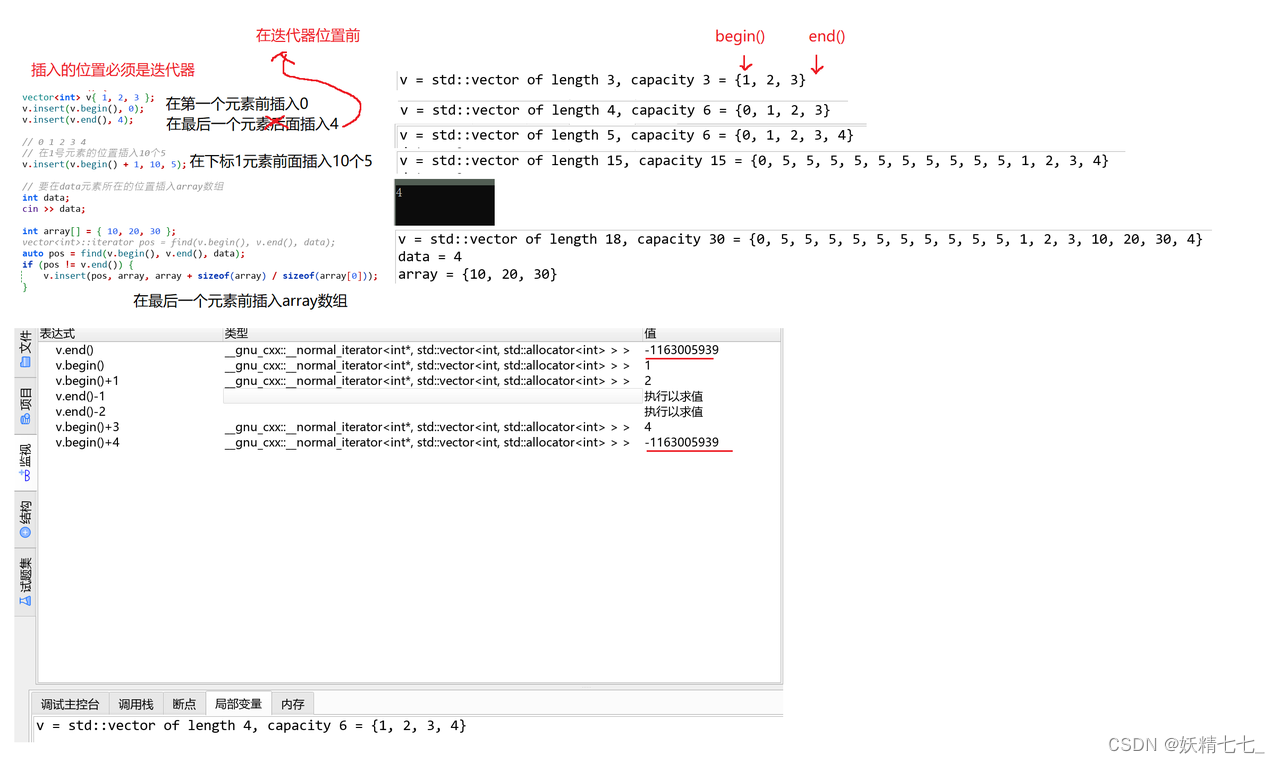
小结论:
迭代器begin()指向第一个元素,end()指向最后一个元素后面一个位置。
插入操作传参表示位置,传的都是迭代器。
都是在迭代器位置前面插入数据。
vector的删除操作erase探究
/*vector的删除erase操作探究*/
#if 1
#define _CRT_SECURE_NO_WARNINGS
 #include <iostream>
using namespace std;
#include <vector>
#include <algorithm>
#include <crtdbg.h>
void TestVector6() {
    vector<int> v{ 1, 2, 3, 4, 5, 6, 7, 8, 9, 0 };

    v.erase(v.begin());
    v.erase(v.begin(), v.begin() + 5);
    v.erase(v.begin(), v.end());    // clear()
}
int main(){
    TestVector6();
 }
#endif
小结论:
删除多个元素,区间是左开右闭。
vector的交换操作swap探究
/*swap交换操作探究*/
#if 1
#define _CRT_SECURE_NO_WARNINGS
 #include <iostream>
using namespace std;
#include <vector>
#include <algorithm>
#include <crtdbg.h>
void TestVector7() {
    vector<int> v1{ 1, 2, 3, 4, 5, 6, 7, 8, 9, 0 };
    vector<int> v2{ 12, 23, 34 };
    swap(v1, v2);

    v1.swap(v2);
 }
int main(){
    TestVector7();
 }
#endif
vector的访问操作探究
/*vector访问操作探究*/
#if 1
#define _CRT_SECURE_NO_WARNINGS
 #include <iostream>
using namespace std;
#include <vector>
#include <algorithm>
#include <crtdbg.h>
void TestVector8() {
    vector<int> v1{ 1, 2, 3, 4, 5, 6, 7, 8, 9, 0 };

    for (size_t i = 0; i < v1.size(); ++i) {
        cout << v1[i] << " ";
    }
    cout << endl;

    for (auto e : v1) {
        cout << e << " ";
    }
    cout << endl;

    auto it = v1.begin();
    while (it != v1.end()) {
        cout << *it << " ";
        ++it;
    }
    cout << endl;

    sort(v1.begin(), v1.end());
 }
int main(){
    TestVector8();
 }
#endif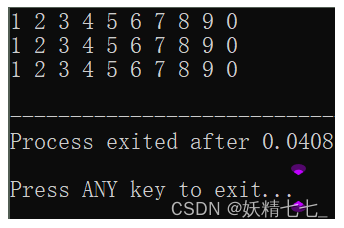
访问vector的三种方式:
-
operator[]访问
-
范围for
-
迭代器
vector的迭代器失效探究
// 迭代器失效
#if 1
#define _CRT_SECURE_NO_WARNINGS
 #include <iostream>
using namespace std;
#include <vector>
#include <algorithm>
#include <crtdbg.h>

void TestVector9() {
    vector<int> v{ 1, 2, 3, 4, 5 };
    // it指向的是v的当前的起始位置
    auto it = v.begin();

    // 扩容之后,可能会导致扩容
    // 开辟新空间  拷贝元素  释放旧空间
    v.push_back(6);

    // it指向v之前的空间已经被释放了,it指向的空间就是非法的
    // it的迭代器已经失效了

    // 解决迭代器失效的方法:
    it = v.begin();
    while (it != v.end()) {
        cout << *it << " ";
        ++it;
    }
    cout << endl;
 }
int main(){
    TestVector9();
 }
#endif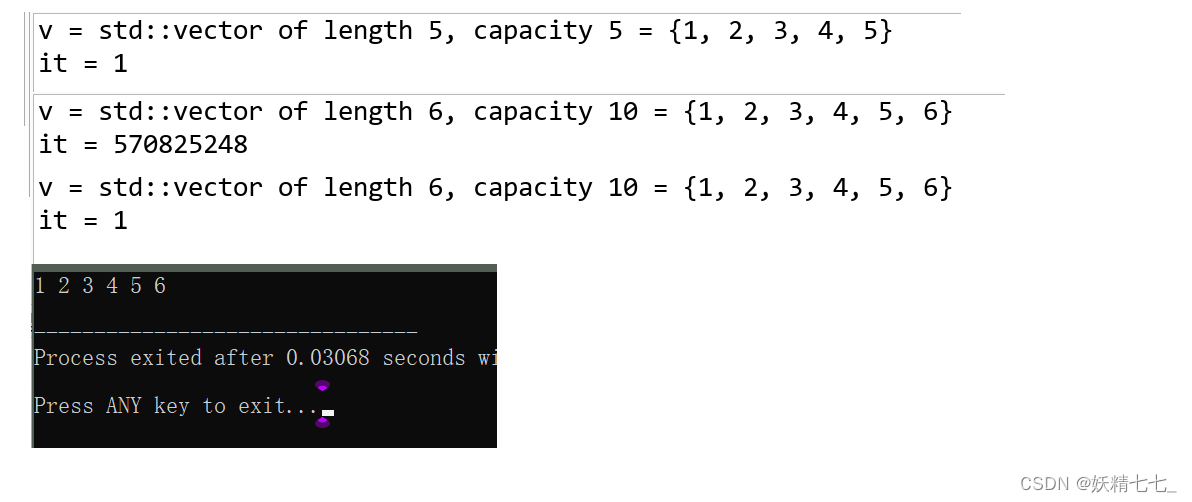
扩容操作,开辟新的空间,而老迭代器还指向旧的空间,此时迭代器指向的空间是已经被消灭的空间,解决这个问题就必须重新让迭代器指向新空间的位置。
vector删除操作后返回下一个元素的迭代器位置
/*vector删除操作后返回下一个位置的迭代器位置*/
#if 1
#define _CRT_SECURE_NO_WARNINGS
 #include <iostream>
using namespace std;
#include <vector>
#include <algorithm>
#include <crtdbg.h>

void TestVector10() {
    vector<int> v{ 1, 2, 3, 4, 5, 6, 7, 8, 9, 0 };
    auto it = v.begin();
    while (it != v.end()) {
        if (*it & 1 || *it == 0)
            it = v.erase(it);
        else
            ++it;
    }

 }
int main() {
    TestVector10();
 }

#endif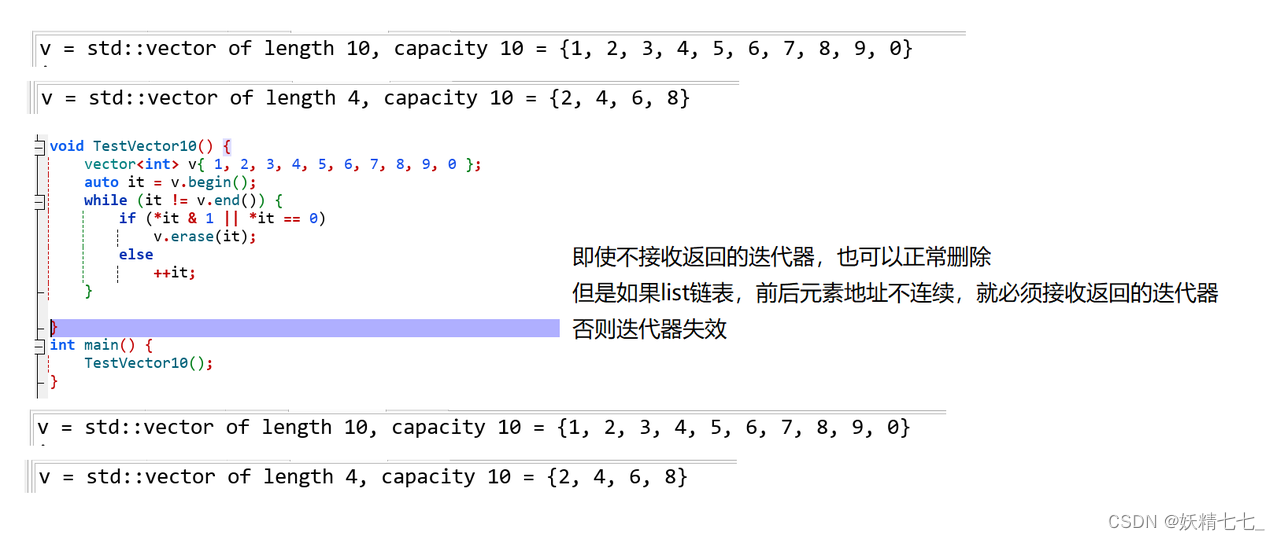
用vector创建二维数组
/*用vector创建二维数组*/
#if 1
/*
 用vector创建二维数组:
 1. 矩阵
 a. 所有元素都相同
 b. 元素不同
 2. 每行元素个数不同---比如杨慧三角
 */

#define _CRT_SECURE_NO_WARNINGS
 #include <iostream>
using namespace std;
#include <vector>
#include <algorithm>
#include <crtdbg.h>
// a. 所有元素都相同
void TestVector11() {

//     5行10列  所有元素都是8
 //    1.依次尾插
    vector<vector<int>> v1;
    v1.resize(5);
    for (int i = 0; i < 5; ++i)
    {
        for (int j = 0; j < 10; ++j)
        {
            v1[i].push_back(8);
        }
    }
//    2.无参构造,resize
     vector<vector<int>> v2;
     v2.resize(5, vector<int>(10, 8));
//    3.vector构造函数嵌套
    vector<vector<int>> v3(5, vector<int>(10, 8));
 }
int main(){
    TestVector11();
 }
#endif

vector<vector<int>> v3(5, vector<int>(10, 8));创建对象v3,元素数据类型是vector<int>类型,元素个数有五个,对这五个元素进行初始化,全部初始化为vector<int>(10,8),匿名对象构造函数。
常用于创建矩阵。
/*用vector创建二维数组---杨慧三角*/
#if 1
#define _CRT_SECURE_NO_WARNINGS
 #include <iostream>
using namespace std;
#include <vector>
#include <algorithm>
#include <crtdbg.h>
// 2. 每行元素个数不同---比如杨慧三角
void TestVector12() {
    int n;
    cin >> n;

    // vector(size_t n, const T& val = T())
    // vector<vector<int>> vv(n, vector<int>());
    vector<vector<int>> vv(n);
    for (size_t i = 0; i < vv.size(); ++i) {
        vv[i].resize(i + 1, 1);
    }

    /*
    0:1
    1:1  1
    2:1  2  1
    3:1  3  3  1
    4:1  4  6  4  1
    。。。
    */
    for (size_t i = 2; i < vv.size(); ++i) {
        for (size_t j = 1; j < vv[i].size() - 1; ++j) {
            vv[i][j] = vv[i - 1][j] + vv[i - 1][j - 1];
        }
    }
 }
int main(){
    TestVector12();
 }
使用reserve、resize的探究
/*使用reserve、resize的小技巧*/
#if 1
#define _CRT_SECURE_NO_WARNINGS
 #include <iostream>
using namespace std;
#include <vector>
#include <algorithm>
#include <crtdbg.h>

void TestVector13() {
    vector<int> v2;
    v2.reserve(10);
    v2[0] = 1;

     vector<int> v3;
    v3.resize(10);
    v3[0] = 1;

     vector<int> v1;
    v1[0] = 1;


 }
int main() {
    TestVector13();
    return 0;
 }
#endif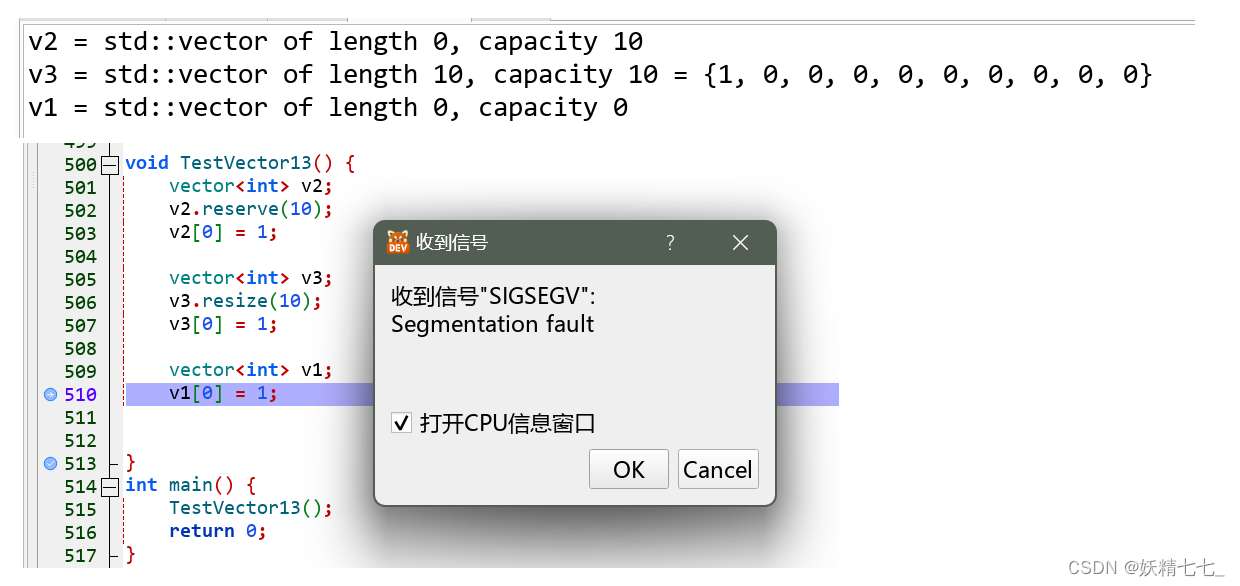
capacity容量,已经开辟的空间大小,length使用的空间大小。如果通过无参的构造函数创建v1,length和capacity都是0,此时访问元素并修改会报错,因为此时v1还没有开辟空间。
结尾
最后,感谢您阅读我的文章,希望这些内容能够对您有所启发和帮助。如果您有任何问题或想要分享您的观点,请随时在评论区留言。
同时,不要忘记订阅我的博客以获取更多有趣的内容。在未来的文章中,我将继续探讨这个话题的不同方面,为您呈现更多深度和见解。
谢谢您的支持,期待与您在下一篇文章中再次相遇!







![[office] excel求乘积的公式和方法 #媒体#笔记#经验分享](https://img-blog.csdnimg.cn/img_convert/b50dbcf3038db9d934dddc6f1fb5bb93.gif)
