目录
介绍
数字模板处理
银行卡图片处理
导入数字模板
模板匹配及结果
介绍
我们有若干个银行卡图片和一个数字模板图片,如下图


我们的目的就是通过对银行卡图片进行一系列图像操作使得我们可以用这个数字模板检测出银行卡号。
数字模板处理
首先我们先对数字模板进行处理,处理的目的是将数字模板中的每个数字分割开来。
先导入需要用到的包
import cv2
import os
import numpy as np
import matplotlib.pyplot as plt
然后再定义一个修改图片尺寸的函数
#修改尺寸
def img_resize(img, hight):
    (h, w) = img.shape[0], img.shape[1]
    r = h / hight
    width = w / r
    img = cv2.resize(img, (int(width), int(hight)))
    return img
接下来,我们读入数字模板图片并对其进行灰度化,二值化和轮廓检测
#读入总模板
img = cv2.imread('images/ocr_a_reference.png')
ref = cv2.cvtColor(img, cv2.COLOR_BGR2GRAY)
ref,thresh= cv2.threshold(ref, 127, 255, cv2.THRESH_BINARY_INV)
contours, hierarchy = cv2.findContours(thresh, cv2.RETR_EXTERNAL, cv2.CHAIN_APPROX_NONE)
由于模板比较简单,故用这些操作即可分割出来数字模板中的每个数字,我们可以看一下操作完后的结果
for i in range(len(contours)):
    x, y, w, h = cv2.boundingRect(contours[i])
    plt.subplot(3, 4, i + 1)
    plt.imshow(thresh[y:y + h, x:x + w], cmap=plt.cm.gray)
    plt.xticks([])
    plt.yticks([])

plt.show()
接下来,我们将各个模板保存起来,以便于后期读取使用
#保存模板
if not os.path.exists('data'):
    os.mkdir('data')

for i in range(len(contours)):
    x, y, w, h = cv2.boundingRect(contours[i])
    cv2.imwrite(os.path.join('data', str(9-i)+'.jpg'), thresh[y:y+h, x:x+w])
保存完后会生成一个data文件夹,可以看到每个数字都已经单独分割保存为单张图片了

到这里,数字模板处理就完成了
银行卡图片处理
我们是要基于模板匹配去识别具体的银行卡号,而且我们在上述操作中已经得到了每个数字的模板,所以我们现在只需要从银行卡里面切割处理每个银行卡号,就可以进行模板匹配,那么怎么切割出银行卡里的每个号码呢,这里小编尝试过直接用图像处理技术进行单个切割,但发现效果并不好。此时我们发现银行卡号共有16位,其中每4位离的都比较近,那我们可不可以先画出整体四个,然后再对四个进行单独切割呢,显然,这样做的效果是比较好的。
我们首先读入银行卡图片并修改尺寸和做灰度化处理
#灰度化
img = cv2.imread('images/credit_card_01.png')
img = img_resize(img, 200)
gray = cv2.cvtColor(img, cv2.COLOR_BGR2GRAY)
plt.imshow(gray, cmap=plt.cm.gray)
然后对灰度图进行礼貌操作,用来突出银行卡中的数字
#礼貌操作
rectKernel = cv2.getStructuringElement(cv2.MORPH_RECT, (9, 5))
sqKernel = cv2.getStructuringElement(cv2.MORPH_RECT, (5, 5))
tophat = cv2.morphologyEx(gray,cv2.MORPH_TOPHAT,rectKernel)
plt.imshow(tophat, cmap=plt.cm.gray)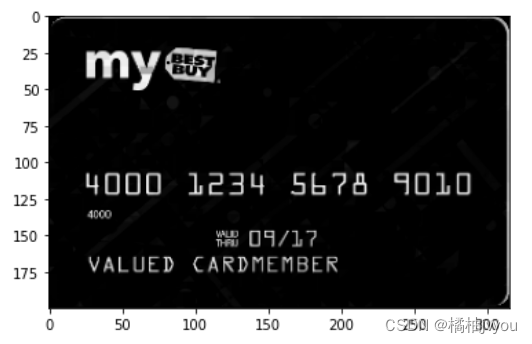
然后利用sobel算子增强图片的边缘信息,即增强数字信息
#sobel边缘检测
sobel = cv2.Sobel(tophat, cv2.CV_64F,dx=1, dy=0, ksize=3)
sobel = cv2.convertScaleAbs(sobel)
minval, maxval = np.min(sobel), np.max(sobel)
sobel = (255 * ((sobel - minval) / (maxval - minval)))
sobex = sobel.astype('uint8')
plt.imshow(sobex, cmap=plt.cm.gray)
再对图像进行膨胀和腐蚀的操作,使得每四个数字连接在一起
#膨胀腐蚀
dilate = cv2.dilate(sobel, rectKernel, 10)
erosion = cv2.erode(dilate, rectKernel, 10)
plt.imshow(erosion, cmap=plt.cm.gray)
此时发现图像上有些噪声,所以我们对图像进行二值化操作,以去除这些白点
#二值化
erosion = cv2.convertScaleAbs(erosion)
ret, thresh = cv2.threshold(erosion, 0, 255, cv2.THRESH_BINARY|cv2.THRESH_OTSU)
plt.imshow(thresh, cmap=plt.cm.gray) 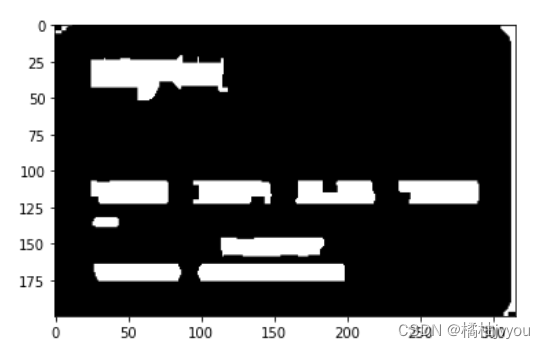
进行完二值化操作后,再进行一次膨胀腐蚀操作,加深数字区域信息
#膨胀腐蚀
dilate = cv2.dilate(thresh, sqKernel, 10)
erosion = cv2.erode(dilate, sqKernel, 10)
plt.imshow(dilate, cmap=plt.cm.gray)
现在效果就比较好了,我们就可以在此图像上画轮廓了
#画轮廓
contours, hierarchy = cv2.findContours(thresh, cv2.RETR_EXTERNAL, cv2.CHAIN_APPROX_NONE)
cur_img = img.copy()
cur_img = cv2.cvtColor(cur_img, cv2.COLOR_BGR2RGB)
cv2.drawContours(cur_img,contours,-1,(0,0,255),3)
plt.imshow(cur_img) 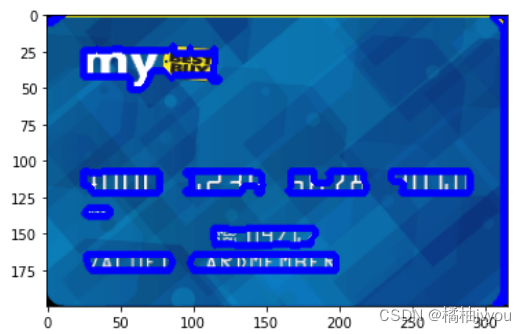
但是我们发现,这个轮廓不仅廓住了数字区域,还廓住了其他区域,此时我们将数字区域轮廓过滤出来,并画出来数字区域显示一下(数字是棕色的是因为此时显示的BGR图像)
#过滤轮廓
locs = []
for(i,c) in enumerate(contours):
    (x,y,w,h) = cv2.boundingRect(c)
    ar = w/float(h)
    if ar>2.5 and ar<4.0:
        if(w>40 and w<60) and (h>10 and h<20):
            locs.append((x,y,w,h))
print(len(locs))

for i in range(len(locs)):
    x,y,w,h = locs[3-i]
    contour = img[y:y+h, x:x+w,:]
    plt.subplot(2, 2, i+1)
    plt.imshow(contour)
    plt.xticks([])
    plt.yticks([])

plt.show() 
此时没有银行卡上其他信息的干扰,我们可以很简单的使用灰度化,二值化和轮廓检测来廓住每个单独的数字
#进行最后的处理
results = []
for i in range(len(locs)):
    x,y,w,h = locs[3-i]
    img_new = img[y:y+h, x:x+w,:]
    gray = cv2.cvtColor(img_new, cv2.COLOR_BGR2GRAY)
    ret, thresh = cv2.threshold(gray, 0, 255, cv2.THRESH_BINARY|cv2.THRESH_OTSU)
    contours, _ = cv2.findContours(thresh, cv2.RETR_EXTERNAL,cv2.CHAIN_APPROX_SIMPLE)
    res = img_new.copy()
    for j in range(len(contours)):
        x, y, w, h = cv2.boundingRect(contours[3-j])
        res = cv2.rectangle(res, (x, y), (x+w, y+h), (255, 0, 0), 1)
        results.append(thresh[y:y+h, x:x+w])

    plt.subplot(2, 2, i+1)
    plt.imshow(res, cmap=plt.cm.gray)
    plt.xticks([])
    plt.yticks([])

plt.show()
最后我们就可以得到银行卡中的每个单独号码
#可以看一下results
for i in range(16):
    results[i] = cv2.resize(results[i], (10, 15))
    plt.subplot(2, 8, i+1)
    plt.imshow(results[i], cmap=plt.cm.gray)
    plt.xticks([])
    plt.yticks([])

plt.show() 
导入数字模板
在处理完银行卡后,我们导入我们一开始获得的数字模板,进行最后的模板匹配
#引入模板
digits = {}
for i in range(10):
    digits[i] = cv2.resize(cv2.imread('data/{}.jpg'.format(i)), (10, 15))
    digits[i] = cv2.cvtColor(digits[i], cv2.COLOR_BGR2GRAY)
    ref, digits[i] = cv2.threshold(digits[i], 0, 255, cv2.THRESH_BINARY|cv2.THRESH_OTSU)

for i in range(10):
    plt.subplot(2, 5, i+1)
    plt.imshow(digits[i], cmap=plt.cm.gray)
    plt.xticks([])
    plt.yticks([])

plt.show()
模板匹配及结果
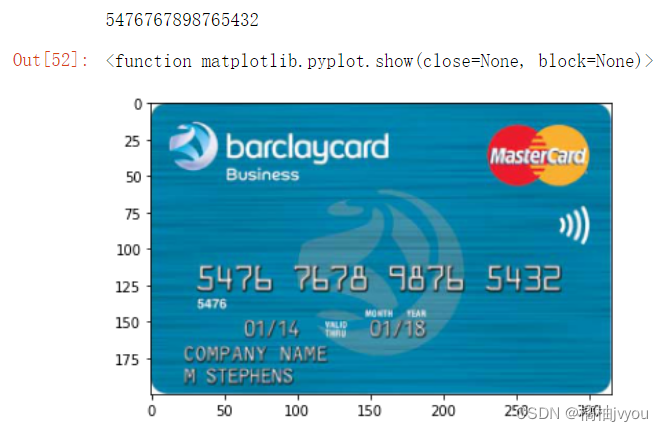
导入数字模板后,就可以进行模板匹配得到结果了
#模板匹配得出结果
res = ''
for i in results:
    scores = []
    for j in range(10):
        result = cv2.matchTemplate(i, digits[j], cv2.TM_CCOEFF)  # result为一个输出矩阵
        (_, score, _, _) = cv2.minMaxLoc(result)  # 这个方法会返回最小值,最大值,最小值位置和最大值位置
        scores.append(score)
    res = res + str(np.argmax(scores))
print(res)

plt.imshow(cv2.cvtColor(img, cv2.COLOR_BGR2RGB))
plt.show
我们也可以看一下其他银行卡的匹配结果


其中有一张银行卡号的识别好像因为环境等因素出了点问题,其他的识别都是没问题的,大体来说结果还算可以
源码及文件请查看:https://github.com/jvyou/Bank-card-number-identification
效果演示请查看:https://www.bilibili.com/video/BV1hK421C7Bk/?spm_id_from=333.999.0.0&vd_source=ea64b940c4e46744da2aa737dca8e183
