文章目录
- 一 需求
- 二 环境准备
- 三 服务端配置
- 3.1 添加硬盘
- 3.2 安装软件
- 3.3 编写配置文件
- 3.4 启动服务
- 3.5 检查配置信息
- 四 客户端配置
- 4.1 安装软件包
- 4.2 启动服务
- 4.3 发现目标
- 4.4 登陆目标
- 4.5 实现开机自动挂载
- 五 对部署进行测试
一 需求
1)首先在服务端添加一块10G的硬盘,并进行分区,得到其中的1G作为远程存储设备
2)其次在服务端创建名为iqn.2023-01-05.com:server的新iscsi目标,并且仅限于客户端iqn.2023-01-06.com:client。
3)在客户端可以发现并登录到新目标。
4)在新磁盘上创建 XFS 文件系统,并将其持久挂载到/data目录上。
二 环境准备
服务端IP:10.0.0.100 主机名:rhel-6
客户端IP:10.0.0.101 主机名:rhel6-01
[root@rhel-6 ~]# cat /etc/redhat-release
Red Hat Enterprise Linux Server release 6.9 (Santiago)
[root@rhel-6 ~]# uname -r
2.6.32-696.el6.x86_64
三 服务端配置
3.1 添加硬盘
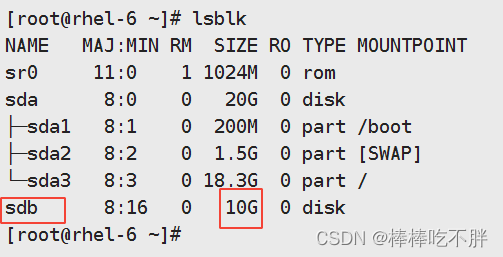
添加一块10G硬盘。
Linux磁盘分区和管理
3.2 安装软件
执行命令安装软件 yum install scsi-target-utils -y

3.3 编写配置文件
[root@rhel-6 ~]# tail -4  /etc/tgt/targets.conf
<target iqn.2023-01-05.com:server>
        backing-store /dev/sdb
        initiator-address 10.0.0.101
</target>
此处补充说明配置文件下的一些常用参数:
| 参数 | 说明 |
|---|---|
| backing-store | 定义一个逻辑单元(LUN),这个LUN通常是一个普通文件或者块设备 |
| initiator-address | 限制可以连接target的客户端地址范围 |
| incominguser | 限制可以连接target的客户端用户 |
3.4 启动服务
[root@rhel-6 ~]# service tgtd start
Starting SCSI target daemon:                               [  OK  ]
[root@rhel-6 ~]# chkconfig tgtd on
[root@rhel-6 ~]# service tgtd status
tgtd (pid 6464 6461) is running...
[root@rhel-6 ~]# netstat -lntup|grep 3260
tcp        0      0 0.0.0.0:3260                0.0.0.0:*                   LISTEN      6461/tgtd
tcp        0      0 :::3260                     :::*                        LISTEN      6461/tgtd
3.5 检查配置信息
[root@rhel-6 ~]# tgt-admin -show
Target 1: iqn.2023-01-05.com:server
    System information:
        Driver: iscsi
        State: ready
    I_T nexus information:
    LUN information:
        LUN: 0
            Type: controller
            SCSI ID: IET     00010000
            SCSI SN: beaf10
            Size: 0 MB, Block size: 1
            Online: Yes
            Removable media: No
            Prevent removal: No
            Readonly: No
            Backing store type: null
            Backing store path: None
            Backing store flags:
        LUN: 1
            Type: disk
            SCSI ID: IET     00010001
            SCSI SN: beaf11
            Size: 10737 MB, Block size: 512
            Online: Yes
            Removable media: No
            Prevent removal: No
            Readonly: No
            Backing store type: rdwr
            Backing store path: /dev/sdb
            Backing store flags:
    Account information:
    ACL information:
        10.0.0.101
四 客户端配置
4.1 安装软件包
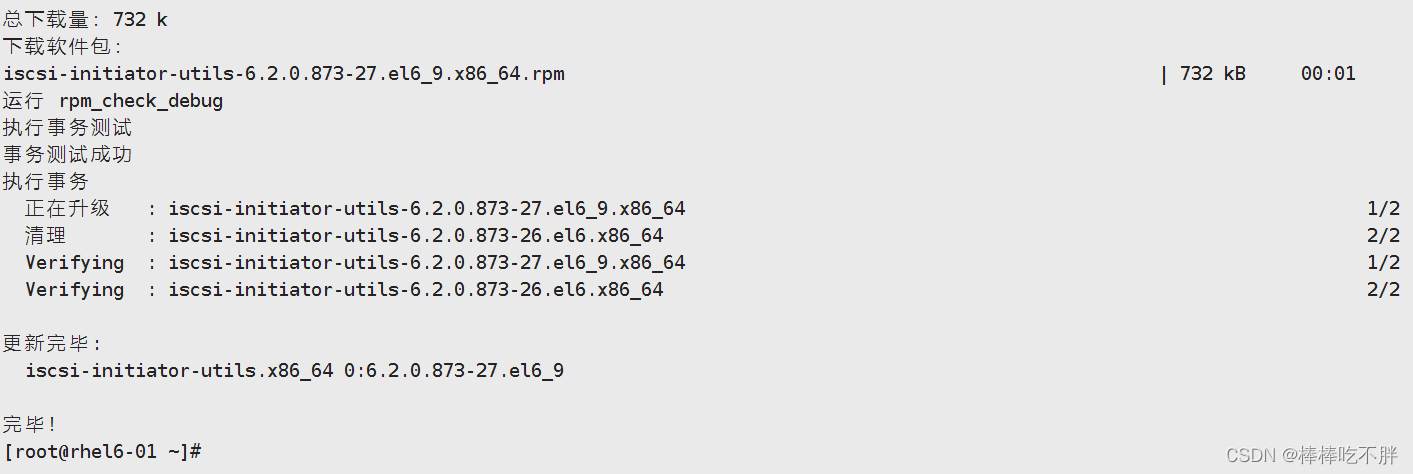
安装软件包 yum install -y iscsi-initiator-utils
4.2 启动服务
[root@rhel6-01 ~]# /etc/init.d/iscsid start
正在启动 iscsid:                                          [确定]
[root@rhel6-01 ~]# chkconfig iscsid on
[root@rhel6-01 ~]# /etc/init.d/iscsid status
iscsid (pid  52352) 正在运行...
4.3 发现目标
[root@rhel6-01 ~]# iscsiadm -m discovery -t sendtargets -p 10.0.0.100
10.0.0.100:3260,1 iqn.2023-01-05.com:server
4.4 登陆目标
[root@rhel6-01 ~]# iscsiadm -m node -T iqn.2023-01-05.com:server -l
Logging in to [iface: default, target: iqn.2023-01-05.com:server, portal: 10.0.0.100,3260] (multiple)
Login to [iface: default, target: iqn.2023-01-05.com:server, portal: 10.0.0.100,3260] successful.
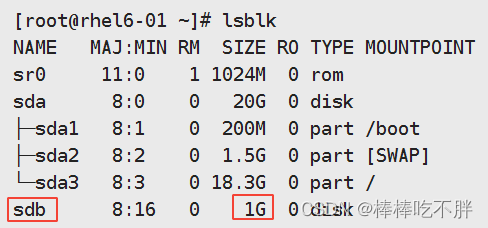
检查后可以识别本地客户端多了一块磁盘。
补充说明,如果想要退出登录并删除目标,依次执行下列两个命令:
iscsiadm -m node -T iqn.2023-01-05.com:server --logout
iscsiadm -m node -T iqn.2023-01-05.com:server -o delete
4.5 实现开机自动挂载
首先创建挂载目录。
mkdir /data
接着创建成分区。
[root@rhel6-01 ~]# fdisk /dev/sdb

WARNING: DOS-compatible mode is deprecated. It's strongly recommended to
         switch off the mode (command 'c') and change display units to
         sectors (command 'u').

Command (m for help): n
Command action
   e   extended
   p   primary partition (1-4)
p
Partition number (1-4): 1
First cylinder (1-10240, default 1): 1
Last cylinder, +cylinders or +size{K,M,G} (1-10240, default 10240): +1G

Command (m for help): p

Disk /dev/sdb: 10.7 GB, 10737418240 bytes
64 heads, 32 sectors/track, 10240 cylinders
Units = cylinders of 2048 * 512 = 1048576 bytes
Sector size (logical/physical): 512 bytes / 512 bytes
I/O size (minimum/optimal): 512 bytes / 512 bytes
Disk identifier: 0x35da8dc7

   Device Boot      Start         End      Blocks   Id  System
/dev/sdb1               1        1025     1049584   83  Linux

Command (m for help): w
The partition table has been altered!

Calling ioctl() to re-read partition table.
Syncing disks.
[root@rhel6-01 ~]# partprobe /dev/sdb
检查创建好的分区。
[root@rhel6-01 ~]# lsblk
NAME   MAJ:MIN RM  SIZE RO TYPE MOUNTPOINT
sr0     11:0    1 1024M  0 rom
sda      8:0    0   20G  0 disk
├─sda1   8:1    0  200M  0 part /boot
├─sda2   8:2    0  1.5G  0 part [SWAP]
└─sda3   8:3    0 18.3G  0 part /
sdb      8:16   0   10G  0 disk
└─sdb1   8:17   0    1G  0 part
接着格式化分区。
[root@rhel6-01 ~]# mkfs -t ext4 /dev/sdb1
mke2fs 1.41.12 (17-May-2010)
警告: 252 块未使用.

文件系统标签=
操作系统:Linux
块大小=4096 (log=2)
分块大小=4096 (log=2)
Stride=0 blocks, Stripe width=0 blocks
65664 inodes, 262144 blocks
13119 blocks (5.00%) reserved for the super user
第一个数据块=0
Maximum filesystem blocks=268435456
8 block groups
32768 blocks per group, 32768 fragments per group
8208 inodes per group
Superblock backups stored on blocks:
        32768, 98304, 163840, 229376

正在写入inode表: 完成
Creating journal (8192 blocks): 完成
Writing superblocks and filesystem accounting information: 完成

This filesystem will be automatically checked every 24 mounts or
180 days, whichever comes first.  Use tune2fs -c or -i to override.
然后实现开机自动挂载。
此处需要注意的是,配置文件 /etc/fstab 文件中需要加一个参数 _netdev,否则在设备重启后会报错。
[root@rhel6-01 ~]# tail -1 /etc/fstab
/dev/sdb1               /data                   ext4    defaults,_netdev 0 0
[root@rhel6-01 ~]# mount -a
[root@rhel6-01 ~]# df -h
Filesystem      Size  Used Avail Use% Mounted on
/dev/sda3        18G  5.2G   12G  31% /
tmpfs           491M   64K  491M   1% /dev/shm
/dev/sda1       190M   35M  146M  20% /boot
/dev/sdb1       976M  1.3M  924M   1% /data
五 对部署进行测试
最后我们进行测试,能否从客户端在设备中写一个文件。
[root@rhel6-01 ~]# cd /data/
[root@rhel6-01 data]# echo client > test
[root@rhel6-01 data]# ll
总用量 20
drwx------ 2 root root 16384 1月   6 10:59 lost+found
-rw-r--r-- 1 root root     7 1月   6 11:06 test
[root@rhel6-01 data]# cat test
client
经过测试,设备挂载成功。
