QML自带的GridView只能定义delegate,没有section,类似手机相册带时间分组标签的样式就没法做。最简单的方式就是组合ListView+GridView,或者ListView+Flow,但是嵌套View时,子级View一般是完全展开的,只显示该分组几行就得把该分组全部加载了,这样就没有了View在需要时才实例化Item的优势,所以最好还是在单层View实现最终效果。
QML的ListView支持section,可以自定义分组样式,所以可以通过ListView来实现带section的GridView。当然,你也可以直接修改GridView的C++源码给他加上section。
ListView实现GridView的效果无非就是把多行显示到一行。可以让ListView某一行撑高,其他行高度为0;也可以平均分配一行高度。因为delegate会被ListView控制位置,所以相对位置可以在内部嵌套然后设置偏移量,使之看起来在一行上。
本文完整代码:
https://github.com/gongjianbo/MyTestCode/tree/master/Qml/TestQml_20240205_SectionGrid
先实现一个不带section的GridView:
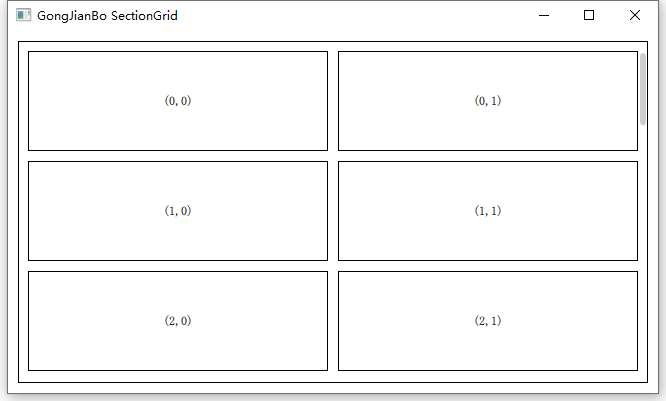
import QtQuick 2.15
import QtQuick.Controls 2.15

// ListView 实现 GridView 效果
Rectangle {
    id: control

    border.color: "black"

    // 边距
    property int padding: 10
    // Item 间隔
    property int spacing: 10
    // Item 宽
    property int itemWidth: 300
    // Item 高
    property int itemHeight: 100
    // Delegate 宽
    property int delegateWidth: itemWidth + spacing
    // Delegate 高
    property int delegateHeight: itemHeight + spacing
    // 列数根据可视宽度和 Item 宽度计算
    property int columns: (list_view.width + spacing - padding) / delegateWidth < 1
                          ? 1
                          : (list_view.width + spacing - padding) / delegateWidth

    // 套一层 Item clip 剪去 ListView 尾巴上多余的部分不显示出来
    Item {
        anchors.fill: parent
        anchors.margins: control.padding
        // 右侧留下滚动条位置,所以 columns 里 list_view.width 要减一个 padding
        anchors.rightMargin: 0
        clip: true

        ListView {
            id: list_view
            width: parent.width
            // 高度多一个 delegate 放置 footer,防止末尾的一行滑倒底部后隐藏
            // 多出来的一部分会被外部 Item clip 掉
            height: parent.height + control.delegateHeight + control.spacing
            flickableDirection: Flickable.HorizontalAndVerticalFlick
            boundsBehavior: Flickable.StopAtBounds
            headerPositioning: ListView.OverlayHeader
            // 底部多一个 footer 撑高可显示范围,防止末尾的一行滑倒底部后隐藏
            footerPositioning: ListView.OverlayFooter
            ScrollBar.vertical: ScrollBar {
                // padding 加上 ListView 多出来的一部分
                bottomPadding: padding + (control.delegateHeight + control.spacing)
                // 常驻显示只是方便调试
                policy: ScrollBar.AlwaysOn
            }
            footer: Item {
                // 竖向的 ListView 宽度无所谓
                width: control.delegateWidth
                // 高度大于等于 delegate 高度才能保证显示
                height: control.delegateHeight
            }
            // 奇数方便测试
            model: 31
            delegate: Item {
                width: control.delegateWidth
                // 每行第一个 Item 有高度,后面的没高度,这样就能排列到一行
                // 因为 0 高度 Item 在末尾,超出范围 visible 就置为 false 了,所以才需要 footer 撑高多显示一行的内容
                // delegate 高度不一致会导致滚动条滚动时长度变化
                height: (model.index % control.columns === 0) ? control.delegateHeight : 0
                // 放置真正的内容
                Rectangle {
                    // 根据列号计算 x
                    x: (model.index % control.columns) * control.delegateWidth
                    // 负高度就能和每行第一个的 y 一样
                    y: (model.index % control.columns !== 0) ? -control.delegateHeight : 0
                    width: control.itemWidth
                    height: control.itemHeight
                    border.color: "black"
                    Text {
                        anchors.centerIn: parent
                        // 显示行号列号
                        text: "(%1,%2)".arg(
                                  parseInt(model.index / control.columns)).arg(
                                  model.index % control.columns)
                    }
                }
            }
        }
    }
}
如果要带section,就得每个分组有单独的index,这样才能计算分组内的行列号,需要我们自定义一个ListModel:
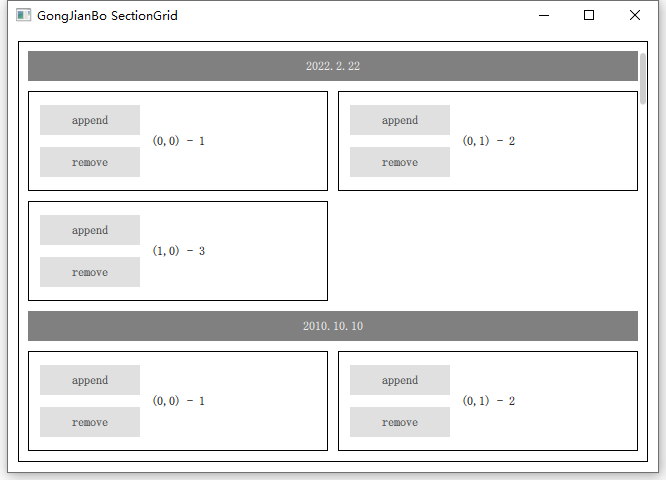
#pragma once
#include <QAbstractListModel>

// 实际数据
struct DataInfo
{
    int value;
    // 本例用日期来分组
    QString date;
};

// 分组信息,如 index
struct SectionInfo
{
    int index;
};

class DataModel : public QAbstractListModel
{
    Q_OBJECT
private:
    enum ModelRole {
        ValueRole = Qt::UserRole
        , GroupNameRole
        , GroupIndexRole
    };
public:
    explicit DataModel(QObject *parent = nullptr);

    // Model 需要实现的必要接口
    int rowCount(const QModelIndex &parent = QModelIndex()) const override;
    QVariant data(const QModelIndex &index, int role = Qt::DisplayRole) const override;
    QHash<int, QByteArray> roleNames() const override;

    // 在头部添加一个数据
    Q_INVOKABLE void appendData(int value, const QString &date);
    // 根据 model.index 删除一个数据
    Q_INVOKABLE void removeData(int index);
    // 加点测试数据
    void test();

private:
    QVector<DataInfo> datas;
    QVector<SectionInfo> inners;
};

DataModel::DataModel(QObject *parent)
    : QAbstractListModel(parent)
{
    test();
}

int DataModel::rowCount(const QModelIndex &parent) const
{
    if (parent.isValid())
        return 0;
    return datas.size();
}

QVariant DataModel::data(const QModelIndex &index, int role) const
{
    if (!index.isValid())
        return QVariant();
    auto &&item = datas.at(index.row());
    auto &&inner = inners.at(index.row());
    switch (role)
    {
    case ValueRole: return item.value;
    case GroupNameRole: return item.date;
    case GroupIndexRole: return inner.index;
    }
    return QVariant();
}

QHash<int, QByteArray> DataModel::roleNames() const
{
    static QHash<int, QByteArray> names{
        {ValueRole, "value"}
        , {GroupNameRole, "groupName"}
        , {GroupIndexRole, "groupIndex"}
    };
    return names;
}

void DataModel::appendData(int value, const QString &date)
{
    // 先判断分组是否相同
    if (datas.isEmpty() || datas.first().date != date) {
        // 没有该组,新建一个分组
        DataInfo item;
        item.value = value;
        item.date = date;
        SectionInfo inner;
        inner.index = 0;
        beginInsertRows(QModelIndex(), 0, 0);
        datas.push_front(item);
        inners.push_front(inner);
        endInsertRows();
    } else {
        // 已有该组,插入并移动该组后面的 Item
        DataInfo item;
        item.value = value;
        item.date = date;
        SectionInfo inner;
        inner.index = 0;
        beginInsertRows(QModelIndex(), 0, 0);
        datas.push_front(item);
        inners.push_front(inner);
        endInsertRows();
        // 刷新该组
        int update_count = 0;
        // 0 是新插入,1 是旧 0
        for (int i = 1; i < inners.size(); i++) {
            auto &&inner_i = inners[i];
            if (i > 1 && inner_i.index == 0)
                break;
            inner_i.index = i;
            update_count ++;
        }
        emit dataChanged(QAbstractListModel::index(1, 0), QAbstractListModel::index(1 + update_count, 0));
    }
}

void DataModel::removeData(int index)
{
    if (index < 0 || index >= datas.size())
        return;
    beginRemoveRows(QModelIndex(), index, index);
    datas.removeAt(index);
    inners.removeAt(index);
    endRemoveRows();
    int update_count = 0;
    for (int i = index; i < inners.size(); i++) {
        auto &&inner_i = inners[i];
        if (inner_i.index == 0)
            break;
        inner_i.index -= 1;
        update_count ++;
    }
    if (update_count > 0) {
        emit dataChanged(QAbstractListModel::index(index, 0), QAbstractListModel::index(index + update_count, 0));
    }
}

void DataModel::test()
{
    DataInfo item;
    SectionInfo inner;
    item.date = "2022.2.22";
    for (int i = 0; i < 11; i++)
    {
        item.value = i + 1;
        datas.push_back(item);
        inner.index = i;
        inners.push_back(inner);
    }
    item.date = "2010.10.10";
    for (int i = 0; i < 21; i++)
    {
        item.value = i + 1;
        datas.push_back(item);
        inner.index = i;
        inners.push_back(inner);
    }
    item.date = "1999.9.9";
    for (int i = 0; i < 31; i++)
    {
        item.value = i + 1;
        datas.push_back(item);
        inner.index = i;
        inners.push_back(inner);
    }
}
import QtQuick 2.15
import QtQuick.Controls 2.15
import Test 1.0

// ListView 实现带 section 分组的 GridView
Rectangle {
    id: control

    border.color: "black"

    // 边距
    property int padding: 10
    // Item 间隔
    property int spacing: 10
    // Item 宽
    property int itemWidth: 300
    // Item 高
    property int itemHeight: 100
    // Delegate 宽
    property int delegateWidth: itemWidth + spacing
    // Delegate 高
    property int delegateHeight: itemHeight + spacing
    // 列数根据可视宽度和 Item 宽度计算
    property int columns: (list_view.width + spacing - padding) / delegateWidth < 1
                          ? 1
                          : (list_view.width + spacing - padding) / delegateWidth

    // 套一层 Item clip 剪去 ListView 尾巴上多余的部分不显示出来
    Item {
        anchors.fill: parent
        anchors.margins: control.padding
        // 右侧留下滚动条位置,所以 columns 里 list_view.width 要减一个 padding
        anchors.rightMargin: 0
        clip: true

        ListView {
            id: list_view
            width: parent.width
            // 高度多一个 delegate 放置 footer,防止末尾的一行滑倒底部后隐藏
            // 多出来的一部分会被外部 Item clip 掉
            height: parent.height + control.delegateHeight + control.spacing
            flickableDirection: Flickable.HorizontalAndVerticalFlick
            boundsBehavior: Flickable.StopAtBounds
            headerPositioning: ListView.OverlayHeader
            // 底部多一个 footer 撑高可显示范围,防止末尾的一行滑倒底部后隐藏
            footerPositioning: ListView.OverlayFooter
            ScrollBar.vertical: ScrollBar {
                // padding 加上 ListView 多出来的一部分
                bottomPadding: padding + (control.delegateHeight + control.spacing)
                // 常驻显示只是方便调试
                policy: ScrollBar.AlwaysOn
            }
            footer: Item {
                // 竖向的 ListView 宽度无所谓
                width: control.delegateWidth
                // 高度大于等于 delegate 高度才能保证显示
                height: control.delegateHeight
            }
            model: DataModel {
                id: list_model
            }
            section {
                property: "groupName"
                criteria: ViewSection.FullString
                delegate: Item {
                    width: list_view.width - control.padding
                    height: 40
                    Rectangle {
                        width: parent.width
                        height: parent.height - control.spacing
                        color: "gray"
                        Text {
                            anchors.centerIn: parent
                            text: section
                            color: "white"
                        }
                    }
                }
                labelPositioning: ViewSection.InlineLabels
            }
            delegate: Item {
                width: control.delegateWidth
                // 每行第一个 Item 有高度,后面的没高度,这样就能排列到一行
                // 因为 0 高度 Item 在末尾,超出范围 visible 就置为 false 了,所以才需要 footer 撑高多显示一行的内容
                // delegate 高度不一致会导致滚动条滚动时长度变化
                height: (model.groupIndex % control.columns === 0) ? control.delegateHeight : 0
                // 放置真正的内容
                Rectangle {
                    // 根据列号计算 x
                    x: (model.groupIndex % control.columns) * control.delegateWidth
                    // 负高度就能和每行第一个的 y 一样
                    y: (model.groupIndex % control.columns !== 0) ? -control.delegateHeight : 0
                    width: control.itemWidth
                    height: control.itemHeight
                    border.color: "black"
                    Text {
                        anchors.centerIn: parent
                        // 显示行号列号
                        text: "(%1,%2) - %3".arg(
                                  parseInt(model.groupIndex / control.columns)).arg(
                                  model.groupIndex % control.columns).arg(
                                  model.value)
                    }
                    Column {
                        x: 12
                        anchors.verticalCenter: parent.verticalCenter
                        spacing: 12
                        Button {
                            width: 100
                            height: 30
                            text: "append"
                            onClicked: {
                                list_model.appendData(model.value, "2222.2.22")
                            }
                        }
                        Button {
                            width: 100
                            height: 30
                            text: "remove"
                            onClicked: {
                                list_model.removeData(model.index)
                            }
                        }
                    }
                }
            } // end delegate Item
        } // end ListView
    }
}
这里只是实现了一个简单的效果,很多细节还需要调整。
通过添加更多的属性和计算,也可以实现带section的FlowView,即Item的宽高不是固定大小,整体为流式布局。




![[word] word 2010宏已被禁用警告关闭方法 #媒体#学习方法](https://img-blog.csdnimg.cn/img_convert/2f87757f0691c89d83f5922bda0f2a4a.png)


