目录
写在前面
unique_ptr
weak_ptr
智能指针的使用陷阱
致谢
写在前面
-
上一篇文章同大家深入探讨了
auto_ptr。今天给大家带来的是对于shared_ptr、unique_ptr以及weak_ptr的深入理解,通过测试案例和源码剖析对这三种重要的智能指针的使用方法,注意事项以及适用范围进行了全面的总结,相信经过这些测试大家对于智能指针的理解会更上一层楼。
-
后续的数据结构会很快开始,大家共勉~
unique_ptr
-
unique_ptr的特性:-
基于排他所有权模式,即两个指针不可指向一个相同的内存空间。
-
无法进行左值的拷贝构造和拷贝赋值,但是允许临时右值的拷贝构造和拷贝赋值。
-
保证指向某个对象的指针在其生命周期截止时自动释放内存空间。
-
在容器中保存指针是被允许的。
-
-
为了解决上述
auto_ptr中遗留的问题,在unique_ptr中,利用左值的拷贝构造和拷贝赋值被禁用。 -
public: // Disable copy from lvalue. unique_ptr(const unique_ptr&) = delete; unique_ptr& operator=(const unique_ptr&) = delete; -
用一个简单的例子解释一下
unique_ptr的优化: -
#include <iostream> #include <memory> #include <string> void test01(){ std::unique_ptr<std::string> p1(new std::string("hello world")); std::unique_ptr<std::string> p2; //both copy assignment and copy constructor with lvalue are banned in unique_ptr // to solve the problem existing in auto_ptr // p1 = p2; // std::unique_ptr<std::string> p3(p2); //while using rvalue will be allowed p2 = std::move(p1); std::cout << "p2: " << *p2 << std::endl; std::cout << "p1 -> " << p1.get() << std::endl; std::unique_ptr<std::string> p3(std::move(p2)); std::cout << "p3: " << *p3 << std::endl; std::cout << "p2 -> " << p2.get() << std::endl; } int main() { test01(); return 0; } -
运行结果如下,拷贝赋值和拷贝构造都被禁用了,只能用右值转换来重新赋值另外一个
unique_ptr的对象,这样一来就保证了一个内存空间只会被一个对象管理: -
/media/herryao/81ca6f19-78c8-470d-b5a1-5f35b4678058/work_dir/Document/computer_science/QINIU/projects/week05/Tue/project02/cmake-build-debug/project02 p2: hello world p1 -> 0 p3: hello world p2 -> 0 Process finished with exit code 0 -
针对标准库容器的优化,需要转化成右值来添加元素,此外直接赋值被禁用,如果非要赋值需要使用
std::move(): -
#include <iostream> #include <memory> #include <string> #include <vector> void test02(){ std::unique_ptr<std::string> p1(new std::string("hello world 01")); std::unique_ptr<std::string> p2(new std::string("hello world 02")); std::vector<std::unique_ptr<std::string>> vu; //using lvalue is banned // vu.push_back(p1); // vu.push_back(p2); vu.push_back(std::move(p1)); vu.push_back(std::move(p2)); std::cout << *vu[0] << "\t" << *vu[1] << std::endl; //this assignment is lvalue, banned by compiler. // vu[0] = vu[1]; //you can swap the value using this method. vu[0].swap(vu[1]); std::cout << *vu[0] << "\t" << *vu[1] << std::endl; //or you can use std::move to convert the lvalue to rvalue vu[0] = std::move(vu[1]); std::cout << "vu[0]: " << *vu[0] << std::endl; std::cout << "vu[1] -> " << vu[1].get() << std::endl; } int main() { test02(); return 0; } -
输出结果如下,大家可以结合代码体会一下:
-
/media/herryao/81ca6f19-78c8-470d-b5a1-5f35b4678058/work_dir/Document/computer_science/QINIU/projects/week05/Tue/project02/cmake-build-debug/project02 p2: hello world p1 -> 0 p3: hello world p2 -> 0 hello world 01 hello world 02 hello world 02 hello world 01 vu[0]: hello world 01 vu[1] -> 0 Process finished with exit code 0 -
关于对象数组的支持,一个简单的例子。
-
#include <iostream> #include <memory> #include <string> #include <vector> void test03(){ //this operation in auto_ptr is not allowed // std::auto_ptr<int[]> ap(new int[10]); std::unique_ptr<int[]> up(new int[10]); } int main() { test03(); return 0; } -
运行正常,但是
auto_ptr不可以这么管理。 -
unique_ptr的常见操作:-
赋值操作(必须使用移动语义):
-
unique_ptr<int> up(new int(10));
unique_ptr<int> up1(new int(11));
up = std::move(up1);//the move need to be used
-
-
对像的释放:
-
unique_ptr<int> up(new int(10));
up = nullptr; // release the memory and pointing it to nullptr
//up = NULL;    //same function as upper one
-
-
.release()和.reset()方法同auto_ptr完全一致,在此不再赘述。 -
.swap()方法其实在auto_ptr中也有定义,即交换两个智能指针的管理权限。
-
-
现在来总结一下
unique_ptr所支持的构造函数:-
unique_ptr<T> up; //empty construction -
unique_ptr<T> up(new T()); -
unique_ptr<T[]> up; //empty construction for T type array -
unique_ptr<T[]> up(new T[]); -
unique_ptr<T,D> up; //empty construction with explictly defined destructor -
unique_ptr<T,D> up(new T[]);
-
-
下面对以上的构造函数进行一一实现,首先是默认的调用类内析构函数的方法。
-
先定义一个类
Test用于测试 -
#include <iostream> #include <string> #include <vector> #include <memory> //define a class to do the test class Test{ public: Test(){ std::cout << "constructor is being called" << std::endl; } ~Test(){ std::cout << "destructor is being called" << std::endl; } }; -
首先是普通类型的类指针的测试,这里使用了默认的空参构造以及传入一个堆开辟的指针的构造方法。
-
然后使用右值转换来传递其控制内存,注意在
unique_ptr中拷贝赋值和拷贝构造已经被禁用了,只有移动赋值可以被调用。其移动构造和移动赋值的定义如下: -
public: // Move constructor. unique_ptr(unique_ptr&&) = default; /** @brief Move assignment operator. * * Invokes the deleter if this object owns a pointer. */ unique_ptr& operator=(unique_ptr&&) = default; -
于是我们对于这个测试的代码如下:
-
void test01(){ //normal pointer management std::unique_ptr<Test> p1; std::unique_ptr<Test> p2(new Test); std::cout << " -------------------------- before --------------------------" << std::endl; std::cout << "p1 -> " << p1.get() << std::endl; std::cout << "p2 -> " << p2.get() << std::endl; p1 = std::move(p2); std::cout << " -------------------------- after --------------------------" << std::endl; std::cout << "p1 -> " << p1.get() << std::endl; std::cout << "p2 -> " << p2.get() << std::endl; Test* t1 = new Test; std::cout << "t1 -> " << t1 << std::endl; p2.reset(t1); std::cout << " -------------------------- final --------------------------" << std::endl; std::cout << "p1 -> " << p1.get() << std::endl; std::cout << "p2 -> " << p2.get() << std::endl; std::cout << "t1 -> " << t1 << std::endl; // delete t1; } int main() { test01(); return 0; } -
其运行结果如下,可以看到,被移动后的智能指针会被置为空,其内部管理的内容会被传递的智能指针接管,当一个普通对象指针被创建,也可用智能指针管理,但是原始指针不会失效,且最终会被析构函数释放掉,因此此时不应该手动释放,一旦手动释放会造成访问越界:
-
/media/herryao/81ca6f19-78c8-470d-b5a1-5f35b4678058/work_dir/Document/computer_science/QINIU/projects/week05/Wed/project01/cmake-build-debug/project01 constructor is being called -------------------------- before -------------------------- p1 -> 0 p2 -> 0x55555556eeb0 -------------------------- after -------------------------- p1 -> 0x55555556eeb0 p2 -> 0 constructor is being called t1 -> 0x55555556f2e0 -------------------------- final -------------------------- p1 -> 0x55555556eeb0 p2 -> 0x55555556f2e0 t1 -> 0x55555556f2e0 destructor is being called destructor is being called Process finished with exit code 0 -
接下来是关于数组类型指针的测试,我们创建一个空的数组类,在创建一个传入长度为3的数组,然后简单看一下构造和析构调用的时机。
-
void test02(){ //array type pointer management std::unique_ptr<Test[]> p1; std::unique_ptr<Test[]> p2(new Test[3]); //3 times constructors and destructors } -
输出结果如下所示,这个内容表明了,空参构造并不会在数组内部初始化对象,但是如果分配了内存空间传入并初始化就会调用构造函数,所以最终输出了三次构造函数和三次析构函数的调用。
-
/media/herryao/81ca6f19-78c8-470d-b5a1-5f35b4678058/work_dir/Document/computer_science/QINIU/projects/week05/Wed/project01/cmake-build-debug/project01 constructor is being called constructor is being called constructor is being called destructor is being called destructor is being called destructor is being called Process finished with exit code 0 -
接下来是定义自定义析构函数作为参数的传入,这个不知道什么时候会用到,我认为了解一下即可。
-
此外就是在这个析构函数的定义中需要传入的不是一个对象而是一个类型,因此我们需要明确传递的是什么,我们会依次按照
仿函数,函数和匿名函数三种情况分别给出测试案例,并在最后统一解释其测试的输出。 -
对于仿函数的测试:
-
这里稍微复习一下仿函数,其实就是一个类对
operator()进行重载。 -
这里因为要对自定义类型Test*的内存进行析构,因此传入参数就是Test*类型。
-
此外值得注意的是这里的自定义destructor不可以进行重载,因为C++ 中数组到指针的退化(decay)规则,当数组作为函数参数传递时,它会退化成指向其第一个元素的指针。
-
所以再次对于普通类型指针和数组类型指针分别定义了其自定义析构函数。
-
这里初始化时,模板类型直接填写类名即可,然后运行时会自动调用类中的括号运算符的重载,调用析构函数。
-
//destructor method 1, using class destructor{ public: void operator()(Test* ptr){ delete ptr; std::cout << "user defined functor destructor is being called now" << std::endl; } }; //to be noticed for the user defined destructor, overloading is not allowed //destructor method 1 for array, using class destructor_array{ public: void operator()(Test* ptr){ delete []ptr; std::cout << "user defined functor destructor for array is being called now" << std::endl; } }; void test03(){ //created and destroyed directly since there is no usage of it std::unique_ptr<Test[], destructor_array> up1(new Test[10]); std::cout << "--------------------------the array object is constructed--------------------------" << std::endl; std::unique_ptr<Test, destructor> up2(new Test); }
-
-
接下来是对于普通函数的测试。
-
由于之前说过的,在实例化
unique_ptr时需要传入的是模板,也就是一个类型,而不是一个已经实例化了的对象。 -
因此就需要把这个自定义析构函数的类型写出来。我们定义的函数类型其实是
void (*)(Test*)类型,因此需要在模板中填写这个类型,然后在构造时传入相应的函数指针。 -
同仿函数一致,对于普通指针和数组的管理必须分别显示定义且不可重载,具体原因已经在前面解释。
-
//destructor method 2, using function void destructor_func(Test* ptr){ delete ptr; std::cout << "user defined function destructor is being called now" << std::endl; } //destructor method 2 for array, using function void destructor_func_array(Test* ptr){ delete []ptr; std::cout << "user defined function destructor for array is being called now" << std::endl; } void test04(){ //created and destroyed directly since there is no usage of it std::unique_ptr<Test[], void (*)(Test*)> up1(new Test[10], destructor_func_array); std::cout << "--------------------------the array object is constructed--------------------------" << std::endl; std::unique_ptr<Test, void (*)(Test*)> up2(new Test, destructor_func); }
-
-
最后是对于匿名函数lambda的测试。
-
lambda表达式本身的类型可以用函数指针来表示,因此我们继续传入
void (*)(Test*)是完全可以的。 -
其次lambda表达式也可以推断得来,
decltype()可以达到这个目的,其感觉类似auto关键字。 -
其余的和前面测试类似,即需要显示定义两种自定义析构函数分别针对指针和数组类型。
-
//destructor method , using lambda expression auto lambdaDestructor = [](Test* ptr){ std::cout << "user defined lambda expression destructor is being called now" << std::endl; delete ptr; }; //destructor method for array, using lambda expression auto lambdaDestructor_array = [](Test* ptr){ std::cout << "user defined lambda expression destructor for array is being called now" << std::endl; delete []ptr; }; void test05(){ // //created and destroyed directly since there is no usage of it // std::unique_ptr<Test[], decltype(lambdaDestructor_array)> up1(new Test[10], lambdaDestructor_array); // std::cout << "--------------------------the array object is constructed--------------------------" << std::endl; // std::unique_ptr<Test, decltype(lambdaDestructor)> up2(new Test, lambdaDestructor); //created and destroyed directly since there is no usage of it std::unique_ptr<Test[], void (*)(Test*)> up1(new Test[3], lambdaDestructor_array); std::cout << "--------------------------the array object is constructed--------------------------" << std::endl; std::unique_ptr<Test, void (*)(Test*)> up2(new Test, lambdaDestructor); }
-
-
最后就是测试结果,直接将上述的所有测试代码同时运行:
-
int main() { test03(); test04(); test05(); return 0; } -
输出如下,其实就是体现了我们的操作被成功运行了,析构函数调用了自定义类型。
-
/media/herryao/81ca6f19-78c8-470d-b5a1-5f35b4678058/work_dir/Document/computer_science/QINIU/projects/week05/Wed/project01/cmake-build-debug/project01 constructor is being called constructor is being called constructor is being called --------------------------the array object is constructed-------------------------- constructor is being called destructor is being called user defined functor destructor is being called now destructor is being called destructor is being called destructor is being called user defined functor destructor for array is being called now constructor is being called constructor is being called constructor is being called --------------------------the array object is constructed-------------------------- constructor is being called destructor is being called user defined function destructor is being called now destructor is being called destructor is being called destructor is being called user defined function destructor for array is being called now constructor is being called constructor is being called constructor is being called --------------------------the array object is constructed-------------------------- constructor is being called user defined lambda expression destructor is being called now destructor is being called user defined lambda expression destructor for array is being called now destructor is being called destructor is being called destructor is being called Process finished with exit code 0
-
-
最后要再次提醒一下,在
unique_ptr中没有拷贝,相互赋值必须使用移动语义。
shared_ptr
-
unique_ptr解决了拷贝构造拷贝赋值的问题,使用了更加安全的移动构造和移动赋值。这使得unique_ptr的使用是具有排他性的。 -
但是这中特性并不符合我们传统意义上对于指针的使用,这是有局限性的。因此引入了
shared_ptr来处理多个智能指针对象共同分享一处内存的管理权限。 -
其原理是通过记录内存被管理的智能指针对象的个数,当进行复制或者拷贝操作时相应地增加这个计数,当一个对象被析构就减少一个计数,当计数归零则对管理的内存进行释放。以上就是
shared_ptr的原理。 -
对于
shared_ptr的使用我们再次从其构造函数入手: -
现在来总结一下
shared_ptr所支持的构造函数:-
shared_ptr<T> sp; //empty construction -
shared_ptr<T> sp(new T()); -
shared_ptr<T[]> sp; //empty construction for T type array supported from c++17 -
shared_ptr<T[]> sp(new T[]{...});//supported from c++17 -
shared_ptr<T> sp(nullptr, D()); //empty construction with explictly defined destructor -
shared_ptr<T> sp(new T(),D());
-
-
我们对上述的构造方法进行逐个测试。
-
首先建立一个类用于相关的测试:
-
#include <iostream> #include <memory> #include <string> class Test{ public: Test(int num){ this->_num = num; std::cout << "in constructor" << std::endl; } ~Test(){ std::cout << "in destructor: " << this->_num << std::endl; } void print_num(){ std::cout << "the member function called successfully: " << _num << std::endl; } private: int _num; }; -
我们建立第一个测试对于普通类型指针以及数组类型指针管理的初始化并查看其生命周期,注意此测试基于类内自带的析构函数:
-
void test01(){ { //this is a test for testing the case with default destructor defined in the class. std::cout << "declaration for shared pointer pointing at normal pointer" << std::endl; std::shared_ptr<Test> sp; std::shared_ptr<Test> sp1(new Test(1)); //use_count() method return the objects number controlling the memory std::cout << "user number controlling the sp: " << sp.use_count() << std::endl; std::cout << "user number controlling the sp1: " << sp1.use_count() << std::endl; sp = sp1; std::cout << "after reassignment of the shared ptr, both pointing at the memory managed by sp1, result in use_count() = 2 for both" << std::endl; std::cout << "user number controlling the sp: " << sp.use_count() << std::endl; std::cout << "user number controlling the sp1: " << sp1.use_count() << std::endl; } std::cout << "===============================Test for normal pointer is done===============================\n\n\n" << std::endl; std::cout << "declaration for shared pointer pointing at array, which is supported since c++17" << std::endl; std::cout << "===============================" << std::endl; std::shared_ptr<Test[]> spA; std::cout << "=============no constructor=============" << std::endl; std::shared_ptr<Test[]> spA1(new Test[3]{1, 2, 3}); std::cout << "=============3 constructor=============" << std::endl; std::shared_ptr<Test[]> spA2(spA1); std::cout << "=============no constructor=============" << std::endl; std::shared_ptr<Test[]> spA3(new Test[2]{1, 2}); std::cout << "=============2 constructor=============" << std::endl; std::cout << "===============================" << std::endl; std::cout << "user number controlling the spA: " << spA.use_count() << std::endl; std::cout << "user number controlling the spA3: " << spA3.use_count() << std::endl; std::cout << "the memory are managed by both spA1 and spA2, which results in count for both are 2" << std::endl; std::cout << "user number controlling the spA1: " << spA1.use_count() << std::endl; std::cout << "user number controlling the spA2: " << spA2.use_count() << std::endl; spA1 = spA; spA3 = spA; std::cout << "after reassignment of the shared ptr, spA1 and spA3 will pointing the nullptr and release the memory under the control, result in use_count() = 0 for both" << std::endl; std::cout << "releasing the memory under the control of spA3 will call the destructor for 2 times" << std::endl; std::cout << "releasing the memory under the control of spA1 will reduce 1 from the use_count of spA2" << std::endl; std::cout << "user number controlling the spA: " << spA.use_count() << std::endl; std::cout << "user number controlling the spA1: " << spA1.use_count() << std::endl; std::cout << "user number controlling the spA2: " << spA2.use_count() << std::endl; std::cout << "user number controlling the spA3: " << spA3.use_count() << std::endl; std::cout << "============================test for the member function usages============================" << std::endl; std::cout << "since the structure of stack, the destruction following the reverse order as the construction" << std::endl; for (int i=0; i<3; ++i){ spA2[i].print_num(); } std::cout << "============================test done============================" << std::endl; } int main() { test01(); return 0; } -
运行结果如下,具体细节很多,大家可以自行运行查看,大致就是测试各种基本功能:
-
/media/herryao/81ca6f19-78c8-470d-b5a1-5f35b4678058/work_dir/Document/computer_science/QINIU/projects/week05/Wed/project02/cmake-build-debug/project02 declaration for shared pointer pointing at normal pointer in constructor user number controlling the sp: 0 user number controlling the sp1: 1 after reassignment of the shared ptr, both pointing at the memory managed by sp1, result in use_count() = 2 for both user number controlling the sp: 2 user number controlling the sp1: 2 in destructor: 1 ===============================Test for normal pointer is done=============================== declaration for shared pointer pointing at array, which is supported since c++17 =============================== =============no constructor============= in constructor in constructor in constructor =============3 constructor============= =============no constructor============= in constructor in constructor =============2 constructor============= =============================== user number controlling the spA: 0 user number controlling the spA3: 1 the memory are managed by both spA1 and spA2, which results in count for both are 2 user number controlling the spA1: 2 user number controlling the spA2: 2 in destructor: 2 in destructor: 1 after reassignment of the shared ptr, spA1 and spA3 will pointing the nullptr and release the memory under the control, result in use_count() = 0 for both releasing the memory under the control of spA3 will call the destructor for 2 times releasing the memory under the control of spA1 will reduce 1 from the use_count of spA2 user number controlling the spA: 0 user number controlling the spA1: 0 user number controlling the spA2: 1 user number controlling the spA3: 0 ============================test for the member function usages============================ since the structure of stack, the destruction following the reverse order as the construction the member function called successfully: 1 the member function called successfully: 2 the member function called successfully: 3 ============================test done============================ in destructor: 3 in destructor: 2 in destructor: 1 Process finished with exit code 0 -
接下来是使用
make_shared<>()方法对shared_ptr<>进行初始化,这种初始化效率更高,其实现源码如下所示。 -
public: template<typename _Tp, typename... _Args> inline shared_ptr<_NonArray<_Tp>> make_shared(_Args&&... __args) { using _Alloc = allocator<void>; _Alloc __a; return shared_ptr<_Tp>(_Sp_alloc_shared_tag<_Alloc>{__a}, std::forward<_Args>(__args)...); } -
对于
make_shared<>()方法进行测试: -
void test02(){ //initialization of the shared_ptr using the method make_shared //this method will malloc the memory in heap and initialize it with one object //make_shared method is much more efficient and the maximum number of input parameters is 10 //make_shared method will not increase the count std::shared_ptr<int> spInt = std::make_shared<int>(1); std::shared_ptr<std::string> spStr = std::make_shared<std::string>("hello world"); std::shared_ptr<Test> sp; std::cout << "before make_shared, the use_count of sp is: " << sp.use_count() << std::endl; sp = std::make_shared<Test>(99); std::cout << "after make_shared, the use_count of sp is: " << sp.use_count() << std::endl; std::cout << "in the spInt: " << *spInt << std::endl; std::cout << "in the spStr: " << *spStr << std::endl; sp->print_num(); } -
其输出结果如下,大概输出同普通初始化没有什么区别,值得注意的是这个方法并不会造成临时对象的产生,及不会对
use_count()的值造成影响: -
/media/herryao/81ca6f19-78c8-470d-b5a1-5f35b4678058/work_dir/Document/computer_science/QINIU/projects/week05/Wed/project02/cmake-build-debug/project02 before make_shared, the use_count of sp is: 0 in constructor after make_shared, the use_count of sp is: 1 in the spInt: 1 in the spStr: hello world the member function called successfully: 99 in destructor: 99 Process finished with exit code 0
-
接下来是针对自定义析构函数的测试,本次测试只是使用一个仿函数。
-
注意此处同
unique_ptr略有不同,不需要在模板参数中传递函数类型,只需要传递函数体即可。 -
此外,类似
unique_ptr,对于普通类型指针和array类型指针需要显式定义不同的析构器,且不支持参数重载,此处对两种情况分别重载并进行了测试。 -
class destructor{ public: void operator()(Test* ptr){ std::cout << "the user defined functor destructor for normal pointer is being called" << std::endl; delete ptr; } }; class destructor_array{ public: void operator()(Test* ptr){ std::cout << "the user defined functor destructor for array is being called" << std::endl; delete []ptr; } }; void test03(){ std::shared_ptr<Test> sp(new Test(1), destructor()); auto sp1 = sp; auto sp2 = sp; std::cout << "the user count should be same and equal to 3" << std::endl; std::cout << "sp user count: " << sp.use_count() << std::endl; std::cout << "sp1 user count: " << sp1.use_count() << std::endl; std::cout << "sp2 user count: " << sp2.use_count() << std::endl; } void test04(){ std::shared_ptr<Test[]> spA(new Test[4]{1, 2, 3, 4}, destructor_array()); auto spA1 = spA; auto spA2 = spA; std::cout << "the user count should be same and equal to 3" << std::endl; std::cout << "spA user count: " << spA.use_count() << std::endl; std::cout << "spA1 user count: " << spA1.use_count() << std::endl; std::cout << "spA2 user count: " << spA2.use_count() << std::endl; std::cout << "test for the member function calling for the array" << std::endl; for(int i=0; i<4; ++i){ std::cout << "spA \t spA1\t spA2, respectively" << std::endl; spA[i].print_num(); spA1[i].print_num(); spA2[i].print_num(); } std::cout << "test for the member function calling for the array is done!" << std::endl; } int main() { test03(); test04(); return 0; } -
其输出结果如下,一样地正确输出了自定义的析构器:
-
/media/herryao/81ca6f19-78c8-470d-b5a1-5f35b4678058/work_dir/Document/computer_science/QINIU/projects/week05/Wed/project02/cmake-build-debug/project02 in constructor the user count should be same and equal to 3 sp user count: 3 sp1 user count: 3 sp2 user count: 3 the user defined functor destructor for normal pointer is being called in destructor: 1 in constructor in constructor in constructor in constructor the user count should be same and equal to 3 spA user count: 3 spA1 user count: 3 spA2 user count: 3 test for the member function calling for the array spA spA1 spA2, respectively the member function called successfully: 1 the member function called successfully: 1 the member function called successfully: 1 spA spA1 spA2, respectively the member function called successfully: 2 the member function called successfully: 2 the member function called successfully: 2 spA spA1 spA2, respectively the member function called successfully: 3 the member function called successfully: 3 the member function called successfully: 3 spA spA1 spA2, respectively the member function called successfully: 4 the member function called successfully: 4 the member function called successfully: 4 test for the member function calling for the array is done! the user defined functor destructor for array is being called in destructor: 4 in destructor: 3 in destructor: 2 in destructor: 1 Process finished with exit code 0 -
shared_ptr的常见操作:-
赋值操作(必须使用移动语义):
-
void test05(){ std::shared_ptr<int> sp = std::make_shared<int>(1); std::shared_ptr<int> sp1 = std::make_shared<int>(2); sp = sp1; std::cout << "the count for sp: " << sp.use_count() << std::endl; std::cout << "the count for sp1: " << sp1.use_count() << std::endl; } -
输出如下,sp首先
use_count()--退化为0,调用了析构然后接管sp1控制的内存,sp1的use_count()++变成2,且两个对象该方法的结果相同: -
/media/herryao/81ca6f19-78c8-470d-b5a1-5f35b4678058/work_dir/Document/computer_science/QINIU/projects/week05/Wed/project02/cmake-build-debug/project02 the count for sp: 2 the count for sp1: 2 Process finished with exit code 0
-
-
对像的释放:
-
shared_ptr<int> sp(new int(10));
sp = nullptr; // count--, if count == 0 release the memory and pointing it to nullptr
//sp = NULL;    //same function as upper one
-
-
重置对象:
-
std::shared_ptr<int> sp = std::make_shared<int>(1); std::shared_ptr<int> sp1 = std::make_shared<int>(2); //sp.reset(); //clear the object sp.reset(sp1); //reset sp using sp1, memory managed by sp count--, that for sp1 count++ //sp.reset(sp1, D); //reset sp with sp1 using D as destructor -
.swap()和 .release()两个方法同之前的智能指针类似,再此不再过多赘述。
-
-
-
shared_ptr中的陷阱(对象之间交叉循环引用至内存无法释放):-
定义两个类,
Boy和Girl。 -
各自定义成员变量
std::shared_ptr<Girl> _girlfriend 和 std::shared_ptr<Boy> _boyfriend。 -
各自定义其构造函数,析构函数并在内部输出其所在函数。
-
各自定义一个方法用来添加异性朋友。
-
类的代码实现如下:
-
#include <iostream> #include <memory> //a test for the looping reference resulting in unreleasable memory class Boy; class Girl{ public: Girl() { std::cout << "girl construct!" << std::endl; } ~Girl() { std::cout << "girl destruct!" << std::endl; } void set_boy_friend(std::shared_ptr<Boy> &boy) { this->_boyfriend = boy; } private: std::shared_ptr<Boy> _boyfriend; }; class Boy{ public: Boy() { std::cout << "boy construct!" << std::endl; } ~Boy() { std::cout << "boy destruct!" << std::endl; } void set_girl_friend(std::shared_ptr<Girl> &girl) { this->_girlfriend = girl; } private: std::shared_ptr<Girl> _girlfriend; }; -
现在开始进行测试,分别初始化两个智能指针用于管理一个男孩和一个女孩的对象。
-
然后利用成员方法分别添加彼此到自己的异性朋友。
-
调用之后应当会有构造和析构函数的调用,因为当程序结束时
shared_ptr的use_count()应该退化为0进而释放内存。 -
测试代码如下所示:
-
void trap(){ std::shared_ptr<Boy> pb = std::make_shared<Boy>(); std::shared_ptr<Girl> pg = std::make_shared<Girl>(); std::cout << "==============before adding==============" << std::endl; std::cout << "count of boy: " << pb.use_count() << std::endl; std::cout << "count of girl: " << pg.use_count() << std::endl; pb->set_girl_friend(pg); pg->set_boy_friend(pb); std::cout << "==============after adding==============" << std::endl; std::cout << "count of boy: " << pb.use_count() << std::endl; std::cout << "count of girl: " << pg.use_count() << std::endl; //there is only the construction while no destruction } int main() { trap(); return 0; } -
输出结果如下,可以看出两个对象在程序退出后竟然没有被析构,也就是导致了内存泄漏。
-
我们试着观察一下这两个智能指针的被占用情况,在相互循环调用导致指针的受控对象增加了。
-
D:\ClionProject\trap\cmake-build-debug\trap.exe boy construct! girl construct! ==============before adding============== count of boy: 1 count of girl: 1 ==============after adding============== count of boy: 2 count of girl: 2 Process finished with exit code 0
-
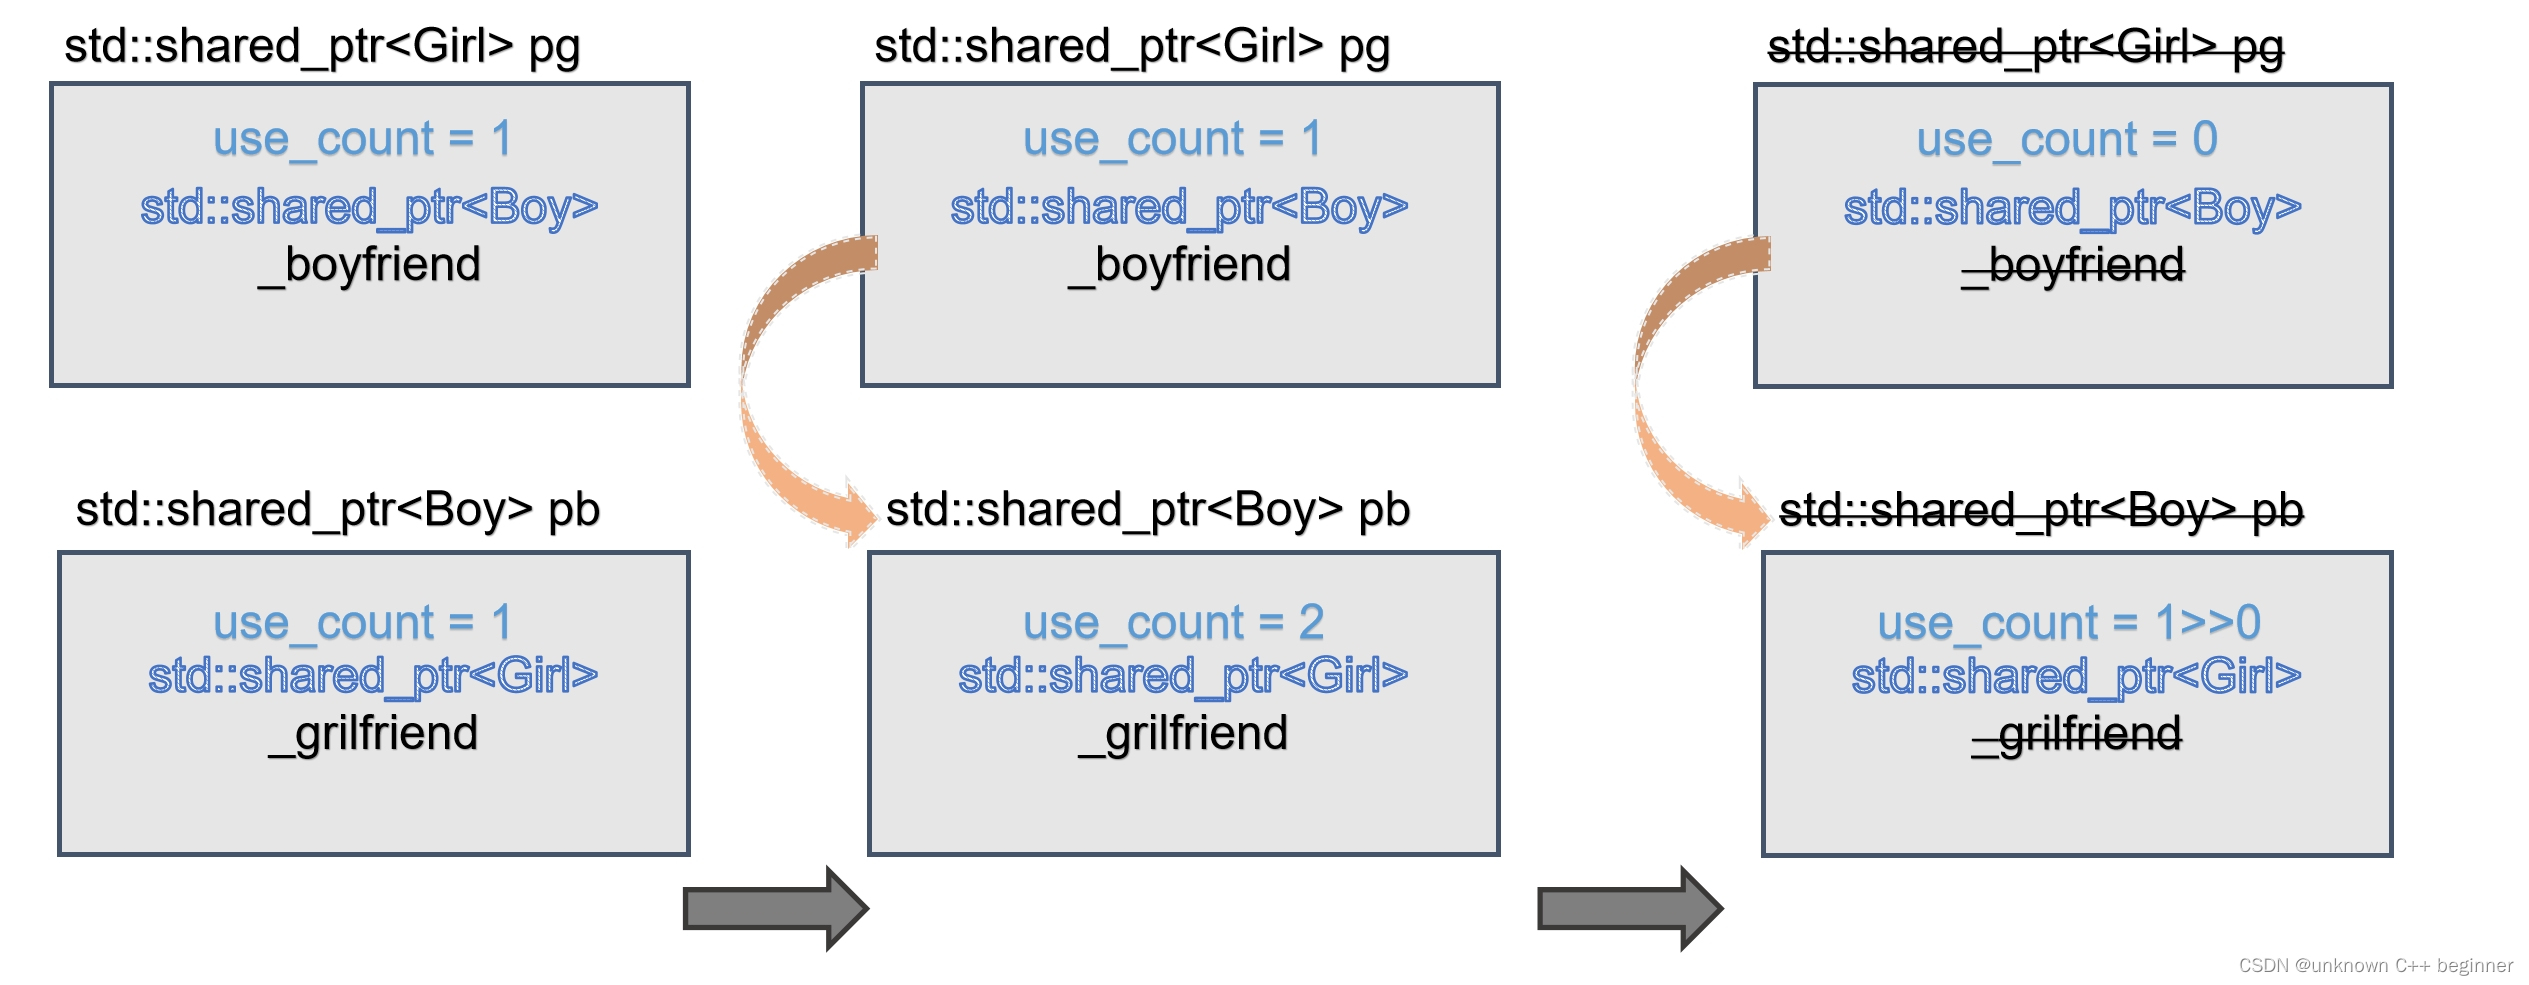
我们来试着理解一下发生了什么,下面是我做的一张对象状态图。

-
首先,在对象被创建时内部占用为1。
-
第二步,在添加异性朋友的操作中,循环引用导致两个对象的计数各自加一变成2。
-
第三步,程序退出,栈变量被清空,栈上的
shared_ptr对象被销毁,计数减一,但是此时计数并不为0,因此不会调用内存销毁,于是由于内部成员变量的存在导致内存未被释放,从而出现内存泄漏。
-
-
怎么解决呢?
-
第一种方法就是双边引用变成单边引用如果只是引用一次,就可以正常全部析构,修改后的测试函数如下:
-
void trap(){ std::shared_ptr<Boy> pb = std::make_shared<Boy>(); std::shared_ptr<Girl> pg = std::make_shared<Girl>(); std::cout << "==============before adding==============" << std::endl; std::cout << "count of boy: " << pb.use_count() << std::endl; std::cout << "count of girl: " << pg.use_count() << std::endl; // pb->set_girl_friend(pg); pg->set_boy_friend(pb); std::cout << "==============after adding==============" << std::endl; std::cout << "count of boy: " << pb.use_count() << std::endl; std::cout << "count of girl: " << pg.use_count() << std::endl; //there is only the construction while no destruction } -
输出结果如下,正常析构:
-
D:\ClionProject\trap\cmake-build-debug\trap.exe boy construct! girl construct! ==============before adding============== count of boy: 1 count of girl: 1 ==============after adding============== count of boy: 1 count of girl: 2 boy destruct! girl destruct! Process finished with exit code 0 -
当然是有原因的,具体可以看下图
-
第一步,和之前相同,在对象被创建时内部占用为1。
-
第二步,在添加异性朋友的操作中,循环引用导致Boy被2个指针管理计数为2,而girl则不变保持1,这也是能够成功析构的关键啊。
-
第三步,程序退出,栈变量被清空,栈上的
shared_ptr对象被销毁,计数减一,此时Girl的计数为0调用了pg管理对象的析构函数,将成员变量清除,成员变量为一shared_ptr,其计数减1变成1,此时pg的管理结束成功释放内存。按照栈的数据结构规则,接下来是Boy指针的销毁,此时此对象的use_count继续减一并退化成0这回激活析构函数pb析构成功。 -
以上就是第一种处理方法。
-
-
如果必须要循环引用彼此包含怎么办?------
weak_ptr
-
-
weak_ptr
-
weak_ptr设计的目的是为配合shared_ptr而引入的一种智能指针来协助shared_ptr工作, 它只可以从一个shared_ptr或另一个weak_ptr对象构造, 它的构造和析构不会引起引用记数的增加或减少。 -
同时
weak_ptr没有重载*和->但可以使用 lock 获得一个可用的shared_ptr对象。 -
下面开始用两个测试来尝试
weak_ptr的使用。 -
首先我们要对我们上文中在
shared_ptr节使用的类做一些修改,因为weak_ptr在方法访问中是有问题的,为了暴露这些限制我们为我们的两个类均添加一个获取姓名的方法。 -
其次就是我们的目的,修改成员变量为
weak_ptr类型由此解决上一节遗留的问题。 -
修改后的男孩(Boy)女孩(Girl)类定义如下:
-
#include <iostream> #include <memory> //a test for the looping reference resulting in unreleasable memory //a version with weak_ptr combined with shared_ptr solving the issue class Boy; class Girl{ public: Girl(std::string name):_name(name) { std::cout << "girl construct! with name " << this->_name << std::endl; } ~Girl() { std::cout << "girl destruct!" << std::endl; } void set_boy_friend(std::shared_ptr<Boy> &boy) { this->_boyfriend = boy; } [[nodiscard]] std::weak_ptr<Boy> getBF()const{ return this->_boyfriend; } [[nodiscard]] std::string getName()const{ return this->_name; } private: std::weak_ptr<Boy> _boyfriend; std::string _name; }; class Boy{ public: Boy(std::string name):_name(name) { std::cout << "boy construct!" << std::endl; } ~Boy() { std::cout << "boy destruct! with name " << this->_name << std::endl; } void set_girl_friend(std::shared_ptr<Girl> &girl) { this->_girlfriend = girl; } [[nodiscard]] std::weak_ptr<Girl> getGF()const{ return this->_girlfriend; } [[nodiscard]] std::string getName()const{ return this->_name; } private: std::weak_ptr<Girl> _girlfriend; std::string _name; }; -
然后是我们的第一个测试,我们先不碰触上一节遗留的问题,首先理解一下
weak_ptr和shared_ptr的区别。 -
首先我们测试了
weak_ptr的构造方法,构造后初始化和构造初始化。 -
然后我们测试了
weak_ptr的use_count()方法,并测试了weak_ptr对原始shared_ptr计数的影响。 -
接下来测试了
weak_ptr的功能性。 -
最后测试了
weak_ptr的方法.lock()调用对于计数的影响,其源码如下所示 : -
public: shared_ptr<_Tp> lock() const noexcept { return shared_ptr<_Tp>(*this, std::nothrow); } -
测试代码如下:
-
void test(){ std::shared_ptr<Girl> sg = std::make_shared<Girl>("Gigi"); std::shared_ptr<Boy> sb = std::make_shared<Boy>("Bigbean"); std::cout << " ================= before assignment =================" << std::endl; std::cout << "sg----count" << sg.use_count() << std::endl; std::cout << "sb----count" << sb.use_count() << std::endl; //initialization from a shared_ptr is allowed //declaration as empty is fine std::weak_ptr<Girl> wg; wg = sg; std::weak_ptr<Boy> wb = sb; //weak_ptr can access the use_count()method as well, while has no influence on the count std::cout << " ================= after assignment =================" << std::endl; std::cout << "sg----count" << sg.use_count() << std::endl; std::cout << "sb----count" << sb.use_count() << std::endl; std::cout << " ================= check from weak_ptr =================" << std::endl; std::cout << "wg----count" << wg.use_count() << std::endl; std::cout << "wb----count" << wb.use_count() << std::endl; std::cout << " ================= check for function of weak_ptr =================" << std::endl; // std::cout << "wg----getName" << wg.getName() << std::endl; // std::cout << "wb----getName" << wb.getName() << std::endl; //weak_ptr is without an overloading of the operator -> and operator * //meaning that weak_ptr itself has no function as one shared_ptr //while using .lock() method it will return a shared_ptr object //, which can be used on demand. std::cout << "wg----getName: \t" << wg.lock()->getName() << std::endl; std::cout << "wb----getName: \t" << wb.lock()->getName() << std::endl; std::cout << " ================= after rvalue lock() =================" << std::endl; std::cout << "sg----count" << sg.use_count() << std::endl; std::cout << "sb----count" << sb.use_count() << std::endl; auto temp_boy = wb.lock(); auto temp_girl = wg.lock(); std::cout << " ================= after lvalue lock() =================" << std::endl; std::cout << "sg----count" << sg.use_count() << std::endl; std::cout << "sb----count" << sb.use_count() << std::endl; } int main() { test(); return 0; } -
输出结果如下:
-
D:\ClionProject\weak_ptr\cmake-build-debug\weak_ptr.exe girl construct! with name Gigi boy construct! ================= before assignment ================= sg----count1 sb----count1 ================= after assignment ================= sg----count1 sb----count1 ================= check from weak_ptr ================= wg----count1 wb----count1 ================= check for function of weak_ptr ================= wg----getName: Gigi wb----getName: Bigbean ================= after rvalue lock() ================= sg----count1 sb----count1 ================= after lvalue lock() ================= sg----count2 sb----count2 boy destruct! with name Bigbean girl destruct! Process finished with exit code 0
-
这一个测试总结起来:
-
weak_ptr可以空参初始化或者从一个shared_ptr对象赋值或初始化构造而来,weak_ptr不会改变计数。 -
weak_ptr没有shared_ptr的功能,因为两个指针相应的运算符没有被重载,测试代码中有类似的操作,想尝试可以直接取消注释自行观察。 -
weak_ptr存储了shared_ptr的内容,需要使用时可以随时通过.lock()转换成shared_ptr对象进行使用。
-
-
总结了基本用法之后我们开始对之前
shared_ptr中遗留的陷阱进行测试。-
按照之前提到的,我们将类内的关于异性朋友的成员变量从
shared_ptr全部转换成了weak_ptr(其实只要转一个就可以了,原理和上一节解决方法一中提到的类似,但是为了一致性这里决定 全部修改)。 -
在调整类设定后,在测试函数中使用
.lock()方法测试了相应对象的功能。
-
-
测试代码如下:
-
void trap_solved(){ std::shared_ptr<Boy> pb = std::make_shared<Boy>("bigbean"); std::shared_ptr<Girl> pg = std::make_shared<Girl>("gigi"); std::cout << "==============before adding==============" << std::endl; std::cout << "count of boy: " << pb.use_count() << std::endl; std::cout << "count of girl: " << pg.use_count() << std::endl; pb->set_girl_friend(pg); pg->set_boy_friend(pb); std::cout << "==============after adding==============" << std::endl; std::cout << "count of boy: " << pb.use_count() << std::endl; std::cout << "count of girl: " << pg.use_count() << std::endl; //there is only the construction while no destruction // std::cout << pb->getName() << "\t<----->\t" << pb->getGF()->getName() << std::endl; // std::cout << pg->getName() << "\t<----->\t" << pg->getBF()->getName() << std::endl; std::cout << pb->getName() << "\t<----->\t" << pb->getGF().lock()->getName() << std::endl; std::cout << pg->getName() << "\t<----->\t" << pg->getBF().lock()->getName() << std::endl; } int main() { trap_solved(); return 0; } -
输出结果如下,可以看到类成员作为一个指针,其功能完好,且最终程序结束时正常调用了析构函数,释放了内存:
-
D:\ClionProject\weak_ptr\cmake-build-debug\weak_ptr.exe boy construct! girl construct! with name gigi ==============before adding============== count of boy: 1 count of girl: 1 ==============after adding============== count of boy: 1 count of girl: 1 bigbean <-----> gigi gigi <-----> bigbean girl destruct! boy destruct! with name bigbean Process finished with exit code 0
智能指针的使用陷阱
-
不要把一个原生指针给多个智能指针管理,这可能会造成多次释放内存,十分危险
int *x = new int(10);
unique_ptr<int> up1(x);
unique_ptr<int> up2(x);
//up1.reset(x);
//up2.reset(x);
//this will result in multi-release of a same memory-
在
unique_ptr中记得使用.release()的返回值-
在
unique_ptr调用.release()时是不会释放u所指的内存的,这时返回值就是对这块内存的唯一索引,如果没有使用这个返回值释放内存或是保存起来,这块内存就泄漏了
-
-
禁止delete 智能指针get 函数返回的指针
-
如果主动释放掉get 函数获得的指针,那么智能 指针内部的指针就变成野指针了,析构时造成重复释放,带来严重后果!
-
-
禁止用任何类型智能指针get 函数返回的指针去初始化另外一个智能指针!
-
//correct shared_ptr<int> sp1(new int(10)); //wrong //shared_ptr<int> sp4(sp1.get());
致谢
-
感谢Martin老师的课程。
-
感谢各位的支持,祝大家的cpp水平越来越强。

![[linux]:匿名管道和命名管道(什么是管道,怎么创建管道(函数),匿名管道和命名管道的区别,代码例子)](https://img-blog.csdnimg.cn/direct/9dc9db6e146545beb42bc1a6c75c7fab.png)


![寒假提升(5)[利用位操作符的算法题]](https://img-blog.csdnimg.cn/direct/bdd25b1781b54466be792e463093571b.png)