MyBatis多数据源以及动态切换实现可以实现不同功能模块可以对应到不同的数据库,现在就让我们来讲解一下。
目录
- 一、引入Maven
- 二、配置文件
- 三、实现多数据源
- 四、动态切换数据源
一、引入Maven
注意:博主这边使用的springboot版本是2.7.14的
<!-- https://mvnrepository.com/artifact/com.alibaba/fastjson -->
<dependency>
    <groupId>com.alibaba</groupId>
    <artifactId>fastjson</artifactId>
    <version>1.2.75</version>
</dependency>

<dependency>
    <groupId>org.projectlombok</groupId>
    <artifactId>lombok</artifactId>
    <version>1.18.6</version>
    <scope>provided</scope>
</dependency>

<dependency>
    <groupId>org.springframework.boot</groupId>
    <artifactId>spring-boot-starter-validation</artifactId>
</dependency>

<!-- MyBatis依赖 -->
<dependency>
    <groupId>org.mybatis.spring.boot</groupId>
    <artifactId>mybatis-spring-boot-starter</artifactId>
    <version>2.2.0</version>
</dependency>

<!-- 数据库连接池依赖(这里以HikariCP为例) -->
<dependency>
    <groupId>com.zaxxer</groupId>
    <artifactId>HikariCP</artifactId>
</dependency>

<!-- MySQL驱动 -->
<dependency>
    <groupId>mysql</groupId>
    <artifactId>mysql-connector-java</artifactId>
    <version>8.0.12</version>
</dependency>

<!-- https://mvnrepository.com/artifact/com.microsoft.sqlserver/mssql-jdbc -->
<!-- SQL Server驱动 -->
<dependency>
    <groupId>com.microsoft.sqlserver</groupId>
    <artifactId>mssql-jdbc</artifactId>
    <version>8.2.0.jre8</version>
</dependency>

<!-- Spring Boot AOP依赖 -->
<dependency>
    <groupId>org.springframework.boot</groupId>
    <artifactId>spring-boot-starter-aop</artifactId>
</dependency>
二、配置文件
以application.properties讲解
server.port=8099

# MySQL1
spring.datasource.mysqldb1.url=jdbc:mysql://localhost:3306/mysql?serverTimezone=UTC&useUnicode=true&characterEncoding=utf-8&useSSL=false
spring.datasource.mysqldb1.username=root
spring.datasource.mysqldb1.password=123456
# MySQL2
spring.datasource.mysqldb2.url=jdbc:mysql://localhost:3306/ke_prd?serverTimezone=UTC&useUnicode=true&characterEncoding=utf-8&useSSL=false
spring.datasource.mysqldb2.username=root
spring.datasource.mysqldb2.password=123456
# sqlserver
spring.datasource.sqlserver.url=jdbc:sqlserver://localhost:1433;database=TEST
spring.datasource.sqlserver.username=sa
spring.datasource.sqlserver.password=123

#mybatis
#pojo对应路径
mybatis.type-aliases-package=com.zhangximing.springbootmybatis_datasource.pojo
# 默认扫描xml
mybatis.mapper-locations=classpath:mybatis/mapper/**/*.xml
# sqlserver数据库对应扫描xml
custom.mapper.xml.sqlserver=classpath:mybatis/mapper/sqlserver/*.xml
# mysql数据库对应扫描xml
custom.mapper.xml.mysql=classpath:mybatis/mapper/mysql/*.xml
# 动态切换数据库对应扫描xml
custom.mapper.xml.dynamic=classpath:mybatis/mapper/dynamic/*.xml

# 编码utf-8
server.servlet.encoding.charset=UTF-8
server.servlet.encoding.enabled=true
server.servlet.encoding.force=true
三、实现多数据源
先实现普通的mybatis写法,写三个(两个mysql,一个sqlserver)(冗余的代码不贴出)
接口入口写法都一样,就是名称换了而已,LogMapperMySql 换 LogMapperMySqlT和LogMapperSqlServer
import com.zhangximing.springbootmybatis_datasource.pojo.LogInfo;
import org.apache.ibatis.annotations.Mapper;
import org.springframework.stereotype.Repository;

import java.util.List;

/**
 * @Author: zhangximing
 * @Email: 530659058@qq.com
 * @Date: 2023/6/14 13:54
 * @Description: 日志操作
 */
/*加了这个注解 就表示了 这是一个Mybatis的mapper类
就相当于之前使用的spring整合mybatis接口 也可以使用@MapperScan("com.kuang.mapper")*/
@Mapper
/**@Component 也可以用这个 万能的*/
@Repository
public interface LogMapperMySql {

    List<LogInfo> queryLogList();

    LogInfo queryLogById(int id);

    int addLog(LogInfo logInfo);

    int updateLog(LogInfo logInfo);

    int deleteLog(LogInfo logInfo);
}
xml文件方面,除了namespace需要修改外,当是sqlserver时NOW()函数要改为GETDATE()
<?xml version="1.0" encoding="UTF-8" ?>
<!DOCTYPE mapper
        PUBLIC "-//mybatis.org//DTD Mapper 3.0//EN"
        "http://mybatis.org/dtd/mybatis-3-mapper.dtd">
<mapper namespace="com.zhangximing.springbootmybatis_datasource.mapper.mysql.LogMapperMySql">
    <select id="queryLogList" resultType="LogInfo">
        select * from log_center
    </select>

    <select id="queryLogById" resultType="LogInfo">
        select * from log_center
        where id=#{id};
    </select>

    <insert id="addLog" parameterType="LogInfo">
        insert into log_center(method,requestJson,responseJson,createDate)
        values(#{method},#{requestJson},#{responseJson},NOW());

    </insert>

    <update id="updateLog" parameterType="LogInfo">
        update mybatis.user
        set responseJson=#{responseJson},requestJson=#{requestJson}
        where id=#{id};
    </update>

    <delete id="deleteLog" parameterType="int">
        delete
        from log_center
        where id=#{id};
    </delete>

</mapper>
pojo实体 LogInfo
//import io.swagger.annotations.ApiModel;
//import io.swagger.annotations.ApiModelProperty;
import lombok.Data;

import java.io.Serializable;

/**
 * @Author: zhangximing
 * @Email: 530659058@qq.com
 * @Date: 2023/5/31 13:07
 * @Description: 日志实体类
 */
@Data
//@ApiModel(value = "日志类")
public class LogInfo implements Serializable {

//    @ApiModelProperty(value = "",required = false)
    private String id;

//    @ApiModelProperty(value = "方法名",required = false)
    private String method;

//    @ApiModelProperty(value = "请求参数",required = false)
    private String requestJson;

//    @ApiModelProperty(value = "返回参数",required = false)
    private String responseJson;

//    @ApiModelProperty(value = "创建日期",required = false)
    private String createDate;
}
开始重点部分啦,如何实现多数据源啦
先写多数据源配置类
package com.zhangximing.springbootmybatis_datasource.config.datasource;

import org.springframework.beans.factory.annotation.Autowired;
import org.springframework.beans.factory.annotation.Qualifier;
import org.springframework.boot.context.properties.ConfigurationProperties;
import org.springframework.boot.jdbc.DataSourceBuilder;
import org.springframework.context.annotation.Bean;
import org.springframework.context.annotation.Configuration;
import org.springframework.context.annotation.Primary;
import org.springframework.core.env.Environment;
import org.springframework.jdbc.datasource.DataSourceTransactionManager;
import org.springframework.transaction.PlatformTransactionManager;

import javax.sql.DataSource;
import java.util.HashMap;
import java.util.Map;

/**
 * 多数据源配置类
 */
@Configuration
public class DataSourceConfig {

    @Autowired
    private Environment env;

    // 多数据源一:默认mysql
    // Primary注解是在没有指明使用哪个数据源的时候指定默认使用的主数据源
    // Primary在无动态切换的情况下可以用
    @Primary
    @Bean(name = "mysqlDataSource")
    //注意:该注解可能失效导致无法直接注入,所以手动获取装配
//    @ConfigurationProperties(prefix = "spring.datasource.mysqldb1")
    public DataSource mysqlDataSource() {
        DataSourceBuilder dataSourceBuilder = DataSourceBuilder.create();
        dataSourceBuilder.url(env.getProperty("spring.datasource.mysqldb1.url"));
        dataSourceBuilder.username(env.getProperty("spring.datasource.mysqldb1.username"));
        dataSourceBuilder.password(env.getProperty("spring.datasource.mysqldb1.password"));
        return dataSourceBuilder.build();
//        return DataSourceBuilder.create().build();
    }

    // 多数据源二:mysql库2
    @Bean(name = "mysqlDataSourceT")
//    @ConfigurationProperties(prefix = "spring.datasource.mysqldb2")
    public DataSource mysqlDataSourceT() {
        DataSourceBuilder dataSourceBuilder = DataSourceBuilder.create();
        dataSourceBuilder.url(env.getProperty("spring.datasource.mysqldb2.url"));
        dataSourceBuilder.username(env.getProperty("spring.datasource.mysqldb2.username"));
        dataSourceBuilder.password(env.getProperty("spring.datasource.mysqldb2.password"));
        return dataSourceBuilder.build();
    }

    // 多数据源三:sqlserver
    @Bean(name = "sqlserverDataSource")
//    @ConfigurationProperties(prefix = "spring.datasource.sqlserver")
    public DataSource sqlserverDataSource() {
        DataSourceBuilder dataSourceBuilder = DataSourceBuilder.create();
        dataSourceBuilder.url(env.getProperty("spring.datasource.sqlserver.url"));
        dataSourceBuilder.username(env.getProperty("spring.datasource.sqlserver.username"));
        dataSourceBuilder.password(env.getProperty("spring.datasource.sqlserver.password"));
        return dataSourceBuilder.build();
    }
针对数据源配置(mysql)
import org.apache.ibatis.session.SqlSessionFactory;
import org.mybatis.spring.SqlSessionFactoryBean;
import org.mybatis.spring.SqlSessionTemplate;
import org.mybatis.spring.annotation.MapperScan;
import org.springframework.beans.factory.annotation.Qualifier;
import org.springframework.beans.factory.annotation.Value;
import org.springframework.context.annotation.Bean;
import org.springframework.context.annotation.Configuration;
import org.springframework.context.annotation.Primary;
import org.springframework.core.io.support.PathMatchingResourcePatternResolver;

import javax.annotation.Resource;
import javax.sql.DataSource;

@Configuration
@MapperScan(
		// 指定该数据源扫描指定包下面的Mapper接口文件
        basePackages = "com.zhangximing.springbootmybatis_datasource.mapper.mysql",
        sqlSessionFactoryRef = "sqlSessionFactoryPrimary",
        sqlSessionTemplateRef = "sqlSessionTemplatePrimary")
public class DataSourceMySqlConfig {

    // mapper扫描xml文件的路径
    @Value("${custom.mapper.xml.mysql}")
    private String MAPPER_LOCATION;

    private DataSource primaryDataSource;

    // 通过构造方法进行注入
    public DataSourceMySqlConfig(@Qualifier("mysqlDataSource") DataSource primaryDataSource) {
        this.primaryDataSource = primaryDataSource;
    }

    /**
     * SqlSession工厂方法
     * 用于创建SqlSession对象。
     * 用于管理SqlSession对象的的生命周期。
     * 可以根据需要创建不同的SqlSession子类,以支持不同的数据库操作需求。
     * 可以将SqlSession对象存储在持久化缓存中,以提高性能。
     * @return
     * @throws Exception
     */
    @Bean
    @Primary
    public SqlSessionFactory sqlSessionFactoryPrimary() throws Exception {
        SqlSessionFactoryBean sqlSessionFactoryBean = new SqlSessionFactoryBean();
        sqlSessionFactoryBean.setDataSource(primaryDataSource);
        sqlSessionFactoryBean.setMapperLocations(new PathMatchingResourcePatternResolver().getResources(MAPPER_LOCATION));
        sqlSessionFactoryBean.setTypeAliasesPackage("com.zhangximing.springbootmybatis_datasource.pojo");
        return sqlSessionFactoryBean.getObject();
    }

    @Bean
    @Primary
    public SqlSessionTemplate sqlSessionTemplatePrimary() throws Exception {
        return new SqlSessionTemplate(sqlSessionFactoryPrimary());
    }
}
针对数据源配置(mysql库2)(sqlserver的参考这个写即可,扫描路径以及配置文件获取修改)
import org.apache.ibatis.session.SqlSessionFactory;
import org.mybatis.spring.SqlSessionFactoryBean;
import org.mybatis.spring.annotation.MapperScan;
import org.springframework.beans.factory.annotation.Qualifier;
import org.springframework.beans.factory.annotation.Value;
import org.springframework.context.annotation.Bean;
import org.springframework.context.annotation.Configuration;
import org.springframework.core.io.Resource;
import org.springframework.core.io.support.PathMatchingResourcePatternResolver;
import org.springframework.jdbc.datasource.DataSourceTransactionManager;

import javax.sql.DataSource;

/**
 * sqlserver数据源配置
 */
@Configuration
@MapperScan(
        basePackages = "com.zhangximing.springbootmybatis_datasource.mapper.mysql",
        sqlSessionFactoryRef = "sqlSessionFactorySecondaryMySql")
public class DataSourceMySqlTConfig {

    // mapper扫描xml文件的路径
    @Value("${custom.mapper.xml.mysql}")
    private String MAPPER_LOCATION;

    private DataSource secondaryDataSource;

	// 通过构造方法进行注入
    public DataSourceMySqlTConfig(@Qualifier("mysqlDataSourceT") DataSource secondaryDataSource) {
        this.secondaryDataSource = secondaryDataSource;
    }

    @Bean("sqlSessionFactorySecondaryMySql")
    public SqlSessionFactory sqlSessionFactorySecondary() throws Exception {

        SqlSessionFactoryBean sqlSessionFactoryBean = new SqlSessionFactoryBean();

        // 指定数据源
        sqlSessionFactoryBean.setDataSource(secondaryDataSource);
        /*
			获取xml文件资源对象
			当Mapper接口所对应的.xml文件与Mapper接口文件分离,存储在 resources
			文件夹下的时候,需要手动指定.xml文件所在的路径
		*/
        sqlSessionFactoryBean.setMapperLocations(new PathMatchingResourcePatternResolver().getResources(MAPPER_LOCATION));
        //指定实体目录
        sqlSessionFactoryBean.setTypeAliasesPackage("com.zhangximing.springbootmybatis_datasource.pojo");
        return sqlSessionFactoryBean.getObject();
    }

    @Bean("SecondaryDataSourceManagerMySql")
    public DataSourceTransactionManager SecondaryDataSourceManager() {
        return new DataSourceTransactionManager(secondaryDataSource);
    }
}
到这里基本上就可以了,写测试类测试
import com.alibaba.fastjson.JSONObject;
//import io.swagger.annotations.Api;
//import io.swagger.annotations.ApiOperation;
import com.zhangximing.springbootmybatis_datasource.annotation.DataBase;
import com.zhangximing.springbootmybatis_datasource.mapper.mysql.LogMapperMySql;
import com.zhangximing.springbootmybatis_datasource.mapper.mysql.LogMapperMySqlT;
import com.zhangximing.springbootmybatis_datasource.mapper.sqlserver.LogMapperSqlServer;
import com.zhangximing.springbootmybatis_datasource.pojo.LogInfo;
import org.springframework.beans.factory.annotation.Autowired;
import org.springframework.web.bind.annotation.*;

/**
 * @Author: zhangximing
 * @Email: 530659058@qq.com
 * @Date: 2023/5/31 13:00
 * @Description: 测试接口
 */
//@Api(value="日志模块",tags = "日志模块管理")
@RestController
@RequestMapping("/log")
public class LogController {

    @Autowired
    private LogMapperMySql logMapper_mysql;

    @Autowired
    private LogMapperMySqlT logMapper_mysqlT;

    @Autowired
    private LogMapperSqlServer logMapper_sqlserver;

//    @ApiOperation(value="插入日志")
    @PostMapping(value = "/addLog", produces = {"text/plain;charset=UTF-8"})
    public String addLog(@RequestBody LogInfo logInfo){

        int cnt = logMapper_sqlserver.addLog(logInfo);

        JSONObject result = new JSONObject();
        result.put("count",cnt);

        return result.toJSONString();
    }

    @RequestMapping("/getLogById/{id}")
    public String getLogById(@PathVariable("id") int logId){

        System.out.println("logId:"+logId);
        LogInfo logInfo = logMapper_sqlserver.queryLogById(logId);

        JSONObject result = new JSONObject();
        result.put("data",JSONObject.toJSONString(logInfo));

        return result.toJSONString();
    }
}
测试结果就不展示了,就手动修改需要调用的数据源进行请求测试
四、动态切换数据源
在第三点的基础上,我们在 多数据源配置类 增加 如下代码
/**
 *  动态数据源配置
 */
@Primary
@Bean(name = "dynamicDataSource")
public DataSource dynamicDataSource(){
    DynamicDataSource dynamicDataSource = new DynamicDataSource();
    //默认数据源
    dynamicDataSource.setDefaultTargetDataSource(mysqlDataSource());

    //配置多数据源
    Map<Object, Object> dsMap = new HashMap<Object, Object>(5);
    dsMap.put("mysqldb1", mysqlDataSource());
    dsMap.put("mysqldb2", mysqlDataSourceT());
    dsMap.put("sqlserver", sqlserverDataSource());
    dynamicDataSource.setTargetDataSources(dsMap);
    return dynamicDataSource;
}

/**
 * 配置@Transactional注解事物(管理事务)
 *  @return
 */
@Bean
public PlatformTransactionManager transactionManager(){
    return new DataSourceTransactionManager(dynamicDataSource());
}
DynamicDataSource(动态数据源配置类)
import org.springframework.jdbc.datasource.lookup.AbstractRoutingDataSource;

/**
 * 动态数据源配置
 */
public class DynamicDataSource extends AbstractRoutingDataSource {
    // 确定当前的数据源键
    @Override
    protected Object determineCurrentLookupKey() {
        return DataSourceContextHolder.getDB();
    }
}
DataSourceContextHolder(切换数据库类)
import lombok.extern.slf4j.Slf4j;

/**
 * 上下文切换(切换数据库)
 */
@Slf4j
public class DataSourceContextHolder {
    // 默认数据源
    public static final String DEFAULT_DS = "mysqldb1";

    // 本地线程共享变量
    private static final ThreadLocal<String> contextHolder = new ThreadLocal<>();

    public static void setDB(String dbType) {
        log.info("切换至" + dbType + "数据源");
        contextHolder.set(dbType);
    }

    public static String getDB() {
        return (contextHolder.get());
    }

    public static void clearDB() {
        contextHolder.remove();
    }
}
增加与mysql配置mybatis一致的xml和接口(由于我们只用一个表测试,所以就以同类型数据库切换进行演示),此处省略代码…
自定义注解(这边打算用注解标记哪些接口需要进行切换数据库的)
import java.lang.annotation.ElementType;
import java.lang.annotation.Retention;
import java.lang.annotation.RetentionPolicy;
import java.lang.annotation.Target;

/**
 * 自定义注解:参数为数据库标识
 */
@Retention(RetentionPolicy.RUNTIME)
@Target(ElementType.METHOD)
public @interface DataBase {
    String value() default "mysqldb1";
}
切面部分,这里测试是以请求头传数据库标识来动态实现,也可以通过数据库或配置文件存储多种方式
import com.zhangximing.springbootmybatis_datasource.annotation.DataBase;
import com.zhangximing.springbootmybatis_datasource.config.datasource.DataSourceContextHolder;
import org.aspectj.lang.JoinPoint;
import org.aspectj.lang.annotation.After;
import org.aspectj.lang.annotation.Aspect;
import org.aspectj.lang.annotation.Before;
import org.aspectj.lang.annotation.Pointcut;
import org.aspectj.lang.reflect.MethodSignature;
import org.springframework.stereotype.Component;
import org.springframework.web.context.request.RequestContextHolder;
import org.springframework.web.context.request.ServletRequestAttributes;

import javax.servlet.http.HttpServletRequest;
import java.lang.reflect.Method;

/**
 *  切面拦截切换数据库
 */
@Aspect
@Component
public class DataBaseAspect {

    // 拦截用过注释的
    @Pointcut("@annotation(com.zhangximing.springbootmybatis_datasource.annotation.DataBase)")
    public void dbPointCut(){

    }

    // 拦截切换数据源
    @Before("dbPointCut()")
    public void beforeSwitchDS(JoinPoint point){
        //获得当前访问的class
        Class<?> className = point.getTarget().getClass();
            //获得访问的方法名
            String methodName = point.getSignature().getName();
            //得到方法的参数的类型
            Class[] argClass = ((MethodSignature)point.getSignature()).getParameterTypes();

            ServletRequestAttributes attributes = (ServletRequestAttributes) RequestContextHolder.getRequestAttributes();
            HttpServletRequest request = attributes.getRequest();
            //获取请求头数据库(模拟动态切换数据库)
            String myDataSource = request.getHeader("dataSource");

            // 获取默认数据源
            String dataSource = DataSourceContextHolder.DEFAULT_DS;
            try {
                // 得到访问的方法对象
                Method method = className.getMethod(methodName, argClass);

                // 判断是否存在@DateBase注解
                if (method.isAnnotationPresent(DataBase.class)) {
                    DataBase annotation = method.getAnnotation(DataBase.class);
                    // 取出注解中的数据源名
                    dataSource = annotation.value();
                }

                if (null != myDataSource && myDataSource.length() > 0){
                    dataSource = myDataSource;
                }
        } catch (Exception e) {
            e.printStackTrace();
        }
        // 切换数据源
        DataSourceContextHolder.setDB(dataSource);
    }

    // 结束后清除线程共享变量
    @After("dbPointCut()")
    public void afterSwitchDS(JoinPoint point){
        DataSourceContextHolder.clearDB();
    }
}
测试类增加如下代码
//置空根据请求头dataSource动态切库
 @DataBase()
 @PostMapping(value = "/addLogDy", produces = {"text/plain;charset=UTF-8"})
 public String addLogDy(@RequestBody LogInfo logInfo){

     int cnt = logMapperDynamic.addLog(logInfo);

     JSONObject result = new JSONObject();
     result.put("count",cnt);

     return result.toJSONString();
 }

 //可注解指定数据库
 @DataBase("mysqldb2")
 @RequestMapping("/getLogByIdDy/{id}")
 public String getLogByIdDy(@PathVariable("id") int logId){

     System.out.println("logId:"+logId);
     LogInfo logInfo = logMapperDynamic.queryLogById(logId);

     JSONObject result = new JSONObject();
     result.put("data",JSONObject.toJSONString(logInfo));

     return result.toJSONString();
 }
--附上表结构创建(mysql)
CREATE TABLE IF NOT EXISTS `log_center`(
   `id` INT UNSIGNED AUTO_INCREMENT,
   `method` VARCHAR(200),
   `requestJson` TEXT,
	 `responseJson` TEXT,
   `createDate` DATE,
   PRIMARY KEY ( `id` )
)ENGINE=InnoDB DEFAULT CHARSET=utf8;
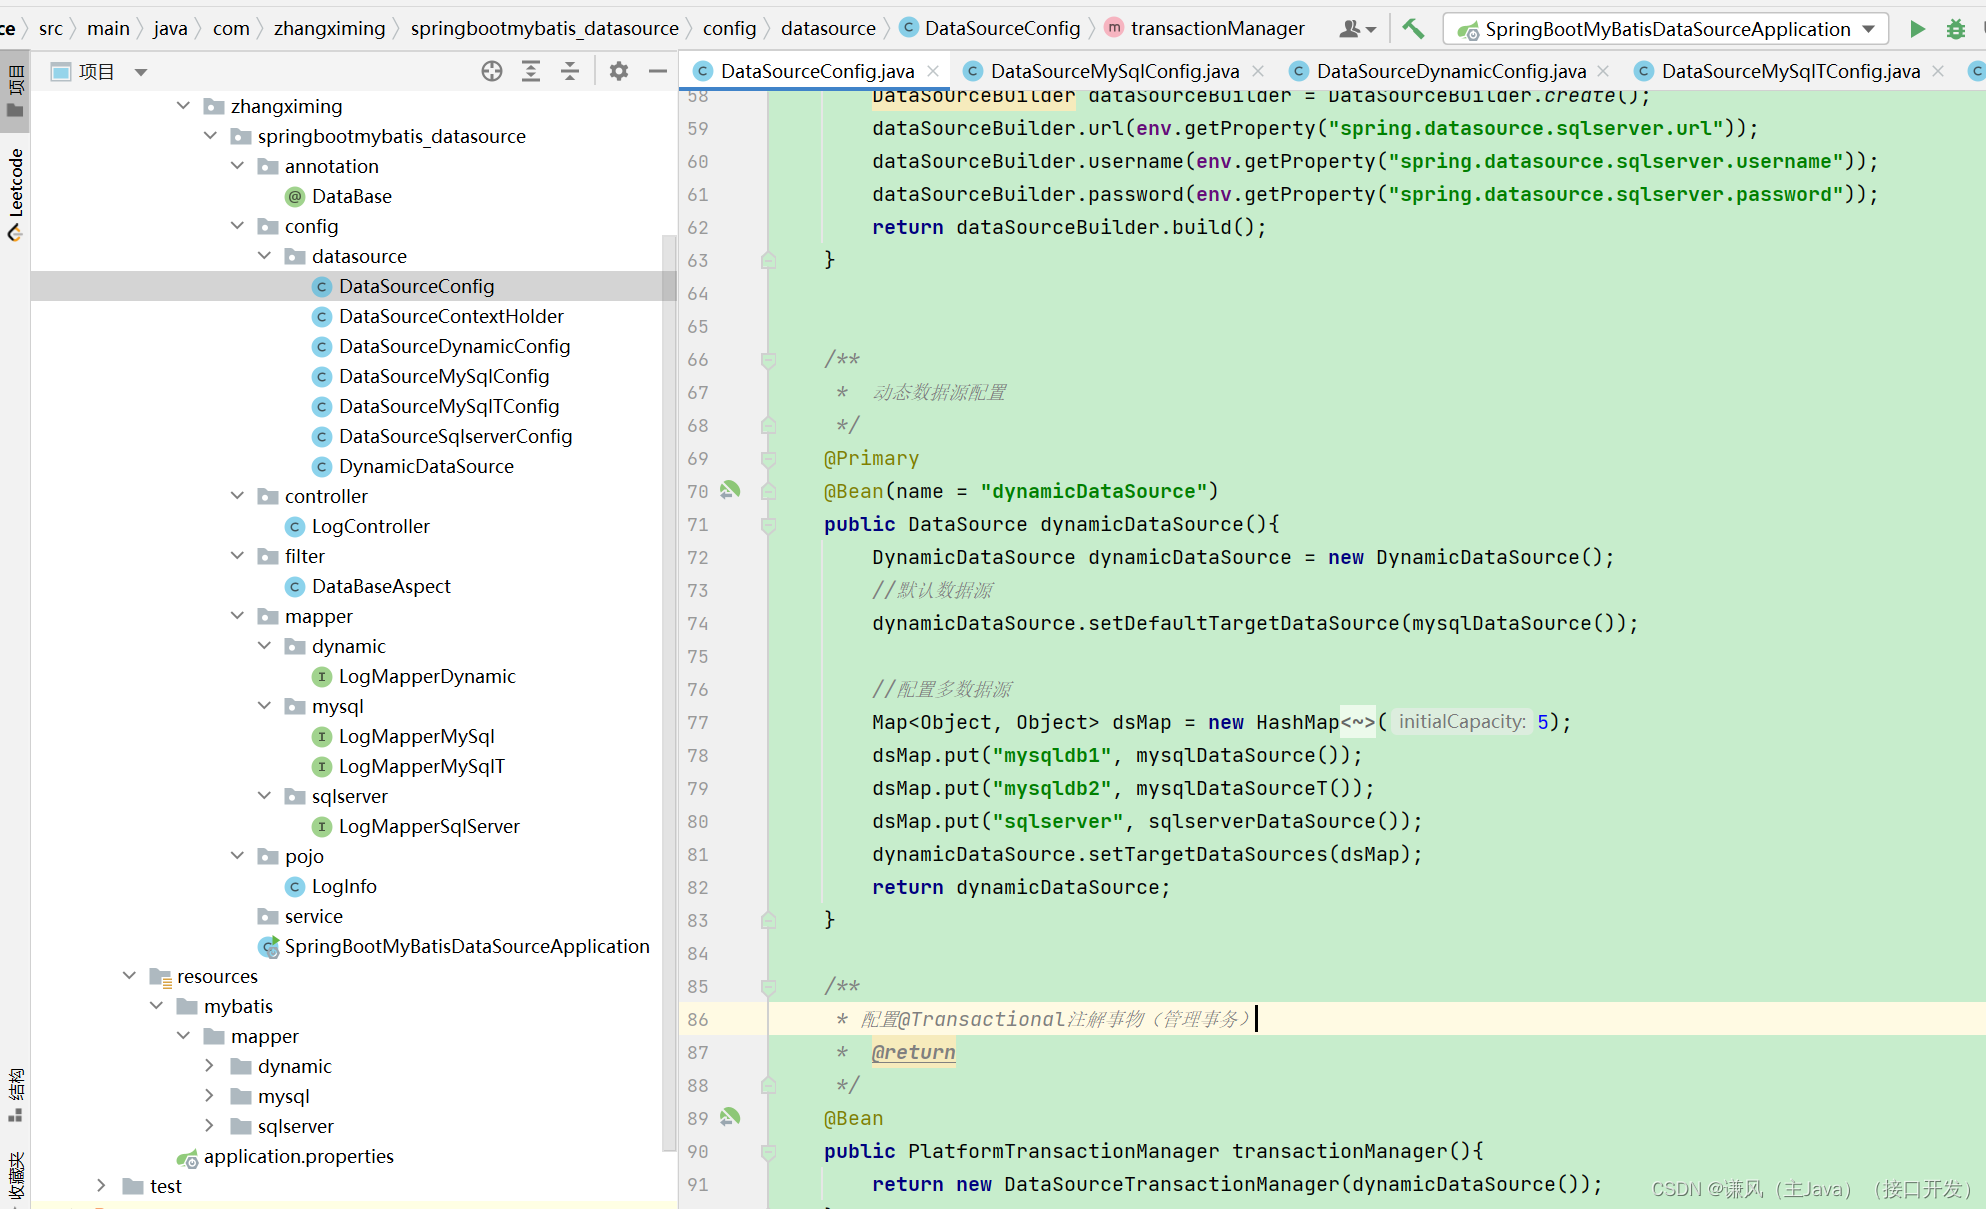
整体代码结构
功能测试正常,大家可以自行试下,代码完整包已放到博主资源(SpringBoot-MyBatis-DataSource(多数据源以及动态切换))。
