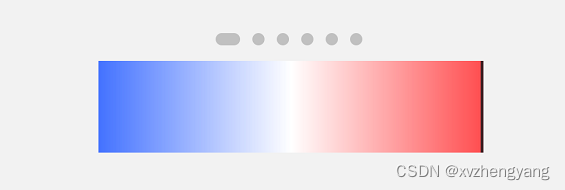
ReactNative实现的横向滑动条

news2024/10/6 5:01:38

OK,我们先看下效果图

注意使用到了两个库

1.react-native-linear-gradient

2.react-native-gesture-handler

ok,我们看下面的代码

import {Image, TouchableWithoutFeedback, StyleSheet, View} from 'react-native';
import LinearGradient from 'react-native-linear-gradient';
import React from 'react';
import {
  Gesture,
  GestureDetector,
  GestureHandlerRootView,
} from 'react-native-gesture-handler';
export class HorizntalSlider extends React.Component {
  shouldComponentUpdate(
    nextProps: Readonly<P>,
    nextState: Readonly<S>,
    nextContext: any,
  ): boolean {
    return false;
  }
  constructor(props) {
    super(props);
    this.progress = props.initValue;
    this.step = props.step;
    this.range = props.max - props.min;
    this.currentX = 0;
    this.enable = true;
  }
  _setValueChange(value) {
    this.currentX = value;
    this.selectedTrack.setNativeProps({
      style: {width: value},
    });
    let indicatorValue = value - 5 > 0 ? value - 5 : 0;
    this.indicator.setNativeProps({
      style: {left: indicatorValue - 1},
    });
  }

  componentDidMount(): void {
    if (this.props) {
      this.setPowerState(this.props.openState);
    }
  }

  _add() {
    if (!this.enable) {
      showToast(this.tips);
      const {onEnableClick} = this.props;
      if (onEnableClick) {
        onEnableClick();
      }
      return;
    }
    let tempValue = this.progress + this.step;
    this.progress =
      tempValue > this.props.max ? this.props.max : tempValue;
    let styleValue =
      ((this.progress - this.props.min) / this.range) * 250;
    this._setValueChange(styleValue);
    const {onLastChange, onChange} = this.props;
    onChange(this.progress);
    onLastChange(this.progress);
  }

  _reduce() {
    if (!this.enable) {
      const {onEnableClick} = this.props;
      if (onEnableClick) {
        onEnableClick();
      }
      showToast(this.tips);
      return;
    }
    let tempValue = this.progress - this.step;
    this.progress =
      tempValue < this.props.min ? this.props.min : tempValue;
    let styleValue =
      ((this.progress - this.props.min) / this.range) * 250;
    this._setValueChange(styleValue);
    const {onLastChange, onChange} = this.props;
    onChange(this.progress);
    onLastChange(this.progress);
  }

  _onValueChange(x, isFinalize = false) {
    if (x > 250) {
      x = 250;
    }
    if (x < 0) {
      x = 0;
    }
    this.currentX = x;
    this.progress = this.props.min + parseInt((x / 250) * this.range);
    // if (isFinalize) {
    //   const {onLastChange} = this.props;
    //   onLastChange(this.progress);
    // } else {
    //   const {onChange} = this.props;
    //   onChange(this.progress);
    // }
    this._setValueChange(x);
  }

  setPowerState(state) {
    if (!this.props) {
      return;
    }
    if (state === 1) {
      this.selectedTrack.setNativeProps({
        style: {
          width: this.currentX,
        },
      });
      this.indicator.setNativeProps({
        style: {opacity: 1},
      });
    } else {
      this.selectedTrack.setNativeProps({
        style: {width: 0},
      });
      this.indicator.setNativeProps({
        style: {opacity: 0},
      });
    }
  }

  setEnable(isEnable, tips) {
    if (!this.props) {
      return;
    }
    this.enable = isEnable;
    this.tips = tips;
  }

  gesture = Gesture.Pan()
    .onBegin(e => {
      this._onValueChange(e.x);
    })
    .onUpdate(e => {
      this._onValueChange(e.x);
    })
    .onFinalize(e => {
      this._onValueChange(e.x, true);
    });

  render() {
    this.currentX = ((this.progress - this.props.min) / this.range) * 250;
    this.currentX = this.currentX > 0 ? this.currentX : 0;
    return (
      <View style={[styles.mainContainer, this.props.style]}>
        <GestureHandlerRootView>
          <GestureDetector gesture={this.gesture}>
            <View style={styles.sliderContainer}>
              <LinearGradient
                start={{x: 0, y: 0}}
                end={{x: 1, y: 0}}
                colors={['#4372FF', 'white', '#FF4D4F']}
                style={{
                  width: 252,
                  height: 60,
                }}
              />
              <View
                style={{
                  flexDirection: 'row',
                  alignItems: 'center',
                  position: 'absolute',
                }}>
                <View
                  ref={c => (this.selectedTrack = c)}
                  style={{
                    width: this.currentX,
                    opacity: 0,
                    height: 60,
                  }}
                />
                <View
                  style={{
                    flex: 1,
                    backgroundColor: '#12161a',
                    opacity: 0.8,
                    height: 60,
                  }}
                />
              </View>
              <View
                ref={c => (this.indicator = c)}
                style={[styles.indicator, {left: this.currentX - 7}]}
              />
            </View>
          </GestureDetector>
        </GestureHandlerRootView>
      </View>
    );
  }
}

class Track extends React.Component {
  constructor(props) {
    super(props);
    this.unitViewArr = [];
    for (let i = 0; i < 42; i++) {
      this.unitViewArr[i] = i;
    }
  }
  shouldComponentUpdate(
    nextProps: Readonly<P>,
    nextState: Readonly<S>,
    nextContext: any,
  ): boolean {
    return false;
  }

  render() {
    return (
      <View style={styles.trackContainer}>
        {this.unitViewArr.map((item, index) => {
          return (
            <View
              key={index}
              style={{flexDirection: 'row', alignItems: 'center'}}>
              <View
                style={{
                  height: 60,
                  width: 2,
                  opacity: 0,
                  backgroundColor: '#12161a',
                  borderRadius: 100,
                }}
              />
              <View
                style={{height: 60, width: 4, backgroundColor: '#12161a'}}
              />
            </View>
          );
        })}
      </View>
    );
  }
}

const styles = StyleSheet.create({
  mainContainer: {
    flexDirection: 'row',
    justifyContent: 'center',
    alignItems: 'center',
  },
  sliderContainer: {
    position: 'relative',
    justifyContent: 'center',
    paddingVertical: 10,
    marginLeft: 10,
    marginRight: 8,
  },
  trackContainer: {
    width: 252,
    flexDirection: 'row',
    position: 'absolute',
  },
  actionImg: {
    width: 60,
    height: 60,
  },
  thumb: {
    height: 34,
    width: 7,
    backgroundColor: 'transparent',
  },
  indicator: {
    width: 0,
    height: 0,
    position: 'absolute',
    top: -2,
    borderLeftWidth: 4,
    borderTopWidth: 4,
    borderRightWidth: 4,
    left: -3,
    borderTopColor: '#FF6A6B',
    borderLeftColor: 'transparent',
    borderRightColor: 'transparent',
  },
});
export default HorizntalSlider;

使用代码如下

        <GestureHandlerHorizntalSlider
              model={{
                initValue: 20,
                step: 10,
                max: 100,
                min: 0,
              }}>
       </GestureHandlerHorizntalSlider>

拖动条:max(最大值),min(最小值),initValue(当前值),step(步调)

本文来自互联网用户投稿,该文观点仅代表作者本人,不代表本站立场。本站仅提供信息存储空间服务,不拥有所有权,不承担相关法律责任。如若转载,请注明出处:http://www.coloradmin.cn/o/1433579.html

如若内容造成侵权/违法违规/事实不符,请联系多彩编程网进行投诉反馈,一经查实,立即删除!

相关文章

[linux] kolla-ansible 部署的openstack 修改mariadb默认端口号

kolla-ansible 部署前修改global.yml #freezer_database_backend: "mariadb" database_port: 9306 mariadb_port: 9306如果已经部署成功&#xff0c;直接修改配置文件里的端口号重启是没有用的&#xff0c;怀疑内部做了缓存&#xff0c;查看openstack 使用的memcach…

Abap与eCharts

一&#xff0c;简介 利用html与eCharts来绘图&#xff0c;然后用cl_gui_html_viewer将html呈现到abap屏幕中。 二&#xff0c;使用eCharts画图 在一个文件夹中准备如下文件&#xff0c;index.html和echarts.js是必须的&#xff0c;data.json(作为数据源)和jquery.js如果用到就可…

windows安装Visual Studio Code,配置C/C++运行环境(亲测可行)

一.下载 Visual Studio Code https://code.visualstudio.com/ 二.安装 选择想要安装的位置: 后面的点击下一步即可。 三.下载编译器MinGW vscode只是写代码的工具&#xff0c;使用编译器才能编译写的C/C程序&#xff0c;将它转为可执行文件。 MinGW下载链接&#xff1a;…

【节选】Go语言的100个错误使用场景|数据类型

Data types &#x1f31f; 章节概述&#xff1a; 基本类型涉及的常见错误 掌握 slice 和 map 的基本概念&#xff0c;避免使用时产生 bug 值的比较 低效的切片初始化&#xff08;#21&#xff09; 实现一个 conver 方法&#xff0c;将一个切片 Foo 转换成另一个类型的切片 Ba…

在线视频格式转换,就是这么简单!(免费)

随着数字化时代的发展&#xff0c;我们在日常生活中越来越频繁地与各种视频文件打交道。然而&#xff0c;不同设备和平台对于视频格式的支持可能存在差异&#xff0c;这就导致了我们有时需要进行视频格式的转换&#xff0c;以确保视频在各种环境中流畅播放。而幸运的是&#xf…

简单使用阿里云OSS对象存储

首先我们先去阿里云控制台开通oss对象存储&#xff08;阿里云登录 - 欢迎登录阿里云&#xff0c;安全稳定的云计算服务平台&#xff09; 这篇文件是借鉴至&#xff08;教你三分钟上手阿里云OOS上传操作_阿里云定时上传怎么使用-CSDN博客&#xff09;的&#xff0c;源码也给了&a…

Python代码混淆工具,Python源代码保密、加密、混

引言 Python作为一种高级脚本语言&#xff0c;便捷的语法和丰富的库使它成为众多开发者的首选。然而&#xff0c;有时候我们希望保护我们的Python源代码&#xff0c;避免被他人轻易获取和篡改。为了实现这一目标&#xff0c;我们可以采取代码混淆的技术手段。本文将介绍Python…

深度学习系列55:深度学习加速技术概述

总体有两个方向&#xff1a;模型优化 / 框架优化 1. 模型优化 1.1 量化 最常见的量化方法为线性量化&#xff0c;权重从float32量化为int8&#xff0c;将输入数据映射在[-128,127]的范围内。在 nvdia gpu&#xff0c;x86、arm 和 部分 AI 芯片平台上&#xff0c;均支持 8bit…

Vue中keep-alive的作用、原理及应用场景

在进行Vue开发的过程中&#xff0c;我们经常会遇到需要进行组件缓存的场景&#xff0c;这时候Vue提供的keep-alive组件就派上了用场。keep-alive组件是Vue内置的一个抽象组件&#xff0c;它可以将其包裹的组件进行缓存&#xff0c;提高组件的性能&#xff0c;同时也可以节省服务…

docker-学习-3

docker 学习第三天 docker 学习第三天1. 回顾一下1.1. 对比图1.2. docker和虚拟机的区别1.3. 在容器化部署中&#xff0c;为什么有些场景更适合选择Docker而非虚拟机&#xff1f;1.4. 有哪些场景适合选择虚拟机而不是Docker进行部署&#xff1f;1.5. 虚拟机和Docker在性能和资源…

Python 数据分析(PYDA)第三版(二)

原文&#xff1a;wesmckinney.com/book/ 译者&#xff1a;飞龙 协议&#xff1a;CC BY-NC-SA 4.0 四、NumPy 基础知识&#xff1a;数组和向量化计算 原文&#xff1a;wesmckinney.com/book/numpy-basics 译者&#xff1a;飞龙 协议&#xff1a;CC BY-NC-SA 4.0 此开放访问网络版…

Java tomcat 使用spring-task,实现定时任务功能

前言 今天接触到一个需求&#xff0c;需要添加一个定时任务功能&#xff0c;第一反应是启动类EnableScheduling、定时任务方法使用Scheduled实现&#xff0c;导入项目后才发现&#xff0c;这个项目是ssm整合框架的tomcat项目&#xff0c;没有启动类&#xff0c; 于是改变了思路…

protoc结合go完成protocol buffers协议的序列化与反序列化

下载protoc编译器 下载 https://github.com/protocolbuffers/protobuf/releases ps: 根据平台选择需要的编译器&#xff0c;这里选择windows 解压 加入环境变量 安装go专用protoc生成器 https://blog.csdn.net/qq_36940806/article/details/135017748?spm1001.2014.3001.…

知识融合前沿技术:构建多模态、公平高效的大规模知识表示

目录 前言1 无监督对齐&#xff1a;构建智能实体关联2 多视角嵌入&#xff1a;提高数据利用效率3 嵌入表示增强&#xff1a;挑战节点相似性&#xff0c;对抗训练解决4 大规模实体对齐&#xff1a;克服模糊性和异构性结论 前言 在信息时代&#xff0c;知识融合成为推动人工智能…

AI新工具(20240204)pot-desktop - 为用户提供便捷的文字翻译和识别功能;ChatALL - 能够同时向多个AI机器人发送提示

pot-desktop - 为用户提供便捷的文字翻译和识别功能 pot-desktop pot-desktop是一款备受欢迎的跨平台划词翻译和OCR软件&#xff0c;为用户提供便捷的文字翻译和识别功能。 功能点&#xff1a; 划词翻译&#xff1a;用户只需将鼠标光标悬停在需要翻译的文字上&#xff0c;po…

Docker 可视化工具

1、Portainer 概念介绍 Portainer是一款轻量级的应用&#xff0c;它提供了图形化界面&#xff0c;用于方便地管理Docker环境&#xff0c;包括单机环境和集群环境。 Portainer分为开源社区版&#xff08;CE版&#xff09;和商用版&#xff08;BE版/EE版&#xff09;。 Porta…

Python实现加密

目录 一&#xff1a;哈希加密 二&#xff1a;aes加密 三&#xff1a;rsa加密 Python中&#xff0c;你可以使用多种方法来实现加密。下面我们介绍下常用的加密方法。 一&#xff1a;哈希加密 下面是一个使用Python内置的hashlib库实现SHA256哈希加密的例子&#xff1a; im…

在vscode上传项目到gitee

一、在Gitee上新建一个仓库 Tip&#xff1a;若已经创建过了&#xff0c;直接跳到第二部分看VsCode如何上传代码到Gitee 创建仓库比较简单&#xff0c;下面两张图就是整个过程&#xff0c;这里不在赘述&#xff0c;具体如下&#xff1a; 二、VsCode连接Gitee上创建的仓…

DevExpress ASP.NET Web Forms v23.2最新版本系统环境配置要求

本文档包含有关安装和使用 DevExpress ASP.NET Web Forms控件的系统要求的信息。 点击获取DevExpress v23.2正式版(Q技术交流&#xff1a;909157416&#xff09; .NET Framework DevExpress ASP.NET Web Forms控件和MVC扩展支持以下.NET Framework 版本。 如果您需要 DevExp…

电脑如何录制屏幕视频?超简单的教程来了!

在当今信息化的时代&#xff0c;电脑已经成为了我们日常生活和工作中不可或缺的工具。除了常规的文字处理、数据分析等功能外&#xff0c;电脑还为我们提供了许多实用的小工具&#xff0c;其中屏幕录制便是其中的一项。本文将介绍电脑如何录制屏幕视频&#xff0c;并推荐两种常…