文章目录
- 1.BMC虚拟多网口:macvlan是kernel提供的一种网卡虚拟化技术,可将网卡(不一定是真实的物理网卡)虚拟出多个接口,这网卡称为master或父接口,这些虚拟接口和外面环境通信都是通过父接口
- 1.1 bridge:ip netns add ns001 / ns002
- 1.2 private:FB Openbmc(AST2520实物芯片)和OcpOpenBMC(qemu ast2500-evb)以及X86 Ubuntu上验证过, Kernel版本均5.0+
- 编译Kernel:BMC/CPU OS的Linux Kernel Config里面加CONFIG_MACVLAN=m/y
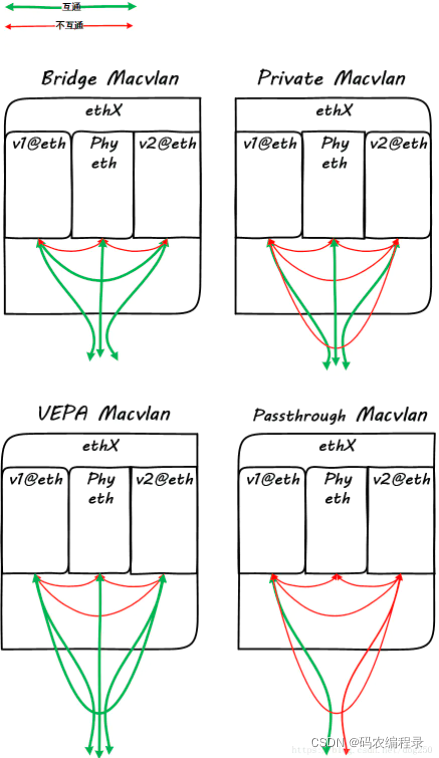
- 创建/启动网卡/获取DHCP地址:创建网卡以eth0为目标物理网口,虚拟网口的MAC地址自定义,mode可以选择private不能互通,bridge内部互通等
- 配置路由表:由于5个网口都被分配在一个网段如10.75.159.0/24(掩码一样),导致Linux内部路由会以高优先级的网口如eth0来响应外部的arp/icmp/tcp等各种网络请求。为了达到5个虚拟网口能在同网段以5个独立网口的形式工作,呈现5个独立网口MAC地址,需要配置路由表
- 远端服务器检查:ping 10.75.159.117/120/121/125/132
- 案例:iproute2,设置路由重启后不丢失/etc/network/interfaces:up route add -host 10.1.1.2 dev eth1
- 1.3 creat_macvlan.sh:macvlan文件夹里file文件夹里有.sh和.service,file文件夹同级有.bb文件
- 2.spi:spi.sh
- 3.rsyslog:rsyslogd一个进程 ,管理每个进程发来的log并往/var/log里写,syslog函数将log写给rsyslogd进程。
- 1.1 log_rotate
- 1.2 rsyslog.conf
- 1.3 rsyslog.logrotate
- 1.4 rsyslog_%.bbappend
- 2.
- logrotate-default
- logrotate_%.bbappend
- SOL
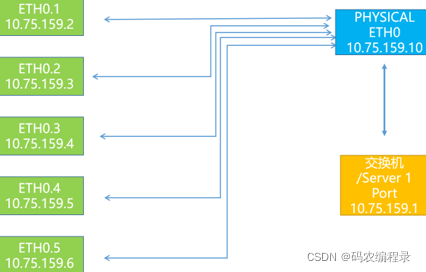
1.BMC虚拟多网口:macvlan是kernel提供的一种网卡虚拟化技术,可将网卡(不一定是真实的物理网卡)虚拟出多个接口,这网卡称为master或父接口,这些虚拟接口和外面环境通信都是通过父接口
1.1 bridge:ip netns add ns001 / ns002
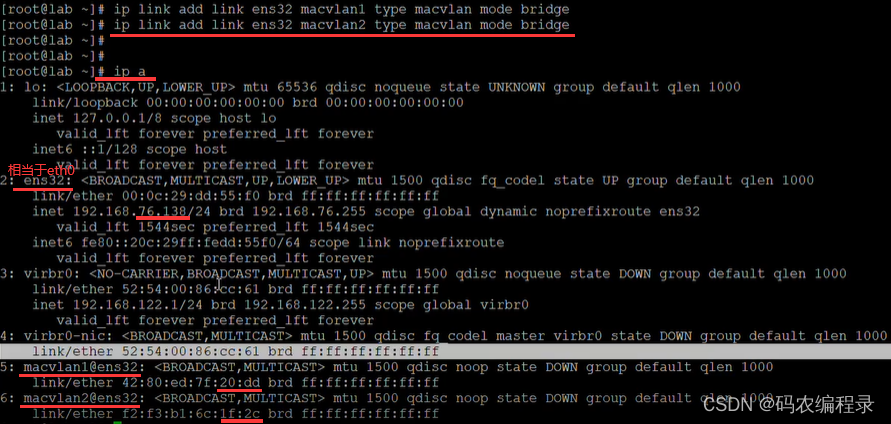
macvlan模拟的mac不同,如下第一行和第二行创建两个以ens32为父接口的macvlan1和macvlan2虚拟网口。
如下将ns001/2绑定网卡macvlan1/2,进入ns001虚拟环境,将网卡up起来。

如下添加ip,不通原因是bridge模式和父接口(.138)是不通的。
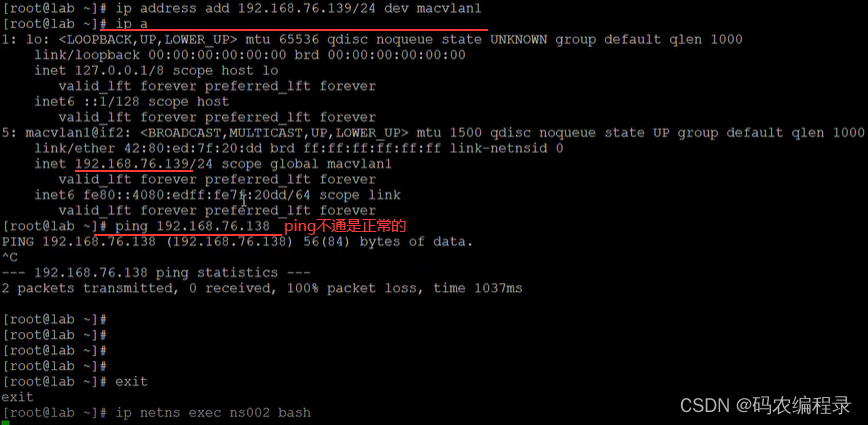
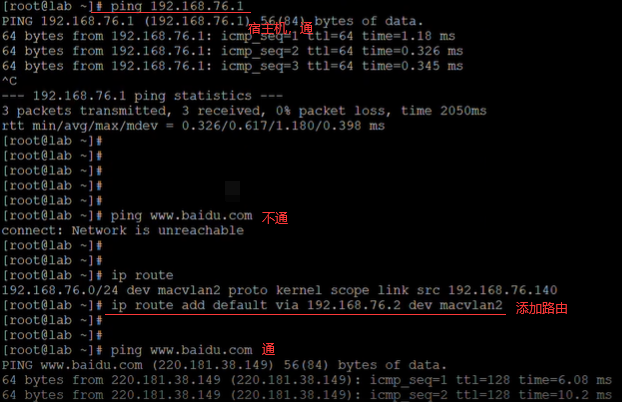
如下在ns002虚拟环境,宿主机(76.1)指的windows这台机器,如下两个都是往外ping。
1.2 private:FB Openbmc(AST2520实物芯片)和OcpOpenBMC(qemu ast2500-evb)以及X86 Ubuntu上验证过, Kernel版本均5.0+
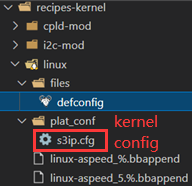
编译Kernel:BMC/CPU OS的Linux Kernel Config里面加CONFIG_MACVLAN=m/y
如下在编译的服务器上编译完后,如果找不到就删除build目录重新编译。

如下在烧录的机器上烧录镜像后,vi第一行.dep文件。
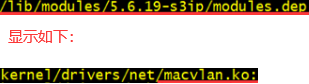
如下不用insmod kernel/drivers/net/maclan.ko。

创建/启动网卡/获取DHCP地址:创建网卡以eth0为目标物理网口,虚拟网口的MAC地址自定义,mode可以选择private不能互通,bridge内部互通等
假设生成5个虚拟网口eth0.1-eth0.5命令如下,ifconfig检查5个虚拟网口的IP地址和MAC地址(都不一样):
ip link add link eth0 dev eth0.1 address D6:D2:52:A8:28:28   type macvlan  mode private
ip link add link eth0 dev eth0.2 address D6:D2:52:A8:28:29   type macvlan  mode private
ip link add link eth0 dev eth0.3 address D6:D2:52:A8:28:2a   type macvlan  mode private
ip link add link eth0 dev eth0.4 address D6:D2:52:A8:28:2b   type macvlan  mode private
ip link add link eth0 dev eth0.5 address D6:D2:52:A8:28:2c   type macvlan  mode private
ifconfig eth0.1 up
ifconfig eth0.2 up
ifconfig eth0.3 up
ifconfig eth0.4 up
ifconfig eth0.5 up
dhclient eth0.1
dhclient eth0.2
dhclient eth0.3
dhclient eth0.4
dhclient eth0.5
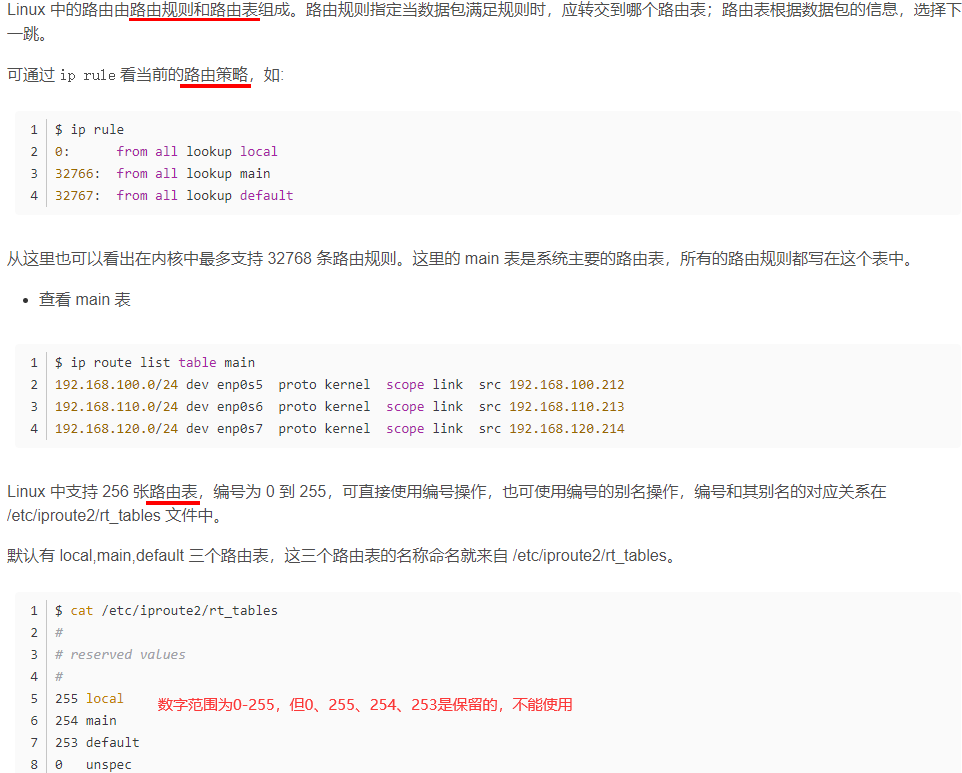
配置路由表:由于5个网口都被分配在一个网段如10.75.159.0/24(掩码一样),导致Linux内部路由会以高优先级的网口如eth0来响应外部的arp/icmp/tcp等各种网络请求。为了达到5个虚拟网口能在同网段以5个独立网口的形式工作,呈现5个独立网口MAC地址,需要配置路由表
获取Gateway网关地址:用route -n 命令获取路由表和Gateway(10.75.159.1)地址。
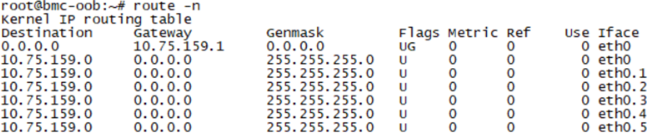
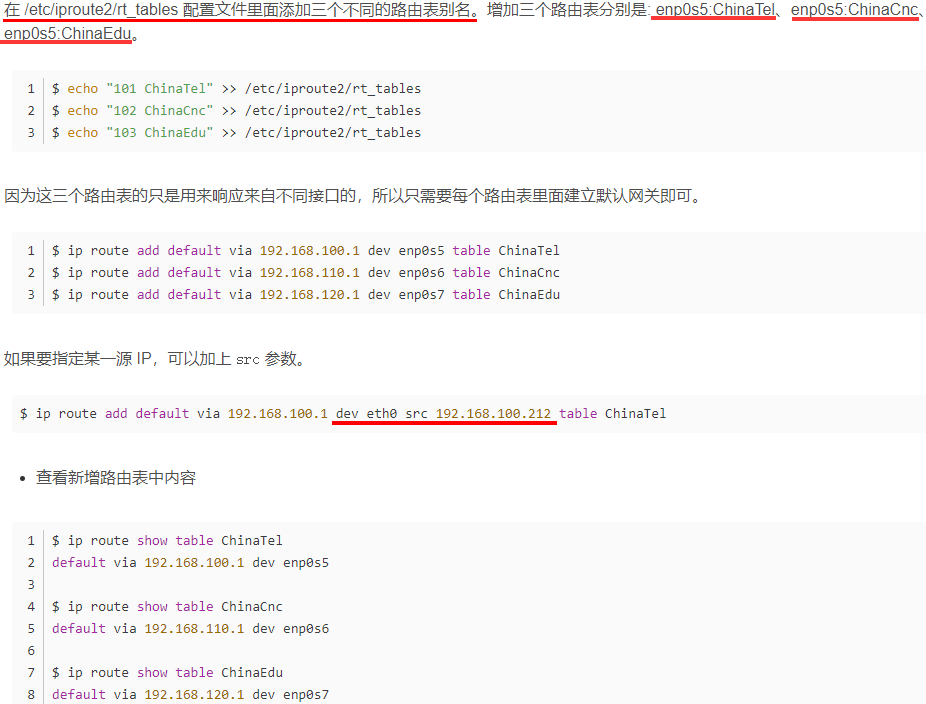
配置路由表:数量以实际虚拟网卡数量为准,需要替换网关IP和每个网口的IP。下面命令中10.75.159.1为网关地址,10.75.159.117等为虚拟网口的IP地址,10.75.159.0/24为网段和NETMASK。
echo "210 eth0table" >> /etc/iproute2/rt_tables # 210越大优先级越低
echo "220 eth1table" >> /etc/iproute2/rt_tables
echo "230 eth2table" >> /etc/iproute2/rt_tables
echo "240 eth3table" >> /etc/iproute2/rt_tables
echo "250 eth4table" >> /etc/iproute2/rt_tables
ip route add 10.75.159.0/24 dev eth0.1 src 10.75.159.117 table eth0table
ip route add 10.75.159.0/24 dev eth0.2 src 10.75.159.120 table eth1table
ip route add 10.75.159.0/24 dev eth0.3 src 10.75.159.121 table eth2table
ip route add 10.75.159.0/24 dev eth0.4 src 10.75.159.125 table eth3table
ip route add 10.75.159.0/24 dev eth0.5 src 10.75.159.132 table eth4table
ip route add default dev eth0.1 via 10.75.159.1 table eth0table
ip route add default dev eth0.2 via 10.75.159.1 table eth1table
ip route add default dev eth0.3 via 10.75.159.1 table eth2table
ip route add default dev eth0.4 via 10.75.159.1 table eth3table
ip route add default dev eth0.5 via 10.75.159.1 table eth4table
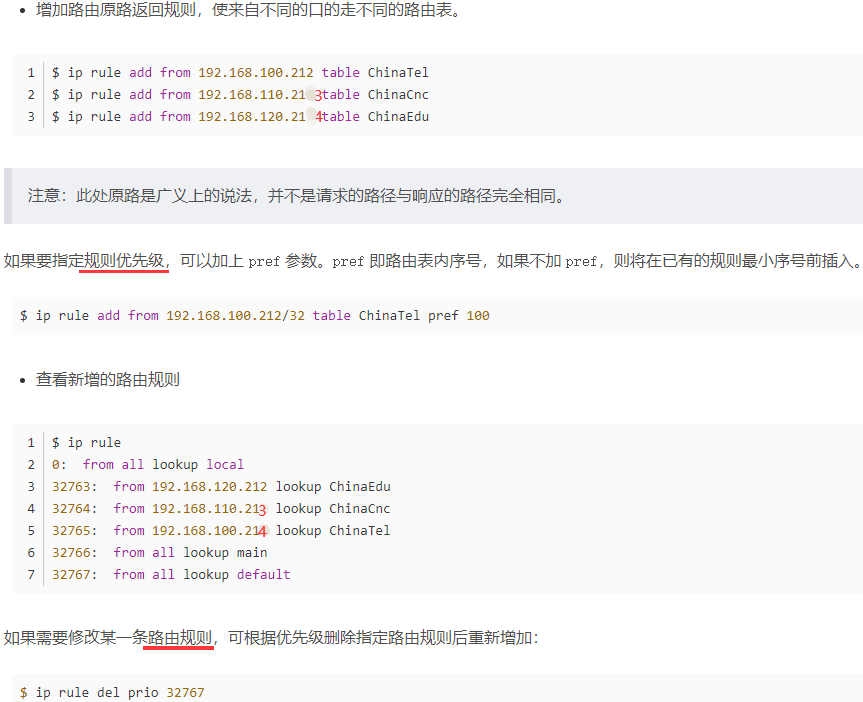
ip rule add from 10.75.159.117 table eth0table
ip rule add from 10.75.159.120 table eth1table
ip rule add from 10.75.159.121 table eth2table
ip rule add from 10.75.159.125 table eth3table
ip rule add from 10.75.159.132 table eth4table
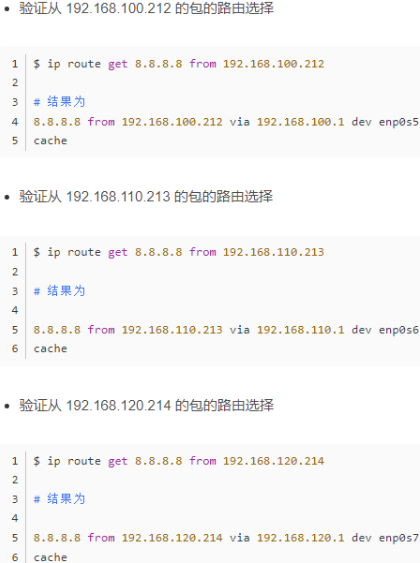
远端服务器检查:ping 10.75.159.117/120/121/125/132
如下只有发起ping 117才能看到117这个ip,BMC侧IP的MAC地址与远端服务器获取的一致,符合预期。使用tcp方式测试:BMC端(服务端)iperf -s -p port,远端(客户端)iperf -c BMCIP -t 1000 -i 3 -p port。

案例:iproute2,设置路由重启后不丢失/etc/network/interfaces:up route add -host 10.1.1.2 dev eth1


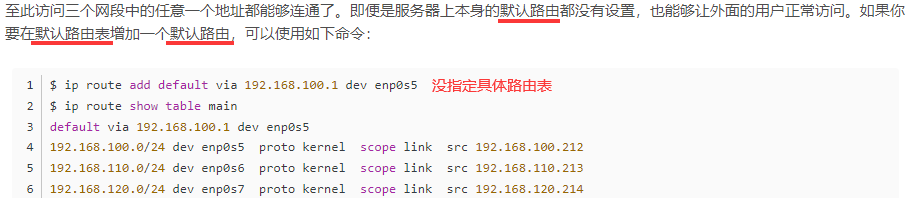
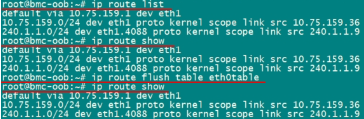
如下default via可省略。
注意如下是规则rule,不是route。
如下没指定路由表就会到main表中。

hping3 -I eth0 -a 10.75.159.37 -S 10.75.159.138 -p 8080 -i u100 发起攻击,iptables限制端口,限制连接数防止攻击。


1.3 creat_macvlan.sh:macvlan文件夹里file文件夹里有.sh和.service,file文件夹同级有.bb文件
#!/bin/sh
IP_ROUTEFILE_PATH="/etc/iproute2/rt_tables"
priority_arry=(210 220 230 240)
tablename_arry=(eth0table eth1table eth2table eth3table)

#dynamic routing configuration for macvlan
dynamic_routing()
{
    #Initialize basic network information
    index=0
    for i in $(ifconfig | grep -o ^[a-z0-9.]* | grep -v lo); do
        ipaddr_array[$index]=$(ifconfig "$i" | sed -n 2p | awk '{ print $2 }' | tr -d 'addr:')
        devname_array[$index]=$i
        gateway_array[$index]=$(route | grep "${devname_array[$index]}" | grep 'default' | awk '{print $2}')
        iprange_array[$index]="${ipaddr_array[$index]%[^0-9]*}.0/24"
        index=$((index + 1))
    done

    #Create the table and initialize it
    index=0
    for i in "${tablename_arry[@]}"; do
        tablename=$(cat $IP_ROUTEFILE_PATH | grep "${devname_array[$index]}" | sed -n 1p | awk -F ' ' '{print$2}')
        if [ "$tablename" != "${tablename_arry[$index]}" ]; then
            echo "${priority_arry[$index]} ${tablename_arry[$index]}" >> $IP_ROUTEFILE_PATH
        fi
        ip route flush table "${tablename_arry[$index]}"
        index=$((index + 1))
    done

    #Configure dynamic routing for the table
    index=0
    for i in "${tablename_arry[@]}"; do
        ip route add "${iprange_array[$index]}" dev "${devname_array[$index]}" src "${ipaddr_array[$index]}" table "${tablename_arry[$index]}"
        ip route add default dev "${devname_array[$index]}" via "${gateway_array[$index]}" table "${tablename_arry[$index]}"
        ip rule add from "${ipaddr_array[$index]}" table "${tablename_arry[$index]}"
        index=$((index + 1))
    done
}

###Creat MAC Vlan
ip link add link eth0 dev eth1 type macvlan
ip link add link eth0 dev eth2 type macvlan
ip link add link eth0 dev eth3 type macvlan
ip link set eth1 up
ip link set eth2 up
ip link set eth3 up

sleep 2
#dhclient eth0.01
#dhclient eth0.02
#dhclient eth0.03
dynamic_routing
# macvlan.service
[Unit]
Description=Mac Vlan Server
After=-xyz.openbmc_project.Network.service

[Service]
ExecStart=/usr/bin/creat_macvlan.sh
Type=oneshot

[Install]
WantedBy=multi-user.target
# macvlan.bb
SUMMARY = "Phosphor BMC Macvlan"
LICENSE = "Apache-2.0"
LIC_FILES_CHKSUM = "file://${COREBASE}/meta/files/common-licenses/Apache-2.0;md5=89aea4e17d99a7cacdbeed46a0096b10"

inherit pkgconfig
inherit obmc-phosphor-systemd

SYSTEMD_SERVICE:${PN} += "macvlan.service"

DEPENDS += "systemd"

SRC_URI += "file://macvlan.service \
            file://creat_macvlan.sh \
            "

do_install() {
    install -d ${D}${bindir}

    install -m 0755 ${WORKDIR}/creat_macvlan.sh ${D}${bindir}/creat_macvlan.sh
}

S = "${WORKDIR}"
2.spi:spi.sh
#!/bin/bash
#shellcheck disable=SC1091
. /usr/local/bin/openbmc-utils.sh
layout_file="/etc/platform/__MACHINE__/fpgarom.layout"
PIDFILE="/var/run/spi_util.pid"

# ctrl+c或升级结束后或异常退出 退出都运行
trap "pre_exit" EXIT
pre_exit()
{
    #echo "Ready to exit $program"
    if [ "${spi}" = "BIOS" ] && [ -n "$come_power_ret" ] && [ "$come_power_ret" -ne 0 ];then
        if [ -n "${boot_source}" ];then
            echo "${boot_source}" > "${LCCPLD_SYSFS_DIR}"/bios_select  #控制
        fi
        #lock
        echo 0x0 > "${LCCPLD_SYSFS_DIR}"/lc_bios_spi_select
    elif [ "${spi}" = "FPGA" ] && [ -n "$fpga_power_ret" ] && [ "$fpga_power_ret" -ne 0 ];then
        #lock
        echo 0x0 > "${LCCPLD_SYSFS_DIR}"/lc_fpga_spi_select
    fi

    if [ -f "$out_file" ] || [ -L "$out_file" ];then
        rm -f "$out_file"
    fi
    if [ -f "${PIDFILE}" ];then
        rm ${PIDFILE}
    fi
}

# check duplicate process,update one fpga/bios at the same time. 多进程对同一文件的读写冲突
check_duplicate_process()
{
    exec 8<>$PIDFILE  #exec后面的数字是[3, 9] 之间的整数
    flock -n 8 || (echo "Another process is running" && exit 1)  #-n是非阻塞的,一旦发现PIDFILE文件被占用,就打印后面echo,然后退出脚本;
    ret=$?
    if [ $ret -eq 1 ]; then
        exit 1
    fi
    pid=$$
    echo $pid >&8
}

#111111111111111111111111111111111111111111111111111111如下都是通过flashrom -p spi设备地址得到信息
check_flash_info()
{
    spi_no=$1
    flashrom -p linux_spi:dev=/dev/spidev"${spi_no}".0
}

get_flash_first_type()
{
    spi_no=$1
    ori_str=$(check_flash_info "${spi_no}")
    type=$(echo ${ori_str} | cut -d '"' -f 2)
    if [ "$type" ];then
        echo "$type"
        return 0
    else
        echo "Get flash type error: [$ori_str]"
        exit 1
    fi
}

get_flash_size()
{
    spi_no=$1
    ori_str=$(check_flash_info "${spi_no}")
    flash_sz=$(echo ${ori_str} | cut -d '(' -f 4 | cut -d ' ' -f 1)
    echo "$flash_sz" | grep -E -q '^[0-9]+$'
    num_ret=$?
    if [ $num_ret -eq 0 ];then
        echo "$flash_sz"
        return 0
    else
        echo "Get flash size error: [$ori_str]"
        return 1
    fi
}

#111111111111111111111111111111111111111111111111111111111111111111如下最重要resize_file()
check_layout_image_exist()
{
    layout_file=$1
    image=$2  #primary/golden
    cut_ret=$(cut -d ' ' -f 2 "$1" | grep "$2")   # cut后面加文件
    if [ "$cut_ret" != "$image" ];then
        echo "cant not find $image in $layout_file "
        return 1
    else
        return 0
    fi
}

get_layout_image_startaddr()
{
    layout_file=$1
    image=$2
    while read -r line
    do
        cut_ret=$(echo "$line" | cut -d ' ' -f 2)
        if [ "$cut_ret" = "$image" ];then
            startaddr=$(echo "$line" | cut -d ':' -f 1) #逐行遍历
            startaddr=$((16#$startaddr)) #转16进制
            echo "$startaddr"
            return 0
        fi
    done < "$layout_file"
    return 1
}

# $1: input file size    $2: flash size    $3: output file path
pad_ff()
{
    out_file=$3
    pad_size=$(($2 - $1))
    dd if=/dev/zero bs=$pad_size count=1 | tr "\000" "\377" >> "$out_file"
}

# $1: image_size    $2: storage_sz     $3: image_startaddr    $4: out_file
pad_touchfile()
{
    image_size=$1  #bin大小
    storage_sz=$2   #flash大小
    image_startaddr=$3 # 真实起始地址
    out_file=$4  #备份的.bin(最后要烧录进flash的),下面操作都是对out_file操作
    dd if=/dev/zero bs="$image_startaddr" count=1 | tr "\000" "\377" >> "$out_file"  #头
    dd if="$in_file" bs="$image_size" count=1 >> "$out_file" # 中间
    declare -i left_size="$storage_sz"-"$image_startaddr"-"$image_size"
    dd if=/dev/zero bs="$left_size" count=1 | tr "\000" "\377" >> "$out_file"  #尾
}

resize_file()
{
    in_file=$1     # .bin
    out_file=$2    # /tmp/.bin
    spi_no=$3
    image_size=$4
    image_startaddr=$5
    in_file_sz=$(stat -c%s "$in_file")
    storage_sz=0

    if flash_sz=$(get_flash_size "$spi_no");then
        storage_sz=$((flash_sz * 1024))
    else
        echo "debug message: $flash_sz"
        exit 1
    fi
    if [ "$image_size" -eq 0 ] && [ "$image_startaddr" -eq 0 ];then  # 不用layout文件
        if [ "$in_file_sz" -ne $storage_sz ];then   #.bin < flash
            cp "$in_file" "$out_file"   # 拷贝.bin (不动bin原文件)
            pad_ff "$in_file_sz" $storage_sz "$out_file"   #尾追加,只能是bios,或mulit混合
        else
            ln -s "$(realpath "${in_file}")" "${out_file}"
        fi
    else
        touch "$out_file"
        pad_touchfile "$image_size" $storage_sz "$image_startaddr" "$out_file"
    fi
}

#1111111111111111111111111111111111111111111111111111111111111如下最重要的是write_flash_to_file,erase和read不重要
read_flash_to_file()
{
    spi_no=$1
    tmp_file=$2
    type=$(get_flash_first_type "$spi_no")
    if ! flashrom -p linux_spi:dev=/dev/spidev"${spi_no}".0 -r "$tmp_file" -c "$type";then
        echo "debug cmd: [flashrom -p linux_spi:dev=/dev/spidev${spi_no}.0 -r $tmp_file -c $type]"
        exit 1
    fi
}

check_fpga_imagesize(){
    if flash_sz=$(get_flash_size "$spi_no");then  # flash_sz   k
        storage_sz=$((flash_sz * 1024))  # B 字节
    else
        echo "debug message: $flash_sz"
        exit 1
    fi
    image_startaddr=$(get_layout_image_startaddr "$layout_file" "$image")  # image_startaddr 字节
    declare -i max_image_size="$storage_sz"-"$image_startaddr"
    file_sz=$(stat -c%s "$file")
    if [ "$file_sz" -gt "$max_image_size" ];then
        echo "The maximum image file size is $max_image_size B."
        exit 1
    fi
}

check_bios_imagesize(){
    if flash_sz=$(get_flash_size "$spi_no");then
        max_image_size=$((flash_sz * 1024))
    else
        echo "debug message: $flash_sz"
        exit 1
    fi
    file_sz=$(stat -c%s "$file")
    if [ "$file_sz" -gt "$max_image_size" ];then
        echo "The maximum image file size is $max_image_size B."
        exit 1
    fi
}

write_flash_to_file()  # $spi_no    .bin    primary/golden
{
    spi_no=$1
    in_file=$2
    image=$3
    if [ $# -eq 3 ];then
        image_size=$(stat -c%s "$in_file")
        image_startaddr=$(get_layout_image_startaddr "$layout_file" "$image")
        mode="layout"
    else #不用layout文件
        image_size=0
        image_startaddr=0
        mode="normal"
    fi
    tmp_file=$(basename "${in_file}")
    out_file="/tmp/spi${spi_no}_${tmp_file}"
    resize_file "$in_file" "$out_file" "$spi_no" $image_size $image_startaddr
    type=$(get_flash_first_type "$spi_no")
    if [ $mode = "normal" ];then
        if ! flashrom -p linux_spi:dev=/dev/spidev"${spi_no}".0 -w "$out_file" -c "$type";then
            echo "debug cmd: [flashrom -p linux_spi:dev=/dev/spidev${spi_no}.0 -w $out_file -c $type]"
            rm -f "$out_file"
            exit 1
        fi
    elif [ $mode = "layout" ];then
        if ! flashrom -p linux_spi:dev=/dev/spidev"${spi_no}".0 --layout "$layout_file" --image "$image" -w "$out_file" -c "$type";then
            echo "debug cmd: [flashrom -p linux_spi:dev=/dev/spidev${spi_no}.0 --layout $layout_file --image $image -w $out_file -c $type]"
            rm -f "$out_file"
            exit 1
        fi
    fi
}

erase_flash()
{
    spi_no=$1
    type=$(get_flash_first_type "$spi_no")
    if ! flashrom -p linux_spi:dev=/dev/spidev"${spi_no}".0 -E -c "$type";then
        echo "debug cmd: [flashrom -p linux_spi:dev=/dev/spidev${spi_no}.0 -E -c $type]"
        exit 1
    fi
}

#111111111111111111111111111111111111111111111111111111111111111111111111111111111111111111111
get_boot_bios_sel_value()
{
    val=$(head -n 1 < "${LCCPLD_SYSFS_DIR}/cpu_boot_bios_sel")
    if [ "${val}" = "0x0" ];then  # 主:记录bios_select原来状态
        ret_value="0x1"  # 退出之前,bios_select切到原来状态master
    elif [ "${val}" = "0x1" ];then # 备
        ret_value="0x3"  # 退出之前, bios_select切到原来状态slaver
    fi
    echo ${ret_value}
}

do_action_BIOS()
{
    #check come power status
    come_power_ret=$(is_come_power_ok "${index}")
    if [ "$come_power_ret" -eq 0 ]; then
        echo "${lcdev} come Power Status: Bad"
        return 1
    fi
    #get present bios status
    boot_source=$(get_boot_bios_sel_value)
    if [ "${master_slave}" = "master" ];then
        echo "Start to update master bios image"
        bios_select_value="0x1"
    elif [ "${master_slave}" = "slave" ];then
        echo "Start to update slave bios image"
        bios_select_value="0x3"
    fi
    spi_no="1"
    #chip select
    do_spi_select "${index}" "bios"
    echo 0x0 > "${LCCPLD_SYSFS_DIR}"/bios_ctrl
    echo ${bios_select_value} > "${LCCPLD_SYSFS_DIR}"/bios_select
    case ${op} in
        "read" )
            read_flash_to_file $spi_no "$file"
            ;;
        "write")
            check_bios_imagesize
            write_flash_to_file $spi_no "$file"
            ;;
        "erase")
            erase_flash $spi_no
            ;;
    esac
}

do_action_FPGA()
{
    #check lc status
    fpga_power_ret=$(is_fpga_power_ok "${index}")
    if [ "$fpga_power_ret" -eq 0 ]; then
        echo "${lcdev} FPGA Power Status: Bad"
        return 1
    fi
    echo "Start to update fpga image"
    spi_no="1"
    #unlock
    do_spi_select "${index}" "fpga"
    echo 0x0 > "${LCCPLD_SYSFS_DIR}"/bios_ctrl
    case ${op} in
        "read" )
            read_flash_to_file $spi_no "$file"
            ;;
        "write")
            check_fpga_imagesize
            write_flash_to_file $spi_no "$file" "$image"
            ;;
        "erase")
            erase_flash $spi_no
            ;;
    esac
}

usage(){
    program=$(basename "$0")
    echo "Usage:"
    echo "$program <op> <spi device> [file] <master|slave>  <lc device>"
    echo "  <op>          : read, write, erase"
    echo "  <spi device>  : BIOS, FPGA"
    echo "  <image>       : master, slave"
    echo "  <lc device>   : lc1,lc2 ... lc7,lc8"
    echo "Note:"
    echo "  master:FPGA primary, BIOS0"
    echo "  slave :FPGA golden , BIOS1"
    echo "  <lc device>:select which linecard to operate"
    echo "Examples:"
    echo "  $program write FPGA fpga.bin master lc1"
    echo "  $program read BIOS bios.bin master lc1"
    echo "  $program erase BIOS master lc1"
    echo ""
}

check_parameter(){
    if [ $# -ne 4 ] && [ $# -ne 5 ];then
        usage
        exit 0
    fi
    if [ $# -eq 5 ];then
        op=$1
        spi=$2
        file=$3
        master_slave=$4
        lcdev=$5
        index=${5: -1}
        if [ "${op}" != "read" ] && [ "${op}" != "write" ];then
            usage
            exit 0
        fi
        if [ "${op}" = "write" ];then
            if [ ! -f "$file" ];then
                echo "$file doesnot exist"
                exit 0
            fi
        fi
    elif [ $# -eq 4 ];then
        op=$1
        spi=$2
        master_slave=$3
        lcdev=$4
        index=${4: -1}
        if [ "${op}" != "erase" ];then
            usage
            exit 0
        fi
    fi
    case ${lcdev} in
        "lc1" | "lc2" | "lc3" | "lc4" | "lc5" | "lc6" | "lc7" | "lc8")
            ;;
        *)
            usage
            exit 0
            ;;
    esac
    LCCPLD_SYSFS_DIR=${LC_PATH_DICT[${index}]}
    case ${spi} in
        "BIOS" | "FPGA")
            ;;
        *)
            usage
            exit 0
            ;;
    esac
    case ${master_slave} in
        "master" | "slave")
            ;;
        *)
            usage
            exit 0
            ;;
    esac
    if [ "${op}" = "read" ] || [ "${op}" = "write" ];then
        if [ "$2" = "FPGA" ];then
            if [ "${master_slave}" = "master" ];then
                image="primary"
            elif [ "${master_slave}" = "slave" ];then
                image="golden"
            fi
            if [ -n "${image}" ];then
                if [ ! -f "${layout_file}" ];then
                    echo "${layout_file} doesnot exist"
                    exit 0
                fi
                if ! check_layout_image_exist "${layout_file}" ${image};then
                    exit 0
                fi
            fi
        fi
    fi
}

check_duplicate_process
check_parameter "$@"
do_action_"${2}" "$@"

# root@bmc-oob:/etc/platform/xs9880-8c# ls
# fpgarom.layout       sensors_config.json
# root@bmc-oob:/etc/platform/xs9880-8c# cat fpgarom.layout
# 00000000:003FEFFF golden
# 003FF000:003FFFFF timer1
# 00400000:006FFFFF primary
# 00700000:0070003B timer2
# root@bmc-oob:/etc/platform/xs9880-8c# cat sensors_config.json
# {
#     "PSU_DICT":{
#         "TotalNum":4,
#         "TempNum":3,
#         "FAN":{"Unit":"RPM","Value":"fan1_input","Desc":"Fan Speed"},
#         "TEMP1":{"Unit":"C","Max":"temp1_max","Value":"temp1_input","Desc":"Temp1"},
#         "TEMP2":{"Unit":"C","Max":"temp2_max","Value":"temp2_input","Desc":"Temp2"},
#         "TEMP3":{"Unit":"C","Max":"temp3_max","Value":"temp3_input","Desc":"Temp3"},
#         "VIN":{"Unit":"V","Min":"in1_min","Max":"in1_max","Value":"in1_input","Desc":"Input Voltage"},
#         "IIN":{"Unit":"A","Max":"curr1_max","Value":"curr1_input","Desc":"Input Current"},
#         "PIN":{"Unit":"W","Max":"power1_max","Value":"power1_input","Desc":"Input Power"},
#         "VOUT":{"Unit":"V","Min":"in2_min","Max":"in2_max","Value":"in2_input","Desc":"Output Voltage"},
#         "IOUT":{"Unit":"A","Max":"curr2_max","Value":"curr2_input","Desc":"Output Current"},
#         "POUT":{"Unit":"W","Max":"power2_max","Value":"power2_input","Desc":"Output Power"},
#         "SupportModule":["G1236-3000WNC"],
#         "ModelName":"mfr_id",
#         "SerialNumber":"mfr_serial",
#         "PartNumber":"mfr_model",
#         "InputType":"input_type",
#         "PSU1":{
#             "Present":"/sys/bus/i2c/devices/82-000d/psu1_present",
#             "PMBus":"/sys/bus/i2c/devices/32-005b",
#             "PowerSta":"/sys/bus/i2c/devices/82-000d/psu1_pwr_ok",
#             "PowerInSta":"/sys/bus/i2c/devices/82-000d/psu1_ac_ok"
#         },
ssh连不上,ip冲突,改interface。
if [ "$1" = "--slave" ];then
    ver=$(strings /dev/mtd5 | grep U-Boot | tail -1 | awk -F ' ' '{print$3}')
    printf "%-25s : %s\n" "Slave BMC Version" ${ver}
    exit
fi
printf "%-25s : v%d.%02d.%02d\n" "FCB1 CPLD Version" ${FCB1cpld_rev_h} ${FCB1cpld_rev_m} ${FCB1cpld_rev_l}
3.rsyslog:rsyslogd一个进程 ,管理每个进程发来的log并往/var/log里写,syslog函数将log写给rsyslogd进程。


ident将是一个标记,省略的话即打印出进程的名字如下。

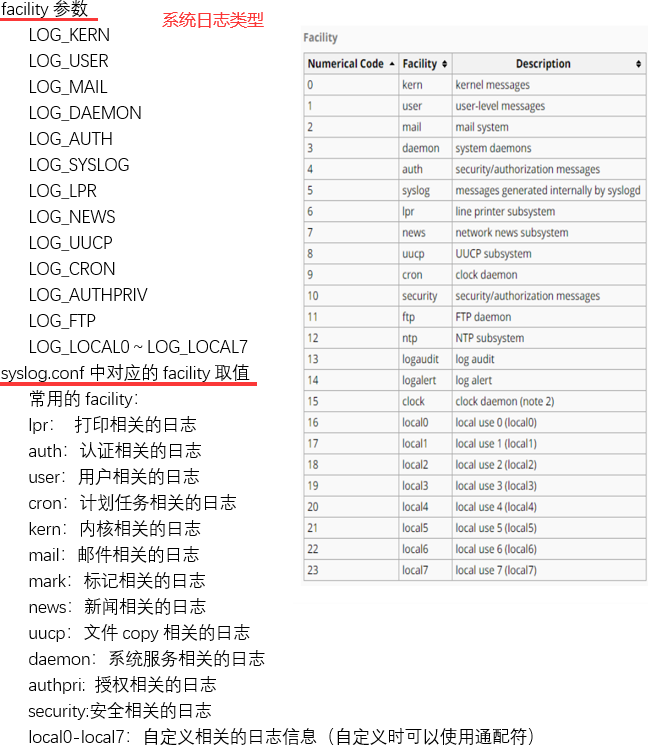
facility默认是user。

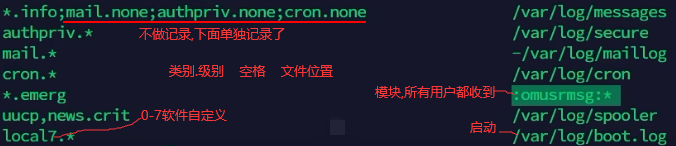
如下排除文件中以#开头的和去除空行。


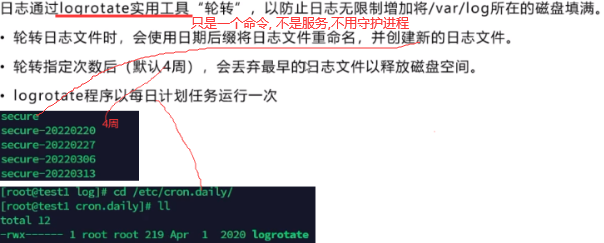
1.1 log_rotate
#!/bin/sh
/usr/sbin/logrotate /etc/logrotate.conf
EXITVALUE=$?
if [ $EXITVALUE != 0 ]; then
    /usr/bin/logger -t logrotate "ALERT exited abnormally with [$EXITVALUE]"
fi
exit $EXITVALUE
1.2 rsyslog.conf
# rsyslog configuration file
#
# This config uses old-style formatting. For more advanced features,
# RainerScript configuration is suggested.
#
# For more information see /usr/share/doc/rsyslog-*/rsyslog_conf.html
# or latest version online at http://www.rsyslog.com/doc/rsyslog_conf.html
# If you experience problems, see http://www.rsyslog.com/doc/troubleshoot.html
$ModLoad imuxsock # provides support for local system logging (e.g. via logger command)
$ModLoad imklog # kernel logging (formerly provided by rklogd)
module(load="imfile") # Provides support for tailing and categorizing existing log files
$ActionQueueType Direct # Do not queue these, write immediately
global(workDirectory="/tmp") # Remembers the last file position when syslog restarts and does not retransmit
# Set the default permissions
$FileOwner root
$FileGroup adm
$FileCreateMode 0640
$DirCreateMode 0755
$Umask 0022
$PreserveFQDN on
# Use format recognized by log-util.
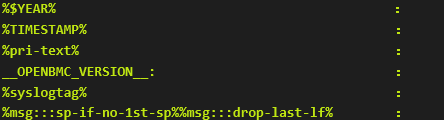
$template LogUtilFileFormat," %$YEAR% %TIMESTAMP% %pri-text% __OPENBMC_VERSION__: %syslogtag%%msg:::sp-if-no-1st-sp%%msg:::drop-last-lf%\n"
# Store dhclient logs into dhclient.log,
# store everything else into /var/log/messages
if $programname == "dhclient" then /var/log/dhclient.log
else
# limit size to 21M
$outchannel messagefile_channel, /var/log/messages, 22020096, /usr/local/fbpackages/rotate/log_rotate
*.* :omfile:$messagefile_channel;LogUtilFileFormat
# Save boot messages also to boot.log
local7.* /tmp/boot.log;LogUtilFileFormat
# Store come-mon logs into come-mon_rsyslog.log
if $programname == "come-mon" then
$outchannel comemonfile_channel, /var/log/come-mon.log, 22020096, /usr/local/fbpackages/rotate/log_rotate
*.* :omfile:$comemonfile_channel;LogUtilFileFormat
# Store power-mon logs into power-mon_rsyslog.log
if $programname == "power-mon" then
$outchannel powermonfile_channel, /var/log/power-mon.log, 22020096, /usr/local/fbpackages/rotate/log_rotate
*.* :omfile:$powermonfile_channel;LogUtilFileFormat
# Store sensor-mon logs into sensor-mon_rsyslog.log
if $programname == "sensor-mon" then
$outchannel sensormonfile_channel, /var/log/sensor-mon.log, 22020096, /usr/local/fbpackages/rotate/log_rotate
*.* :omfile:$sensormonfile_channel;LogUtilFileFormat
# Store temp-mon logs into temp-mon_rsyslog.log
if $programname == "temp-mon" then
$outchannel tempmonfile_channel, /var/log/temp-mon.log, 22020096, /usr/local/fbpackages/rotate/log_rotate
*.* :omfile:$tempmonfile_channel;LogUtilFileFormat
#mTerm_server log (TBD)
# Send local3 log to the /var/log/messages
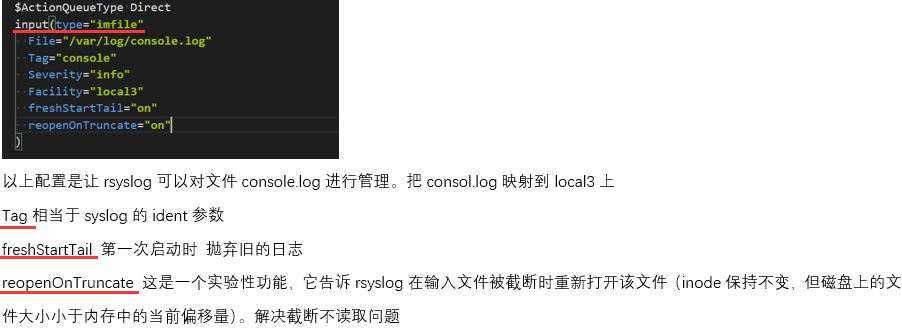
#input(type="imfile"
# File="/var/log/mTerm_consol.log"
# Tag="oob_mTerm_consol"
# Severity="debug"
# Facility="local3"
# reopenOnTruncate="on"
#)
# 如下将info级别及其以上级别(可改成crit等其他级别)的日志发送给target服务端
*.info action(type="omfwd" name="remoteLog" template="LogUtilFileFormat" target="10.75.159.146" port="514" protocol="udp"
queue.type="LinkedList" action.resumeRetryCount="1" action.resumeInterval="60"
queue.size="500" queue.workerthreadminimummessages="101" queue.discardseverity="0"
queue.timeoutenqueue="0" queue.timeoutshutdown="10" queue.timeoutactioncompletion="100"
action.reportSuspension="off" action.reportSuspensionContinuation="off")
$IncludeConfig /etc/rsyslog.d/*.conf
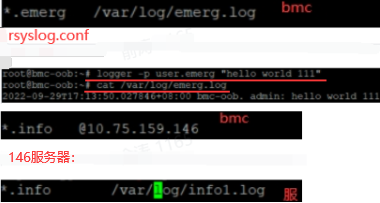
10.75.159.146做服务端,/etc/rsyslog.conf 打开如下配置,tcp打开tcp的配置:
module(load="imudp")
input(type="imudp" port="514")
$IncludeConfig /etc/rsyslog.d/*.conf
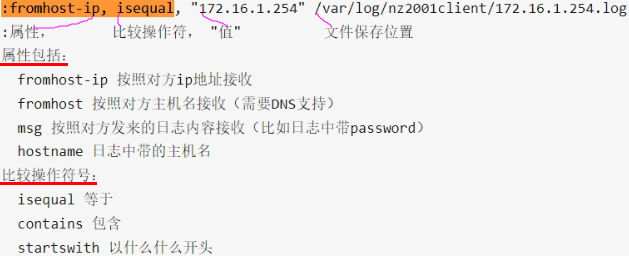
/etc/rsyslog.d/remote.conf 配置如下(修改完需重启rsyslog进程):
:fromhost,isequal, "10.75.159.37" /var/log/remote_37.log
1.3 rsyslog.logrotate
# Logs to be managed by logrotate:

/var/log/fscd.log
/var/log/dhclient.log
/var/log/messages
/var/log/sensor-mon.log
/var/log/power-mon.log
/var/log/come-mon.log
/var/log/temp-mon.log
{
        rotate 9
        missingok
        notifempty
        size 20M
        delaycompress
        compress
        postrotate
            /bin/kill -HUP `cat /var/run/rsyslogd.pid 2> /dev/null` 2> /dev/null || true
        endscript
}
1.4 rsyslog_%.bbappend
FILESEXTRAPATHS_prepend := "${THISDIR}/files:"

SRC_URI += "file://rsyslog.conf \
            file://log_rotate \
            file://rsyslog.logrotate \
"

MTERM_LOG_FILES ?= "mTerm_${MACHINE}"

do_install_append() {
  dst="${D}/usr/local/fbpackages/rotate"
  rsysconf="${D}${sysconfdir}/rsyslog.d"
  install -d $dst
  install -d ${rsysconf}
  install -m 755 ${WORKDIR}/log_rotate ${dst}/log_rotate

  install -m 644 ${WORKDIR}/rsyslog.logrotate ${D}${sysconfdir}/logrotate.rsyslog
  install -m 644 ${WORKDIR}/rsyslog.conf ${D}${sysconfdir}/rsyslog.conf
  sed -i "s/__OPENBMC_VERSION__/${OPENBMC_VERSION}/g" ${D}${sysconfdir}/rsyslog.conf
}

FILES_${PN} += "/usr/local/fbpackages/rotate"
2.


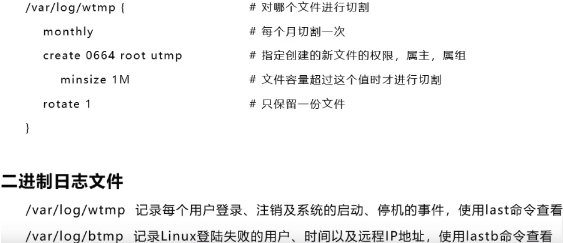
以下的ip用lastb查看

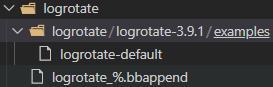
logrotate-default
# RPM packages drop log rotation information into this directory
include /etc/logrotate.d
logrotate_%.bbappend
FILESEXTRAPATHS_append := "${THISDIR}/${PN}:"

SRC_URI += " \
            file://logrotate-3.9.1/examples/logrotate-default \
           "

# We need to rotate every hour or could quickly run out of RAM.
LOGROTATE_SYSTEMD_TIMER_BASIS = "hourly"
LOGROTATE_SYSTEMD_TIMER_ACCURACY = "30m"

do_install_append() {
    install -p -m 644 ${WORKDIR}/logrotate-3.9.1/examples/logrotate-default ${D}${sysconfdir}/logrotate.conf

    if ${@bb.utils.contains('DISTRO_FEATURES', 'systemd', 'true', 'false', d)}; then
        # XXX For now we build Yocto with systemd enabled and sysvinit
        # compat to allow remaining sysvinit scripts to continue working.
        # With both systemd & sysvinit compat on, the logrotate recipe gets
        # it wrong and installs both the crontab entry and systemd timer.
        # When sysvinit compat is removed then this can go away.
        rm -f ${D}${sysconfdir}/cron.daily/logrotate
    fi
}
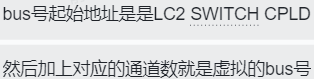
左面是对应的LC CPLD寄存器的名字 中间是 切换后器件在的通道号 右面是器件位号
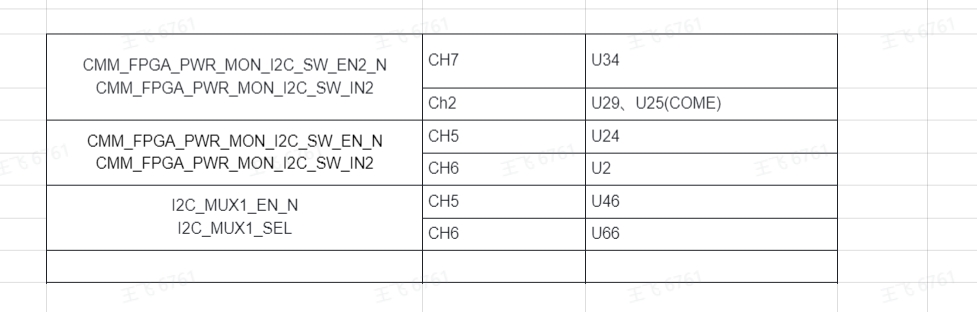


测完了要把这个节点值再 写回0

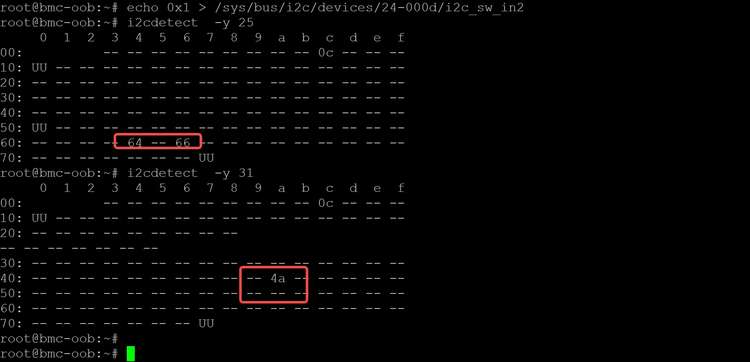

这个硬件给错了 这个是ch1
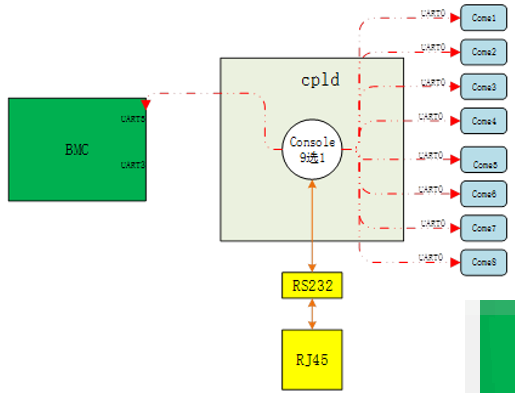
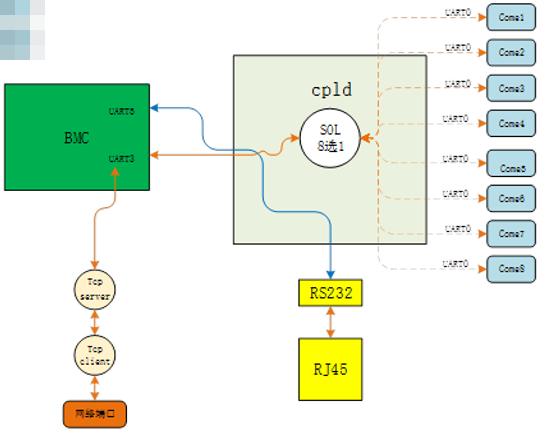
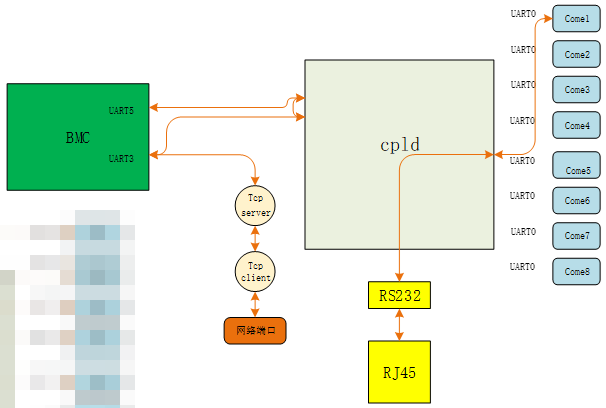
SOL


![[oeasy]python0016_编码_encode_编号_字节_计算机](https://img-blog.csdnimg.cn/img_convert/b5f55c3ec67a9d6dcaa9677b0656652c.png)
