先上结果:

代码:
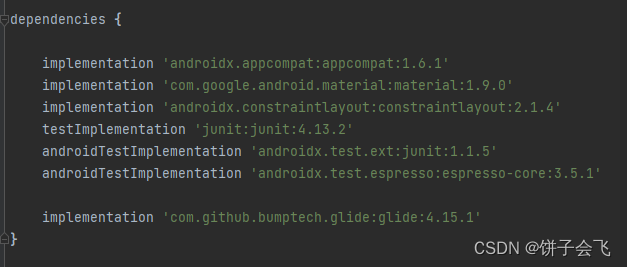
首先引入图片加载:
implementation 'com.github.bumptech.glide:glide:4.15.1'
配置权限清单:
    <!-- 网络权限 -->
    <uses-permission android:name="android.permission.INTERNET"/>
    <uses-permission android:name="android.permission.ACCESS_NETWORK_STATE"/>

页面布局:activity_main.xml
<?xml version="1.0" encoding="utf-8"?>
<LinearLayout xmlns:android="http://schemas.android.com/apk/res/android"
    xmlns:app="http://schemas.android.com/apk/res-auto"
    xmlns:tools="http://schemas.android.com/tools"
    android:layout_width="match_parent"
    android:layout_height="match_parent"
    android:orientation="vertical"
    tools:context=".MainActivity">
    <RelativeLayout
        android:layout_width="match_parent"
        android:layout_height="?attr/actionBarSize"
        android:background="#2196F3">
        <TextView
            android:id="@+id/personalCenterText"
            android:layout_width="wrap_content"
            android:layout_height="wrap_content"
            android:layout_centerInParent="true"
            android:text="购物车"
            android:textColor="#ffffff"
            android:textSize="24sp" />

        <TextView
            android:id="@+id/edit"
            android:text="编辑"
            android:textColor="@color/white"
            android:textSize="24sp"
            android:layout_marginEnd="10dp"
            android:layout_centerVertical="true"
            android:layout_alignParentEnd="true"
            android:layout_width="wrap_content"
            android:layout_height="wrap_content"/>
    </RelativeLayout>

    <androidx.recyclerview.widget.RecyclerView
        android:id="@+id/recyclerView"
        android:layout_weight="1"
        android:layout_width="match_parent"
        android:layout_height="0dp"/>
    <RelativeLayout
        android:layout_width="match_parent"
        android:layout_height="50dp">
        <CheckBox
            android:id="@+id/allSelect"
            android:text="全选"
            android:layout_centerVertical="true"
            android:textColor="@color/colorAccent"
            android:layout_width="wrap_content"
            android:layout_height="wrap_content"/>
        <TextView
            android:id="@+id/total"
            android:textSize="20sp"
            android:text="合计0.00¥"
            android:textColor="@color/colorAccent"
            android:layout_centerVertical="true"
            android:layout_toStartOf="@id/pay"
            android:layout_marginEnd="10dp"
            android:layout_width="wrap_content"
            android:layout_height="wrap_content"/>
        <Button
            android:id="@+id/pay"
            android:text="结算"
            android:textColor="@color/white"
            android:background="@drawable/button_red"
            android:layout_width="100dp"
            android:layout_alignParentEnd="true"
            android:layout_height="wrap_content"/>
    </RelativeLayout>

</LinearLayout>
条目布局:item_cart.xml
<?xml version="1.0" encoding="utf-8"?>
<RelativeLayout xmlns:android="http://schemas.android.com/apk/res/android"
    android:layout_width="match_parent"
    android:layout_height="100dp">
    <CheckBox
        android:id="@+id/checkbox"
        android:layout_centerVertical="true"
        android:layout_width="wrap_content"
        android:layout_height="wrap_content"/>

    <ImageView
        android:id="@+id/cover"
        android:layout_width="80dp"
        android:layout_height="80dp"
        android:layout_margin="10dp"
        android:layout_toEndOf="@id/checkbox" />
    <LinearLayout
        android:layout_toEndOf="@id/cover"
        android:layout_width="wrap_content"
        android:layout_height="wrap_content"
        android:orientation="vertical">
        <TextView
            android:id="@+id/name"
            android:layout_width="wrap_content"
            android:layout_height="wrap_content"
            android:textStyle="bold"
            android:textSize="18sp"
            android:textColor="@color/black"
            android:maxLines="2"
            android:ellipsize="end"
            android:layout_marginTop="5dp" />
        <TextView
            android:id="@+id/price"
            android:layout_width="wrap_content"
            android:layout_height="wrap_content"
            android:text=""
            android:textColor="#D32F2F"
            android:textStyle="bold"
            android:layout_marginTop="5dp" />
    </LinearLayout>
    <LinearLayout
        android:id="@+id/view_number"
        android:layout_width="wrap_content"
        android:layout_height="23dp"
        android:background="@drawable/shape_cart_item_add_cut_border"
        android:divider="@drawable/shape_divider_1_v"
        android:orientation="horizontal"
        android:showDividers="middle"
        android:layout_marginBottom="10dp"
        android:layout_marginEnd="10dp"
        android:layout_alignParentBottom="true"
        android:layout_alignParentEnd="true">

        <TextView
            android:id="@+id/tv_reduce"
            android:layout_width="27dp"
            android:layout_height="match_parent"
            android:gravity="center"
            android:text="-"
            android:textColor="#676767"
            android:textSize="15sp"/>

        <TextView
            android:id="@+id/tv_num"
            android:layout_width="wrap_content"
            android:layout_height="match_parent"
            android:gravity="center"
            android:minWidth="40dp"
            android:paddingHorizontal="12dp"
            android:singleLine="true"
            android:text="1"
            android:textColor="#676767"
            android:textSize="15sp"/>

        <TextView
            android:id="@+id/tv_add"
            android:layout_width="27dp"
            android:layout_height="match_parent"
            android:gravity="center"
            android:text="+"
            android:textColor="#676767"
            android:textSize="15sp"/>
    </LinearLayout>
</RelativeLayout>
资源文件:shape_cart_item_add_cut_border.xml
<?xml version="1.0" encoding="utf-8"?>
<shape xmlns:android="http://schemas.android.com/apk/res/android"
       android:shape="rectangle"
       android:visible="true">
    <!-- 描边,边框 -->
    <stroke
        android:width="1px"
        android:color="#E0E0E0"/><!--dashGap虚线段的间距、dashWidth虚线段的长度-->
</shape>
shape_divider_1_v.xml
<?xml version="1.0" encoding="utf-8"?>
<shape xmlns:android="http://schemas.android.com/apk/res/android"
       android:shape="rectangle"
       android:visible="true">
    <size
        android:width="1px"/><!-- 宽度和高度 -->
    <!-- 填充 -->
    <solid
        android:color="#E0E0E0"/><!-- 填充的颜色 -->
</shape>
适配器:CartAdapter
public class CartAdapter extends RecyclerView.Adapter<CartAdapter.Holder> {
    private final List<CartBean> list;
    private final Context context;
    private final List<CartBean> selects=new ArrayList<>();

    public CartAdapter(List<CartBean> list, Context context) {
        this.list = list;
        this.context = context;
    }

    @NonNull
    @Override
    public Holder onCreateViewHolder(@NonNull ViewGroup parent, int viewType) {
        View view= LayoutInflater.from(context).inflate(R.layout.item_cart,null,false);
        return new Holder(view);
    }

    @Override
    public void onBindViewHolder(@NonNull Holder holder, int position) {
        CartBean cartBean =list.get(position);
        holder.name.setText(cartBean.getName());
        holder.number.setText(String.valueOf(cartBean.getNumber()));
        holder.price.setText(String.format("%1$.2f¥", cartBean.getPrice()));
        holder.reduce.setOnClickListener(new View.OnClickListener() {
            @Override
            public void onClick(View view) {
                int n;
                n = Integer.parseInt(holder.number.getText().toString());
                if (n >1){
                    n = n -1;
                    holder.number.setText(String.valueOf(n));
                    cartBean.setNumber(n);
                }
                else {
                    Toast.makeText(context,"最少选择一件",Toast.LENGTH_SHORT).show();
                }
                updateItem();
            }
        });
        holder.add.setOnClickListener(new View.OnClickListener() {
            @Override
            public void onClick(View view) {
                int n;
                n = Integer.parseInt(holder.number.getText().toString());
                n = n + 1;
                cartBean.setNumber(n);
                holder.number.setText(String.valueOf(n));
                updateItem();
            }
        });
        holder.checkBox.setOnCheckedChangeListener(new CompoundButton.OnCheckedChangeListener() {
            @Override
            public void onCheckedChanged(CompoundButton compoundButton, boolean b) {
                cartBean.setSelect(b);
                updateItem();
            }
        });
        holder.checkBox.setChecked(cartBean.isSelect());
        Glide.with(context).load(cartBean.getCover()).into(holder.cover);
    }

    @Override
    public int getItemCount() {
        return list.size();
    }

    public static class Holder extends RecyclerView.ViewHolder{
        CheckBox checkBox;
        ImageView cover;
        TextView name,number,reduce,add,price;
        public Holder(@NonNull View itemView) {
            super(itemView);
            checkBox=itemView.findViewById(R.id.checkbox);
            cover=itemView.findViewById(R.id.cover);
            name=itemView.findViewById(R.id.name);
            number=itemView.findViewById(R.id.tv_num);
            reduce=itemView.findViewById(R.id.tv_reduce);
            add=itemView.findViewById(R.id.tv_add);
            price=itemView.findViewById(R.id.price);
        }
    }
    private void updateItem(){
        selects.clear();
        for (CartBean cartBean:list){
            if (cartBean.isSelect()){
                selects.add(cartBean);
            }
        }
        onChange.change(selects);
    }
    public OnChange onChange;

    public void setOnChange(OnChange onChange) {
        this.onChange = onChange;
    }

    public List<CartBean> getSelects() {
        return selects;
    }
    //条目改变-接口回调
    public interface OnChange{
        void change(List<CartBean> selects);
    }
}
bean类:CartBean
public class CartBean {
    private String name;
    private String cover;
    private boolean isSelect;
    private int number;
    private double price;

    public String getName() {
        return name;
    }

    public void setName(String name) {
        this.name = name;
    }

    public String getCover() {
        return cover;
    }

    public void setCover(String cover) {
        this.cover = cover;
    }

    public boolean isSelect() {
        return isSelect;
    }

    public void setSelect(boolean select) {
        isSelect = select;
    }

    public int getNumber() {
        return number;
    }

    public void setNumber(int number) {
        this.number = number;
    }

    public double getPrice() {
        return price;
    }

    public void setPrice(double price) {
        this.price = price;
    }

    public CartBean(String name, String cover, boolean isSelect, int number, double price) {
        this.name = name;
        this.cover = cover;
        this.isSelect = isSelect;
        this.number = number;
        this.price = price;
    }

    @Override
    public String toString() {
        return "CartBean{" +
                "name='" + name + '\'' +
                ", cover='" + cover + '\'' +
                ", isSelect=" + isSelect +
                ", number=" + number +
                ", price=" + price +
                '}';
    }
}
源码
github:https://github.com/panzhusheng/CartDemo
gitee:https://gitee.com/pan-zs/cart-demo
