利用 "diart" 和 OpenAI 的 Whisper 简化实时转录
工作原理
Diart 是一个基于人工智能的 Python 库,用于实时记录说话者语言(即 "谁在什么时候说话"),它建立在 pyannote.audio 模型之上,专为实时音频流(如麦克风)而设计。
只需几行代码,diart 就能让您获得类似这样的实时发言者标签:
与此同时,Whisper 是 OpenAI 最新推出的一种为自动语音识别(ASR)而训练的模型,它对嘈杂环境的适应能力特别强,非常适合现实生活中的使用案例。
准备工作
- 按照此处的说明安装 diart
- 使用 pip install git+https://github.com/linto-ai/whisper-timestamped 安装 whisper-timestamped
在这篇文章的其余部分,我将使用 RxPY(Python 的反应式编程扩展)来处理流媒体部分。如果你对它不熟悉,我建议你看看这个文档页面,了解一下基本知识。
简而言之,反应式编程就是对来自给定源(在我们的例子中是麦克风)的发射项(在我们的例子中是音频块)进行操作。
结合听和写
让我们先概述一下源代码,然后将其分解成若干块,以便更好地理解它。
import logging
import traceback
import diart.operators as dops
import rich
import rx.operators as ops
from diart import OnlineSpeakerDiarization, PipelineConfig
from diart.sources import MicrophoneAudioSource

# Suppress whisper-timestamped warnings for a clean output
logging.getLogger("whisper_timestamped").setLevel(logging.ERROR)

config = PipelineConfig(
    duration=5,
    step=0.5,
    latency="min",
    tau_active=0.5,
    rho_update=0.1,
    delta_new=0.57
)
dia = OnlineSpeakerDiarization(config)
source = MicrophoneAudioSource(config.sample_rate)

asr = WhisperTranscriber(model="small")

transcription_duration = 2
batch_size = int(transcription_duration // config.step)
source.stream.pipe(
    dops.rearrange_audio_stream(
        config.duration, config.step, config.sample_rate
    ),
    ops.buffer_with_count(count=batch_size),
    ops.map(dia),
    ops.map(concat),
    ops.filter(lambda ann_wav: ann_wav[0].get_timeline().duration() > 0),
    ops.starmap(asr),
    ops.map(colorize_transcription),
).subscribe(on_next=rich.print, on_error=lambda _: traceback.print_exc())

print("Listening...")
source.read()
创建发言者记录模块
首先,我们创建了流媒体(又称 "在线")扬声器日记系统以及与本地麦克风相连的音频源。
我们将系统配置为使用 5 秒的滑动窗口,步长为 500 毫秒(默认值),并将延迟设置为最小值(500 毫秒),以提高响应速度。
# If you have a GPU, you can also set device=torch.device("cuda")
config = PipelineConfig(
    duration=5,
    step=0.5,
    latency="min",
    tau_active=0.5,
    rho_update=0.1,
    delta_new=0.57
)
dia = OnlineSpeakerDiarization(config)
source = MicrophoneAudioSource(config.sample_rate)
配置中的三个附加参数可调节扬声器识别的灵敏度:
- tau_active=0.5: 只识别发言概率高于 50% 的发言者。
- rho_update=0.1: Diart 会自动收集发言者的信息以自我改进(别担心,这是在本地完成的,不会与任何人共享)。在这里,我们只使用每位发言者 100ms 以上的语音进行自我改进。
- delta_new=0.57:这是一个介于 0 和 2 之间的内部阈值,用于调节新发言人的检测。该值越小,系统对语音差异越敏感。
创建 ASR 模块
接下来,我们使用我为这篇文章创建的 WhisperTranscriber 类加载语音识别模型。
# If you have a GPU, you can also set device="cuda"
asr = WhisperTranscriber(model="small")
该类的定义如下:
import os
import sys
import numpy as np
import whisper_timestamped as whisper
from pyannote.core import Segment
from contextlib import contextmanager


@contextmanager
def suppress_stdout():
    # Auxiliary function to suppress Whisper logs (it is quite verbose)
    # All credit goes to: https://thesmithfam.org/blog/2012/10/25/temporarily-suppress-console-output-in-python/
    with open(os.devnull, "w") as devnull:
        old_stdout = sys.stdout
        sys.stdout = devnull
        try:
            yield
        finally:
            sys.stdout = old_stdout

class WhisperTranscriber:
    def __init__(self, model="small", device=None):
        self.model = whisper.load_model(model, device=device)
        self._buffer = ""

    def transcribe(self, waveform):
        """Transcribe audio using Whisper"""
        # Pad/trim audio to fit 30 seconds as required by Whisper
        audio = waveform.data.astype("float32").reshape(-1)
        audio = whisper.pad_or_trim(audio)

        # Transcribe the given audio while suppressing logs
        with suppress_stdout():
            transcription = whisper.transcribe(
                self.model,
                audio,
                # We use past transcriptions to condition the model
                initial_prompt=self._buffer,
                verbose=True  # to avoid progress bar
            )

        return transcription

    def identify_speakers(self, transcription, diarization, time_shift):
        """Iterate over transcription segments to assign speakers"""
        speaker_captions = []
        for segment in transcription["segments"]:

            # Crop diarization to the segment timestamps
            start = time_shift + segment["words"][0]["start"]
            end = time_shift + segment["words"][-1]["end"]
            dia = diarization.crop(Segment(start, end))

            # Assign a speaker to the segment based on diarization
            speakers = dia.labels()
            num_speakers = len(speakers)
            if num_speakers == 0:
                # No speakers were detected
                caption = (-1, segment["text"])
            elif num_speakers == 1:
                # Only one speaker is active in this segment
                spk_id = int(speakers[0].split("speaker")[1])
                caption = (spk_id, segment["text"])
            else:
                # Multiple speakers, select the one that speaks the most
                max_speaker = int(np.argmax([
                    dia.label_duration(spk) for spk in speakers
                ]))
                caption = (max_speaker, segment["text"])
            speaker_captions.append(caption)

        return speaker_captions

    def __call__(self, diarization, waveform):
        # Step 1: Transcribe
        transcription = self.transcribe(waveform)
        # Update transcription buffer
        self._buffer += transcription["text"]
        # The audio may not be the beginning of the conversation
        time_shift = waveform.sliding_window.start
        # Step 2: Assign speakers
        speaker_transcriptions = self.identify_speakers(transcription, diarization, time_shift)
        return speaker_transcriptions
转录器执行一个简单的操作,接收音频块及其日记,并按照以下步骤操作:
- 用 Whisper 转录音频片段(带单词时间戳)
- 通过调整单词和说话人之间的时间戳,为转录的每个片段指定说话人
将两个模块放在一起
既然我们已经创建了日记化和转录模块,那么我们就可以定义对每个音频块应用的操作链:
import traceback
import rich
import rx.operators as ops
import diart.operators as dops

# Split the stream into 2s chunks for transcription
transcription_duration = 2
# Apply models in batches for better efficiency
batch_size = int(transcription_duration // config.step)

# Chain of operations to apply on the stream of microphone audio
source.stream.pipe(
    # Format audio stream to sliding windows of 5s with a step of 500ms
    dops.rearrange_audio_stream(
        config.duration, config.step, config.sample_rate
    ),
    # Wait until a batch is full
    # The output is a list of audio chunks
    ops.buffer_with_count(count=batch_size),
    # Obtain diarization prediction
    # The output is a list of pairs `(diarization, audio chunk)`
    ops.map(dia),
    # Concatenate 500ms predictions/chunks to form a single 2s chunk
    ops.map(concat),
    # Ignore this chunk if it does not contain speech
    ops.filter(lambda ann_wav: ann_wav[0].get_timeline().duration() > 0),
    # Obtain speaker-aware transcriptions
    # The output is a list of pairs `(speaker: int, caption: str)`
    ops.starmap(asr),
    # Color transcriptions according to the speaker
    # The output is plain text with color references for rich
    ops.map(colorize_transcription),
).subscribe(
    on_next=rich.print,  # print colored text
    on_error=lambda _: traceback.print_exc()  # print stacktrace if error
)
在上述代码中,来自麦克风的所有音频块都将通过我们定义的操作链推送。
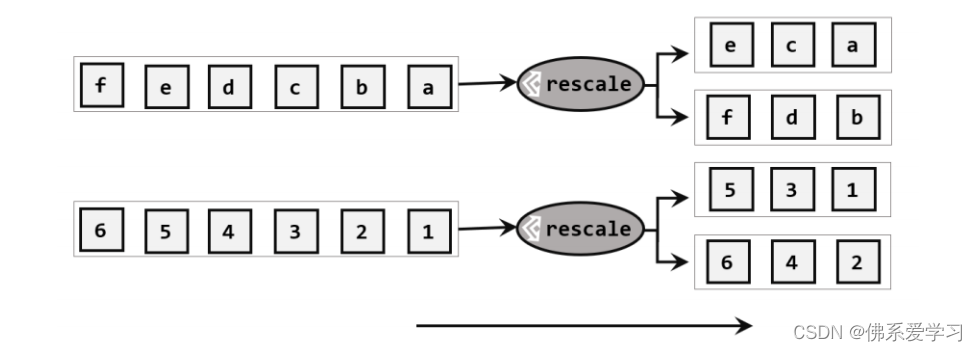
在这一系列操作中,我们首先使用 rearrange_audio_stream 将音频格式化为 5 秒钟的小块,小块之间的间隔为 500 毫秒。然后,我们使用 buffer_with_count 填充下一个批次,并应用日记化。请注意,批量大小的定义与转录窗口的大小相匹配。
接下来,我们将批次中不重叠的 500ms 日志化预测连接起来,并应用我们的 WhisperTranscriber,只有在音频包含语音的情况下才能获得说话者感知转录。如果没有检测到语音,我们就跳过这一大块,等待下一块。
最后,我们将使用 rich 库为文本着色并打印到标准输出中。
由于整个操作链可能有点晦涩难懂,我还准备了一个操作示意图,希望能让大家对算法有一个清晰的认识:

你可能已经注意到,我还没有定义 concat 和 colorize_transcriptions,但它们是非常简单的实用函数:
import numpy as np
from pyannote.core import Annotation, SlidingWindowFeature, SlidingWindow

def concat(chunks, collar=0.05):
    """
    Concatenate predictions and audio
    given a list of `(diarization, waveform)` pairs
    and merge contiguous single-speaker regions
    with pauses shorter than `collar` seconds.
    """
    first_annotation = chunks[0][0]
    first_waveform = chunks[0][1]
    annotation = Annotation(uri=first_annotation.uri)
    data = []
    for ann, wav in chunks:
        annotation.update(ann)
        data.append(wav.data)
    annotation = annotation.support(collar)
    window = SlidingWindow(
        first_waveform.sliding_window.duration,
        first_waveform.sliding_window.step,
        first_waveform.sliding_window.start,
    )
    data = np.concatenate(data, axis=0)
    return annotation, SlidingWindowFeature(data, window)

def colorize_transcription(transcription):
    """
    Unify a speaker-aware transcription represented as
    a list of `(speaker: int, text: str)` pairs
    into a single text colored by speakers.
    """
    colors = 2 * [
        "bright_red", "bright_blue", "bright_green", "orange3", "deep_pink1",
        "yellow2", "magenta", "cyan", "bright_magenta", "dodger_blue2"
    ]
    result = []
    for speaker, text in transcription:
        if speaker == -1:
            # No speakerfound for this text, use default terminal color
            result.append(text)
        else:
            result.append(f"[{colors[speaker]}]{text}")
    return "\n".join(result)
如果您对 pyannote.audio 中使用的 Annotation 和 SlidingWindowFeature 类不熟悉,我建议您查看一下它们的官方文档页面。
在这里,我们使用 SlidingWindowFeature 作为音频块的 numpy 数组封装器,这些音频块还带有 SlidingWindow 实例提供的时间戳。
我们还使用 Annotation 作为首选数据结构来表示日记化预测。它们可被视为包含说话者 ID 以及开始和结束时间戳的片段有序列表。
结论
在这篇文章中,我们将 diart 流媒体扬声器日记库与 OpenAI 的 Whisper 结合起来,以获得实时的扬声器彩色转录。
为了方便起见,作者在 GitHub gist 中提供了完整的脚本。