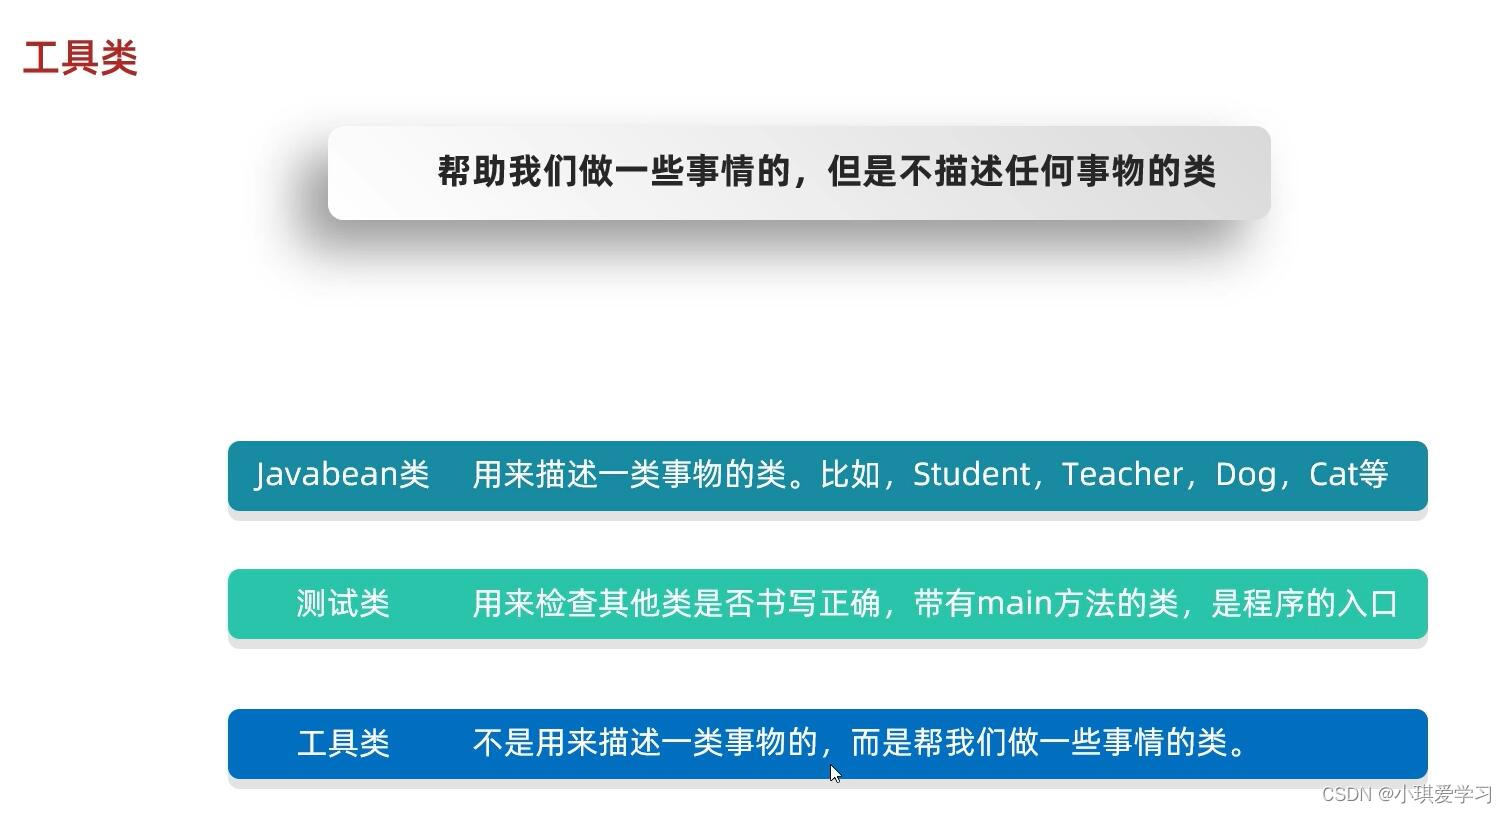
案例1:项目环境准备
环境准备说明:
本阶段共使用虚拟机6台,操作系统使用RockyLinux8.6
环境准备要求:
- 最小化安装即可
- 配置好主机名和IP地址
- 搭建好yum源
- 关闭防火墙和SELinux!!!
项目主机列表
| 主机名 | IP地址 | 规格 | 角色 | 服务 |
|---|---|---|---|---|
| Programer | 192.168.88.10/24 | 2vCPUs+1GiB+20G | 程序员主机 | Git |
| GitLab | 192.168.88.20/24 | 2vCPUs+4GiB+20G | 内部代码托管平台 | GitLab |
| Jenkins | 192.168.88.30/24 | 2vCPUs+2GiB+20G | 持续集成工具 | Jenkins |
| Services | 192.168.88.50/24 | 2vCPUs+4GiB+20G | 应用服务器 | RabbitMQ MySQL Elasticsearch Redis |
| Backend | 192.168.88.60/24 | 2vCPUs+2GiB+20G | 后端服务器 | HIS后端jar包 |
| Fontend | 192.168.88.70/24 | 2vCPUs+1GiB+20G | 前端服务器 | Nginx |
环境准备结果
##再次强调:所有主机需关闭防火墙和SELinux,配置好yum源

#搭建本地yum源

[root@Programer ~]# cat /etc/yum.repos.d/rocky.repo

[BaseOS]

name=RockyLinux_BaseOS

enabled=true

gpgcheck=false

baseurl=file:///dvd/BaseOS


[AppStream]

name=RockyLinux_AppStream

enabled=true

gpgcheck=false

baseurl=file:///dvd/AppStream


#关闭SELinux

[root@Programer ~]# vim /etc/sysconfig/selinux

[root@Programer ~]# sed -rn '7p' /etc/sysconfig/selinux

SELINUX=disabled


#禁止firewalld服务开机自启动

[root@Programer ~]# systemctl disable firewalld.service

[root@Programer ~]# reboot


#Programer主机准备

[root@Programer ~]# hostname

Programer

[root@Programer ~]# ifconfig eth0

eth0: flags=4163<UP,BROADCAST,RUNNING,MULTICAST>  mtu 1500

        inet 192.168.88.10  netmask 255.255.255.0  broadcast 192.168.88.255


#GitLab主机准备

[root@GitLab ~]# hostname

GitLab

[root@GitLab ~]# ifconfig eth0

eth0: flags=4163<UP,BROADCAST,RUNNING,MULTICAST>  mtu 1500

        inet 192.168.88.20  netmask 255.255.255.0  broadcast 192.168.88.255


#Jenkins主机准备

[root@Jenkins ~]# hostname

Jenkins

[root@Jenkins ~]# ifconfig eth0

eth0: flags=4163<UP,BROADCAST,RUNNING,MULTICAST>  mtu 1500

        inet 192.168.88.30  netmask 255.255.255.0  broadcast 192.168.88.255


#Services主机准备

[root@Services ~]# hostname

Services

[root@Services ~]# ifconfig eth0

eth0: flags=4163<UP,BROADCAST,RUNNING,MULTICAST>  mtu 1500

        inet 192.168.88.50  netmask 255.255.255.0  broadcast 192.168.88.255


#Backend主机准备

[root@Backend ~]# hostname

Backend

[root@Backend ~]# ifconfig eth0

eth0: flags=4163<UP,BROADCAST,RUNNING,MULTICAST>  mtu 1500

        inet 192.168.88.60  netmask 255.255.255.0  broadcast 192.168.88.255


#Fontend主机准备

[root@Fontend ~]# hostname

Fontend

[root@Fontend ~]# ifconfig eth0

eth0: flags=4163<UP,BROADCAST,RUNNING,MULTICAST>  mtu 1500

        inet 192.168.88.70  netmask 255.255.255.0  broadcast 192.168.88.255
案例2:Git安装
Programer主机安装Git
#安装中文支持(选做)

[root@Programer ~]# echo $LANG                              #查看当前系统语言及编码

en_US.UTF-8

[root@Programer ~]# yum -y install langpacks-zh_CN.noarch   #安装中文支持

[root@Programer ~]# vim /etc/locale.conf                    #配置系统使用中文及编码

[root@Programer ~]# cat /etc/locale.conf

LANG="zh_CN.UTF-8"

[root@Programer ~]# reboot                                  #重启使语言配置生效


[root@Programer ~]# echo $LANG                              #确认使用中文编码

zh_CN.UTF-8

[root@Programer ~]#


#yum源中集成了Git软件包,使用yum安装Git

[root@Programer ~]# yum clean all; yum repolist -v          #插件yum源是否可用

...

Total packages: 8,265

[root@Programer ~]# yum -y install git                      #使用yum安装Git

...

Complete!

[root@Programer ~]# git --version                           #查看Git版本

git version 2.31.1

[root@Programer ~]# git --help                              #查看Git命令帮助信息
案例3:Git版本库操作
回顾Git工作流程

Git基础配置
#Git基础配置

    # --local:  仓库级

    # --global: 全局级

    # --system: 系统级

[root@Programer ~]# git config --global user.name mark              #设置用户名

[root@Programer ~]# git config --global user.email mark@tedu.cn     #设置用户邮箱

[root@Programer ~]# git config --global init.defaultBranch master   #设置版本库默认分支


[root@Programer ~]# git config --list                               #查看已有Git配置

user.name=mark

user.email=mark@tedu.cn

init.defaultbranch=master

[root@Programer ~]# cat ~/.gitconfig                                #查看Git配置持久化文件

[user]

        name = mark

        email = mark@tedu.cn

[init]

        defaultBranch = master

[root@Programer ~]#
Git创建版本库
- Git初始化空版本库
#使用Git命令初始化空版本库

[root@Programer ~]# ls

[root@Programer ~]# git init myproject                          #初始化空版本库

已初始化空的 Git 仓库于 /root/myproject/.git/

[root@Programer ~]# ls                                          #确认版本库已创建

myproject

[root@Programer ~]# ls -a myproject/

.  ..  .git

[root@Programer ~]# ls -a myproject/.git/

.  ..  branches  config  description  HEAD  hooks  info  objects  refs

[root@Programer ~]# - 将已有目录制作成版本库
#将已有目录制作成Git版本库

[root@Programer ~]# mkdir mytest                                #创建空目录

[root@Programer ~]# ls -a mytest/

.  ..

[root@Programer ~]# cd mytest/

[root@Programer mytest]# git init                               #将已有目录制作成Git版本库

已初始化空的 Git 仓库于 /root/mytest/.git/

[root@Programer mytest]# ls -a

.  ..  .git

[root@Programer mytest]# ls -a .git/

.  ..  branches  config  description  HEAD  hooks  info  objects  refs

[root@Programer mytest]# cd

[root@Programer ~]#
Git版本库操作
#熟悉Git基础命令使用

[root@Programer ~]# cd myproject/

[root@Programer myproject]# git status                          #查看Git本地仓库状态

位于分支 master


尚无提交


无文件要提交(创建/拷贝文件并使用 "git add" 建立跟踪)

[root@Programer myproject]# echo "Learning Git" >> readme.md    #创建readme文件

[root@Programer myproject]# git status                          #查看Git本地仓库状态

位于分支 master


尚无提交


未跟踪的文件:

  (使用 "git add <文件>..." 以包含要提交的内容)

        readme.md


提交为空,但是存在尚未跟踪的文件(使用 "git add" 建立跟踪)

[root@Programer myproject]# git add readme.md                   #将文件信息添加到暂存区

[root@Programer myproject]# git status                          #查看Git本地仓库状态

位于分支 master


尚无提交


要提交的变更:

  (使用 "git rm --cached <文件>..." 以取消暂存)

        新文件:   readme.md


[root@Programer myproject]# git commit -m "add readme"          #将暂存区文件提交到本地仓库

[master(根提交) 09d8603] add readme

 1 file changed, 1 insertion(+)

 create mode 100644 readme.md

[root@Programer myproject]# git status

位于分支 master

无文件要提交,干净的工作区

[root@Programer myproject]#
Git版本库查询
#查看本地Git版本库信息

[root@Programer myproject]# git log                             #本地版本库提交记录(详细)

commit 09d8603547b7f7c6cf5b2850dd241d4b8b799b74 (HEAD -> master)

Author: mark <mark@tedu.cn>

Date:   Wed Feb 22 15:00:46 2023 +0800


    add readme

[root@Programer myproject]# git log --pretty=oneline            #本地版本库提交记录(简略)

09d8603547b7f7c6cf5b2850dd241d4b8b799b74 (HEAD -> master) add readme

[root@Programer myproject]# git log --oneline                   #本地版本库提交记录(极简)

09d8603 (HEAD -> master) add readme

[root@Programer myproject]#
Git练习(生成多个版本)
#数量掌握Git本地版本库操作

[root@Programer ~]# cd myproject/

[root@Programer myproject]# echo 123 > test.txt                 #新建test.txt文件

[root@Programer myproject]# git add test.txt                    #将test.txt添加到暂存区

[root@Programer myproject]# git commit -m "add test.txt"        #生成新版本

[master 27466f7] add test.txt

 1 file changed, 1 insertion(+)

 create mode 100644 test.txt


[root@Programer myproject]# echo 456 > test.txt                 #修改test.txt文件

[root@Programer myproject]# git add .                           #将修改文件添加到暂存区

[root@Programer myproject]# git commit -m "modify test.txt"     #生成新版本

[master 58cdf79] modify test.txt

 1 file changed, 1 insertion(+), 1 deletion(-)


[root@Programer myproject]# echo 789 > test.txt                 #修改test.txt文件

[root@Programer myproject]# git add ./                          #将修改文件添加到暂存区

[root@Programer myproject]# git commit -m "done test.txt"       #生成新版本

[master 0f44bf0] done test.txt

 1 file changed, 1 insertion(+), 1 deletion(-)


[root@Programer myproject]# git log --pretty=oneline            #查看本地提交记录(简略)

0f44bf04834eac643a0d56901039cec73128d3cc (HEAD -> master) done test.txt

58cdf7905a95a956fc65da264aab827fc7290dbf modify test.txt

27466f79df8e0cbfd3f8f2349143e054db8ac693 add test.txt

09d8603547b7f7c6cf5b2850dd241d4b8b799b74 add readme

[root@Programer myproject]# git log --oneline                   #查看本地提交记录(极简)

0f44bf0 (HEAD -> master) done test.txt

58cdf79 modify test.txt

27466f7 add test.txt

09d8603 add readme

[root@Programer myproject]#
案例4:Git指针操作
查看Git指针信息
#使用git log命令查看HEAD指针

[root@Programer ~]# cd myproject/

[root@Programer myproject]# git log --pretty=oneline            #查看Git指针

0f44bf04834eac643a0d56901039cec73128d3cc (HEAD -> master) done test.txt

58cdf7905a95a956fc65da264aab827fc7290dbf modify test.txt

27466f79df8e0cbfd3f8f2349143e054db8ac693 add test.txt

09d8603547b7f7c6cf5b2850dd241d4b8b799b74 add readme

[root@Programer myproject]# cat test.txt                        #查看文件内容

789

[root@Programer myproject]#
利用指针实现Git版本还原
#reset子命令用于版本还原

    #--soft:缓存区和工作目录不受影响。reset后分支和HEAD指针移动到指定的commit,代码文件内容和reset之前一样,修改部分已加入到暂存区。通常用于重新提交。

    #--mixed:(默认)工作目录不受影响。reset后分支和HEAD指针移动到指定位置,代码文件内容和reset之前一样,修改部分未加入到暂存区。(需要重新执行git add)

    #--hard:工作目录,缓存区均受影响。reset后分支和HEAD指针移动到指定commit,代码文件内容回退到指定commit,工作空间为clean状态。通常用于获取指定版本的代码文件

[root@Programer myproject]# git reset --hard 58cdf7905a     #还原到指定版本

HEAD 现在位于 58cdf79 modify test.txt

[root@Programer myproject]# git log --oneline               #确认HEAD指针移动

58cdf79 (HEAD -> master) modify test.txt

27466f7 add test.txt

09d8603 add readme

[root@Programer myproject]# cat test.txt                    #查看文件内容

456

[root@Programer myproject]#


#reflog子命令用于获取HEAD指针移动轨迹

[root@Programer myproject]# git reflog

58cdf79 (HEAD -> master) HEAD@{0}: reset: moving to 58cdf79

0f44bf0 HEAD@{1}: commit: done test.txt

58cdf79 (HEAD -> master) HEAD@{2}: commit: modify test.txt

27466f7 HEAD@{3}: commit: add test.txt

09d8603 HEAD@{4}: commit (initial): add readme

[root@Programer myproject]# git reset --hard 0f44bf0

HEAD 现在位于 0f44bf0 done test.txt

[root@Programer myproject]# git log --oneline

0f44bf0 (HEAD -> master) done test.txt

58cdf79 modify test.txt

27466f7 add test.txt

09d8603 add readme

[root@Programer myproject]# git reflog

0f44bf0 (HEAD -> master) HEAD@{0}: reset: moving to 0f44bf0

58cdf79 HEAD@{1}: reset: moving to 58cdf79

0f44bf0 (HEAD -> master) HEAD@{2}: commit: done test.txt

58cdf79 HEAD@{3}: commit: modify test.txt

27466f7 HEAD@{4}: commit: add test.txt

09d8603 HEAD@{5}: commit (initial): add readme

[root@Programer myproject]# cat test.txt

789
案例5:Git分支操作
Git分支管理
#查看当前分支信息,branch子命令

[root@Programer ~]# cd myproject/

[root@Programer myproject]# git status                      #查看本地Git仓库信息

位于分支 master

无文件要提交,干净的工作区

[root@Programer myproject]# git branch -v                   #查看分支信息

* master 0f44bf0 done test.txt

[root@Programer myproject]#


#创建分支

[root@Programer myproject]# git branch hotfix               #创建hotfix分支

[root@Programer myproject]# git branch feature              #创建feature分支

[root@Programer myproject]# git branch -v                   #查看分支信息

  feature 0f44bf0 done test.txt

  hotfix  0f44bf0 done test.txt

* master  0f44bf0 done test.txt

[root@Programer myproject]#


#切换分支,checkout子命令

[root@Programer myproject]# git branch -v                   #查看分支信息

  feature 0f44bf0 done test.txt

  hotfix  0f44bf0 done test.txt

* master  0f44bf0 done test.txt

[root@Programer myproject]# git checkout hotfix             #切换分支

切换到分支 'hotfix'

[root@Programer myproject]# git branch -v                   #查看分支信息

  feature 0f44bf0 done test.txt

* hotfix  0f44bf0 done test.txt

  master  0f44bf0 done test.txt

[root@Programer myproject]# git checkout feature            #切换分支

切换到分支 'feature'

[root@Programer myproject]# git branch -v                   #查看分支信息

* feature 0f44bf0 done test.txt

  hotfix  0f44bf0 done test.txt

  master  0f44bf0 done test.txt

[root@Programer myproject]#


#删除分支

[root@Programer myproject]# git branch develop              #创建develop分支

[root@Programer myproject]# git branch -v

  develop 0f44bf0 done test.txt

* feature 0f44bf0 done test.txt

  hotfix  0f44bf0 done test.txt

  master  0f44bf0 done test.txt

[root@Programer myproject]# git branch -d develop           #删除develop分支

已删除分支 develop(曾为 0f44bf0)。

[root@Programer myproject]#
Git合并分支
#无冲突分支合并

[root@Programer ~]# cd myproject/

[root@Programer myproject]# git checkout hotfix             #切换到hotfix分支

切换到分支 'hotfix'

[root@Programer myproject]# echo haha > haha.txt            #创建haha文件

[root@Programer myproject]# git add ./                      #添加haha到暂存区

[root@Programer myproject]# git commit -m "add haha.txt"    #生成新版本

[hotfix 108cf46] add haha.txt

 1 file changed, 1 insertion(+)

 create mode 100644 haha.txt

[root@Programer myproject]# ls

haha.txt  readme.md  test.txt

[root@Programer myproject]# cat haha.txt

haha

[root@Programer myproject]# git checkout master             #切换到master分支

切换到分支 'master'

[root@Programer myproject]# echo xixi > xixi.txt            #创建xixi文件

[root@Programer myproject]# git add ./                      #添加xixi到暂存区

[root@Programer myproject]# git commit -m "add xixi.txt"    #生成新版本

[master 32f0842] add xixi.txt

 1 file changed, 1 insertion(+)

 create mode 100644 xixi.txt

[root@Programer myproject]# ls

readme.md  test.txt  xixi.txt


[root@Programer myproject]# git branch -v                   #切换到master分支

  feature 0f44bf0 done test.txt

  hotfix  108cf46 add haha.txt

* master  32f0842 add xixi.txt

[root@Programer myproject]# git merge hotfix                #合并hotfix分支到master分支

Merge made by the 'recursive' strategy.

 haha.txt | 1 +

 1 file changed, 1 insertion(+)

 create mode 100644 haha.txt

[root@Programer myproject]# ls                              #确认文件

haha.txt  readme.md  test.txt  xixi.txt

[root@Programer myproject]# cat haha.txt

haha

[root@Programer myproject]# cat xixi.txt

xixi

[root@Programer myproject]#


#有冲突分支合并(修改不同分支中相同文件的相同行)

[root@Programer myproject]# git branch -v                   #查看分支

  feature 0f44bf0 done test.txt

  hotfix  108cf46 add haha.txt

* master  b4bea28 Merge branch 'hotfix' 合并hotfix分支

[root@Programer myproject]# git checkout hotfix             #切换到hotfix分支

切换到分支 'hotfix'

[root@Programer myproject]# echo "hahaha" > a.txt           #创建a.txt文件

[root@Programer myproject]# git add .                       #添加到暂存区

[root@Programer myproject]# git commit -m "hotfix"          #生成新版本

[hotfix af8a04b] hotfix

 1 file changed, 1 insertion(+)

 create mode 100644 a.txt

[root@Programer myproject]# git checkout master             #切换到master分支

切换到分支 'master'

[root@Programer myproject]# echo "xixixi" > a.txt           #创建a.txt

[root@Programer myproject]# git add .                       #添加到暂存区

[root@Programer myproject]# git commit -m "master"          #生成新版本

[master f556200] master

 1 file changed, 1 insertion(+)

 create mode 100644 a.txt


[root@Programer myproject]# git merge hotfix                #合并hotfix分支到master分支

冲突(add/add):合并冲突于 a.txt

自动合并 a.txt

自动合并失败,修正冲突然后提交修正的结果。                         #文件冲突,合并失败,手工解决

[root@Programer myproject]# cat a.txt

<<<<<<< HEAD

xixixi

=======

hahaha

>>>>>>> hotfix

[root@Programer myproject]# vim a.txt                       #手工解决冲突

[root@Programer myproject]# cat a.txt

xixixi

hahaha

[root@Programer myproject]# git add ./                      #添加到暂存区

[root@Programer myproject]# git commit -m "resolv conflict" #生成新版本,解决冲突

[master 2a6f272] resolv conflict

[root@Programer myproject]#
案例六:Git标签操作
Git标签管理
#使用tag子命令管理标签

[root@Programer ~]# cd myproject/

[root@Programer myproject]# git tag                         #查看已有标签

[root@Programer myproject]# git tag v1                      #创建v1标签

[root@Programer myproject]# git tag                         #查看已有标签

v1

[root@Programer myproject]# git tag v2                      #创建v2标签

[root@Programer myproject]# git tag                         #查看已有标签

v1

v2

[root@Programer myproject]# git tag -d v2                   #删除v2标签

已删除标签 'v2'(曾为 2a6f272)

[root@Programer myproject]#