1、Verilog文件操作
Verilog具有系统任务和功能,可以打开文件、将值输出到文件、从文件中读取值并加载到其他变量和关闭文件。
1.1 、Verilog文件操作
1.1.1、打开和关闭文件
module tb;
// 声明一个变量存储 file handler
integer fd;
initial begin
// 以写权限打开一个文件名为 "my_file.txt" 的新文件,并将文件柄指针存储在变量"fd"中
    fd = $fopen("my_file.txt", "w");
// 关闭指向 "fd"的文件柄
    $fclose(fd);
end
endmodule
文件操作选项:
1.1.2、写文件

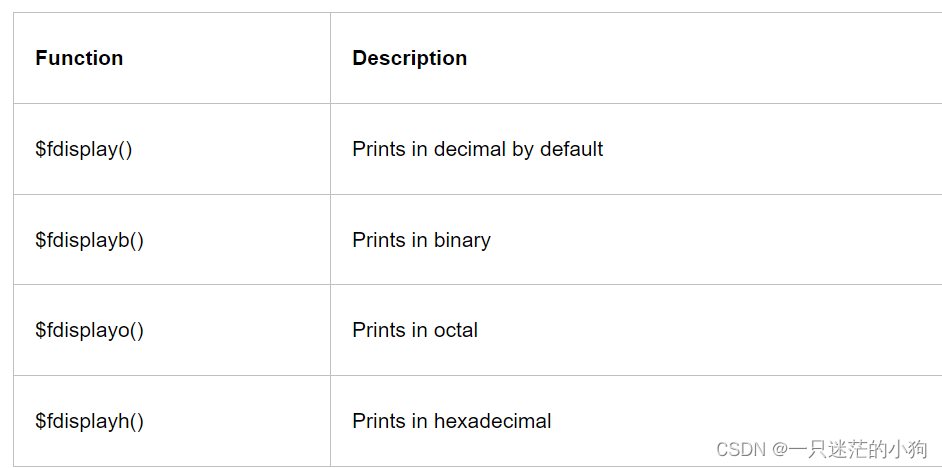
每个系统函数都以基数十进制打印值。它们还有其他三个版本,可以以二进制、八进制和十六进制打印。
integer handle1;
initial begin
handel1=$fopen("picture_out.txt","w");
forever @(posedge clk) begin
    if(PicInHEnd &PicInVEnd) begin
        $fclose(handle1);
        $finish;
    end
end
end
always@(posedge clk) begin
    if(  PicOutVld  ) begin
        if(PicInHEnd)
            $fwrite(handle1,"%h",PicInData,"\n");
        else
            $fwrite(handle1,"%h",PicInData,"\n");
    end
end
使用方法如下:
module tb;
integer fd;
integer i;
reg [7:0] my_var;
initial begin
  // Create a new file
  fd = $fopen("my_file.txt", "w");
  my_var = 0;
   $fdisplay(fd, "Value displayed with $fdisplay");
  #10 my_var = 8'h1A;
  $fdisplay(fd, my_var); // Displays in decimal
  $fdisplayb(fd, my_var); // Displays in binary
  $fdisplayo(fd, my_var); // Displays in octal
  $fdisplayh(fd, my_var); // Displays in hex
  // $fwrite does not print the newline char '' automatically at
   // the end of each line; So we can predict all the values printed
   // below to appear on the same line
   $fdisplay(fd, "Value displayed with $fwrite");
  #10 my_var = 8'h2B;
  $fwrite(fd, my_var);
  $fwriteb(fd, my_var);
  $fwriteo(fd, my_var);
  $fwriteh(fd, my_var);
   // Jump to new line with '', and print with strobe which takes
   // the final value of the variable after non-blocking assignments
   // are done
   $fdisplay(fd, "Value displayed with $fstrobe");
  #10 my_var <= 8'h3C;
  $fstrobe(fd, my_var);
  $fstrobeb(fd, my_var);
  $fstrobeo(fd, my_var);
  $fstrobeh(fd, my_var);
   #10 $fdisplay(fd, "Value displayed with $fmonitor");
   $fmonitor(fd, my_var);
  for(i = 0; i < 5; i= i+1) begin
    #5 my_var <= i;
  end
   #10 $fclose(fd);
end
endmodule
1.1.3、读取文件
1.1.3.1、文件读取:$fscanf和$readmemh
其中$readmemh的作用是一次性将文件中的数据读取到某个数组中,然后一次从数组中读取1个数组进行处理,而$fscanf的作用是从文件中读取一行数据。
在verilog中,$fscanf函数用于从文件中读取格式化的数据,他的语法如下:
$fscanf(file ,format ,variable);
其中:
file:表示一个整数变量,表示要读取的文件句柄
format:是一个字符串,指定读取数据的格
variable:是一个变量,用于存储从文件中读取的数据
$fscanf函数将根据指定的文件中读取数据,并将其存储在变下是一些常见的格式说明符
%h:十六进制表示的整数
%d:十进制表示的整数
%b:二进制表示的整数
%f:浮点数。
以下演示如何使用$ fscanf函数从文件中读取十六进制
module file_reader;
  reg [7:0] data;
  reg clk;
  integer file;
  initial begin
    // 打开文件
    file = $fopen("input.txt", "r");
    if (file == 0) begin
      $display("无法打开文件");
      $finish;
    end
    // 模拟时钟
    clk = 0;
    forever #5 clk = ~clk;
  end

  always @(posedge clk) begin
    // 读取文件中的数据
    if (!$feof(file)) begin
      $fscanf(file, "%h", data);
      $display("读取数据:%h", data);
    end
    else begin
      $display("文件读取完毕");
      $fclose(file);
      $finish;
    end
  end

endmodule
在此例中, Verilog模块 file reader使用$ fopen函数打开名为" input tx'的文件,并按照每个时钟周期读取文件的数据。使用 sfscanf函数从文件中读取十六进制数,并使用 display函数打印读取到的数据。每当读取到一个数据时,它将使用 Display函数打印出来。当文件读取完毕时,它将关闭文件并结束仿真。请确保在使用此代码之前,将文件" input. txt"放在与 Verilog源代码相同的目录中,并在文件中包含要读取的数据。
1.1.3.2、读取文件
在 Verilog 中,$readmemh 是一个系统任务,用于从文件中读取十六进制数据并将其加载到内存中。它的语法如下:


$readmemh(filename, memory);
其中:

filename 是一个字符串,表示要读取的文件名。
memory 是一个内存数组或寄存器数组,用于存储从文件中读取的数据。
$readmemh 任务会打开指定的文件,并按行读取文件中的十六进制数据。它会将数据加载到 memory 数组中,每行数据对应数组的一个元素。

以下是一个示例,演示如何使用 $readmemh 任务从文件中读取十六进制数据:


module file_reader;

  reg [7:0] memory [0:9]; // 定义一个包含10个元素的内存数组

  initial begin
    $readmemh("input.txt", memory); // 从文件中读取数据并加载到内存数组中

    // 打印内存数组中的数据
    for (integer i = 0; i < 10; i = i + 1) begin
      $display("memory[%0d] = %h", i, memory[i]);
    end

    $finish;
  end

endmodule
在此示例中,我们通过$ readmemh任务从文件"input"中读取数据,并将其加载到内存数组 memory中。然后,我们使用循环打印出 memory数组中的数据。" input. txt"需要放在与 Verilog源代码相同的目录中,并在文件中包含要读取的十六进制数据(每行一个)
3.1.1.3、
使用 Verilog的fget函数输入文件读取功能,逐行读取文件内容并将其存储在寄存器或内存。
3.1.1.4、读取一行:
系统函数$ fgets从fd指定的文件中将字符读入变量str直到st被填满,或者读取换行符并传输到st,或者遇到EOF条件。如果在读取过程中发生错误,则返回代码零。否则返回读取的字符数。以下是—个示例代码,演示如何逐行读取文件并将其存储在寄存器。
module file_reader;

  reg [7:0] data [0:9]; // 定义一个包含10个元素的寄存器数组
  reg [7:0] temp;
  integer file;
  integer line_num;
  initial begin
    // 打开文件
    file = $fopen("input.txt", "r");
    if (file == 0) begin
      $display("无法打开文件");
      $finish;
    end
    line_num = 0;
    // 逐行读取文件
    while (!$feof(file)) begin
      $fgets(temp, file);
      data[line_num] = temp; // 将读取到的数据存储在寄存器中
      line_num = line_num + 1;
    end
    $fclose(file);
    // 打印寄存器中的数据
    for (integer i = 0; i < 10; i = i + 1) begin
      $display("data[%0d] = %h", i, data[i]);
    end
    $finish;
  end
endmodule
在此示例中,我们定义了一个包含10个元素的寄存器数组data,用于存储从文件中读取的每一行数据。使用$ fgets函数逐行读取文件,并将读取到的数据存储在temp变量中。然后,将temp的值存储在data数组的相应索引位置上。最后,我们使用循环打印出data数组中的数据请确保在使用此代码之前,将文件"inpυt.txt"放在与 Verilog源代码相同的目录中,并在文件中包含要读取的数据。
1.1.3.1、检测EOF
当找到EOF时,系统函数$feof返回一个非零值,否则对于给定的文件描述符作为参数返回零。
module tb;
reg[8*45:1] str;
integer fd;
initial begin
 fd = $fopen("my_file.txt", "r");
 // Keep reading lines until EOF is found
 while (! $feof(fd)) begin
 // Get current line into the variable 'str'
 $fgets(str, fd);
 // Display contents of the variable
 $display("%0s", str);
 end
 $fclose(fd);
end
endmodule
1.1.3.2 、display的多个参数
当给$display多个变量是按给定的顺序一个接一个地打印所有变量,没有空格。
module tb;

 reg [3:0] a, b, c, d;
 reg [8*30:0] str;
 integer fd;
 initial begin
 a = 4'ha;
 b = 4'hb;
 c = 4'hc;
 d = 4'hd;
 fd = $fopen("my_file.txt", "w");
 $fdisplay(fd, a, b, c, d);
 $fclose(fd);
 end
endmodule
1.1.4将数据格式化为字符串
系统函数中的第一个参数$sformat是放置结果的变量名。第二个参数是 Eformat string,它告诉如何将以下参数格式化为字符串。
module tb;
reg [8*19:0] str;
reg [3:0] a, b;
initial begin
a = 4'hA;
b = 4'hB;
// Format 'a' and 'b' into a string given
// by the format, and store into 'str' variable
$sformat(str, "a=%0d b=0x%0h", a, b);
$display("%0s", str);
end
endmodule
2、systemverilog文件操作
2.1.1、打开关闭文件
$fopen系统函数打开文件进行读取或者写入,该任务将返回一个成为文件描述符的32位整数句柄,这个句柄应该用于读取和写入该文件,
直到它被关闭。
$fclose系统任务用于关闭文件,一旦文件描述符关闭,就不允许进一步读取或写入文件描述符。
例如:在下面的代码中,声明一个名为fd的int变量来保存文件描述符。fd最初为零,并从$fopen()中获取有效值,可以检查文件是否成功打开,该文件最终在执行$fclose()时关闭。
module tb;
 initial begin
 // 1. Declare an integer variable to hold the file descriptor
   int fd;
 // 2. Open a file called "note.txt" in the current folder with a "read permission
 // If the file does not exist, then fd will be zero
   fd = $fopen ("./note.txt", "r");
     if (fd) $display("File was opened successfully : %0d", fd);
     else $display("File was NOT opened successfully : %0d", fd);
 // 2. Open a file called "note.txt" in the current folder with a "write permission
 // "fd" now points to the same file, but in write mode
     fd = $fopen ("./note.txt", "w");
     if (fd) $display("File was opened successfully : %0d", fd);
     else $display("File was NOT opened successfully : %0d", fd);
 // 3. Close the file descriptor
     $fclose(fd);
 end
endmodule
1.1.2、以读取和附加模式打开
默认情况下,文件以写入w模式打开。通过提正确的模式类型,也可以在其他模式下打开文件。下表显示可以打开文件的所有不同模式例子:在下面的代码中,我们将看到如何使用上表中描述的不同文件访问模式。
module tb;
 initial begin
 int fd_w, fd_r, fd_a, fd_wp, fd_rp, fd_ap;
 fd_w = $fopen ("./todo.txt", "w"); // Open a new file in write mode a
 fd_r = $fopen ("./todo.txt", "r"); // Open in read mode
 fd_a = $fopen ("./todo.txt", "a"); // Open in append mode
 if (fd_w) $display("File was opened successfully : %0d", fd_w);
 else $display("File was NOT opened successfully : %0d", fd_w)
 if (fd_r) $display("File was opened successfully : %0d", fd_r);
 else $display("File was NOT opened successfully : %0d", fd_r)
 if (fd_a) $display("File was opened successfully : %0d", fd_a);
 else $display("File was NOT opened successfully : %0d", fd_a)
 // Close the file descriptor
 $fclose(fd_w);
 $fclose(fd_r);
 $fclose(fd_a);
 end
endmodule
2.1.3、读取和写入文件
文件应以写入w模式或附加a模式打开。系统任务如 $fdisplay和 $fwrite0可用于将格式化字符串写入文件这些任务的第一个参数是文件描述符句柄,第二个参数是要存储的数据。要读取文件,必须以读取r模式或读写r+模式打开它。$ fgets()系统任务,它将从文件中读取一行。如果这个任务被调用10次,那么它将读取10。
例子:下面显示的代码演示了如何使用 $display。然后以读取模式打开文件,并使用$ fgets()本地变量将内容读然后使用标准显示任务 $display打印出来。
module tb;
 int fd; // Variable for file descriptor handle
 string line; // String value read from the file
 initial begin
 // 1. Lets first open a new file and write some contents into it
 fd = $fopen ("trial", "w");
 // Write each index in the for loop to the file using $fdisplay
 // File handle should be the first argument
 for (int i = 0; i < 5; i++) begin
 $fdisplay (fd, "Iteration = %0d", i);
 end
 // Close this file handle
 $fclose(fd);
 // 2. Let us now read back the data we wrote in the previous step
 fd = $fopen ("trial", "r");
 // Use $fgets to read a single line into variable "line"
 $fgets(line, fd);
 $display ("Line read : %s", line);
 // Get the next line and display
 $fgets(line, fd);
 $display ("Line read : %s", line);
 // Close this file handle
 $fclose(fd);
 end
endmodule
2.1.4、阅读直到文件结束
在前面的示例中,$fgets()两次使用系统任务从文件中读取两行。 Systemverilog有另一个任务调用$feof(),当到达文件未尾时返回tue。这可以在循环中使用,如下所示以读取文件的全部内容。例子。
module tb;
 int fd; // Variable for file descriptor handle
 string line; // String value read from the file
 initial begin
 // 1. Lets first open a new file and write some contents into it
 fd = $fopen ("trial", "w");
 for (int i = 0; i < 5; i++) begin
 $fdisplay (fd, "Iteration = %0d", i);
 end
 $fclose(fd);
 // 2. Let us now read back the data we wrote in the previous step
 fd = $fopen ("trial", "r");
 while (!$feof(fd)) begin
 $fgets(line, fd);
 $display ("Line: %s", line);
 end
 // Close this file handle
 $fclose(fd);
 end
endmodule
2.2.5、解析值的行
System Verilog有另一个名为的系统任务 Sfscanf(),它允许我们扫描并获取某些值。
module tb;
 int fd; // Variable for file descriptor handle
 int idx;
 string str;
 initial begin
 // 1. Lets first open a new file and write some contents into it
 fd = $fopen ("trial", "w");
 for (int i = 0; i < 5; i++)
 $fdisplay (fd, "Iteration = %0d", i);
 $fclose(fd);
 // 2. Let us now read back the data we wrote in the previous step
 fd = $fopen ("trial", "r");
 // fscanf returns the number of matches
 while ($fscanf (fd, "%s = %0d", str, idx) == 2) begin
 $display ("Line: %s = %0d", str, idx);
 end
 // Close this file handle
 $fclose(fd);
 end
endmodule
2.1.6、多通道文件描述符
mcd是一个32位压缩数组值,其中设置打开哪个文件。mcs的LSB总是指标准输出。输向到使用多通道描述符打开的两个或多个文件,方法是将它们的mcd按位或运算在写入结果值。
3、范围解析运算符::
范围解析运算符∷用于引用类范围内的标识符。范围解析运算符∷的左侧应该是类类型名称、包名称、覆盖组类型名称、覆盖点或交叉名称、 typedef名称。运算符的右侧应该是_个标识符,如变量或方法名称。
3.1、使用范围解析运算符原因
类和其他作用域可以具有相同的标识符名称,并且如果在未指定作用域的情况下被引用,则可能会产生命名空间冲突。范围解析运算符∷唯一标识给定类的成员或参数。它们还用于从类外部访问类的静态变量和方法、参数和局部参数。它还允许从子类中访问基类的公共和受保护成员。
3.1.1、定义外部函数
class ABC;
int data;
extern virtual function void display();
endclass
// Definition of an external function using scope
// resolution operator
function void ABC::display();
$display("data = 0x%0h", data);
endfunction
module tb;
initial begin
ABC abc = new();
abc.data = 32'hface_cafe;
abc.display();
end
endmodule
3.1.2、访问静态方法和函数
class ABC;

static int data;

static function void display();

$display("data = 0x%0h", data);

endfunction

endclass

module tb;
initial begin
 ABC a1, a2;
 // Assign to static variable before creating
 // class objects, and display using class_type and
 // scope resolution operator
ABC::data = 32'hface_cafe;
ABC::display();
 a1 = new();
 a2 = new();
 $display ("a1.data=0x%0h a2.data=0x%0h", a1.data, a2.data);
end
endmodule
3.1.3、使用包
package my_pkg;
typedef enum bit {FALSE, TRUE} e_bool;
endpackage
module tb;
 bit val;
 initial begin
 // Refer to types that have been declared
 // in a package. Note that package has to
 // be included in compilation but not
 // necessarily "imported"
 val = my_pkg::TRUE;
 $display("val = 0x%0h", val);
 end
endmodule
3.1.4、避免命名空间冲突
package my_pkg;
typedef enum bit {FALSE, TRUE} e_bool;
endpackage
import my_pkg::*;
module tb;
 typedef enum bit {TRUE, FALSE} e_bool;
 initial begin
 e_bool val;
// Be explicit and say that TRUE from my_pkg
 // should be assigned to val
 val = my_pkg::TRUE;
 $display("val = 0x%0h", val);
 // TRUE from current scope will be assigned to
 // val
 val = TRUE;
 $display("val = 0x%0h", val);
 end
endmodule


![[AutoSar]BSW_OS 08 Autosar OS_内存保护](https://img-blog.csdnimg.cn/direct/84382a3c560e435da5ef2b99dfe01bc8.png)
