文章目录
- 前言
- 一、ChatGLM-6B安装
- 1.1 下载
- 1.2 环境安装
- 二、ChatGLM-6B推理
- 三、P-tuning 微调
- 3.1微调数据集
- 3.2微调训练
- 3.3微调评估
- 3.4 调用新的模型进行推理
- 总结
前言
ChatGLM-6B ChatGLM-6B 是一个开源的、支持中英双语的对话语言模型,基于 General Language Model (GLM) 架构,具有 62 亿参数。ChatGLM-6B是本人尝试使用和微调的第一个大语言模型,自我感觉该模型很适合作为大语言模型的入门级选手,无论是部署配置还是推理微调都十分方便。本文主要介绍如何配置部署ChatGLM-6B,以及ChatGLM-6B推理和P-tuning v2微调基本步骤,希望可以帮助大家使用ChatGLM-6B。
一、ChatGLM-6B安装
1.1 下载
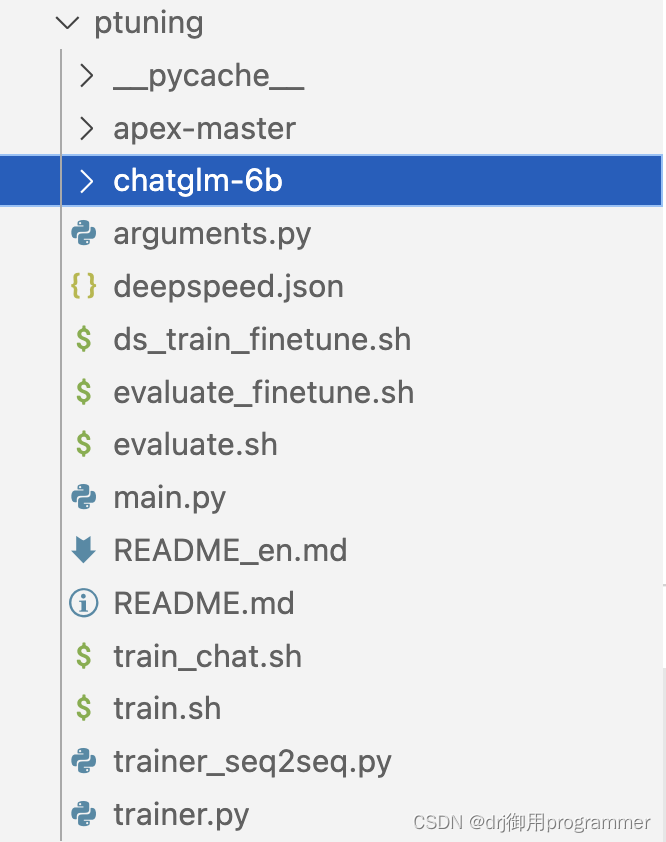
ChatGLM-6B项目仓库地址为 GitHub,模型文件下载地址为Huggingface,将下载好的模型文件chatglm-6b文件放至项目仓库中的ptuning文件目录下(如下图所示)。整个下载时间的长短根据网速和是否使用远程服务器因人而异,本人因使用的是远程服务器,下载时间共约5个小时。
1.2 环境安装
服务器的版本为RTX 3090,内存为24GB。Python版本为3.8.16,ubuntu的版本为20.04,Cuda的版本为11.6。
| 库名 | 版本 |
|---|---|
| transformers | 4.27.1 |
| torch | 1.13.1 |
详情可见requirements.txt,其中gradio库有的时候会安装失败,如果后续不考虑前端交互的平台的构建,此库可以先不安装,并不影响模型推理和微调。环境配置步骤如下代码所示:
conda create -n test python=3.8.16 -y
source activate test
pip install -r requirements.txt
cd ChatGLM
二、ChatGLM-6B推理
ChatGLM-6B推理部分,只要找到cli_demo.py文件运行即可。
tokenizer = AutoTokenizer.from_pretrained("ptuning/chatglm-6b", trust_remote_code=True)
model = AutoModel.from_pretrained("ptuning/chatglm-6b", trust_remote_code=True).half().cuda()
model = model.eval()
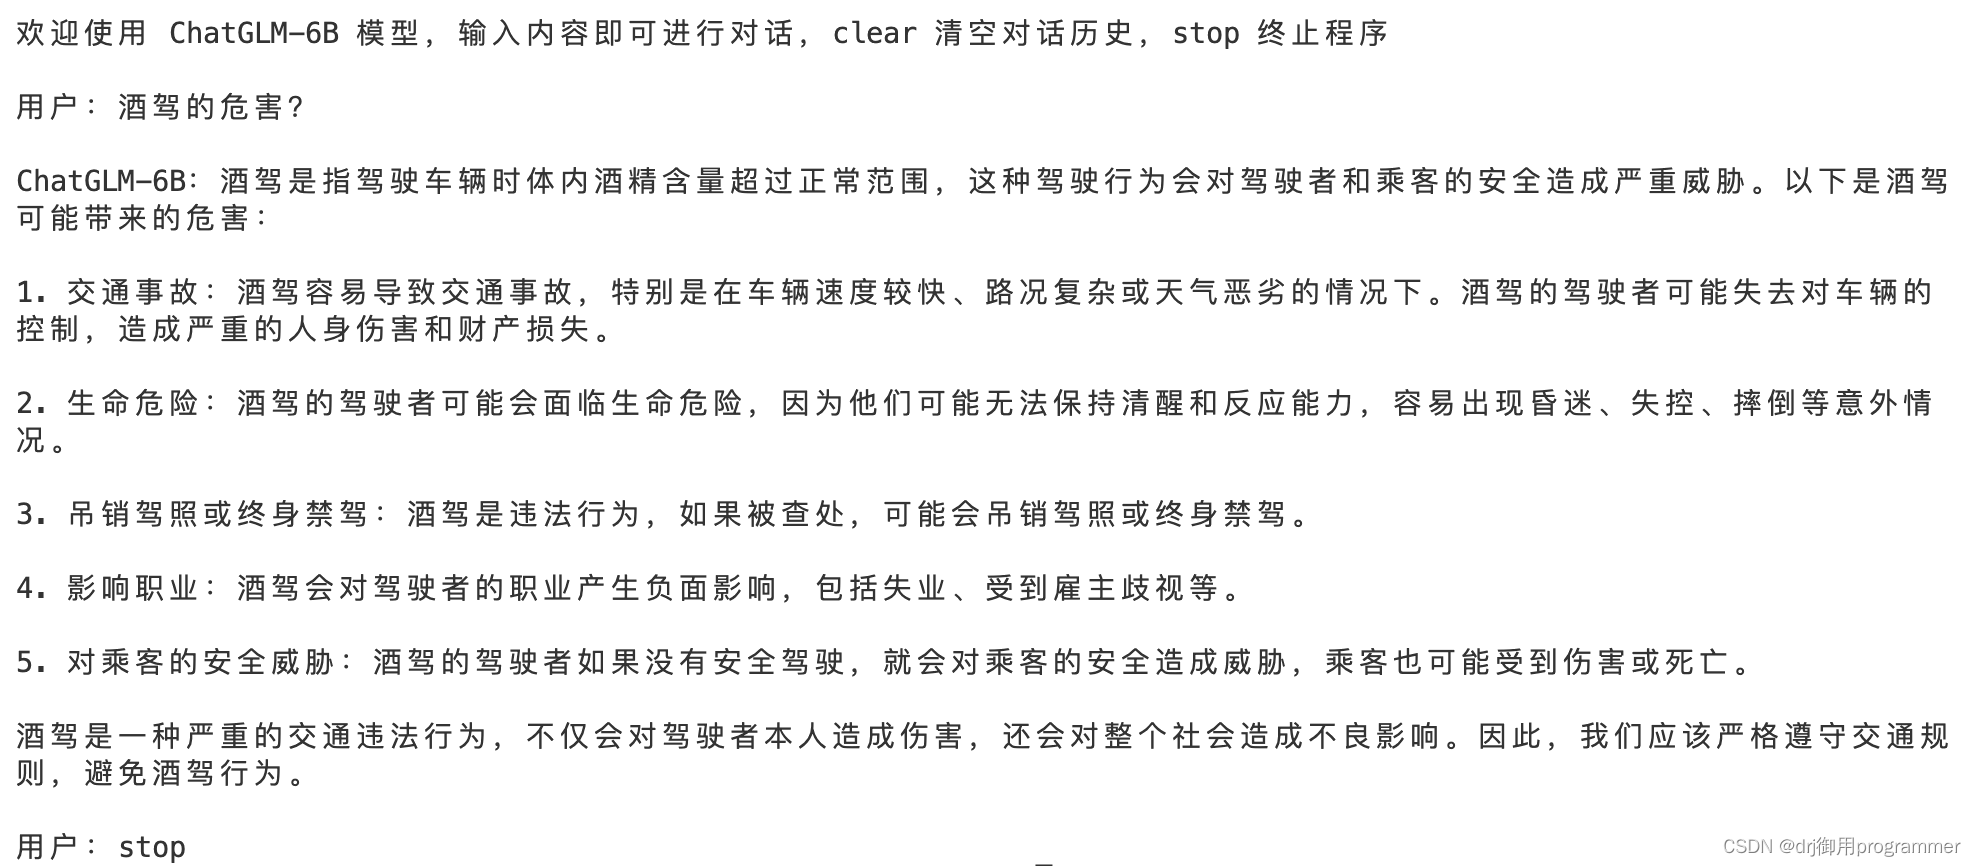
以下是推理部分的展示:
当然我们也想要批量式询问ChatGLM-6B,这里我自己写了一个批量调用的py文件:
import torch
from transformers import AutoTokenizer, AutoModel
import torch
import sys
import pandas as pd
model_path="ptuning/chatglm-6b"
tokenizer = AutoTokenizer.from_pretrained(model_path, trust_remote_code=True)
model = AutoModel.from_pretrained("ptuning/chatglm-6b",trust_remote_code=True).float()
#model =model.to("cpu")
model = model.eval()
data = pd.read_csv('Q1.csv')
MC = data['Question'].tolist()
j = -1
for i in MC:
    j = j+1
    input1 = f"{i}"
    print(input1)
    response,history = model.chat(tokenizer,input1,history=[],temperature=1)
    print(response)
    print("--------------------------------------------------")
    data['Answer'].loc[j] = response
    data.to_csv('Q1.csv',index = False,encoding='utf_8_sig')
最终Q1.csv的结果为:

三、P-tuning 微调
下图展示出ChatGLM-6B进行P-tuning v2微调的大致流程,首先需要构建好微调模型使用的数据集(包括训练集,验证集和测试集),接着是配置运行train.sh,进行数小时的训练之后将会得到模型参数权重文件Checkpoint,然后对evaluate.sh进行参数配置和运行,将会得到一系列的测试集结果,到此便是微调部分。为了检测微调后的模型在新数据上的效果,可以对cli_demo.py文件进行配置和运行。

3.1微调数据集
我的课题是研究法律判决预测任务,因此我的微调数据集的输入为案情陈述,输出为罪行判决。ChatGLM-6B的微调数据集有很多的格式可以选择,这里是经典的content+summary格式。以下是一个例子🌰:
{“content”: “经审理查明,2017年10月10日18时左右,被告人张某酒后驾驶牌号为川Q???二轮摩托车从宜宾市翠屏区牟坪镇牟坪村5组35号家中出发,前往宜宾市翠屏区牟坪镇派出所办事,被办案民警发现被告人张某饮酒驾驶机动车,即对张某进行了呼气式酒精检测,检出酒精含量268mg/100mL。”, “summary”: “根据中华人民共和国刑法第133条,判处张某危险驾驶罪。其中检出张某酒精含量268mg/100mL,根据中国的交通法规,血液中酒精含量超过80mg/100ml,即被认定为醉驾,因此张某符合危险驾驶罪中的醉酒驾驶机动车。”}
我们将标注好的数据分成训练集、验证集和测试集,一起存入Legal_data文件夹中,并放在ptuning目录下,如下图所示:
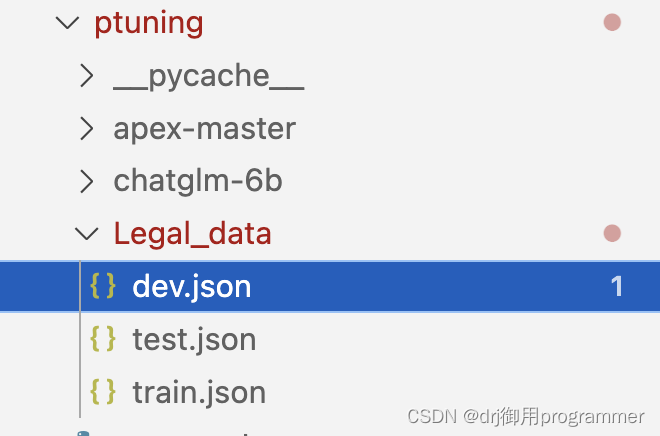
其中train.json中有44条数据, dev.json中有10条数据, test.json中有10条数据。数据量不大,只是为了方便走一遍微调流程,大家可以在创建自己的微调数据集的时候多标注些,这样会大大提高模型的性能。
3.2微调训练
查看train.sh,模型主要的训练参数有PRE_SEQ_LEN,max_target_length,max_source_length,learning_rate,per_device_train_batch_size,max_steps,per_device_train_batch_size,gradient_accumulation_steps和quantization_bit。下面将详细介绍这些训练参数的含义与作用。
PRE_SEQ_LEN是指自然语言指令的长度,而max_source_length是指整个输入序列的最大长度,max_target_length指整个输出序列的最大长度。 一般来说,PRE_SEQ_LEN应该小于或者等于max_source_length,因为输入序列除了包含指令之外,还可能包含其他内容,例如上下文信息或对话历史。根据微调标注数据的输入输出的文本长度,我们设置PRE_SEQ_LEN为128,max_target_length和max_source_length为300。
learning_rate是一个关键参数,它决定了每次更新模型权重时,根据梯度下降的方向应该迈出多大的步伐。我们使用ChatGLM的默认值1e-3。
per_device_train_batch_size设置为1,那么每个设备上将会有1个样本作为输入进行模型训练,并且基于这1个样本的损失值来进行一次模型参数的更新。
gradient_accumulation_steps指定了在执行一次模型权重更新(即一次反向传播步骤)之前,要累积多少个批次的梯度。gradient_accumulation_steps的值为16,这样模型会在每16个批次后进行一次权重更新,等价于使用大小为 16的批次进行训练。
max_steps 参数用于指定在结束训练前,模型应进行多少步的更新。每一“步”通常包括一个前向传播和一个反向传播,并且可能涉及到多个批次,在实验中max_steps设置为300。
quantization_bit 参数通常关联到模型权重的量化过程。量化是一种将模型权重从浮点数转换为低精度(如整数)表示形式的技术。这个过程可以显著减少模型的存储需求和计算复杂性,从而提高推理速度并减少内存使用。
PRE_SEQ_LEN=128
LR=2e-2

CUDA_VISIBLE_DEVICES=0 python3 main.py \
    --do_train \
    --train_file Legal_data/train.json \
    --validation_file Legal_data/dev.json \
    --prompt_column content \
    --response_column summary \
    --overwrite_cache \
    --model_name_or_path chatglm-6b \
    --output_dir output/adgen-chatglm-6b-pt-$PRE_SEQ_LEN-$LR \
    --overwrite_output_dir \
    --max_source_length 300 \
    --max_target_length 300 \
    --per_device_train_batch_size 1 \
    --per_device_eval_batch_size 1 \
    --gradient_accumulation_steps 16 \
    --predict_with_generate \
    --max_steps 300 \
    --logging_steps 10 \
    --save_steps 100 \
    --learning_rate $LR \
    # --report_to tensorboard \
    --pre_seq_len $PRE_SEQ_LEN \
    --quantization_bit 4
在运行sh train.sh之前,我们需要额外安装datasets、jieba、rouge_chinese和nltk库:
pip install -i https://pypi.tuna.tsinghua.edu.cn/simple datasets
pip install -i https://pypi.tuna.tsinghua.edu.cn/simple jieba
pip install rouge_chinese
pip install -i https://pypi.tuna.tsinghua.edu.cn/simple nltk
微调训练成功的截图如下:

由于logging_steps 设置为10,因此每运行十个step,便会保留一次loss,learning_rate和epoch值。最后也会输出一个train metrics。


sh train.sh完成之后会发现ptuning路径下有新的文件夹output,文件夹中保存了微调训练后的checkpoint和一些评估指标,下图中有三个checkpoint是因为max_steps 为300,save_steps为100。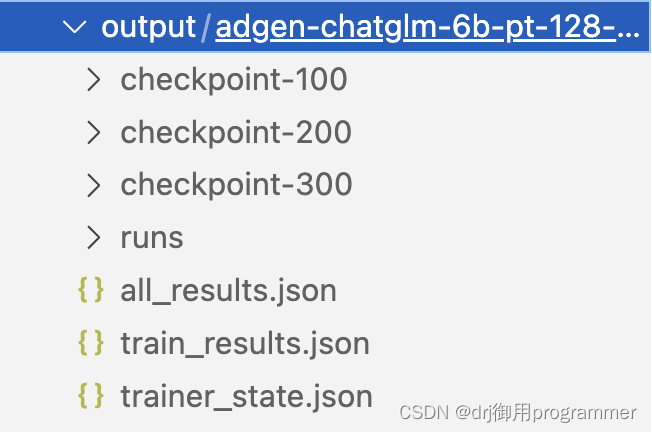
3.3微调评估
执行sh evaluate.sh,注意evaluate.sh中的一些参数要和train.sh中的参数一致。如max_source_length,max_target_length和PRE_SEQ_LEN。
PRE_SEQ_LEN=128
CHECKPOINT=adgen-chatglm-6b-pt-128-2e-2
STEP=300

CUDA_VISIBLE_DEVICES=0 python3 main.py \
    --do_predict \
    --validation_file Legal_data/dev.json \
    --test_file Legal_data/test.json \
    --overwrite_cache \
    --prompt_column content \
    --response_column summary \
    --model_name_or_path chatglm-6b \
    --ptuning_checkpoint ./output/$CHECKPOINT/checkpoint-$STEP \
    --output_dir ./output/$CHECKPOINT \
    --overwrite_output_dir \
    --max_source_length 300 \
    --max_target_length 300 \
    --per_device_eval_batch_size 1 \
    --predict_with_generate \
    --pre_seq_len $PRE_SEQ_LEN \
    --quantization_bit 4
sh evaluate.sh执行成功的截图如下:
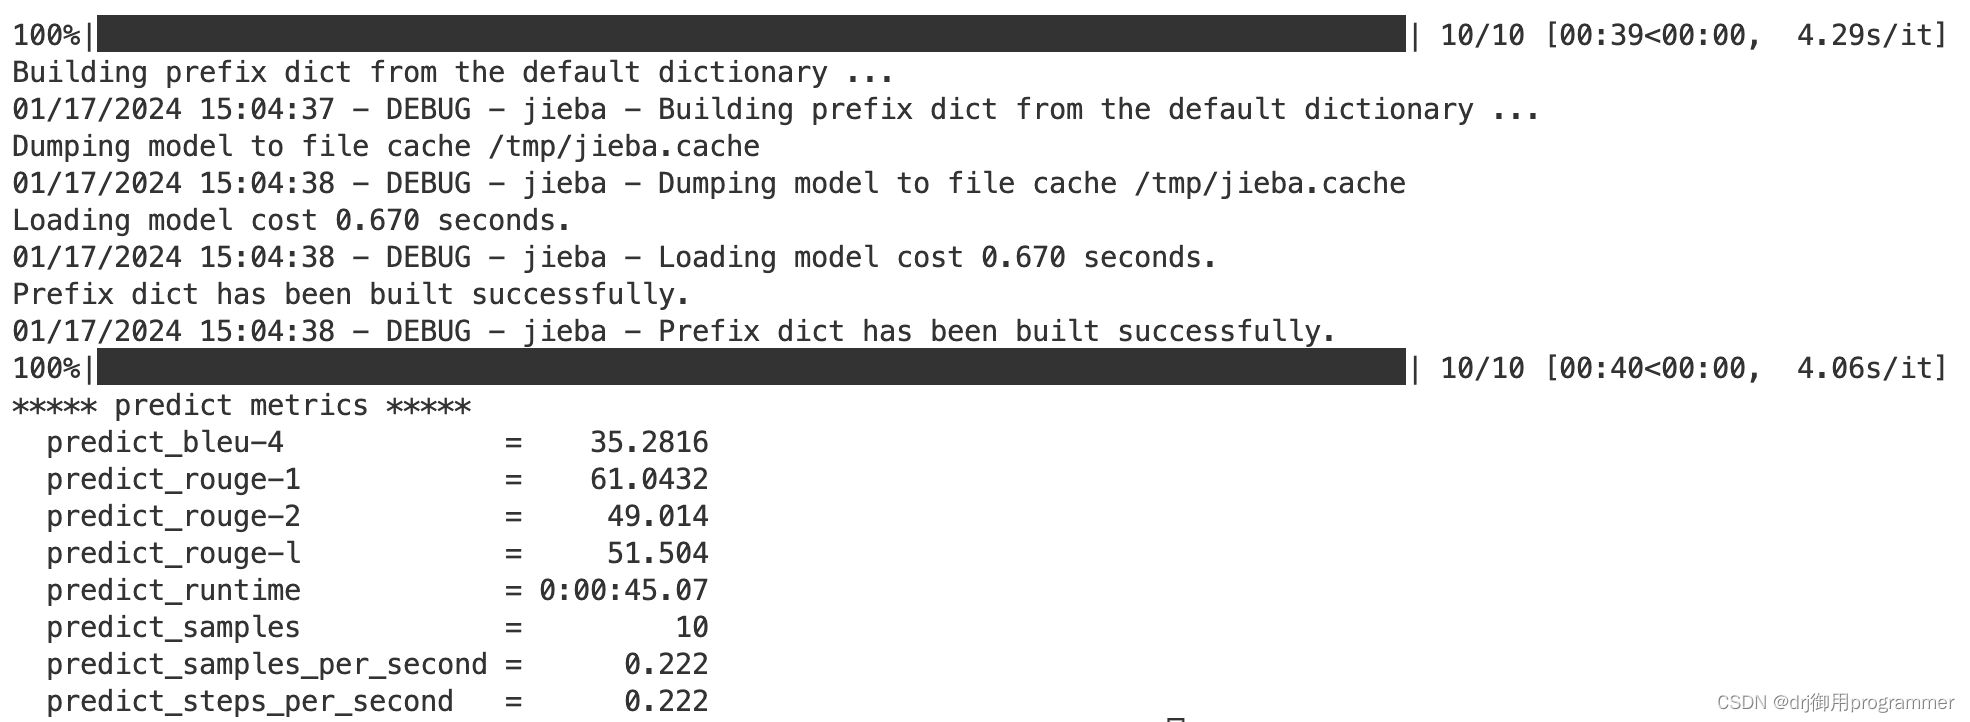
sh evaluate.sh完成之后会发现output文件夹中保存了评估后的generated_predictions.txt``predict_results.json文件。
3.4 调用新的模型进行推理
完成微调后的模型在测试集上的评估之后,我们如何使用微调好的模型进行推理呢?这里我们以cli_demo.py为例,之前的是这样的调用模型:
tokenizer = AutoTokenizer.from_pretrained("ptuning/chatglm-6b", trust_remote_code=True)
model = AutoModel.from_pretrained("ptuning/chatglm-6b", trust_remote_code=True).half().cuda()
model = model.eval()
我们仅需要将上面的代码变为:
tokenizer = AutoTokenizer.from_pretrained("ptuning/chatglm-6b", trust_remote_code=True)

config = AutoConfig.from_pretrained("ptuning/chatglm-6b", trust_remote_code=True, pre_seq_len=128)
model = AutoModel.from_pretrained("ptuning/chatglm-6b", config=config, trust_remote_code=True)
prefix_state_dict = torch.load(os.path.join('ptuning/output/adgen-chatglm-6b-pt-128-2e-2/checkpoint-300', "pytorch_model.bin"))
new_prefix_state_dict = {}
for k, v in prefix_state_dict.items():
    if k.startswith("transformer.prefix_encoder."):
        new_prefix_state_dict[k[len("transformer.prefix_encoder."):]] = v
model.transformer.prefix_encoder.load_state_dict(new_prefix_state_dict)
model = model.quantize(4)
model = model.half().cuda()
model.transformer.prefix_encoder.float()
model = model.eval()
主要注意⚠️的是以下一行代码,需要导入微调好的checkpoint:
prefix_state_dict = torch.load(os.path.join('ptuning/output/adgen-chatglm-6b-pt-128-2e-2/checkpoint-300', "pytorch_model.bin"))
这样我们便可以调用自己微调好的ChatGLM-6B模型:

总结
ChatGLM-6B对于中文的问题回答能力优秀,希望大家可以通过我的分享来测试它❤️❤️❤️
