使用vscode在CMake工程中集成gtest共享库做单元测试
- 一、概述
- 二、工程内容清单
- 三、CMakeLists.txt内容说明
- 四、构建工程
一、概述
本文主要介绍如何在一个多层次目录结构的CMAKE工程中以共享库的形式集成gtest进行单元测试。
关于如何使用CMake管理多层次目录结构的CMake工程,可以参考我的这一篇博文:
《多层次目录结构的CMake工程管理》
本文的工程基本就采用上述博文中的样例,只不过稍微改造了一下C++的代码。
关于如何在CMake中使用外部共享库和头文件,请参考我的这一篇博文:
《CMake使用外部动态库/静态库和头文件》
关于如何使用CMake构建和安装gtest,请参考我的这一篇博文:
《在linux上使用CMake构建和安装gtest》
本文代码结构为:
[hubing@192 gtestdemo]$ tree
.
├── CMakeLists.txt
├── doc
│   └── README.md
└── src
    ├── CMakeLists.txt
    ├── main.cpp
    └── utils
        ├── CMakeLists.txt
        ├── MathUtils.cpp
        ├── MathUtils.hpp
        └── ut
            ├── CMakeLists.txt
            └── testMathUtils.cpp

4 directories, 9 files

二、工程内容清单
在src/utils目录下,有一个ut子目录,用于放置ut文件,每个ut文件,用于测试src/utils下对应的文件。比如testMathUtils.cpp就专门用来测试MathUtils.cpp/hpp。这里仅以一个文件作为示例,如果有多个文件,则以此类推。本文重点关注的就是如何使用CMake来集成gtest并跑通这个ut test。
这里把所有文件的内容都贴出来,方便参考。
顶层目录名为gtestdemo,后续的路径以此为根目录。
gtestdemo/src/main.cpp
#include <iostream>
#include "MathUtils.hpp"

int main(int, char**) {
    std::cout << "Hello, gtestdemo!"<< std::endl;

    auto mathUtils = utils::math::MathUtils();
    std::cout << "4! = " << mathUtils.getFactorial(4) << std::endl;
    std::cout << "check whether 10 is a prime number: " << mathUtils.isPrime(10) << std::endl;
    std::cout << "check whether 11 is a prime number: " << mathUtils.isPrime(11) << std::endl;
}
gtestdemo/src/utils/MathUtils.hpp
namespace utils::math
{

class MathUtils
{
public:

    // Returns n! (the factorial of n).  For negative n, n! is defined to be 1.
    int getFactorial(int n);

    // Returns true if n is a prime number.
    bool isPrime(int n);
};

}
gtestdemo/src/utils/MathUtils.cpp
#include "MathUtils.hpp"

namespace utils::math
{

// Returns n! (the factorial of n).  For negative n, n! is defined to be 1.
int MathUtils::getFactorial(int n) {
    int result = 1;
    for (int i = 1; i <= n; i++) {
        result *= i;
    }

    return result;
}

bool MathUtils::isPrime(int n) {
    // Trivial case 1: small numbers
    if (n <= 1) return false;

    // Trivial case 2: even numbers
    if (n % 2 == 0) return n == 2;

    // Now, we have that n is odd and n >= 3.
    // Try to divide n by every odd number i, starting from 3
    for (int i = 3; ; i += 2) {
        // We only have to try i up to the squre root of n
        if (i > n / i) break;

        // Now, we have i <= n/i < n.
        // If n is divisible by i, n is not prime.
        if (n % i == 0) return false;
    }
    // n has no integer factor in the range (1, n), and thus is prime.
    return true;
}

}
gtestdemo/src/utils/ut/testMathUtils.cpp
#include <gtest/gtest.h>
#include "../MathUtils.cpp"


class TestMathUtils : public testing::Test
{
protected:
    void SetUp() override
    {
        // 空,仅做示范
    }
    void TearDown() override
    {
        // 空,仅做示范
    }

    utils::math::MathUtils mathUtils{};
};

TEST_F(TestMathUtils, testFactorial)
{
    EXPECT_EQ(1, mathUtils.getFactorial(0));
    EXPECT_EQ(1, mathUtils.getFactorial(1));
    EXPECT_EQ(24, mathUtils.getFactorial(4));
}

TEST_F(TestMathUtils, testIsPrime)
{
    EXPECT_FALSE(mathUtils.isPrime(1));
    EXPECT_TRUE(mathUtils.isPrime(2));
    EXPECT_TRUE(mathUtils.isPrime(3));
    EXPECT_FALSE(mathUtils.isPrime(4));
    //实际是EXPECT_TRUE(mathUtils.isPrime(5));
    //这里做个错误示范,方便观察输出
    EXPECT_FALSE(mathUtils.isPrime(5));
}
gtestdemo/CMakeLists.txt:
cmake_minimum_required(VERSION 3.0.0)
project(gtestdemo VERSION 0.1.0)

# enable c++ 11
set(CMAKE_CXX_STANDARD 11)
set(CMAKE_CXX_STANDARD_REQUIRED True)

# take respectives flags for debug & release process
set(CMAKE_CXX_FLAGS_DEBUG_INIT "-std=c++11 -g -fno-omit-frame-pointer")
set(CMAKE_CXX_FLAGS_RELEASE_INIT "-std=c++11 -g -O2")

# default build type : Debug
if (NOT CMAKE_BUILD_TYPE)
    set(CMAKE_BUILD_TYPE Debug)
endif()

# 在add_subdirectory之前调用enable_testing
include(CTest)
enable_testing()

add_subdirectory(src bin)

set(CPACK_PROJECT_NAME ${PROJECT_NAME})
set(CPACK_PROJECT_VERSION ${PROJECT_VERSION})
include(CPack)
gtestdemo/src/CMakeLists.txt:
add_subdirectory(utils)

add_executable(gtestdemo main.cpp)

target_link_libraries(gtestdemo PUBLIC utils)

message(STATUS "this is BINARY dir " ${PROJECT_BINARY_DIR})
message(STATUS "this is SOURCE dir " ${PROJECT_SOURCE_DIR})
target_include_directories(gtestdemo PUBLIC "${PROJECT_BINARY_DIR}" "${PROJECT_SOURCE_DIR}/src/utils")
gtestdemo/src/utils/CMakeLists.txt:
add_library(utils MathUtils.cpp)

add_subdirectory(ut)
gtestdemo/src/utils/ut/CMakeLists.txt:
include_directories(/usr/local/include/gtest/)
link_directories(/usr/local/lib64)

add_executable(testMathUtils testMathUtils.cpp)
add_test(NAME testMathUtils COMMAND testMathUtils)

target_link_libraries(testMathUtils gtest gtest_main)
三、CMakeLists.txt内容说明
源代码层面的相关内容就不再复述了,相关内容都可以从《多层次目录结构的CMake工程管理》中找到说明。这里主要涉及ut相关的内容。
首先在最顶级的CMakeLists.txt中,必须通过enable_testing()来使能单元测试。且最好把它放在add_subdirectory语句之前。 核心部分为:
enable_testing()
add_subdirectory(src bin)
然后,再在src/utils/CMakeLists.txt中,使用add_subdirectory指令把下面的ut子目录添加进工程得以编译,核心语句为:
add_subdirectory(ut)
最后就是src/utils/ut/CMakeLists.txt了。本例中gtest由于是采用默认安装路径的,所以它被安装到了/usr/local目录下,这并不是标准的搜索路径。因为要以共享库的形式加载gtest,所以我们必须通过相关指令来指明gtest的共享库位于何处,以及相关头文件位于何处。
# 指明头文件路径
include_directories(/usr/local/include/gtest/)
# 指明共享库路径
link_directories(/usr/local/lib64)
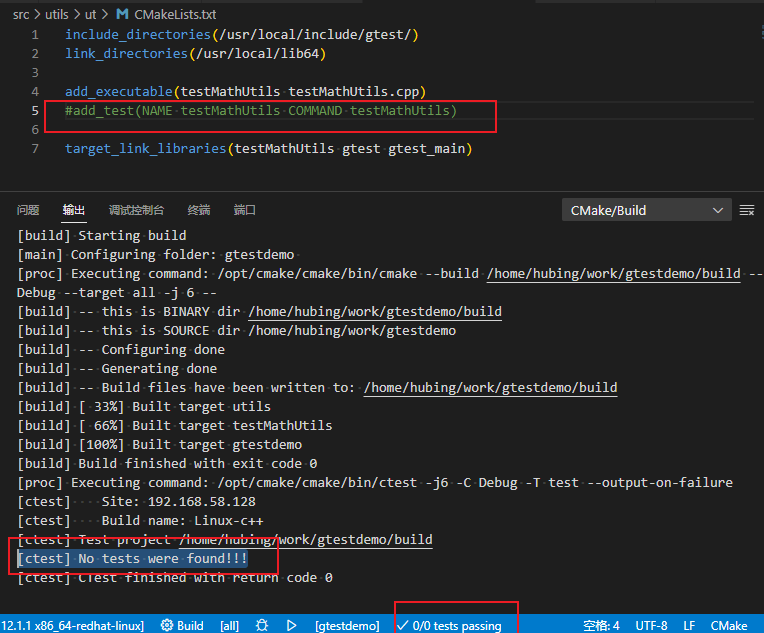
然后使用add_executable添加可执行程序,再使用add_test指令将其添加到CMake中,使CMake能够发现相关测试。如果不使用add_test将测试到CMake,那么待所有内容编译完成后,CMake将检测不到我们的单元测试,会提示:[ctest] No tests were found!!!
当然了,我们可以手工执行二进制可执行文件testMathUtils,但这终究不是很方便。当ut文件数目变得庞大时,更加不可能手工去一个个执行了。
最后使用target_link_libraries指令将我们的可执行目标程序链接到gtest。
# 将源文件testMathUtils.cpp编译为名为testMathUtils的可执行目标
add_executable(testMathUtils testMathUtils.cpp)
# 在CMake中创建一个名为testMathUtils的测试,如果这里不使用该指令,那么CMake无法发现ut测试
add_test(NAME testMathUtils COMMAND testMathUtils)
# 链接到gtest
target_link_libraries(testMathUtils gtest gtest_main)
四、构建工程
照例,进入到build目录,然后cmake
mkdir build
cd build
cmake ..
make
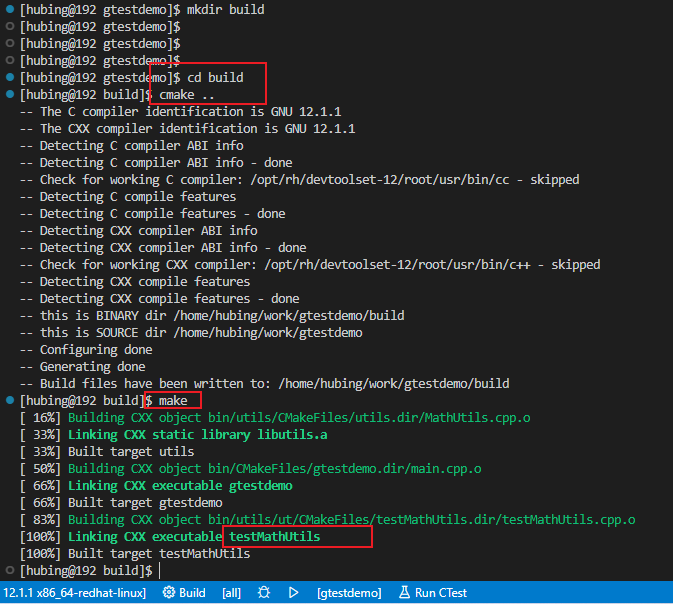
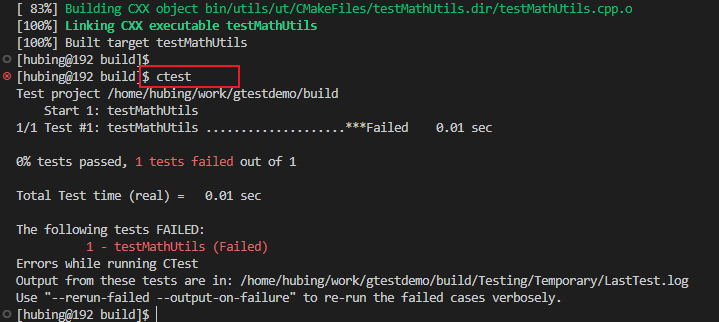
此时,执行ctest即可跑ut case了
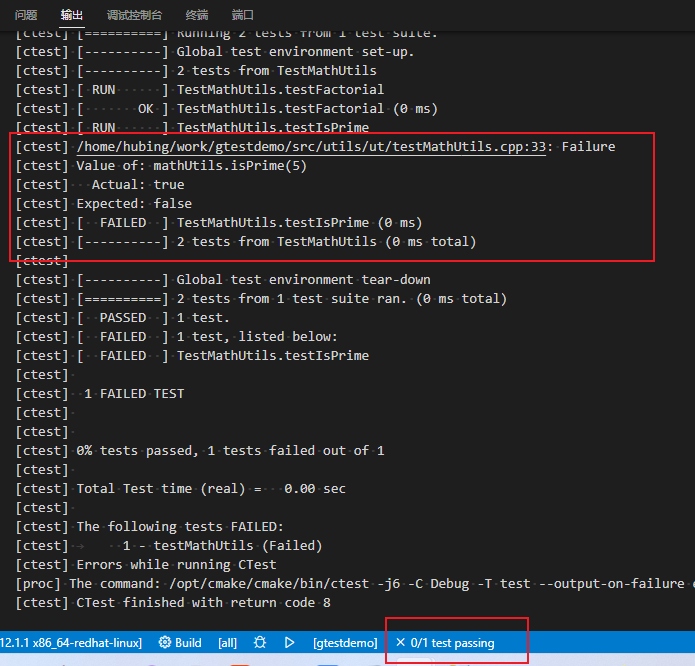
当然了,你可以通过直接点击下面这个Run CTest按钮,获得更好的体验(实际是ctest命令配合一些参数)

点击之后,可以自动为你构建工程并运行ut
现在我们试下把add_test指令注掉,你就会发现CMake不能发现测试用例,报出:
[ctest] No tests were found!!!
