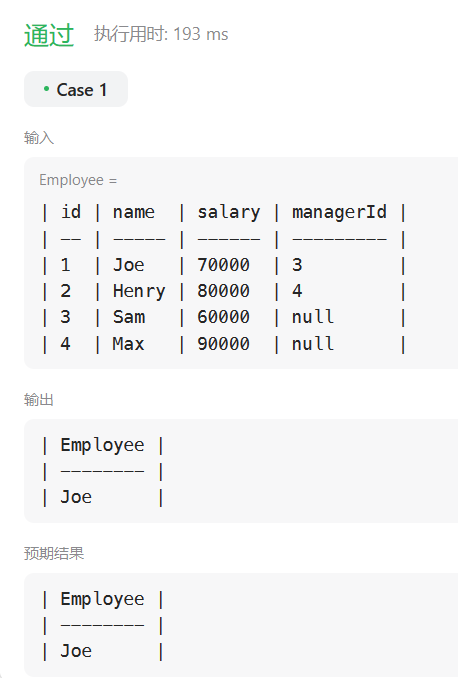
nestjs的jwt认证利用了 Passport.js 的认证机制。要根据这个源码实现您自己的 AuthGuard,需要理解几个关键部分:如何集成 Passport.js、如何处理认证结果,以及如何使用 NestJS 的依赖注入系统。
先自定义一个策略函数类
// wsy.strategy.ts
import { Injectable } from '@nestjs/common';
import { PassportStrategy } from '@nestjs/passport';
import { ExtractJwt, Strategy } from 'passport-jwt';

@Injectable()
export class WsyStrategy extends PassportStrategy(Strategy) {
  constructor() {
    // 由于是indectable,所以实例化的时候就会执行super,super是PassportStrategy(Strategy)返回的类
    super({
      jwtFromRequest: ExtractJwt.fromAuthHeaderAsBearerToken(),
      ignoreExpiration: false,
      secretOrKey: '123456',
    });
  }

  async validate(payload: any) {
    return { userId: payload.sub, username: payload.username };
  }
}
PassportStrategy函数返回的是MixinStrategy 类,该类提供callback去调用我们自定义的validate方法
// @nestjs\passport\dist\passport\passport.strategy.js
"use strict";
function PassportStrategy(Strategy, name, callbackArity) {
    class MixinStrategy extends Strategy {
        constructor(...args) {
        	// 此时该回调函数的this是指向WsyStrategy的
            const callback = async (...params) => {
                const done = params[params.length - 1];
                try {
                	// 调用WsyStrategy中的validate方法
                    const validateResult = await this.validate(...params);
                    if (Array.isArray(validateResult)) {
                        done(null, ...validateResult);
                    }
                    else {
                        done(null, validateResult);
                    }
                }
                catch (err) {
                    done(err, null);
                }
            };
            ...
            // 调用Strategy的constructor方法,并传入callback
            super(...args, callback);
            // 获取唯一的passport为Authenticator
            const passportInstance = this.getPassportInstance();
            if (name) {
            	// 关键!!这里调用Authenticator的use方法设置当前的strategy为WsyStrategy
                passportInstance.use(name, this);
            }
            else {
                passportInstance.use(this);
            }
        }
        getPassportInstance() {
            return passport;
        }
    }
    return MixinStrategy;
}
保存我们的WsyStrategy策略
// passport\lib\authenticator.js
Authenticator.prototype.use = function(name, strategy) {
  if (!strategy) {
    strategy = name;
    name = strategy.name;
  }
  if (!name) { throw new Error('Authentication strategies must have a name'); }

  this._strategies[name] = strategy;
  return this;
};
保存PassportStrategy的callback,后面解析jwt后调用
// passport-jwt\lib\strategy.js
function JwtStrategy(options, verify) {

    passport.Strategy.call(this);
    this.name = 'jwt';
    ...
	// 保存了PassportStrategy的callback!!
    this._verify = verify;
    ...
}
此时发起请求前的配置以及配置好了,还有发起请求后的配置:
// auth.controller.ts
import { Controller, Post, Body, HttpCode, HttpStatus, UseGuards, Get, Request } from '@nestjs/common';
import { AuthService } from './auth.service';
import { LoginDto } from './login.dto'; // 假设您有一个 DTO 定义登录请求的结构
import { AuthGuard } from '@nestjs/passport';

@Controller('auth')
export class AuthController {
  // 首先请求被AuthGuard的返回给拦截,执行AuthGuard得到的是MixinAuthGuard
  @UseGuards(AuthGuard('jwt'))
  @Get()
  getProtectedRoute(@Request() req) {
    // 如果 JWT 验证通过,req.user 将包含用户信息
    return req.user;
  }
}
进入AuthGuard的编译后的源码
// AuthGuard是createAuthGuard
export const AuthGuard: (type?: string | string[]) => Type<IAuthGuard> =
  memoize(createAuthGuard);
function createAuthGuard(type?: string | string[]): Type<IAuthGuard> {
  class MixinAuthGuard<TUser = any> implements CanActivate {
    ...

    async canActivate(context: ExecutionContext): Promise<boolean> {
      const options = {
        ...defaultOptions,
        ...this.options,
        ...(await this.getAuthenticateOptions(context))
      };
      const [request, response] = [
        this.getRequest(context),
        this.getResponse(context)
      ];
      const passportFn = createPassportContext(request, response);
      // 最终是执行passportFn=createPassportContext
      const user = await passportFn(
        type || this.options.defaultStrategy,
        options,
        (err, user, info, status) =>
          this.handleRequest(err, user, info, context, status)
      );
      request[options.property || defaultOptions.property] = user;
      return true;
    }
    handleRequest(err, user, info, context, status): TUser {
      if (err || !user) {
        throw err || new UnauthorizedException();
      }
      return user;
    }
  }
}
返回一个函数,该函数返回一个promise
const createPassportContext = (request, response) => (type, options, callback) => new Promise((resolve, reject) => passport.authenticate(type, options, (err, user, info, status) => {
    try {
        request.authInfo = info;
        return resolve(callback(err, user, info, status));
    }
    catch (err) {
        reject(err);
    }
})(request, response, (err) => (err ? reject(err) : resolve())));
化简后
const createPassportContext = (request, response) => (type, options, callback) => {
  // 该函数返回一个 Promise
  return new Promise((resolve, reject) => {
    // 使用 Passport 的 authenticate 方法进行认证
    passport.authenticate(type, options, (err, user, info, status) => {
      try {
        // 在认证回调中,将认证的信息存储在请求对象的 authInfo 属性中
        request.authInfo = info;
        // 调用传入的回调函数,传递认证结果和信息
        return resolve(callback(err, user, info, status));
      } catch (err) {
        // 捕获可能的错误并将其拒绝
        reject(err);
      }
    })(request, response, (err) => {
      // 处理认证过程中的错误
      if (err) {
        reject(err); // 如果有错误,拒绝 Promise
      } else {
        resolve(); // 没有错误,解析 Promise
      }
    });
  });
};
主要执行passport.authenticate方法
Authenticator.prototype.authenticate = function(strategy, options, callback) {
  return this._framework.authenticate(this, strategy, options, callback);
};
module.exports = function authenticate(passport, name, options, callback) {
  ...
  return function authenticate(req, res, next) {

    ...

    (function attempt(i) {
      var layer = name[i];
      // If no more strategies exist in the chain, authentication has failed.
      if (!layer) { return allFailed(); }

      // Get the strategy, which will be used as prototype from which to create
      // a new instance.  Action functions will then be bound to the strategy
      // within the context of the HTTP request/response pair.
      var strategy, prototype;
      if (typeof layer.authenticate == 'function') {
        strategy = layer;
      } else {
      // 关键!!这里执行_strategy方法并传入layer('jwt')去获取(初始化时调用Authenticator的use方法设置当前的strategy为WsyStrategy)WsyStrategy
        prototype = passport._strategy(layer);
        if (!prototype) { return next(new Error('Unknown authentication strategy "' + layer + '"')); }

        strategy = Object.create(prototype);
      }
    ...
      // 执行WsyStrategy继承的JwtStrategy的authenticate方法
      strategy.authenticate(req, options);
    })(0); // attempt
  };
};
passport._strategy(layer)方法:
Authenticator.prototype._strategy = function(name) {
  return this._strategies[name];
};
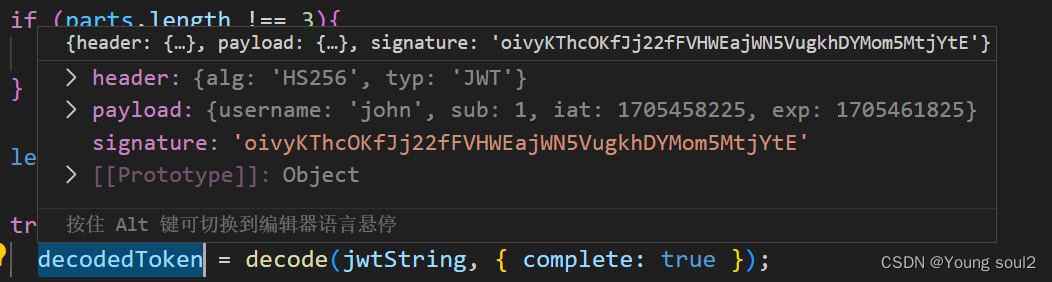
函数strategy.authenticate(req, options)最终通过jsonwebtoken库解码我们的authtoken并生成下图所示:
然后把生成的结果传给PassportStrategy的callback函数,该函数会调用我们定义好的validate方法。如果validate方法没有返回值或者抛出异常那么就会判断为失败。validate返回值最后会被传入auth.controller.ts的getProtectedRoute的req方法。
理解代码的关键部分
- Passport 集成:
代码中使用了 Passport.js 的 passport.authenticate 方法。这是 Passport.js 的核心功能,用于执行认证流程。 - 处理认证结果:
handleRequest 方法处理 passport.authenticate 的结果。这里可以自定义决定如何处理认证失败(例如抛出异常)或成功(例如返回用户对象)。 - 获取请求和响应对象:
在守卫中,需要访问当前的 HTTP 请求和响应对象。这是通过 ExecutionContext 实现的。
所以我们可以总结下这几个关键模块的功能:
- wsy.strategy.ts
该模块是给passport设置strategy为WsyStrategy和传入一些初始化参数,比如密钥,jwt的获取方式等,以及提供验证函数供用户给出返回值。
- AuthGuard(‘jwt’)
解析header中的token并将validate函数的返回值设置到req上,默认是user,也可以自己设置


![[New Tech] Compute Express Link 101](https://img-blog.csdnimg.cn/direct/21ab28ffc9b5494ea26451d64d7a70ae.png)