目录
一、yum仓库
1.yum简介
2.yum实现过程
3.如何实现安装服务
4.yum配置文件及命令
4.1yum配置文件
4.1.1主配置文件
4.1.2仓库设置文件
4.1.3日志文件
4.2yum命令详解
4.2.1查询
4.2.2yum安装升级
4.2.3软件卸载
4.2.4操作安装历史记录
5.搭建本地yum仓库
5.1通过ftp服务搭建内网yum仓库
1.服务端
2.客户端
5.2通过httpd服务搭建yum仓库
1.服务端
2.客户端
5.3一键安装本地yum源
5.4搭建阿里云仓库(http方式外网环境)
5.5如果误将rpm软件删除(切勿尝试!)
5.6自行打包后建立元数据
5.7制作镜像
5.8离线安装软件
5.9升级内核
二、NFS共享
1.NFS简介
2.NAS存储
3.NFS工作原理
4.NFS软件介绍
5.NFS共享配置文件格式
6.默认选项
7.NFS工具
7.1exportfs
7.2showmount
8.实验操作
一、yum仓库
1.yum简介
yum是一个基于RPM包(是Red-Hat Package Manager红帽软件包管理器的缩写)构建的软件更新机制,能够自动解决软件包之间的依赖关系。解决了日常工作中的大量查找安装依赖包的时间 为什么会有依赖关系的发生 因为linux本身就是以系统简洁为自身优势,所以在安装操作系统的时候并没有将所有的库文件以及编译软件包进行安装,所以在linux操作系统上进行软件安装的时候会出现软件包依赖的情况。yum由仓库和客户端组成,也就是整个yum由两部分组成,所以yum可以存放在两台服务器上。也可以存放在一台服务器上。可以有官方来提供服务,也可以由第三方来提供,比如国内的阿里云,搜狐云,还有一些非盈利组织比如学校等。官方的源一般在国外,下载速度肯定有限,手动更改成国内的云可以大幅提升下载速度。
YUM 的前身是 YUP(Yellow dog Updater,Yellow dog Linux 的软件更新器),最初由 TSS 公司(Terra Soft Solutions,INC.)使用 Python 语言开发而成,后来由杜克大学(Duck University)的 Linux 开发队伍进行改进,命名为 YUM(Yellow dog Updater,Modified)。 要成功使用 YUM 机制来更新系统和软件,需要有一个包含各种 rpm 安装包文件及其依 赖软件的软件仓库(repository),提供软件仓库的服务器也称为“源”服务器。在客户机中只 要正确指定软件仓库的地址等信息,就可以通过对应的“源”服务器来安装或更新软件。
2.yum实现过程
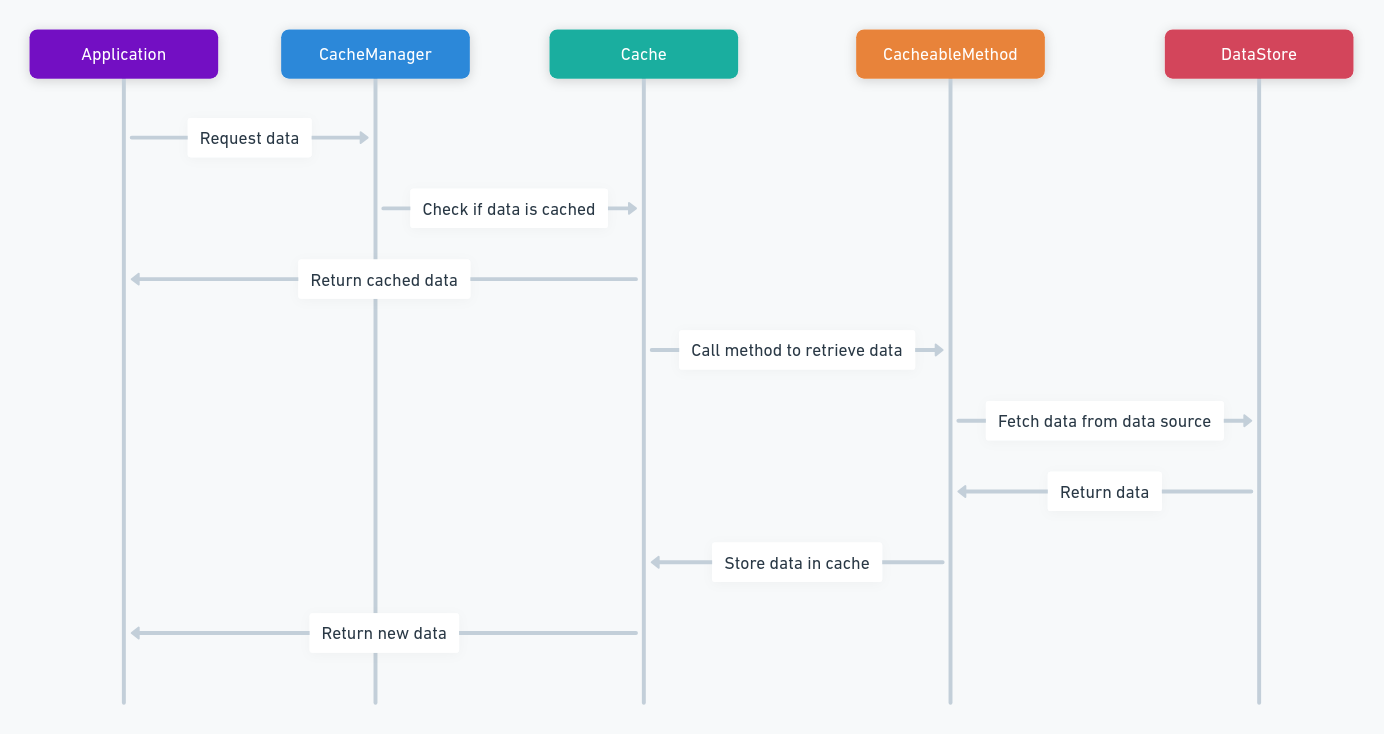
先在yum服务器上创建 yum repository(仓库),在仓库中事先存储了众多rpm包,以及包的相关的元数据文件(放置于特定目录repodata下),当yum客户端利用yum/dnf工具进行安装时包时,会自动下载repodata中的元数据,查询远数据是否存在相关的包及依赖关系,自动从仓库中找到相关包下载并安装。

yum需要依赖于环境,依赖于服务端和客户端,允许跨网络
服务器:
- RPM包 (Packages文件夹中)
- 元数据(repodata文件夹:目录(软件的目录),软件的依赖关系,软件的位置)
仓库类型:
- 光盘的仓库基本仓库 比较常用的
- epel扩展仓库 比较新
3.如何实现安装服务

4.yum配置文件及命令
4.1yum配置文件
4.1.1主配置文件
/etc/yum.conf
[root@localhost]# /etc/yum.conf
[main]
cachedir=/var/cache/yum/$basearch/$releasever //yum下载的RPM包的缓存目录 $basearch代表硬件架构 $releasever系统版本比如7
keepcache=0                                   //是否保存缓存  0代表不保存,1代表保存
debuglevel=2                                  //调试级别了解即可
logfile=/var/log/yum.log					 // 日志文件位置
exactarch=1								     //是否允许不同版本的rpm安装
obsoletes=1									//update 的一个参数是否可以允许旧版本的运行
gpgcheck=1                                  //验证秘钥
plugins=1                                   //是否允许插件1代表可以
installonly_limit=5                         //保存几个内核 5代表5个
bugtracker_url=http://bugs.centos.org/set_project.php?project_id=23&ref=http://bugs.centos.org/bug_report_page.php?category=yum
distroverpkg=centos-release

yum的repo配置文件中可用的变量:
$releasever: 当前OS的发行版的主版本号,如:8,7,6
$arch: CPU架构,如:aarch64, i586, i686,x86_64等
$basearch:系统基础平台;i386, x86_64
$contentdir:表示目录,比如:centos-8,centos-7
$YUM0-$YUM9:自定义变量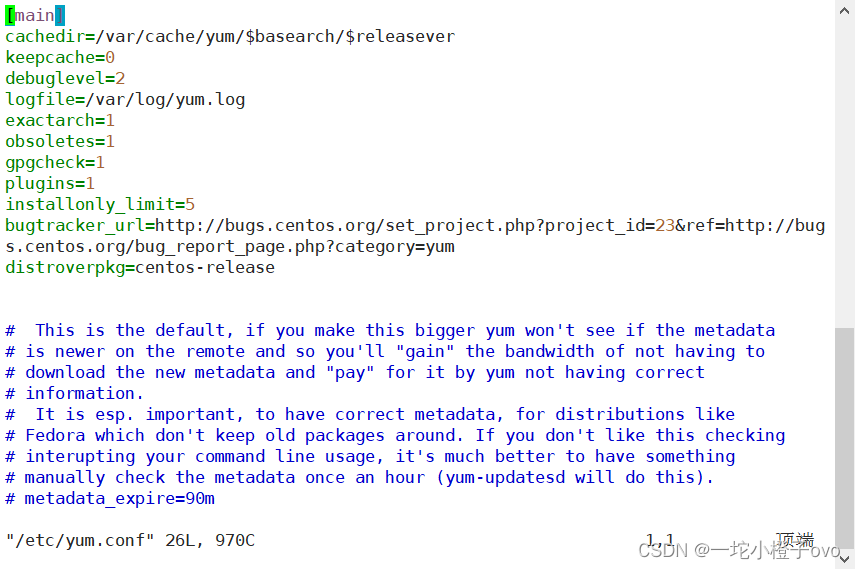
4.1.2仓库设置文件
/etc/yum.repos.d/*.repo

4.1.3日志文件
/var/log/yum.log
可以使用cat /var/log/yum.log查看yum日志的信息
4.2yum命令详解
| 命令 | 不加关键字 | 加入关键词、软件包、软件包组 |
|---|---|---|
| yum list | 显示所有可用包 | 单个的可安装包 |
| yum info | 显示所有可用包的信息 | 单个具体的信息 |
| yum search | \ | 模糊查找所有的相关信息 |
| yum provides | \ | 精确查找 |
| yum grouplist | 显示所有可用包组 | 显示具体的包组 |
| yum groupinfo | 显示所有的包组具体信息 | 显示具体的包组的具体信息 |
| yum install | \ | 安装具体软件包 |
| yum groupinstall | \ | 安装具体软件包组 |
| yum update | 所有软件升级 | 具体软件升级 |
| 命令 | 不加关键字 | 加入关键词、软件包、软件包组 |
|---|---|---|
| yum group update | 所有包组升级 | 具体包组升级 |
| yum remove | \ | 卸载具体软件 |
| yum groupremove | \ | 卸载具体包组软件 |
| yum history | 查看当前yum操作历史 | \ |
| yum history undo | 加入序号卸载序号里安装的软件 | \ |
| yum history redo | 加入序号重新执行序号里的操作 | \ |
4.2.1查询
1.yum list 软件名
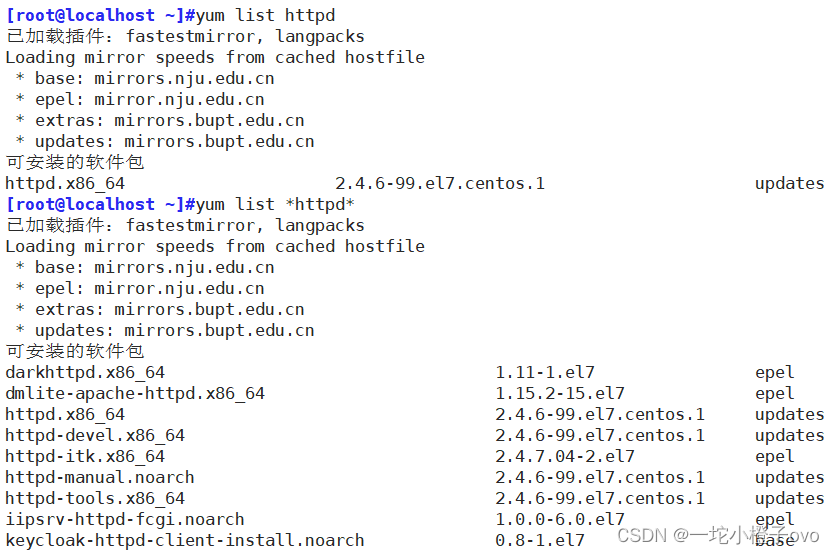
[root@localhost ~]#yum list httpd           #具体软件名称  查询软件安装包
已加载插件:fastestmirror, langpacks
Loading mirror speeds from cached hostfile
 * base: mirrors.nju.edu.cn
 * epel: mirror.nju.edu.cn
 * extras: mirrors.bupt.edu.cn
 * updates: mirrors.bupt.edu.cn
可安装的软件包
httpd.x86_64                     2.4.6-99.el7.centos.1                     updates
[root@localhost ~]#yum list *httpd*         #查询包含httpd的软件
已加载插件:fastestmirror, langpacks
Loading mirror speeds from cached hostfile
 * base: mirrors.nju.edu.cn
 * epel: mirror.nju.edu.cn
 * extras: mirrors.bupt.edu.cn
 * updates: mirrors.bupt.edu.cn
可安装的软件包
darkhttpd.x86_64                                 1.11-1.el7                epel
dmlite-apache-httpd.x86_64                       1.15.2-15.el7             epel
httpd.x86_64                                     2.4.6-99.el7.centos.1     updates
httpd-devel.x86_64                               2.4.6-99.el7.centos.1     updates
httpd-itk.x86_64                                 2.4.7.04-2.el7            epel
httpd-manual.noarch                              2.4.6-99.el7.centos.1     updates
httpd-tools.x86_64                               2.4.6-99.el7.centos.1     updates
iipsrv-httpd-fcgi.noarch                         1.0.0-6.0.el7             epel
keycloak-httpd-client-install.noarch             0.8-1.el7                 base
libmicrohttpd.i686                               0.9.33-2.el7              base
libmicrohttpd.x86_64                             0.9.33-2.el7              base
libmicrohttpd-devel.i686                         0.9.33-2.el7              base
libmicrohttpd-devel.x86_64                       0.9.33-2.el7              base
libmicrohttpd-doc.noarch                         0.9.33-2.el7              base
lighttpd.x86_64                                  1.4.54-1.el7              epel
lighttpd-fastcgi.x86_64                          1.4.54-1.el7              epel
lighttpd-mod_authn_gssapi.x86_64                 1.4.54-1.el7              epel
lighttpd-mod_authn_mysql.x86_64                  1.4.54-1.el7              epel
lighttpd-mod_authn_pam.x86_64                    1.4.54-1.el7              epel
lighttpd-mod_geoip.x86_64                        1.4.54-1.el7              epel
lighttpd-mod_mysql_vhost.x86_64                  1.4.54-1.el7              epel
mirmon-httpd.noarch                              2.11-1.el7                epel
opensips-httpd.x86_64                            1.10.5-4.el7              epel
pagure-web-apache-httpd.noarch                   5.13.3-2.el7              epel
perl-Test-Fake-HTTPD.noarch                      0.09-1.el7                epel
python2-keycloak-httpd-client-install.noarch     0.8-1.el7                 base
python2-sphinxcontrib-httpdomain.noarch          1.7.0-1.el7               epel
radicale-httpd.noarch                            1.1.2-1.el7               epel
sympa-httpd.x86_64                               6.2.72-3.el7              epel
sympa-lighttpd.x86_64                            6.2.72-3.el7              epel
sysusage-httpd.noarch                            5.7-2.el7                 epel
thttpd.x86_64                                    2.29-2.el7                epel
viewvc-httpd-fcgi.noarch                         1.1.30-1.el7              epel
viewvc-httpd-wsgi.noarch                         1.1.30-1.el7              epel
web-assets-httpd.noarch                          5-1.el7                   epel
2.yum info 软件名
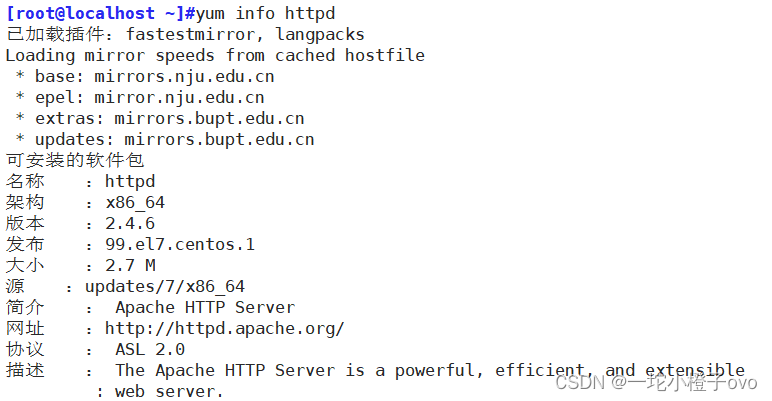
[root@localhost ~]# yum info httpd     #查询软件包的详细信息
已加载插件:fastestmirror, langpacks
Loading mirror speeds from cached hostfile
可安装的软件包
名称    :httpd
架构    :x86_64
版本    :2.4.6
发布    :67.el7.centos
大小    :2.7 M
源    :abc
简介    : Apache HTTP Server
网址    :http://httpd.apache.org/
协议    : ASL 2.0
描述    : The Apache HTTP Server is a powerful, efficient, and
         : extensible web server.
3.yum search 关键词
根据关键字查找软件安装包,相当于你只知道这个包里的某个关键字会全部给你匹配出来

4.yum provides 关键词
知道命令但不知道具体的包,搜索可执行命令

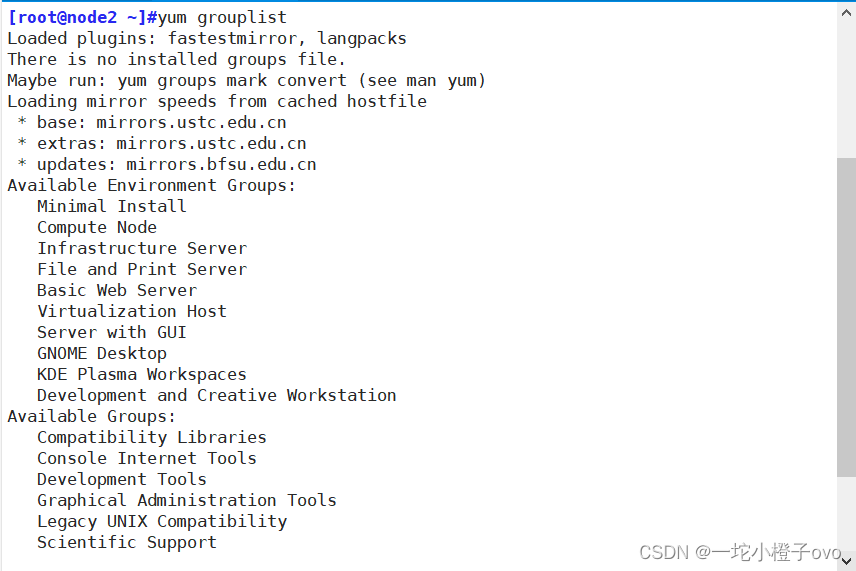
5.yum grouplist 包组名
安装包组的查询 不加包组名 就是显示所有
6.yum groupinfo 包组名
不加包组名显示全部

4.2.2yum安装升级
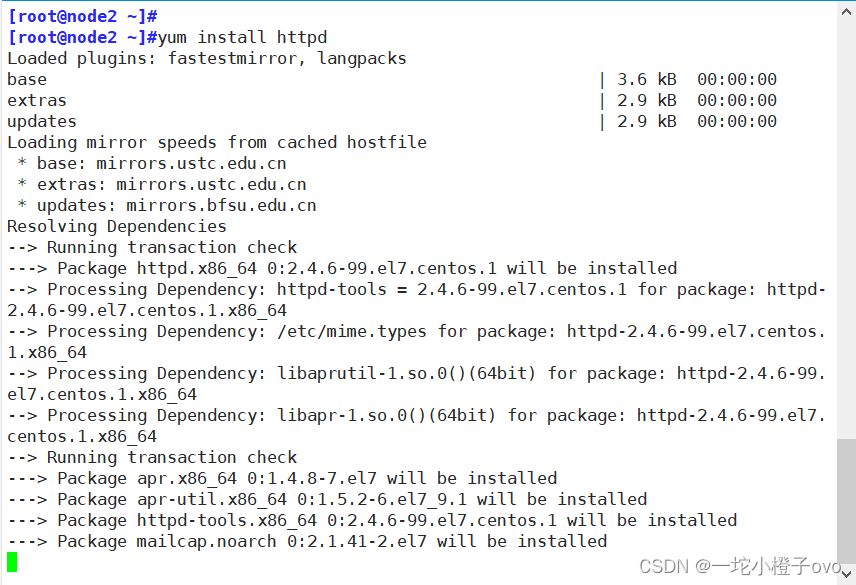
1.yum install 软件名
安装软件包
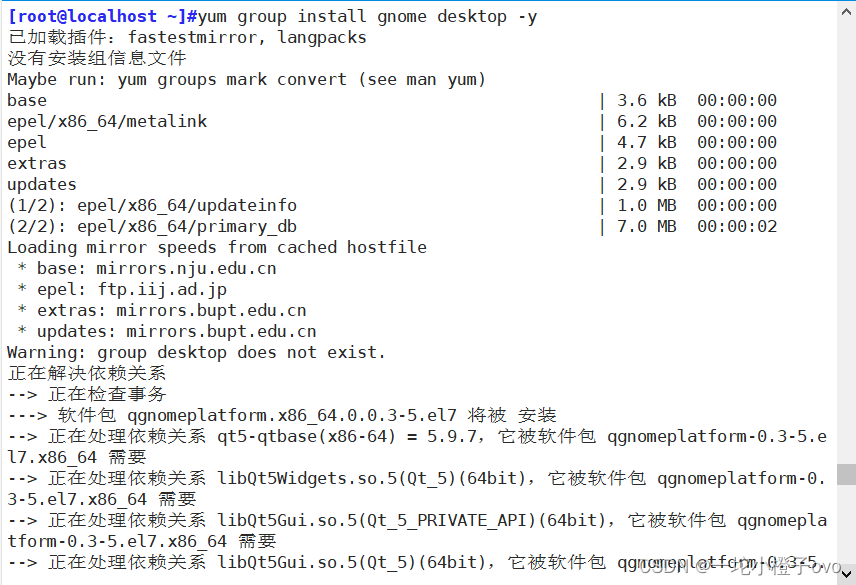
2.yum groupinstall 包组名
包组安装yum install
3.yum update
更新包组,可以单个也可以全部,后面加具体包组名称就是单个更新,不加就是全部更新

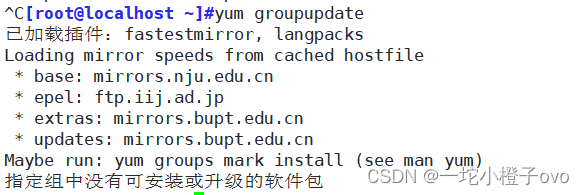
4.yum groupupdate
组包更新和单个安装包更新
4.2.3软件卸载
yum remove 软件名

yum remove卸载 只卸载了软件包,并不能卸载依赖关系 如果想全卸载的话,使用yum history undo 历史命令ID

4.2.4操作安装历史记录
yum history
查看历史的使用记录

5.搭建本地yum仓库
本地yum仓库是在没有网络的情况下,使用光盘挂载搭建yum仓库
软件仓库的提供方式(baseurl)
- FTP服务:ftp://ip地址/站点里路径
- HTTP服务:http://域名或者ip地址/站点里的路径
- 本地目录:file://绝对路径 (file:///mnt 此处第三个/为根目录)
5.1通过ftp服务搭建内网yum仓库
1.服务端
[root@localhost ~]#systemctl stop firewalld
#关闭防火墙
[root@localhost ~]#setenforce 0
#关闭防护
setenforce: SELinux is disabled
[root@localhost ~]#yum install vsftpd -y
#安装vsftpd软件   将此机器当作服务端
[root@localhost ~]#systemctl start vsftpd
#开启vsftpd服务
[root@localhost ~]#mkdir /var/ftp/centos7
#创建centos7的文件夹在/var/ftp服务端文件夹下
[root@localhost ~]#mount /dev/sr0 /var/ftp/centos7/
#光盘挂载到服务端文件夹下
mount: /dev/sr0 写保护,将以只读方式挂载
2.客户端
[root@node2 ~]#systemctl stop firewalld
#关闭防火墙
[root@node2 ~]#setenforce 0
#关闭防护
[root@node2 ~]#cd /etc/yum.repos.d/
#切换到本地yum文件夹
[root@node2 yum.repos.d]#mkdir bak
#创建一个bak文件夹
[root@node2 yum.repos.d]#ls
bak               CentOS-Debuginfo.repo  CentOS-Sources.repo
CentOS-Base.repo  CentOS-fasttrack.repo  CentOS-Vault.repo
CentOS-CR.repo    CentOS-Media.repo
[root@node2 yum.repos.d]#mv *.repo bak
#减少网络干扰源   将所有以repo结尾的文件移动到bak文件夹中
[root@node2 yum.repos.d]#ls
bak


vim ftp.repo
#搭建本地yum仓库

[ftp]
name=ftp
baseurl=ftp://192.168.241.11/centos7
#软件仓库由ftp连接到192.168.241.11的服务端进行提供
gpgcheck=0


[root@node2 yum.repos.d]#yum install tree
Loaded plugins: fastestmirror, langpacks
ftp                                                        | 3.6 kB  00:00:00
(1/2): ftp/group_gz                                        | 156 kB  00:00:00
(2/2): ftp/primary_db                                      | 3.1 MB  00:00:00
Determining fastest mirrors
Resolving Dependencies
--> Running transaction check
---> Package tree.x86_64 0:1.6.0-10.el7 will be installed
--> Finished Dependency Resolution

Dependencies Resolved

==================================================================================
 Package         Arch              Version                   Repository      Size
==================================================================================
Installing:
 tree            x86_64            1.6.0-10.el7              ftp             46 k

Transaction Summary
==================================================================================
Install  1 Package

Total download size: 46 k
Installed size: 87 k
Is this ok [y/d/N]: y
Downloading packages:
tree-1.6.0-10.el7.x86_64.rpm                               |  46 kB  00:00:00
Running transaction check
Running transaction test
Transaction test succeeded
Running transaction
  Installing : tree-1.6.0-10.el7.x86_64                                       1/1
  Verifying  : tree-1.6.0-10.el7.x86_64                                       1/1

Installed:
  tree.x86_64 0:1.6.0-10.el7

Complete!
ftp://192.168.241.11 这个根相当于 /var/ftp/
http://192.168.241.11 这个根相当于 httpd服务 /var/www/html
5.2通过httpd服务搭建yum仓库
1.服务端
[root@localhost ~]#systemctl stop firewalld
#关闭防火墙
[root@localhost ~]#setenforce 0
#关闭防护
setenforce: SELinux is disabled
[root@localhost ~]#systemctl stop nginx
#关闭nginx服务
[root@localhost ~]#systemctl start httpd
#开启httpd服务
[root@localhost ~]#cd /var/www/html/
#切换目录到httpd服务端的文件夹下
[root@localhost html]#ls
[root@localhost html]#mkdir centos7
#建立一个centos7的文件夹
[root@localhost html]#ls
centos7
[root@localhost html]#mount /dev/sr0 /var/www/html/centos7/
#挂载
mount: /dev/sr0 写保护,将以只读方式挂载
2.客户端
[root@node2 ~]#systemctl stop firewalld
#关闭防火墙
[root@node2 ~]#setenforce 0
#关闭防护
[root@node2 ~]#cd /etc/yum.repos.d/
#切换到服务端目录文件夹
[root@node2 yum.repos.d]#ls
CentOS-Base.repo  CentOS-Debuginfo.repo  CentOS-Media.repo    CentOS-Vault.repo
CentOS-CR.repo    CentOS-fasttrack.repo  CentOS-Sources.repo
[root@node2 yum.repos.d]#mkdir bak
#创建bak文件夹
[root@node2 yum.repos.d]#mv *.repo bak
#减少网络干扰源
[root@node2 yum.repos.d]#ls
bak
[root@node2 yum.repos.d]#vim http.repo
#搭建http的yum仓库


[http]
name=http
baseurl=http://192.168.241.11/centos7
gpgcheck=0


[root@node2 yum.repos.d]#yum clean all
Loaded plugins: fastestmirror, langpacks
Cleaning repos: http
Cleaning up everything
Maybe you want: rm -rf /var/cache/yum, to also free up space taken by orphaned data from disabled or removed repos
[root@node2 yum.repos.d]#yum install tree -y
Loaded plugins: fastestmirror, langpacks
http                                                       | 3.6 kB  00:00:00
(1/2): http/group_gz                                       | 156 kB  00:00:00
(2/2): http/primary_db                                     | 3.1 MB  00:00:00
Determining fastest mirrors
Resolving Dependencies
--> Running transaction check
---> Package tree.x86_64 0:1.6.0-10.el7 will be installed
--> Finished Dependency Resolution

Dependencies Resolved

==================================================================================
 Package         Arch              Version                  Repository       Size
==================================================================================
Installing:
 tree            x86_64            1.6.0-10.el7             http             46 k

Transaction Summary
==================================================================================
Install  1 Package

Total download size: 46 k
Installed size: 87 k
Downloading packages:
tree-1.6.0-10.el7.x86_64.rpm                               |  46 kB  00:00:00
Running transaction check
Running transaction test
Transaction test succeeded
Running transaction
  Installing : tree-1.6.0-10.el7.x86_64                                       1/1
  Verifying  : tree-1.6.0-10.el7.x86_64                                       1/1

Installed:
  tree.x86_64 0:1.6.0-10.el7

Complete!
5.3一键安装本地yum源
[root@localhost ~]#vim yum.sh


mount /dev/sr0 /mnt
cd /etc/yum.repos.d
mkdir bak
mv *.repo bak
echo "
[local]
name=local
baseurl=file:///mnt
gpgcheck=0
" >local.repo

yum clean all
yum makecache


[root@localhost ~]#bash yum.sh
mount: /dev/sr0 写保护,将以只读方式挂载
已加载插件:fastestmirror, langpacks
正在清理软件源: local
Cleaning up everything
Maybe you want: rm -rf /var/cache/yum, to also free up space taken by orphaned data from disabled or removed repos
Cleaning up list of fastest mirrors
已加载插件:fastestmirror, langpacks
local                                                      | 3.6 kB  00:00:00
(1/4): local/group_gz                                      | 156 kB  00:00:00
(2/4): local/primary_db                                    | 3.1 MB  00:00:00
(3/4): local/filelists_db                                  | 3.1 MB  00:00:00
(4/4): local/other_db                                      | 1.2 MB  00:00:00
Determining fastest mirrors
元数据缓存已建立
5.4搭建阿里云仓库(http方式外网环境)
国外云仓库比较慢,可以使用阿里云仓库代替
[root@localhost ~]#systemctl stop firewalld
#关闭防火墙
[root@localhost ~]#setenforce 0
#关闭防护
setenforce: SELinux is disabled
[root@localhost ~]#cd /etc/yum.repos.d/
[root@localhost yum.repos.d]#ls
CentOS-Base.repo       CentOS-fasttrack.repo  CentOS-Vault.repo
CentOS-CR.repo         CentOS-Media.repo      epel.repo
CentOS-Debuginfo.repo  CentOS-Sources.repo    epel-testing.repo
[root@localhost yum.repos.d]#mkdir bak
[root@localhost yum.repos.d]#mv *.repo bak
[root@localhost yum.repos.d]#ls
bak
[root@localhost yum.repos.d]#vim ali.repo


[ali]
name=aliyunbaseurl=https://mirrors.aliyun.com/centos/$releasever/os/$basearch/
gpgcheck=0

[epel]
name=epel
baseurl=https://mirrors.aliyun.com/centos/7/extras/x86_64/
gpgcheck=0

[update]
name=update
baseurl=https://mirrors.aliyun.com/centos/7/updates/x86_64/
gpgcheck=0
CentOS系统的yum源
#阿里云
https://mirrors.aliyun.com/centos/$releasever/
#腾讯云
https://mirrors.cloud.tencent.com/centos/$releasever/
#华为云
https://repo.huaweicloud.com/centos/$releasever/
#清华大学
https://mirrors.tuna.tsinghua.edu.cn/centos/$releasever/


EPEL的yum源
#阿里云
https://mirrors.aliyun.com/epel/$releasever/x86_64
#腾讯云
https://mirrors.cloud.tencent.com/epel/$releasever/x86_64
#华为云
https://mirrors.huaweicloud.com/epel/$releasever/x86_64
#清华大学
https://mirrors.tuna.tsinghua.edu.cn/epel/$releasever/x86_64

#更新源
http://mirrors.aliyun.com/centos/$releasever/updates/$basearch/ http://mirrors.aliyuncs.com/centos/$releasever/updates/$basearch/ http://mirrors.cloud.aliyuncs.com/centos/$releasever/updates/$basearch/


baseurl=https://mirrors.aliyun.com/epel/$releasever/x86_64
		https://mirrors.cloud.tencent.com/epel/$releasever/x86_64
		https://mirrors.huaweicloud.com/epel/$releasever/x86_64
		https://mirrors.tuna.tsinghua.edu.cn/epel/$releasever/x86_64
5.5如果误将rpm软件删除(切勿尝试!)
[root@localhost ~]#type rpm
rpm 是 /usr/bin/rpm
[root@localhost ~]#rpm -e rpm
错误:依赖检测失败:
	rpm = 4.11.3-25.el7 被 (已安裝) rpm-libs-4.11.3-25.el7.x86_64 需要
	rpm 被 (已安裝) color-filesystem-1-13.el7.noarch 需要
	rpm = 4.11.3-25.el7 被 (已安裝) rpm-python-4.11.3-25.el7.x86_64 需要
	rpm >= 0:4.11.3-22 被 (已安裝) yum-3.4.3-154.el7.centos.noarch 需要
	rpm >= 4.1.1 被 (已安裝) createrepo-0.9.9-28.el7.noarch 需要
	rpm 被 (已安裝) policycoreutils-2.5-17.1.el7.x86_64 需要
[root@localhost ~]#rpm -e rpm --nodeps
#忽略依赖关系
[root@localhost ~]#rpm -e rpm --nodeps
#--nodeps  忽略依赖关系
[root@localhost ~]#yum install rpm -y
error: Unable to open /usr/lib/rpm/rpmrc for reading: No such file or directory.
There was a problem importing one of the Python modules
required to run yum. The error leading to this problem was:

   cannot import name ts

Please install a package which provides this module, or
verify that the module is installed correctly.

It's possible that the above module doesn't match the
current version of Python, which is:
2.7.5 (default, Aug  4 2017, 00:39:18)
[GCC 4.8.5 20150623 (Red Hat 4.8.5-16)]

If you cannot solve this problem yourself, please go to
the yum faq at:
  http://yum.baseurl.org/wiki/Faq
解决办法
进入急救模式


5.6自行打包后建立元数据
[root@localhost opt]#mount /dev/sr0 /mnt
#挂载
mount: /dev/sr0 写保护,将以只读方式挂载
[root@localhost opt]#cp /mnt/Packages/tree-1.6.0-10.el7.x86_64.rpm test/
#将tree拷贝到服务端的配置文件夹中  准备进行搭建yum仓库
[root@localhost opt]#ls
test
[root@localhost opt]#cd test/
[root@localhost test]#ls
tree-1.6.0-10.el7.x86_64.rpm
[root@localhost test]#mkdir packages
#创建yum仓库所需的packages的文件夹
[root@localhost test]#mv tree-1.6.0-10.el7.x86_64.rpm packages/
#将元数据中的数据包移动到packages中   供客户端使用
[root@localhost test]#ls
packages
[root@localhost test]#createrepo -v test
Directory test must exist
[root@localhost test]#cd ..
[root@localhost opt]#createrepo -v test
#生成元数据信息
Spawning worker 0 with 1 pkgs
Spawning worker 1 with 0 pkgs
Worker 0: reading packages/tree-1.6.0-10.el7.x86_64.rpm
Workers Finished
Saving Primary metadata
Saving file lists metadata
Saving other metadata
Generating sqlite DBs
Starting other db creation: Tue Jan 16 15:11:57 2024
Ending other db creation: Tue Jan 16 15:11:57 2024
Starting filelists db creation: Tue Jan 16 15:11:57 2024
Ending filelists db creation: Tue Jan 16 15:11:57 2024
Starting primary db creation: Tue Jan 16 15:11:57 2024
Ending primary db creation: Tue Jan 16 15:11:57 2024
Sqlite DBs complete
[root@localhost opt]#cd /etc/yum.repos.d/
#去往yum仓库准备搭建
[root@localhost yum.repos.d]#ls
CentOS-Base.repo       CentOS-fasttrack.repo  CentOS-Vault.repo
CentOS-CR.repo         CentOS-Media.repo      epel.repo
CentOS-Debuginfo.repo  CentOS-Sources.repo    epel-testing.repo
[root@localhost yum.repos.d]#mkdir bak
[root@localhost yum.repos.d]#mv *.repo bak
#减少网络干扰源
[root@localhost yum.repos.d]#ls
bak
[root@localhost yum.repos.d]#
[root@localhost yum.repos.d]#vim tree.repo
#搭建tree的本地yum仓库


[tree]
name=tree
baseurl=file:///opt/test
#软件仓库提供源
gpgcheck=0


[root@localhost yum.repos.d]#yum clean all
#清理缓存
已加载插件:fastestmirror, langpacks
正在清理软件源: tree
Cleaning up everything
Maybe you want: rm -rf /var/cache/yum, to also free up space taken by orphaned data from disabled or removed repos
Cleaning up list of fastest mirrors
[root@localhost yum.repos.d]#yum makecache
#重新下载元数据
已加载插件:fastestmirror, langpacks
tree                                                       | 2.9 kB  00:00:00
(1/3): tree/filelists_db                                   |  880 B  00:00:00
(2/3): tree/other_db                                       | 1.3 kB  00:00:00
(3/3): tree/primary_db                                     | 1.8 kB  00:00:00
Determining fastest mirrors
元数据缓存已建立
[root@localhost yum.repos.d]#yum install tree -y
#安装tree
已加载插件:fastestmirror, langpacks
Loading mirror speeds from cached hostfile
正在解决依赖关系
--> 正在检查事务
---> 软件包 tree.x86_64.0.1.6.0-10.el7 将被 安装
--> 解决依赖关系完成

依赖关系解决

==================================================================================
 Package         架构              版本                     源               大小
==================================================================================
正在安装:
 tree            x86_64            1.6.0-10.el7             tree             46 k

事务概要
==================================================================================
安装  1 软件包

总下载量:46 k
安装大小:87 k
Downloading packages:
Running transaction check
Running transaction test
Transaction test succeeded
Running transaction
  正在安装    : tree-1.6.0-10.el7.x86_64                                      1/1
  验证中      : tree-1.6.0-10.el7.x86_64                                      1/1

已安装:
  tree.x86_64 0:1.6.0-10.el7

完毕!
5.7制作镜像
mkisofs -r -o  /root/xxx.iso  /data/centos7/epel
将光盘制作成镜像
5.8离线安装软件
[root@localhost ~]#yum install nginx -y
已加载插件:fastestmirror, langpacks
base                                                       | 3.6 kB  00:00:00
epel/x86_64/metalink                                       | 6.2 kB  00:00:00
epel                                                       | 4.7 kB  00:00:00
extras                                                     | 2.9 kB  00:00:00
updates                                                    | 2.9 kB  00:00:00
(1/2): epel/x86_64/updateinfo                              | 1.0 MB  00:00:08
epel/x86_64/primary_db         FAILED
https://mirrors.xtom.hk/epel/7/x86_64/repodata/b25b166362209e9f70ab05f80ed29ca130466b4550507ddc7ddcb50583697b6b-primary.sqlite.bz2: [Errno 14] HTTPS Error 403 - Forbidden
正在尝试其它镜像。
To address this issue please refer to the below knowledge base article

https://access.redhat.com/solutions/69319

If above article doesn't help to resolve this issue please create a bug on https://bugs.centos.org/

(2/2): epel/x86_64/primary_db                              | 7.0 MB  00:01:44
Loading mirror speeds from cached hostfile
 * base: mirrors.bupt.edu.cn
 * epel: ftp.iij.ad.jp
 * extras: mirrors.bupt.edu.cn
 * updates: mirrors.bupt.edu.cn
正在解决依赖关系
--> 正在检查事务
---> 软件包 nginx.x86_64.1.1.20.1-10.el7 将被 安装
--> 正在处理依赖关系 nginx-filesystem = 1:1.20.1-10.el7,它被软件包 1:nginx-1.20.1-10.el7.x86_64 需要
--> 正在处理依赖关系 libcrypto.so.1.1(OPENSSL_1_1_0)(64bit),它被软件包 1:nginx-1.20.1-10.el7.x86_64 需要
--> 正在处理依赖关系 libssl.so.1.1(OPENSSL_1_1_0)(64bit),它被软件包 1:nginx-1.20.1-10.el7.x86_64 需要
--> 正在处理依赖关系 libssl.so.1.1(OPENSSL_1_1_1)(64bit),它被软件包 1:nginx-1.20.1-10.el7.x86_64 需要
--> 正在处理依赖关系 nginx-filesystem,它被软件包 1:nginx-1.20.1-10.el7.x86_64 需要
--> 正在处理依赖关系 libcrypto.so.1.1()(64bit),它被软件包 1:nginx-1.20.1-10.el7.x86_64 需要
--> 正在处理依赖关系 libssl.so.1.1()(64bit),它被软件包 1:nginx-1.20.1-10.el7.x86_64 需要
--> 正在检查事务
---> 软件包 nginx-filesystem.noarch.1.1.20.1-10.el7 将被 安装
---> 软件包 openssl11-libs.x86_64.1.1.1.1k-6.el7 将被 安装
--> 解决依赖关系完成

依赖关系解决

==================================================================================
 Package                 架构          版本                     源           大小
==================================================================================
正在安装:
 nginx                   x86_64        1:1.20.1-10.el7          epel        588 k
为依赖而安装:
 nginx-filesystem        noarch        1:1.20.1-10.el7          epel         24 k
 openssl11-libs          x86_64        1:1.1.1k-6.el7           epel        1.5 M

事务概要
==================================================================================
安装  1 软件包 (+2 依赖软件包)

总下载量:2.1 M
安装大小:5.3 M
Downloading packages:
警告:/var/cache/yum/x86_64/7/epel/packages/nginx-1.20.1-10.el7.x86_64.rpm: 头V4 RSA/SHA256 Signature, 密钥 ID 352c64e5: NOKEY
nginx-1.20.1-10.el7.x86_64.rpm 的公钥尚未安装
(1/3): nginx-1.20.1-10.el7.x86_64.rpm                      | 588 kB  00:00:00
(2/3): nginx-filesystem-1.20.1-10.el7.noarch.rpm           |  24 kB  00:00:02
(3/3): openssl11-libs-1.1.1k-6.el7.x86_64.rpm              | 1.5 MB  00:00:09
----------------------------------------------------------------------------------
总计                                                 224 kB/s | 2.1 MB  00:09
从 file:///etc/pki/rpm-gpg/RPM-GPG-KEY-EPEL-7 检索密钥
导入 GPG key 0x352C64E5:
 用户ID     : "Fedora EPEL (7) <epel@fedoraproject.org>"
 指纹       : 91e9 7d7c 4a5e 96f1 7f3e 888f 6a2f aea2 352c 64e5
 软件包     : epel-release-7-11.noarch (@extras)
 来自       : /etc/pki/rpm-gpg/RPM-GPG-KEY-EPEL-7
Running transaction check
Running transaction test
Transaction test succeeded
Running transaction
  正在安装    : 1:nginx-filesystem-1.20.1-10.el7.noarch                       1/3
  正在安装    : 1:openssl11-libs-1.1.1k-6.el7.x86_64                          2/3
  正在安装    : 1:nginx-1.20.1-10.el7.x86_64                                  3/3
  验证中      : 1:openssl11-libs-1.1.1k-6.el7.x86_64                          1/3
  验证中      : 1:nginx-filesystem-1.20.1-10.el7.noarch                       2/3
  验证中      : 1:nginx-1.20.1-10.el7.x86_64                                  3/3

已安装:
  nginx.x86_64 1:1.20.1-10.el7

作为依赖被安装:
  nginx-filesystem.noarch 1:1.20.1-10.el7   openssl11-libs.x86_64 1:1.1.1k-6.el7

完毕!
[root@localhost ~]#yum install nginx --downloadonly --downloaddir=/data/
已加载插件:fastestmirror, langpacks
Loading mirror speeds from cached hostfile
 * base: mirrors.bupt.edu.cn
 * epel: ftp.iij.ad.jp
 * extras: mirrors.bupt.edu.cn
 * updates: mirrors.bupt.edu.cn
软件包 1:nginx-1.20.1-10.el7.x86_64 已安装并且是最新版本
无须任何处理
5.9升级内核
[root@localhost ~]#yum install https://www.elrepo.org/elrepo-release-7.0-4.el7.elrepo.noarch.rpm
已加载插件:fastestmirror, langpacks
elrepo-release-7.0-4.el7.elrepo.noarch.rpm                 | 8.5 kB  00:00:00
正在检查 /var/tmp/yum-root-b9hPjt/elrepo-release-7.0-4.el7.elrepo.noarch.rpm: elrepo-release-7.0-4.el7.elrepo.noarch
/var/tmp/yum-root-b9hPjt/elrepo-release-7.0-4.el7.elrepo.noarch.rpm 将被安装
正在解决依赖关系
--> 正在检查事务
---> 软件包 elrepo-release.noarch.0.7.0-4.el7.elrepo 将被 安装
--> 解决依赖关系完成

依赖关系解决

==================================================================================
 Package    架构   版本             源                                       大小
==================================================================================
正在安装:
 elrepo-release
            noarch 7.0-4.el7.elrepo /elrepo-release-7.0-4.el7.elrepo.noarch 5.0 k

事务概要
==================================================================================
安装  1 软件包

总计:5.0 k
安装大小:5.0 k
Is this ok [y/d/N]: y
Downloading packages:
Running transaction check
Running transaction test
Transaction test succeeded
Running transaction
  正在安装    : elrepo-release-7.0-4.el7.elrepo.noarch                        1/1
  验证中      : elrepo-release-7.0-4.el7.elrepo.noarch                        1/1

已安装:
  elrepo-release.noarch 0:7.0-4.el7.elrepo

完毕!
[root@localhost ~]#yum repolist all
已加载插件:fastestmirror, langpacks
elrepo                                                     | 3.0 kB  00:00:00
elrepo/primary_db                                          | 370 kB  00:00:02
Loading mirror speeds from cached hostfile
 * base: mirrors.bupt.edu.cn
 * elrepo: ftp.yz.yamagata-u.ac.jp
 * epel: ftp.iij.ad.jp
 * extras: mirrors.bupt.edu.cn
 * updates: mirrors.bupt.edu.cn
源标识                        源名称                                  状态
C7.0.1406-base/x86_64         CentOS-7.0.1406 - Base                  禁用
C7.0.1406-centosplus/x86_64   CentOS-7.0.1406 - CentOSPlus            禁用
C7.0.1406-extras/x86_64       CentOS-7.0.1406 - Extras                禁用
C7.0.1406-fasttrack/x86_64    CentOS-7.0.1406 - CentOSPlus            禁用
C7.0.1406-updates/x86_64      CentOS-7.0.1406 - Updates               禁用
C7.1.1503-base/x86_64         CentOS-7.1.1503 - Base                  禁用
C7.1.1503-centosplus/x86_64   CentOS-7.1.1503 - CentOSPlus            禁用
C7.1.1503-extras/x86_64       CentOS-7.1.1503 - Extras                禁用
C7.1.1503-fasttrack/x86_64    CentOS-7.1.1503 - CentOSPlus            禁用
C7.1.1503-updates/x86_64      CentOS-7.1.1503 - Updates               禁用
C7.2.1511-base/x86_64         CentOS-7.2.1511 - Base                  禁用
C7.2.1511-centosplus/x86_64   CentOS-7.2.1511 - CentOSPlus            禁用
C7.2.1511-extras/x86_64       CentOS-7.2.1511 - Extras                禁用
C7.2.1511-fasttrack/x86_64    CentOS-7.2.1511 - CentOSPlus            禁用
C7.2.1511-updates/x86_64      CentOS-7.2.1511 - Updates               禁用
C7.3.1611-base/x86_64         CentOS-7.3.1611 - Base                  禁用
C7.3.1611-centosplus/x86_64   CentOS-7.3.1611 - CentOSPlus            禁用
C7.3.1611-extras/x86_64       CentOS-7.3.1611 - Extras                禁用
C7.3.1611-fasttrack/x86_64    CentOS-7.3.1611 - CentOSPlus            禁用
C7.3.1611-updates/x86_64      CentOS-7.3.1611 - Updates               禁用
base/7/x86_64                 CentOS-7 - Base                         启用: 10,072
base-debuginfo/x86_64         CentOS-7 - Debuginfo                    禁用
base-source/7                 CentOS-7 - Base Sources                 禁用
c7-media                      CentOS-7 - Media                        禁用
centosplus/7/x86_64           CentOS-7 - Plus                         禁用
centosplus-source/7           CentOS-7 - Plus Sources                 禁用
cr/7/x86_64                   CentOS-7 - cr                           禁用
elrepo                        ELRepo.org Community Enterprise Linux R 启用:    141
elrepo-extras                 ELRepo.org Community Enterprise Linux E 禁用
elrepo-kernel                 ELRepo.org Community Enterprise Linux K 禁用
elrepo-testing                ELRepo.org Community Enterprise Linux T 禁用
epel/x86_64                   Extra Packages for Enterprise Linux 7 - 启用: 13,786
epel-debuginfo/x86_64         Extra Packages for Enterprise Linux 7 - 禁用
epel-source/x86_64            Extra Packages for Enterprise Linux 7 - 禁用
epel-testing/x86_64           Extra Packages for Enterprise Linux 7 - 禁用
epel-testing-debuginfo/x86_64 Extra Packages for Enterprise Linux 7 - 禁用
epel-testing-source/x86_64    Extra Packages for Enterprise Linux 7 - 禁用
extras/7/x86_64               CentOS-7 - Extras                       启用:    518
extras-source/7               CentOS-7 - Extras Sources               禁用
fasttrack/7/x86_64            CentOS-7 - fasttrack                    禁用
updates/7/x86_64              CentOS-7 - Updates                      启用:  5,558
updates-source/7              CentOS-7 - Updates Sources              禁用
repolist: 30,075
二、NFS共享
由于ftp操作过于繁琐,衍生出NFS共享协议
1.NFS简介
NFS(Network File System 网络文件服务) 文件系统(软件)文件的权限 NFS 是一种基于 TCP/IP 传输的网络文件系统协议,最初由 Sun 公司开发。 通过使用 NFS 协议,客户机可以像访问本地目录一样访问远程服务器中的共享资源 NFS 也是 NAS 存储 设备必然支持的一种协议
NFS 它是文件系统,是操作系统内核来管理的
2.NAS存储
NFS 服务的实现依赖于 RPC(Remote Process Call,远端过程调用)机制,通过使用 NFS 协议,客户机可以像访问本地目录一样访问远程服务器中的共享资源。(远端过程调用:自己没有这种功能,调用别人的功能) NFS 也是 NAS 存储 设备必然支持的一种协议 以完成远 程到本地的映射过程。在 CentOS 7 系统中,需要安装 nfs-utils、rpcbind 软件包来提供 NFS 共享服务, 前者用于 NFS 共享发布和访问,后者用于 RPC 支持。 手动加载 NFS 共享服务时,应该先启动 rpcbind,再启动 NFS。
RPC采用C/S模式,客户机请求程序调用进程发送一个有进程参数的调用信息到服务进程,然后等待应答信息。在服务器端,进程保持睡眠状态直到调用信息到达为止。当一个调用信息到达,服务器获得进程参数,计算结果,发送答复信息,然后等待下一个调用信息,最后,客户端调用进程接收答复信息,获得进程结果,然后调用执行继续进行。
特点: 采用TCP/IP传输网络文件 安全性低 简单易操作 适合局域网环境
3.NFS工作原理
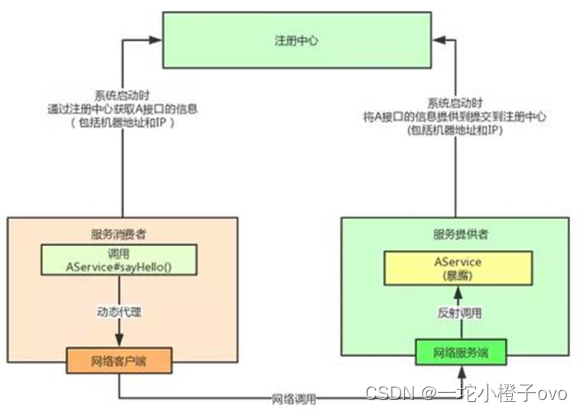
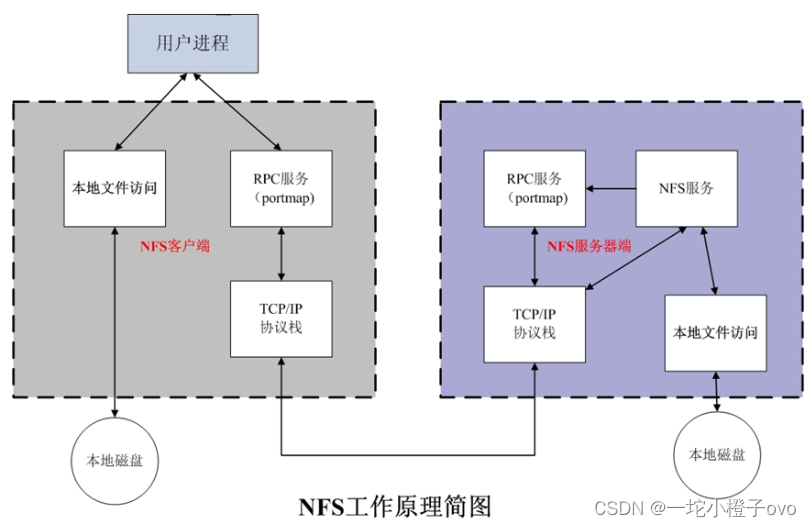
NFS优势:节省本地存储空间,将常用的数据如:/home 目录,存放在NFS服务器上且可以通过网络访问,将减少本地磁盘的使用率。
4.NFS软件介绍
软件包:nfs-utils(包括服务器端和客户端)
相关软件包:rpcbind(必须)
NFS的端口号不固定,是随机的;RPC(远程过程调用协议)端口号为111
配置文件:/etc/exports /etc/exports.d/*.exports
日志文件:/var/lib/nfs/
5.NFS共享配置文件格式
/dir 主机1(opt1,opt2) 主机2(opt1,opt2)...
共享目录 共享给哪个主机
6.默认选项
| 选项 | 含义 |
| ro,rw | 只读和读写 |
| async | 异步,数据变化后不立即写磁盘,先写入到缓冲区中,过一段时间再写入磁盘,性能高,安全性低 |
| sync | 同步,数据在请求时立即写入共享存储磁盘,性能低,安全性高 |
| root_squash | 远程root映射为nfsnobody,UID为65534,CentOS8 为nobody,CentOS 7以前的版本为nfsnobody |
| no_root_squash | 远程root映射成NFS服务器的root用户 |
| all_squash | 所有远程用户(包括root)都变成nfsnobody,CentOS8 为nobody |
| no_all_squash | 保留共享文件的UID和GID |
| anonuid和anongid | 指明匿名用户映射为特定用户UID和组GID,而非nobody,可配合all_squash使用 /data/nfs1 *(rw,all_squash,anonuid=1002,anongid=1002) |
7.NFS工具
7.1exportfs
exportfs:可用于管理NFS导出的文件系统
| 选项 | 含义 |
| -v | 查看本机所有NFS共享 |
| -r | 重读配置文件并共享目录 |
| -a | 输出本机所有共享 |
| -au | 停止本机所有共享 |
7.2showmount
showmount -e hostname:客户机上查看共享
8.实验操作
[root@localhost ~]#systemctl status nfs
● nfs-server.service - NFS server and services
   Loaded: loaded (/usr/lib/systemd/system/nfs-server.service; disabled; vendor preset: disabled)
   Active: inactive (dead)
[root@localhost ~]#systemctl status rpcbind
● rpcbind.service - RPC bind service
   Loaded: loaded (/usr/lib/systemd/system/rpcbind.service; indirect; vendor preset: enabled)
   Active: inactive (dead)
[root@localhost ~]#systemctl start rpcbind
[root@localhost ~]#systemctl status rpcbind
● rpcbind.service - RPC bind service
   Loaded: loaded (/usr/lib/systemd/system/rpcbind.service; indirect; vendor preset: enabled)
   Active: active (running) since 二 2024-01-16 16:52:58 CST; 1s ago
  Process: 2264 ExecStart=/sbin/rpcbind -w $RPCBIND_ARGS (code=exited, status=0/SUCCESS)
 Main PID: 2266 (rpcbind)
   CGroup: /system.slice/rpcbind.service
           └─2266 /sbin/rpcbind -w

1月 16 16:52:58 localhost.localdomain systemd[1]: Starting RPC bind service...
1月 16 16:52:58 localhost.localdomain systemd[1]: Started RPC bind service.
[root@localhost ~]#vim /etc/exports
[root@localhost ~]#ll /etc/exports
-rw-r--r-- 1 root root 35 1月  16 16:53 /etc/exports
[root@localhost ~]#mkdir /share
[root@localhost ~]#vim /etc/exports
[root@localhost ~]#systemctl start nfs
[root@localhost ~]#exportfs -v
/share        	<world>(ro,sync,wdelay,hide,no_subtree_check,sec=sys,secure,root_squash,no_all_squash)
[root@localhost ~]#vim /etc/exports
[root@localhost ~]#exportfs -r
exportfs: No options for /share *: suggest *(sync) to avoid warning
exportfs: No options for /data *: suggest *(sync) to avoid warning
exportfs: Failed to stat /data: No such file or directory
[root@localhost ~]#exportfs -v
/share        	<world>(ro,sync,wdelay,hide,no_subtree_check,sec=sys,secure,root_squash,no_all_squash)
/data         	<world>(ro,sync,wdelay,hide,no_subtree_check,sec=sys,secure,root_squash,no_all_squash)
[root@localhost ~]#showmount -e
Export list for localhost.localdomain:
/data  *
/share *
[root@node2 ~]#mount 192.168.241.11:/share          /opt
#                  挂载服务器地址   对方共享文件夹   本地挂载点
[root@node2 ~]#df
Filesystem              1K-blocks    Used Available Use% Mounted on
/dev/mapper/centos-root  52403200 3397072  49006128   7% /
devtmpfs                   917604       0    917604   0% /dev
tmpfs                      933524       0    933524   0% /dev/shm
tmpfs                      933524    9308    924216   1% /run
tmpfs                      933524       0    933524   0% /sys/fs/cgroup
/dev/sda1                 5232640  182380   5050260   4% /boot
tmpfs                      186708       0    186708   0% /run/user/0
tmpfs                      186708      12    186696   1% /run/user/42
192.168.241.11:/share    52403200 5295104  47108096  11% /opt
[root@node2 opt]#touch 123.txt
touch: cannot touch ‘123.txt’: Read-only file system
#客户端没有权限通过NFS协议进行建立文件


#服务端如果进行操作
[root@localhost opt]#cd /share/
[root@localhost share]#ls
[root@localhost share]#touch 123.txt
[root@localhost share]#ls
123.txt

#客户端会看到服务端的操作
[root@node2 opt]#ls
123.txt


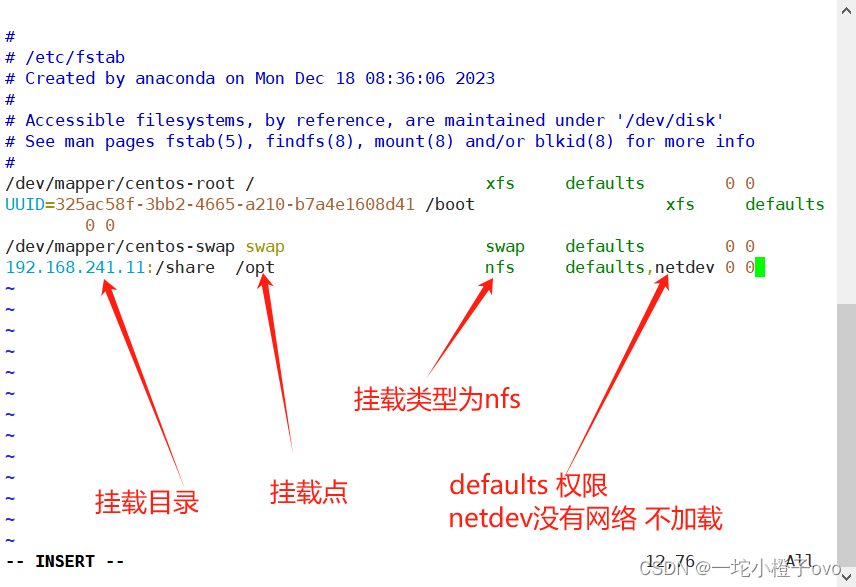
#如果想永久挂载
[root@node2 opt]#vim /etc/fstab


192.168.241.11:/share  /opt                     nfs     defaults,netdev 0 0
如果想设置永久挂载
exportfs -v 显示本机服务端的共享目录
exportfs -r 重新加载配置文件

