在这一部分中,我们将创建一个ASPNET核心项目,作为我们授权服务器的最低设置。我们将使用MVC来提供页面,并将身份验证添加到项目中,包括一个基本的登录表单。
创建一个空的asp.net core项目
正如前一篇文章中所说,授权服务器只是另一个web应用程序。以下内容将指导您使用用户名密码登录来设置ASPNET Core应用程序。我选择不使用ASPNET core 标识来保持简单。基本上,每个用户名密码组合都可以工作。
让我们从创建一个名为AuthorizationServer的新web应用程序开始,使用 ASP.NET Core Empty template
dotnet new web --name AuthorizationServer

我们将只处理此项目,并且不会在本指南中添加解决方案文件。
OpenIddict要求我们使用https协议,即使在本地开发时也是如此。要确保本地证书是可信的,您必须运行以下命令:
dotnet dev-certs https --trust

在Windows上,证书将被添加到证书存储中,在OSX上,证书被添加到密钥链中。在Linux上,没有一种跨发行版的标准方式来信任证书。在Hanselman的博客文章中关于这个主题的信息。
启动应用程序以查看是否一切正常
dotnet run --project AuthorizationServer
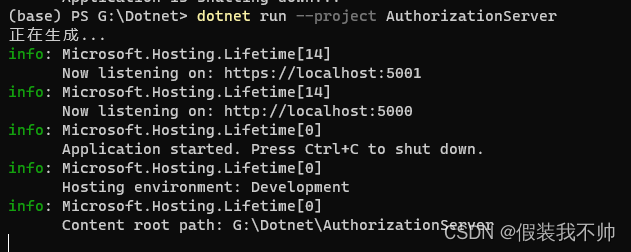
访问localhost:5001应该能看到Hello World!

mvc
我们已经创建了一个基于ASPNET Core Empty模板的项目。这是一个非常小的模板。我这样做是有意的,因为我喜欢在我的项目中尽可能少的“噪音”,以保持事情的清晰和简单。
使用这个模板的缺点是我们必须自己添加MVC。首先,我们需要通过更改Startup.cs类来启用MVC:
var builder = WebApplication.CreateBuilder(args);
builder.Services.AddControllersWithViews();
var app = builder.Build();

app.UseStaticFiles();

app.UseRouting();

app.MapDefaultControllerRoute();
app.Run();
MVC是通过调用services.AddControllersWithViews()。端点设置为使用默认布线。我们还启用了静态文件的服务,我们需要它来提供wwwroot文件夹中的样式表。
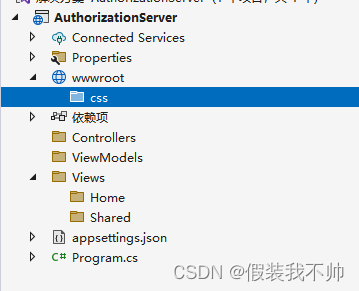
现在,让我们创建控制器、视图和视图模型。首先在项目文件夹中添加以下文件夹结构(注意大小写):
/Controllers
/Views
/Views/Home
/Views/Shared
/ViewModels
/wwwroot
/wwwroot/css
布局
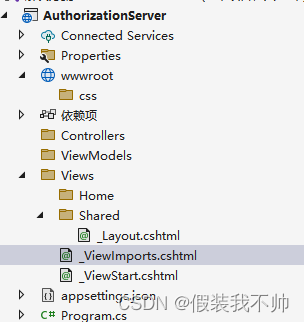
我们添加的第一项是一个名为_layout.cshtml的布局文件,该文件位于Views/Shared文件夹中。该文件定义了应用程序的总体布局,还从CDN加载Bootstrap和jQuery。jQuery是Bootstrap的一个依赖项。
<!DOCTYPE html>
<html lang="en">
<head>
    <meta charset="utf-8" />
    <meta http-equiv="X-UA-Compatible" content="IE=edge">
    <meta name="viewport" content="width=device-width, initial-scale=1.0, shrink-to-fit=no" />

    <title>OpenIddict - Authorization Server</title>

     @* <link rel="stylesheet" href="https://cdn.jsdelivr.net/npm/bootstrap@4.5.3/dist/css/bootstrap.min.css" crossorigin="anonymous"> *@
    <link href="https://cdn.bootcdn.net/ajax/libs/twitter-bootstrap/4.5.3/css/bootstrap.min.css" rel="stylesheet">
    <link rel="stylesheet" href="~/css/site.css" />
</head>
<body>
    <div class="container-sm mt-3">
        <div class="row mb-3">
            <div class="col text-center">
                <h1>
                    Authorization Server
                </h1>
            </div>
        </div>
        <div class="row">
            <div class="col-xs-12 col-md-8 col-xl-4 offset-md-2 offset-xl-4 text-center mb-3">
                @RenderBody()
            </div>
        </div>
    </div>
    @* <script src="https://code.jquery.com/jquery-3.5.1.slim.min.js" crossorigin="anonymous"></script> *@
    @* <script src="https://cdn.jsdelivr.net/npm/bootstrap@4.5.3/dist/js/bootstrap.bundle.min.js" crossorigin="anonymous"></script> *@
    <script src="https://cdn.bootcdn.net/ajax/libs/jquery/3.5.1/jquery.slim.min.js"></script>
    <script src="https://cdn.bootcdn.net/ajax/libs/twitter-bootstrap/4.5.3/js/bootstrap.bundle.min.js"></script>
</body>
</html>
为了使布局和视图正常工作,我们需要将两个文件添加到\views文件夹中:
_ViewStart.cshtml
@{
    Layout = "_Layout";
}
_ViewImports.cshtml
@addTagHelper *, Microsoft.AspNetCore.Mvc.TagHelpers
首页
在/Controllers文件夹中添加一个基本的HomeController,其唯一目的是为我们的主页提供服务:
将Index.chtml添加到Views/Home文件夹,该文件夹由HomeController提供服务:
<h2>MVC is working</h2>
最后但同样重要的是,我们需要一些造型。将名为site.css的样式表添加到wwwroot\css文件夹中:
:focus {
    outline: 0 !important;
}

.input-validation-error {
    border: 1px solid darkred;
}

form {
    width: 100%;
}

.form-control {
    border: 0;
    border-radius: 0;
    border-bottom: 1px solid lightgray;
    font-size: 0.9rem;
}

    .form-control:focus {
        border-bottom-color: lightgray;
        box-shadow: none;
    }

    .form-control.form-control-last {
        border-bottom: 0;
    }

    .form-control::placeholder {
        opacity: 0.6;
    }

    .form-control.input-validation-error {
        border: 1px solid darkred;
    }
一些样式规则已经添加到样式表中,预计我们稍后将创建登录表单。
如果您想使用SASS,或使用SASS自定义引导程序,请查看我关于使用ASPNET设置引导程序SASS的文章。
让我们运行应用程序,看看是否一切正常,您应该在浏览器中看到这样的内容:

启用身份验证
在ASP.NET Core,身份验证由IAuthenticationService处理。身份验证服务使用身份验证处理程序来完成与身份验证相关的操作。
身份验证处理程序在启动期间注册,其配置选项称为“方案(scheme)”。身份验证方案是通过在“startup”中Startup.ConfigureServices来指定的。
或者在这个项目中,我们将使用cookie身份验证,因此我们需要在Startup.cs的ConfigureServices方法中注册cookie身份验证方案:
using Microsoft.AspNetCore.Authentication.Cookies;

var builder = WebApplication.CreateBuilder(args);
builder.Services.AddControllersWithViews();
builder.Services.AddAuthentication(CookieAuthenticationDefaults.AuthenticationScheme)
       .AddCookie(CookieAuthenticationDefaults.AuthenticationScheme, options =>
       {
           options.LoginPath = "/account/login";
       });
var app = builder.Build();

app.UseStaticFiles();

app.UseRouting();

app.MapDefaultControllerRoute();
app.Run();
登录路径设置为/account/login,我们将很快实现此端点。
通过调用应用程序的 IApplicationBuilder 上的 UseAuthentication 扩展方法来添加使用注册的身份验证方案的身份验证中间件:
app.UseRouting();
app.UseAuthentication();//需要放在UseRouting和MapDefaultControllerRoute中间
app.MapDefaultControllerRoute();
对 UseAuthentication 的调用是在调用 UseRouting 之后进行的,以便路由信息可用于身份验证决策,但在 UseEndpoints 之前进行,以便用户在访问端点之前进行身份验证。
登录页面
现在我们已经启用了身份验证,我们将需要一个登录页面来验证用户。
首先,创建包含我们验证用户身份所需的信息的登录视图模型。 确保将此文件放入“ViewModels”文件夹中:
using System.ComponentModel.DataAnnotations;

namespace AuthorizationServer.ViewModels
{
    public class LoginViewModel
    {
        [Required]
        public string? Username { get; set; }

        [Required]
        public string? Password { get; set; }

        public string? ReturnUrl { get; set; }
    }
}
在“Views”文件夹中创建一个名为“Account”的文件夹,并添加登录视图“Login.cshtml”,其中包含登录表单:
@model AuthorizationServer.ViewModels.LoginViewModel

<form autocomplete="off" asp-route="Login">
    <input type="hidden" asp-for="ReturnUrl" />
    <div class="card">
        <input type="text" class="form-control form-control-lg" placeholder="Username" asp-for="Username" autofocus>
        <input type="password" class="form-control form-control-lg form-control-last" placeholder="Password" asp-for="Password">
    </div>
    <p>
        <button type="submit" class="btn btn-dark btn-block mt-3">Login</button>
    </p>
</form>
最后,我们添加AccountController
using AuthorizationServer.ViewModels;
using Microsoft.AspNetCore.Authentication;
using Microsoft.AspNetCore.Authentication.Cookies;
using Microsoft.AspNetCore.Authorization;
using Microsoft.AspNetCore.Mvc;
using System.Security.Claims;

namespace AuthorizationServer.Controllers
{
    public class AccountController : Controller
    {
        [HttpGet]
        [AllowAnonymous]
        public IActionResult Login(string returnUrl = null)
        {
            ViewData["ReturnUrl"] = returnUrl;
            return View();
        }

        [HttpPost]
        [AllowAnonymous]
        [ValidateAntiForgeryToken]
        public async Task<IActionResult> Login(LoginViewModel model)
        {
            ViewData["ReturnUrl"] = model.ReturnUrl;

            if (ModelState.IsValid)
            {
                var claims = new List<Claim>
                {
                    new Claim(ClaimTypes.Name, model.Username)
                };

                var claimsIdentity = new ClaimsIdentity(claims, CookieAuthenticationDefaults.AuthenticationScheme);

                await HttpContext.SignInAsync(new ClaimsPrincipal(claimsIdentity));

                if (Url.IsLocalUrl(model.ReturnUrl))
                {
                    return Redirect(model.ReturnUrl);
                }

                return RedirectToAction(nameof(HomeController.Index), "Home");
            }

            return View(model);
        }

        public async Task<IActionResult> Logout()
        {
            await HttpContext.SignOutAsync();

            return RedirectToAction(nameof(HomeController.Index), "Home");
        }
    }
}
那么,这里会发生什么?我们在帐户控制器上有两个登录操作(GET 和 POST),都允许匿名请求,否则没有人能够登录。
GET 操作为我们刚刚创建的登录表单提供服务。 我们有一个可选的查询参数 returlUrl ,我们将其存储在 ViewData 中,因此我们可以在成功登录后使用它来重定向用户。
POST 操作更有趣。 首先验证 ModelState。 这意味着需要用户名和密码。 我们在这里不检查凭据,任何组合在此示例中都是有效的。 通常,您可以在此处根据数据库检查凭据。
当 ModelState 有效时,将构建声明身份。 我们添加一项声明,即用户的姓名。 请注意,我们在创建声明身份时指定了 cookie 身份验证方案 (CookieAuthenticationDefaults.AuthenticationScheme)。 这基本上是一个字符串,映射到我们在设置 cookie 身份验证时在 Startup.cs 类中定义的身份验证方案。
SignInAsync方法是一个扩展方法,它调用AuthenticationService,后者调用CookieAuthenticationHandler,因为这是我们在创建声明标识时指定的方案。
登录后我们需要重定向用户。 如果指定了返回 url,我们会在重定向之前检查它是否是本地 url,以防止开放重定向攻击。 否则,用户将被重定向到主页。
最后一个操作Logout调用身份验证服务以注销用户。身份验证服务将调用身份验证中间件,在我们的例子中是cookie身份验证中间件来注销用户。
更新首页
更新主页(Views/Home/Index.cshtml)
@using Microsoft.AspNetCore.Authentication

@if (User?.Identity?.IsAuthenticated == true)
{
    var authenticationResult = await Context.AuthenticateAsync();
    var issued = authenticationResult?.Properties?.Items[".issued"];
    var expires = authenticationResult?.Properties?.Items[".expires"];
    <div>
        <p>You are signed in as</p>
        <h2>@User.Identity.Name</h2>
        <hr />
        <dl>
            <dt>Issued</dt>
            <dd>@issued</dd>
            <dt>Expires</dt>
            <dd>@expires</dd>
        </dl>
        <hr />
        <p><a class="btn btn-dark" asp-controller="Account" asp-action="Logout">Sign out</a></p>
    </div>
}

@if (User?.Identity?.IsAuthenticated != true)
{
    <div>
        <p>You are not signed in</p>
        <p><a class="btn btn-sm btn-dark" asp-controller="Account" asp-action="Login">Sign in</a></p>
    </div>
}
如果用户已通过身份验证,我们将显示用户名、当前会话信息和注销按钮。当用户未通过身份验证时,我们会显示一个登录按钮,用于将用户导航到登录表单。


账号密码随便输入即可
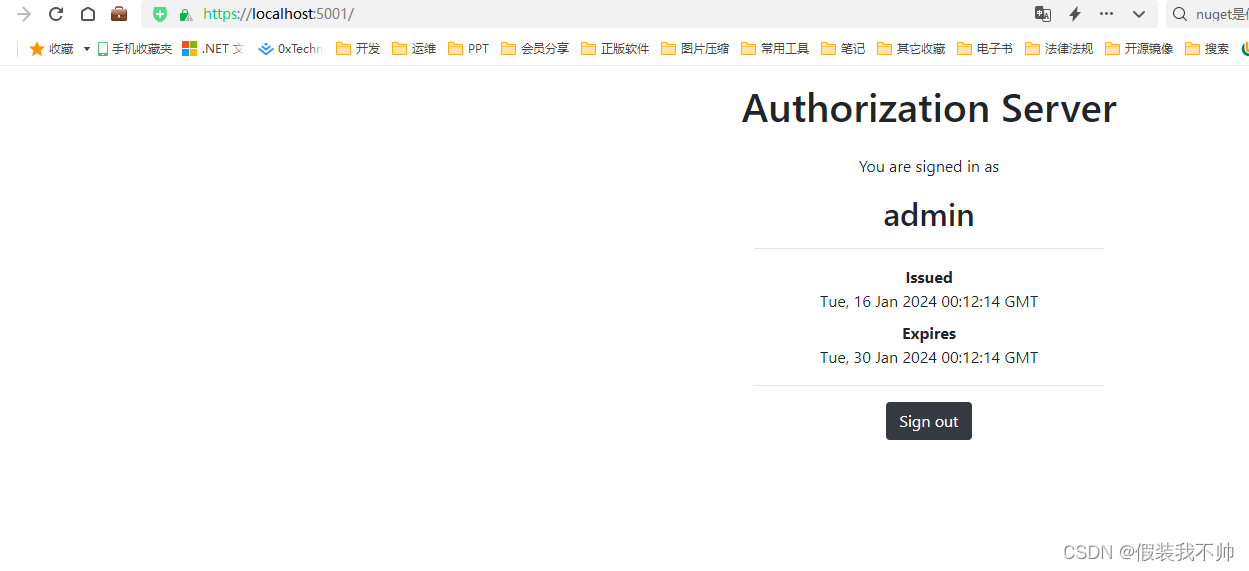
退出就会回到登录页面

目前,我们有一个基本的ASPNET核心项目在运行,并实现了身份验证,到目前为止还没有什么新奇之处。接下来,我们将把OpenIddict添加到项目中,并实现客户端凭据流。

