mvvm基础知识
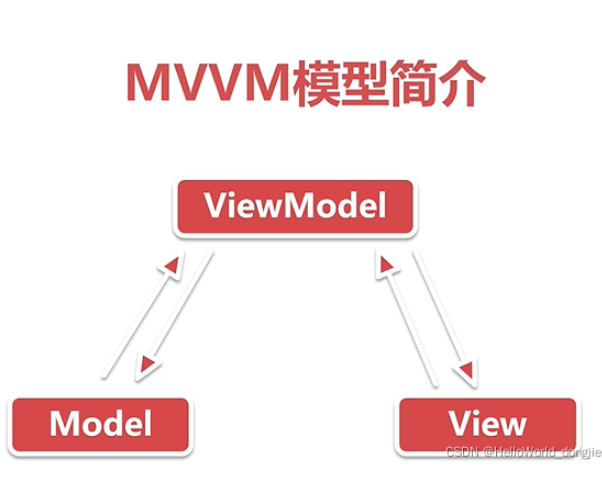
Model:repository Entity 数据库 网络访问等对数据进行直接操作的代码
View:视图代码 xml activity fragment adapter 等ui层的一些代码
ViewModel:视图模型 用来和View ,Model层交互,将Model层的数据显示到View上,并处理View层的事件和Mode层交互
ViewModel 和Model 交互:ViewModel持有Model层的引用
ViewModel和View 交互:使用LiveData ObservableField 存放View中用到的数据
public ObservableField<String> name = new ObservableField<>("tutu");

public MutableLiveData<Integer> level = new MutableLiveData<>(0);
vm里用了LiveData 需要设置这个方法
 //vm里用了LiveData 需要设置这个方法
  mMvvmTestBinding.setLifecycleOwner(this);
MVVM简单使用:
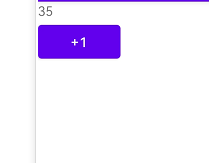
功能介绍:点一下加1
代码:
package com.example.mvvmtest;

import androidx.appcompat.app.AppCompatActivity;
import androidx.databinding.DataBindingUtil;
import androidx.databinding.ViewDataBinding;
import androidx.lifecycle.ViewModelProvider;

import android.os.Bundle;
import android.view.View;

import com.example.mvvmtest.databinding.ActivityMainBinding;

public class MainActivity extends AppCompatActivity {

    private NumberTestVm mNumberTestVm;
    private ActivityMainBinding mViewDataBinding;

    @Override
    protected void onCreate(Bundle savedInstanceState) {
        super.onCreate(savedInstanceState);

        mNumberTestVm = new ViewModelProvider(this).get(NumberTestVm.class);
        mViewDataBinding = DataBindingUtil.setContentView(this, R.layout.activity_main);
        mViewDataBinding.setLifecycleOwner(this);
        mViewDataBinding.setVm(mNumberTestVm);

        ClickHandlers mClickHandlers = new ClickHandlers();
        mViewDataBinding.setHanders(mClickHandlers);

    }


    //todo 什么时候方法里加View view
    public class ClickHandlers {

        public void onClick(View view) {
            mNumberTestVm.add();
        }

    }

}
package com.example.mvvmtest;
import android.app.Application;
import androidx.annotation.NonNull;
import androidx.databinding.ObservableField;
import androidx.lifecycle.AndroidViewModel;
import androidx.lifecycle.MutableLiveData;
/**
* Administrator
* 2023/1/4
*/
public class NumberTestVm extends AndroidViewModel {
public ObservableField<Integer> number = new ObservableField<>(1);
// public MutableLiveData<Integer> number = new MutableLiveData<>(1);
public NumberTestVm(@NonNull Application application) {
super(application);
}
public void add() {
Integer integer = number.get();
number.set(integer + 2);
}
// public void add(){
// Integer value = number.getValue();
// number.postValue(value+2);
// }
}
<?xml version="1.0" encoding="utf-8"?>
<layout xmlns:android="http://schemas.android.com/apk/res/android"
    xmlns:app="http://schemas.android.com/apk/res-auto"
    xmlns:tools="http://schemas.android.com/tools">

    <data>

        <variable
            name="vm"
            type="com.example.mvvmtest.NumberTestVm" />

        <variable
            name="handers"
            type="com.example.mvvmtest.MainActivity.ClickHandlers" />


    </data>

    <LinearLayout
        android:layout_width="match_parent"
        android:layout_height="match_parent"
        android:orientation="vertical"
        tools:context=".MainActivity">

        <TextView
            android:layout_width="wrap_content"
            android:layout_height="wrap_content"
            android:text="@{String.valueOf(vm.number)}" />

        <Button
            android:layout_width="wrap_content"
            android:layout_height="wrap_content"
            android:onClick="@{handers::onClick}"
            android:text="+1" />

    </LinearLayout>
</layout>
知识点:
配置环境
要将应用配置为使用数据绑定,请在应用模块的 build.gradle 文件中添加 dataBinding 元素,如以下示例所示:
android {
        ...
        dataBinding {
            enabled = true
        }
    }
使用
data 中的 user 变量描述了可在此布局中使用的属性。
<variable name="user" type="com.example.User" />
布局中的表达式使用“@{}”语法写入特性属性中。在这里,TextView 文本被设置为 user 变量的 firstName 属性
布局中的表达式使用“@{}”语法写入特性属性中。在这里,TextView 文本被设置为 user 变量的 firstName 属性绑定数据
此类包含从布局属性(例如,user 变量)到布局视图的所有绑定
在Activity里
    @Override
    protected void onCreate(Bundle savedInstanceState) {
       super.onCreate(savedInstanceState);
       ActivityMainBinding binding = DataBindingUtil.setContentView(this, R.layout.activity_main);
       User user = new User("Test", "User");
       binding.setUser(user);
    }
方法引用
    public class MyHandlers {
        public void onClickFriend(View view) { ... }
    }
绑定表达式可将视图的点击监听器分配给 onClickFriend() 方法,如下所示
<?xml version="1.0" encoding="utf-8"?>
    <layout xmlns:android="http://schemas.android.com/apk/res/android">
       <data>
           <variable name="handlers" type="com.example.MyHandlers"/>
           <variable name="user" type="com.example.User"/>
       </data>
       <LinearLayout
           android:orientation="vertical"
           android:layout_width="match_parent"
           android:layout_height="match_parent">
           <TextView android:layout_width="wrap_content"
               android:layout_height="wrap_content"
               android:text="@{user.firstName}"
               android:onClick="@{handlers::onClickFriend}"/>
       </LinearLayout>
    </layout>










![[阶段4 企业开发进阶] 7. 微服务--SpringCloud Alibaba](https://img-blog.csdnimg.cn/d058108b73504a2890d507837a2c8f95.png#pic_center)