1:继承
1.1 继承概述
首先,我们来说一下,什么是继承:
-
继承是面向对象三大特征之一(封装,继承和多态)
-
可以使得子类具有父类的属性和方法,还可以在子类中重新定义,追加属性和方法
也就是说,通过继承,可以把父类中能够被访问到的成员变量和成员方法拿过来直接使用。
了解了什么是继承后,我们在来说一下,继承是如何实现的。
那继承是如何实现的呢?我们一起来看一下继承的格式:
-
格式:public class 子类名 extends 父类名 { }
-
范例:public class Zi extends Fu { }
-
Fu:是父类,也被称为基类、超类
-
Zi:是子类,也被称为派生类
在这里,Zi类和Fu类,通过extends就产生了继承关系。这样呢,Zi类就可以使用Fu类中的成员了。
在这里,Fu这个类,被称为是父类,也被称为基类、超类,Zi这个类:是子类,也被称为派生类
了解了继承是如何实现的,下面呢,我们再来举例说明一下,其实我们在前面已经使用过继承的知识了。
看这里,我们使用过GUI中这样的几个组件:
JLabel,JButton,JTextField,JTextArea
并且还使用过它们的一些方法,比如说:public void setBounds(int x, int y, int width, int height),这几个组件我们都使用过这样的一个方法。
大家想一下,如果我们在每个类中都定义这样的同体系的多个类中都使用的方法,有多个这样的组件,我们就要定义多少个这样的方法。
将来如果有新的组件,我们还是需要定义这样的方法,这样设计起来,我们程序的复用性是不是就太差了啊。
而且,这是Java给我们提供的API,Java大师们肯定不会有这么low的设计,
所以,为了提高代码的复用性,这里就采用了继承的思想,让一个类中定义这样的方法,所有继承该类的类就可以使用这个方法了。
来,打开帮助文档,我们一起去看一下:
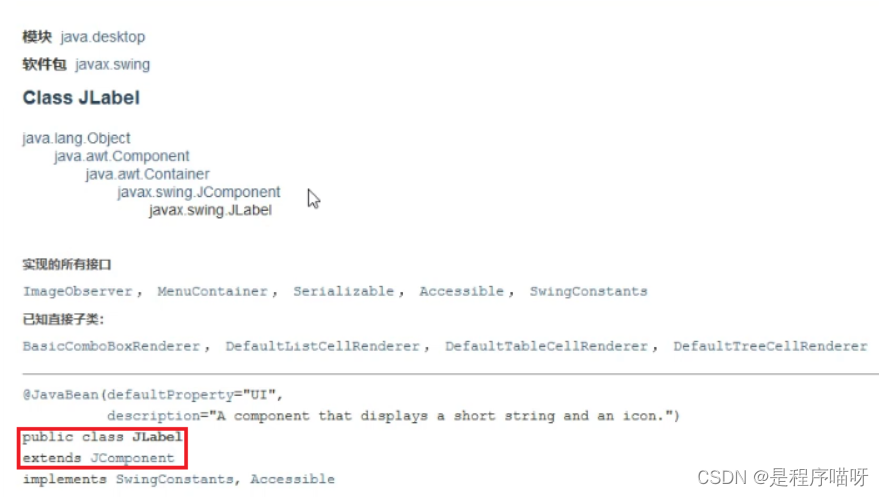
其他的几个,大家打开文档自己去看,最终能够找到他们共同的父类:Component。
看完文档之后,回来总结一下,继承的好处之一是:提高了代码的复用性
1.2 继承的练习
首先,我们来看一下需求:使用继承的方式,改写用户登录界面展示的案例
知道了,要做什么之后,下面呢,我们到IDEA中一边分析,一边实现:
import javax.swing.*;

public class UserLoginFrame extends JFrame {

    public UserLoginFrame() {
        //窗体初始化
        initFrame();

        //绘制窗体
        paintView();

        this.setVisible(true);
    }

    public void paintView() {
        //显示用户名文本
        JLabel usernameLable = new JLabel("用户名");
        usernameLable.setBounds(50, 50, 50, 20);
        this.add(usernameLable);

        //用户名输入框
        JTextField usernameField = new JTextField();
        usernameField.setBounds(150, 50, 180, 20);
        this.add(usernameField);

        //显示密码文本
        JLabel passwordLable = new JLabel("密码");
        passwordLable.setBounds(50, 100, 50, 20);
        this.add(passwordLable);

        //密码输入框
        JPasswordField passwordField = new JPasswordField();
        passwordField.setBounds(150, 100, 180, 20);
        this.add(passwordField);

        //登录按钮
        JButton loginButton = new JButton("登录");
        loginButton.setBounds(50, 200, 280, 20);
        this.add(loginButton);
    }

    public void initFrame() {
        this.setTitle("用户登录");
        this.setSize(400, 300);
        this.setDefaultCloseOperation(3);
        this.setLocationRelativeTo(null);
        this.setAlwaysOnTop(true);
        this.setLayout(null);
    }

}
public class App {
public static void main(String[] args) {
UserLoginFrame userLoginFrame = new UserLoginFrame();
}
}用继承改进后,代码看起来清晰多了,所以,如果我们做GUI开发的,在做窗体的时候,就会定义类继承自JFrame来使用。
2:动漫美女拼图
2.1 项目演示
这里我们先来演示一下该项目:
来,打开准备好的Java文件,这里有两个类:

一个是动漫拼图窗体的类,一个是测试类。
右键运行测试类,我们看到了这样的一个界面。
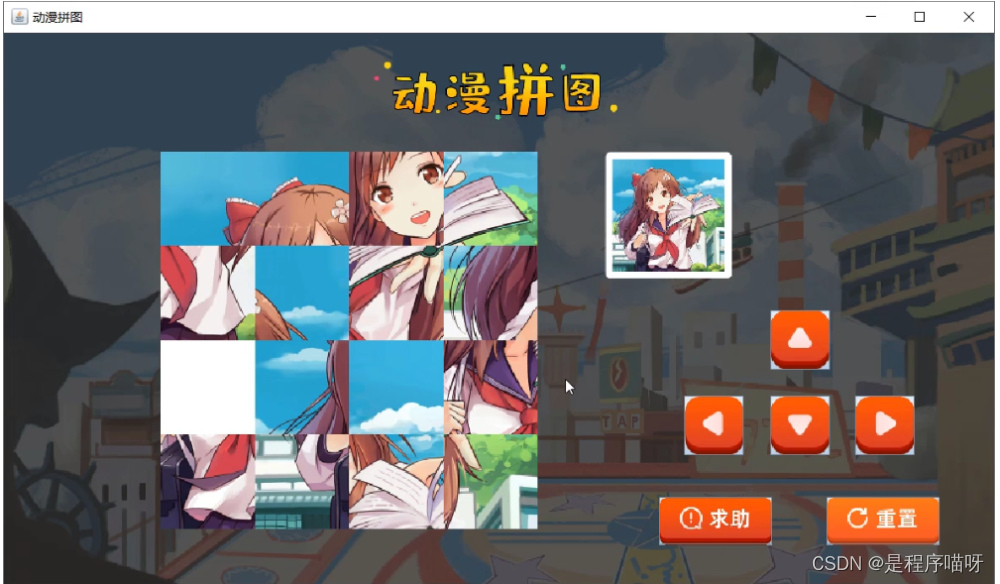
大家可以通过按钮来玩这个游戏了。还可以点击求助按钮和重置按钮。
2.2 动漫美女拼图游戏实现
2.2.1 窗体绘制

分析思路:
1:新建一个模块:itheima-picture-puzzle;在模块的src下新建一个包com.itheima
2:在com.itheima这个包下定义类:PictureFrame,继承自JFrame
3:在PictureFrame类中编写无参构造方法,在构造方法中调用两个方法:
第一个方法:initFrame(),用于窗体的基本设置
第二个方法:setVisible(true),用于设置窗体可见
4:在initFrame()方法中编写代码,进行窗体的基本设置
窗体大小
窗体标题
窗体居中
窗体关闭时退出应用程序
窗体位于其他窗口之上
取消窗体默认布局
5:在com.itheima包下定义测试类:App;创建PictureFrame的对象进行测试
代码实现:
public class PictureFrame extends JFrame {
    public PictureFrame() {
        //用于窗体的基本设置
        initFrame();
        //设置窗体可见
        this.setVisible(true);
    }

    //用于窗体的基本设置
    public void initFrame() {
        //窗体大小
        this.setSize(960,565);
        //窗体标题
        this.setTitle("动漫拼图");
        //窗体居中
        this.setLocationRelativeTo(null);
        //窗体关闭时退出应用程序
        this.setDefaultCloseOperation(3);
        //窗体位于其他窗口之上
        this.setAlwaysOnTop(true);
        //取消窗体默认布局
        this.setLayout(null);
    }
}
public class App {
    public static void main(String[] args) {
        PictureFrame pf = new PictureFrame();
    }
}
2.2.2 窗体上组件绘制
分析思路:
1:定义方法,用于窗体上的组件绘制:paintView()
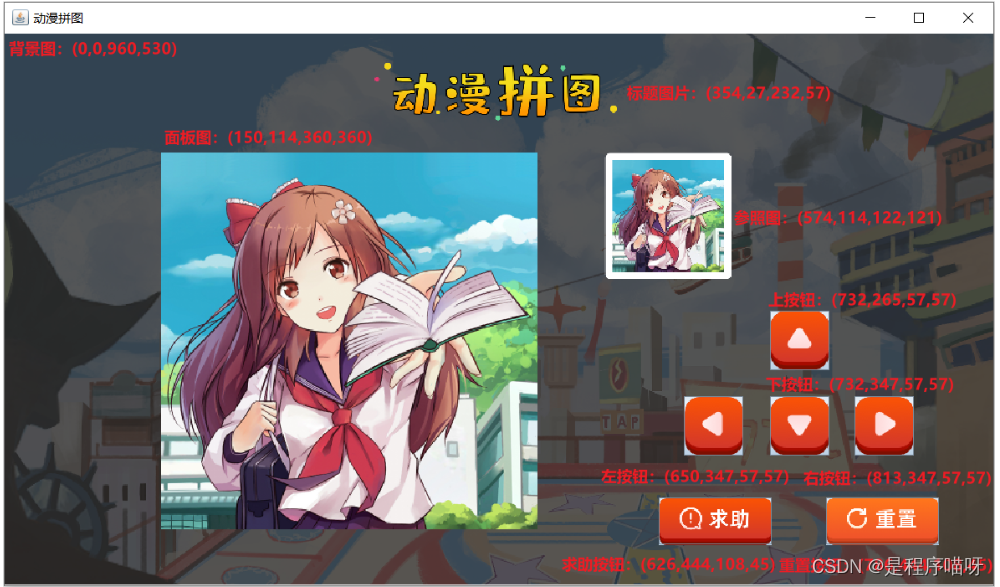
2:按照如下组件绘制
标题图片
面板图片,存储着将来要移动的图片
参照图
上按钮
左按钮
下按钮
右按钮
求助按钮
重置按钮
3:在构造方法中调用paintView()方法
代码实现:
	//窗体上组件的绘制
    public void paintView() {
        //标题图片
        JLabel titleLabel = new JLabel(new ImageIcon("itheima-picture-puzzle\\images\\title.png"));
        titleLabel.setBounds(354,27,232,57);
        this.add(titleLabel);

        //定义一个二维数组,用来存储图片的编号
        int[][] datas = {
                {1,2,3,4},
                {5,6,7,8},
                {9,10,11,12},
                {13,14,15,16}
        };

        //创建面板
        JPanel imagePanel = new JPanel();
        imagePanel.setBounds(150,114,360,360);
        imagePanel.setLayout(null);
        //遍历二维数组,得到图片编号
        for (int i = 0; i < datas.length; i++) {
            for (int j = 0; j < datas[i].length; j++) {
                //创建JLabel对象,加载图片资源
                JLabel imageLabel = new JLabel(new ImageIcon("itheima-picture-puzzle\\images\\"+datas[i][j]+".png"));
                //调整图片的位置
                imageLabel.setBounds(j*90,i*90,90,90);
                imagePanel.add(imageLabel);
            }
        }
        //把面板添加到窗体上
        this.add(imagePanel);

        //动漫参照图
        JLabel canZhaoTuLabel = new JLabel(new ImageIcon("itheima-picture-puzzle\\images\\canzhaotu.png"));
        canZhaoTuLabel.setBounds(574,114,122,121);
        this.add(canZhaoTuLabel);

        //上下左右,求助,重置按钮
        JButton shangButton = new JButton(new ImageIcon("itheima-picture-puzzle\\images\\shang.png"));
        shangButton.setBounds(732,265,57,57);
        this.add(shangButton);

        JButton zuoButton = new JButton(new ImageIcon("itheima-picture-puzzle\\images\\zuo.png"));
        zuoButton.setBounds(650,347,57,57);
        this.add(zuoButton);

        JButton xiaButton = new JButton(new ImageIcon("itheima-picture-puzzle\\images\\xia.png"));
        xiaButton.setBounds(732,347,57,57);
        this.add(xiaButton);

        JButton youButton = new JButton(new ImageIcon("itheima-picture-puzzle\\images\\you.png"));
        youButton.setBounds(813,347,57,57);
        this.add(youButton);

        JButton qiuZhuButton = new JButton(new ImageIcon("itheima-picture-puzzle\\images\\qiuzhu.png"));
        qiuZhuButton.setBounds(626,444,108,45);
        this.add(qiuZhuButton);

        JButton chongZhiButton = new JButton(new ImageIcon("itheima-picture-puzzle\\images\\chongzhi.png"));
        chongZhiButton.setBounds(786,444,108,45);
        this.add(chongZhiButton);

        //展示背景图
        JLabel backgroundLabel = new JLabel(new ImageIcon("itheima-picture-puzzle\\images\\background.png"));
        backgroundLabel.setBounds(0,0,960,530);
        this.add(backgroundLabel);
    }
//构造方法方法中调用绘图方法
public PictureFrame() {
//用于窗体的基本设置
initFrame();
//窗体上组件的绘制
paintView();
//设置窗体可见
this.setVisible(true);
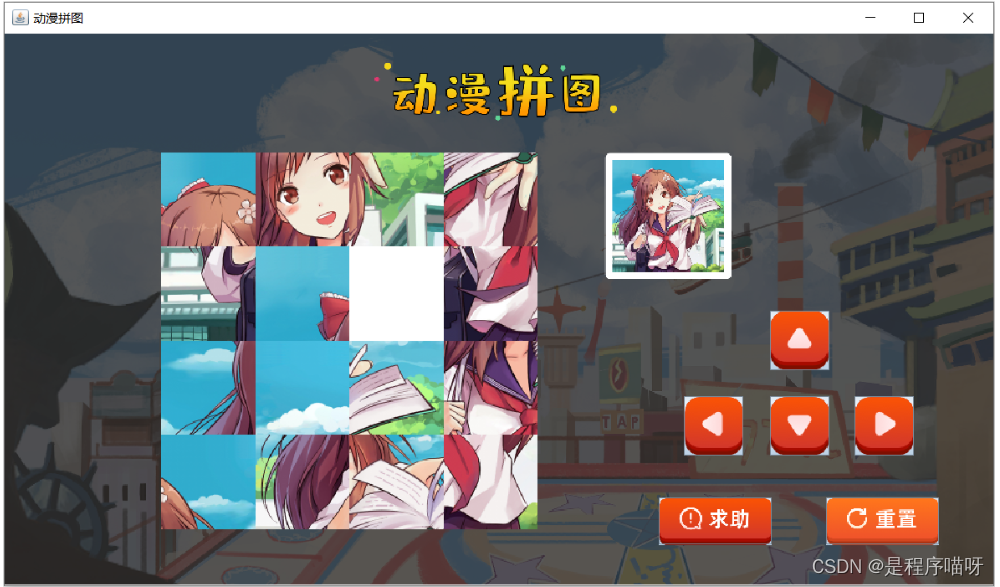
}2.2.3 图片打乱
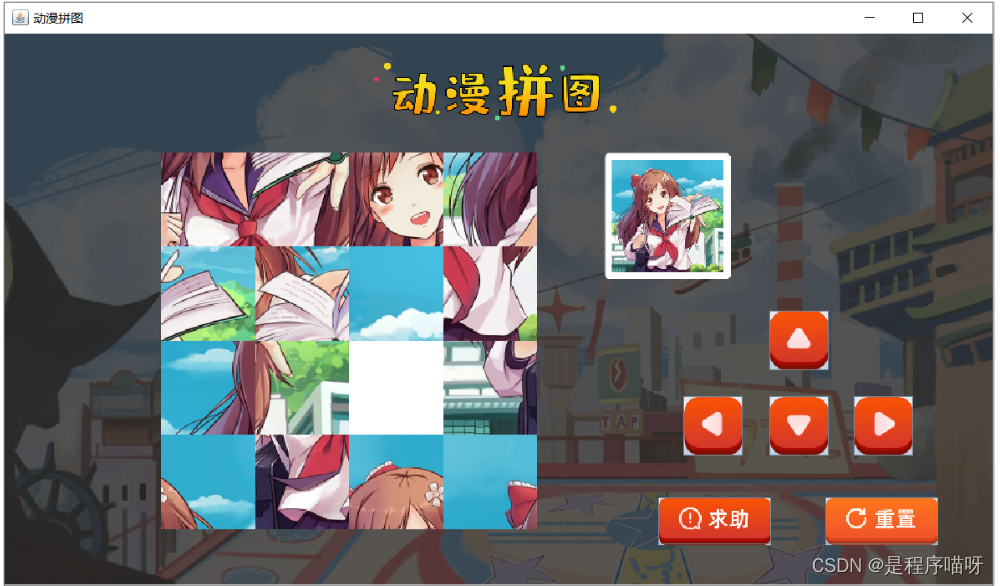
图片打乱,其实就是二维数组元素打乱。
注意事项:
-
由于在多个方法中使用同一个数组,故将二维数组的定义放置在成员位置
-
为了能够进行图片的移动,把16号图片用0号图片替换,当前15个移动到正确位置,显示正确的图片
分析思路:
1:定义方法,用于二维数组元素打乱:initData()
2:创建Random对象
3:遍历存储图片编号的二维数组,得到每一个元素
4:产生两个随机索引,进行二维数组元素交换
	int x = r.nextInt(datas.length);//行索引
    int y = r.nextInt(datas[x].length);//列索引

	//元素交换
    int temp = datas[i][j];
    datas[i][j] = datas[x][y];
    datas[x][y] = temp;
5:在构造方法中调用initData()方法
代码实现:
private int[][] datas = {
        {1, 2, 3, 4},
        {5, 6, 7, 8},
        {9, 10, 11, 12},
        {13, 14, 15, 0}
};
//二维数组元素打乱
public void randomData() {
Random r = new Random();
for (int i = 0; i < datas.length; i++) {
for (int j = 0; j < datas[i].length; j++) {
int x = r.nextInt(datas.length);
int y = r.nextInt(datas[i].length);
int temp = datas[i][j];
datas[i][j] = datas[x][y];
datas[x][y] = temp;
}
}
}
public PictureFrame() {
//用于窗体的基本设置
initFrame();
//二维数组元素打乱
randomData();
//窗体上组件的绘制
paintView();
//设置窗体可见
this.setVisible(true);
}2.2.4 纪录0号图片的索引
为什么要纪录0号图片索引呢?
-
由于将来要进行图片的移动,以实现动漫拼图的实现
-
而移动的操作,得有一个空白的区别,这里我们采用0号图片表示,需要纪录0号图片的位置,也就是在数组中的索引
分析思路:
1:在PictureFrame类中定义两个成员变量用于纪录0号图片的索引
private int x0;
private int y0;
2:在initData()方法中继续编写代码,在打乱后的数组中找到0号图片的位置
遍历二维数组,得到每一个元素
如果元素为0,则纪录该元素的索引,并结束循环。
代码实现:
//定义两个int类型的变量,用于纪录0号图片的位置
private int x0;
private int y0;
//二维数组元素打乱
public void randomData() {
Random r = new Random();
for (int i = 0; i < datas.length; i++) {
for (int j = 0; j < datas[i].length; j++) {
int x = r.nextInt(datas.length);
int y = r.nextInt(datas[i].length);
int temp = datas[i][j];
datas[i][j] = datas[x][y];
datas[x][y] = temp;
}
}
//纪录0号图片的位置
wc:for (int i = 0; i < datas.length; i++) {
for (int j = 0; j < datas[i].length; j++) {
if(datas[i][j] == 0) {
x0 = i;
y0 = j;
break wc;
}
}
}
//System.out.println(x0+","+y0);
}2.2.5 给按钮注册事件
注意事项:由于在多个方法中使用同一个按钮,故将按钮的定义放置在成员位置
分析思路:
1:定义方法,用于给按钮添加事件:addButtonEvent()
2:在addButtonEvent()方法中给每一个按钮添加事件,并给出输出语句提示
3:在构造方法中调用addButtonEvent()方法
代码实现:
//给按钮添加事件
public void addButtonEvent() {
    shangButton.addActionListener(new ActionListener() {
        @Override
        public void actionPerformed(ActionEvent e) {
            System.out.println("上");
        }
    });
    zuoButton.addActionListener(new ActionListener() {
        @Override
        public void actionPerformed(ActionEvent e) {
            System.out.println("左");
        }
    });
    xiaButton.addActionListener(new ActionListener() {
        @Override
        public void actionPerformed(ActionEvent e) {
            System.out.println("下");
        }
    });
    youButton.addActionListener(new ActionListener() {
        @Override
        public void actionPerformed(ActionEvent e) {
            System.out.println("右");
        }
    });
    qiuzhuButton.addActionListener(new ActionListener() {
        @Override
        public void actionPerformed(ActionEvent e) {
            System.out.println("求助");
        }
    });
    chongzhiButton.addActionListener(new ActionListener() {
        @Override
        public void actionPerformed(ActionEvent e) {
            System.out.println("重置");
        }
    });
}
//无参构造方法
public PictureFrame() {
//用于窗体的基本设置
initFrame();
//二维数组元素打乱
randomData();
//窗体上组件的绘制
paintView();
//给按钮添加事件
addButtonEvent();
//设置窗体可见
this.setVisible(true);
}2.2.6 移动业务实现
移动原理:图片的移动,其实就是做元素的交换,也就是二维数组的元素改变了,然后进行图片重绘就可以了
2.2.6.1 上移业务实现
分析思路:
1:移动规则:竖的是x,横的是y
空白图片,和下方元素(x0+1),进行交换
2:把空白图片和下方图片的位置交换
datasx0 = datasx0 + 1;
datasx0 + 1 = 0;
x0 = x0 + 1;
3:编写重绘方法:rePaintView()
先移除,再重新绘制
4:调用重绘方法
5:边界问题处理:当x0=3,不能进行上移动
代码实现:
shangButton.addActionListener(new ActionListener() {
    @Override
    public void actionPerformed(ActionEvent e) {
        //边界处理
        if (x0 == 3) {
            return;
        }
        //位置交换
        datas[x0][y0] = datas[x0 + 1][y0];
        datas[x0 + 1][y0] = 0;
        x0 = x0 + 1;
        //重绘方法调用
        rePaintView();
    }
});

//移动的图形重新绘制
public void rePaintView() {
    //移除所有
    imagePanel.removeAll();

    //遍历二维数组,得到每一个图片编号
    for (int i = 0; i < datas.length; i++) {
        for (int j = 0; j < datas[i].length; j++) {
            //在遍历的过程中,创建 JLabel 对象,加载图片资源
            JLabel imageLabel = new JLabel(new ImageIcon("itheima-picture-puzzle\\images\\" + datas[i][j] + ".png"));
            //调整图片资源的摆放位置
            imageLabel.setBounds(j * 90, i * 90, 90, 90);
            imagePanel.add(imageLabel);
        }
    }

    //重新绘制窗体
    imagePanel.repaint();
}
2.2.6.2 其他移动业务实现
分析思路:
1:左移动
边界:y0=3
移动代码:
        datas[x0][y0] = datas[x0][y0 + 1];

        datas[x0][y0 + 1] = 0;

        y0 = y0 + 1;
2:下移动
边界:x0=0
移动代码:
     datas[x0][y0] = datas[x0 - 1][y0];

        datas[x0 - 1][y0] = 0;

        x0 = x0 - 1;
3:右移动
边界:y0=0
移动代码:
        datas[x0][y0] = datas[x0][y0 - 1];

        datas[x0][y0 - 1] = 0;

        y0 = y0 - 1;
代码实现:
zuoButton.addActionListener(new ActionListener() {
    @Override
    public void actionPerformed(ActionEvent e) {
        if (y0 == 3) {
            return;
        }
        datas[x0][y0] = datas[x0][y0 + 1];
        datas[x0][y0 + 1] = 0;
        y0 = y0 + 1;
        rePaintView();
    }
});
xiaButton.addActionListener(new ActionListener() {
    @Override
    public void actionPerformed(ActionEvent e) {
        if (x0 == 0) {
            return;
        }
        datas[x0][y0] = datas[x0 - 1][y0];
        datas[x0 - 1][y0] = 0;
        x0 = x0 - 1;
        rePaintView();
    }
});
youButton.addActionListener(new ActionListener() {
    @Override
    public void actionPerformed(ActionEvent e) {
        if (y0 == 0) {
            return;
        }
        datas[x0][y0] = datas[x0][y0 - 1];
        datas[x0][y0 - 1] = 0;
        y0 = y0 - 1;
        rePaintView();
    }
});
2.2.7 求助业务实现

注意事项:
-
数组元素应该是1-16,而不是0-15了
-
按钮也不能在点击了
分析思路:
1:定义移动成功的方法:success()
2:在success()方法内部进行如下操作:
修改datas数组的元素为正确的元素值
按钮设置为不可用
3:在重置操作中调用两个方法:
第一个方法:success()
第二个方法:rePaintView()
代码实现:
//移动成功的操作
public void success() {
    datas = new int[][]{
            {1, 2, 3, 4},
            {5, 6, 7, 8},
            {9, 10, 11, 12},
            {13, 14, 15, 16}
    };
    shangButton.setEnabled(false);
    zuoButton.setEnabled(false);
    xiaButton.setEnabled(false);
    youButton.setEnabled(false);
}
qiuzhuButton.addActionListener(new ActionListener() {
@Override
public void actionPerformed(ActionEvent e) {
success();
rePaintView();
}
});2.2.8 移动业务的问题
问题分析:每次移动之后,都要判断是否移动成功,如果成功了,需要调用成功的方法。
而判断移动是否成功,我们来写方法实现。
分析思路:
1:定义一个方法,用于比较两个数组元素是否相同
2:每次移动完毕,调用该方法:
如果返回值为true,则调用success()方法
代码实现:
//定义移动成功后的数组
private int[][] winDatas = {
    {1, 2, 3, 4},
    {5, 6, 7, 8},
    {9, 10, 11, 12},
    {13, 14, 15, 0}
};
//判断移动是否成功
public boolean isSuccess() {
for (int i = 0; i < datas.length; i++) {
for (int j = 0; j < datas[i].length; j++) {
if (datas[i][j] != winDatas[i][j]) {
return false;
}
}
}
return true;
}
shangButton.addActionListener(new ActionListener() {
@Override
public void actionPerformed(ActionEvent e) {
//边界处理
if (x0 == 3) {
return;
}
//位置交换
datas[x0][y0] = datas[x0 + 1][y0];
datas[x0 + 1][y0] = 0;
x0 = x0 + 1;
//判断移动是否成功
if(isSuccess()) {
success();
}
//调用重绘的方法
rePaintView();
}
});
zuoButton.addActionListener(new ActionListener() {
@Override
public void actionPerformed(ActionEvent e) {
//边界处理
if (y0 == 3) {
return;
}
//位置交换
datas[x0][y0] = datas[x0][y0 + 1];
datas[x0][y0 + 1] = 0;
y0 = y0 + 1;
//判断移动是否成功
if(isSuccess()) {
success();
}
//调用重绘的方法
rePaintView();
}
});
xiaButton.addActionListener(new ActionListener() {
@Override
public void actionPerformed(ActionEvent e) {
//边界处理
if (x0 == 0) {
return;
}
//位置交换
datas[x0][y0] = datas[x0 - 1][y0];
datas[x0 - 1][y0] = 0;
x0 = x0 - 1;
//判断移动是否成功
if(isSuccess()) {
success();
}
//调用重绘的方法
rePaintView();
}
});
youButton.addActionListener(new ActionListener() {
@Override
public void actionPerformed(ActionEvent e) {
//边界处理
if (y0 == 0) {
return;
}
//位置交换
datas[x0][y0] = datas[x0][y0 - 1];
datas[x0][y0 - 1] = 0;
y0 = y0 - 1;
//判断移动是否成功
if(isSuccess()) {
success();
}
//调用重绘的方法
rePaintView();
}
});2.2.9 重置业务实现
分析思路:
1:当重置的时候,需要修改数组为1,2...15,0
2:打乱数组元素
3:重绘面板图
4:设置按钮可用
代码实现:
chongzhiButton.addActionListener(new ActionListener() {
    @Override
    public void actionPerformed(ActionEvent e) {
        datas = new int[][]{
                {1, 2, 3, 4},
                {5, 6, 7, 8},
                {9, 10, 11, 12},
                {13, 14, 15, 0}
        };
        initData();
        rePaintView();
        shangButton.setEnabled(true);
        zuoButton.setEnabled(true);
        xiaButton.setEnabled(true);
        youButton.setEnabled(true);
    }
});
讲解完毕后,大家赶快动手练习一下吧。