Fine-Tuning Mixtral 8x7B with QLoRA:Enhancing Model Performance 🚀
编者按:最近,混合专家(Mixture of Experts,MoE)这种模型设计策略展现出了卓越的语言理解能力,如何在此基础上进一步提升 MoE 模型的性能成为业界热点。
本文作者使用一种名为 QLoRA 的方法,通过量化和 LoRA 技术对 MoE 模型 Mixtral-8x7B 进行微调,以期大幅提高其性能。
作者详细阐明这种方法的诸多优势,包括显著增强 MoE 模型的理解生成能力、计算效率更高等。文中还逐步介绍了使用 QLoRA 微调 Mixtral-8x7B 的全过程。
本文探索了使用 QLoRA 推动 MoE 模型的性能改进这一技术方案。期待未来更多关于 MoE 模型的性能改进方案出现!
一、简介
目前整个业界都希望经过优化的模型能够表现出卓越的性能,这一追求不断推动着自然语言理解(natural language understanding)的发展。Mixtral-8x7B Mixture of Experts(MoE)模型就是其中之一,该模型在各种基准测试(benchmarks)中表现出优于同类产品的性能,尤其是优于 Llama 2 70B。
本教程采用一种名为 QLoRA 的创新方法对 Mixtral-8x7B 模型进行微调,该方法结合了量化(quantization)和 LoRA(Local Representation Adaptation)技术。期望通过这两种技术的结合来进一步增强Mixtral-8x7B模型的能力。
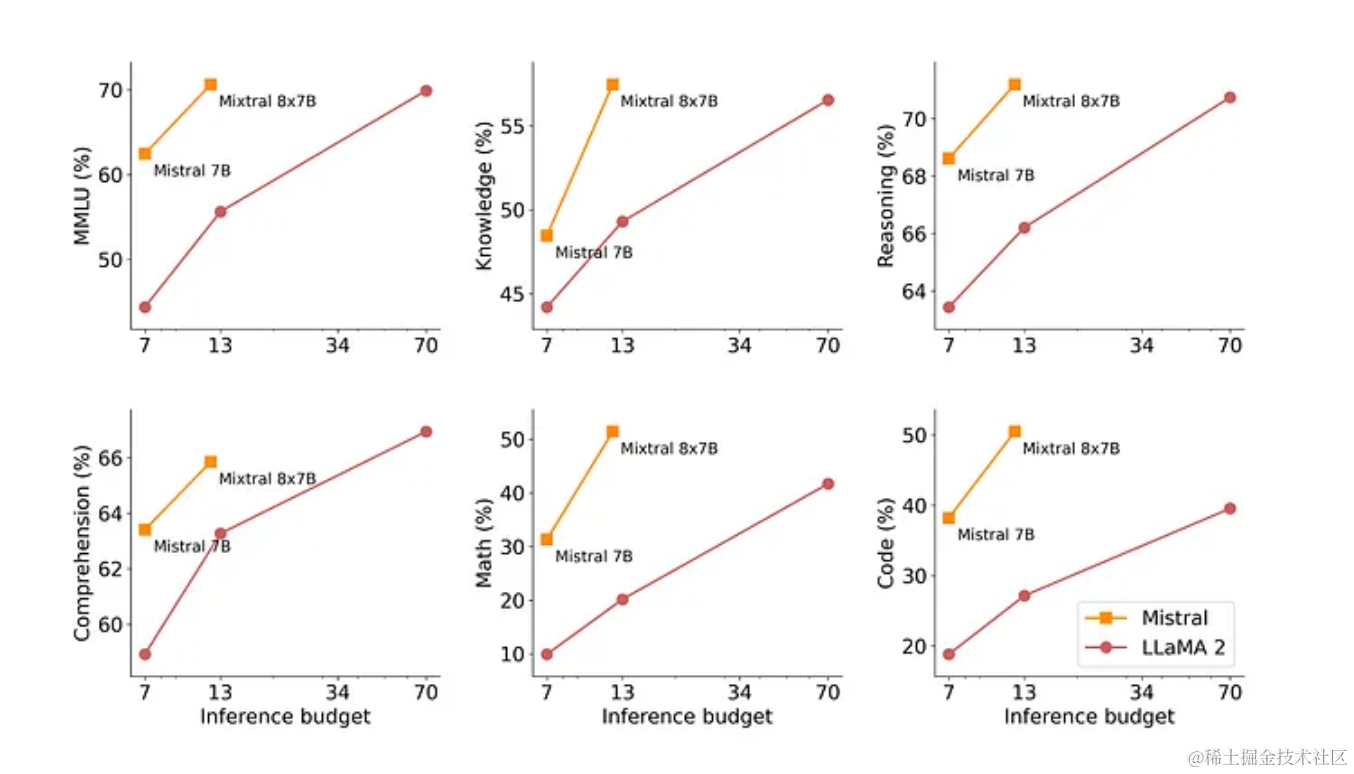
Source: Mixtral[1]
二、相关定义
● Mixtral 8x7B:一种混合专家模型,因其架构设计在自然语言处理任务中表现出色而闻名。
● QLoRA:Quantization 和 LoRA 技术相结合的缩写。量化涉及降低模型权重的精度,从而优化内存使用并加快计算速度。LoRA 可调整模型中的局部表征,增强模型对特定上下文的理解。
三、优势
● 增强性能:使用 QLoRA 对 Mixtral 8x7B 进行微调,可提高其性能,从而更好地理解和生成各种领域的文本。
● 能效比高:量化的整合降低了内存需求和计算复杂度,使模型更节省资源。
● 针对垂直领域进行微调:通过微调,该模型可针对特定任务进行定制,从而提高其在特定领域的准确性和相关性。
四、代码实现说明
本教程在 Notebook 环境中(译者注:使用Jupyter notebook 或白海IDP自研notebook)使用 Python。整个过程包括使用 "bitsandbytes "库加载 4 位精度的大型 Mixtral 模型。随后,在训练阶段使用 Hugging Face 的 PEFT 库实现 LoRA。
4.1 步骤 1:安装相关库
# You only need to run this once per machine, even if you stop/restart it
!pip install --upgrade pip
!pip install -q -U bitsandbytes
!pip install -q -U git+https://github.com/huggingface/transformers.git
!pip install -q -U git+https://github.com/huggingface/peft.git
!pip install -q -U git+https://github.com/huggingface/accelerate.git
!pip install -q -U datasets scipy ipywidgets matplotlib
4.2 步骤 2:设置 Accelerator
from accelerate import FullyShardedDataParallelPlugin, Accelerator
from torch.distributed.fsdp.fully_sharded_data_parallel import FullOptimStateDictConfig, FullStateDictConfig

fsdp_plugin = FullyShardedDataParallelPlugin(
    state_dict_config=FullStateDictConfig(offload_to_cpu=True, rank0_only=False),
    optim_state_dict_config=FullOptimStateDictConfig(offload_to_cpu=True, rank0_only=False),
)

accelerator = Accelerator(fsdp_plugin=fsdp_plugin)
4.3 步骤 3:使用Weights & Biases追踪性能指标
!pip install -q wandb -U

import wandb, os
wandb.login()

wandb_project = "viggo-finetune"
if len(wandb_project) > 0:
    os.environ["WANDB_PROJECT"] = wandb_project
4.4 步骤 4:加载数据集
from datasets import load_dataset

dataset_name = "databricks/databricks-dolly-15k"

train_dataset = load_dataset(dataset_name, split="train[0:800]")
eval_dataset = load_dataset(dataset_name, split="train[800:1000]")
4.5 步骤 5:加载基础模型
import torch
from transformers import AutoTokenizer, AutoModelForCausalLM, BitsAndBytesConfig

base_model_id = "mistralai/Mixtral-8x7B-v0.1"
bnb_config = BitsAndBytesConfig(
    load_in_4bit=True,
    bnb_4bit_use_double_quant=True,
    bnb_4bit_compute_dtype=torch.bfloat16
)

model = AutoModelForCausalLM.from_pretrained(base_model_id, quantization_config=bnb_config, device_map="auto")

# Tokenization
tokenizer = AutoTokenizer.from_pretrained(
    base_model_id,
    padding_side="left",
    add_eos_token=True,
    add_bos_token=True,
)
tokenizer.pad_token = tokenizer.eos_token

def tokenize(prompt):
    result = tokenizer(prompt)
    result["labels"] = result["input_ids"].copy()
    return result

def generate_and_tokenize_prompt(data_point):
    full_prompt = f"""Given a question and some additional context, provide an answer

    ### Target sentence:
    Question: {data_point['instruction']}
    Additional Context: {f"Here is some context: {data_point['context']}" if len(data_point["context"]) > 0 else ""}
    Response: [/INST] {data_point['response']}</s>"""

    tokenized_prompt = tokenizer(full_prompt)
    return tokenized_prompt

tokenized_train_dataset = train_dataset.map(generate_and_tokenize_prompt)
tokenized_val_dataset = eval_dataset.map(generate_and_tokenize_prompt)

untokenized_text = tokenizer.decode(tokenized_train_dataset[1]['input_ids'])
print(untokenized_text)

# Output
<s> Given a question and some additional context, provide an answer

    ### Target sentence:
    Question: Alice's parents have three daughters: Amy, Jessy, and what’s the name of the third daughter?
    Additional Context:
    Response: [/INST] The name of the third daughter is Alice</s></s>
4.6 步骤 6:获取数据集中各个样本长度的分布情况
import matplotlib.pyplot as plt

def plot_data_lengths(tokenized_train_dataset, tokenized_val_dataset):
    lengths = [len(x['input_ids']) for x in tokenized_train_dataset]
    lengths += [len(x['input_ids']) for x in tokenized_val_dataset]
    print(len(lengths))

    # Plotting the histogram
    plt.figure(figsize=(10, 6))
    plt.hist(lengths, bins=20, alpha=0.7, color='blue')
    plt.xlabel('Length of input_ids')
    plt.ylabel('Frequency')
    plt.title('Distribution of Lengths of input_ids')
    plt.show()

plot_data_lengths(tokenized_train_dataset, tokenized_val_dataset)
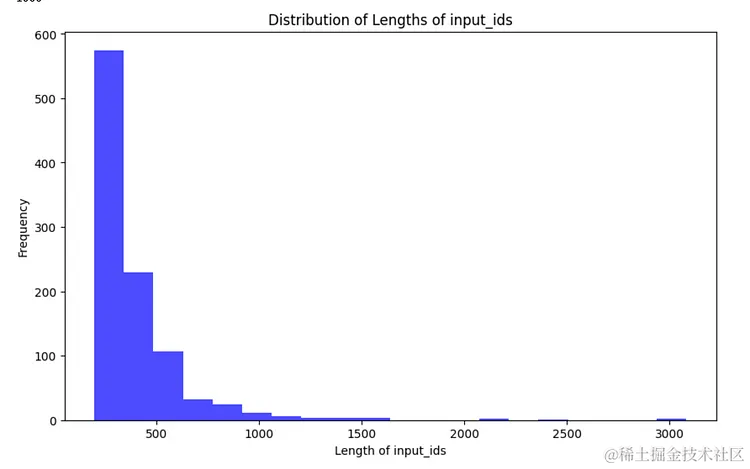
Source: Image created by Author
4.7 步骤 7:在数据的左侧添加 padding ,以减少内存的使用
max_length = 320 # This was an appropriate max length for my dataset

# redefine the tokenize function and tokenizer

tokenizer = AutoTokenizer.from_pretrained(
    base_model_id,
    padding_side="left",
    add_eos_token=True,
    add_bos_token=True,
)
tokenizer.pad_token = tokenizer.eos_token


def tokenize(prompt):
    result = tokenizer(
        prompt,
        truncation=True,
        max_length=max_length,
        padding="max_length",
    )
    result["labels"] = result["input_ids"].copy()
    return result

tokenized_train_dataset = train_dataset.map(generate_and_tokenize_prompt)
tokenized_val_dataset = eval_dataset.map(generate_and_tokenize_prompt)

untokenized_text = tokenizer.decode(tokenized_train_dataset[4]['input_ids'])
print(untokenized_text)

# Output
<s> Given a target sentence construct the underlying meaning representation of the input sentence as a single function with attributes and attribute values.
    This function should describe the target string accurately and the function must be one of the following ['inform', 'request', 'give_opinion', 'confirm', 'verify_attribute', 'suggest', 'request_explanation', 'recommend', 'request_attribute'].
    The attributes must be one of the following: ['name', 'exp_release_date', 'release_year', 'developer', 'esrb', 'rating', 'genres', 'player_perspective', 'has_multiplayer', 'platforms', 'available_on_steam', 'has_linux_release', 'has_mac_release', 'specifier']

    ### Target sentence:
    When did Virgin Australia start operating?
    Here is some context: Virgin Australia, the trading name of Virgin Australia Airlines Pty Ltd, is an Australian-based airline. It is the largest airline by fleet size to use the Virgin brand. It commenced services on 31 August 2000 as Virgin Blue, with two aircraft on a single route. It suddenly found itself as a major airline in Australia's domestic market after the collapse of Ansett Australia in September 2001. The airline has since grown to directly serve 32 cities in Australia, from hubs in Brisbane, Melbourne and Sydney.
    [/INST] Virgin Australia commenced services on 31 August 2000 as Virgin Blue, with two aircraft on a single route.</s></s>
plot_data_lengths(tokenized_train_dataset, tokenized_val_dataset)
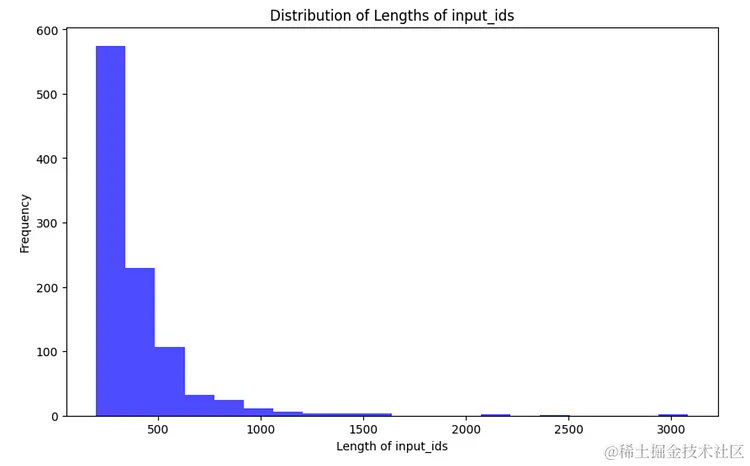
Source: Image created by Author
4.8 步骤 8:设置 LoRA
from peft import prepare_model_for_kbit_training

model.gradient_checkpointing_enable()
model = prepare_model_for_kbit_training(model)

def print_trainable_parameters(model):
    """
    Prints the number of trainable parameters in the model.
    """
    trainable_params = 0
    all_param = 0
    for _, param in model.named_parameters():
        all_param += param.numel()
        if param.requires_grad:
            trainable_params += param.numel()
    print(
        f"trainable params: {trainable_params} || all params: {all_param} || trainable%: {100 * trainable_params / all_param}"
    )

from peft import LoraConfig, get_peft_model

config = LoraConfig(
    r=8,
    lora_alpha=16,
    target_modules=[
        "q_proj",
        "k_proj",
        "v_proj",
        "o_proj",
        "w1",
        "w2",
        "w3",
        "lm_head",
    ],
    bias="none",
    lora_dropout=0.05,  # Conventional
    task_type="CAUSAL_LM",
)

model = get_peft_model(model, config)
print_trainable_parameters(model)

# Apply the accelerator. You can comment this out to remove the accelerator.
model = accelerator.prepare_model(model)

# Output
trainable params: 120350720 || all params: 23602952192 || trainable%: 0.5098968934945001
4.9 步骤 9:进行训练
import transformers
from datetime import datetime

if torch.cuda.device_count() > 1: # If more than 1 GPU
    model.is_parallelizable = True
    model.model_parallel = True

project = "databricks-dolly-finetune"
base_model_name = "mixtral"
run_name = base_model_name + "-" + project
output_dir = "./" + run_name

tokenizer.pad_token = tokenizer.eos_token

trainer = transformers.Trainer(
    model=model,
    train_dataset=tokenized_train_dataset,
    eval_dataset=tokenized_val_dataset,
    args=transformers.TrainingArguments(
        output_dir=output_dir,
        warmup_steps=5,
        per_device_train_batch_size=1,
        gradient_checkpointing=True,
        gradient_accumulation_steps=4,
        max_steps=500,
        learning_rate=2.5e-5,
        logging_steps=25,
        fp16=True,
        optim="paged_adamw_8bit",
        logging_dir="./logs",        # Directory for storing logs
        save_strategy="steps",       # Save the model checkpoint every logging step
        save_steps=50,                # Save checkpoints every 50 steps
        evaluation_strategy="steps", # Evaluate the model every logging step
        eval_steps=50,               # Evaluate and save checkpoints every 50 steps
        do_eval=True,                # Perform evaluation at the end of training
        report_to="wandb",           # Comment this out if you don't want to use weights & baises
        run_name=f"{run_name}-{datetime.now().strftime('%Y-%m-%d-%H-%M')}"          # Name of the W&B run (optional)
    ),
    data_collator=transformers.DataCollatorForLanguageModeling(tokenizer, mlm=False),
)

model.config.use_cache = False  # silence the warnings. Please re-enable for inference!
trainer.train()
4.10 步骤 10:使用训练完毕的模型
import torch
from transformers import AutoTokenizer, AutoModelForCausalLM, BitsAndBytesConfig

base_model_id = "mistralai/Mixtral-8x7B-v0.1"
bnb_config = BitsAndBytesConfig(
    load_in_4bit=True,
    bnb_4bit_use_double_quant=True,
    bnb_4bit_compute_dtype=torch.bfloat16
)

base_model = AutoModelForCausalLM.from_pretrained(
    base_model_id,  # Mixtral, same as before
    quantization_config=bnb_config,  # Same quantization config as before
    device_map="auto",
    trust_remote_code=True,
    use_auth_token=True
)

eval_tokenizer = AutoTokenizer.from_pretrained(
    base_model_id,
    add_bos_token=True,
    trust_remote_code=True,
)
from peft import PeftModel

ft_model = PeftModel.from_pretrained(base_model, "mixtral-databricks-dolly-finetune/checkpoint-100")
eval_prompt = """Given a question and some additional context, provide an answer

### Target sentence:
Question: When was Tomoaki Komorida born?
Here is some context: Komorida was born in Kumamoto Prefecture on July 10, 1981. After graduating from high school, he joined the J1 League club Avispa Fukuoka in 2000. Although he debuted as a midfielder in 2001, he did not play much and the club was relegated to the J2 League at the end of the 2001 season. In 2002, he moved to the J2 club Oita Trinita. He became a regular player as a defensive midfielder and the club won the championship in 2002 and was promoted in 2003. He played many matches until 2005. In September 2005, he moved to the J2 club Montedio Yamagata. In 2006, he moved to the J2 club Vissel Kobe. Although he became a regular player as a defensive midfielder, his gradually was played less during the summer. In 2007, he moved to the Japan Football League club Rosso Kumamoto (later Roasso Kumamoto) based in his local region. He played as a regular player and the club was promoted to J2 in 2008. Although he did not play as much, he still played in many matches. In 2010, he moved to Indonesia and joined Persela Lamongan. In July 2010, he returned to Japan and joined the J2 club Giravanz Kitakyushu. He played often as a defensive midfielder and center back until 2012 when he retired.

### Response:
"""

model_input = eval_tokenizer(eval_prompt, return_tensors="pt").to("cuda")

ft_model.eval()

with torch.no_grad():
    print(eval_tokenizer.decode(ft_model.generate(**model_input, max_new_tokens=100)[0], skip_special_tokens=True))

Given a question and some additional context, provide an answer

### Target sentence:
Question: When was Tomoaki Komorida born?
Here is some context: Komorida was born in Kumamoto Prefecture on July 10, 1981. After graduating from high school, he joined the J1 League club Avispa Fukuoka in 2000. Although he debuted as a midfielder in 2001, he did not play much and the club was relegated to the J2 League at the end of the 2001 season. In 2002, he moved to the J2 club Oita Trinita. He became a regular player as a defensive midfielder and the club won the championship in 2002 and was promoted in 2003. He played many matches until 2005. In September 2005, he moved to the J2 club Montedio Yamagata. In 2006, he moved to the J2 club Vissel Kobe. Although he became a regular player as a defensive midfielder, his gradually was played less during the summer. In 2007, he moved to the Japan Football League club Rosso Kumamoto (later Roasso Kumamoto) based in his local region. He played as a regular player and the club was promoted to J2 in 2008. Although he did not play as much, he still played in many matches. In 2010, he moved to Indonesia and joined Persela Lamongan. In July 2010, he returned to Japan and joined the J2 club Giravanz Kitakyushu. He played often as a defensive midfielder and center back until 2012 when he retired.

### Response:
Tomoaki Komorida was born on July 10, 1981.
五、结论
利用 QLoRA 对 Mixtral-8x7B 模型进行微调是自然语言处理 (NLP) 领域的一个重要进展,它将模型性能提升到了新的高度。这一缜密的过程融合了量化和 LoRA 等前沿技术,为超越基准(benchmarks)提供了一条稳健的途径,甚至在各种评估指标上超越了强大的 Llama 2 70B 模型。
本教程的核心在于使用QLoRA进行微调,利用bitsandbytes以4位精度实例化模型,并运用Hugging Face 🤗的PEFT库。该指南不仅概述了微调方法,还揭示了实践过程中可能遇到的问题,如OutOfMemory errors,为用户提供了精确的解决途径。
从本质上讲,该教程并非是一个技术指南,更像一个倡导模型微调最佳实践的指引。它倡导协作式微调,请邀请其他研究人员和从业者一同踏上推动语言理解模型发展的旅程。
前沿技术、详细的指导以及合作共赢的态度使得该教程对于NLP社区来说是一个非常重要且不可或缺的资源,期望能够引导 NLP 社区进一步提高模型性能,丰富理解能力。
Resources:
● Mixtral-8x7b[2]
● Thanks to Harper Carroll[2]
文中链接
[1]https://mistral.ai/news/mixtral-of-experts/
[2]https://huggingface.co/blog/mixtral
[3]https://twitter.com/HarperSCarroll

