前端学习笔记 3:Vue 工程
上一篇文章介绍了如何在单一 Html 页面中使用 Vue,本文介绍如何从头开始用 Vue 构建一个前端工程项目。
1.环境准备
Vue 框架代码的创建依赖于 Node.js,因此需要先安装 Node.js。
2.创建和启动
2.1.创建
通过以下命令可以创建 Vue 的框架代码:
npm create vue@latest
- 该命令执行后会先检查是否安装 create-vue 工具,如果没有,就安装。然后再使用 create-vue 创建框架代码。
- npm(Node Package Manager)是 NodeJS 的包管理工具,类似于 Linux 的 RPM 或 YUM。
在执行过程中会询问是否启用一些功能模块:
Vue.js - The Progressive JavaScript Framework

√ 请输入项目名称: ... vue-project
√ 是否使用 TypeScript 语法? ... 否 / 是
√ 是否启用 JSX 支持? ... 否 / 是
√ 是否引入 Vue Router 进行单页面应用开发? ... 否 / 是
√ 是否引入 Pinia 用于状态管理? ... 否 / 是
√ 是否引入 Vitest 用于单元测试? ... 否 / 是
√ 是否要引入一款端到端(End to End)测试工具? » 不需要
√ 是否引入 ESLint 用于代码质量检测? ... 否 / 是
默认是否。
安装好框架代码后,还需要进入工程目录安装相关依赖:
cd .\vue-project\
npm install
2.2.启动
执行npm run dev命令可以启动 Vue 项目:
VITE v5.0.10  ready in 2711 ms

➜  Local:   http://localhost:5173/
➜  Network: use --host to expose
➜  press h + enter to show help
就像控制台提示信息中显示的,运行 Vue 项目的 Nodejs 服务端地址默认是 http://localhost:5173/,前往该地址就能看到一个默认的欢迎页面。
除了命令行启动外,还可以用 VSCode 启动:
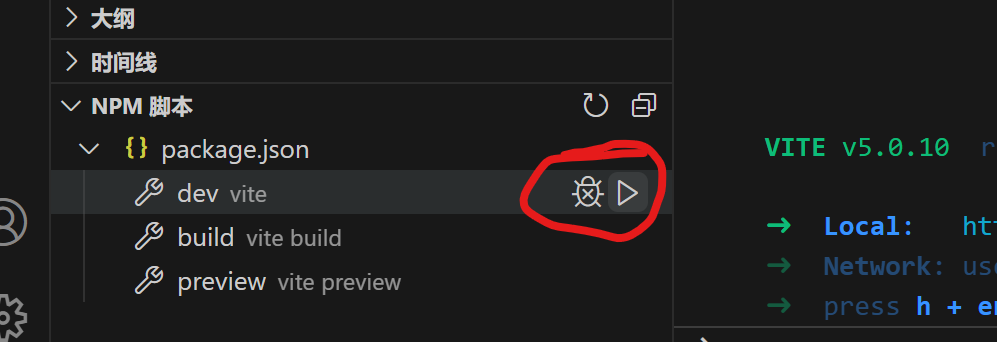
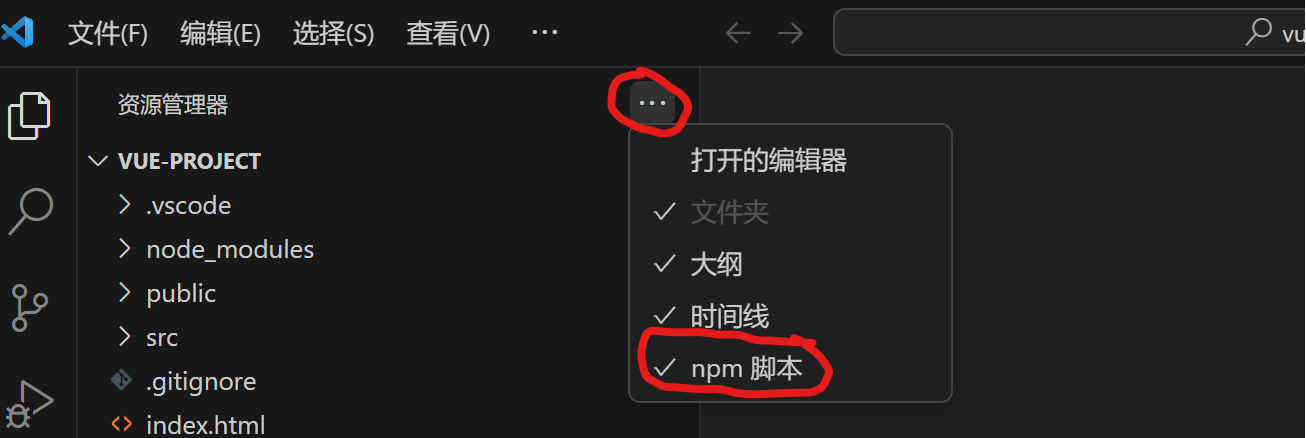
如果界面上没有 NPM 脚本 这一栏,可以通过这里开启:
3.快速开始
下面简单分析一下工程默认的欢迎页的显示逻辑。
实际上浏览器访问时加载的是index.html文件:

该文件通过<script type="module" src="/src/main.js"></script>这行代码以模块化的方式加载了 JS 文件/src/main.js:

在main.js中,通过import { createApp } from 'vue'导入了 Vue 的createApp函数,与之前不同的是,因为已经用 npm 工具安装了本地依赖(npm install),所以这里是通过本地导入,而非从在线的 JS 文件导入 Vue 函数。
npm 安装的本地依赖模块位于
node_modules目录下。
这里最重要的是import App from './App.vue',从App.vue文件导入了一个 App 对象,之后的代码createApp(App).mount('#app')使用该对象作为参数创建了 Vue 实例。
App.vue文件包含三部分:
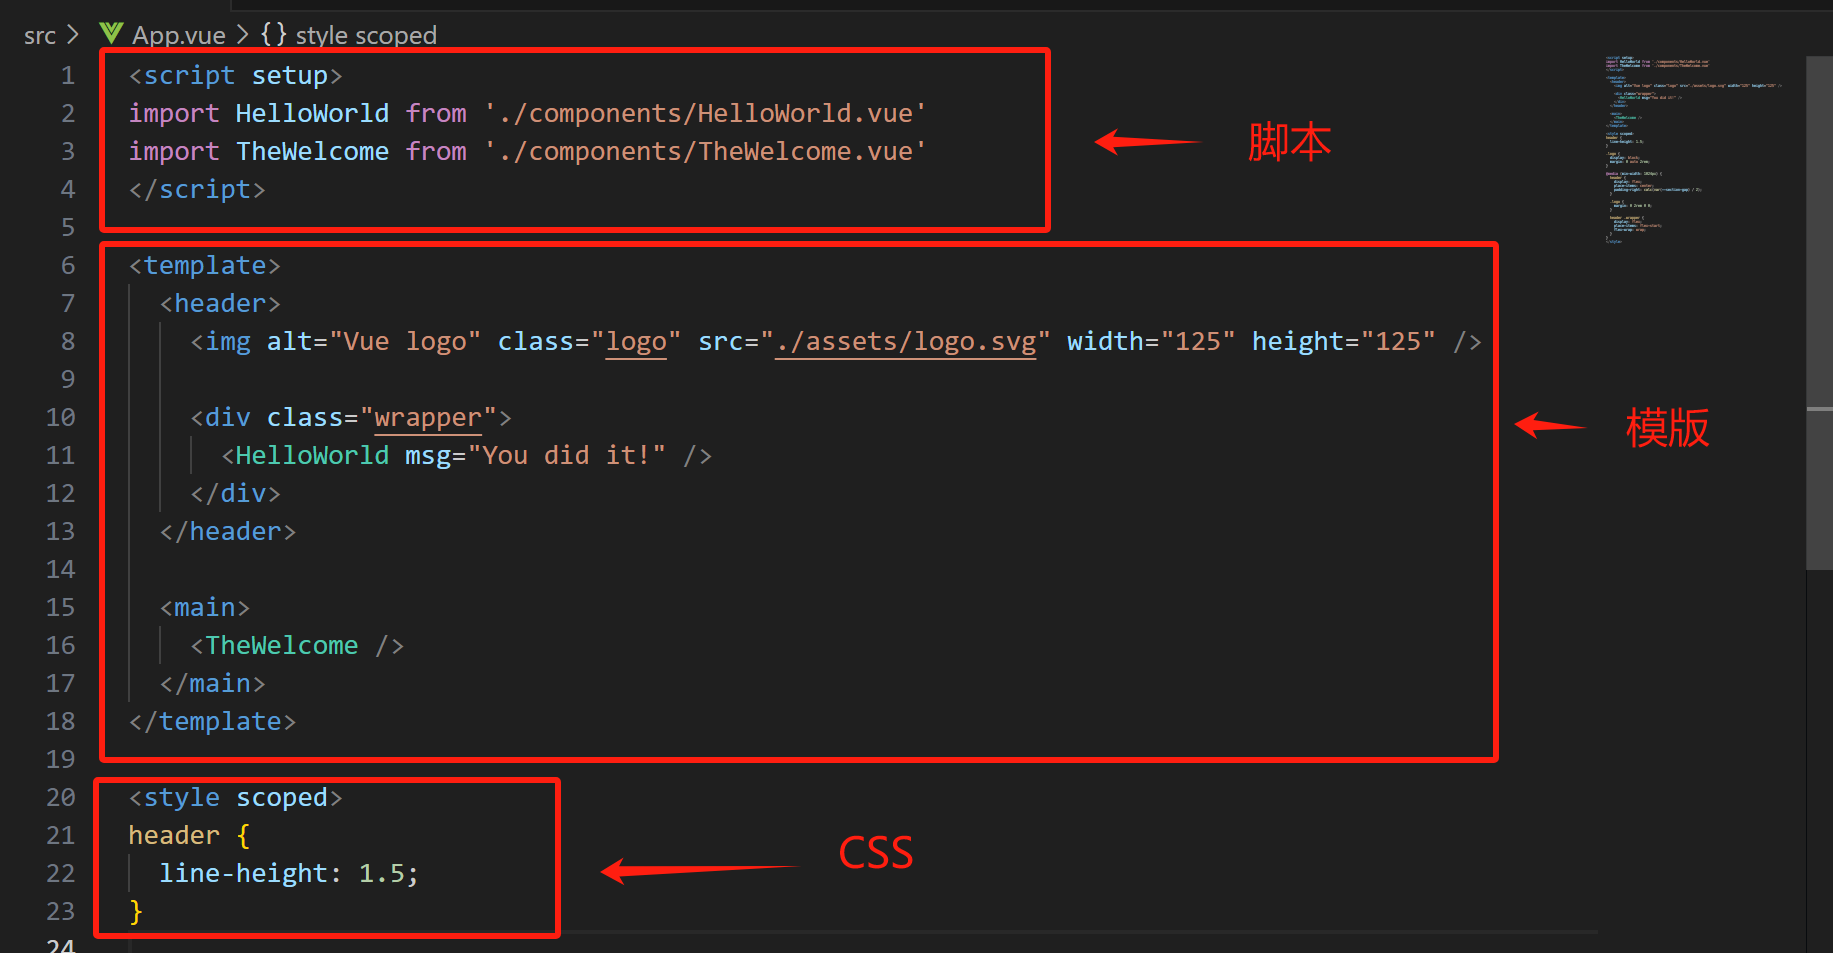
事实上,在开发基于 Vue 的前端项目时,我们主要工作是创建和修改 Vue 文件。
作为示例,这里可以创建一个Hello.vue:
<template>
    <h1>Hello World!</h1>
</template>
<style>
h1 {
    color: aqua;
}
</style>
要在页面中显示,还需要在main.js中替换导入代码:
import App from './Hello.vue'
在 Vue 文件中同样可以像前文那样为 Vue 实例提供数据和方法:
<script>
export default {
    data() {
        return {
            msg: 'Hello World!'
        }
    }
}
</script>
<template>
    <h1>{{ msg }}</h1>
</template>
这里通过export default {...}指定了Hello.vue文件默认导出的对象内容,该对象会在main.js中导入为App对象,也就是用于创建 Vue 实例的参数对象,因此我们可以在export default {...}定义的默认导出对象中定义data或methods等 Vue 需要的方法或属性。
除了上面的方式外,还可以借助ref函数定义数据或方法:
<script setup>
import {ref} from 'vue'
const msg = ref('Hello World!')
</script>
注意,这里的
script有setup属性。
4.API 风格
Vue 的 API 有两种风格,这里分别用两种风格编写同样的功能页面进行说明。
4.1.选项式
定义一个 Count.vue 文件:
<script>
export default {
    data() { //定义响应式数据
        return {
            num: 0
        }
    },
    methods: { // 定义 Vue 方法
        count() {
            this.num++;
        }
    },
    mounted(){ // 定义钩子函数
        console.log("Vue 实例已加载...")
    }
}
</script>
<template>
    <button @click="count">count:{{ num }}</button>
</template>
要让该文件生效,还要在Hello.vue中导入:
<script setup>
import {ref} from 'vue'
const msg = ref('Hello World!')
import Count from './Count.vue'
</script>
<template>
    <h1>{{ msg }}</h1>
    <br/>
    <Count/>
</template>
注意
>Count/>标签,该标签的位置代表Count.vue文件中的模版插入的位置。
选项式的优点在于结构简单,便于理解,缺点是代码结构过于死板,不够灵活。
4.2.组合式
<script setup>
import { ref, onMounted } from 'vue'
// 定义响应式数据
const num = ref(0)
// 定义 Vue 方法
function count() {
    num.value++;
}
// 定义钩子函数
onMounted(() => {
    console.log("Vue 实例已加载...")
})
</script>
<template>
    <button @click="count">count:{{ num }}</button>
</template>
在组合式 API 中,需要用ref函数定义响应式数据,用特定的函数(比如 onMounted)定义 Vue 生命周期的钩子方法。特别需要注意的是,组合式 API 中,ref定义的响应式数据有一个value属性,表示响应式数据的值,因此这里在count函数中,自增使用的是num.value++而非num++。
5 常用函数
5.1.setup
在组合式 API 中,script标签上使用了一个setup属性,这个属性实际上是一个语法糖,如果不使用这种简便写法,代码可能需要写成下面的形式:
<script>
export default {
    setup() {
        const message = 'Hello World!'
        const logMessage = () => {
            console.log(message)
        }
        return { message, logMessage }
    }
}
</script>
<template>
    {{ message }}
    <button @click="logMessage">log message</button>
</template>
在上面这个示例中,setup是 Vue 生命周期的钩子函数,其中定义的变量和方法通过返回值的方式暴露,这样就可以在模版中使用。
使用语法糖后可以简写为:
<script setup>
const message = 'Hello World!'
const logMessage = () => {
    console.log(message)
}
</script>
<template>
    {{ message }}
    <button @click="logMessage">log message</button>
</template>
不再需要以返回值方式暴露定义的变量和方法。
setup 钩子会在 beforeCreate 钩子之前调用:
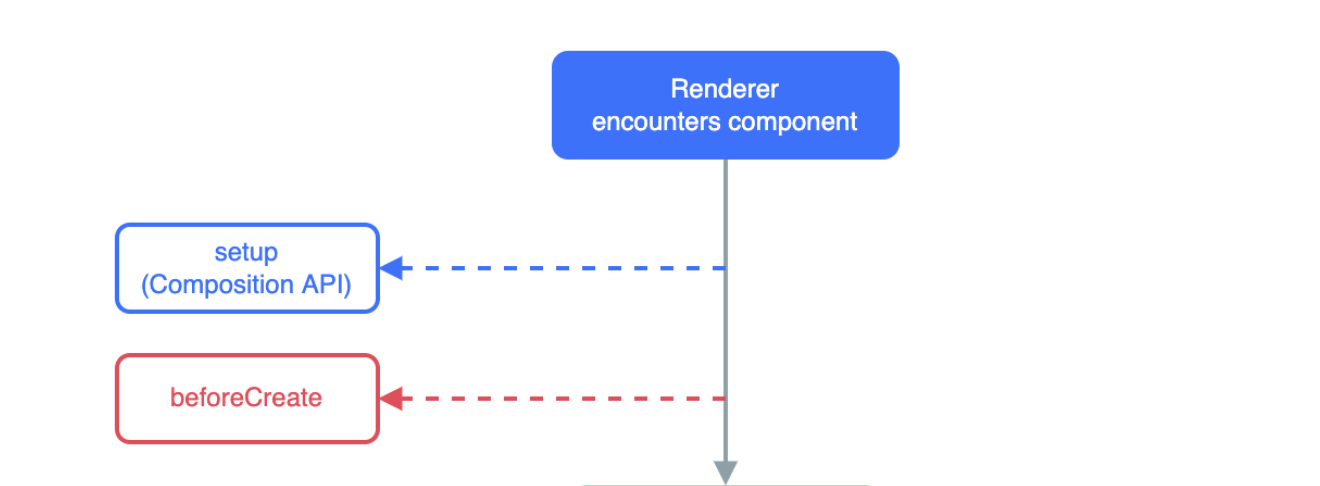
可以通过以下代码证实:
<script>
export default {
    setup() {
        console.log('setup()')
    },
    beforeCreate() {
        console.log('beforeCreate()')
    }
}
</script>
5.2.reactive & ref
普通变量改变后是不会触发视图改变的:
<script setup>
let count = 0
const increase = () => {
    count++
}
</script>
<template>
    <button @click="increase">{{ count }}</button>
</template>
点击事件虽然会改变 count 的值,但按钮上的文字并不会同样改变。
如果要让数据改变反应到视图,就需要使用响应式数据,可以通过 vue 提供的reactive或ref函数实现。
reactive函数可以接收一个对象,并返回一个响应式数据:
<script setup>
import {reactive} from 'vue'
const counter = reactive({
    num: 0
})
const increase = ()=>{
    counter.num++
}
</script>
<template>
    <button @click="increase">{{ counter.num }}</button>
</template>
注意,reactive只能接收对象,不能处理基础类型。
ref的适用范围比reactive更广,它可以接收基础类型或对象,返回一个响应式对象:
<script setup>
import { ref } from 'vue'
const count = ref(0)
const increase = () => {
    count.value++
}
</script>
<template>
    <button @click="increase">{{ count }}</button>
</template>
注意,ref返回的是一个响应式对象,要对值进行修改,需要使用xxx.value属性,在模版中可以直接使用,不需要使用.value。
5.3.computed
computed 可以用于基于已有的响应式数据的计算,返回的响应式数据将随着参与计算的响应式数据的改变而改变:
<script setup>
import { ref, computed } from 'vue';
const num1 = ref(0)
const num2 = ref(0)
const sum = computed(() => {
    return num1.value + num2.value
})
</script>
<template>
    <input type="number" v-model="num1" style="width: 50px;"/>+<input type="number" v-model="num2" style="width: 50px;"/>={{ sum }}
</template>
需要注意的是:
- 不要在 Computed 函数中加入计算之外的内容
- 不要直接修改 Computed 函数返回的计算后的变量的值
5.4.watch
5.4.1.监听单个
watch可以监听响应式数据的改变,响应式数据的值发生变化时会触发绑定的函数:
<script setup>
import { ref, watch } from 'vue'
const count = ref(0)
const increase = () => {
    count.value++
}
watch(count, (newVal, oldVal) => {
    console.log("count发生改变,newVal:" + newVal + " oldVal:" + oldVal)
})
</script>
<template>
    <button @click="increase">{{ count }}</button>
</template>
5.4.2.监听多个
可以用watch监听多个响应式数据,其中任意一个值发生变化就会触发绑定的函数:
<script setup>
import { ref, watch } from 'vue';
const num1 = ref(0)
const num2 = ref(0)
const sum = ref(num1.value + num2.value)
const history = ref([])
watch([num1, num2], ([newNum1, newNum2], [oldNum1, oldNum2]) => {
    history.value.push({
        num1: oldNum1,
        num2: oldNum2,
        sum: oldNum1 + oldNum2
    })
    sum.value = newNum1 + newNum2
})
</script>
<template>
    <li v-for="his in history">{{ his.num1 }}+{{ his.num2 }}={{ his.sum }}</li>
    <input type="number" v-model="num1" style="width: 50px;" />+<input type="number" v-model="num2" style="width: 50px;" />={{ sum }}
</template>
这里用watch同时监听两个输入框绑定的响应式数据,值发生变化后保存旧值以及计算结果到历史记录,并计算新值的和。这里用watch实现了类似computed的功能,且赋予了更多功能(历史记录)。
5.4.3.immediate
watch可以添加一个immediate参数,这样会在页面加载后立即执行一次回调函数,而不是等到监听的数据改变时才执行:
<script setup>
import { ref, watch } from 'vue'
const count = ref(0)
const increase = () => {
    count.value++
}
watch(count, (newVal, oldVal) => {
    console.log("count发生改变,newVal:" + newVal + " oldVal:" + oldVal)
}, { immediate: true })
</script>
<template>
    <button @click="increase">{{ count }}</button>
</template>
可以在控制台看到,页面刷新后会立即输出:
count发生改变,newVal:0 oldVal:undefined
5.4.4.深层监听
默认情况下,watch 是浅层监听,也就是说,当监听的响应式数据是对象而非基本数据时,其中的嵌套属性发生变化,是不会触发监听回调的:
<script setup>
import { ref, watch } from 'vue';
const computer = ref({
    num1: 0,
    num2: 0,
})
const sum = ref(computer.value.num1 + computer.value.num2)
const history = ref([])
watch(computer, (newComputer, oldComputer) => {
    history.value.push({
        num1: oldComputer.num1,
        num2: oldComputer.num2,
        sum: oldComputer.num1 + oldComputer.num2
    })
    sum.value = newComputer.num1 + newComputer.num2
})
</script>
<template>
    <li v-for="his in history">{{ his.num1 }}+{{ his.num2 }}={{ his.sum }}</li>
    <input type="number" v-model="computer.num1" style="width: 50px;" />+<input type="number" v-model="computer.num2"
        style="width: 50px;" />={{ sum }}
</template>
上面代码中的监听实际上并不会生效。
如果要监听对象中嵌套的属性变化,需要使用深层监听:
watch(computer, (newComputer, oldComputer) => {
    history.value.push({
        num1: oldComputer.num1,
        num2: oldComputer.num2,
        sum: oldComputer.num1 + oldComputer.num2
    })
    sum.value = newComputer.num1 + newComputer.num2
}, { deep: true })
只需要在watch参数中加入{deep: true}即可。
5.4.5.精确监听
如果要对响应式对象中的某个属性值进行监听,可以使用精确监听:
watch(() => computer.value.num1, (newNum1, oldNum1) => {
    history.value.push({
        num1: oldNum1,
        num2: computer.value.num2,
        sum: oldNum1 + computer.value.num2
    })
    sum.value = newNum1 + computer.value.num2
})
此时watch需要两个参数,都是函数,第一个函数返回需要监听的数据,第二个函数是监听触发时的函数。
6 生命周期
组合式 API 下生命周期函数与选项式API下命名有所不同:

可以在导出后直接使用:
<script setup>
import { onMounted } from 'vue';
onMounted(()=>{
    console.log("onMounted is called.")
})
</script>
同一个生命周期函数可以使用多次,会在合适的时候依次调用对应的回调:
<script setup>
import { onMounted } from 'vue';
onMounted(()=>{
    console.log("onMounted is called 1.")
})
onMounted(()=>{
    console.log("onMounted is called 2.")
})
</script>
7.父子通信
7.1.父传子
父组件要传递信息给子组件,要将信息附加在子组件的属性上:
<script setup>
import SonVue from './Son.vue';
</script>
<template>
    <div id="app">
        <SonVue message="Hello World!"/>
    </div>
</template>
子组件可以使用编译器宏函数defineProps获取信息:
<script setup>
defineProps({
    message: String
})
</script>
<template>
    <div>{{ message }}</div>
</template>
编译器宏函数不需要导入就可以直接使用。
如果需要在子组件的脚本中使用信息,可以通过宏函数的返回值:
<script setup>
const props = defineProps({
    message: String
})
console.log(props.message)
</script>
<template>
    <div>{{ message }}</div>
</template>
除了传递静态数据,还可以传递响应式数据,这需要父组件进行数据绑定:
<script setup>
import SonVue from './Son.vue';
import { ref } from 'vue';
const count = ref(0)
const doCount = () => {
    setTimeout(() => {
        if (count.value >= 20) {
            return
        }
        count.value++
        doCount()
    }, 1000)
}
doCount()
</script>
<template>
    <div id="app">
        <SonVue :count="count" message="Hello World!" />
    </div>
</template>
子组件可以用同样的方式接收:
<script setup>
const props = defineProps({
    message: String,
    count: Number
})
console.log(props.message)
</script>
<template>
    <div>{{ message }}</div>
    <br/>
    <div>{{ count }}</div>
</template>
刷新后可以看到页面中子组件里count值的变化。
7.2.子传父
首先,需要在父组件中定义一个函数,并绑定到子组件的事件上:
<script setup>
import Son2Vue from './Son2.vue';
const getMessage = (msg) => {
    console.log("Get message from son: " + msg)
}
</script>
<template>
    <div id="app">
        <Son2Vue @get-message="getMessage"></Son2Vue>
    </div>
</template>
在子组件中,可以通过编译器宏函数defineEmits获取一个emits对象,可以通过该对象执行之前绑定的事件:
<script setup>
const emits = defineEmits(['get-message'])
const sendMessage = () => {
    emits('get-message', 'Hello World!')
}
</script>
<template>
    <button @click="sendMessage">send message to father</button>
</template>
7.3.跨层通信
可以使用provide和inject函数在跨多层组件之间进行通信:
Top.vue:
<script setup>
import { provide } from 'vue';
import MiddleVue from './Middle.vue';
provide('top-msg', 'Hello World!')
</script>
<template>
    <MiddleVue></MiddleVue>
</template>
Middle.vue:
<script setup>
import FloorVue from './Floor.vue';
</script>
<template>
    <FloorVue></FloorVue>
</template>
Floor.vue:
<script setup>
import { inject } from 'vue';

const topMsg = inject('top-msg')
</script>
<template>
    {{ topMsg }}
</template>
就像上边的示例那样,需要在顶层组件中使用provide(key, value)提供数据,在底层组件中用inject(key)获取数据。
用这种方法同样可以传递响应式数据:
<script setup>
import { provide, ref } from 'vue';
import MiddleVue from './Middle.vue';
provide('top-msg', 'Hello World!')
const count = ref(0)
provide('top-count', count)
setTimeout(() => {
    count.value = 100
}, 3000)
</script>
<template>
    <MiddleVue></MiddleVue>
</template>
<script setup>
import { inject } from 'vue';

const topMsg = inject('top-msg')
const topCount = inject('top-count')
</script>
<template>
    {{ topMsg }}
    <br/>
    {{ topCount }}
</template>
还可以传递函数:
<script setup>
// ...
const increase = () => {
    count.value++
}
provide('top-increase', increase)
</script>
<template>
    <MiddleVue></MiddleVue>
</template>
<script setup>
// ...
const topIncrease = inject('top-increase')
</script>
<template>
    {{ topMsg }}
    <br/>
    {{ topCount }}
    <br/>
    <button @click="topIncrease">increase</button>
</template>
8.模版引用
8.1.引用 DOM 对象
可以通过ref对象获取模版或DOM对象的引用:
<script setup>
import { onMounted, ref } from 'vue';
// 定义 Ref 对象
const h1Ref = ref(null)
// 在组件挂载后使用 Ref 对象
onMounted(()=>{
    console.log(h1Ref.value)
})
</script>
<template>
    <!-- 绑定 Ref 对象 -->
    <h1 ref="h1Ref">Hello World!</h1>
</template>
需要注意的是,需要在组件挂载完毕后才能获取 DOM 对象,因此这里将打印 DOM 对象内容的逻辑放在onMounted钩子中。
8.2.引用子模版
获取模版引用的方式是类似的:
<script setup>
import { onMounted, ref } from 'vue';
import Son3Vue from './Son3.vue';
const sonRef = ref(null)
onMounted(() => {
    console.log(sonRef.value)
})
</script>
<template>
    <Son3Vue ref="sonRef" />
</template>
模版Son3.vue的内容如下:
<script setup>
const message = 'Hello World!'
const logMessage = () => {
    console.log(message)
}
</script>
<template></template>
需要注意的是,默认情况下子模版中定义的变量和方法对父模版是不可见的,所以这里打印的子模版对象中并没有message和logMessage属性。如果要暴露子模版的属性给父模版,可以使用编译器宏函数defineExpose:
<script setup>
const message = 'Hello World!'
const logMessage = () => {
    console.log(message)
}
defineExpose({
    message,
    logMessage
})
</script>
<template></template>
现在就可以在父模版中使用子模版的属性和方法:
<script setup>
import { onMounted, ref } from 'vue';
import Son3Vue from './Son3.vue';
const sonRef = ref(null)
onMounted(() => {
    console.log(sonRef.value)
    sonRef.value.logMessage()
})
</script>
<template>
    <Son3Vue ref="sonRef" />
</template>
9.案例
下面是一个简单案例,用 Vue 工程的方式创建一个ArticleList.vue,用于展示文章列表和搜索框。
在编写这个 Vue 文件之前,需要先在本地安装 axios 的依赖:
npm install axios
下面是ArticleList.vue的完整内容:
<script setup>
import { ref, onMounted } from 'vue'
import axios from 'axios'
// 创建表格对应的响应式数据
const articles = ref([])
// Vue 实例初始化后加载表格数据
onMounted(() => {
    axios.get("http://localhost:8080/article/getAll")
        .then(result => {
            articles.value = result.data
        })
        .catch(error => {
            console.log(error)
        })
})
// 创建搜索条件对应的响应式数据
const conditions = ref({
    category: '',
    state: ''
})
// 定义搜索绑定事件
const search = () => {
    axios.get("http://localhost:8080/article/search", { params: {...conditions.value} })
        .then(result => {
            articles.value = result.data
        })
        .catch(error => {
            console.log(error)
        })
}
</script>
<template>
    <div>
        文章分类:<input type="text" v-model="conditions.category"/>
        发布状态:<input type="text" v-model="conditions.state"/>
        <button @click="search">搜索</button>
        <br />
        <br />
        <table border="1">
            <tr>
                <td>文章标题</td>
                <td>分类</td>
                <td>发表时间</td>
                <td>状态</td>
                <td>操作</td>
            </tr>
            <tr v-for="article in articles">
                <td>{{ article.title }}</td>
                <td>{{ article.category }}</td>
                <td>{{ article.time }}</td>
                <td>{{ article.state }}</td>
                <td>
                    <button>编辑</button>
                    <button>删除</button>
                </td>
            </tr>
        </table>
    </div>
</template>
注意,这里search函数内调用axios.get方法传参时使用了 ES6 的解构赋值:
{ params: {...conditions.value} }
这样可以让代码更简洁。
当然你也可以使用传统匿名函数分别给属性赋值的方式。
9.1.封装函数
上面的案例有一个缺陷——通过 Axios 调用接口获取数据的部分没有单独封装成函数,这样不利于其它部分的代码进行复用。更好的做法是将这些会被复用的逻辑抽取成单独的函数保存在单独的 JS 文件中,在需要使用的地方导入所需的函数并进行调用。
首先在src目录下创建一个/api/article.js文件:
import axios from 'axios'

export async function getAllArticlesService(){
    return await axios.get("http://localhost:8080/article/getAll")
    .then(result => {
        return result.data
    })
    .catch(error => {
        console.log(error)
    })
}
对 ArticleList.vue 进行重构:
import { getAllArticlesService } from '@/api/article.js'
// ...
// Vue 实例初始化后加载表格数据
onMounted(async () => {
    articles.value = await getAllArticlesService()
})
需要注意的是,这里使用了await与async关键字,这是因为抽取后的函数getAllArticlesService中的axios.get本质上是异步调用,因此没办法同步地获取其返回值,所以需要在调用时添加await关键字将其变成同步调用,而此时进行调用的函数(getAllArticlesService)本身变成了异步,所以要添加async关键字。同理,在调用onMounted钩子方法时,同样需要给作为参数的匿名函数加上async,并且在其中的getAllArticlesService调用加上await。
- 如果不使用
await和async,就不会有任何数据加载。因为异步调用的关系,响应式数据的赋值语句实际上还没有等到异步调用执行并返回就已经被主线程执行完毕,所以不会有任何实际数据被赋值。- 在导入时,如果导入的是本地
src目录下的资源,可以使用@/代表src目录。
搜索文章相关调用同样可以进行封装,这里不再赘述。
9.2.axios 实例
上面的案例还存在一个瑕疵,单个 JS 文件中的多次 Axios 调用实际上使用的是相同的服务端域名(HOST),只是具体的接口路径不同。针对这个问题,可以使用 Axios 实例进行简化和统一设置:
import axios from 'axios'
const instance = axios.create({
    baseURL: 'http://localhost:8080'
});

export async function getAllArticlesService() {
    return await instance.get("/article/getAll")
        .then(result => {
            return result.data
        })
        .catch(error => {
            console.log(error)
        })
}
9.3.axios 拦截器
使用axios进行异步请求时,往往需要对响应结果进行相似的处理,比如:
instance.get("/article/getAll")
        .then(result => {
            return result.data
        })
        .catch(error => {
            console.log(error)
        })
对此,可以创建一个单独的 axios 实例进行复用,并且在这个实例上定义请求/响应拦截器对请求或响应进行统一处理。
添加/util/request.js
import axios from 'axios'
const instance = axios.create({
    baseURL: 'http://localhost:8080'
});
instance.interceptors.response.use(
    result => {
        return result.data
    },
    error => {
        console.log(error)
        return Promise.reject(error);
    }
)
export default instance
interceptors.response.use用于设置响应拦截器,接收两个参数,分别为调用成功(HTTP 状态码 2XX)和调用失败(HTTP 状态码不是 2XX)时的回调函数。
在article.js中导入:
import request from '@/util/request.js'

export async function getAllArticlesService() {
    return await request.get("/article/getAll")
}

export async function searchService(conditions) {
    return await request.get("/article/search", { params: conditions })
}
因为实例request设置了响应拦截器对结果进行统一处理,所以这里不需要再使用.then或.catch进行处理。
实际上内层的await和async关键字是可以省略的,只要最外层调用有即可:
import request from '@/util/request.js'

export function getAllArticlesService() {
    return request.get("/article/getAll")
}

export function searchService(conditions) {
    return request.get("/article/search", { params: conditions })
}
谢谢阅读,本文的完整示例代码见这里。
10.参考资料
- 1.1 ES6 教程 | 菜鸟教程 (runoob.com)
- 拦截器 | Axios中文文档 | Axios中文网 (axios-http.cn)
- 黑马程序员前端Vue3小兔鲜电商项目实战
