JWT、session、token区别和实现
这里需要用到Redis和JWT。
springboot版本是3.2.1
<dependency>
    <groupId>org.springframework.boot</groupId>
    <artifactId>spring-boot-starter-web</artifactId>
</dependency>
<dependency>
    <groupId>org.springframework.boot</groupId>
    <artifactId>spring-boot-starter-data-redis</artifactId>
</dependency>
<dependency>
    <groupId>org.apache.commons</groupId>
    <artifactId>commons-pool2</artifactId>
</dependency>
<dependency>
    <groupId>com.github.xiaoymin</groupId>
    <artifactId>knife4j-openapi3-jakarta-spring-boot-starter</artifactId>
    <version>4.3.0</version>
</dependency>
<!--redisson-->
<dependency>
    <groupId>org.redisson</groupId>
    <artifactId>redisson</artifactId>
    <version>3.14.1</version>
</dependency>

<!--通用基础配置boottest/lombok/hutool-->
<dependency>
    <groupId>org.springframework.boot</groupId>
    <artifactId>spring-boot-starter-test</artifactId>
    <scope>test</scope>
</dependency>
<dependency>
    <groupId>org.projectlombok</groupId>
    <artifactId>lombok</artifactId>
    <optional>true</optional>
</dependency>
<dependency>
    <groupId>cn.hutool</groupId>
    <artifactId>hutool-all</artifactId>
    <version>5.8.6</version>
</dependency>

<dependency>
    <groupId>org.springdoc</groupId>
    <artifactId>springdoc-openapi-ui</artifactId>
    <version>1.7.0</version>
</dependency>
<dependency>
    <groupId>org.springframework.boot</groupId>
    <artifactId>spring-boot-starter-data-redis-reactive</artifactId>
</dependency>
<dependency>
    <groupId>io.projectreactor</groupId>
    <artifactId>reactor-test</artifactId>
    <scope>test</scope>
</dependency>
<!-- JWT需要的包 -->
<dependency>
    <groupId>com.alibaba</groupId>
    <artifactId>fastjson</artifactId>
    <version>2.0.32</version>
</dependency>
<dependency>
    <groupId>com.auth0</groupId>
    <artifactId>java-jwt</artifactId>
    <version>4.3.0</version>
</dependency>
Knief4j配置
import io.swagger.v3.oas.models.OpenAPI;
import io.swagger.v3.oas.models.info.Contact;
import io.swagger.v3.oas.models.info.Info;
import org.springdoc.core.models.GroupedOpenApi;
import org.springframework.context.annotation.Bean;
import org.springframework.context.annotation.Configuration;

@Configuration
public class Knife4jConfig {
    // 创建 admin API分组
    @Bean
    public GroupedOpenApi sessionApi() {
        return GroupedOpenApi.builder()
                .group("session接口")
                .pathsToMatch("/session/**")
                .build();
    }

    // 创建 token API分组
    @Bean
    public GroupedOpenApi tokenApi() {
        return GroupedOpenApi.builder()
                .group("token接口")
                .pathsToMatch("/token/**")
                .build();
    }

    // 创建 jwt API分组
    @Bean
    public GroupedOpenApi JWTApi() {
        return GroupedOpenApi.builder()
                .group("jwt接口")
                .pathsToMatch("/jwt/**")
                .build();
    }

    @Bean
    public OpenAPI customerOpenApi() {
        return new OpenAPI().info(
                new Info()
                .title("接口文档")
                .version("1.0")
                .contact(new Contact()
                .name("bunny")));
    }
}
applicatuion.xml配置
spring:
  mvc:
    pathmatch:
      matching-strategy: ant_path_matcher

  data:
    redis:
      database: 0
      host: 192.168.31.140
      port: 6379
session
简介
session是浏览器存在内存中的一种验证方式,基于会话式的,如果服务器重启或者是浏览器关闭这一次会话结束才会重新生成新的session。
或者是设置session的过期时间,当到达过期时间时session也会失效
但是session好处在于,如果设定时间时半小时,如果这段时间用户一直在操作那么session会自动延长过期时间,当在这段时间内用户一直未操作那么才会过期。
优点
- 状态保持:会话允许服务器在多个页面请求之间保持用户的状态。这意味着用户在网站上浏览时,服务器可以跟踪他们的活动,包括登录状态、购物车内容等。
- 安全性:通过会话,服务器可以在不暴露用户信息的情况下跟踪用户的活动。相比于将用户信息直接存储在客户端(如cookie)中,使用会话可以提供更高的安全性。
- 用户体验:会话可以改善用户体验,因为它可以使用户在网站上进行交互时更加流畅,而不需要在每个页面都重新进行身份验证或者重新输入信息。
- 个性化服务:通过会话,网站可以根据用户的活动和偏好提供个性化的服务,比如推荐商品、定制内容等。
缺点
- 服务器负载:使用会话需要服务器在一段时间内保持用户状态,这可能会增加服务器的负载,尤其是在大量用户同时访问时。
- 存储开销:会话数据通常需要存储在服务器端,这可能会增加存储开销,尤其是对于大型网站来说。
- 跨设备问题:会话通常是与特定设备或浏览器相关联的,这可能导致在不同设备或浏览器上的一致性问题。
- 隐私问题:如果会话数据不正确处理或者未加密,可能会导致隐私问题,比如会话劫持或会话固定攻击。
session是比较安全的,缺点是不能跨设备,比如分布式中。我在和服务器A进行通信,这时候接口需要和服务器B进行通信时是不可能实现的因为是基于会话的,所以需要重新登录。
虽然说不可跨设备,在后面中我也会介绍session如何跨设备,这里需要使用到Redis,将信息存储在Redis中这样就可以做到跨设备了。
关于session存储在cookies中不安全的问题?
这里的案例会在后面代码中写到。
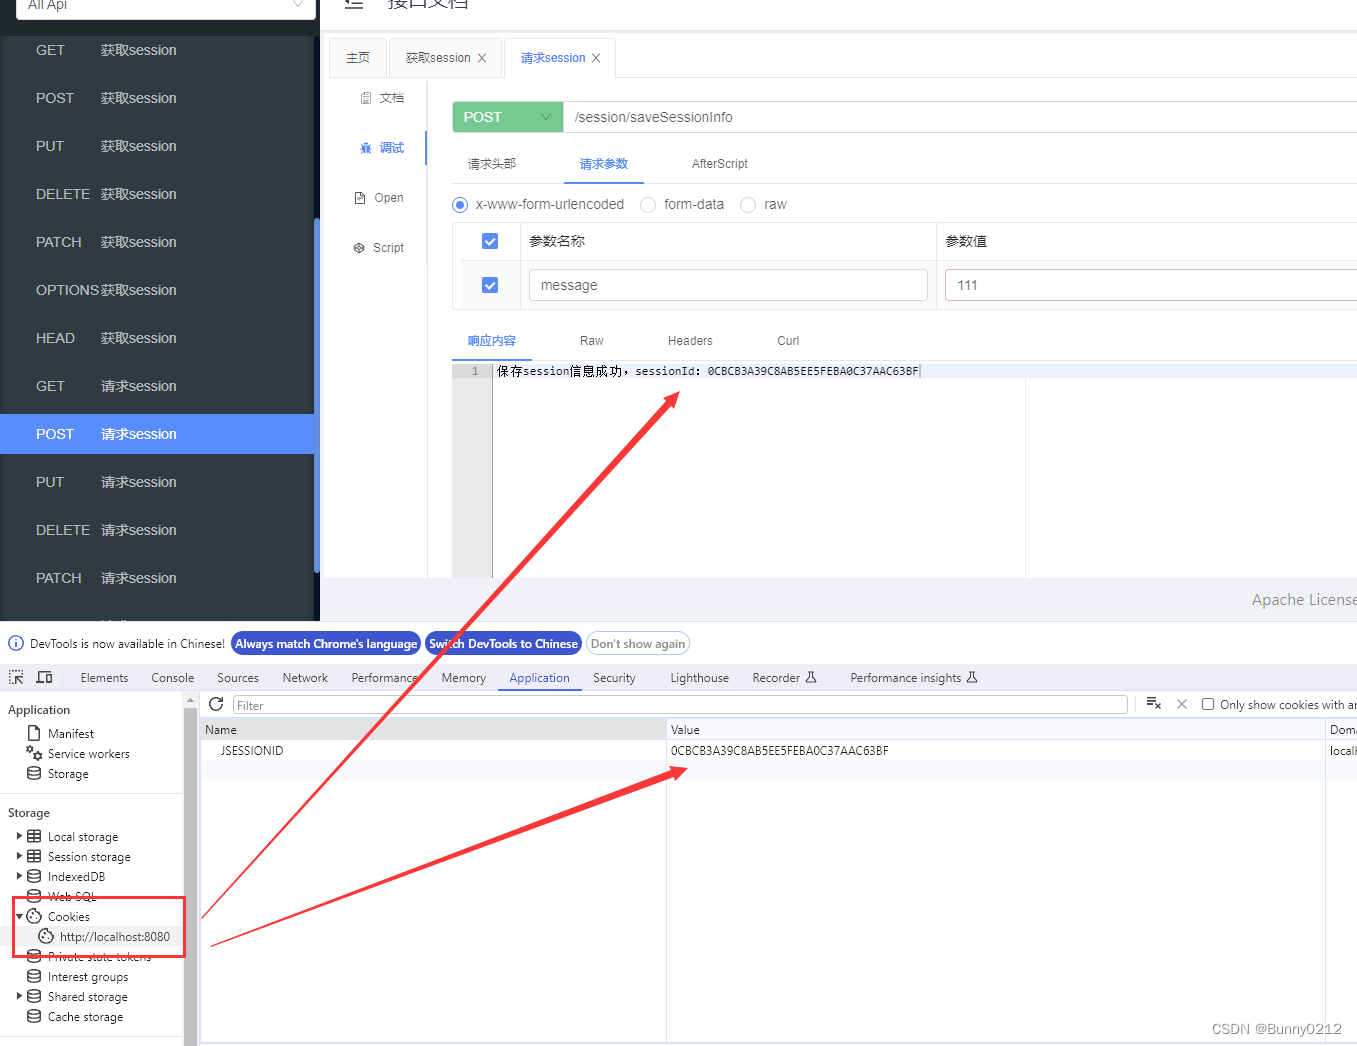
打开控制台找到应用,存储在这里面的内容是基于
domain存储的,其实就是按照域名访问的,不同域名之间是相互隔绝的,如果说存储在cookie中不安全其实存储在这里任何东西都不安全,照我来说的话。只要代码写的没问题,不跨域之间都是相互隔绝的。只不过session会存在无法跨设备(可以自己手动解决下面会说到)。
具体实现
SessionController
其中需要用到HttpSessionpublic String getSessionInfo(HttpSession session),这样就可以操作session了。
import io.swagger.v3.oas.annotations.Operation;
import io.swagger.v3.oas.annotations.media.Schema;
import io.swagger.v3.oas.annotations.tags.Tag;
import jakarta.servlet.http.HttpSession;
import org.springframework.web.bind.annotation.RequestMapping;
import org.springframework.web.bind.annotation.RestController;

@RestController
@RequestMapping(value = "/session")
@Tag(name = "session请求相关", description = "session请求相关")
public class SessionController {
    private static final String SESSION_KEY = "session_key";

    /**
     * 判断消息是否为空
     *
     * @param message 消息
     * @return 是否为空,布尔值
     */
    private boolean isEmpty(String message) {
        return message == null || message.trim().isEmpty();
    }

    /**
     * @param session session
     * @param message 罅隙
     * @return 保存session信息成功消息
     */
    @RequestMapping("saveSessionInfo")
    @Operation(summary = "请求session")
    public String saveSessionInfo(HttpSession session, String message) {
        if (isEmpty(message)) {
            return "messages不能为空";
        }
        session.setAttribute(SESSION_KEY, message);
        return "保存session信息成功,sessionId:" + session.getId();
    }

    @RequestMapping("getSessionInfo")
    @Operation(summary = "获取session", description = "获取session")
    public String getSessionInfo(HttpSession session) {
        return "获取session消息为:" + session.getAttribute(SESSION_KEY);
    }
}
实际操作
打开浏览器,可以使用接口文档测试或者是浏览器进行测试都可以。
假设message中存储就是用户信息
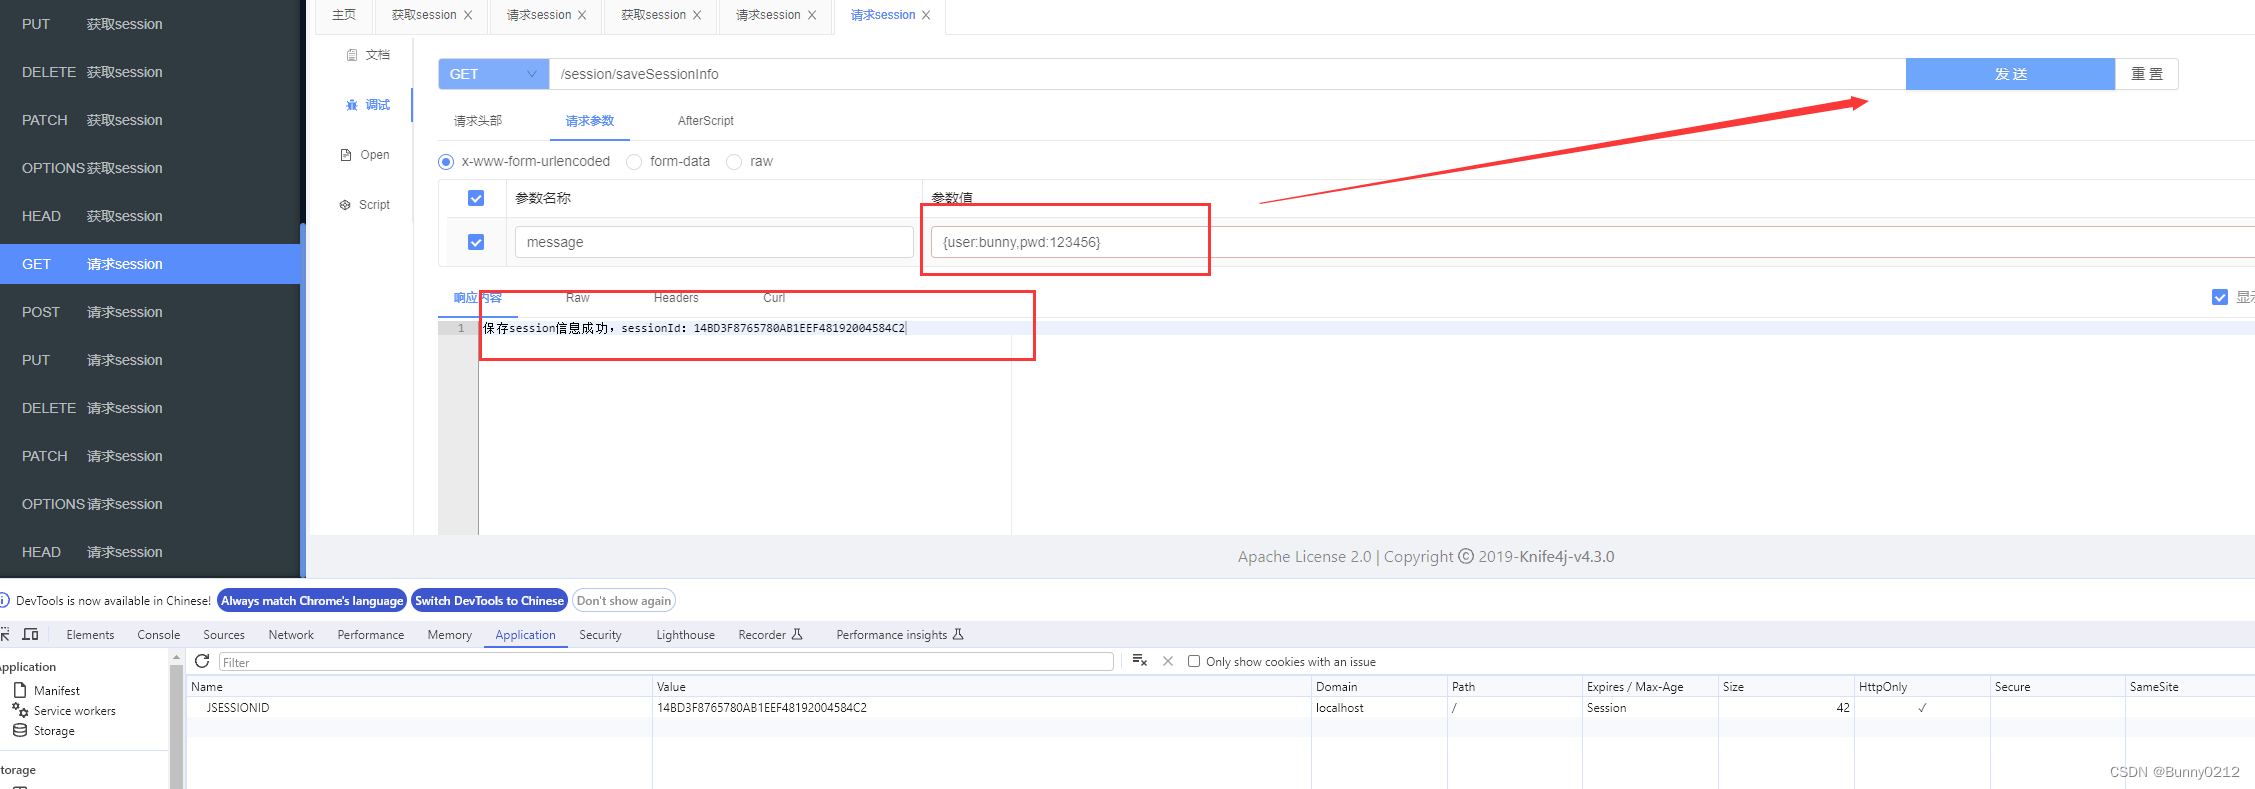
当我们获取session时,浏览器会判断这次会话是否是上次的,如果是的就会获取用户信息,比如在用户登录时,登录完成之后前端不需要再传递userid也能获得用户的登录信息。
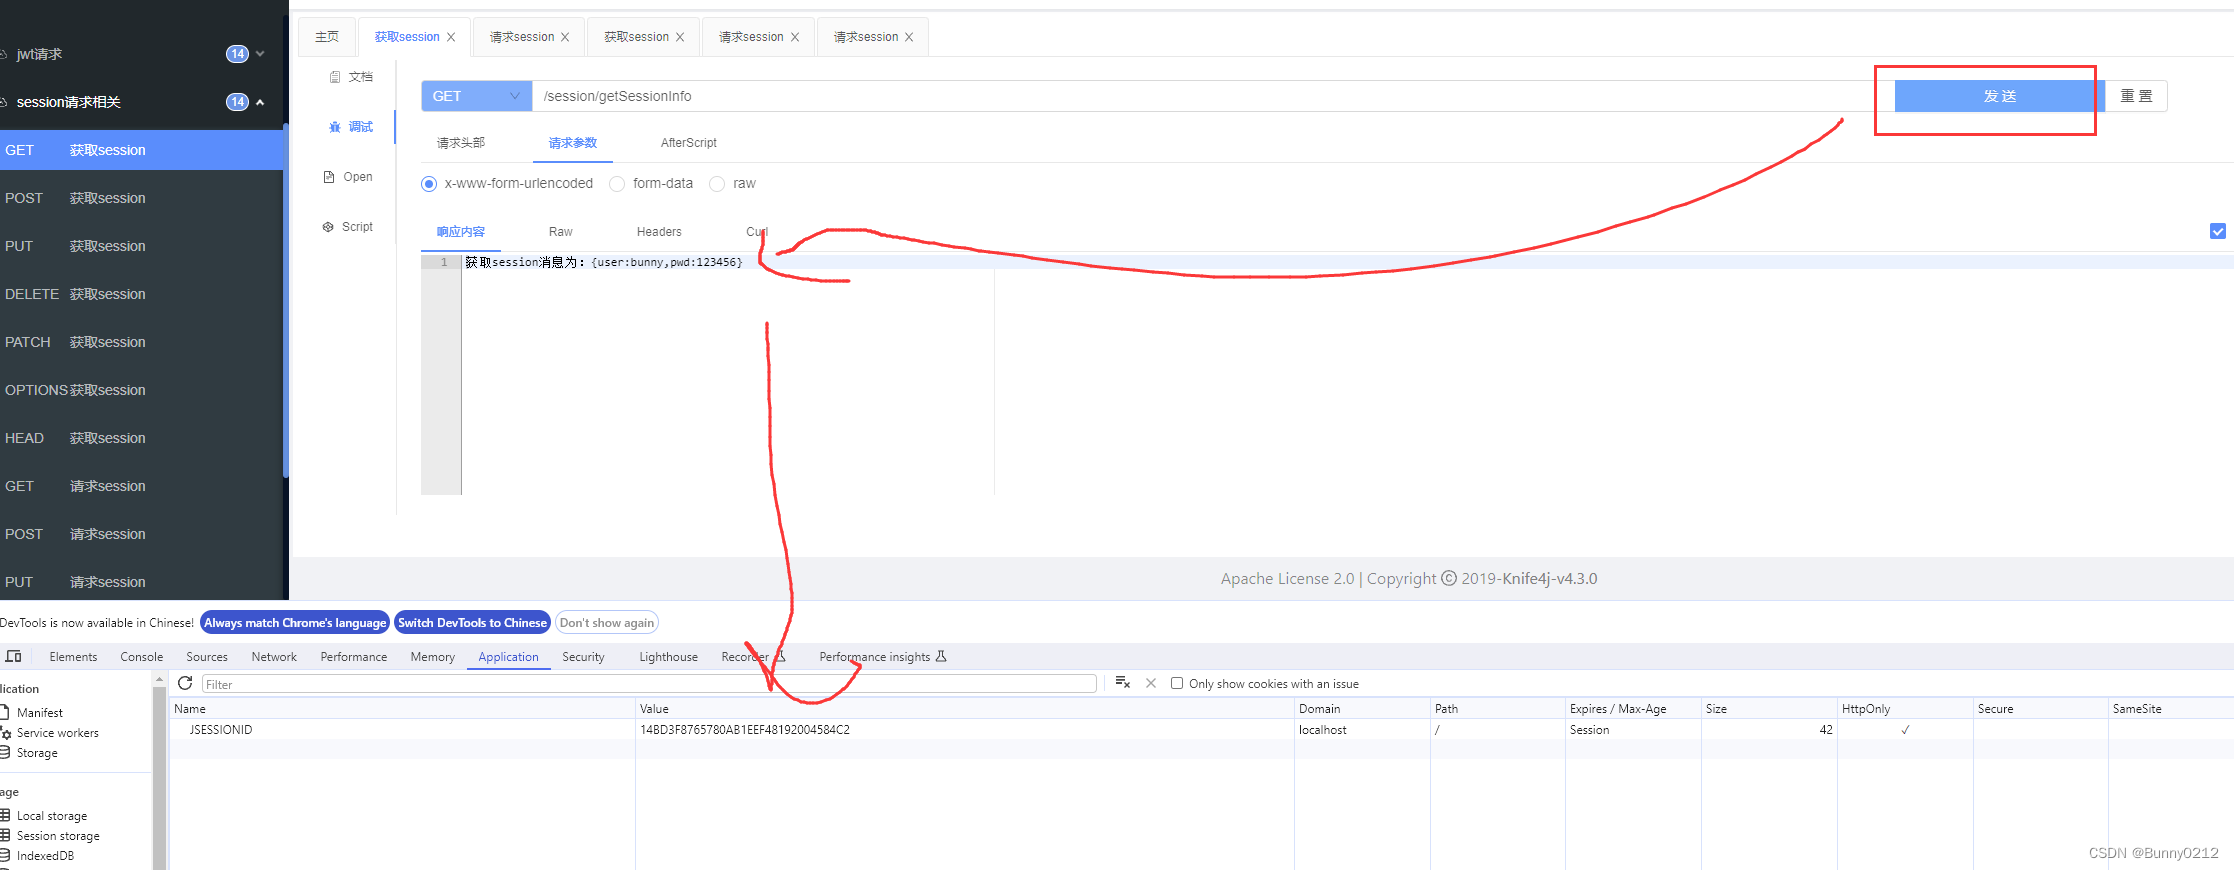
如何实现关闭或者重启服务器也可以获得session
如果说现在需要重启服务器或者关闭浏览器也能获得上次session,方法有多终,下面说的token就是一种将用户信息存储在Redis中模拟session的情况。
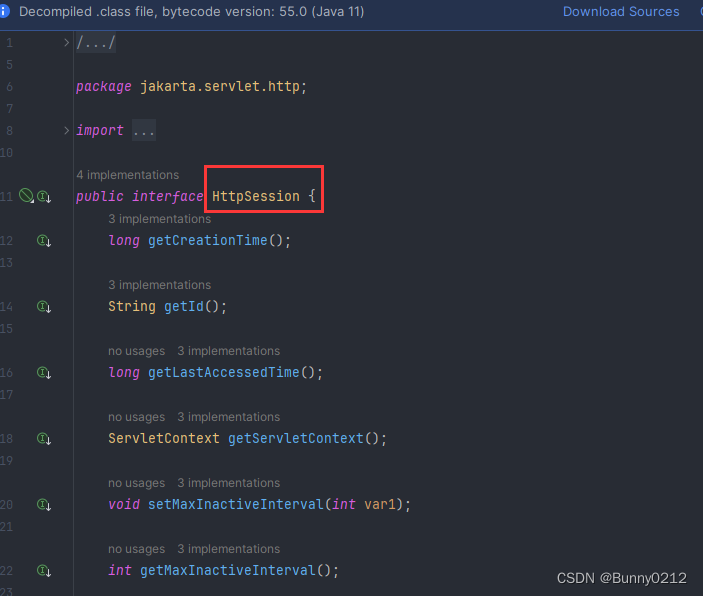
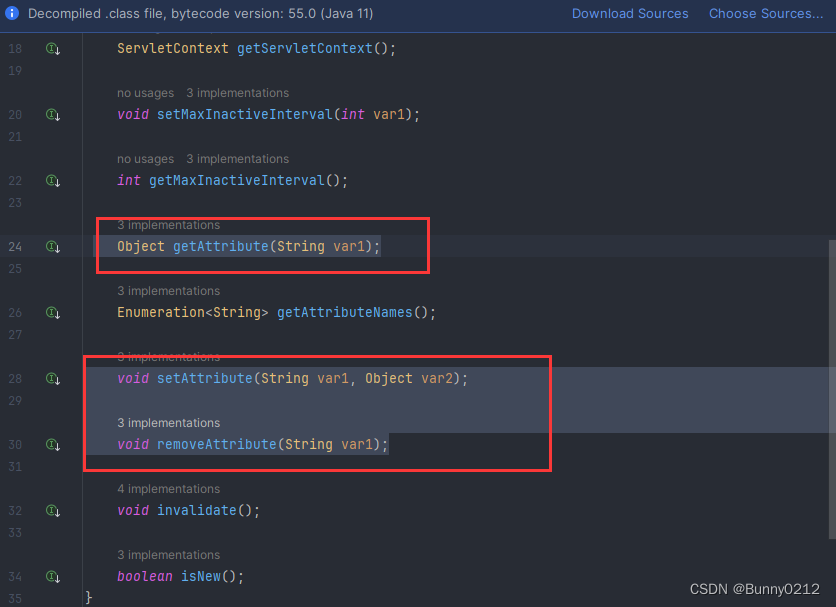
或者是重写HttpSession接口,因为HttpSession是使用HttpSession接口实现的,那么我们只需要重写其中的方法自定义去控制也可以完成session自己控制。
只要重写这三个就可以完成对session的设置、获取、移出。
- 这种session有缺点,它是基于会话的,如果浏览器关闭那么session会重新登录
- 或者服务器重启时也会重新登录因为会重新获取session
- 又或者没有重启,没有关闭浏览器,如果是分布式的服务器。
- 当访问服务器(server1)时,这个session是存在 server1中的
- 如果这时请求接口是在另一个服务器上(server2)那么session会不存在。
- 因为不是基于同一个会话,但是也有优点。
- 假如设置session过期时间比如半小时,如果在29:59:59时这时又重新发起请求那么这个session会自动会续时长
- 如果要想自己操作session,想让session自定义
- 解决方案:
- 可以重写session,因为session集成于接口 HttpSession;可以重写它可以实现自己操作session自定义
- 或者将session放在redis中
token
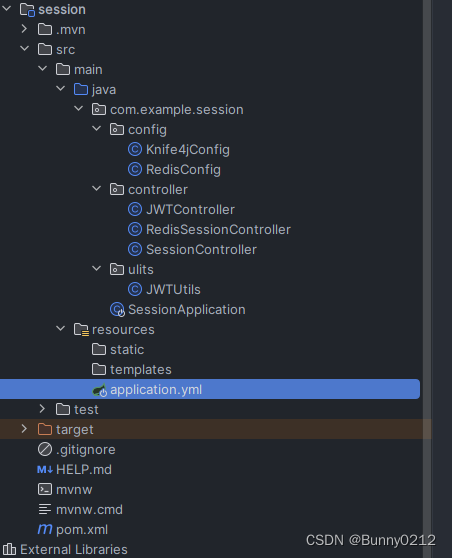
目录结构见上面
Redis序列化配置RedisConfig
这个就不解释了,序列化Redis,学过Redis的都应该知道的。每个人配置方式不同,可以按照自己的方式来,这只是提供参考
import org.springframework.context.annotation.Bean;
import org.springframework.context.annotation.Configuration;
import org.springframework.data.redis.connection.lettuce.LettuceConnectionFactory;
import org.springframework.data.redis.core.RedisTemplate;
import org.springframework.data.redis.serializer.GenericJackson2JsonRedisSerializer;
import org.springframework.data.redis.serializer.StringRedisSerializer;

@Configuration
public class RedisConfig {
    @Bean
    public RedisTemplate<String, Object> redisTemplate(LettuceConnectionFactory lettuceConnectionFactory) {
        RedisTemplate<String, Object> redisTemplate = new RedisTemplate<>();
        redisTemplate.setConnectionFactory(lettuceConnectionFactory);

        // 设置key序列化为String
        redisTemplate.setKeySerializer(new StringRedisSerializer());
        // 设置value序列化方式为JSON,使用GenericJackson2JsonRedisSerializer替换为默认序列化
        redisTemplate.setValueSerializer(new GenericJackson2JsonRedisSerializer());

        redisTemplate.setHashKeySerializer(new StringRedisSerializer());
        redisTemplate.setHashValueSerializer(new GenericJackson2JsonRedisSerializer());

        return redisTemplate;
    }
}
实际操作
先将代码粘上来,后面逐一说明其作用。
import com.alibaba.fastjson.JSON;
import io.swagger.v3.oas.annotations.Operation;
import io.swagger.v3.oas.annotations.tags.Tag;
import jakarta.annotation.Resource;
import jakarta.servlet.http.Cookie;
import jakarta.servlet.http.HttpServletRequest;
import jakarta.servlet.http.HttpServletResponse;
import org.springframework.data.redis.core.RedisTemplate;
import org.springframework.web.bind.annotation.RequestMapping;
import org.springframework.web.bind.annotation.RestController;

import java.net.http.HttpRequest;
import java.util.UUID;

@RestController
@RequestMapping("/token")
@Tag(name = "基于Redis存储session", description = "Redis存储token")
public class RedisSessionController {
    @Resource
    private RedisTemplate redisTemplate;

    /**
     * 判断消息是否为空
     *
     * @param message 消息
     * @return 是否为空,布尔值
     */
    private boolean isEmpty(String message) {
        return message == null || message.trim().isEmpty();
    }


    @RequestMapping("saveSessionByToken")
    @Operation(summary = "设置session使用token", description = "设置session使用token")
    public String saveSessionByToken(String message) {
        if (isEmpty(message)) {
            return "messages不为空";
        }

        String token = UUID.randomUUID().toString();
        redisTemplate.opsForValue().set(token, message);
        return "保存session信息成功,sessionId=" + token;
    }

    @RequestMapping("getSessionByToken")
    @Operation(summary = "获取token使用token", description = "获取token使用token")
    public String getSessionByToken(String token) {
        if (isEmpty(token)) {
            return "token不为空";
        }
        return "获取的token的信息为:" + redisTemplate.opsForValue().get(token);
    }

    @RequestMapping("getSessionByTokenWithCookie")
    @Operation(summary = "设置token使用cookies", description = "设置token使用cookies")
    public String getSessionByTokenWithCookie(HttpServletResponse response, String message) {
        if (isEmpty(message)) {
            return "message不能为空";
        }

        String token = UUID.randomUUID().toString();
        redisTemplate.opsForValue().set(token, message);
        Cookie cookie = new Cookie("token", token);
        cookie.setMaxAge(-1);// 设置有效期
        response.addCookie(cookie);
        return "保存token信息成功,token:" + token;
    }

    @RequestMapping("getByTokenWithCookie")
    @Operation(summary = "获取token使用cookies", description = "获取token使用cookies")
    public String getByTokenWithCookie(HttpServletRequest request) {
        Cookie[] cookies = request.getCookies();// 因为cookie是一个数组,浏览器中有很多cookie
        String token = null;

        if (cookies == null) return "信息为空";

        // 当找到cookie时就跳出
        for (Cookie cookie : cookies) {
            if ("token".equals(cookie.getName())) {
                token = cookie.getValue();
                break;
            }
        }

        if (isEmpty(token)) return "token不能为空";
        Object message = redisTemplate.opsForValue().get(token);
        return "获取token使用cookies,token:" + token+";获取message使用cookies,message:" + message;// 这里不做转换JSON也可以
        // return "获取token使用cookies,token:" + token+";获取message使用cookies,message:" + JSON.toJSONString(message);// 这里不做转换JSON也可以
    }
}
设置token
将用户信息存储到Redis中,先设置唯一值将这个值放在Redis中,获取时因为这个值是唯一的所以可以在Redis中获取到。判断是否为空的函数isEmpty在上面全部代码中有的。
当然这里也需要讲你Redis服务器打开,否则也是没用的。
@RequestMapping("saveSessionByToken")
@Operation(summary = "设置session使用token", description = "设置session使用token")
public String saveSessionByToken(String message) {
    if (isEmpty(message)) {
        return "messages不为空";
    }

    String token = UUID.randomUUID().toString();
    redisTemplate.opsForValue().set(token, message);
    return "保存session信息成功,sessionId=" + token;
}

可以发现,存储的值在Redis中了,那么下次就是用这个key去获取用户相关信息
获取token
请求接口时也可以正常的拿到所需要的值
@RequestMapping("getSessionByToken")
@Operation(summary = "获取token使用token", description = "获取token使用token")
public String getSessionByToken(String token) {
    if (isEmpty(token)) {
        return "token不为空";
    }
    return "获取的token的信息为:" + redisTemplate.opsForValue().get(token);
}

将token存储在cookie中
在cookie中可以设置setMaxAge来设置有效期
@RequestMapping("getSessionByTokenWithCookie")
@Operation(summary = "设置token使用cookies", description = "设置token使用cookies")
public String getSessionByTokenWithCookie(HttpServletResponse response, String message) {
    if (isEmpty(message)) {
        return "message不能为空";
    }

    String token = UUID.randomUUID().toString();
    redisTemplate.opsForValue().set(token, message);
    Cookie cookie = new Cookie("token", token);
    cookie.setMaxAge(-1);// 设置有效期
    response.addCookie(cookie);
    return "保存token信息成功,token:" + token;
}

从cookie中获取token
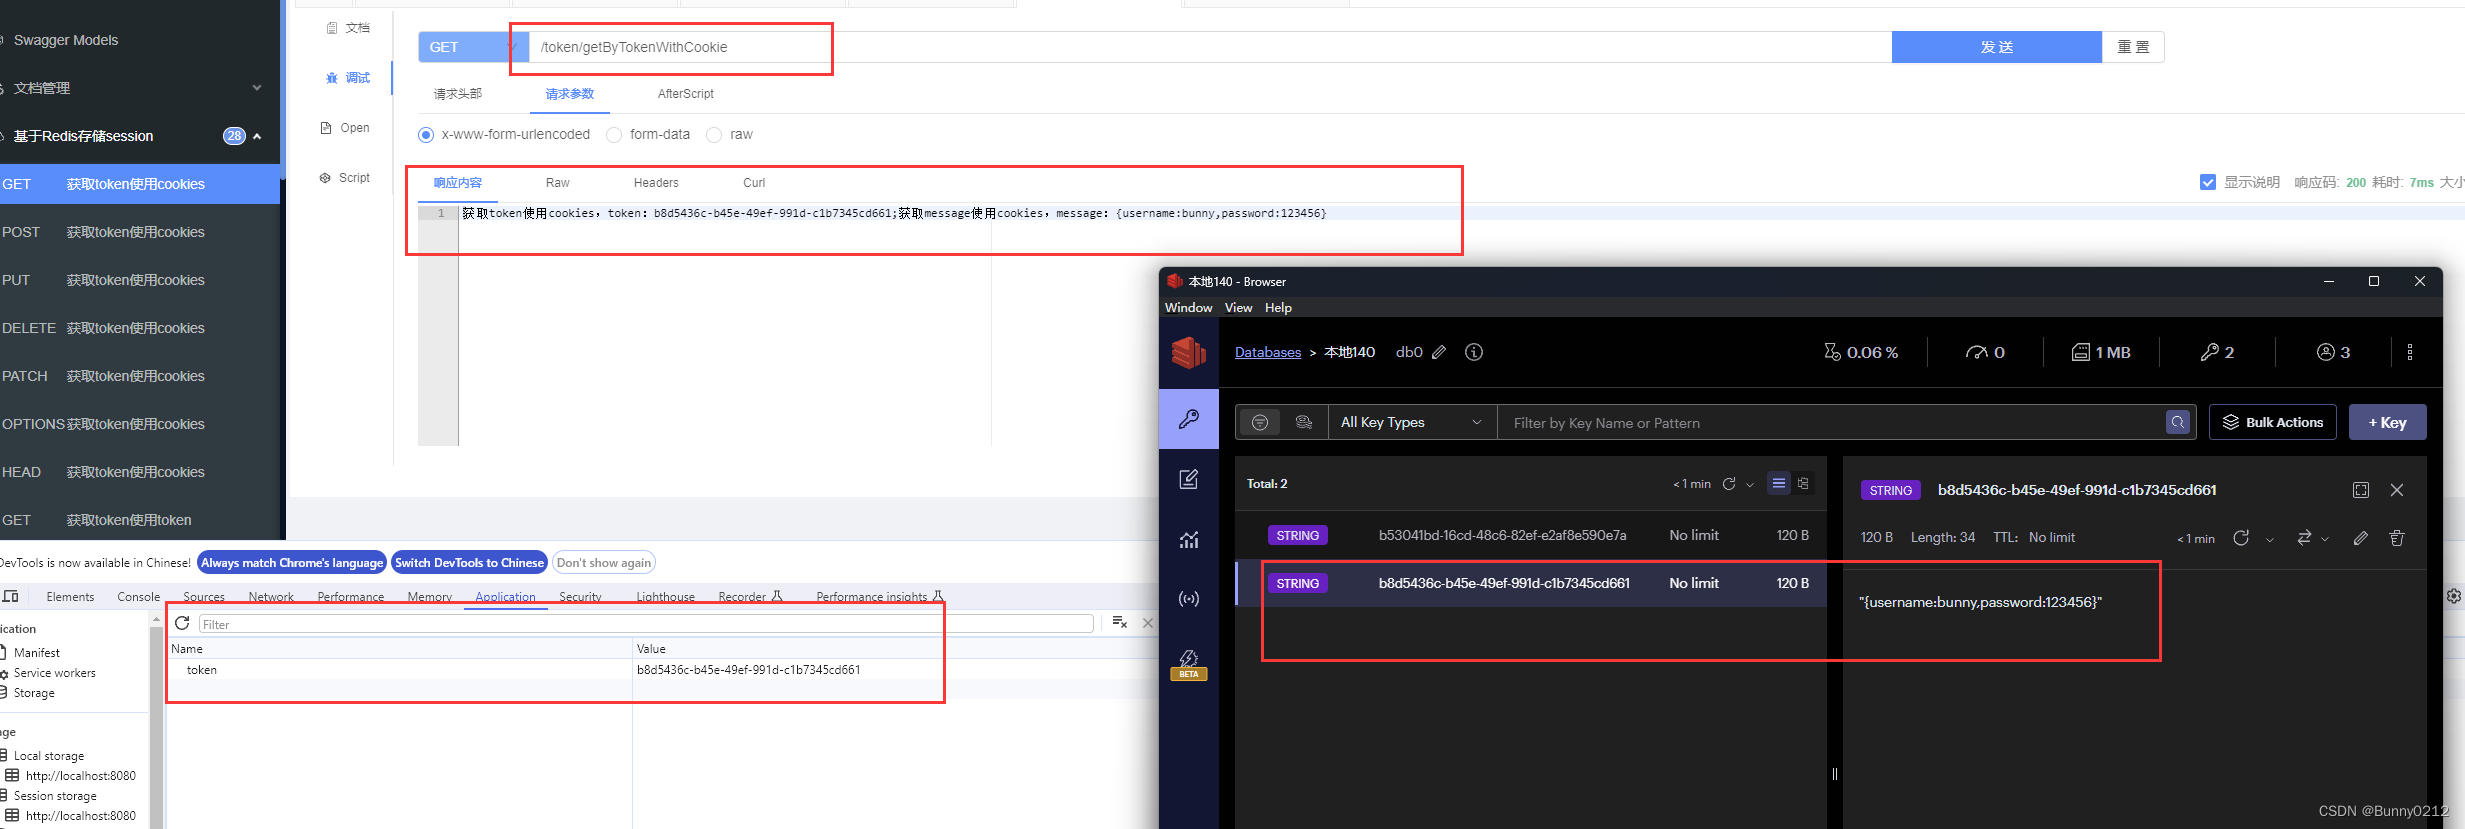
这时候就不需要前端再传递当前登录时这个用户的id,直接请求这个接口就可以获取到用户登录的信息等。
因为存储在cookie中的,所以下次请求带上这个cookie就可以了。
@RequestMapping("getByTokenWithCookie")
@Operation(summary = "获取token使用cookies", description = "获取token使用cookies")
public String getByTokenWithCookie(HttpServletRequest request) {
    Cookie[] cookies = request.getCookies();// 因为cookie是一个数组,浏览器中有很多cookie
    String token = null;

    if (cookies == null) return "信息为空";

    // 当找到cookie时就跳出
    for (Cookie cookie : cookies) {
        if ("token".equals(cookie.getName())) {
            token = cookie.getValue();
            break;
        }
    }

    if (isEmpty(token)) return "token不能为空";
    Object message = redisTemplate.opsForValue().get(token);
    return "获取token使用cookies,token:" + token+";获取message使用cookies,message:" + message;// 这里不做转换JSON也可以
    // return "获取token使用cookies,token:" + token+";获取message使用cookies,message:" + JSON.toJSONString(message);// 这里不做转换JSON也可以
}
JWT
目录结构见最上面开头截图。
JWT这个就有点鸡肋了,感觉现在没有多少用JWT了,因为不安全,比如说使用session或者是Redis存储,举个例子;我想让这个用户下线,只需要在后面将这个用户剔除就行了。
但是JWT不行,只要她的信息没有过期而且可以被解析,她就认为这个服务器就是她主人。
而且她的信息是可以被解析的,因为信息是base64编码的,并不是加密的,你可以去网上找一个可以解析base64的,看看是否可以被解析。
当然我这里就不去网上找解析base64网站了,因为浏览器控制台为我们提供了这个函数叫atob,也是JavaScript中自带的,如果想把字符串弄成base64可以使用函数btoa()。
JWT工具类JWTUtils
先把这个工具类放上,目录结构看上面的就可以了。
import com.alibaba.fastjson.JSON;
import com.alibaba.fastjson2.JSONWriterUTF16JDK8UF;
import com.auth0.jwt.JWT;
import com.auth0.jwt.JWTVerifier;
import com.auth0.jwt.algorithms.Algorithm;
import com.auth0.jwt.interfaces.DecodedJWT;
import io.swagger.v3.core.util.Json;
import nonapi.io.github.classgraph.json.JSONUtils;
import org.springframework.stereotype.Component;

import java.util.Date;

@Component("jwtUtils")
public class JWTUtils<T> {
    private static final String SECRET = "test123456";

    public String createToken(String key, T data, Integer expireSeconds) {
        String token = null;
        try {
            // 因为
            Date date = new Date(System.currentTimeMillis() + expireSeconds + 100000);
            token = JWT.create()
                    .withClaim(key, JSON.toJSONString(data))
                    .withExpiresAt(date)
                    .sign(Algorithm.HMAC256(SECRET));
        } catch (Exception e) {
            e.printStackTrace();
        }
        return token;
    }

    public <T> T getTokenData(String key, String token, Class<T> tClass) {
        try {
            if (null == token || token.isEmpty()) {
                return null;
            }

            JWTVerifier verifier = JWT.require(Algorithm.HMAC256(SECRET)).build();
            DecodedJWT jwt = verifier.verify(token);
            String jsonData = jwt.getClaim(key).asString();
            return JSON.parseObject(jsonData, tClass);
        } catch (Exception e) {
            e.printStackTrace();
            return null;
        }
    }
}
实际操作
先把全部的代码都放上来。
import com.example.session.ulits.JWTUtils;
import io.swagger.v3.oas.annotations.Operation;
import io.swagger.v3.oas.annotations.tags.Tag;
import jakarta.annotation.Resource;
import jakarta.servlet.http.Cookie;
import jakarta.servlet.http.HttpServletResponse;
import org.springframework.data.redis.core.RedisTemplate;
import org.springframework.web.bind.annotation.RequestMapping;
import org.springframework.web.bind.annotation.RestController;

import java.util.UUID;

@RestController
@Tag(name = "jwt请求", description = "测试jwt请求")
@RequestMapping("/jwt")
public class JWTController {
    private static final String SESSION_KEY = "session_key";
    @Resource
    private RedisTemplate redisTemplate;

    @Resource
    private JWTUtils jwtUtils;

    /**
     * 判断消息是否为空
     *
     * @param message 消息
     * @return 是否为空,布尔值
     */
    private boolean isEmpty(String message) {
        return message == null || message.trim().isEmpty();
    }


    @RequestMapping("saveMyJWT")
    @Operation(summary = "保存JWT信息")
    public String saveMyJWT(HttpServletResponse response, String message) {
        if (isEmpty(message)) {
            return "message不能为空";
        }
        // 设置JWT的key值和消息,还有过期时间这里是10秒
        String token = jwtUtils.createToken(SESSION_KEY, message, 100);
        Cookie cookie = new Cookie("token", token);
        response.addCookie(cookie);// 将这个JWT的信息保存在cookie中
        return "保存信息token成功,token:" + token;
    }

    @RequestMapping("getByJwt")
    @Operation(summary = "获取JWT")
    public String getByJwt(String token) {
        if (isEmpty(token)) {
            return "token不能为空";
        }

        String message = (String) jwtUtils.getTokenData(SESSION_KEY, token, String.class);
        return "保存token信息成功,token的:" + message;
    }
}
保存JWT信息
这里的消息我就不写用户信息随便写一个message,看看中文如何被解析的
@RequestMapping("saveMyJWT")
@Operation(summary = "保存JWT信息")
public String saveMyJWT(HttpServletResponse response, String message) {
    if (isEmpty(message)) {
        return "message不能为空";
    }
    String token = jwtUtils.createToken(SESSION_KEY, message, 10);
    redisTemplate.opsForValue().set(token, message);
    Cookie cookie = new Cookie("token", token);
    response.addCookie(cookie);
    return "保存信息token成功,token:" + token;
}
附上JavaScript解析中文的代码,如果你的是英文的就不需要这样做了,这里只是做一个扩展。
function b64_to_utf8(str) {
  return decodeURIComponent(escape(atob(str)));
}

let base64String = "5L2g5aW977yM5LiW55WM77yB";
let chineseString = b64_to_utf8(base64String);
console.log(chineseString);
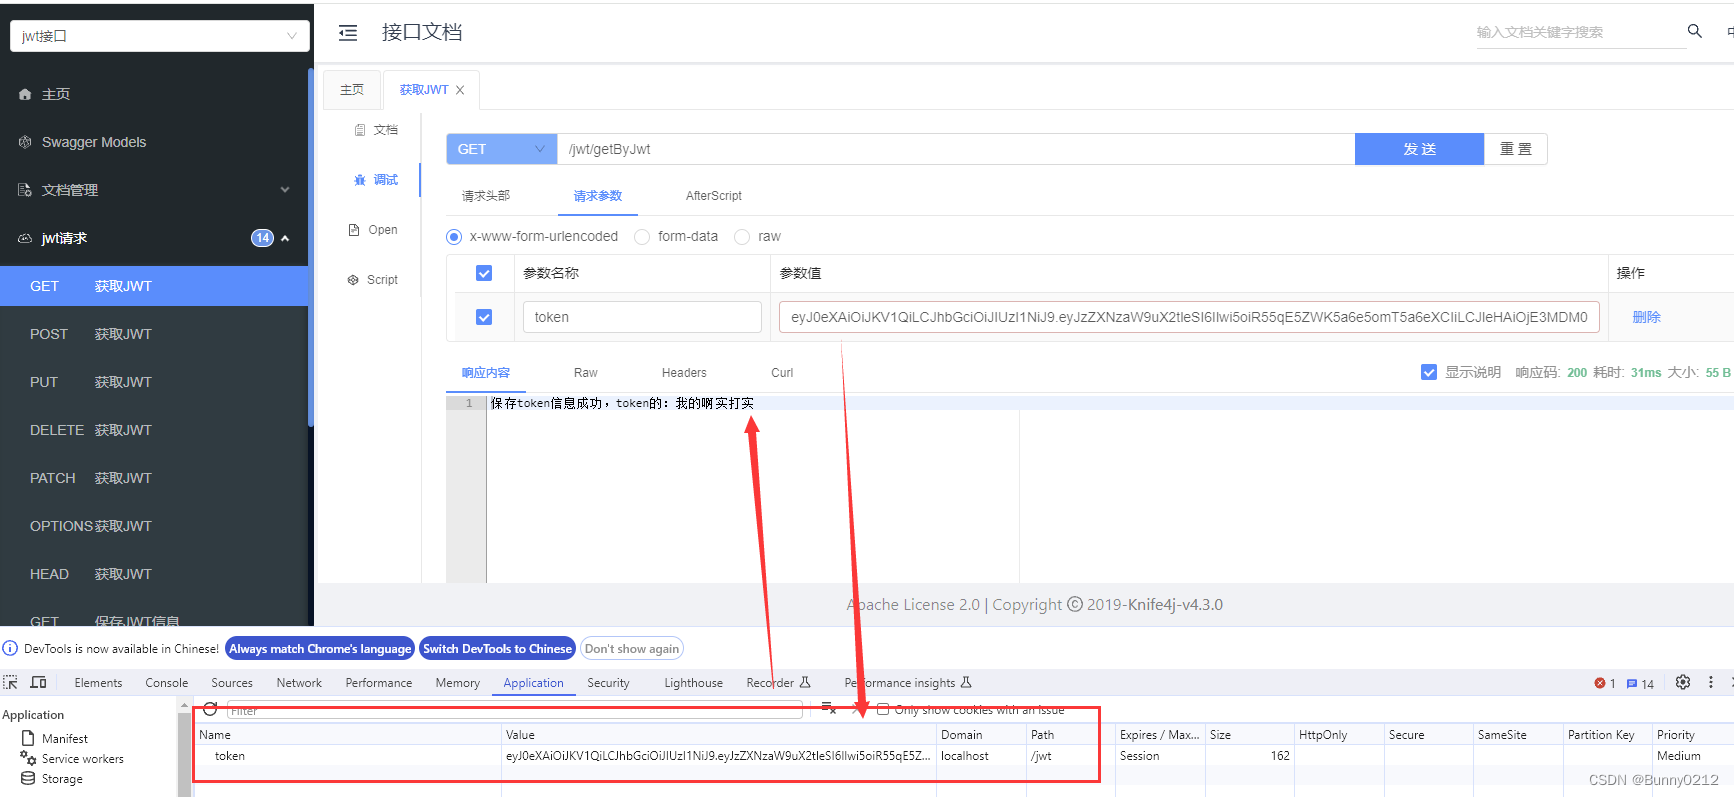
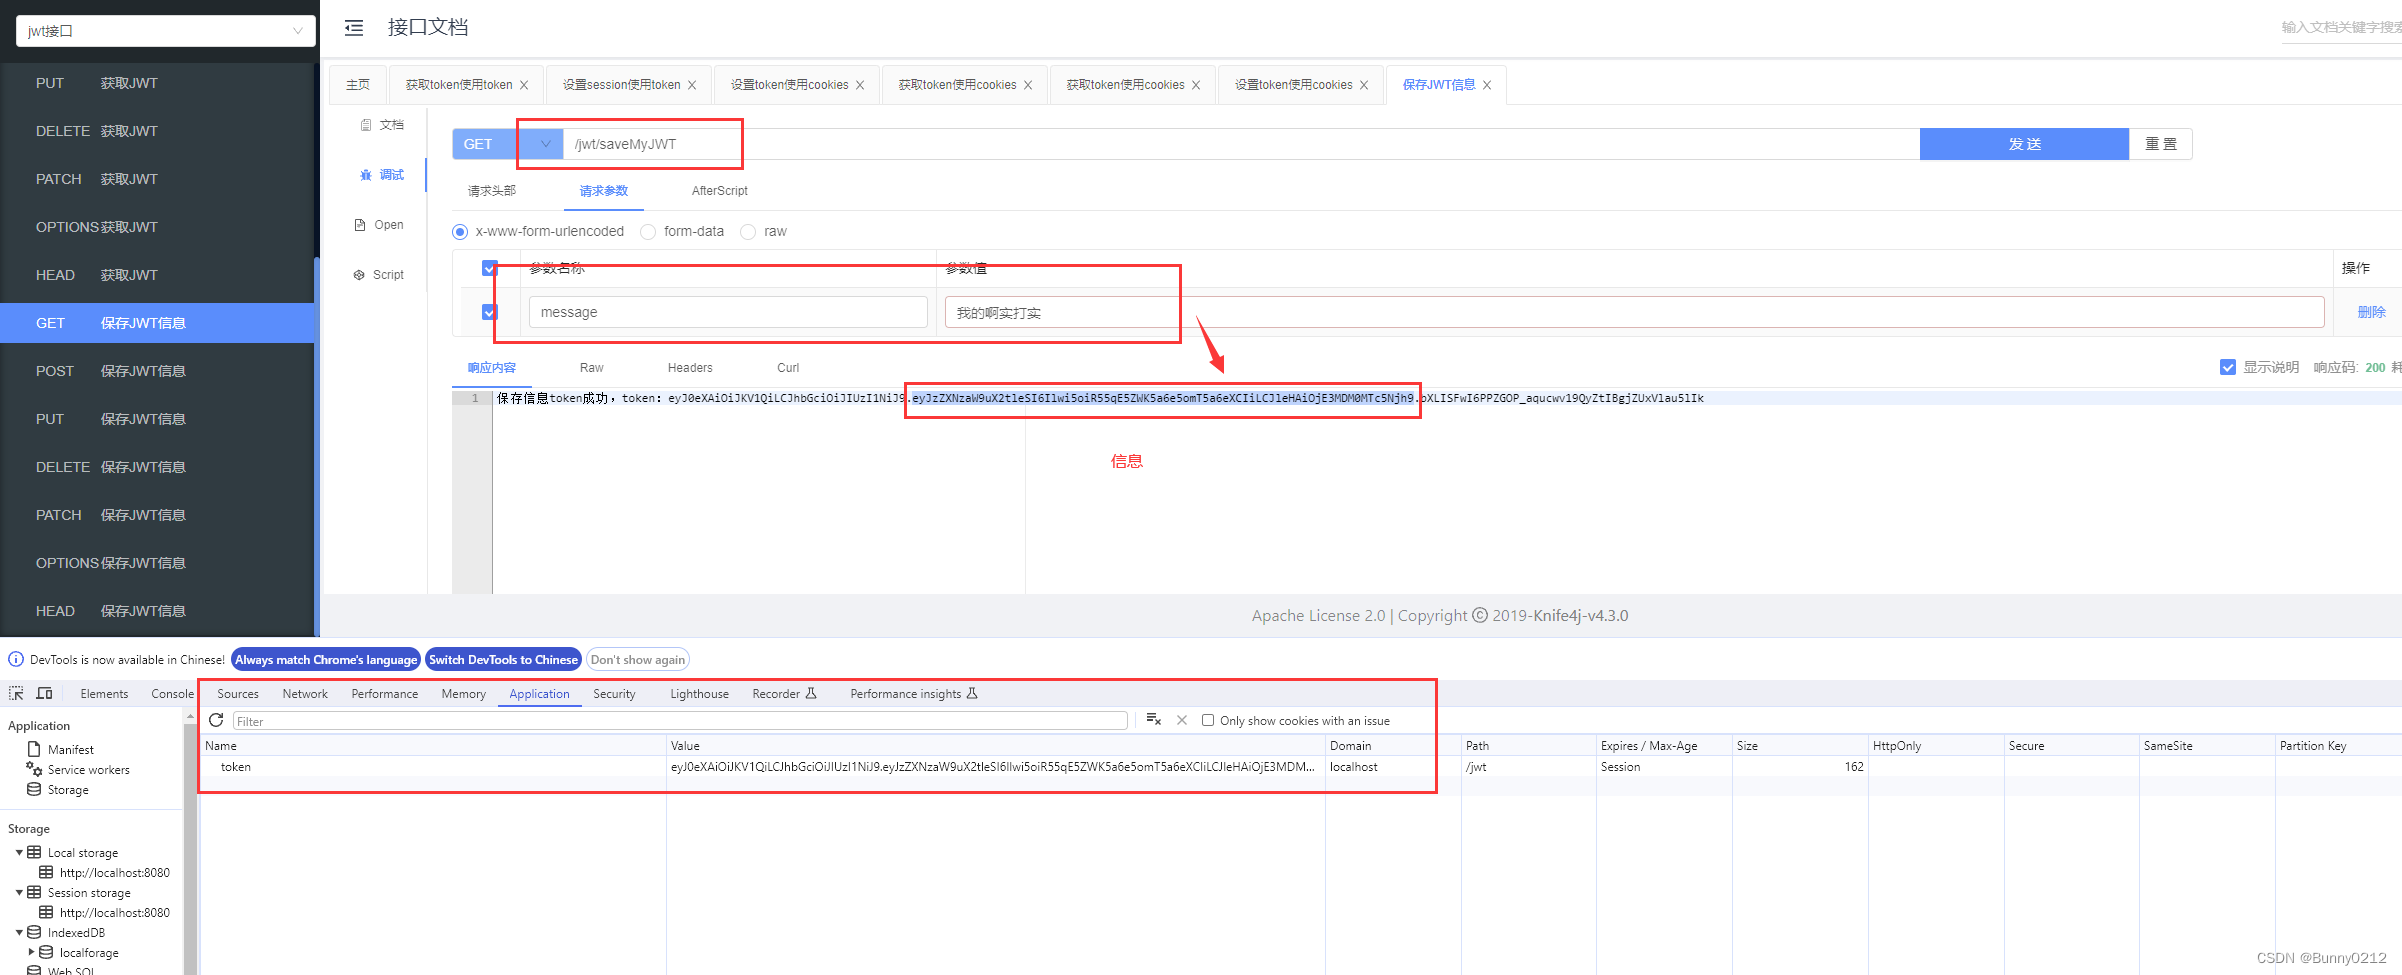
可以看到JWT的信息已经保存在cookie中了。
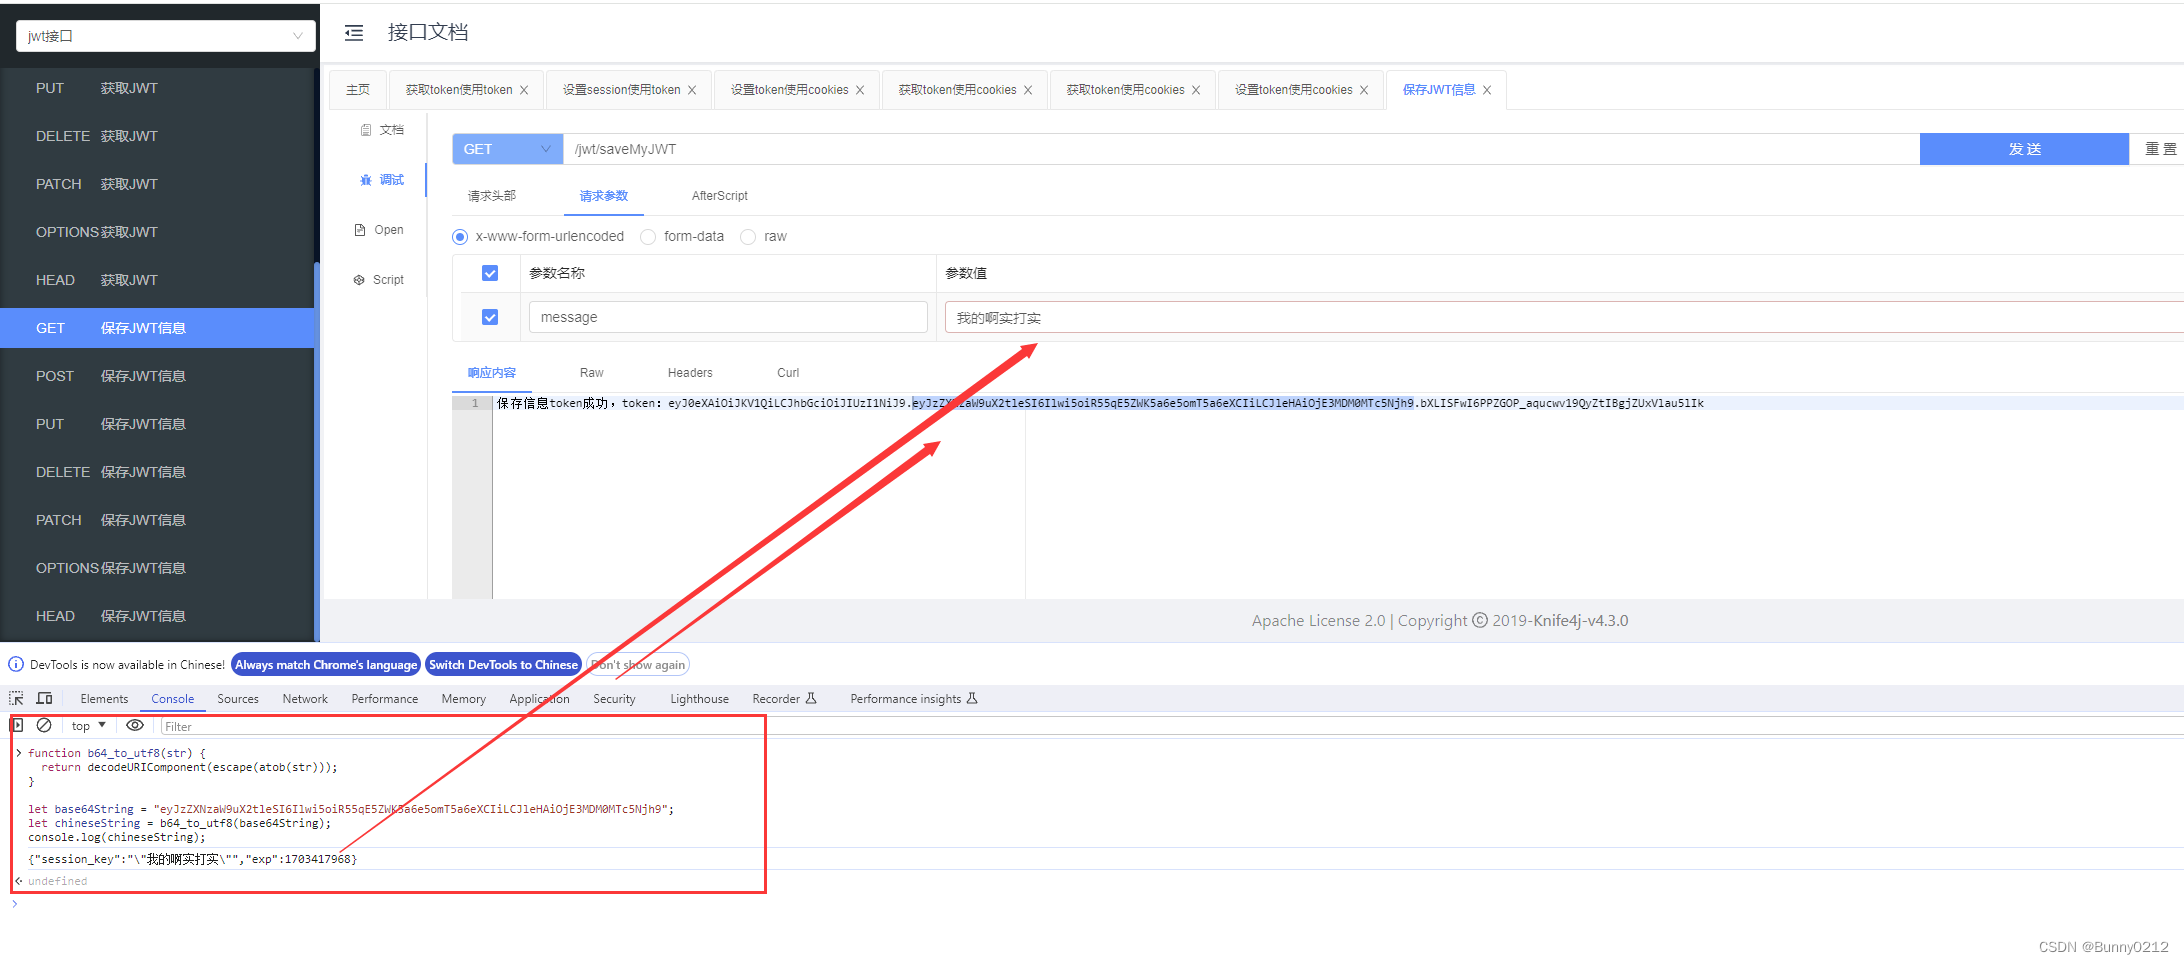
将上图中,中间的这串字符串传递到刚刚写的JavaScript代码中。可以看到信息已经被解析了。
它的字符串是用.来分割的,所以每个.后面的字符串都是base64,也就是说都可以被解析的。
function b64_to_utf8(str) {
  return decodeURIComponent(escape(atob(str)));
}

let base64String = "eyJzZXNzaW9uX2tleSI6Ilwi5oiR55qE5ZWK5a6e5omT5a6eXCIiLCJleHAiOjE3MDM0MTc5Njh9";
let chineseString = b64_to_utf8(base64String);
console.log(chineseString);
获取JWT信息
之后使用Java的代码获取JWT信息,这里就不使用cookie遍历了,简单的实现下。
@RequestMapping("getByJwt")
@Operation(summary = "获取JWT")
public String getByJwt(String token) {
    if (isEmpty(token)) {
        return "token不能为空";
    }

    String message = (String) jwtUtils.getTokenData(SESSION_KEY, token, String.class);
    return "保存token信息成功,token的:" + message;
}
的。
function b64_to_utf8(str) {
  return decodeURIComponent(escape(atob(str)));
}

let base64String = "eyJzZXNzaW9uX2tleSI6Ilwi5oiR55qE5ZWK5a6e5omT5a6eXCIiLCJleHAiOjE3MDM0MTc5Njh9";
let chineseString = b64_to_utf8(base64String);
console.log(chineseString);
[外链图片转存中…(img-K7dL767V-1703419158667)]
获取JWT信息
之后使用Java的代码获取JWT信息,这里就不使用cookie遍历了,简单的实现下。
@RequestMapping("getByJwt")
@Operation(summary = "获取JWT")
public String getByJwt(String token) {
    if (isEmpty(token)) {
        return "token不能为空";
    }

    String message = (String) jwtUtils.getTokenData(SESSION_KEY, token, String.class);
    return "保存token信息成功,token的:" + message;
}
