Spring整合
- 1.1 Spring整合Mybatis思路分析
- 1.1.1 环境准备
- 步骤1:准备数据库表
- 步骤2:创建项目导入jar包
- 步骤3:根据表创建模型类
- 步骤4:创建Dao接口
- 步骤5:创建Service接口和实现类
- 步骤6:添加jdbc.properties文件
- 步骤7:添加Mybatis核心配置文件
- 步骤8:编写应用程序
- 步骤9:运行程序
- 1.1.2 整合思路分析
- 1.2 Spring整合Mybatis
- 步骤1:项目中导入整合需要的jar包
- 步骤2:创建Spring的主配置类
- 步骤3:创建数据源的配置类
- 步骤4:主配置类中读properties并引入数据源配置类
- 步骤5:创建Mybatis配置类并配置SqlSessionFactory
- 步骤6:主配置类中引入Mybatis配置类
- 步骤7:编写运行类
- 步骤8:运行程序
- 1.3 Spring整合Junit
- 1.3.1 环境准备
- 1.3.2 整合Junit步骤
- 步骤1:引入依赖
- 步骤2:编写测试类
- 知识点1:@RunWith
- 知识点2:@ContextConfiguration
1.1 Spring整合Mybatis思路分析
1.1.1 环境准备
步骤1:准备数据库表
Mybatis是来操作数据库表,所以先创建一个数据库及表
create database spring_db character set utf8;
use spring_db;
create table tbl_account(
    id int primary key auto_increment,
    name varchar(35),
    money double
);
步骤2:创建项目导入jar包
项目的pom.xml添加相关依赖
<dependencies>
    <dependency>
        <groupId>org.springframework</groupId>
        <artifactId>spring-context</artifactId>
        <version>5.2.10.RELEASE</version>
    </dependency>
    <dependency>
        <groupId>com.alibaba</groupId>
        <artifactId>druid</artifactId>
        <version>1.1.16</version>
    </dependency>
    <dependency>
        <groupId>org.mybatis</groupId>
        <artifactId>mybatis</artifactId>
        <version>3.5.6</version>
    </dependency>
    <dependency>
        <groupId>mysql</groupId>
        <artifactId>mysql-connector-java</artifactId>
        <version>5.1.47</version>
    </dependency>
</dependencies>
步骤3:根据表创建模型类
public class Account implements Serializable {

    private Integer id;
    private String name;
    private Double money;
	//setter...getter...toString...方法略
}
步骤4:创建Dao接口
public interface AccountDao {

    @Insert("insert into tbl_account(name,money)values(#{name},#{money})")
    void save(Account account);

    @Delete("delete from tbl_account where id = #{id} ")
    void delete(Integer id);

    @Update("update tbl_account set name = #{name} , money = #{money} where id = #{id} ")
    void update(Account account);

    @Select("select * from tbl_account")
    List<Account> findAll();

    @Select("select * from tbl_account where id = #{id} ")
    Account findById(Integer id);
}
步骤5:创建Service接口和实现类
public interface AccountService {

    void save(Account account);

    void delete(Integer id);

    void update(Account account);

    List<Account> findAll();

    Account findById(Integer id);

}

@Service
public class AccountServiceImpl implements AccountService {

    @Autowired
    private AccountDao accountDao;

    public void save(Account account) {
        accountDao.save(account);
    }

    public void update(Account account){
        accountDao.update(account);
    }

    public void delete(Integer id) {
        accountDao.delete(id);
    }

    public Account findById(Integer id) {
        return accountDao.findById(id);
    }

    public List<Account> findAll() {
        return accountDao.findAll();
    }
}
步骤6:添加jdbc.properties文件
resources目录下添加,用于配置数据库连接四要素
jdbc.driver=com.mysql.jdbc.Driver
jdbc.url=jdbc:mysql://localhost:3306/spring_db?useSSL=false
jdbc.username=root
jdbc.password=root
useSSL:关闭MySQL的SSL连接
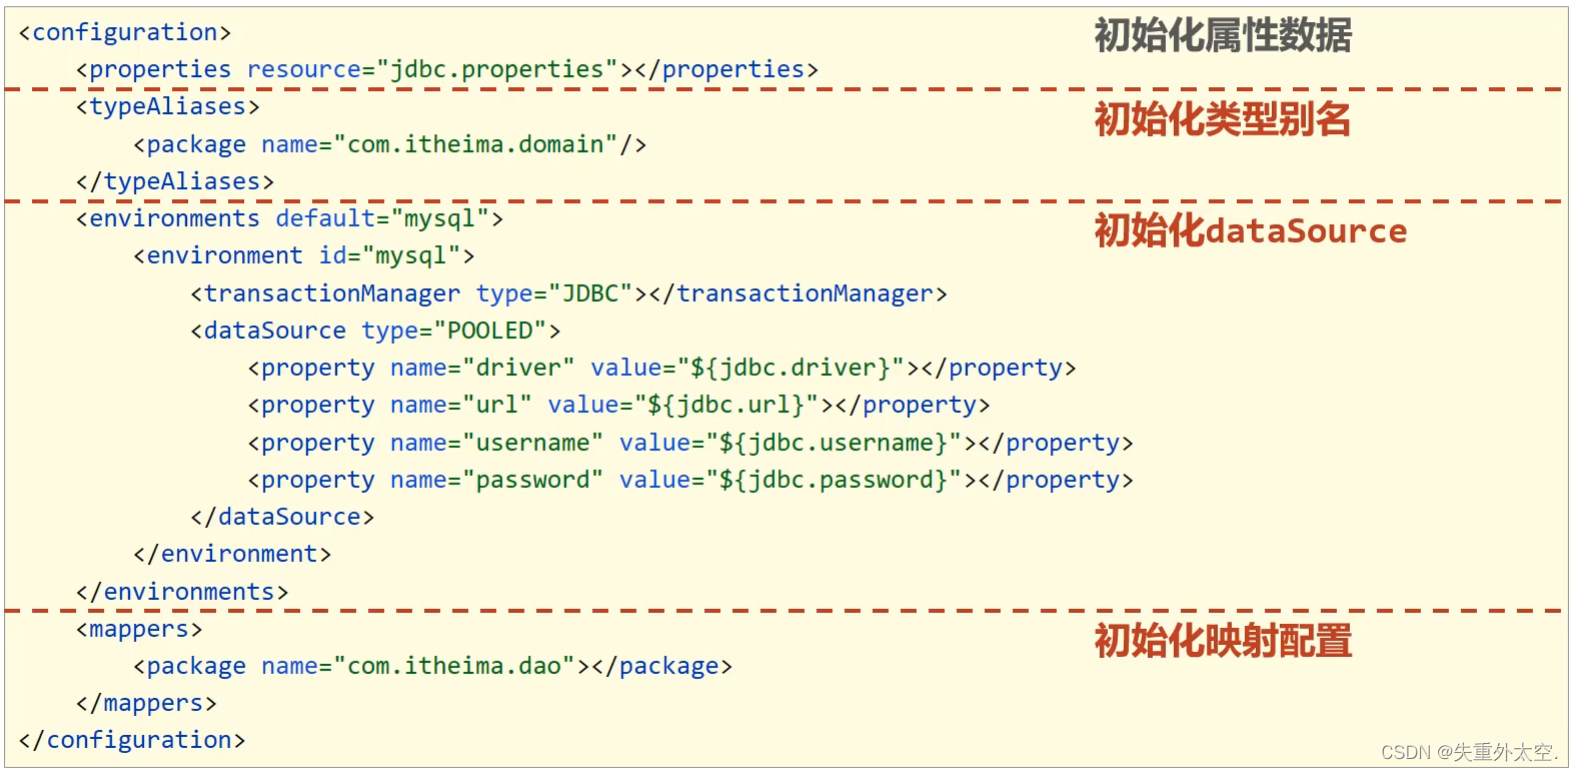
步骤7:添加Mybatis核心配置文件
<?xml version="1.0" encoding="UTF-8"?>
<!DOCTYPE configuration
        PUBLIC "-//mybatis.org//DTD Config 3.0//EN"
        "http://mybatis.org/dtd/mybatis-3-config.dtd">
<configuration>
    <!--读取外部properties配置文件-->
    <properties resource="jdbc.properties"></properties>
    <!--别名扫描的包路径-->
    <typeAliases>
        <package name="com.itheima.domain"/>
    </typeAliases>
    <!--数据源-->
    <environments default="mysql">
        <environment id="mysql">
            <transactionManager type="JDBC"></transactionManager>
            <dataSource type="POOLED">
                <property name="driver" value="${jdbc.driver}"></property>
                <property name="url" value="${jdbc.url}"></property>
                <property name="username" value="${jdbc.username}"></property>
                <property name="password" value="${jdbc.password}"></property>
            </dataSource>
        </environment>
    </environments>
    <!--映射文件扫描包路径-->
    <mappers>
        <package name="com.itheima.dao"></package>
    </mappers>
</configuration>
步骤8:编写应用程序
public class App {
    public static void main(String[] args) throws IOException {
        // 1. 创建SqlSessionFactoryBuilder对象
        SqlSessionFactoryBuilder sqlSessionFactoryBuilder = new SqlSessionFactoryBuilder();
        // 2. 加载SqlMapConfig.xml配置文件
        InputStream inputStream = Resources.getResourceAsStream("SqlMapConfig.xml.bak");
        // 3. 创建SqlSessionFactory对象
        SqlSessionFactory sqlSessionFactory = sqlSessionFactoryBuilder.build(inputStream);
        // 4. 获取SqlSession
        SqlSession sqlSession = sqlSessionFactory.openSession();
        // 5. 执行SqlSession对象执行查询,获取结果User
        AccountDao accountDao = sqlSession.getMapper(AccountDao.class);

        Account ac = accountDao.findById(1);
        System.out.println(ac);

        // 6. 释放资源
        sqlSession.close();
    }
}
步骤9:运行程序

1.1.2 整合思路分析
Mybatis的基础环境我们已经准备好了,接下来就得分析下在上述的内容中,哪些对象可以交给Spring来管理?
-
Mybatis程序核心对象分析
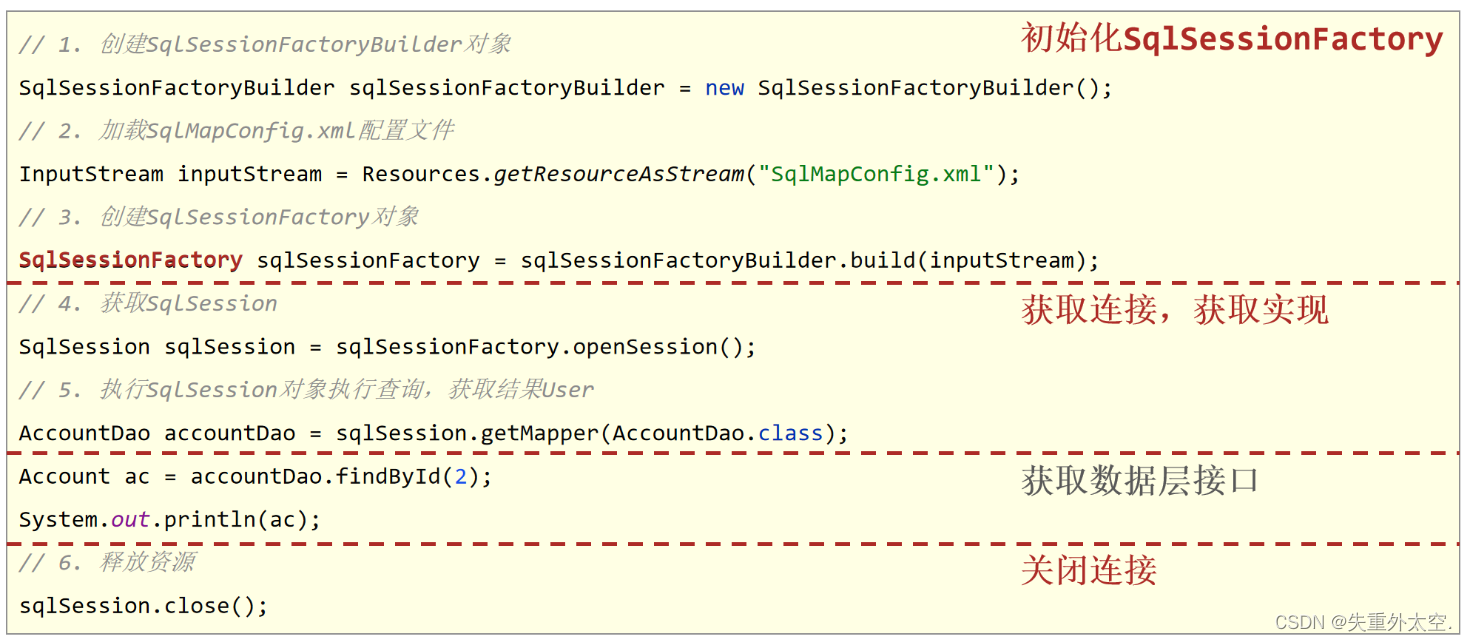
从图中可以获取到,真正需要交给Spring管理的是SqlSessionFactory
-
整合Mybatis,就是将Mybatis用到的内容交给Spring管理,分析下配置文件
说明:
- 第一行读取外部properties配置文件,Spring有提供具体的解决方案
@PropertySource,需要交给Spring - 第二行起别名包扫描,为SqlSessionFactory服务的,需要交给Spring
- 第三行主要用于做连接池,Spring之前我们已经整合了Druid连接池,这块也需要交给Spring
- 前面三行一起都是为了创建SqlSession对象用的,那么用Spring管理SqlSession对象吗?回忆下SqlSession是由SqlSessionFactory创建出来的,所以只需要将SqlSessionFactory交给Spring管理即可。
- 第四行是Mapper接口和映射文件[如果使用注解就没有该映射文件],这个是在获取到SqlSession以后执行具体操作的时候用,所以它和SqlSessionFactory创建的时机都不在同一个时间,可能需要单独管理。
- 第一行读取外部properties配置文件,Spring有提供具体的解决方案
1.2 Spring整合Mybatis
前面我们已经分析了Spring与Mybatis的整合,大体需要做两件事,
第一件事是:Spring要管理MyBatis中的SqlSessionFactory
第二件事是:Spring要管理Mapper接口的扫描
具体该如何实现,具体的步骤为:
步骤1:项目中导入整合需要的jar包
<dependency>
    <!--Spring操作数据库需要该jar包-->
    <groupId>org.springframework</groupId>
    <artifactId>spring-jdbc</artifactId>
    <version>5.2.10.RELEASE</version>
</dependency>
<dependency>
    <!--
		Spring与Mybatis整合的jar包
		这个jar包mybatis在前面,是Mybatis提供的
	-->
    <groupId>org.mybatis</groupId>
    <artifactId>mybatis-spring</artifactId>
    <version>1.3.0</version>
</dependency>
步骤2:创建Spring的主配置类
//配置类注解
@Configuration
//包扫描,主要扫描的是项目中的AccountServiceImpl类
@ComponentScan("com.itheima")
public class SpringConfig {
}
步骤3:创建数据源的配置类
在配置类中完成数据源的创建
public class JdbcConfig {
    @Value("${jdbc.driver}")
    private String driver;
    @Value("${jdbc.url}")
    private String url;
    @Value("${jdbc.username}")
    private String userName;
    @Value("${jdbc.password}")
    private String password;

    @Bean
    public DataSource dataSource(){
        DruidDataSource ds = new DruidDataSource();
        ds.setDriverClassName(driver);
        ds.setUrl(url);
        ds.setUsername(userName);
        ds.setPassword(password);
        return ds;
    }
}
步骤4:主配置类中读properties并引入数据源配置类
@Configuration
@ComponentScan("com.itheima")
@PropertySource("classpath:jdbc.properties")
@Import(JdbcConfig.class)
public class SpringConfig {
}
步骤5:创建Mybatis配置类并配置SqlSessionFactory
public class MybatisConfig {
    //定义bean,SqlSessionFactoryBean,用于产生SqlSessionFactory对象
    @Bean
    public SqlSessionFactoryBean sqlSessionFactory(DataSource dataSource){
        SqlSessionFactoryBean ssfb = new SqlSessionFactoryBean();
        //设置模型类的别名扫描
        ssfb.setTypeAliasesPackage("com.itheima.domain");
        //设置数据源
        ssfb.setDataSource(dataSource);
        return ssfb;
    }
    //定义bean,返回MapperScannerConfigurer对象
    @Bean
    public MapperScannerConfigurer mapperScannerConfigurer(){
        MapperScannerConfigurer msc = new MapperScannerConfigurer();
        msc.setBasePackage("com.itheima.dao");
        return msc;
    }
}
说明:
-
使用SqlSessionFactoryBean封装SqlSessionFactory需要的环境信息
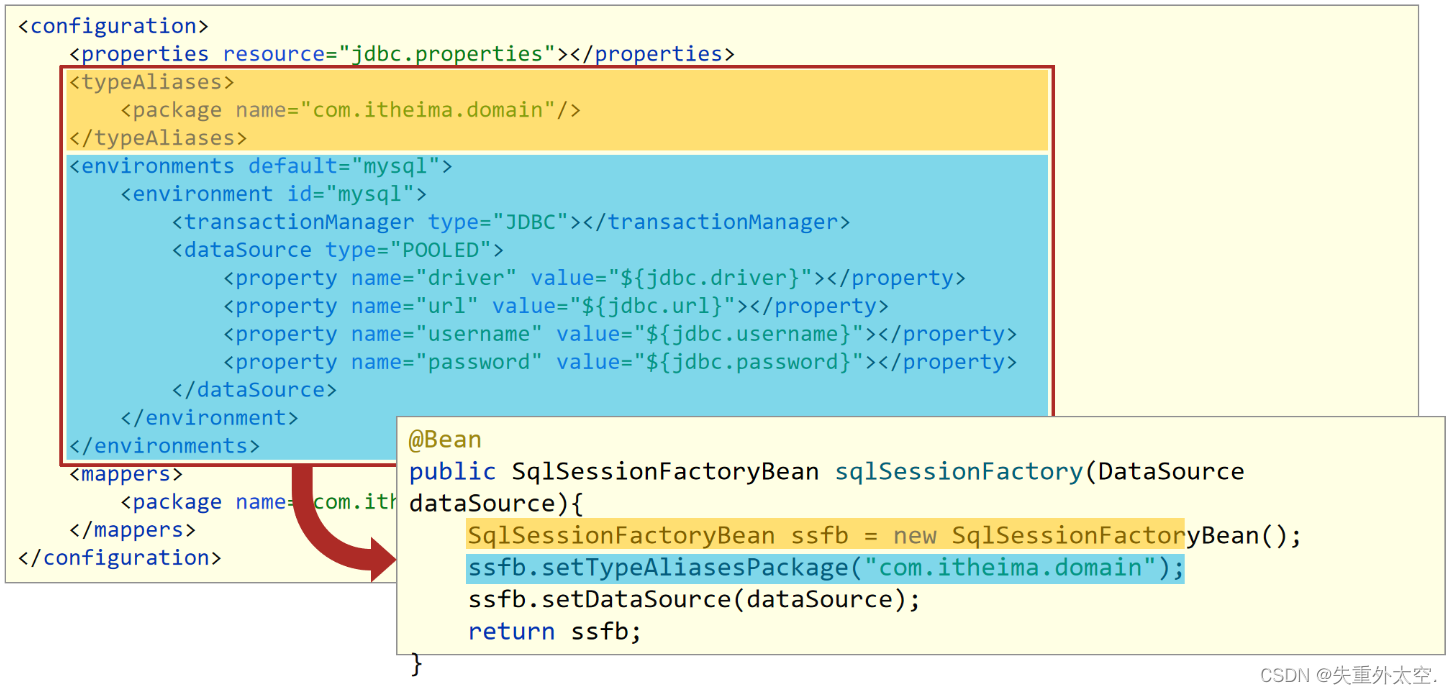
- SqlSessionFactoryBean是前面我们讲解FactoryBean的一个子类,在该类中将SqlSessionFactory的创建进行了封装,简化对象的创建,我们只需要将其需要的内容设置即可。
- 方法中有一个参数为dataSource,当前Spring容器中已经创建了Druid数据源,类型刚好是DataSource类型,此时在初始化SqlSessionFactoryBean这个对象的时候,发现需要使用DataSource对象,而容器中刚好有这么一个对象,就自动加载了DruidDataSource对象。
-
使用MapperScannerConfigurer加载Dao接口,创建代理对象保存到IOC容器中
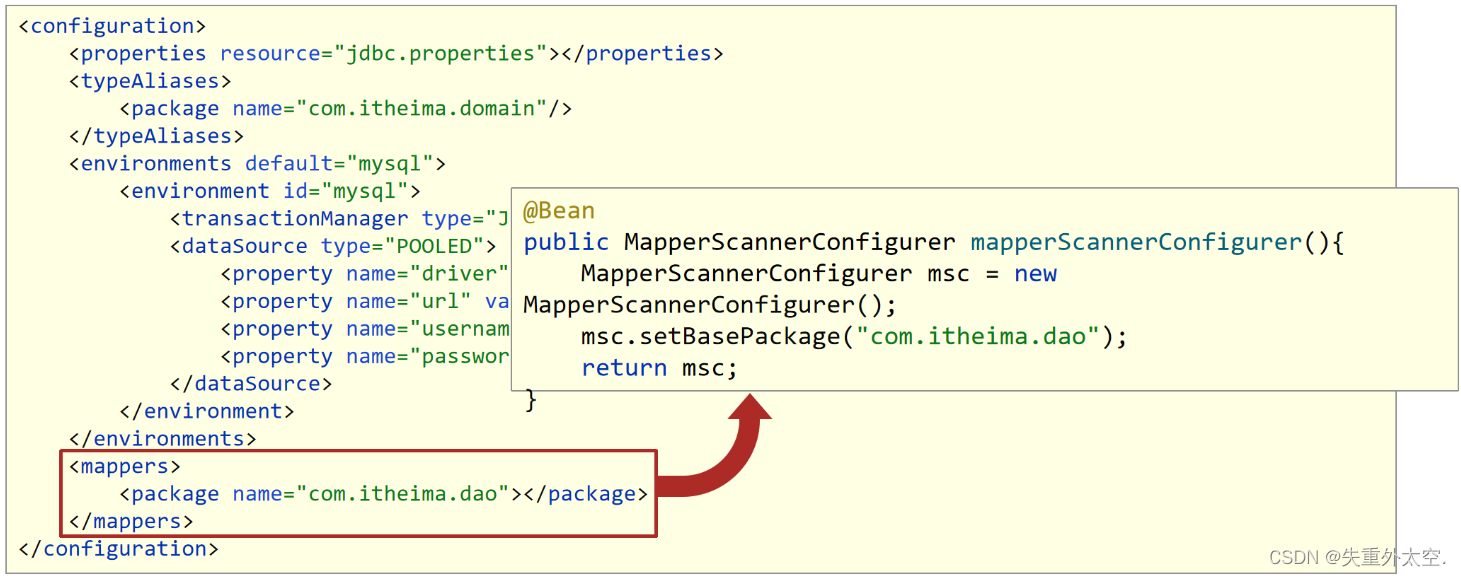
- 这个MapperScannerConfigurer对象也是MyBatis提供的专用于整合的jar包中的类,用来处理原始配置文件中的mappers相关配置,加载数据层的Mapper接口类
- MapperScannerConfigurer有一个核心属性basePackage,就是用来设置所扫描的包路径
步骤6:主配置类中引入Mybatis配置类
@Configuration
@ComponentScan("com.itheima")
@PropertySource("classpath:jdbc.properties")
@Import({JdbcConfig.class,MybatisConfig.class})
public class SpringConfig {
}
步骤7:编写运行类
在运行类中,从IOC容器中获取Service对象,调用方法获取结果
public class App2 {
    public static void main(String[] args) {
        ApplicationContext ctx = new AnnotationConfigApplicationContext(SpringConfig.class);

        AccountService accountService = ctx.getBean(AccountService.class);

        Account ac = accountService.findById(1);
        System.out.println(ac);
    }
}
步骤8:运行程序

支持Spring与Mybatis的整合就已经完成了,其中主要用到的两个类分别是:
- SqlSessionFactoryBean
- MapperScannerConfigurer
1.3 Spring整合Junit
整合Junit与整合Druid和MyBatis差异比较大,为什么呢?Junit是一个搞单元测试用的工具,它不是我们程序的主体,也不会参加最终程序的运行,从作用上来说就和之前的东西不一样,它不是做功能的,看做是一个辅助工具就可以了。
1.3.1 环境准备
直接使用Spring与Mybatis整合的环境即可。
1.3.2 整合Junit步骤
在上述环境的基础上,我们来对Junit进行整合。
步骤1:引入依赖
pom.xml
<dependency>
    <groupId>junit</groupId>
    <artifactId>junit</artifactId>
    <version>4.12</version>
    <scope>test</scope>
</dependency>

<dependency>
    <groupId>org.springframework</groupId>
    <artifactId>spring-test</artifactId>
    <version>5.2.10.RELEASE</version>
</dependency>
步骤2:编写测试类
在test\java下创建一个AccountServiceTest,这个名字任意
//设置类运行器
@RunWith(SpringJUnit4ClassRunner.class)
//设置Spring环境对应的配置类
@ContextConfiguration(classes = {SpringConfiguration.class}) //加载配置类
//@ContextConfiguration(locations={"classpath:applicationContext.xml"})//加载配置文件
public class AccountServiceTest {
    //支持自动装配注入bean
    @Autowired
    private AccountService accountService;
    @Test
    public void testFindById(){
        System.out.println(accountService.findById(1));

    }
    @Test
    public void testFindAll(){
        System.out.println(accountService.findAll());
    }
}
注意:
- 单元测试,如果测试的是注解配置类,则使用
@ContextConfiguration(classes = 配置类.class) - 单元测试,如果测试的是配置文件,则使用
@ContextConfiguration(locations={配置文件名,...}) - Junit运行后是基于Spring环境运行的,所以Spring提供了一个专用的类运行器,这个务必要设置,这个类运行器就在Spring的测试专用包中提供的,导入的坐标就是这个东西
SpringJUnit4ClassRunner - 上面两个配置都是固定格式,当需要测试哪个bean时,使用自动装配加载对应的对象,下面的工作就和以前做Junit单元测试完全一样了
知识点1:@RunWith
| 名称 | @RunWith |
|---|---|
| 类型 | 测试类注解 |
| 位置 | 测试类定义上方 |
| 作用 | 设置JUnit运行器 |
| 属性 | value(默认):运行所使用的运行期 |
知识点2:@ContextConfiguration
| 名称 | @ContextConfiguration |
|---|---|
| 类型 | 测试类注解 |
| 位置 | 测试类定义上方 |
| 作用 | 设置JUnit加载的Spring核心配置 |
| 属性 | classes:核心配置类,可以使用数组的格式设定加载多个配置类 locations:配置文件,可以使用数组的格式设定加载多个配置文件名称 |
后记
👉👉💕💕美好的一天,到此结束,下次继续努力!欲知后续,请看下回分解,写作不易,感谢大家的支持!! 🌹🌹🌹


![php伪协议 [SWPUCTF 2021 新生赛]PseudoProtocols](https://img-blog.csdnimg.cn/direct/b1a891a2a552413ba1787004dc1e668a.png)