一、本文内容
本文给大家带来的改进内容是ShuffleNetV2,这是一种为移动设备设计的高效CNN架构。其在ShuffleNetV1的基础上强调除了FLOPs之外,还应考虑速度、内存访问成本和平台特性。(我在YOLOv8n上修改该主干降低了GFLOPs,但是参数量还是有一定上涨,其非常适合轻量化的读者来使用,同时精度也有一定程度的上涨)。本文通过介绍其主要框架原理,然后教你如何添加该网络结构到网络模型中。
适用检测目标:轻量化模型,一定程度涨点。
推荐指数:⭐⭐⭐⭐
专栏回顾:YOLOv8改进系列专栏——本专栏持续复习各种顶会内容——科研必备
效果回顾展示->

目录
一、本文内容
二、ShuffleNetV2框架原理编辑
三、ShuffleNetV2核心代码
四、手把手教你添加ShuffleNetV2网络结构
修改一
修改二
修改三
修改四
修改五
修改六
修改七
修改八
五、ShuffleNetV2的yaml文件
六、成功运行记录
七、本文总结
二、ShuffleNetV2框架原理
官方论文地址:官方论文地址
官方代码地址:官方代码地址

ShuffleNet的创新机制为点群卷积和通道混:使用了新的操作点群卷积(pointwise group convolution)和通道混洗(channel shuffle),以减少计算成本,同时保持网络精度
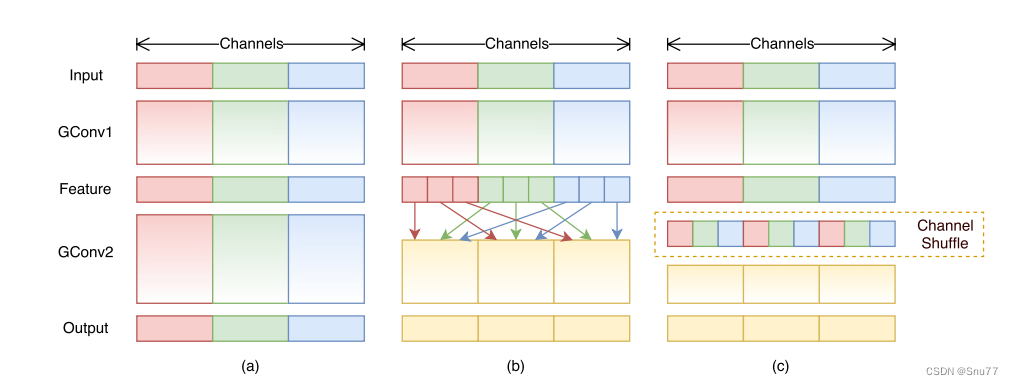
您上传的图片展示的是ShuffleNet架构中的通道混洗机制。这一机制通过两个堆叠的分组卷积(GConv)来实现:
图示(a):展示了两个具有相同分组数量的堆叠卷积层。每个输出通道仅与同一组内的输入通道相关联。
图示(b):在不使用通道混洗的情况下,展示了在GConv1之后,GConv2从不同分组获取数据时输入和输出通道是如何完全相关联的。
图示(c:提供了与(b)相同的实现,但使用了通道混洗来允许跨组通信,从而使网络内更有效和强大的特征学习成为可能。

上面的图片描述了ShuffleNet架构中的ShuffleNet单元。这些单元是网络中的基本构建块,具体包括:
图示(a):一个基本的瓶颈单元,使用了深度可分离卷积(DWConv)和一个简单的加法(Add)来融合特征。
图示(b):在标准瓶颈单元的基础上,引入了点群卷积(GConv)和通道混洗操作,以增强特征的表达能力。
图示(c):适用于空间下采样的ShuffleNet单元,使用步长为2的平均池化(AVG Pool)和深度可分离卷积,再通过通道混洗和点群卷积进一步处理特征,最后通过连接操作(Concat)合并特征。
三、ShuffleNetV2核心代码
下面的代码是整个ShuffleNetV1的核心代码,其中有个版本,对应的GFLOPs也不相同,使用方式看章节四。
# Copyright 2022 Dakewe Biotech Corporation. All Rights Reserved.
# Licensed under the Apache License, Version 2.0 (the "License");
#   you may not use this file except in compliance with the License.
#   You may obtain a copy of the License at
#
#       http://www.apache.org/licenses/LICENSE-2.0
#
# Unless required by applicable law or agreed to in writing, software
# distributed under the License is distributed on an "AS IS" BASIS,
# WITHOUT WARRANTIES OR CONDITIONS OF ANY KIND, either express or implied.
# See the License for the specific language governing permissions and
# limitations under the License.
# ==============================================================================
from typing import Any, List, Optional

import torch
from torch import Tensor
from torch import nn

__all__ = [
    "ShuffleNetV1",
    "shufflenet_v1_x0_5", "shufflenet_v1_x1_0", "shufflenet_v1_x1_5", "shufflenet_v1_x2_0",
]


class ShuffleNetV1(nn.Module):

    def __init__(
            self,
            repeats_times: List[int],
            stages_out_channels: List[int],
            groups: int = 8,
            num_classes: int = 1000,
    ) -> None:
        super(ShuffleNetV1, self).__init__()
        in_channels = stages_out_channels[0]

        self.first_conv = nn.Sequential(
            nn.Conv2d(3, in_channels, (3, 3), (2, 2), (1, 1), bias=False),
            nn.BatchNorm2d(in_channels),
            nn.ReLU(True),
        )
        self.maxpool = nn.MaxPool2d((3, 3), (2, 2), (1, 1))

        features = []
        for state_repeats_times_index in range(len(repeats_times)):
            out_channels = stages_out_channels[state_repeats_times_index + 1]

            for i in range(repeats_times[state_repeats_times_index]):
                stride = 2 if i == 0 else 1
                first_group = state_repeats_times_index == 0 and i == 0
                features.append(
                    ShuffleNetV1Unit(
                        in_channels,
                        out_channels,
                        stride,
                        groups,
                        first_group,
                    )
                )
                in_channels = out_channels
        self.features = nn.Sequential(*features)

        self.globalpool = nn.AvgPool2d((7, 7))

        self.classifier = nn.Sequential(
            nn.Linear(stages_out_channels[-1], num_classes, bias=False),
        )

        # Initialize neural network weights
        self._initialize_weights()
        self.index = stages_out_channels[-4:]
        self.width_list = [i.size(1) for i in self.forward(torch.randn(1, 3, 640, 640))]

    def forward(self, x: Tensor) -> list[Optional[Any]]:
        out = self.first_conv(x)
        out = self.maxpool(out)
        results = [None, None, None, None]
        for model in self.features:
            out = model(out)
            # results.append(out)
            if out.size(1) in self.index:
                position = self.index.index(out.size(1))  # Find the position in the index list
                results[position] = out

        return results

    def _initialize_weights(self) -> None:
        for name, module in self.named_modules():
            if isinstance(module, nn.Conv2d):
                if 'first' in name:
                    nn.init.normal_(module.weight, 0, 0.01)
                else:
                    nn.init.normal_(module.weight, 0, 1.0 / module.weight.shape[1])
                if module.bias is not None:
                    nn.init.constant_(module.bias, 0)
            elif isinstance(module, nn.BatchNorm2d):
                nn.init.constant_(module.weight, 1)
                if module.bias is not None:
                    nn.init.constant_(module.bias, 0.0001)
                nn.init.constant_(module.running_mean, 0)
            elif isinstance(module, nn.BatchNorm1d):
                nn.init.constant_(module.weight, 1)
                if module.bias is not None:
                    nn.init.constant_(module.bias, 0.0001)
                nn.init.constant_(module.running_mean, 0)
            elif isinstance(module, nn.Linear):
                nn.init.normal_(module.weight, 0, 0.01)
                if module.bias is not None:
                    nn.init.constant_(module.bias, 0)


class ShuffleNetV1Unit(nn.Module):
    def __init__(
            self,
            in_channels: int,
            out_channels: int,
            stride: int,
            groups: int,
            first_groups: bool = False,
    ) -> None:
        super(ShuffleNetV1Unit, self).__init__()
        self.stride = stride
        self.groups = groups
        self.first_groups = first_groups
        hidden_channels = out_channels // 4

        if stride == 2:
            out_channels -= in_channels
            self.branch_proj = nn.AvgPool2d((3, 3), (2, 2), (1, 1))

        self.branch_main_1 = nn.Sequential(
            # pw
            nn.Conv2d(in_channels, hidden_channels, (1, 1), (1, 1), (0, 0), groups=1 if first_groups else groups,
                      bias=False),
            nn.BatchNorm2d(hidden_channels),
            nn.ReLU(True),
            # dw
            nn.Conv2d(hidden_channels, hidden_channels, (3, 3), (stride, stride), (1, 1), groups=hidden_channels,
                      bias=False),
            nn.BatchNorm2d(hidden_channels),
        )
        self.branch_main_2 = nn.Sequential(
            # pw-linear
            nn.Conv2d(hidden_channels, out_channels, (1, 1), (1, 1), (0, 0), groups=groups, bias=False),
            nn.BatchNorm2d(out_channels),
        )

        self.relu = nn.ReLU(True)

    def channel_shuffle(self, x):
        batch_size, channels, height, width = x.data.size()
        assert channels % self.groups == 0
        group_channels = channels // self.groups

        out = x.reshape(batch_size, group_channels, self.groups, height, width)
        out = out.permute(0, 2, 1, 3, 4)
        out = out.reshape(batch_size, channels, height, width)

        return out

    def forward(self, x: Tensor) -> Tensor:
        identify = x

        out = self.branch_main_1(x)
        out = self.channel_shuffle(out)
        out = self.branch_main_2(out)

        if self.stride == 2:
            branch_proj = self.branch_proj(x)
            out = self.relu(out)
            out = torch.cat([branch_proj, out], 1)
            return out
        else:
            out = torch.add(out, identify)
            out = self.relu(out)
            return out


def shufflenet_v1_x0_5(**kwargs: Any) -> ShuffleNetV1:
    model = ShuffleNetV1([4, 4, 8, 4], [16, 96, 192, 384, 768], 8, **kwargs)

    return model


def shufflenet_v1_x1_0(**kwargs: Any) -> ShuffleNetV1:
    model = ShuffleNetV1([4, 4, 8, 4], [24, 192, 384, 768, 1536], 8, **kwargs)

    return model


def shufflenet_v1_x1_5(**kwargs: Any) -> ShuffleNetV1:
    model = ShuffleNetV1([4, 4, 8, 4], [24, 288, 576, 1152, 2304], 8, **kwargs)

    return model


def shufflenet_v1_x2_0(**kwargs: Any) -> ShuffleNetV1:
    model = ShuffleNetV1([4, 4, 8, 4], [48, 384, 768, 1536, 3072], 8, **kwargs)

    return model


if __name__ == "__main__":

    # Generating Sample image
    image_size = (1, 3, 640, 640)
    image = torch.rand(*image_size)

    # Model
    model = shufflenet_v1_x0_5()

    out = model(image)
    print(out)
四、手把手教你添加ShuffleNetV2网络结构
这个主干的网络结构添加起来算是所有的改进机制里最麻烦的了,因为有一些网略结构可以用yaml文件搭建出来,有一些网络结构其中的一些细节根本没有办法用yaml文件去搭建,用yaml文件去搭建会损失一些细节部分(而且一个网络结构设计很多细节的结构修改方式都不一样,一个一个去修改大家难免会出错),所以这里让网络直接返回整个网络,然后修改部分 yolo代码以后就都以这种形式添加了,以后我提出的网络模型基本上都会通过这种方式修改,我也会进行一些模型细节改进。创新出新的网络结构大家直接拿来用就可以的。下面开始添加教程->
(同时每一个后面都有代码,大家拿来复制粘贴替换即可,但是要看好了不要复制粘贴替换多了)
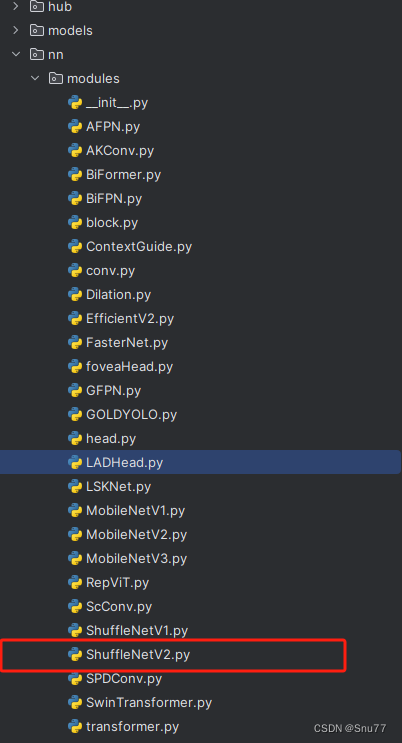
修改一
我们复制网络结构代码到“ultralytics/nn/modules”目录下创建一个py文件复制粘贴进去 ,我这里起的名字是ShuffleNetV1。
修改二
找到如下的文件"ultralytics/nn/tasks.py" 在开始的部分导入我们的模型如下图。

修改三
添加如下两行代码!!!

修改四
找到七百多行大概把具体看图片,按照图片来修改就行,添加红框内的部分,注意没有()只是函数名,我这里只添加了部分的版本,大家有兴趣这个ShuffleNetV1还有更多的版本可以添加,看我给的代码函数头即可。
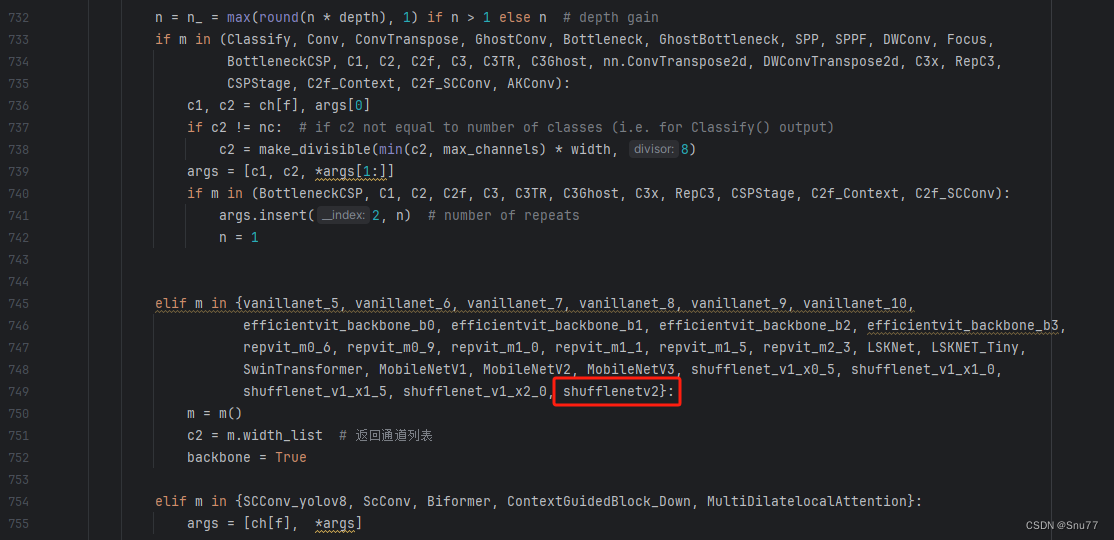
        elif m in {自行添加对应的模型即可,下面都是一样的}:
            m = m()
            c2 = m.width_list  # 返回通道列表
            backbone = True
修改五
下面的两个红框内都是需要改动的。

        if isinstance(c2, list):
            m_ = m
            m_.backbone = True
        else:
            m_ = nn.Sequential(*(m(*args) for _ in range(n))) if n > 1 else m(*args)  # module
            t = str(m)[8:-2].replace('__main__.', '')  # module type


        m.np = sum(x.numel() for x in m_.parameters())  # number params
        m_.i, m_.f, m_.type = i + 4 if backbone else i, f, t  # attach index, 'from' index, type
修改六
如下的也需要修改,全部按照我的来。

代码如下把原先的代码替换了即可。
        if verbose:
            LOGGER.info(f'{i:>3}{str(f):>20}{n_:>3}{m.np:10.0f}  {t:<45}{str(args):<30}')  # print

        save.extend(x % (i + 4 if backbone else i) for x in ([f] if isinstance(f, int) else f) if x != -1)  # append to savelist
        layers.append(m_)
        if i == 0:
            ch = []
        if isinstance(c2, list):
            ch.extend(c2)
            if len(c2) != 5:
                ch.insert(0, 0)
        else:
            ch.append(c2)
修改七
修改七和前面的都不太一样,需要修改前向传播中的一个部分, 已经离开了parse_model方法了。
可以在图片中开代码行数,没有离开task.py文件都是同一个文件。 同时这个部分有好几个前向传播都很相似,大家不要看错了,是70多行左右的!!!,同时我后面提供了代码,大家直接复制粘贴即可,有时间我针对这里会出一个视频。

代码如下->
    def _predict_once(self, x, profile=False, visualize=False):
        """
        Perform a forward pass through the network.

        Args:
            x (torch.Tensor): The input tensor to the model.
            profile (bool):  Print the computation time of each layer if True, defaults to False.
            visualize (bool): Save the feature maps of the model if True, defaults to False.

        Returns:
            (torch.Tensor): The last output of the model.
        """
        y, dt = [], []  # outputs
        for m in self.model:
            if m.f != -1:  # if not from previous layer
                x = y[m.f] if isinstance(m.f, int) else [x if j == -1 else y[j] for j in m.f]  # from earlier layers
            if profile:
                self._profile_one_layer(m, x, dt)
            if hasattr(m, 'backbone'):
                x = m(x)
                if len(x) != 5: # 0 - 5
                    x.insert(0, None)
                for index, i in enumerate(x):
                    if index in self.save:
                        y.append(i)
                    else:
                        y.append(None)
                x = x[-1] # 最后一个输出传给下一层
            else:
                x = m(x)  # run
                y.append(x if m.i in self.save else None)  # save output
            if visualize:
                feature_visualization(x, m.type, m.i, save_dir=visualize)
        return x
到这里就完成了修改部分,但是这里面细节很多,大家千万要注意不要替换多余的代码,导致报错,也不要拉下任何一部,都会导致运行失败,而且报错很难排查!!!很难排查!!!
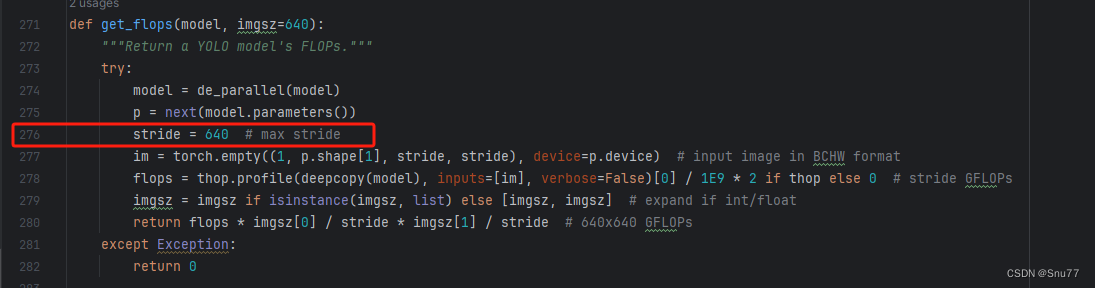
修改八
我们找到如下文件'ultralytics/utils/torch_utils.py'按照如下的图片进行修改,否则容易打印不出来计算量。
五、ShuffleNetV2的yaml文件
复制如下yaml文件进行运行!!!
# Ultralytics YOLO 🚀, AGPL-3.0 license
# YOLOv8 object detection model with P3-P5 outputs. For Usage examples see https://docs.ultralytics.com/tasks/detect

# Parameters
nc: 80  # number of classes
scales: # model compound scaling constants, i.e. 'model=yolov8n.yaml' will call yolov8.yaml with scale 'n'
  # [depth, width, max_channels]
  n: [0.33, 0.25, 1024]  # YOLOv8n summary: 225 layers,  3157200 parameters,  3157184 gradients,   8.9 GFLOPs
  s: [0.33, 0.50, 1024]  # YOLOv8s summary: 225 layers, 11166560 parameters, 11166544 gradients,  28.8 GFLOPs
  m: [0.67, 0.75, 768]   # YOLOv8m summary: 295 layers, 25902640 parameters, 25902624 gradients,  79.3 GFLOPs
  l: [1.00, 1.00, 512]   # YOLOv8l summary: 365 layers, 43691520 parameters, 43691504 gradients, 165.7 GFLOPs
  x: [1.00, 1.25, 512]   # YOLOv8x summary: 365 layers, 68229648 parameters, 68229632 gradients, 258.5 GFLOP

# YOLOv8.0n backbone
backbone:
  # [from, repeats, module, args]
  - [-1, 1, shufflenetv2, []]  # 4
  - [-1, 1, SPPF, [1024, 5]]  # 5

# YOLOv8.0n head
head:
  - [-1, 1, nn.Upsample, [None, 2, 'nearest']] # 6
  - [[-1, 3], 1, Concat, [1]]  # 7 cat backbone P4
  - [-1, 3, C2f, [512]]  # 8

  - [-1, 1, nn.Upsample, [None, 2, 'nearest']] # 9
  - [[-1, 2], 1, Concat, [1]]  # 10 cat backbone P3
  - [-1, 3, C2f, [256]]  # 11 (P3/8-small)

  - [-1, 1, Conv, [256, 3, 2]] # 12
  - [[-1, 8], 1, Concat, [1]]  # 13 cat head P4
  - [-1, 3, C2f, [512]]  # 14 (P4/16-medium)

  - [-1, 1, Conv, [512, 3, 2]] # 15
  - [[-1, 5], 1, Concat, [1]]  # 16 cat head P5
  - [-1, 3, C2f, [1024]]  # 17 (P5/32-large)

  - [[11, 14, 17], 1, Detect, [nc]]  # Detect(P3, P4, P5)
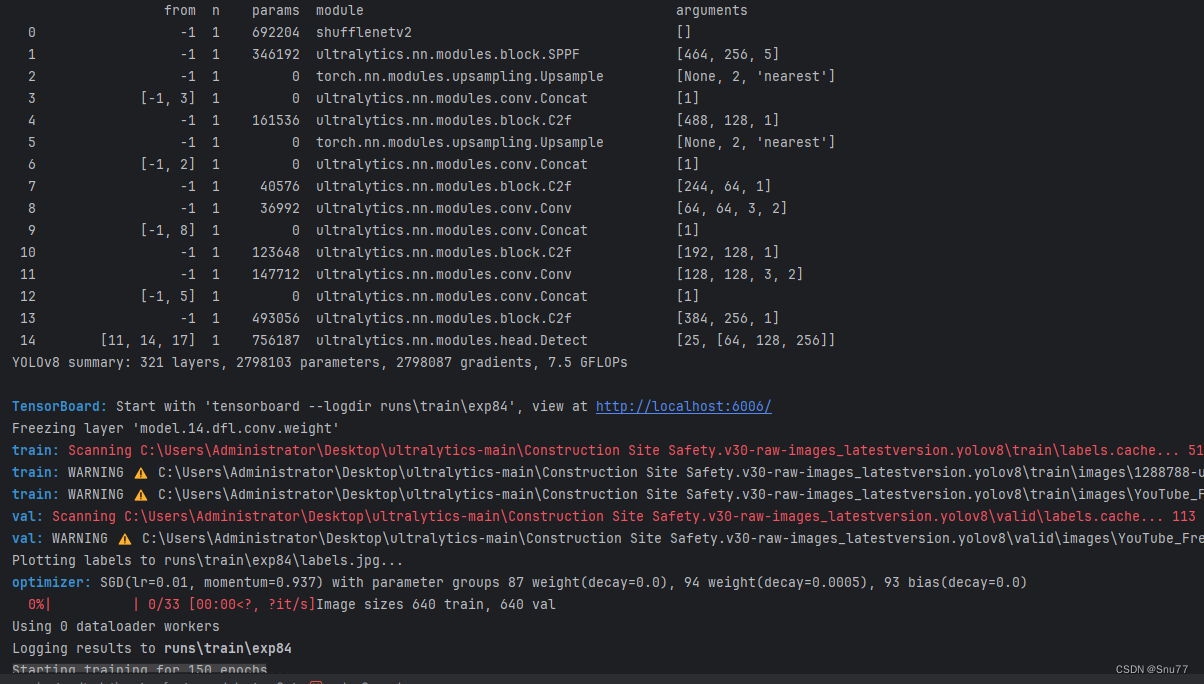
六、成功运行记录
下面是成功运行的截图,已经完成了有1个epochs的训练,图片太大截不全第2个epochs了。
七、本文总结
到此本文的正式分享内容就结束了,在这里给大家推荐我的YOLOv8改进有效涨点专栏,本专栏目前为新开的平均质量分98分,后期我会根据各种最新的前沿顶会进行论文复现,也会对一些老的改进机制进行补充,目前本专栏免费阅读(暂时,大家尽早关注不迷路~),如果大家觉得本文帮助到你了,订阅本专栏,关注后续更多的更新~
专栏回顾:YOLOv8改进系列专栏——本专栏持续复习各种顶会内容——科研必备