目录结构如下:
分类模型web部署
classification.py
import os
import cv2
import numpy as np
import onnxruntime
from flask import Flask, render_template, request, jsonify


app = Flask(__name__)


onnx_session = onnxruntime.InferenceSession("mobilenet_v2.onnx", providers=['CPUExecutionProvider'])

input_name = []
for node in onnx_session.get_inputs():
    input_name.append(node.name)

output_name = []
for node in onnx_session.get_outputs():
    output_name.append(node.name)


def allowed_file(filename):
    return '.' in filename and filename.rsplit('.', 1)[1] in set(['bmp', 'jpg', 'JPG', 'png', 'PNG'])


def preprocess(image):
    if image.shape[0] < image.shape[1]: #h<w
        image = cv2.resize(image, (int(256*image.shape[1]/image.shape[0]), 256))
    else:
        image = cv2.resize(image, (256, int(256*image.shape[0]/image.shape[1])))

    crop_size = min(image.shape[0], image.shape[1])
    left = int((image.shape[1]-crop_size)/2)
    top = int((image.shape[0]-crop_size)/2)
    image_crop = image[top:top+crop_size, left:left+crop_size]
    image_crop = cv2.resize(image_crop, (224,224))

    image_crop = image_crop[:,:,::-1].transpose(2,0,1).astype(np.float32)   #BGR2RGB和HWC2CHW
    image_crop[0,:] = (image_crop[0,:] - 123.675) / 58.395
    image_crop[1,:] = (image_crop[1,:] - 116.28) / 57.12
    image_crop[2,:] = (image_crop[2,:] - 103.53) / 57.375

    return  np.expand_dims(image_crop, axis=0)


@app.route('/classification', methods=['POST', 'GET'])  # 添加路由
def classification():
    if request.method == 'POST':
        f = request.files['file']
        if not (f and allowed_file(f.filename)):
            return jsonify({"error": 1001, "msg": "only support image formats: .bmp .png .PNG .jpg .JPG"})

        basepath = os.path.dirname(__file__)  # 当前文件所在路径
        upload_path = os.path.join(basepath, 'static/images/temp.jpg')  # 注意:没有的文件夹一定要先创建,不然会提示没有该路径
        f.save(upload_path)

        image = cv2.imread(upload_path)
        tensor = preprocess(image)
        inputs = {}
        for name in input_name:
            inputs[name] = tensor
        outputs = onnx_session.run(None, inputs)[0]
        label = np.argmax(outputs)
        score = np.exp(outputs[0][label]) / np.sum(np.exp(outputs), axis=1)

        return render_template('classification.html', label=label, score=score[0])

    return render_template('upload.html')


if __name__ == '__main__':
    app.run(host='0.0.0.0', port=8000, debug=True)
classification.html
<!DOCTYPE html>
<html lang="en">
<head>
<meta charset="UTF-8">
</head>
<body>
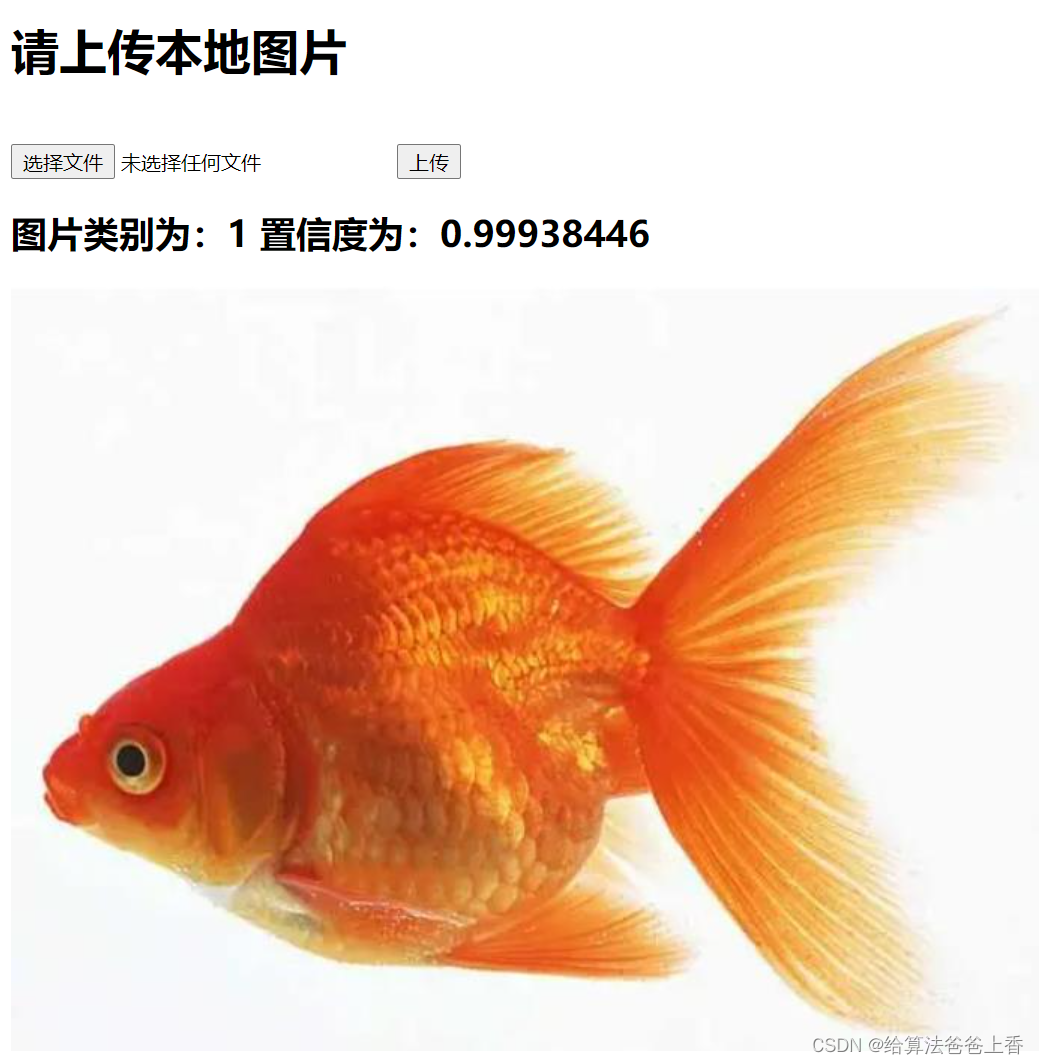
<h1>请上传本地图片</h1>
<form action="" enctype='multipart/form-data' method='POST'>
<input type="file" name="file" style="margin-top:20px;"/>
<input type="submit" value="上传" class="button-new" style="margin-top:15px;"/>
</form>
<h2>图片类别为:{{label}} 置信度为:{{score}} </h2>
<img src="{{ url_for('static', filename= './images/temp.jpg') }}" alt="你的图片被外星人劫持了~~"/>
</body>
</html>
运行程序,在浏览器输入http://127.0.0.1:8000/classification,效果展示:
检测模型web部署
detection.py
import os
import cv2
import numpy as np
import onnxruntime
from flask import Flask, render_template, request, jsonify


app = Flask(__name__)


class_names = ['person', 'bicycle', 'car', 'motorcycle', 'airplane', 'bus', 'train', 'truck', 'boat', 'traffic light',
        'fire hydrant', 'stop sign', 'parking meter', 'bench', 'bird', 'cat', 'dog', 'horse', 'sheep', 'cow',
        'elephant', 'bear', 'zebra', 'giraffe', 'backpack', 'umbrella', 'handbag', 'tie', 'suitcase', 'frisbee',
        'skis', 'snowboard', 'sports ball', 'kite', 'baseball bat', 'baseball glove', 'skateboard', 'surfboard',
        'tennis racket', 'bottle', 'wine glass', 'cup', 'fork', 'knife', 'spoon', 'bowl', 'banana', 'apple',
        'sandwich', 'orange', 'broccoli', 'carrot', 'hot dog', 'pizza', 'donut', 'cake', 'chair', 'couch',
        'potted plant', 'bed', 'dining table', 'toilet', 'tv', 'laptop', 'mouse', 'remote', 'keyboard', 'cell phone',
        'microwave', 'oven', 'toaster', 'sink', 'refrigerator', 'book', 'clock', 'vase', 'scissors', 'teddy bear',
        'hair drier', 'toothbrush'] #coco80类别
input_shape = (640, 640)
score_threshold = 0.2
nms_threshold = 0.5
confidence_threshold = 0.2


onnx_session = onnxruntime.InferenceSession("yolov5n.onnx", providers=['CPUExecutionProvider'])

input_name = []
for node in onnx_session.get_inputs():
    input_name.append(node.name)

output_name = []
for node in onnx_session.get_outputs():
    output_name.append(node.name)


def allowed_file(filename):
    return '.' in filename and filename.rsplit('.', 1)[1] in set(['bmp', 'jpg', 'JPG', 'png', 'PNG'])


def nms(boxes, scores, score_threshold, nms_threshold):
    x1 = boxes[:, 0]
    y1 = boxes[:, 1]
    x2 = boxes[:, 2]
    y2 = boxes[:, 3]
    areas = (y2 - y1 + 1) * (x2 - x1 + 1)
    keep = []
    index = scores.argsort()[::-1]

    while index.size > 0:
        i = index[0]
        keep.append(i)
        x11 = np.maximum(x1[i], x1[index[1:]])
        y11 = np.maximum(y1[i], y1[index[1:]])
        x22 = np.minimum(x2[i], x2[index[1:]])
        y22 = np.minimum(y2[i], y2[index[1:]])
        w = np.maximum(0, x22 - x11 + 1)
        h = np.maximum(0, y22 - y11 + 1)
        overlaps = w * h
        ious = overlaps / (areas[i] + areas[index[1:]] - overlaps)
        idx = np.where(ious <= nms_threshold)[0]
        index = index[idx + 1]
    return keep


def xywh2xyxy(x):
    y = np.copy(x)
    y[:, 0] = x[:, 0] - x[:, 2] / 2
    y[:, 1] = x[:, 1] - x[:, 3] / 2
    y[:, 2] = x[:, 0] + x[:, 2] / 2
    y[:, 3] = x[:, 1] + x[:, 3] / 2
    return y


def filter_box(outputs): #过滤掉无用的框
    outputs = np.squeeze(outputs)
    outputs = outputs[outputs[..., 4] > confidence_threshold]
    classes_scores = outputs[..., 5:]

    boxes = []
    scores = []
    class_ids = []
    for i in range(len(classes_scores)):
        class_id = np.argmax(classes_scores[i])
        outputs[i][4] *= classes_scores[i][class_id]
        outputs[i][5] = class_id
        if outputs[i][4] > score_threshold:
            boxes.append(outputs[i][:6])
            scores.append(outputs[i][4])
            class_ids.append(outputs[i][5])

    if len(boxes) == 0 :
        return
    boxes = np.array(boxes)
    boxes = xywh2xyxy(boxes)
    scores = np.array(scores)
    indices = nms(boxes, scores, score_threshold, nms_threshold)
    output = boxes[indices]
    return output


def letterbox(im, new_shape=(416, 416), color=(114, 114, 114)):
    # Resize and pad image while meeting stride-multiple constraints
    shape = im.shape[:2]  # current shape [height, width]

    # Scale ratio (new / old)
    r = min(new_shape[0] / shape[0], new_shape[1] / shape[1])

    # Compute padding
    new_unpad = int(round(shape[1] * r)), int(round(shape[0] * r))
    dw, dh = (new_shape[1] - new_unpad[0])/2, (new_shape[0] - new_unpad[1])/2  # wh padding
    top, bottom = int(round(dh - 0.1)), int(round(dh + 0.1))
    left, right = int(round(dw - 0.1)), int(round(dw + 0.1))

    if shape[::-1] != new_unpad:  # resize
        im = cv2.resize(im, new_unpad, interpolation=cv2.INTER_LINEAR)
    im = cv2.copyMakeBorder(im, top, bottom, left, right, cv2.BORDER_CONSTANT, value=color)  # add border
    return im


def scale_boxes(boxes, shape):
    # Rescale boxes (xyxy) from input_shape to shape
    gain = min(input_shape[0] / shape[0], input_shape[1] / shape[1])  # gain  = old / new
    pad = (input_shape[1] - shape[1] * gain) / 2, (input_shape[0] - shape[0] * gain) / 2  # wh padding
    boxes[..., [0, 2]] -= pad[0]  # x padding
    boxes[..., [1, 3]] -= pad[1]  # y padding
    boxes[..., :4] /= gain
    boxes[..., [0, 2]] = boxes[..., [0, 2]].clip(0, shape[1])  # x1, x2
    boxes[..., [1, 3]] = boxes[..., [1, 3]].clip(0, shape[0])  # y1, y2
    return boxes


def draw(image, box_data):
    box_data = scale_boxes(box_data, image.shape)
    boxes = box_data[...,:4].astype(np.int32)
    scores = box_data[...,4]
    classes = box_data[...,5].astype(np.int32)

    for box, score, cl in zip(boxes, scores, classes):
        top, left, right, bottom = box
        cv2.rectangle(image, (top, left), (right, bottom), (255, 0, 0), 1)
        cv2.putText(image, '{0} {1:.2f}'.format(class_names[cl], score), (top, left), cv2.FONT_HERSHEY_SIMPLEX, 0.6, (0, 0, 255), 1)


def preprocess(img):
    input = letterbox(img, input_shape)
    input = input[:, :, ::-1].transpose(2, 0, 1).astype(dtype=np.float32)
    input = input / 255.0
    input = np.expand_dims(input, axis=0)
    return input


@app.route('/detection', methods=['POST', 'GET'])  # 添加路由
def detection():
    if request.method == 'POST':
        f = request.files['file']
        if not (f and allowed_file(f.filename)):
            return jsonify({"error": 1001, "msg": "only support image formats: .bmp .png .PNG .jpg .JPG"})

        basepath = os.path.dirname(__file__)  # 当前文件所在路径
        upload_path = os.path.join(basepath, 'static/images/temp.jpg')  # 注意:没有的文件夹一定要先创建,不然会提示没有该路径
        f.save(upload_path)

        image = cv2.imread(upload_path)
        tensor = preprocess(image)
        inputs = {}
        for name in input_name:
            inputs[name] = tensor
        outputs = onnx_session.run(None, inputs)[0]

        boxes = filter_box(outputs)
        if boxes is not None:
            draw(image, boxes)
        cv2.imwrite(os.path.join(basepath, 'static/images/temp.jpg'), image)

        return render_template('detection.html')

    return render_template('upload.html')


if __name__ == '__main__':
    app.run(host='0.0.0.0', port=8000, debug=True)
detection.html
<!DOCTYPE html>
<html lang="en">
<head>
    <meta charset="UTF-8">
</head>
<body>
    <h1>请上传本地图片</h1>
    <form action="" enctype='multipart/form-data' method='POST'>
        <input type="file" name="file" style="margin-top:20px;"/>
        <input type="submit" value="上传" class="button-new" style="margin-top:15px;"/>
    </form>
    <img src="{{ url_for('static', filename= './images/temp.jpg') }}"  alt="你的图片被外星人劫持了~~"/>
</body>
</html>
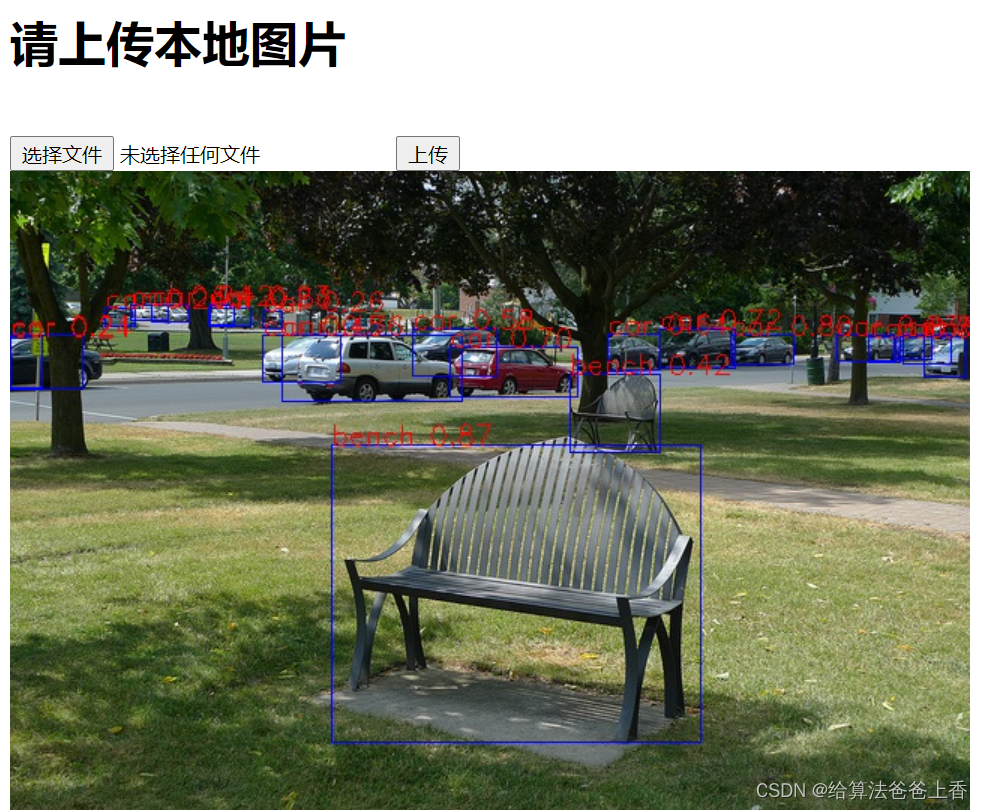
运行程序,在浏览器输入http://127.0.0.1:8000/detection,效果展示: