文章目录
- 第1关:创建用户与动态
- 第2关:处理用户关系
- 第3关:状态与信息流
第1关:创建用户与动态
编程要求
在Begin-End区域编写 create_user(login_name, real_name) 函数,实现创建新用户的功能,具体参数与要求如下:
方法参数login_name为用户登录名,real_name为用户真名;
用户登录名预处理的实现:将用户登录名转换成全小写格式;
重名检测的实现:查询哈希键users中是否存在与用户登录名同名的域,若存在,则不允许重新创建该用户,返回None;
分配用户编号的实现:对计数器user:id递增1,并将递增后的值作为新用户的编号;
存储用户信息的实现:使用事务一次性提交:
存储登录名的实现:将用户登录名记录到哈希键users当中,值为该用户编号;
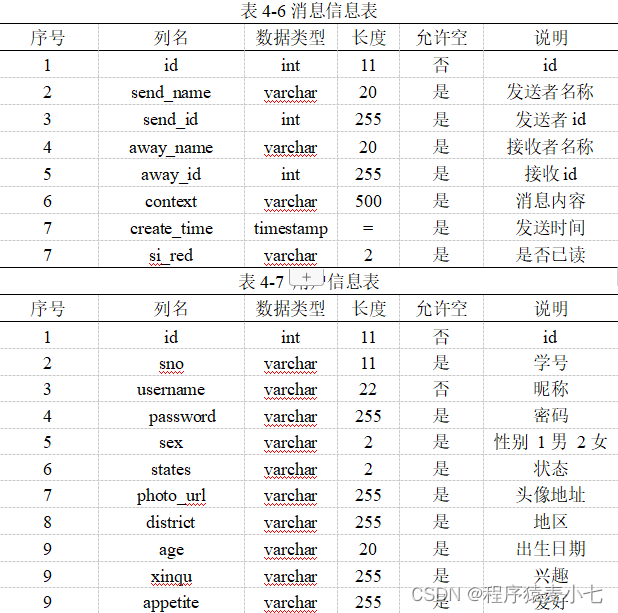
存储详情的实现:按照如下示意将用户信息存储到哈希键user:{id}中:
返回创建结果的实现:返回新创建用户的编号。
编写 create_post(uid, content) 函数,实现创建新动态的功能,具体参数与要求如下:
方法参数uid为发布动态的用户编号,content为要发布的动态内容;
用户合法性检测的实现:查找用户编号对应详情信息哈希user:{uid}是否存在login_name域,若存在,则记录,若不存在,则不允许创建新动态,返回None;
分配动态编号的实现:对计数器post:id递增1,并将递增后的值作为新动态的编号;
存储动态信息的实现:按照如下示意将动态信息存储到哈希键post:{id}中:
更新用户动态数的实现:为该用户编号对应的详情信息哈希user:{uid}中的posts域的值加1;
返回创建结果的实现:返回新创建动态的编号。
测试说明
平台会对你编写的代码进行测试:
测试输入:无;
预期输出:
测试 create_user 方法…
第一次创建登录名为 TestUser 的用户
创建的用户ID为: 1
当前分配的用户ID为: 1
创建的用户信息为: {‘login_name’: ‘testuser’, ‘posts’: ‘0’, ‘real_name’: ‘Test User’, ‘followers’: ‘0’, ‘following’: ‘0’, ‘id’: ‘1’}
第二次创建登录名为 TestUser 的用户
创建的用户ID为: None
当前分配的用户ID为: 1
测试 create_post 方法…
为用户 1 创建一条动态
创建的动态ID为: 1
当前分配的动态ID为: 1
创建的动态信息为: {‘content’: ‘First POST!’, ‘uid’: ‘1’, ‘user_name’: ‘testuser’, ‘id’: ‘1’}
对应用户信息中更新为: {‘login_name’: ‘testuser’, ‘posts’: ‘1’, ‘real_name’: ‘Test User’, ‘followers’: ‘0’, ‘following’: ‘0’, ‘id’: ‘1’}
为不存在的用户 9 创建一条动态
创建的动态ID为: None
开始你的任务吧,祝你成功!
#!/usr/bin/env python
#-*- coding:utf-8 -*-

import re
import time
import redis

conn = redis.Redis()

# 创建新用户
def create_user(login_name, real_name):
    # 请在下面完成要求的功能
    #********* Begin *********#
    login_name = login_name.lower()
    if conn.hget("users", login_name):
        return None

    uid = conn.incr("user:id")
    pipe = conn.pipeline(True)
    pipe.hset("users", login_name, uid)
    pipe.hmset("user:%i"%(uid), {
        'login_name': login_name,
        'id': uid,
        'real_name': real_name,
        'followers': 0,
        'following': 0,
        'posts': 0,
        'last_signup': time.time(),
    })
    pipe.execute()

    return uid
    #********* End *********#

# 为用户创建新动态
def create_post(uid, content):
    # 请在下面完成要求的功能
    #********* Begin *********#
    pipe = conn.pipeline(True)
    pipe.hget("user:%i"%(uid), 'login_name')
    pipe.incr("post:id")
    login_name, pid = pipe.execute()

    if not login_name:
        return None

    pipe.hmset("post:%i"%(pid), {
        'id': pid,
        'uid': uid,
        'content': content,
        'posted': time.time(),
        'user_name': login_name,
    })
    pipe.hincrby("user:%i"%(uid), 'posts')
    pipe.execute()

    return pid
    #********* End *********#

第2关:处理用户关系
编程要求
在Begin-End区域编写 follow(uid, other_uid) 函数,实现关注用户的功能,具体参数与要求如下:
方法参数uid为当前用户编号,other_uid为被关注的用户编号;
避免重复关注的实现:如果被关注的用户编号已经在当前用户的关注列表following:{uid}中,则不重复关注,直接返回None;
建立关注关系的实现:使用事务一次性提交:
将被关注的用户编号加入到当前用户的关注列表following:{uid}中,分值为当前时间戳。
将当前用户编号加入到被关注用户的粉丝列表中followers:{other_uid},分值为当前时间戳。
修改统计数据的实现:若关系建立成功,则使用事务一次性提交:
将当前用户详情user:{uid}中的关注数following加1
将被关注用户详情user:{other_uid}中的粉丝数followers加1
返回执行结果的实现:返回True
编写 unfollow(uid, other_uid) 函数,实现取消关注的功能,具体参数与要求如下:
方法参数uid为当前用户编号,other_uid为被取消关注的用户编号;
避免重复取消关注的实现:如果被关注的用户编号已经不在当前用户的关注列表following:{uid}中,则不重复取消关注,直接返回None;
删除关注关系的实现:使用事务一次性提交:
从当前用户的关注列表following:{uid}中移除被取消关注用户编号。
从被取消关注用户的粉丝列表中followers:{other_uid}移除当前用户编号。
修改统计数据的实现:若关系删除成功,则使用事务一次性提交:
将当前用户详情user:{uid}中的关注数following减1
将被取消关注用户详情user:{other_uid}中的粉丝数followers减1
返回执行结果的实现:返回True
注意:
关注列表和粉丝列表均为有序集合,存储成员时,分值均为当前时间戳;
用户详情为上一关中创建的哈希结构。
测试说明
平台会对你编写的代码进行测试:
测试输入:
9
4
预期输出:
测试 follow 方法…
用户 9 关注 用户 4
关注结果: True
用户 9 的关注列表内容为: [‘4’]
用户 4 的粉丝列表内容为: [‘9’]
用户 9 的用户详情为: {‘login_name’: ‘test_user9’, ‘posts’: ‘0’, ‘real_name’: ‘Test user9’, ‘followers’: ‘0’, ‘following’: ‘1’, ‘id’: ‘9’}
用户 4 的用户详情为: {‘login_name’: ‘test_user4’, ‘posts’: ‘0’, ‘real_name’: ‘Test user4’, ‘followers’: ‘1’, ‘following’: ‘0’, ‘id’: ‘4’}
用户 9 再次关注 用户 4
关注结果: None
测试 unfollow 方法…
用户 9 取消关注 用户 4
取消关注结果: True
用户 9 的关注列表内容为: []
用户 4 的粉丝列表内容为: []
用户 9 的用户详情为: {‘login_name’: ‘test_user9’, ‘posts’: ‘0’, ‘real_name’: ‘Test user9’, ‘followers’: ‘0’, ‘following’: ‘0’, ‘id’: ‘9’}
用户 4 的用户详情为: {‘login_name’: ‘test_user4’, ‘posts’: ‘0’, ‘real_name’: ‘Test user4’, ‘followers’: ‘0’, ‘following’: ‘0’, ‘id’: ‘4’}
用户 9 再次取消关注 用户 4
取消关注结果: None
开始你的任务吧,祝你成功!
#!/usr/bin/env python
#-*- coding:utf-8 -*-

import re
import time
import redis

conn = redis.Redis()

# 关注用户
def follow(uid, other_uid):
    # 请在下面完成要求的功能
    #********* Begin *********#
    fkey1 = "following:%s"%(uid)
    fkey2 = "followers:%s"%(other_uid)

    if conn.zscore(fkey1, other_uid):
        return None

    now = time.time()
    pipe = conn.pipeline(True)
    pipe.zadd(fkey1, other_uid, now)
    pipe.zadd(fkey2, uid, now)
    following, followers = pipe.execute()

    pipe.hincrby("user:%s"%(uid), 'following', int(following))
    pipe.hincrby("user:%s"%(other_uid), 'followers', int(followers))
    pipe.execute()

    return True
    #********* End *********#

# 取消关注
def unfollow(uid, other_uid):
    # 请在下面完成要求的功能
    #********* Begin *********#
    fkey1 = "following:%s"%(uid)
    fkey2 = "followers:%s"%(other_uid)

    if not conn.zscore(fkey1, other_uid):
        return None

    pipe = conn.pipeline(True)
    pipe.zrem(fkey1, other_uid)
    pipe.zrem(fkey2, uid)
    following, followers = pipe.execute()

    pipe.hincrby("user:%s"%(uid), 'following', -int(following))
    pipe.hincrby("user:%s"%(other_uid), 'followers', -int(followers))
    pipe.execute()

    return True
    #********* End *********#

# 创建新用户
def create_user(login_name, real_name):
    login_name = login_name.lower()
    if conn.hget("users", login_name):
        return None

    uid = conn.incr("user:id")
    pipe = conn.pipeline(True)
    pipe.hset("users", login_name, uid)
    pipe.hmset("user:%i"%(uid), {
        'login_name': login_name,
        'id': uid,
        'real_name': real_name,
        'followers': 0,
        'following': 0,
        'posts': 0,
        'last_signup': time.time(),
    })
    pipe.execute()

    return uid

# 为用户创建新动态
def create_post(uid, content):
    pipe = conn.pipeline(True)
    pipe.hget("user:%i"%(uid), 'login_name')
    pipe.incr("post:id")
    login_name, pid = pipe.execute()

    if not login_name:
        return None

    pipe.hmset("post:%i"%(pid), {
        'id': pid,
        'uid': uid,
        'content': content,
        'posted': time.time(),
        'user_name': login_name,
    })
    pipe.hincrby("user:%i"%(uid), 'posts')
    pipe.execute()

    return pid

第3关:状态与信息流
编程要求
在Begin-End区域编写 get_home_timeline(uid) 函数,实现获得主页时间线的功能,具体参数与要求如下:
方法参数uid为要获取主页时间线的用户编号;
获取动态编号的实现:从存储用户主页时间线的有序集合home:{uid}中按照分值递减的顺序取出所有成员;
获取动态详情的实现:遍历动态编号,使用事务一次性获取每个动态编号对应动态详情哈希键post:{pid}的所有域-值对;
返回主页时间线的实现:返回事务执行的结果。
编写 post(uid, content) 函数,实现发布动态并将动态推送给粉丝的功能,具体参数与要求如下:
方法参数uid为要发布动态的用户编号,content为要发布的动态内容;
发布动态的实现:调用第一关中实现的create_post方法,并接收返回的动态编号,若发布失败,则取消发布,返回None;
获取发布时间的实现:从新发布的动态编号对应的动态详情哈希键post:{pid}中获取posted域;
更新个人主页的实现:将新发布的动态编号存储到个人主页有序集合键profile:{uid}中,分值为转为浮点数后的发布时间;
更新粉丝主页时间线的实现:遍历用户的粉丝列表followers:{uid},将新发布的动态编号存储到每个粉丝的主页时间线的有序集合home:{follower_id}中,分值为转为浮点数后的发布时间;
返回发布结果的实现:返回新发布的动态编号。
测试说明
平台会对你编写的代码进行测试:
测试输入:4;
预期输出:
用户 4 关注 用户 1
关注结果: True
测试 post 方法…
创建动态: 1
创建动态: 2
用户 1 的动态列表: [‘2’, ‘1’]
用户 4 的主页时间线动态编号: [‘2’, ‘1’]
测试 get_home_timeline 方法…
用户 4 的主页时间线: [{‘content’: ‘NEW post from user 1!!!’, ‘uid’: ‘1’, ‘user_name’: ‘test_user1’, ‘id’: ‘2’}, {‘content’: ‘This is the first post from user 1’, ‘uid’: ‘1’, ‘user_name’: ‘test_user1’, ‘id’: ‘1’}]
开始你的任务吧,祝你成功!
#!/usr/bin/env python
#-*- coding:utf-8 -*-

import re
import time
import redis

conn = redis.Redis()

# 获得主页时间线
def get_home_timeline(uid, page=1, count=30):
    # 请在下面完成要求的功能
    #********* Begin *********#
    post_ids = conn.zrevrange("home:%s"%(uid), 0, -1)

    pipe = conn.pipeline(True)
    for pid in post_ids:
        pipe.hgetall("post:%s"%(pid))

    return pipe.execute()
    #********* End *********#

# 发布动态并将动态推送给粉丝
def post(uid, content):
    # 请在下面完成要求的功能
    #********* Begin *********#
    pid = create_post(uid, content)
    if not pid:
        return None

    posted = conn.hget("post:%s"%(pid), "posted")
    conn.zadd("profile:%s"%(uid), pid, float(posted))
    followers = conn.zrange("followers:%s"%(uid), 0, -1)

    pipe = conn.pipeline(False)
    for follower in followers:
        pipe.zadd("home:%s"%(follower), pid, float(posted))
    pipe.execute()

    return pid
    #********* End *********#

# 关注用户
def follow(uid, other_uid):
    fkey1 = "following:%s"%(uid)
    fkey2 = "followers:%s"%(other_uid)

    if conn.zscore(fkey1, other_uid):
        return None

    now = time.time()
    pipe = conn.pipeline(True)
    pipe.zadd(fkey1, other_uid, now)
    pipe.zadd(fkey2, uid, now)
    following, followers = pipe.execute()

    posts = conn.zrevrange("profile:%s"%(other_uid), 0, 100, withscores=True)
    if posts:
        pipe.zadd("home:%s"%(uid), **dict(posts))

    pipe.hincrby("user:%s"%(uid), 'following', int(following))
    pipe.hincrby("user:%s"%(other_uid), 'followers', int(followers))
    pipe.execute()

    return True

# 取消关注
def unfollow(uid, other_uid):
    fkey1 = "following:%s"%(uid)
    fkey2 = "followers:%s"%(other_uid)

    if not conn.zscore(fkey1, other_uid):
        return None

    pipe = conn.pipeline(True)
    pipe.zrem(fkey1, other_uid)
    pipe.zrem(fkey2, uid)
    following, followers = pipe.execute()

    posts = conn.zrevrange("profile:%s"%(other_uid), 0, -1)
    if posts:
        pipe.zrem("home:%s"%(uid), *posts)

    pipe.hincrby("user:%s"%(uid), 'following', -int(following))
    pipe.hincrby("user:%s"%(other_uid), 'followers', -int(followers))
    pipe.execute()

    return True

# 创建新用户
def create_user(login_name, real_name):
    login_name = login_name.lower()
    if conn.hget("users", login_name):
        return None

    uid = conn.incr("user:id")
    pipe = conn.pipeline(True)
    pipe.hset("users", login_name, uid)
    pipe.hmset("user:%i"%(uid), {
        'login_name': login_name,
        'id': uid,
        'real_name': real_name,
        'followers': 0,
        'following': 0,
        'posts': 0,
        'last_signup': time.time(),
    })
    pipe.execute()

    return uid

# 为用户创建新动态
def create_post(uid, content):
    pipe = conn.pipeline(True)
    pipe.hget("user:%i"%(uid), 'login_name')
    pipe.incr("post:id")
    login_name, pid = pipe.execute()

    if not login_name:
        return None

    pipe.hmset("post:%i"%(pid), {
        'id': pid,
        'uid': uid,
        'content': content,
        'posted': time.time(),
        'user_name': login_name,
    })
    pipe.hincrby("user:%i"%(uid), 'posts')
    pipe.execute()

    return pid






![【C++入门到精通】 线程库 | thread类 C++11 [ C++入门 ]](https://img-blog.csdnimg.cn/direct/cc54c76d53ef401cb7aab0ccdd65ab56.png#pic_center)

